


一、介绍
orchestrator
是一个用于 MySQL 的高可用性和复制管理工具。
功能特性:
发现(Discovery):主动遍历 MySQL 拓扑结构并绘制拓扑图,读取复制状态和配置等基本信息,能以直观方式展示拓扑结构及复制问题。 重构(Refactoring):理解复制规则,支持通过拖动副本到其他主节点来重构复制拓扑,操作安全,会拒绝非法重构尝试,还可通过命令行选项进行细粒度控制。 恢复(Recovery):采用整体方法检测主节点和中间主节点故障,识别多种故障场景,可配置为自动恢复或允许用户选择手动恢复,恢复过程基于拓扑状态选择最佳方法。 接口支持:提供命令行接口、Web API(HTTP GET 访问)和简洁的 Web 界面。
orchestrator -c命令对拓扑管理 |
二、安装
wget https://github.com/openark/orchestrator/releases/download/v3.2.6/orchestrator-3.2.6-1.x86_64.rpm
dnf -y install orchestrator-3.2.6-1.x86_64.rpm
三、配置文件
Orchestrator 使用 JSON 格式的配置文件(默认路径为 /etc/orchestrator.conf.json
),通过该文件可自定义其行为和连接参数。以下是配置文件的核心参数及说明:
{
   🐞 调试与服务日志
"Debug": true,                                启用调试日志模式
"EnableSyslog": false,                        是否将日志写入系统 syslog

   🌐 Web 服务配置
"ListenAddress": ":3000",                    // Web UI 监听地址与端口(默认3000)
"StatusEndpoint": "/api/status",              健康检查端点
"StatusSimpleHealth": true,                  // 简单健康状态返回 true/false

   🔐 Web UI 认证
"AuthenticationMethod": "basic",              HTTP Basic 认证
"HTTPAuthUser": "admin",                      登录用户名
"HTTPAuthPassword": "your_password_here",    // 登录密码(建议加密或配置 nginx)
"PowerAuthUsers": ["admin"],                  拥有执行操作权限的用户列表

   📡 MySQL 拓扑数据库(被管理实例)
"MySQLTopologyUser": "orchestrator",          用于连接被监控 MySQL 实例的账号
"MySQLTopologyPassword": "xxxxx",// 账号密码
"DefaultInstancePort": 3306,                  默认 MySQL 端口
"InstancePollSeconds": 5,                    // 每几秒轮询 MySQL 拓扑信息
"MySQLConnectTimeoutSeconds": 1,              MySQL 连接超时时间(秒)

   🗃️ Orchestrator 元数据库配置
"MySQLOrchestratorHost": "127.0.0.1",        // Orchestrator 元数据库地址
"MySQLOrchestratorPort": 3306,
"MySQLOrchestratorUser": "orchestrator",
"MySQLOrchestratorPassword": "",
"MySQLOrchestratorDatabase": "orchestrator",

   🧠 拓扑检测逻辑
"UnseenInstanceForgetHours": 240,            // 多久不见忘记该实例
"ReasonableReplicationLagSeconds": 10,        正常复制延迟阈值(秒)
"ReasonableMaintenanceReplicationLagSeconds": 20,  // 维护状态下允许的复制延迟
"CandidateInstanceExpireMinutes": 60,        // 候选主库信息过期时间

   🧩 主机名解析策略
"HostnameResolveMethod": "none",              禁用 DNS 反解析,避免 test-mysql-01 与 IP 冲突
"MySQLHostnameResolveMethod": "@@hostname",  // 获取实例名方式
"ExpiryHostnameResolvesMinutes": 60,          主机名缓存过期时间(分钟)

   🔁 自动恢复相关设置
"AutoRecoverMaster": true,                    开启主库自动切换
"AutoRecoverIntermediateMaster": true,        开启中间主切换
"RecoverMasterClusterFilters": ["*"],        // 哪些集群支持主库切换
"RecoverIntermediateMasterClusterFilters": ["*"],  哪些集群支持中间主切换
"ApplyMySQLPromotionAfterMasterFailover": true,    // 故障切换后应用主库提升语句
"DetachLostSlavesAfterMasterFailover": true,        故障切换后断开丢失的从库连接
"RecoveryPeriodBlockSeconds": 300,            故障恢复后阻塞切换的冷却时间(秒)
"MasterFailoverDetachReplicaMasterHost": false,    // 切换后是否移除旧主的 master_host 设置

   📝 审计与日志
"AuditLogFile": "/var/log/orchestrator/audit.log",  审计日志文件路径
"AuditToSyslog": false,                      是否输出到 syslog

   🛠 故障处理脚本(支持钉钉/邮件/VIP切换)
"OnFailureDetectionProcesses": [
    "/usr/local/bin/notify_failure.sh {failureType} {failureCluster} {failedHost}:{failedPort}"
  ],
"PreGracefulTakeoverProcesses": [
    "/usr/local/bin/pre_takeover.sh {failureCluster}"
  ],
"PreFailoverProcesses": [
    "/usr/local/bin/pre_failover.sh {failureCluster}"
  ],
"PostFailoverProcesses": [
    "/usr/local/bin/post_failover.sh {failureType} {failureCluster} {failedHost}:{failedPort} {successorHost}:{successorPort}"
  ],
"PostUnsuccessfulFailoverProcesses": [
    "/usr/local/bin/failover_failed.sh {failureType} {failureCluster} {failedHost}:{failedPort}"
  ],
"PostMasterFailoverProcesses": [
    "/usr/local/bin/post_master_failover.sh {failureType} {failureCluster} {failedHost}:{failedPort} {successorHost}:{successorPort}"
  ],
"PostIntermediateMasterFailoverProcesses": [
    "/usr/local/bin/post_im_failover.sh {failureType} {failureCluster} {failedHost}:{failedPort} {successorHost}:{successorPort}"
  ],
"PostGracefulTakeoverProcesses": [
    "/usr/local/bin/post_takeover.sh {failureCluster}"
  ],

   🔒 多主场景兼容
"CoMasterRecoveryMustPromoteOtherCoMaster": true,  必须提升非失败 Co-Master

   ⚠️ 跨区域容灾限制
"PreventCrossDataCenterMasterFailover": false,    // 是否禁止跨机房切换
"PreventCrossRegionMasterFailover": false,        // 是否禁止跨区域切换

   📈 Graphite 监控集成(可选)
"GraphiteConvertHostnameDotsToUnderscores": true,

   🔒 SSL配置(未启用)
"UseSSL": false
}
1. 建议配置
{
  "Debug": true,
"EnableSyslog": false,
"ListenAddress": ":3000",

"MySQLTopologyUser": "orchestrator",
"MySQLTopologyPassword": "xxxxxxxx",
"MySQLOrchestratorHost": "127.0.0.1",
"MySQLOrchestratorPort": 3306,
"MySQLOrchestratorUser": "orchestrator",
"MySQLOrchestratorPassword": "xxxxx",
"MySQLOrchestratorDatabase": "orchestrator",

"DefaultInstancePort": 3306,
"InstancePollSeconds": 5,
"MySQLConnectTimeoutSeconds": 1,
"UnseenInstanceForgetHours": 240,
"ReasonableReplicationLagSeconds": 10,
"ReasonableMaintenanceReplicationLagSeconds": 20,
"CandidateInstanceExpireMinutes": 60,

"ReadOnly": false,

"RecoverMasterClusterFilters": ["*"],
"RecoverIntermediateMasterClusterFilters": ["*"],
"AutoRecoverMaster": true,
"AutoRecoverIntermediateMaster": true,
"ApplyMySQLPromotionAfterMasterFailover": true,
"DetachLostSlavesAfterMasterFailover": true,
"RecoveryPeriodBlockSeconds": 300,
"MasterFailoverDetachReplicaMasterHost": false,

"AuditLogFile": "/var/log/orchestrator/audit.log",
"AuditToSyslog": false,

"AuthenticationMethod": "basic",
"HTTPAuthUser": "admin",
"HTTPAuthPassword": "your_password_here",
"PowerAuthUsers": ["admin"],

"HostnameResolveMethod": "none",
"MySQLHostnameResolveMethod": "@@hostname",
"ExpiryHostnameResolvesMinutes": 60,

"StatusEndpoint": "/api/status",
"StatusSimpleHealth": true,

"OnFailureDetectionProcesses": [
    "/usr/local/bin/notify_failure.sh {failureType} {failureCluster} {failedHost}:{failedPort}"
  ],
"PreGracefulTakeoverProcesses": [
    "/usr/local/bin/pre_takeover.sh {failureCluster}"
  ],
"PreFailoverProcesses": [
    "/usr/local/bin/pre_failover.sh {failureCluster}"
  ],
"PostFailoverProcesses": [
    "/usr/local/bin/post_failover.sh {failureType} {failureCluster} {failedHost}:{failedPort} {successorHost}:{successorPort}"
  ],
"PostUnsuccessfulFailoverProcesses": [
    "/usr/local/bin/failover_failed.sh {failureType} {failureCluster} {failedHost}:{failedPort}"
  ],
"PostMasterFailoverProcesses": [
    "/usr/local/bin/post_master_failover.sh {failureType} {failureCluster} {failedHost}:{failedPort} {successorHost}:{successorPort}"
  ],
"PostIntermediateMasterFailoverProcesses": [
    "/usr/local/bin/post_im_failover.sh {failureType} {failureCluster} {failedHost}:{failedPort} {successorHost}:{successorPort}"
  ],
"PostGracefulTakeoverProcesses": [
    "/usr/local/bin/post_takeover.sh {failureCluster}"
  ],

"CoMasterRecoveryMustPromoteOtherCoMaster": true,
"PreventCrossDataCenterMasterFailover": false,
"PreventCrossRegionMasterFailover": false,

"GraphiteConvertHostnameDotsToUnderscores": true,
"UseSSL": false
}
四、开始配置
Orchestrator 的配置文件路径支持多种形式,具体如下:
系统级配置:/etc/orchestrator.conf
二进制同级配置:conf/orchestrator.conf(相对于二进制文件的相对路径)
安装包中包含示例配置文件orchestrator.conf.json.sample
,可作为orchestrator.conf.json
的基础配置。该文件默认路径为:/usr/local/orchestrator/orchestrator-sample.conf.json
通过以下步骤使用该示例配置:
1.复制示例文件到目标配置路径:
cp /usr/local/orchestrator/orchestrator-sample.conf.json /etc/orchestrator.conf.json
2.根据实际环境修改数据库连接、拓扑发现等参数后启动服务。
1. 配置backend数据库
Orchestrator依赖一个后端数据库来存储拓扑信息、执行状态和配置数据。
CREATE DATABASE IF NOT EXISTS orchestrator;
CREATE USER 'orchestrator'@'%' IDENTIFIED BY 'xxxxxx';
GRANT ALL PRIVILEGES ON `orchestrator`.* TO 'orchestrator'@'%';
修改配置文件,添加配置:
...
"MySQLOrchestratorHost": "127.0.0.1", # 假设备份实例和Orchestrator部署在同一台机器上
"MySQLOrchestratorPort": 3306,
"MySQLOrchestratorDatabase": "orchestrator",
"MySQLOrchestratorUser": "orchestrator",
"MySQLOrchestratorPassword": "xxxxx",
...
2. 配置统一的拓扑发现账号
为了确保Ochestrator能够检测复制拓扑,需要在所有拓扑节点上使用统一的认证账户(相同的用户名和密码)。
GRANT SUPER, PROCESS, REPLICATION SLAVE, RELOAD ON *.* TO 'orchestrator'@'%';
GRANT SELECT ON mysql.slave_master_info TO 'orchestrator'@'%';
配置Ochestrator统一账号,修改配置文件,添加配置:
...
"MySQLTopologyUser": "orchestrator",
"MySQLTopologyPassword": "xxxxxxx",
...
五、配置systemd启动服务
# /etc/systemd/system/orchestrator.service

[Unit]
Description=Orchestrator MySQL HA
After=network.target

[Service]
ExecStart=/usr/local/orchestrator/orchestrator --config=/etc/orchestrator.conf.json http
Restart=always
LimitNOFILE=65536

[Install]
WantedBy=multi-user.target
sudo systemctl daemon-reexec
sudo systemctl daemon-reload
sudo systemctl start orchestrator
sudo systemctl enable orchestrator
六、登录web界面
Orchestrator将在端口3000上开始侦听。将浏览器指向http://your.host:3000/,就可以开始了使用Orchestrator了。
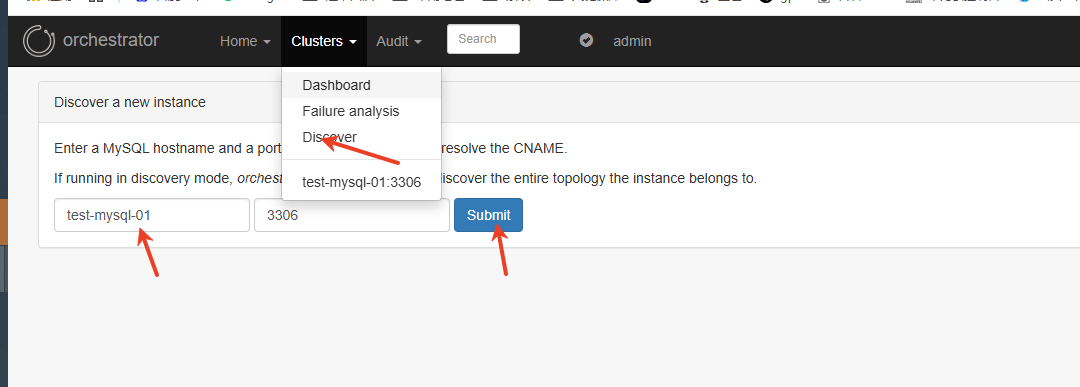
七、手动注册Mysql主从实例
在浏览器界面右上角点击:
Clusters->Discover → 输入主库 IP(HOST):PORT,例如 test-mysql-01:3306 → Discover
只需要输入主库,Orchestrator 会自动发现主从拓扑。
八、查看拓扑图
进入Cluster视图,可以查看刚加入实例的拓扑结构。
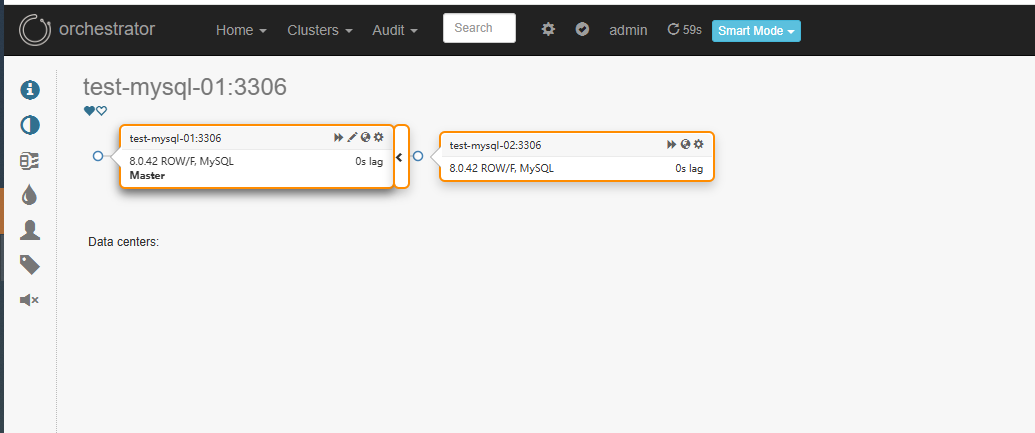
或者使用命令:
orchestrator -c topology -i 10.10.112.5:3306
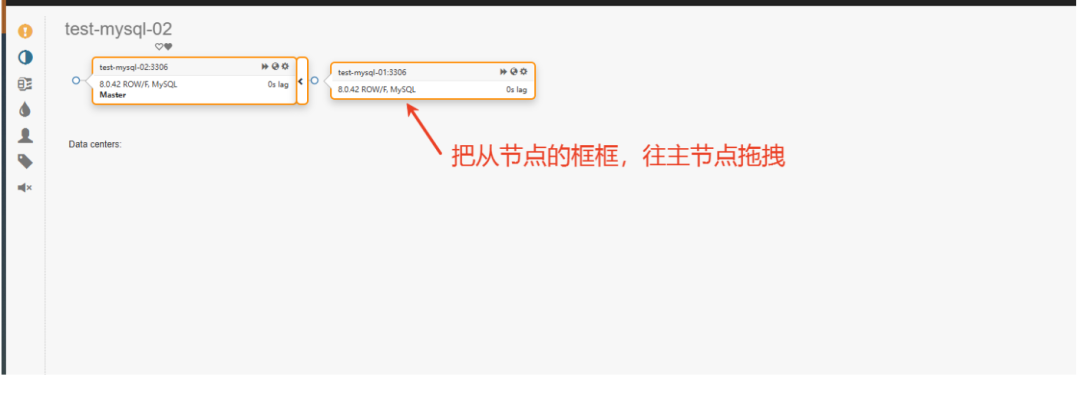
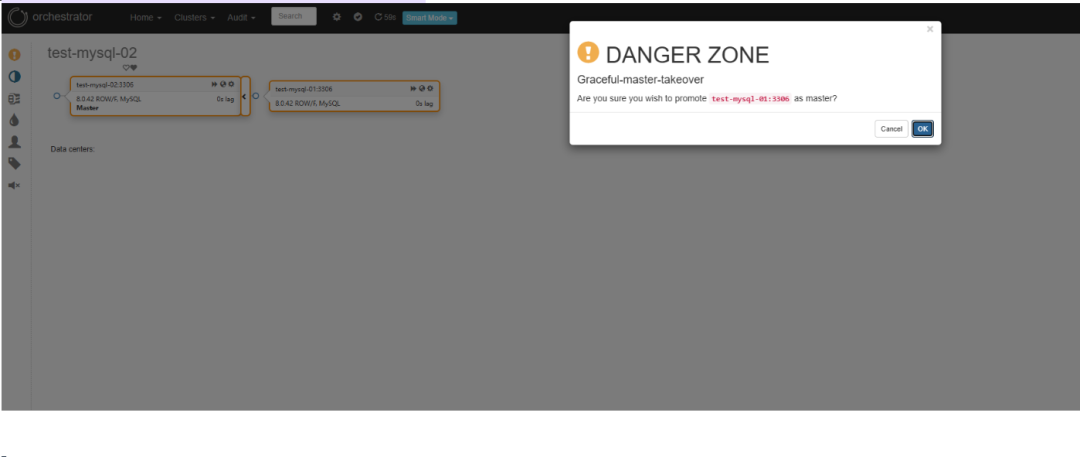
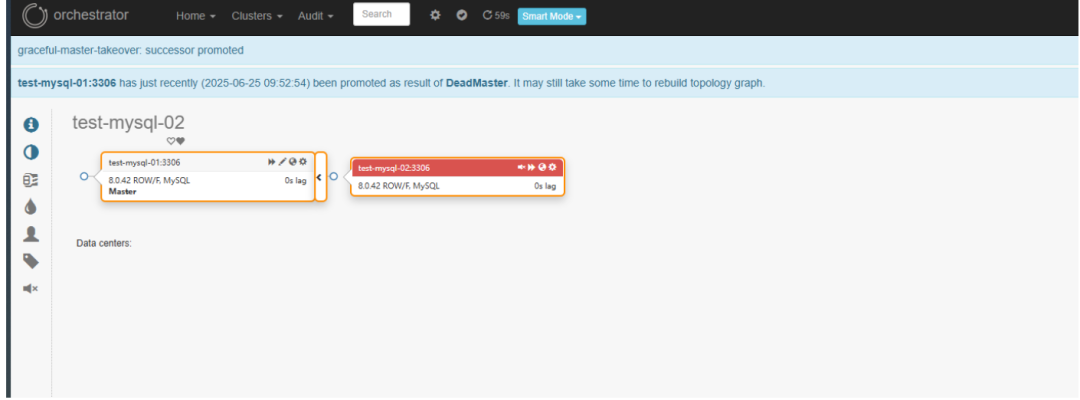
九、web ui操作主从切换
1.把从节点提升为主节点
查看orchestrator的日志: sudo journalctl -u orchestrator -f
可能遇到的问题
1. lookup test-mysql-01 on 10.10.107.14:53: no such host
说明Orchestrator所在机器正在使用10.10.107.14作为DNS服务器,但这个服务器无法解析test-mysql-01这个主机名。
解决:手动添加/etc/hosts解析 在Orchestrator所在服务器上添加静态解析记录:
echo "10.10.112.xxx test-mysql-02" | sudo tee -a /etc/hosts
echo "10.10.112.xxx test-mysql-01" | sudo tee -a /etc/hosts
2. 主从实例的拓扑中看不到从库
两种情况:
1)show slave hosts的返回结果中,host字段为空,从库的配置中增加report-host=本机IP的配置。
2)show Slave host 返回为空,原因可能是主从复制曾出错过,可以先stop slave,再start slave,尝试恢复。
卸载Orchestrator
1.停止orchestrator服务
systemctl stop orchestrator
systemctl diable orchestrator
2.删除二进制文件(如果是手动编译安装)
sudo rm -f /usr/local/bin/orchestrator
#如果是yum安装的(rpm)
yum remove orchestrator
#linux 9.*
dnf remove orchestratro
为什么不是MHA
相比于MHA,Orch除了支持failover的切换,还可通过Orch完成mysql数据库的一些简单的复制管理操作。可以把MHA的升级版,而且提供了http接口来进行数据库的操作,比起MHA需要每次登录MHA Manger服务器来说,方便很多。
参考: https://github.com/openark/orchestrator/blob/master/docs/install.md https://mp.weixin.qq.com/s/XYjqwXgXy9BZbGBKueE5Dw

点个“赞 or 在看” 你最好看!

👇👇👇 谢谢各位老板啦!!!
