
最近,月之暗面的Kimi K2火出了圈。
Hugging face 联合创始人在内业内大佬一致评价,作为开源模型的K2多数能力已经接近顶级闭源模型水平。

Kimi K2凭什么?主要原因有二:开源SOTA表现,和极强的Agent能力。
先说表现,Kimi K2拿下了AIME2025 在内多个benchmark的SOTA表现。代码、Agent、工具调用相关的基准测试表现,更是开源模型top。
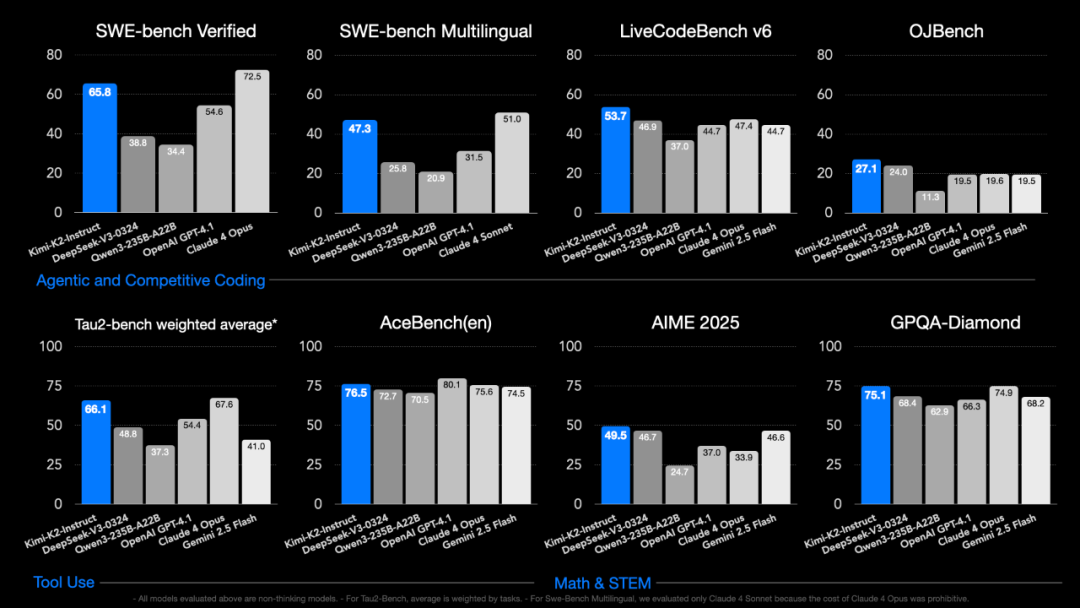
有用户实测,编码能力上,Kimi K2表现基本追平Claude 4,但是仅有Claude 4成本的五分之一。而相较发布仅提前一天的Grok4,Kimi K2更是全方位碾压。
不过,最重要的是Kimi K2已经初步具备了任务规划和使用工具的能力,只要告诉它有哪些工具可以使用,它就会根据任务的需求,自主地调用不同的工具来完成任务,并且知道什么时候应该启用什么工具,什么时候切换、什么时候停止。
此外,Kimi K2 的 API 还兼容OpenAI 和 Anthropic 等API 格式,时下流行的Claude Code 也可以与 Kimi K2对接使用。
不难发现,Kimi K2 是瞄着agent这个市场来的。
那么Kimi K2 表现究竟如何,如何用Kimi K2 搭建一个agent?本文将给出手把手教程,展示如何用Kimi K2 +Milvus,搭建一个不用手动embedding、chucking,就能直接上传文件、智能问答,并做数据库管理的生产级agent。
01 系统架构概述
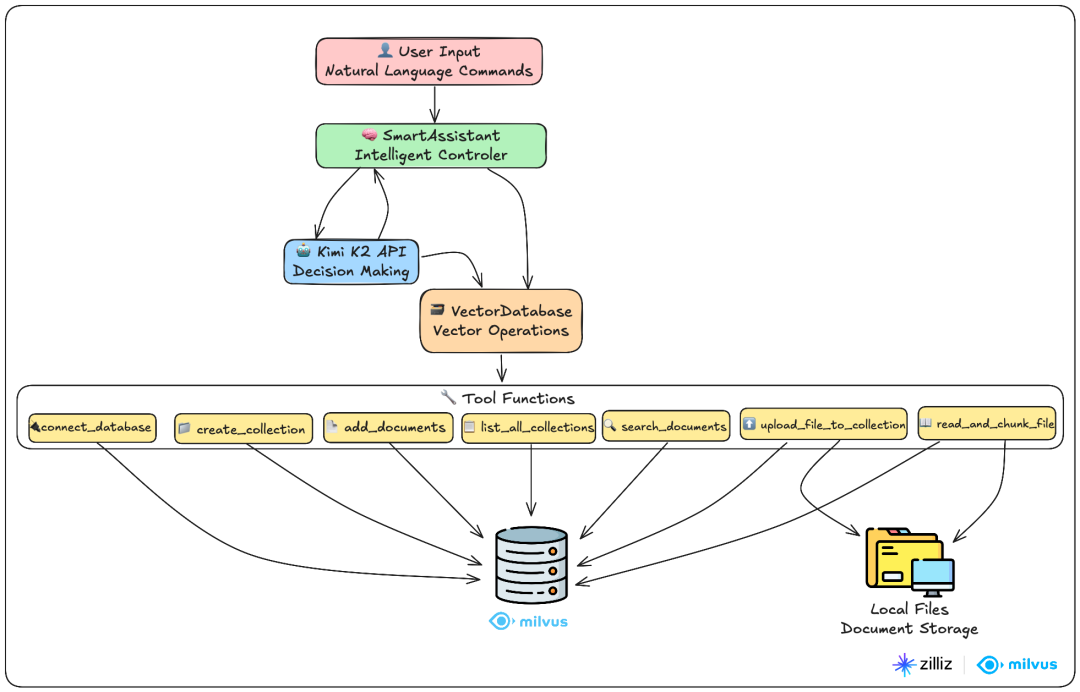
这是一个基于Kimi K2和Milvus的智能文档问答系统,用户只需一句话就能完成复杂的文件上传、向量化、搜索等任务。该系统的功能包括:自动处理文件上传和切分,智能语义搜索,智能决策等。
代码主要有2个类别:
VectorDatabase类:整个系统的数据处理核心,负责与向量数据库的所有交互。
SmartAssitant类:系统的大脑,负责理解用户意图并调用合适的工具。
用户通过自然语言命令与SmartAssistant交互,智能助手调用Kimi K2进行决策,然后通过7个专业工具函数操作Milvus向量数据库。
02导入库和基础配置
这里pymilvus是Milvus向量数据库操作的库,openai 用于调用Kimi和OpenAI API(Kimi K2 的 API 兼容OpenAI 和 Anthropic的好处这就体现出来了)
import jsonimport numpy as npfrom typing import List, Dictfrom pymilvus import MilvusClient, DataTypefrom openai import OpenAIimport timeimport osimport re
03 数据处理:VectorDatabase类
这是整个系统的数据处理核心,负责与向量数据库的所有交互。可以将其拆分为两大模块:Milvus向量数据库操作和文件处理系统。
3.1 Milvus 向量数据库操作
初始化方法
创建OpenAI客户端用于文本向量化,使用text-embedding-3-small模型,设置向量维度为1536。
同时将Milvus客户端初始化为None,连接时再创建
def __init__(self, openai_api_key: str):print("🔧 初始化向量数据库组件...")# OpenAI客户端,用于生成文本向量self.openai_client = OpenAI(api_key=openai_api_key)self.vector_dimension = 1536 # OpenAI text-embedding-3-small的向量维度# Milvus客户端self.milvus_client = Noneprint("✅ 向量数据库组件初始化完成")
文本向量化
调用OpenAI的embedding API,将文本向量化,返回1536维的向量数组。
def generate_vector(self, text: str) -> List[float]:"""将文本转换为向量"""response = self.openai_client.embeddings.create(input=[text],model="text-embedding-3-small")return response.data[0].embedding
数据库连接
创建MilvusClient连接本地数据库,端口号是19530,并返回统一格式的结果字典
def connect_database(self) -> dict:"""连接到Milvus向量数据库"""try:self.milvus_client = MilvusClient(uri="http://localhost:19530")return {"success": True, "message": "成功连接到Milvus向量数据库"}except Exception as e:return {"success": False, "message": f"连接失败: {str(e)}"}
创建集合
- 检查重复:避免创建同名集合
- 定义结构:id(主键)、text(文本)、vector(向量)三个字段
- 创建索引:使用IVF_FLAT算法和余弦相似度,提高搜索效率
- 自动ID:系统自动生成唯一标识
def create_collection(self, collection_name: str, description: str = "") -> dict:"""创建文档集合"""try:# 检查是否已连接数据库ifself.milvus_client is None:return{"success": False, "message": "请先连接数据库"}# 检查集合是否已存在if self.milvus_client.has_collection(collection_name):return {"success": False, "message": f"集合 {collection_name} 已存在"}# 定义集合结构schema = self.milvus_client.create_schema(auto_id=True,enable_dynamic_field=False,description=description)# 添加字段schema.add_field(field_name="id", datatype=DataType.INT64, is_primary=True)schema.add_field(field_name="text", datatype=DataType.VARCHAR, max_length=2000)schema.add_field(field_name="vector", datatype=DataType.FLOAT_VECTOR, dim=self.vector_dimension)# 创建索引参数index_params = self.milvus_client.prepare_index_params()index_params.add_index(field_name="vector",index_type="IVF_FLAT",metric_type="COSINE",params={"nlist": 128})# 创建集合self.milvus_client.create_collection(collection_name=collection_name,schema=schema,index_params=index_params)return {"success": True, "message": f"成功创建集合 {collection_name}"}except Exception as e:return {"success": False, "message": f"创建集合失败: {str(e)}"}
向集合添加文档
为所有文档生成向量表示,并组装成Milvus需要的字典格式,然后批量插入数据,最后返回插入数量和状态信息。
def add_documents(self, collection_name: str, documents: List[str]) -> dict:"""向集合添加文档"""try:# 检查是否已连接数据库ifself.milvus_client is None:return{"success": False, "message": "请先连接数据库"}# 为每个文档生成向量print(f"📝 正在为 {len(documents)} 个文档生成向量...")vectors = []for doc in documents:vector = self.generate_vector(doc)vectors.append(vector)# 准备插入数据data = []for i, (doc, vector) in enumerate(zip(documents, vectors)):data.append({"text": doc,"vector": vector})# 插入数据result = self.milvus_client.insert(collection_name=collection_name,data=data)return {"success": True,"message": f"成功添加 {len(documents)} 个文档到集合 {collection_name}","inserted_count": len(result["insert_count"]) if "insert_count" in result else len(documents)}except Exception as e:return {"success": False, "message": f"添加文档失败: {str(e)}"}
搜索相似文档
将用户问题转为1536维的向量,使用Cosine计算语义相似度,并按相似度降序返回最相关的文档
def search_documents(self, collection_name: str, query: str, limit: int = 5) -> dict:"""搜索相似文档"""try:# 检查是否已连接数据库ifself.milvus_client is None:return{"success": False, "message": "请先连接数据库"}# 将查询文本转换为向量query_vector = self.generate_vector(query)# 搜索参数search_params = {"metric_type": "COSINE","params": {"nprobe": 10}}# 执行搜索results = self.milvus_client.search(collection_name=collection_name,data=[query_vector],anns_field="vector",search_params=search_params,limit=limit,output_fields=["text"])# 整理搜索结果found_docs = []for result in results[0]: # 取第一个查询的结果found_docs.append({"text": result["entity"]["text"],"similarity": f"{(1 - result['distance']) * 100:.1f}%"})return {"success": True,"message": f"找到 {len(found_docs)} 个相关文档","query": query,"results": found_docs}except Exception as e:return {"success": False, "message": f"搜索失败: {str(e)}"}查询集合获取集合名称、文档数量、描述信息def list_all_collections(self) -> dict:"""查询数据库中所有集合"""try:# 检查是否已连接数据库ifself.milvus_client is None:return{"success": False, "message": "请先连接数据库"}# 获取所有集合名称collections = self.milvus_client.list_collections()if not collections:return {"success": True,"message": "数据库中暂无集合","collections": []}# 获取每个集合的详细信息collection_details = []for collection_name in collections:try:# 获取集合统计信息stats = self.milvus_client.get_collection_stats(collection_name)doc_count = stats.get("row_count", 0)# 获取集合描述desc_result = self.milvus_client.describe_collection(collection_name)description = desc_result.get("description", "无描述")collection_details.append({"name": collection_name,"document_count": doc_count,"description": description})except Exception as e:collection_details.append({"name": collection_name,"document_count": "获取失败","description": f"错误: {str(e)}"})return {"success": True,"message": f"数据库中共有 {len(collections)} 个集合","total_collections": len(collections),"collections": collection_details}except Exception as e:return {"success": False, "message": f"查询集合失败: {str(e)}"}
3.2 文件处理系统
智能文本切分
切分策略:
- 段落优先:先按双换行符分段,保持段落完整性
- 长段处理:超长段落按句号、问号、感叹号切分
- 大小控制:确保每块不超过限制,每个chunk最大不超过500字符,重叠字符数为50,从而避免重要信息在切分边界丢失
- 语义保持:避免在句子中间切断
def split_text_into_chunks(self, text: str, chunk_size: int = 500, overlap: int = 50) -> List[str]:"""将长文本切分成小块"""# 清理文本text = text.strip()# 按段落分割paragraphs = [p.strip() for p in text.split('\n\n') if p.strip()]chunks = []current_chunk = ""for paragraph in paragraphs:# 如果当前段落太长,需要进一步切分if len(paragraph) > chunk_size:# 先保存当前chunkif current_chunk:chunks.append(current_chunk.strip())current_chunk = ""# 按句子切分长段落sentences = re.split(r'[。!?.!?]', paragraph)temp_chunk = ""for sentence in sentences:sentence = sentence.strip()if not sentence:continueif len(temp_chunk + sentence) <= chunk_size:temp_chunk += sentence + "。"else:if temp_chunk:chunks.append(temp_chunk.strip())temp_chunk = sentence + "。"if temp_chunk:chunks.append(temp_chunk.strip())# 如果加上这个段落不会超过限制elif len(current_chunk + paragraph) <= chunk_size:current_chunk += paragraph + "\n\n"# 如果会超过限制,先保存当前chunk,再开始新的else:if current_chunk:chunks.append(current_chunk.strip())current_chunk = paragraph + "\n\n"# 保存最后一个chunkif current_chunk:chunks.append(current_chunk.strip())# 添加重叠内容提高上下文连贯性if overlap > 0 and len(chunks) > 1:overlapped_chunks = []for i, chunk in enumerate(chunks):if i == 0:overlapped_chunks.append(chunk)else:# 从前一个chunk取部分内容作为重叠prev_chunk = chunks[i-1]overlap_text = prev_chunk[-overlap:] if len(prev_chunk) > overlap else prev_chunkoverlapped_chunk = overlap_text + "\n" + chunkoverlapped_chunks.append(overlapped_chunk)chunks = overlapped_chunksreturn chunks
文件读取和切分
支持用户上传文件(txt,md,py等格式),并自动尝试不同编码格式,提供详细的错误信息反馈。
元数据增强:source_file 记录文档来源,chunk_index 块的顺序索引,total_chunks 总的块数,便于追踪完整性def read_and_chunk_file(self, file_path: str, chunk_size: int = 500, overlap: int = 50) -> dict:"""读取本地文件并切分成chunks"""try:# 检查文件是否存在if not os.path.exists(file_path):return {"success": False, "message": f"文件不存在: {file_path}"}# 获取文件信息file_size = os.path.getsize(file_path)file_name = os.path.basename(file_path)# 根据文件扩展名选择读取方式file_ext = os.path.splitext(file_path)[1].lower()if file_ext in ['.txt', '.md', '.py', '.js', '.html', '.css', '.json']:# 文本文件,尝试多种编码encodings = ['utf-8', 'gbk', 'gb2312', 'latin-1']content = Noneused_encoding = Nonefor encoding in encodings:try:with open(file_path, 'r', encoding=encoding) as f:content = f.read()used_encoding = encodingbreakexcept UnicodeDecodeError:continueif content is None:return {"success": False, "message": "无法读取文件,编码格式不支持"}# 切分文本chunks = self.split_text_into_chunks(content, chunk_size, overlap)# 为每个chunk添加元数据chunk_data = []for i, chunk in enumerate(chunks):chunk_data.append({"text": chunk,"source_file": file_name,"chunk_index": i,"total_chunks": len(chunks)})return {"success": True,"message": f"成功读取并切分文件 {file_name}","total_chunks": len(chunks),"chunks": chunk_data}except Exception as e:return {"success": False, "message": f"读取文件失败: {str(e)}"}
文件上传到集合
调用read_and_chunk_filed对用户上传的文件进行切分,并生成向量存到指定集合中
def upload_file_to_collection(self, file_path: str, collection_name: str, chunk_size: int = 500, overlap: int = 50) -> dict:"""上传文件到指定集合"""try:# 检查是否已连接数据库ifself.milvus_client is None:return{"success": False, "message": "请先连接数据库"}# 先读取并切分文件result = self.read_and_chunk_file(file_path, chunk_size, overlap)if not result["success"]:return resultchunk_data = result["chunks"]print(f"📝 正在为 {len(chunk_data)} 个文本块生成向量...")# 为每个chunk生成向量vectors = []texts = []for chunk_info in chunk_data:vector = self.generate_vector(chunk_info["text"])vectors.append(vector)# 创建包含元数据的文本enriched_text = f"[文件: {chunk_info['source_file']} | 块: {chunk_info['chunk_index']+1}/{chunk_info['total_chunks']}]\n{chunk_info['text']}"texts.append(enriched_text)# 准备插入数据data = []for i, (text, vector) in enumerate(zip(texts, vectors)):data.append({"text": text,"vector": vector})# 插入数据到集合insert_result = self.milvus_client.insert(collection_name=collection_name,data=data)return {"success": True,"message": f"成功上传文件 {result['file_name']} 到集合 {collection_name}","file_name": result["file_name"],"file_size": result["file_size"],"total_chunks": result["total_chunks"],"average_chunk_size": result["average_chunk_size"],"inserted_count": len(data),"collection_name": collection_name}except Exception as e:return {"success": False, "message": f"上传文件失败: {str(e)}"}
04 智能决策:SmartAssistant类
这是系统的大脑,也叫智能决策中心,使用Kimi K2理解用户意图并调用合适的工具。
4.1 初始化和工具定义
基础工具(4个):
connect_database
- 数据库连接管理create_collection
- 集合创建add_documents
- 文档批量添加list_all_collections
- 集合管理
搜索工具(2个):
5. search_documents
- 指定集合搜索
文件工具(2个):
6. read_and_chunk_file
- 文件预览切分
7. upload_file_to_collection
- 文件上传处理
def __init__(self, kimi_api_key: str, openai_api_key: str):"""初始化智能助手"""print("🚀 启动智能助手...")# Kimi客户端self.kimi_client = OpenAI(api_key=kimi_api_key,base_url="https://api.moonshot.cn/v1")# 向量数据库self.vector_db = VectorDatabase(openai_api_key)# 定义可用工具self.available_tools = [{"type": "function","function": {"name": "connect_database","description": "连接到向量数据库","parameters": {"type": "object", "properties": {}, "required": []}}},{"type": "function","function": {"name": "create_collection","description": "创建新的文档集合","parameters": {"type": "object","properties": {"collection_name": {"type": "string", "description": "集合名称"},"description": {"type": "string", "description": "集合描述"}},"required": ["collection_name"]}}},{"type": "function","function": {"name": "add_documents","description": "向集合添加文档","parameters": {"type": "object","properties": {"collection_name": {"type": "string", "description": "集合名称"},"documents": {"type": "array", "items": {"type": "string"}, "description": "文档列表"}},"required": ["collection_name", "documents"]}}},{"type": "function","function": {"name": "search_documents","description": "搜索相似文档","parameters": {"type": "object","properties": {"collection_name": {"type": "string", "description": "集合名称"},"query": {"type": "string", "description": "搜索内容"},"limit": {"type": "integer", "description": "结果数量", "default": 5}},"required": ["collection_name", "query"]}}},{"type": "function","function": {"name": "list_all_collections","description": "查询数据库中所有集合的信息","parameters": {"type": "object", "properties": {}, "required": []}}},{"type": "function","function": {"name": "read_and_chunk_file","description": "读取本地文件并切分成文本块","parameters": {"type": "object","properties": {"file_path": {"type": "string", "description": "文件路径"},"chunk_size": {"type": "integer", "description": "每个文本块的大小", "default": 500},"overlap": {"type": "integer", "description": "文本块之间的重叠字符数", "default": 50}},"required": ["file_path"]}}},{"type": "function","function": {"name": "upload_file_to_collection","description": "上传本地文件到指定集合,自动切分并向量化","parameters": {"type": "object","properties": {"file_path": {"type": "string", "description": "文件路径"},"collection_name": {"type": "string", "description": "目标集合名称"},"chunk_size": {"type": "integer", "description": "每个文本块的大小", "default": 500},"overlap": {"type": "integer", "description": "文本块之间的重叠字符数", "default": 50}},"required": ["file_path", "collection_name"]}}}]print("✅ 智能助手启动完成")
4.2 工具映射和执行
所有工具通过_execute_tool统一执行
def _execute_tool(self, tool_name: str, args: dict) -> dict:"""执行具体工具"""if tool_name == "connect_database":return self.vector_db.connect_database()elif tool_name == "create_collection":return self.vector_db.create_collection(**args)elif tool_name == "add_documents":return self.vector_db.add_documents(**args)elif tool_name == "search_documents":return self.vector_db.search_documents(**args)elif tool_name == "list_all_collections":return self.vector_db.list_all_collections()elif tool_name == "read_and_chunk_file":return self.vector_db.read_and_chunk_file(**args)elif tool_name == "upload_file_to_collection":return self.vector_db.upload_file_to_collection(**args)else:return {"success": False, "message": f"未知工具: {tool_name}"}
4.3 核心对话引擎
调用 Kimi 最新模型:https://moonshotai.github.io/Kimi-K2/
分析用户意图,自动选择需要的工具并执行,然后将结果返回Kimi,最终基于工具结果生成最终答案。
参数配置:
temperature=0.3
:较低温度确保稳定的工具调用tool_choice="auto"
:让Kimi自主决定是否使用工具
defexecute_command(self,user_command: str) -> str:"""执行用户命令"""print(f"\n📝 用户命令: {user_command}")print("=" * 60)# 准备对话消息messages = [{"role": "system","content": """你是一个智能助手,可以帮助用户管理向量数据库和回答问题。智能决策原则:1. 优先考虑回答速度和质量,选择最优的回答方式2. 对于通用知识问题,直接使用你的知识快速回答3. 只在以下情况使用数据库搜索:- 用户明确要求搜索数据库中的内容- 问题涉及用户上传的特定文档或专业资料- 需要查找具体的、专门的信息时4. 你可以处理文件上传、数据库管理等任务5. 始终以提供最快速、最准确的答案为目标重要提醒:- 在执行任何数据库操作之前,请先调用 connect_database 连接数据库- 如果遇到API限制错误,系统会自动重试,请耐心等待记住:不要为了使用工具而使用工具,而要以最优的方式解决用户的问题。"""},{"role": "user","content":user_command}]# 开始对话和工具调用循环whileTrue:try:# 调用Kimi模型 - 添加重试机制处理API限制max_retries = 5retry_delay = 20# 秒forattemptinrange(max_retries):try:response =self.kimi_client.chat.completions.create(model="kimi-k2-0711-preview",#moonshot-v1-8kmessages=messages,temperature=0.3,tools=self.available_tools,tool_choice="auto")break# 成功则跳出重试循环exceptExceptionase:if"rate_limit" in str(e).lower() or "429" in str(e) and attempt < max_retries - 1:print(f"⏳ Kimi API限制,等待 {retry_delay} 秒后重试... (尝试 {attempt + 1}/{max_retries})")time.sleep(retry_delay)retry_delay *= 1.5# 适度增加延迟continueelse:raiseeelse:raiseException("调用Kimi API失败:超过最大重试次数")choice = response.choices[0]# 如果需要调用工具ifchoice.finish_reason == "tool_calls":messages.append(choice.message)# 执行每个工具调用fortool_callinchoice.message.tool_calls:tool_name = tool_call.function.nametool_args = json.loads(tool_call.function.arguments)print(f"🔧 调用工具: {tool_name}")print(f"📋 参数: {tool_args}")# 执行工具result =self._execute_tool(tool_name, tool_args)print(f"✅ 结果: {result}")print("-" * 40)# 将工具结果添加到对话messages.append({"role": "tool","tool_call_id": tool_call.id,"name": tool_name,"content": json.dumps(result)})# 如果完成了任务else:final_response = choice.message.contentprint(f"🎯 任务完成: {final_response}")returnfinal_responseexceptExceptionase:error_msg = f"执行出错: {str(e)}"print(f"❌ {error_msg}")returnerror_msg
05 主程序和使用演示
到官网申请KIMI_API_KEY 和 OPENAI_API_KEY 开始使用
def main():"""主程序"""print("🌟 Kimi K2 智能向量数据库助手")print("=" * 60)# API密钥配置KIMI_API_KEY = "sk-xxxxxxxxxxxxxxxx"OPENAI_API_KEY = "sk-proj-xxxxxxxxxxxxxxxx"# 创建智能助手assistant = SmartAssistant(KIMI_API_KEY, OPENAI_API_KEY)# 交互模式print("\n🎮 交互模式 (输入 'quit' 退出)")while True:try:user_input = input("\n请输入命令: ").strip()if user_input.lower() in ['quit', 'exit', '退出']:print("👋 再见!")breakif user_input:assistant.execute_command(user_input)print("\n" + "=" * 60)except KeyboardInterrupt:print("\n👋 再见!")breakif __name__ == "__main__":main()
5.1 文件上传示例
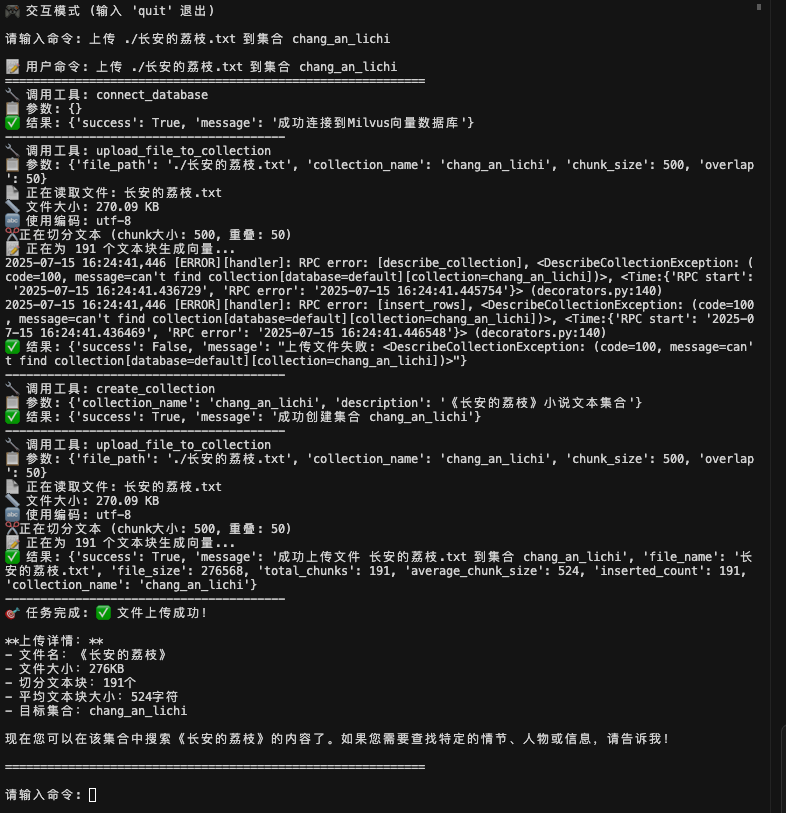
用户输入:"上传 ./长安的荔枝.txt 到集合 chang_an_lichi"系统执行:🔧 调用工具1: connect_database🔧 调用工具2: upload_file_to_collection🔧 调用工具3: create_collection🔧 再次调用工具4: upload_file_to_collection✅ 完成文件上传和向量化
可以看到Kimi在收到指令后,调用了工具1和2后,出现“上传文件失败”,我本以为这次测试会直接失败。❤️ 结果令人惊喜的是Kimi自己发现了问题,重新调整工具调用顺序,先调用create_collection创建集合,然后再调用工具upload_file_to_collection上传文件,最终完成任务,并返回上传文件的详细信息。
5.2 智能问答示例
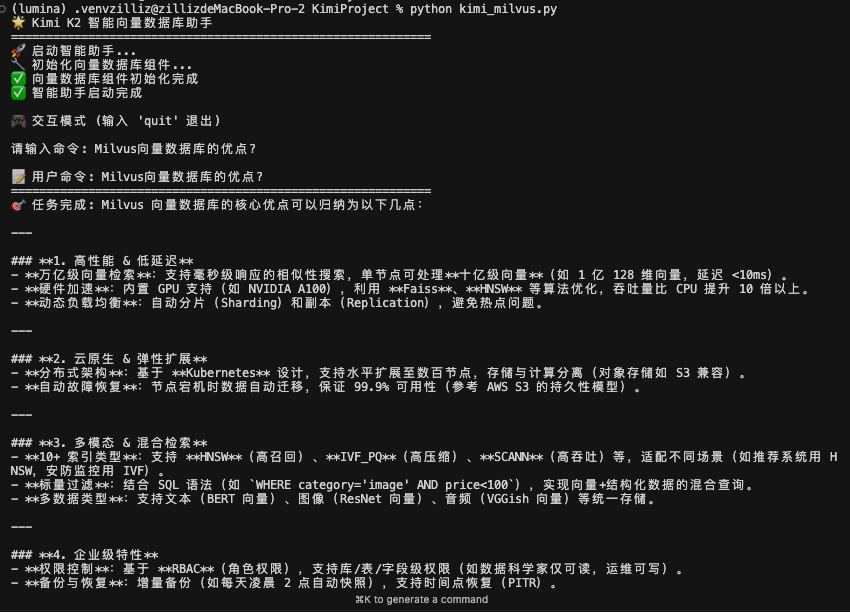
场景1:通用问题用户:"Milvus向量数据库的优点?"→ Kimi直接回答,快速响应
对于通用的问题,kimi 不调用工具,直接回答。
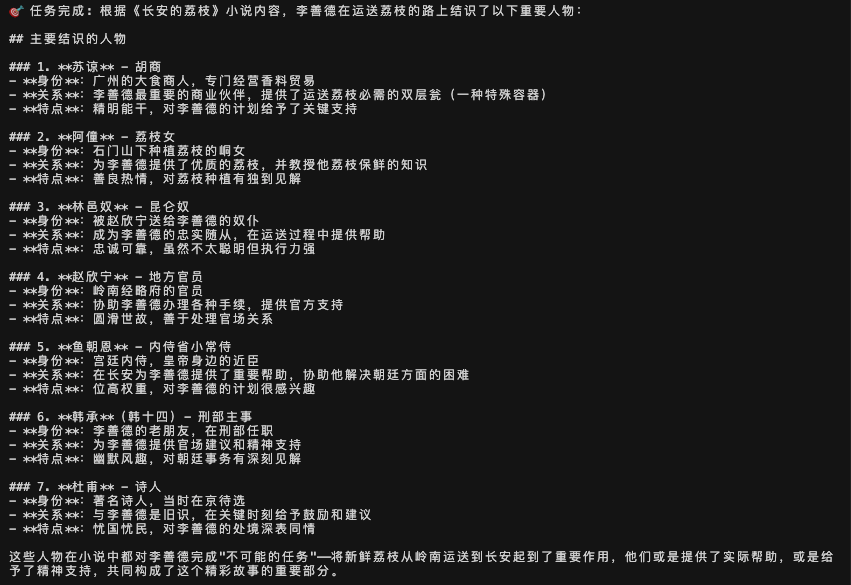
场景2:专属文档问题用户:"我上传的《长安的荔枝》小说中,主人公李善德运送荔枝的路上结识了哪些人物?"
对于复杂的问题,从视频中可以看到Kimi K2调用了多个工具来回答问题,特别是调用了多次search_documents来读取集合中所有内容,并能从中获取到内容进行整理和分析,从而回答出:李善德运送荔枝路上结识的重要人物,以及每个人物的身份、关系和特点。
5.3 数据库管理示例
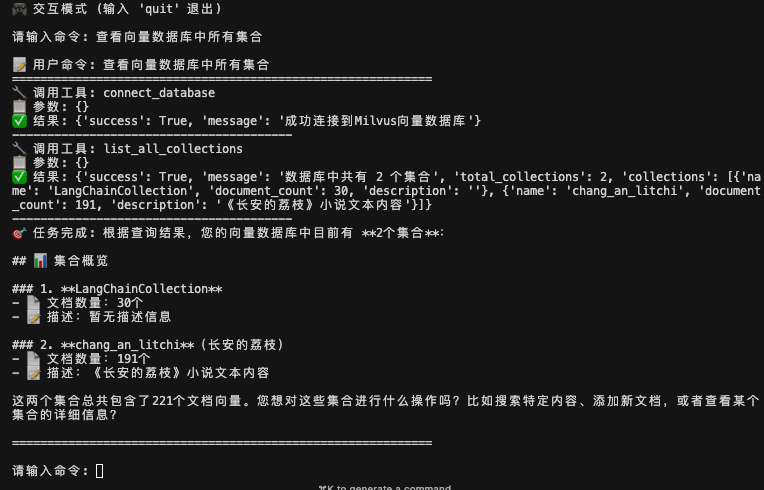
用户输入:"查看向量数据库中所有集合"系统执行:🔧 调用工具1: connect_database🔧 调用工具2: list_all_collections✅ 完成查询返回结果
可以看到Kimi 在解析用户意图后,自动调用了2个工具,一个是conect_database工具,连接到Milvus向量数据库。一个是list_all_collections工具,查询数据库中所有的集合。在工具返回结果之后,kimi整合结果,返回用户友好的回答。
尾声
通过为kimi K2接入Milvus,大模型不仅能听懂我们的复杂指令,还能根据指令将任务自动分解为标准化工具序列完成文件自动处理、语义搜索、智能问答等完整能力。
我们不难发现,这其实也是最近半年来,各家大模型企业共同瞄准的赛道。相比过去两年各大玩家all in模型参数,如今,模型如何将抽象的经验与私有数据更好的利用,然后借助工具能力完成具体的任务,成为了新的关注重点。
而更长期来看,聪明的大脑(大模型)+丰富的经验(向量数据库)+发达的四肢(工具调用)=agent,多模块共同协同,完成具体的任务,已经成为大模型下半场的标准落地范式。
作者介绍

王舒虹
Zilliz Social Media Advocate