


年初阿里云发布相关公告,MongoDB V3.0及3.2版本进入强制的EOFS阶段
云上的小伙伴们,还有谁没有升级呢???
【通知】MongoDB 3.0和3.2版本实例计划于12月31日终止服务(EOS)
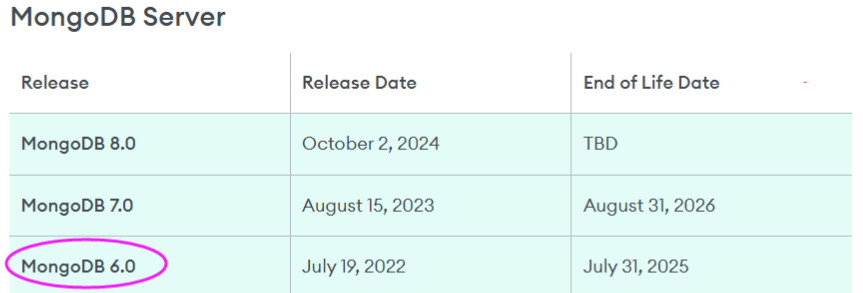
MongoDB 6.0也已经End Of Life Date,为啥不用V8.0呢?无他,因为从3x版本直升上来了,且V8.0发布快一年,只为降低风险而已
环境说明:
| 名称 | 操作系统 | 配置 | 数据盘 | IP | 说明 |
|---|---|---|---|---|---|
| A服务器 | Centos 7.9 | 4H16G | 100G | 192.168.10.11 | 用于安装MongoDB 6.0版本 |
| B服务器 | Centos 6.5 | 4H16G | 100G | 192.168.10.12 | V3.2版本,需迁移数据到A服务器 |
1. 环境准备
1.1 永久关闭SELinux(需要重启服务器)
PS: 若不关闭,从MongoDB 5.0版本开始,需要做相关的配置,具体参考官方文档
sed -i s#SELINUX=enforcing#SELINUX=disabled# /etc/selinux/config
1.2 开启防护墙
查看防护墙已开启,需要打开相关端口

firewall-cmd --remove-port=27017/tcp --permanent
firewall-cmd --reload
1.3 优化系统资源
cat /etc/security/limits.conf
# 新增配置
mongod soft nofile 64000
mongod hard nofile 64000
mongod soft nproc 32000
mongod hard nproc 32000
1.4 关闭透明大页(推荐:通过 rc.local 永久禁用)
1.4.1 编辑 /etc/rc.d/rc.local 文件,新增配置
if test -f /sys/kernel/mm/transparent_hugepage/enabled; then
 echo never > /sys/kernel/mm/transparent_hugepage/enabled
fi
if test -f /sys/kernel/mm/transparent_hugepage/defrag; then
 echo never > /sys/kernel/mm/transparent_hugepage/defrag
fi
1.4.2 赋予执行权限:
chmod +x /etc/rc.d/rc.local
1.4.3 立即生效:
/etc/rc.d/rc.local
1.4.4验证设置
cat /sys/kernel/mm/transparent_hugepage/enabled
cat /sys/kernel/mm/transparent_hugepage/defrag
应显示类似输出:
always madvise [never]
1.5 安装依赖
yum install -y libcurl openssl wget
1.6 创建仓库文件(6.0)
cat /etc/yum.repos.d/mongodb-org-6.0.repo
[mongodb-org-6.0]
name=MongoDB Repository
baseurl=https://repo.mongodb.org/yum/redhat/$releasever/mongodb-org/6.0/x86_64/
gpgcheck=1
enabled=1
gpgkey=https://www.mongodb.org/static/pgp/server-6.0.asc
2. 安装最新稳定版 MongoDB 6.0
PS:需要在上文1.6中指定大版本
2.1 执行安装命令(默认创建所有者和群组名称是mongod)
# 运行以下命令安装 MongoDB 6.0 完整套件:
sudo yum install -y mongodb-org
2.2 检查安装是否成功:
mongod --version

db version v6.0.25
Build Info: {
    "version": "6.0.25",
    "gitVersion": "919f50c37ef9f544a27e7c6e2d5e8e0093bc4902",
    "openSSLVersion": "OpenSSL 1.0.1e-fips 11 Feb 2013",
    "modules": [],
    "allocator": "tcmalloc",
    "environment": {
        "distmod": "rhel70",
        "distarch": "x86_64",
        "target_arch": "x86_64"
    }
}
3. 配置及启停mongod服务
3.1 创建专用的数据及日志目录,并授权mongod用户访问(不使用默认的情况)
PS:默认情况下使用/var/lib/mongo(数据目录),/var/log/mongodb(日志目录)
mkdir -p /data/mongodb
mkdir -p /data/mongodb/{mbdata,mblog}
chown -R mongod:mongod /data/mongodb
PS:设置正确的权限确保 MongoDB 服务可以访问,系统启动默认使用mongod用户
3.2 启动 MongoDB 服务
使用 systemctl 启动并设置开机自启:
sudo systemctl start mongod
sudo systemctl enable mongod
sudo systemctl status mongod
检查状态:启动状态应显示 active (running)。
3.3 查看进程
# ps -ef|grep mongo
mongod   13646     1  0 16:33 ?        00:00:07 /usr/bin/mongod -f /etc/mongod.conf
3.4 基本配置(可选)
编辑配置文件 /etc/mongod.conf
# 日志设置【PS:一定是文件,若为目录则启动报错】
systemLog:
  destination: file
  logAppend: true
  path: /data/mongodb/mglog/mongod.log

# Where and how to store data(数据目录及内存设置)
storage:
  dbPath: /data/mongodb/mgdata
  journal:
    enabled: true
  wiredTiger:
    engineConfig:
      cacheSizeGB: 3  # 设置为物理内存的50-60%

# how the process runs
processManagement:
  timeZoneInfo: /usr/share/zoneinfo

# network interfaces(允许远程访问)
net:
  port: 27017
  bindIp: 127.0.0.1,192.168.10.11  # Enter 0.0.0.0,:: to bind to all IPv4 and IPv6 addresses or, alternatively, use the net.bindIpAll setting.
- 重启mongod服务使得配置生效
sudo systemctl restart mongod
4. 登录认证
4.1 登录客户端
mongosh --port 27017 -u admin -p "Virdb_123"
4.2 启用登录认证验证
use admin
# 新建admin用户
db.createUser({
  user: "admin",
  pwd: passwordPrompt(), // 交互式输入密码
  roles: ["root"]
})

# Enter password
***********
设置完成后,修改配置文件 /etc/mongod.conf,增加配置
# 启用认证(设置账密后添加)
security:
  authorization: enabled
PS:修改过配置文件,需要重启mongod服务
4.3 更改密码(有需要的话)
db.changeUserPassword("admin", "Virdb_123")
# 返回消息如下(PS:在V3.2版本,执行成功是没有任何提示的)
{ ok: 1 }
4.4 设置免密登录
cat ~/.bash_profile
# 增加
export MONGOPD="Virdb_123"
alias mosh='mongosh --port 27017 -u admin -p $MONGOPD'

# 立即生效
source  ~/.bash_profile
5. 数据迁移兼容性测试(单集合处理)
PS:由于跨越多个版本,使用json导出格式
5.1 mongodb V3.2导出json格式的数据(单集合处理)
新建备份数据的目录
mkdir -p /home/dmp/json
测试一个集合数据导出
mongoexport --port 27017 --db virdb --collection collection_2 --out /home/dmp/json/collection_2.json
输出:
diagnosis.json
2025-08-21T10:17:52.011+0800    connected to: 192.168.10.12:27017
2025-08-21T10:17:52.050+0800    exported 430 records
5.2 数据导入mongodb V6.0(单集合处理)
将文件复制到mongodb V6.0的服务器上,路径如下
/data/dmp/json/collection_2.json
执行单集合的导入
mongoimport --port 27017 -u admin -p "Virdb_123" --authenticationDatabase admin --db virdb --collection collection_2 --file /data/dmp/json/collection_2.json
输出:
2025-08-21T10:18:51.171+0800    connected to: mongodb://localhost:27017/
2025-08-21T10:18:51.197+0800    430 document(s) imported successfully. 0 document(s) failed to import.
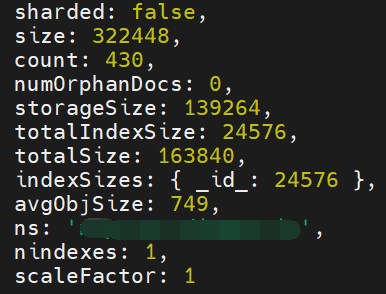
5.3 数据验证
查看集合状态,比对集合大小,集合文档数量,查看中英文是否有乱码等
# 查看状态
db.collection_2.stats()

# 查看集合数据
db.collection_2.find().limit(50)
状态截选部分:
6. 数据迁移(批量处理)
6.1 mongodb V3.2导出json格式的数据(耗时与数据量有关,当前测试:1.5G数据用时6分钟)
编辑脚本 exp_mongojson.sh
#!/bin/bash

# 获取 test 数据库中的所有集合名称
collections=$(mongo  --port 27017 virdb --eval "db.getCollectionNames()" --quiet | sed 's/\[//g' | sed 's/\]//g' | sed 's/,/ /g')

# 为每个集合执行导出
for collection in $collections; do
    echo "Exporting $collection..."
    mongoexport --host 192.168.10.12 --port 27017 --db virdb --collection $collection --out /home/dmp/json/$collection.json
done
给予执行权限
chmod a+x exp_mongojson.sh
执行脚本
nohup sh exp_mongojson.sh &
6.2 数据导入mongodb V6.0
删除导入的测试索引【谨慎检查执行的库】
# 登录
mosh
# 删除测试索引
db.virdb.drop()
db.collection_2.drop()
批量导入的脚本
cat imp_mongo.sh
#!/bin/bash

for i in `ls /data/dmp/json/json` ;do
echo "处理集合$i----"
rname=`echo "$i" | awk -F '.' '{print $1}'`
mongoimport --port 27017 -u admin -p "Virdb_123" --authenticationDatabase admin --db virdb --collection $rname --file /data/dmp/json/$rname.json
done
执行脚本导入数据
nohup sh imp_mongo.sh &
6.3 数据验证(集合抽样查看前文5.3,并比对数据库的集合数量和大小)
登录查看集合格式及库大小是否一致
use virdb
show dbs
show tables
7. 索引迁移之在Mongodb V6.0重建索引
7.1 在Mongodb V3.2上导出索引
新建js文件,写入处理逻辑
// exp_mongo_index.js
var output = [];
var collections = db.getCollectionNames().filter(function(coll) {
    return coll !== 'system.indexes' && coll !== 'system.profile'; // 排除系统集合
});

collections.forEach(function(coll) {
    var indexes = db.getCollection(coll).getIndexes();
    output.push({
        collection: coll,
        indexes: indexes
    });
});

printjson(output);
执行导出
mongo --port 27017 virdb --quiet /home/script/exp_mongo_index.js > /home/script/expport_indexes.json
MongoDB V3.2导出的索引格式如下(节选):
cat expport_indexes.json
[
        {
                "collection" : "collection_1",
                "indexes" : [
                        {
                                "v" : 1,
                                "key" : {
                                        "_id" : 1
                                },
                                "name" : "_id_",
                                "ns" : "virdb.collection_1"
                        },
                        {
                                "v" : 1,
                                "key" : {
                                        "cname" : 1
                                },
                                "name" : "cname_1",
                                "ns" : "virdb.collection_1",
                                "background" : true
                        }
                ]
        }
]
7.2 在MongoDB V6.0重建相应索引(批量)
新建 import_indexes.js文件,写入处理逻辑
// import_indexes.js
const fs = require('fs');

try {
    // 1. 读取并解析索引文件
    const data = JSON.parse(fs.readFileSync('expport_indexes.json', 'utf8'));

    // 2. 验证数据格式
    if (!Array.isArray(data) || data.length === 0) {
        throw new Error("索引数据格式错误:应为非空数组");
    }

    // 3. 处理每个集合的索引
    data.forEach(collectionData => {
        const collectionName = collectionData.collection;
        const indexes = collectionData.indexes;

        // 4. 创建每个索引
        indexes.forEach((index, i) => {
            // 跳过默认的_id索引
            if (index.name === "_id_") return;

            // 准备选项
            const options = {
                name: index.name,
                background: index.background || true, // 默认后台创建
                ...index // 包含其他所有选项
            };

            // 删除已包含在参数中的字段
            delete options.key;
            delete options.v;
            delete options.ns;

            print(`正在创建索引 ${index.name} 到集合 ${collectionName}`);
            db.getCollection(collectionName).createIndex(index.key, options);
        });
    });

    print("索引导入完成");
} catch (e) {
    print(`导入失败: ${e.message}`);
    // 记录详细错误到日志
    fs.writeFileSync('import_error.log', e.stack);
}
- 执行命令导入索引
mongosh --port 27017 -u admin -p $MONGOPD --authenticationDatabase admin hup --quiet import_indexes.js

- 索引验证
db.collection_1.getIndexes()
8. 遇到的问题处理
8.1 登录报错没有权限
{"t":{"$date":"2025-08-21T09:52:17.427+08:00"},"s":"I", "c":"ACCESS", "id":20249, "ctx":"conn66","msg":"Authentication failed","attr":{"mechanism":"SCRAM-SHA-256","speculative":true,"principalName":"admin","authenticationDatabase":"virdb","remote":"127.0.0.1:50340","extraInfo":{},"error":"UserNotFound: Could not find user \"admin\" for db \"virdb\""}}
**解决措施:**连接到验证的admin库,而非virdb库
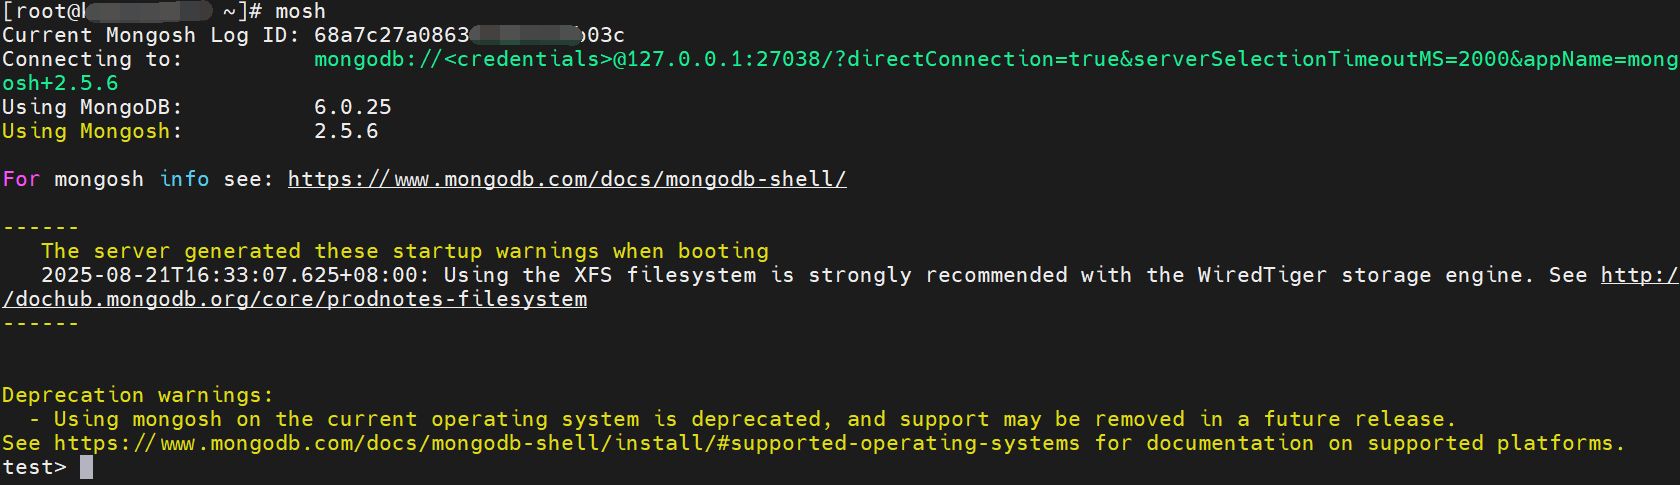
8.2 登录启动后的告警
The server generated these startup warnings when booting
2025-08-20T17:49:27.868+08:00: Using the XFS filesystem is strongly recommended with the WiredTiger storage engine. See http://dochub.mongodb.org/core/prodnotes-filesystem
2025-08-20T17:49:28.812+08:00: /sys/kernel/mm/transparent_hugepage/enabled is 'always'. We suggest setting it to 'never' in this binary version
2025-08-20T17:49:28.812+08:00: /sys/kernel/mm/transparent_hugepage/defrag is 'always'. We suggest setting it to 'never' in this binary version
2025-08-20T17:49:28.812+08:00: vm.max_map_count is too low
解决措施: 关闭透明大页,优化参数,参考前文1.3 、1.4章节
8.3 mongoexport 导出报错
mongoexport --host 192.168.10.12 --port 27017 --db test --out /home/dmp/test
提示 2025-08-21T10:09:58.710+0800    error validating settings: must specify a collection
2025-08-21T10:09:58.710+0800    try 'mongoexport --help' for more information
解决措施: 这是由于其必须知道集合,故后续使用了脚本批量进行处理virdb下的所有集合
8.4 客户端连报错
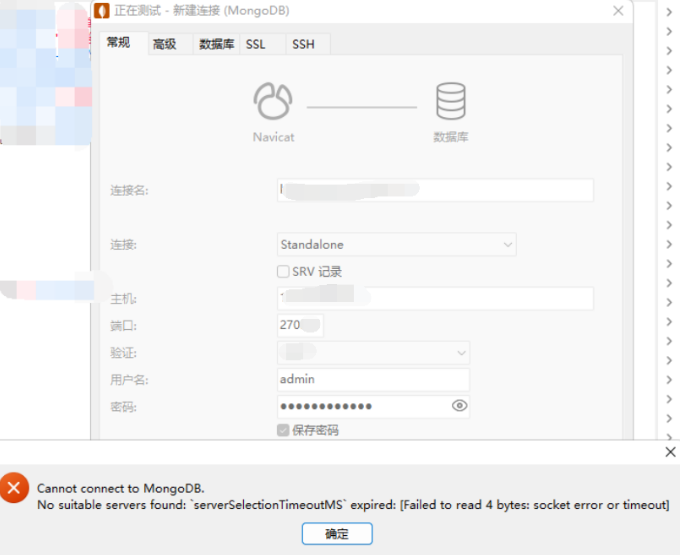
Cannot connect to MongoDB.No suitable servers found: `serverSelectionTimeoutMS` expired: [failed to read 4 bytes: socket error or timeout
**解决措施:**防火墙未打开端口导致,参照前文1.3章节
8.5 测试使用mongodump/mongorestore 备份V3.2,恢复到6.0报错
导出导入命令如下:
# V3.2执行导出
mongodump --host 192.168.10.11 --port 27017  --db virdb--out /home/dmp --gzip

# V6.0 执行导入
mongorestore --port 27017 -u admin -p $MONGOPD --authenticationDatabase admin virdb /data/dmp/virdb --gzip
报错日志如下:
# 部分节选
2025-08-21T09:54:03.405+0800    don't know what to do with file "/data/dmp/virdb/collection_1.js.bson.gz", skipping...
2025-08-21T09:54:03.405+0800    don't know what to do with file "/data/dmp/virdb/collection_2.js.bson.gz", skipping...
解决措施: 不兼容导致,使用 mongoexport/mongoimport 导出json文件格式处理,参照前文数据迁移的章节
9. MongoDB 卸载【谨慎!谨慎!再谨慎!】
9.1 停止 MongoDB
通过发出以下命令来停止 mongod 进程:
sudo service mongod stop
9.2. 删除包
删除您之前安装的所有 MongoDB 包:
sudo yum erase $(rpm -qa | grep mongodb-org)
9.3. 删除数据目录
删除 MongoDB 数据库和日志文件(查看配置文件可知):
sudo rm -r /var/log/mongodb
sudo rm -r /var/lib/mongo
10. 参考文档及手册:
10.1 手动安装参考如下网址
官网下载地址
https://www.mongodb.com/try/download/community-kubernetes-operator
软件下载地址:
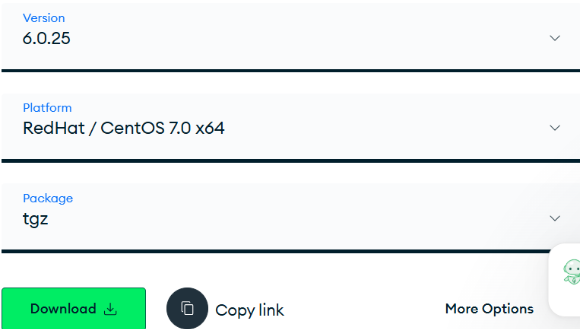
https://fastdl.mongodb.org/linux/mongodb-linux-x86_64-rhel70-6.0.25.tgz
当前选择的6.0的最新版本:6.0.25版本
10.2 官方文档
https://www.mongodb.com/zh-cn/docs/v6.0/
mongosh的安装及使用
https://www.mongodb.com/zh-cn/docs/mongodb-shell/install/#supported-operating-systems
具体的,在centos上6.0安装说明:
https://www.mongodb.com/zh-cn/docs/v6.0/tutorial/install-mongodb-on-red-hat/
Database Tools(含上述使用过的mongoimport)
https://www.mongodb.com/zh-cn/docs/database-tools/
