


前言
在认真阅读白皮书和官方文档后,了解了 Vertica 架构的两种模式,这篇打算本地安装体验一下,测试安装单机版!
🏆 作者写的 《Vertica 技术文章合集》,欢迎阅读 👏🏻!
一、介绍
Vertica 支持不同的环境安装,可以选择在物理主机硬件上运行,或者在云上部署,条件有限,就在本地虚拟机上测试安装啦!
单机:安装在单个主机上,通常用于测试和开发环境,不支持扩展更多主机。集群:通常用于生产环境的安装,通过集群管理数据库,数据均匀存储在集群的各个节点上。
📢 安装注意点:
- Vertica 仅支持每个集群运行一个数据库。
- Vertica 支持在一个、两个或多个节点上安装。无论集群中有多少个节点,安装
Vertica的步骤都是相同的。 - 所有 Vertica 配置都需要安装 Vertica 之前列出的先决条件。
- 在任何时候,一台主机上只能运行一个 Vertica 实例。
- 要运行
install_vertica脚本以及添加、更新或删除节点,必须以 root 身份登录,或以具有所有权限的用户身份登录 sudo。必须为所有安装运行该脚本,包括升级和单节点安装。
😁 通过仔细研读了官方文档之后,总结一下如何安装单机版用来测试学习,其中的一些注意点比较细节,对初学者很有帮助!
二、安装前准备
1、安装介质下载
Vertica 11.0.x CE 社区免费版安装包、客户端、驱动程序:
| 名称 | 大小 | 备注 |
|---|---|---|
| vsql-11.0.1-0.mac.dmg | 2.3M | vsql 客户端 for macOS |
| Vertica_11.0.x_Release_Notes.html | 96KB | Vertica 11.0 版本文档 |
| vertica_11.0.1-2_amd64.deb | 517.4M | Vertica Debian、Ubuntu 安装包 |
| VerticaSetup-11.0.1-0.exe | 78.1M | Vertica Windows 安装程序 |
| Vertica-user-doc_11.0.x-for-download.zip | 111.5M | Vertica 用户手册 |
| vertica-R-lang_11.0.1-0_amd64.deb | 52.7M | Debian、Ubuntu R 语言 Vertica 驱动 |
| vertica-R-lang-11.0.1-0.x86_64.SUSE.rpm | 46.9M | SUSE R 语言 Vertica 驱动 |
| vertica-R-lang-11.0.1-0.x86_64.RHEL6.rpm | 53M | RHEL6 R 语言 Vertica 驱动 |
| vertica-odbc-11.0.1-0.mac.pkg | 14.4M | Vertica ODBC 驱动 |
| vertica-jdbc-11.0.1-0.jar | 1.3M | Vertica JDBC 驱动 |
| vertica-console_11.0.1-2_amd64.deb | 621.1M | Vertica Debian、Ubuntu 管理控制台 |
| vertica-console-11.0.1-2.x86_64.SUSE.rpm | 447.1M | Vertica SUSE 管理控制台 |
| vertica-console-11.0.1-2.x86_64.RHEL6.rpm | 621.2M | Vertica RHEL6 管理控制台 |
| vertica-client-fips-11.0.1-0.x86_64.rpm | 32.5M | Vertica FIPS 客户端 |
| vertica-client-11.0.1-0.x86_64.rpm | 37.9M | Vertica 客户端 |
| vertica-11.0.1-2.x86_64.SUSE.rpm | 513.7M | Vertica SUSE 安装包 |
| vertica-11.0.1-2.x86_64.RHEL6.rpm | 513.7M | Vertica RHEL6 安装包 |
📢 注意: 虽然安装包名称是 RHEL6,但是兼容!
2、防火墙端口
Vertica 需要在本地网络上打开多个端口。Vertica 不建议在节点之间放置防火墙(所有节点都应位于防火墙之后),但如果您必须在节点之间使用防火墙,请确保以下端口可用:
| 端口 | 协议 | 服务 | 注意点 |
|---|---|---|---|
| 22 | TCP | sshd | 通过所需的管理工具和管理控制台群集安装向导。 |
| 5433 | TCP | Vertica | Vertica 客户端(vsql、ODBC、JDBC 等)端口。 |
| 5434 | TCP | Vertica | 集群内和集群间通信。Vertica 打开 Vertica 客户端端口 +1(默认为 5434)用于集群内通信,例如在计划期间。如果来自默认客户端端口的端口 +1 不可用,则 Vertica 会打开一个随机端口用于集群内通信。 |
| 5433 | UDP | Vertica | Vertica 传播监控和 MC 集群导入。 |
| 5444 | TCP | Vertica 控制台 | MC 到节点和节点到节点(代理)通信端口。 |
| 5450 | TCP | Vertica 控制台 | 用于从 Web 浏览器连接到 MC 并允许从节点到 MC 应用程序/Web 服务器的通信的端口。 |
| 4803 | TCP | Spread | 客户端连接。 |
| 4803 | UDP | Spread | 守护进程到守护进程的连接。 |
| 4804 | UDP | Spread | 守护进程到守护进程的连接。 |
| 6543 | UDP | Spread | 监视守护程序连接。 |
3、系统支持
以下摘自官方文档,Vertica 11 版本支持 RedHat 7/8 或 Centos 7/8 以上版本。

| 平台 | 处理器 | 支持版本 |
|---|---|---|
| Red Hat Enterprise Linux / CentOS | x86_64 | 6.x is no longer supported,7.x: all with known issues,8.x: all with known issues |
| SUSE Linux Enterprise Server | x86_64 | 12 SP2 and higher,15.x: all |
| openSUSE | x86_64 | 42.3 |
| Oracle Enterprise Linux | x86_64 | 6.x: all,7.x: all |
| Debian Linux | x86_64 | 8.5,8.9,10.x: with known issues |
| Ubuntu | x86_64 | 14.04 LTS and higher with known issues |
二、Linux 系统
1、环境信息
单机版本环境信息如下:
| 主机版本 | Vertica 版本 | 主机名 | IP 地址 | 内存 | SWAP | 磁盘容量 |
|---|---|---|---|---|---|---|
| centos7.9 | 11.0.1 | vertica | 192.168.56.100 | 4G | 2G | 50G |
📢 官方文档要求:
- 每个 逻辑处理器 至少具有
1GB内存 - 需要至少
2 GB的交换分区SWAP - 磁盘格式建议使用
ext4或者XFS
2、系统安装
本次使用 Centos7.9 主机进行安装,常规的系统安装过程就不再过多赘述,安装过程可参考:
或者使用 vagrant 进行一键安装:
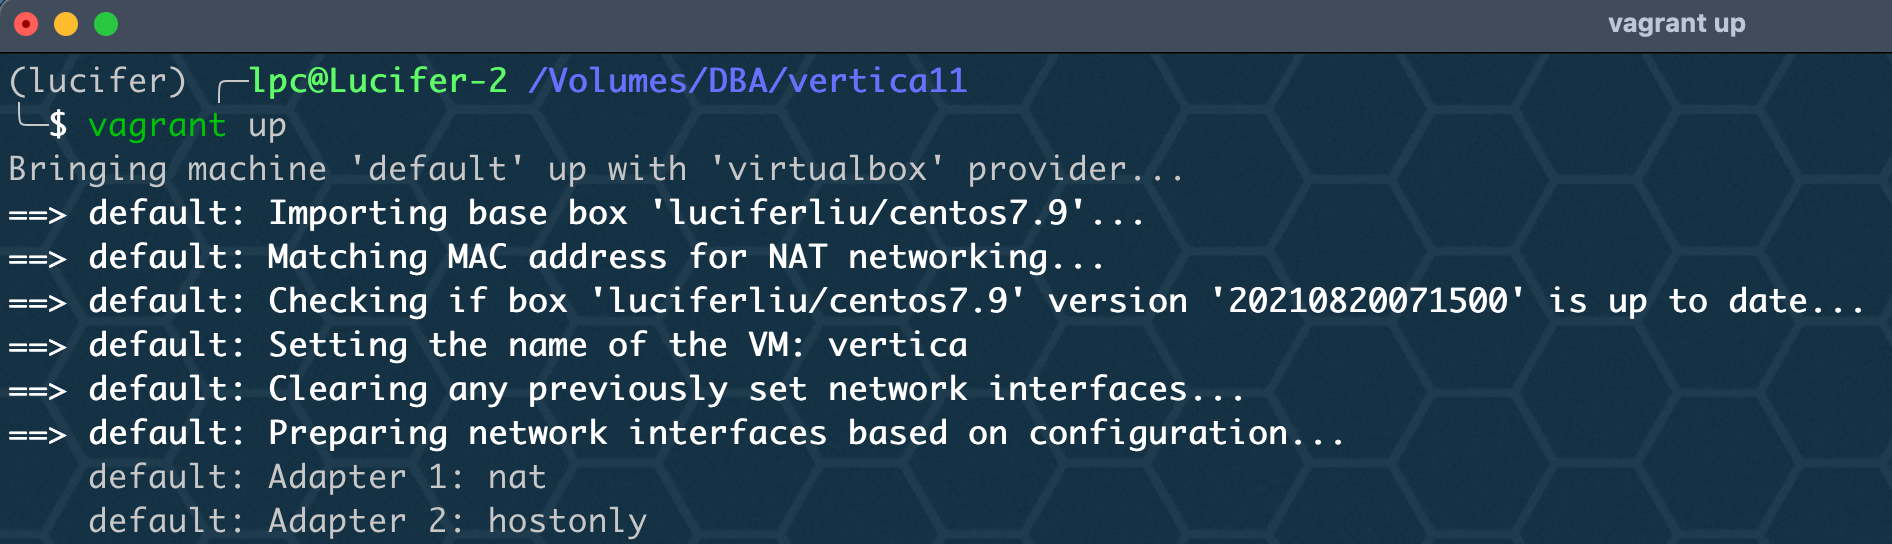
下面演示下,vagrant 安装:
cd /Volumes/DBA/vertica11
vagrant init luciferliu/centos7.9
修改配置:
cat<<EOF>Vagrantfile
Vagrant.configure("2") do |config|
  config.vm.box = "luciferliu/centos7.9"
  config.vm.synced_folder "/Volumes/DBA/vertica11", "/vagrant"
  config.vm.network :forwarded_port, guest: 22, host: 22
  config.vm.network "private_network", ip: "192.168.56.100"
  config.vm.provider "virtualbox" do |vb|
  vb.name = "vertica"
  vb.memory = 4096
  vb.cpus = 2
  end
end
EOF

开始安装:
vagrant up
vagrant ssh
sudo passwd root
su - root
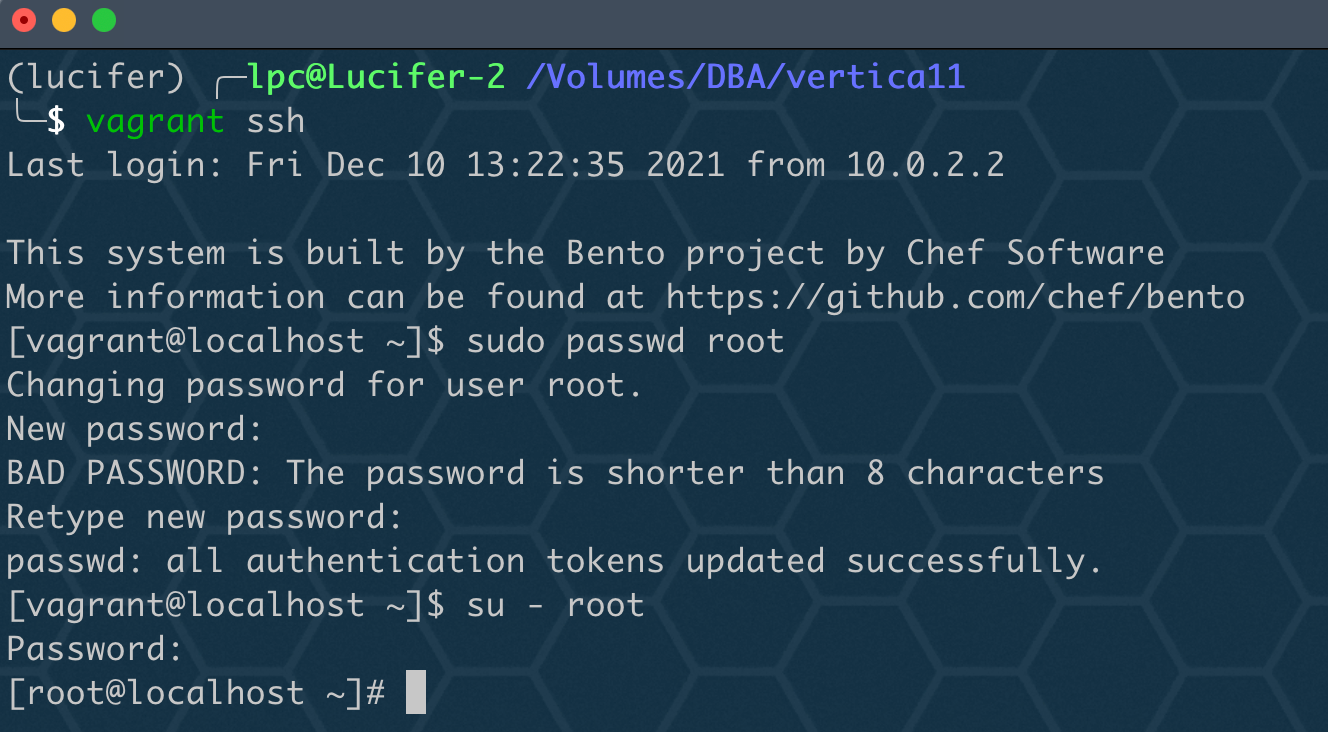
至此,Centos7.9 主机已经安装完成!
三、安装前配置
系统安装好后,需要 配置网络 和 yum 源,由于我使用 vagrant 进行安装,已经提前配置好,这里不再演示!
1、配置主机名
vertica 不建议设置主机为 localhost,应设置对应可辨别的主机名
hostnamectl set-hostname vertica
hostname
bash

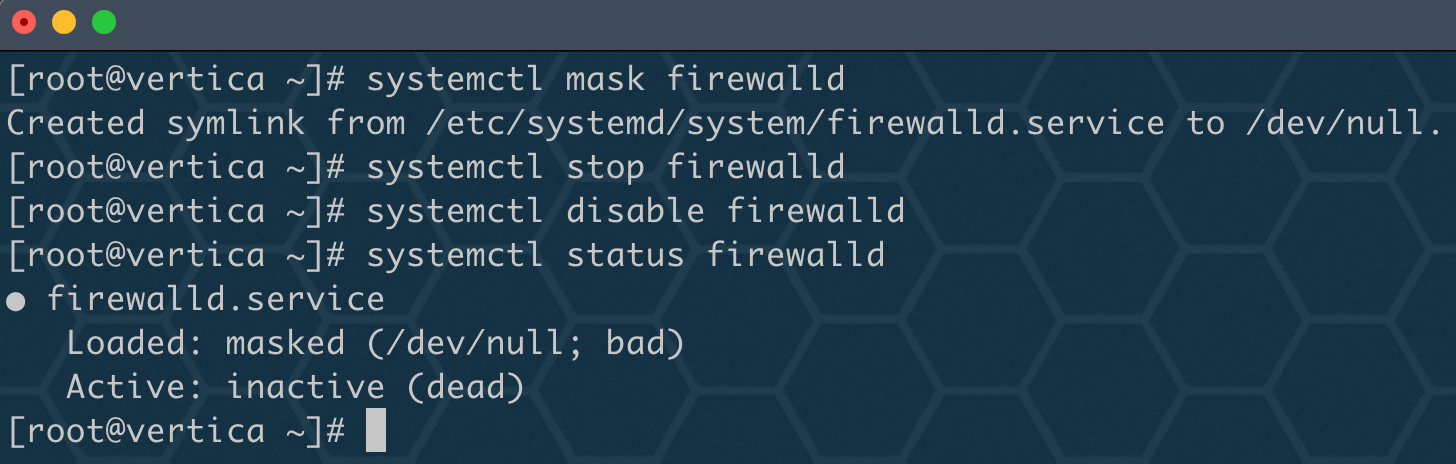
2、关闭防火墙
如果没有特殊需求,建议直接关闭:
systemctl mask firewalld
systemctl stop firewalld
systemctl disable firewalld
systemctl status firewalld
3、关闭 selinux
SElinux 必须设为 disabled 禁用或在 permissive 下运行:
sed -i 's/SELINUX=enforcing/SELINUX=disabled/g' /etc/selinux/config
setenforce 0
getenforce

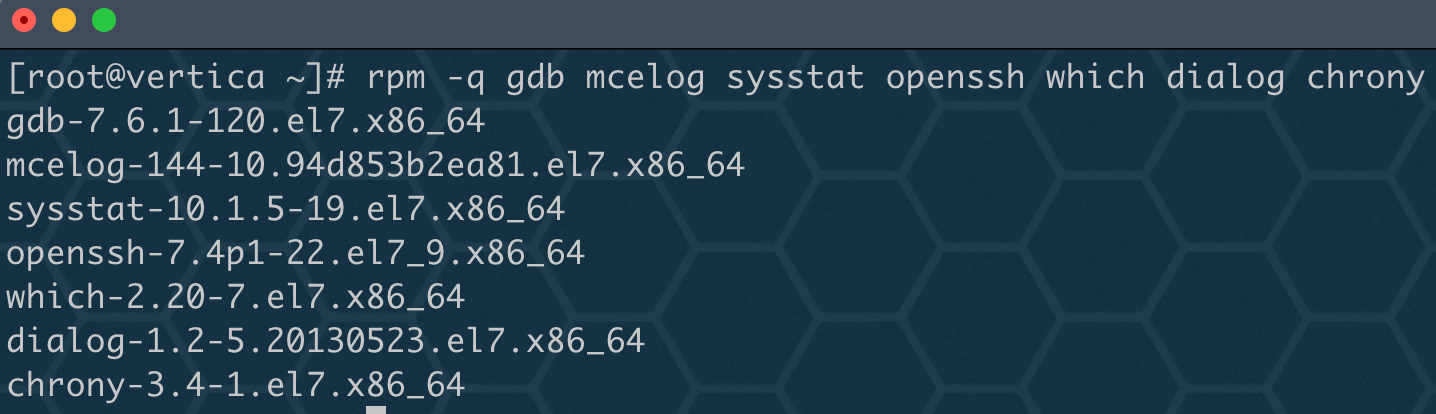
4、安装依赖包
我已配置好网络 yum 源,没有配置的朋友请自行配置。
yum install -y gdb mcelog sysstat openssh which dialog chrony
rpm -q gdb mcelog sysstat openssh which dialog chrony
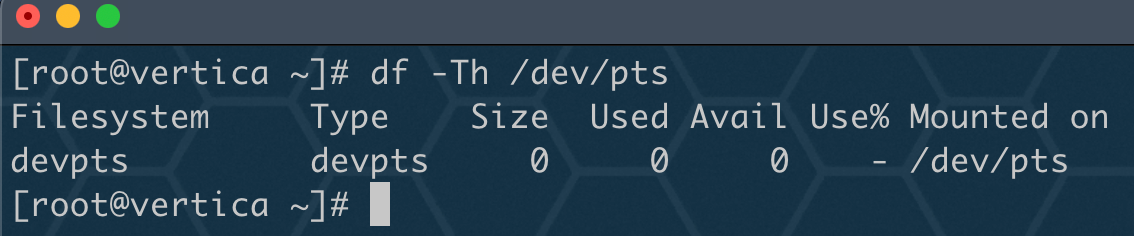
5、检查 pts 是否挂载
确保 /dev/pts 已挂载,否则创建数据库时,在缺少挂载点 /dev/pts 的主机上安装 Vertica 可能会导致错误。
df -Th /dev/pts
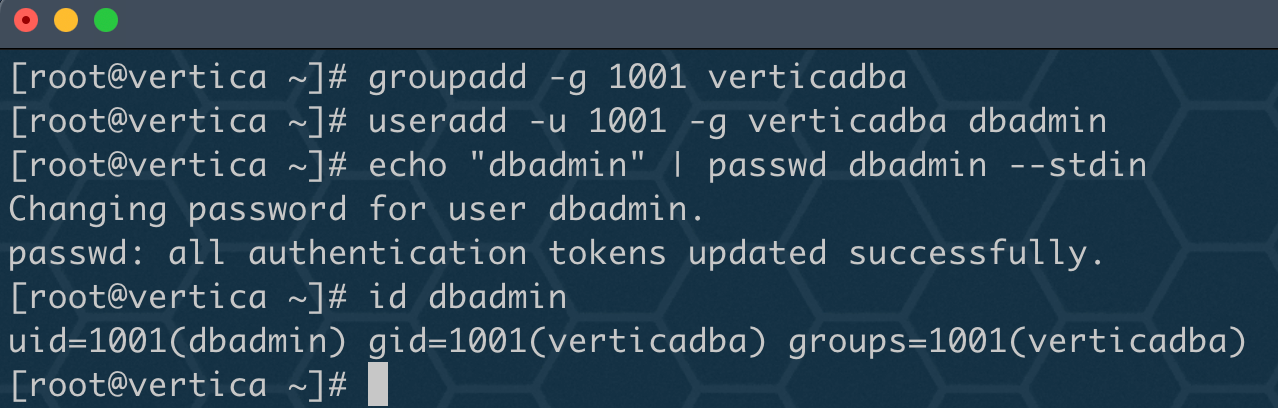
6、创建用户和组
虽然安装脚本中会自动创建 dbadmin 用户,但是我还是习惯性手动创建下。
groupadd -g 1001 verticadba
useradd -u 1001 -g verticadba dbadmin
echo "dbadmin" | passwd dbadmin --stdin
id dbadmin
7、配置 Disk Readahead
Vertica 建议您将预读值设置为至少 2048,该命令会立即更改指定磁盘的预读值!
lsblk
/sbin/blockdev --setra 8192 /dev/sda
echo '/sbin/blockdev --setra 8192 /dev/sda' >> /etc/rc.local
chmod +x /etc/rc.d/rc.local

📢 注意: 如果你对一个分区运行 blockdev,例如:/dev/sda1,那么该设置仍然适用于整个 /dev/sda 设备。 例如,运行 /sbin/blockdev --setra 2048/dev/sda1 还导致 /dev/sda2 到 /dev/sdaN 使用预读值 2048。
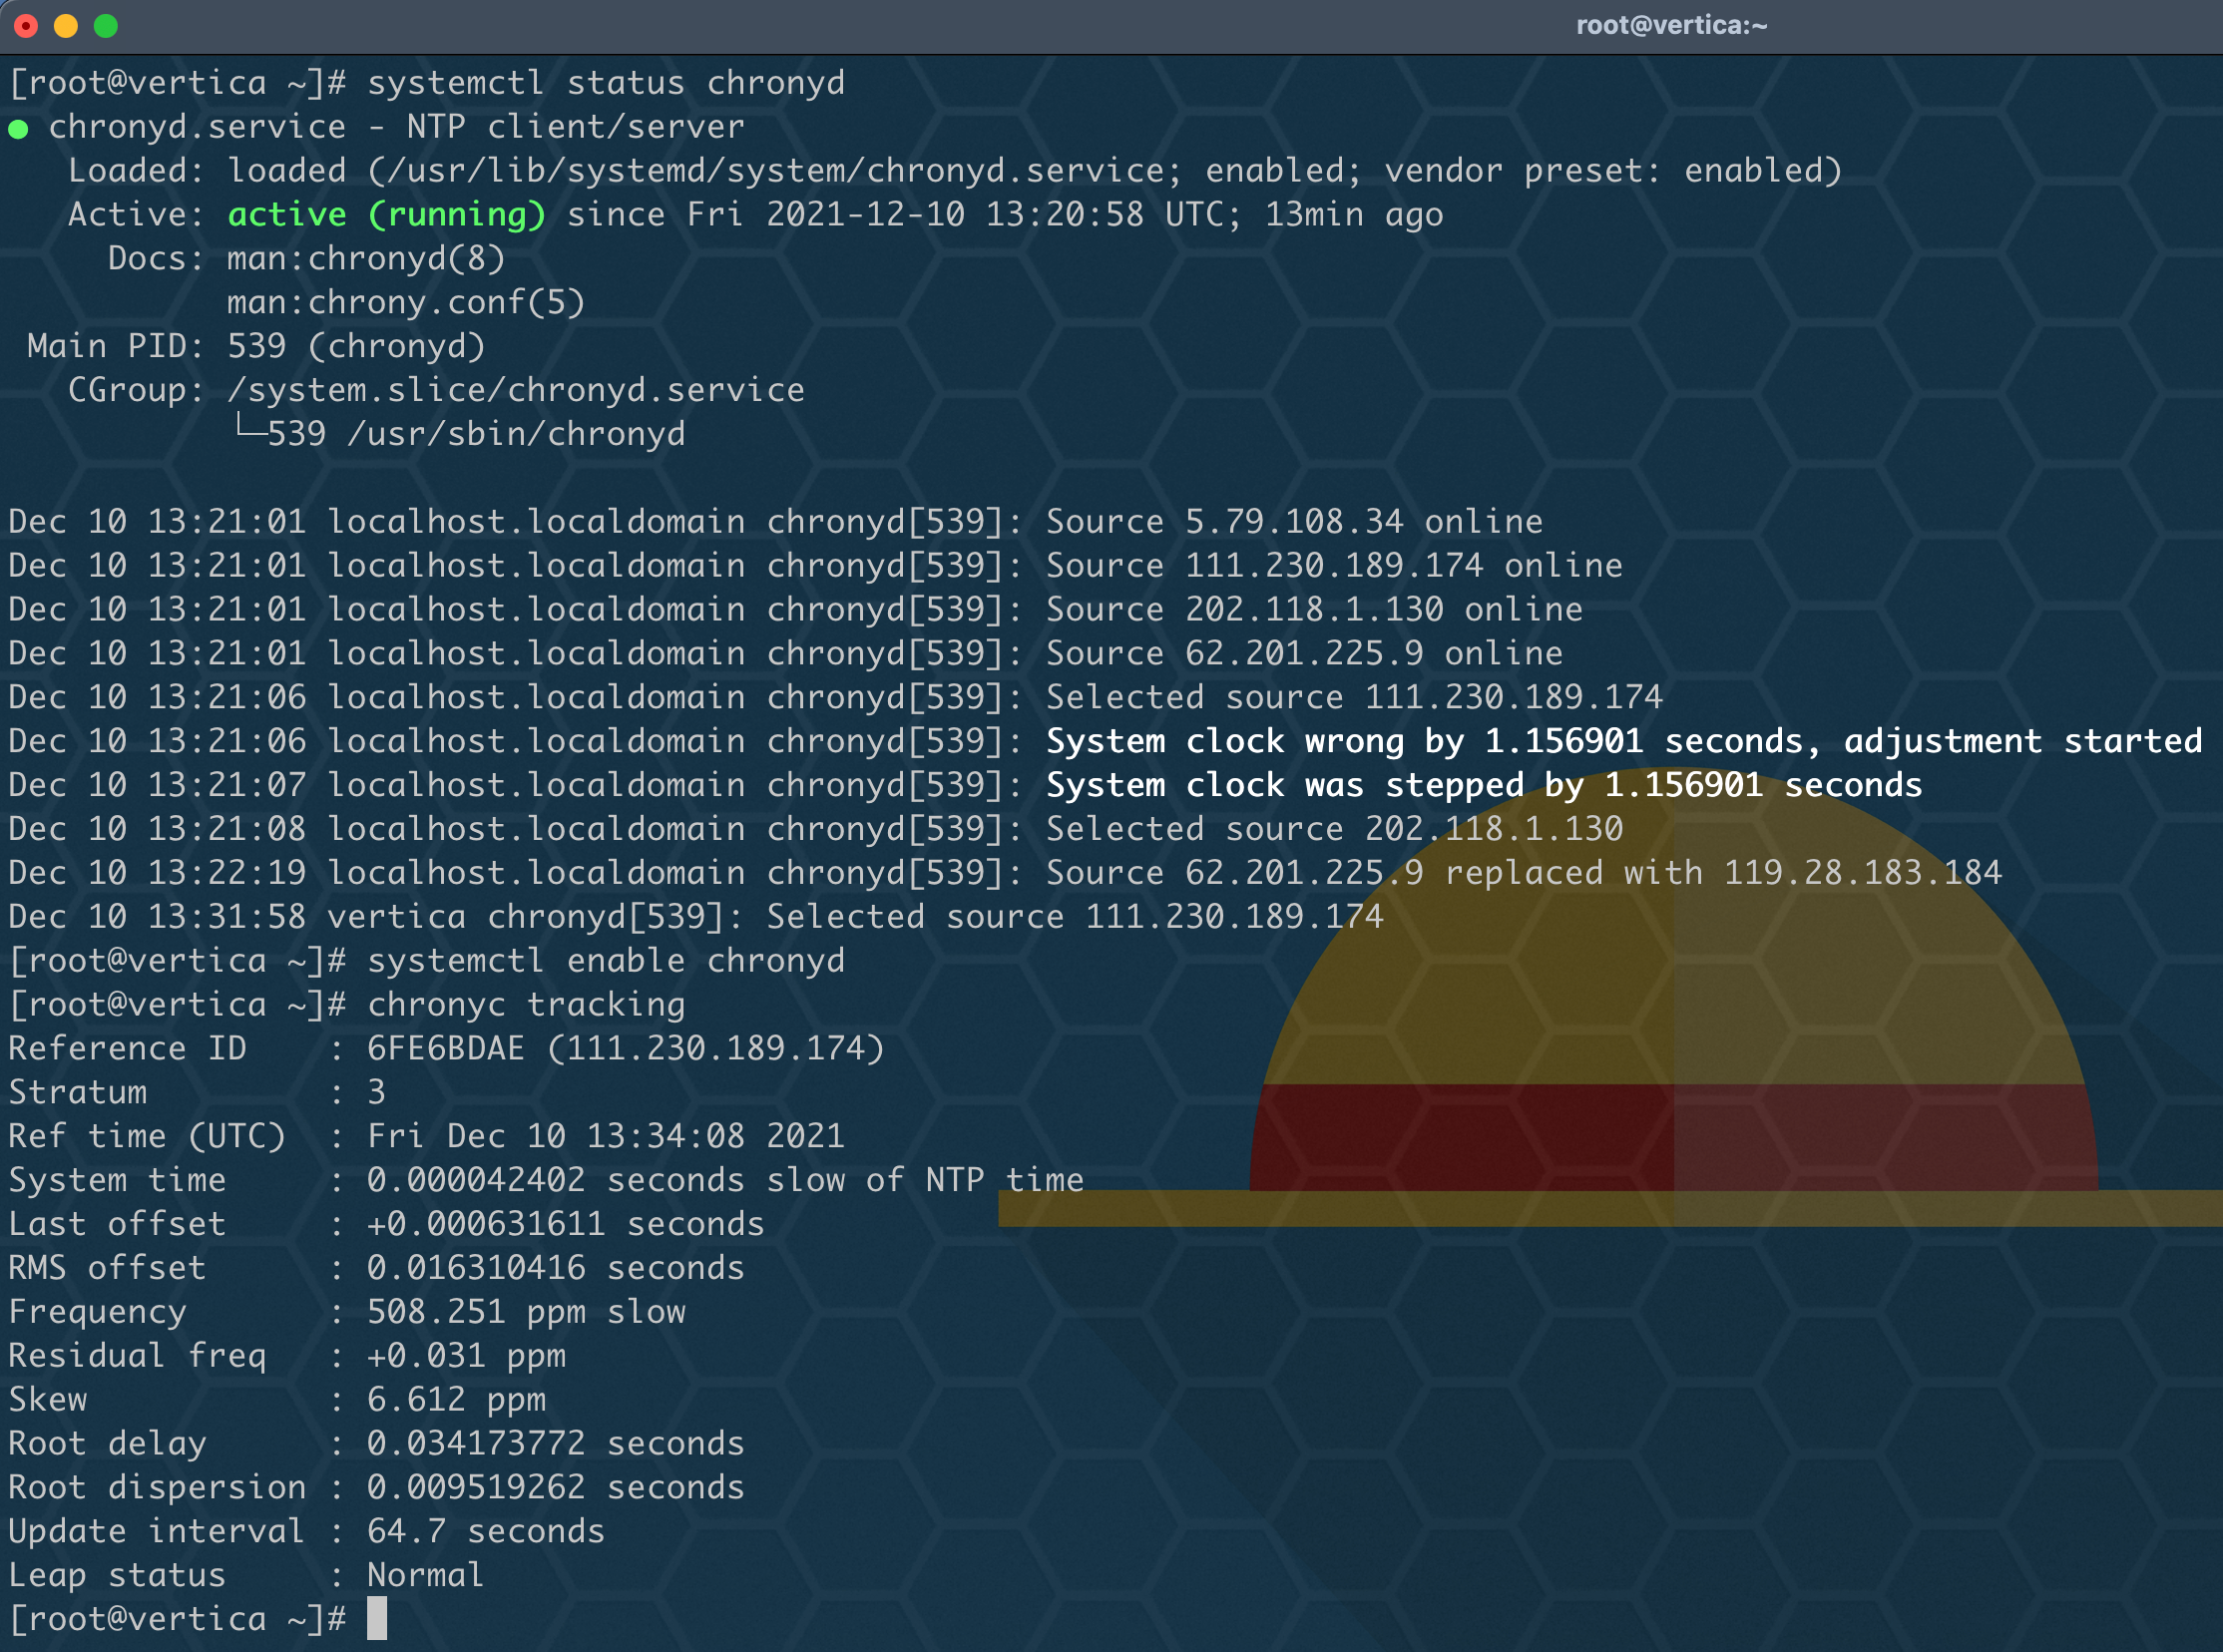
8、开启 chrony
对于 Red Hat 7 和 CentOS 7 系统,必须启用并运行 chrony,如果是 6 版本,则需要启动 NTP,默认是开启的。
systemctl status chronyd
systemctl enable chronyd
chronyc tracking
9、配置透明大页
对于 Red Hat 7/CentOS 7,您必须启用透明大页面,透明大页默认值为 always。
## 默认为 always
cat /sys/kernel/mm/transparent_hugepage/enabled
## 如果不是 always,通过以下命令设置
echo always > /sys/kernel/mm/transparent_hugepage/enabled
## 设置开机自启动设置 always
cat<<EOF>>/etc/rc.local
if test -f /sys/kernel/mm/transparent_hugepage/enabled; then
echo always > /sys/kernel/mm/transparent_hugepage/enabled
fi
EOF
## redhat7 或 centos7 需要设置可执行权限
chmod +x /etc/rc.d/rc.local
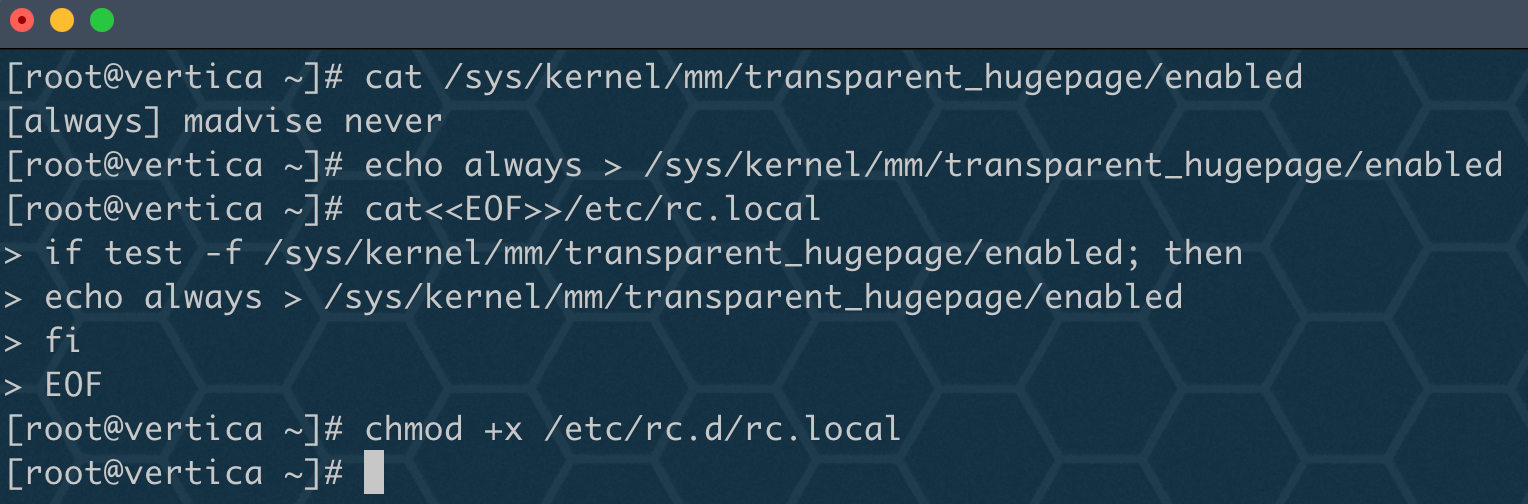
📢 注意: 对于 Red Hat 7、CentOS 7 和 Amazon Linux 2.0,透明大页面必须设置为 always。对于所有其他操作系统,Transparent Hugepages 必须是 disable 或设置为 madvise。
10、配置 I/O Scheduler
Vertica 使用的磁盘的 I/O 调度程序必须设置为 deadline 或 noop,默认为 deadline。
cat /sys/block/sda/queue/scheduler
echo deadline > /sys/block/sda/queue/scheduler
## 加入开机自启
echo 'echo deadline > /sys/block/sda/queue/scheduler' >> /etc/rc.local
chmod +x /etc/rc.d/rc.local

11、配置 TZ(TimeZone)
如果不设置 TZ 变量,安装 vertica 时会报错!
yum update -y tzdata
timedatectl set-timezone Asia/Shanghai
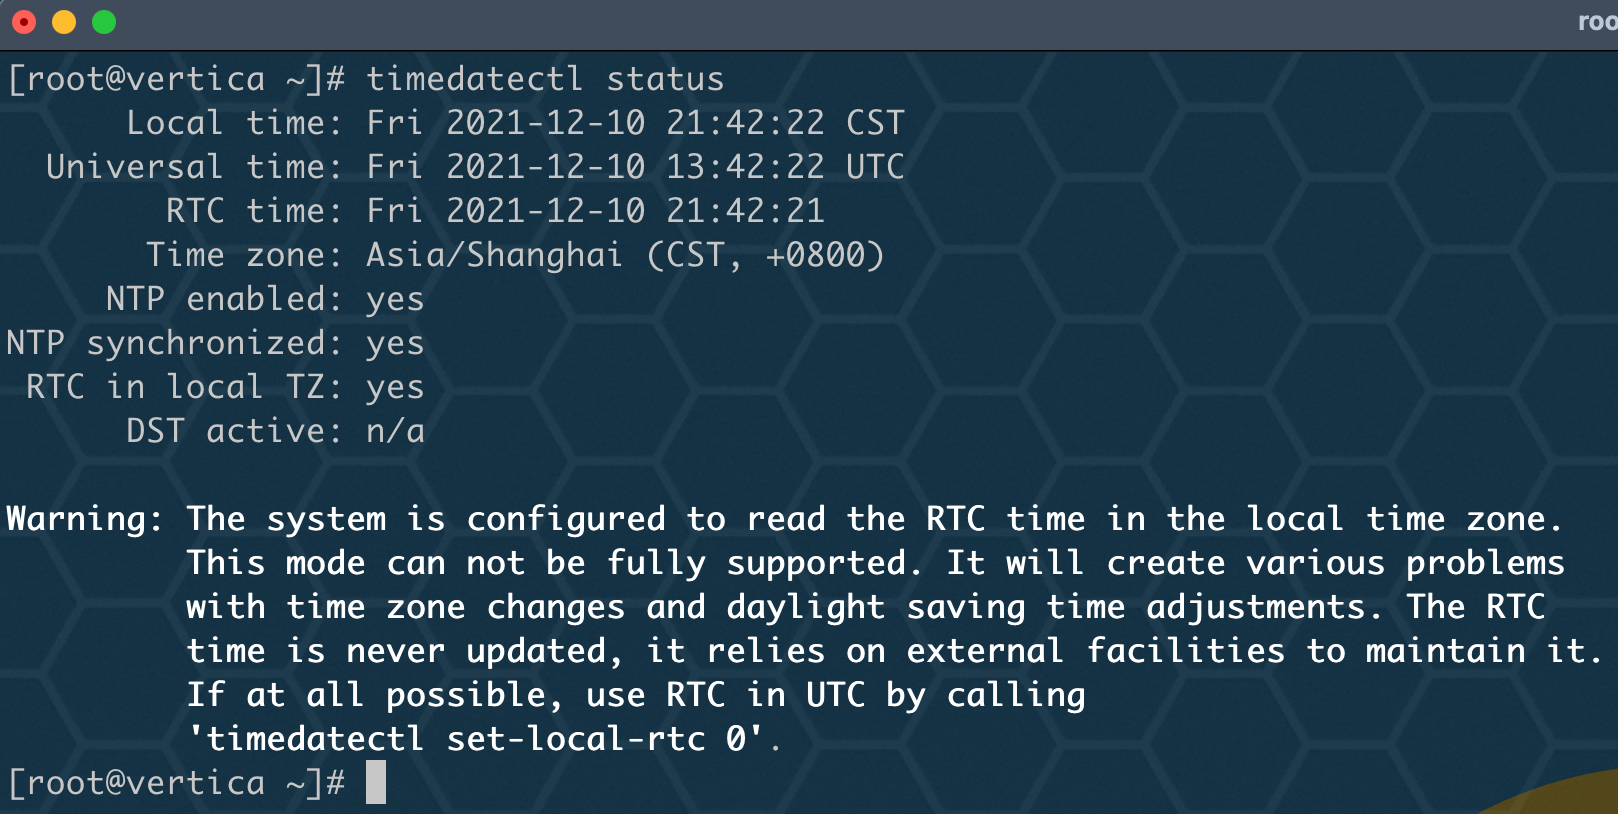
📢 注意: 如果是集群,必须在所有节点上将 TZ 变量设置为相同的值。
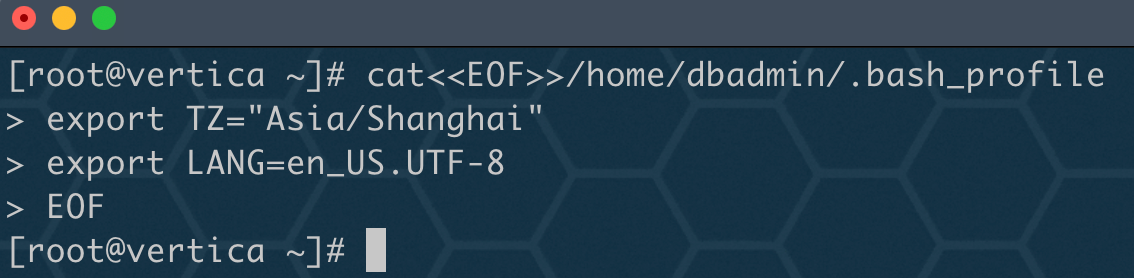
12、配置环境变量
环境变量主要配置 TZ 和 LANG:
cat<<EOF>>/home/dbadmin/.bash_profile
export TZ="Asia/Shanghai"
export LANG=en_US.UTF-8
EOF
13、关闭 tuned
对于 Red Hat 7 或 CentOS 7 或更高版本,请确保在 Vertica 重新启动时未启动调整系统服务:
systemctl stop tuned.service
systemctl disable tuned.service
systemctl status tuned.service
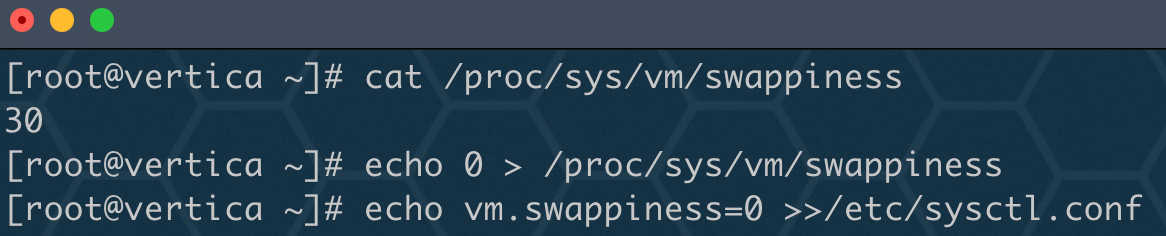
14、配置 swapiness
cat /proc/sys/vm/swappiness
echo 0 > /proc/sys/vm/swappiness
echo vm.swappiness=0 >>/etc/sysctl.conf
sysctl -p
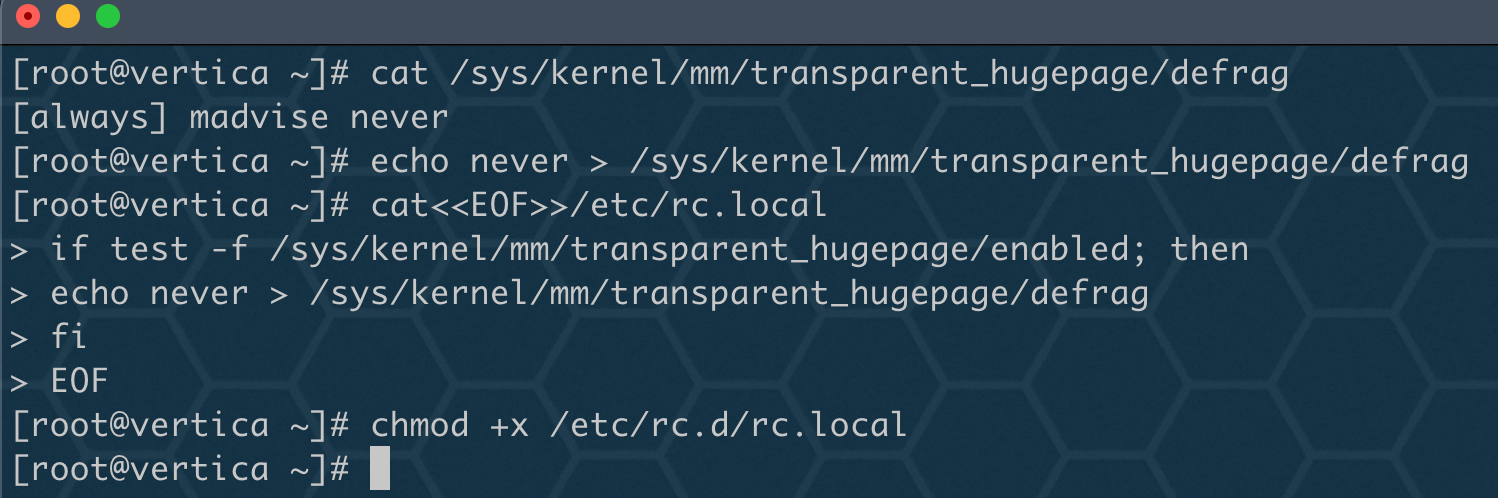
15、禁用 Defrag(碎片整理)
在所有 Red Hat/CentOS 系统上,您必须禁用碎片整理实用程序才能满足 Vertica 配置要求。
cat /sys/kernel/mm/transparent_hugepage/defrag
echo never > /sys/kernel/mm/transparent_hugepage/defrag
cat<<EOF>>/etc/rc.local
if test -f /sys/kernel/mm/transparent_hugepage/enabled; then
echo never > /sys/kernel/mm/transparent_hugepage/defrag
fi
EOF
chmod +x /etc/rc.d/rc.local
📢 注意: 下方 16、17、18 步骤中 如果这些常规操作系统设置不满足 Vertica 要求,则安装程序会自动进行这些设置。当然也可以使用脚本的 --no-system-configuration 参数来阻止安装程序自动进行这些配置更改 install_vertica。
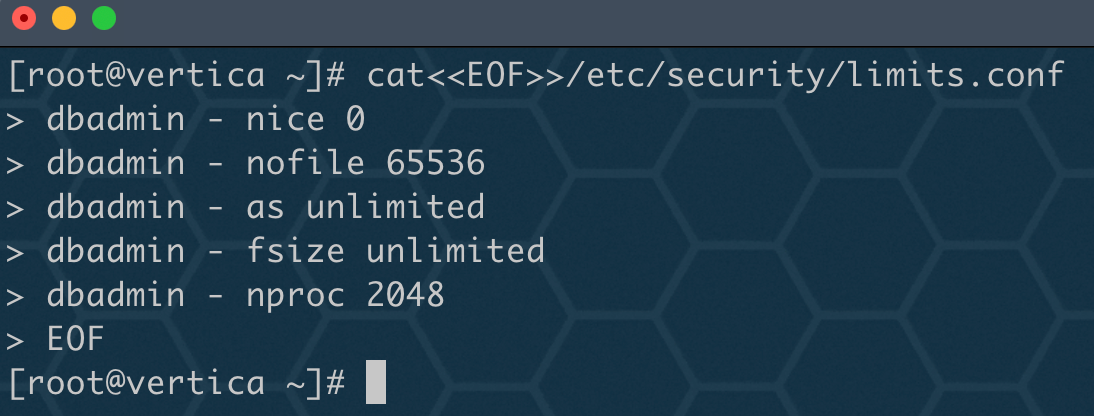
16、配置 limits.conf
为 dbadmin 用户设置 Limit 配置:
cat<<EOF>>/etc/security/limits.conf
dbadmin - nice 0
dbadmin - nofile 65536
dbadmin - as unlimited
dbadmin - fsize unlimited
dbadmin - nproc 30152
EOF
17、配置 pam.d
cat<<EOF>>/etc/pam.d/su
session required pam_limits.so
EOF

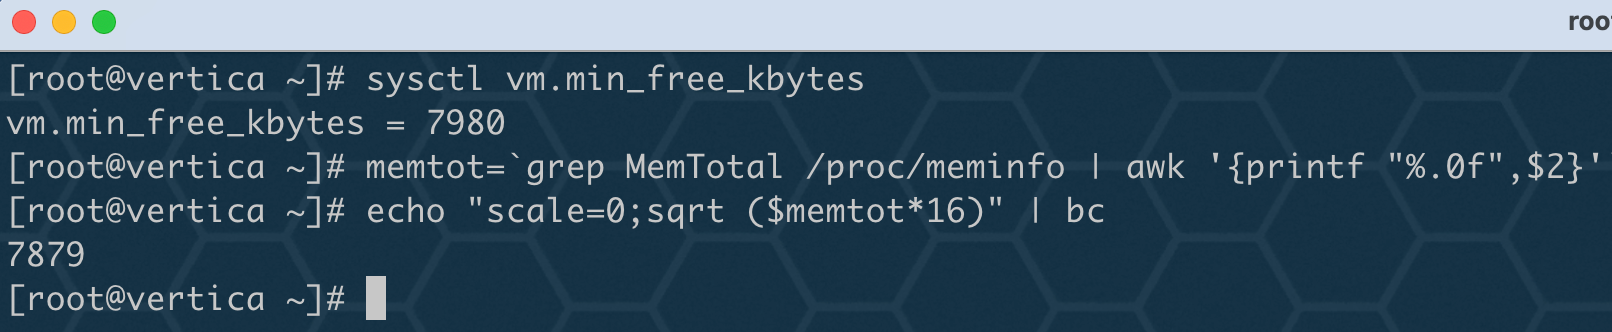
18、配置 sysctl.conf(这一步可以省略配置)
1、min_free_kbytes
通过以下命令可以算出当前主机推荐的 vm.min_free_kbytes 参数值:
sysctl vm.min_free_kbytes
memtot=`grep MemTotal /proc/meminfo | awk '{printf "%.0f",$2}'`
echo "scale=0;sqrt ($memtot*16)" | bc
2、pid_max
通过以下命令计算 pid_max 参数值,最小值为 524288,其中 num-user-proc 为内存大小,字节单位。
memTotal=$(grep MemTotal /proc/meminfo | awk '{print $2}')
numUserProc=$((memTotal * 1024))
pid_max=$((numUserProc + 32768))

3、max_map_count
max_map_count 最低为 65536,更精准计算公式:内存 KB/16
memTotal=$(grep MemTotal /proc/meminfo | awk '{print $2}')
max_map_count=$((memTotal /16))

4、fs.file-max
Vertica打开许多文件。某些平台对打开文件的数量有全局限制。必须将打开文件限制设置得足够高,以免干扰数据库操作。
推荐值至少为内存量(MB),但不小于 65536。
free -m

完整配置命令:
cat<<EOF>>/etc/sysctl.conf
fs.file-max=65536
vm.min_free_kbytes=7980
kernel.pid_max=524288
vm.max_map_count=65536
EOF
sysctl -p
至此,主机环境配置完成!
四、安装 Vertica 单机版
1、上传安装介质
文章开始已经介绍了如何下载安装包,现在上传所需安装包 vertica-11.0.1-2.x86_64.RHEL6.rpm 至 /soft 目录下。
mkdir /soft
scp vertica-11.0.1-2.x86_64.RHEL6.rpm root@192.168.56.100:/soft

2、rpm 安装
通过 rpm 安装 vertical 包:
cd /sofy
rpm -ivh vertica-11.0.1-2.x86_64.RHEL6.rpm
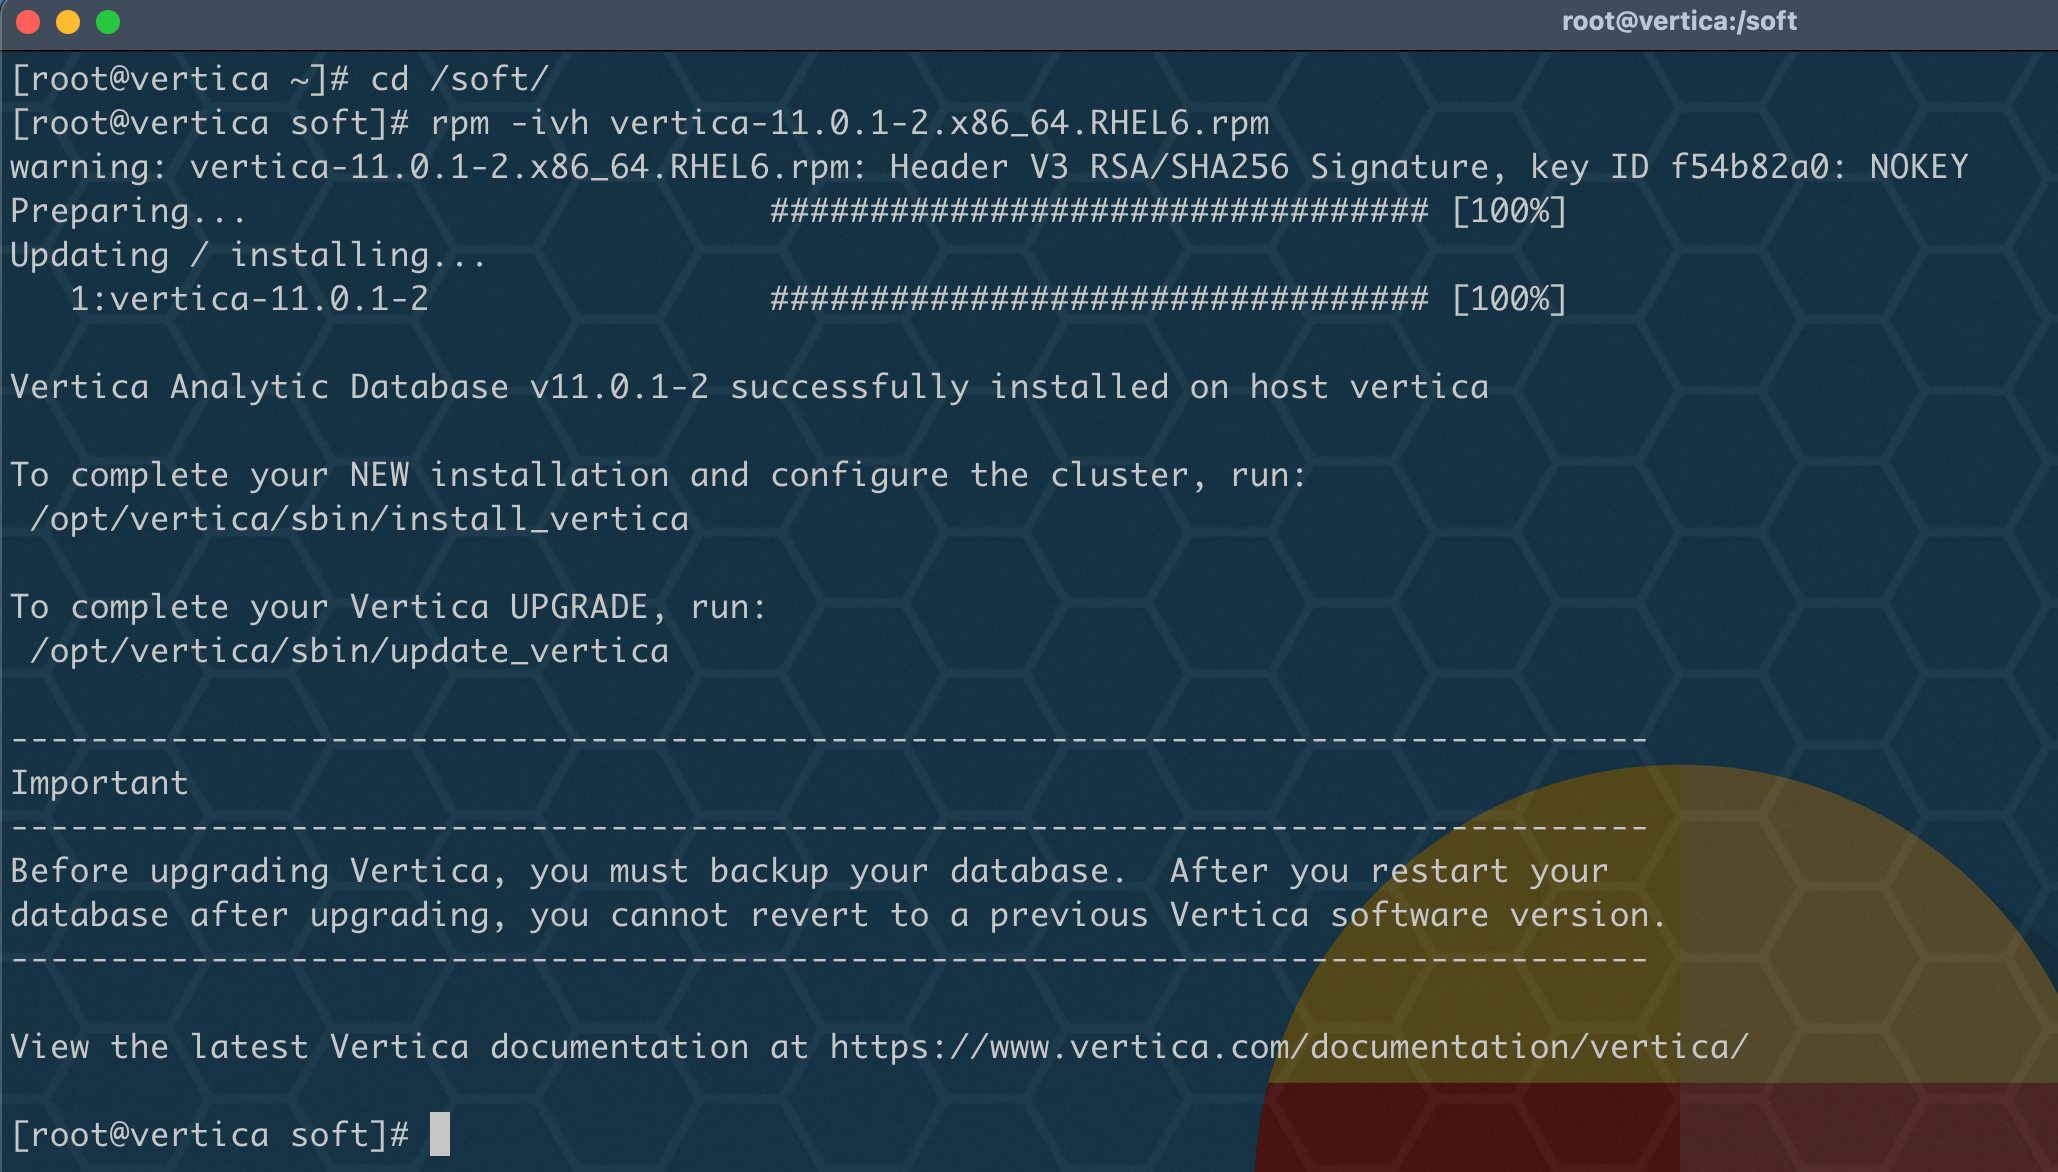
根据提示信息,安装成功后会在 /opt 目录下生成一个 vertica 文件夹。
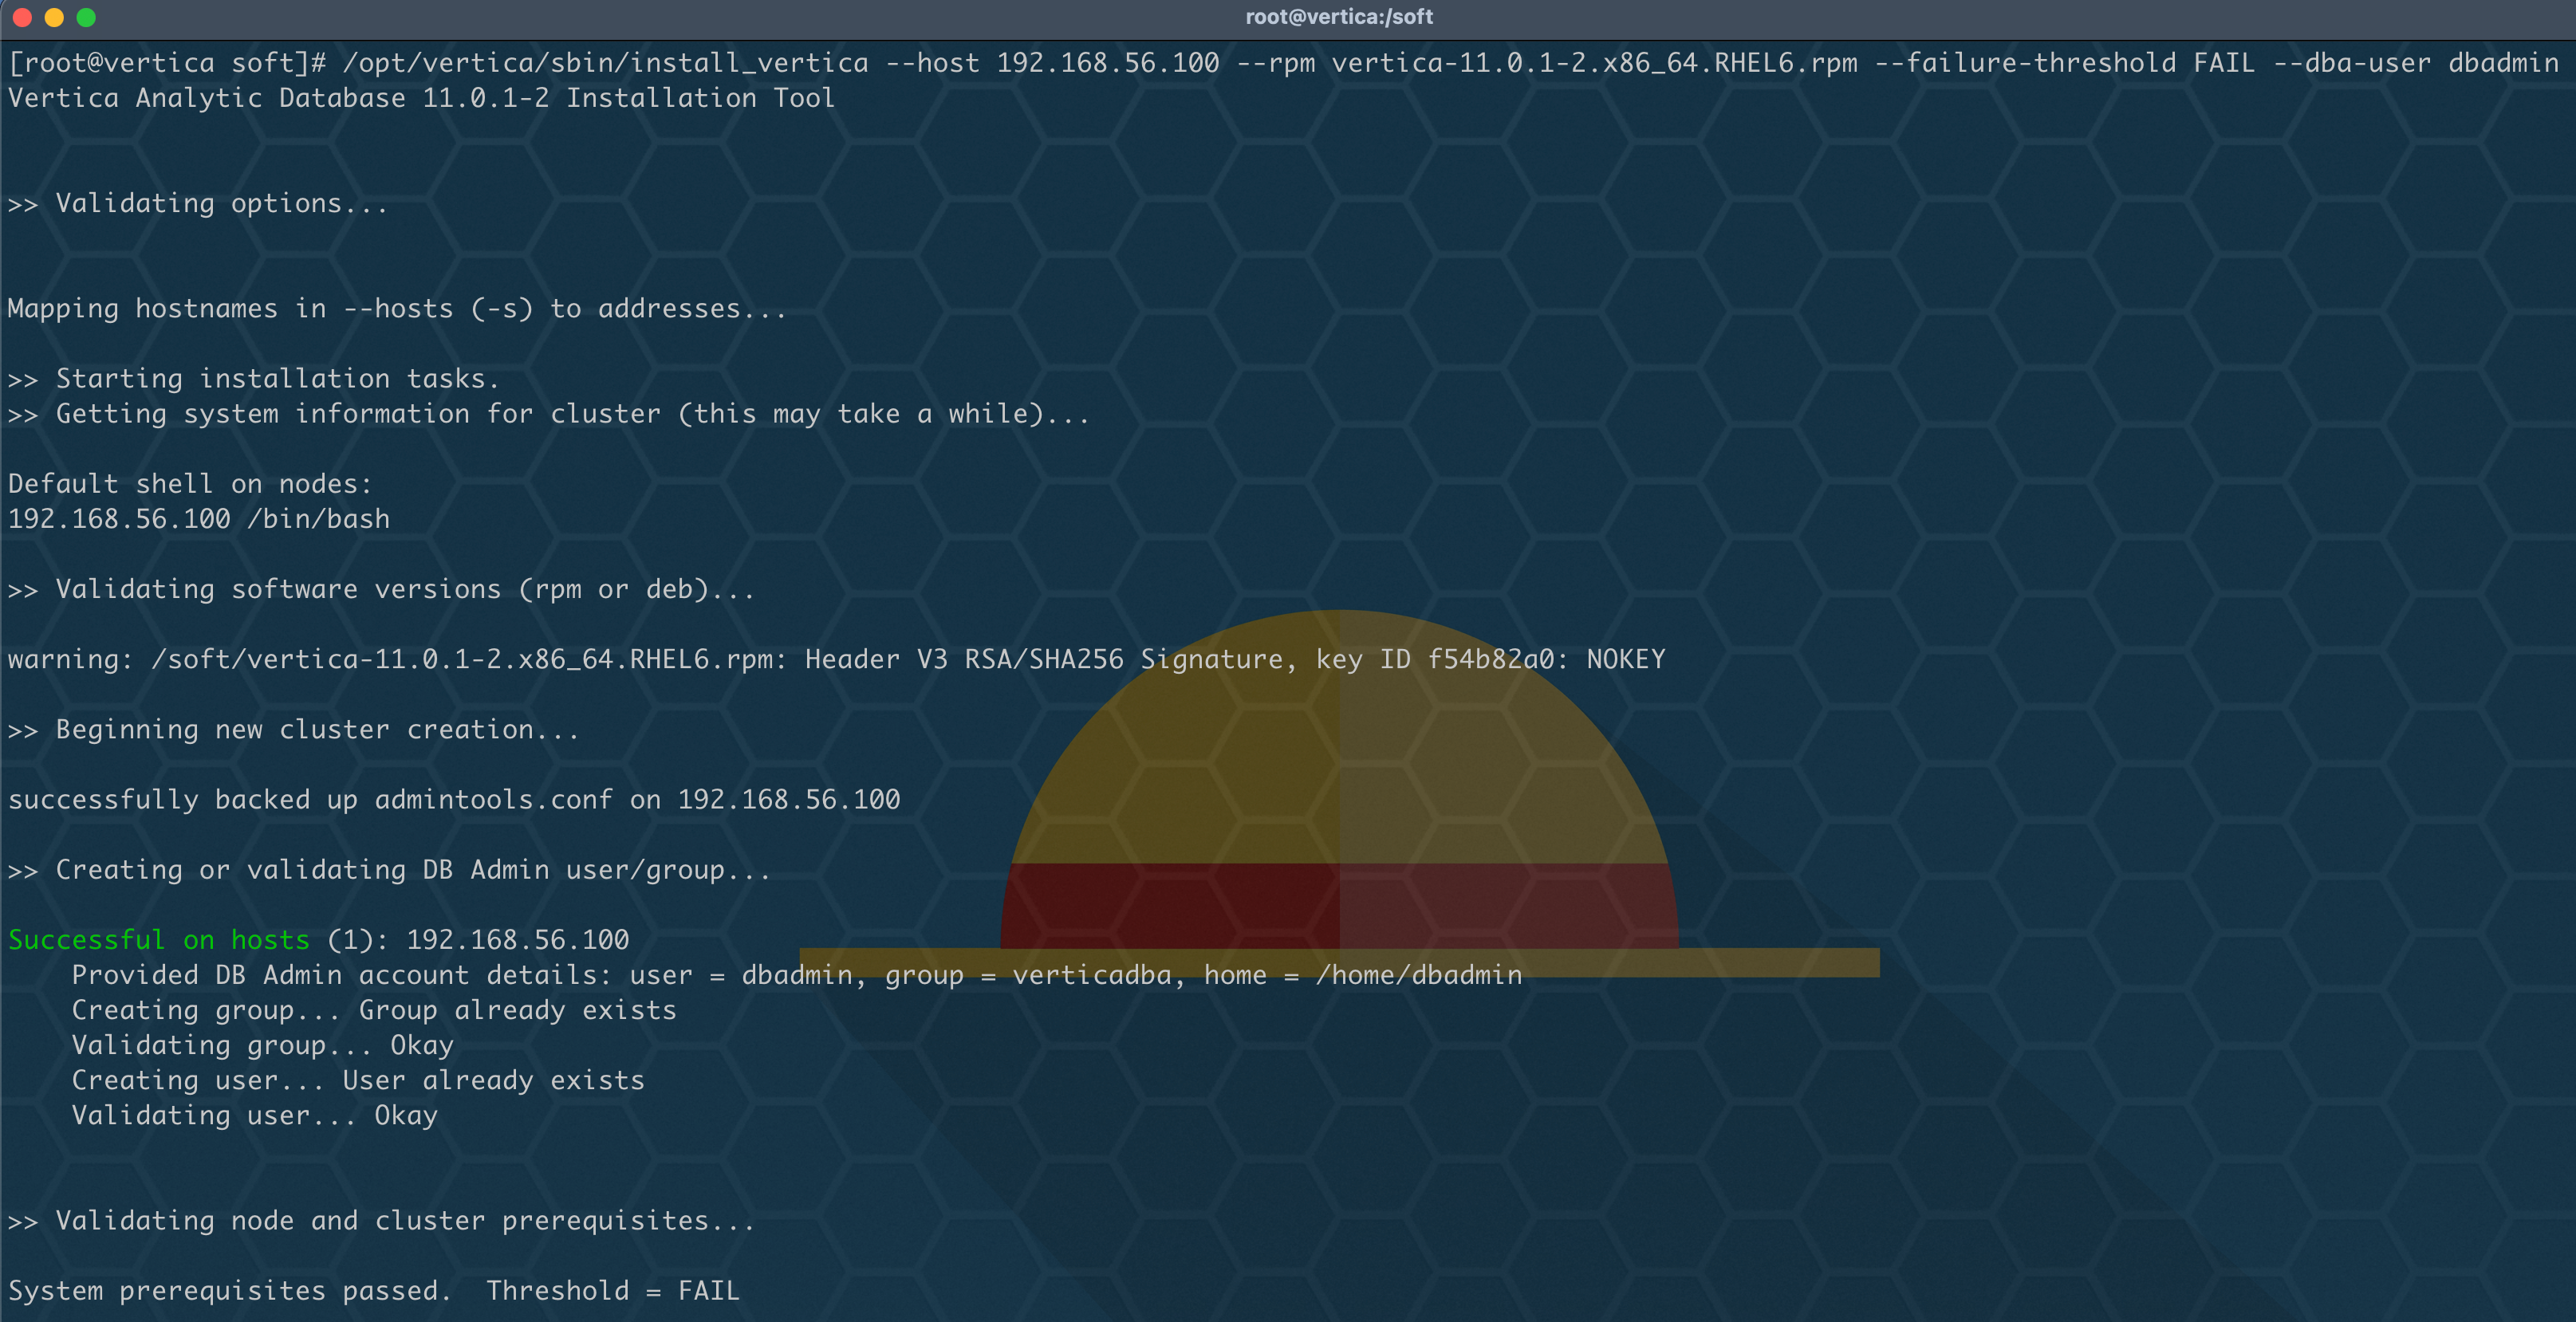
3、脚本安装 vertica
使用 /opt/vertica/sbin/install_vertica 脚本来安装,可以使用 --help 看一下基本参数:
[root@vertica soft]# /opt/vertica/sbin/install_vertica --help
Vertica Analytic Database 11.0.1-2 Installation Tool

usage:
  # install or update:
  install_vertica --hosts host1,host2,host3 --rpm vertica.rpm
  install_vertica --hosts 192.168.1.101,192.168.1.101,192.168.1.102 \
          --rpm vertica.rpm

  # add or remove nodes
  install_vertica --add-hosts host4 --rpm vertica.rpm
  install_vertica --remove-hosts host4

  # get the full detailed help
  install_vertica --help

optional arguments:
  -h, --help            show this help message and exit
  --hosts HOST,HOST..., -s HOST,HOST...
                        A comma-separated list of hosts to install or update
  --rpm FILE, -r FILE, --deb FILE
                        The software package to install. Either an RPM or Debian package.
  --clean               Forcibly remove all pre-existing cluster configuration, including database listings. (unsafe!)
  --broadcast, -U       For control messaging, use broadcast UDP messages (default)
  --license FILE, -L FILE
                        License file
  --accept-eula, -Y     Accept the EULA quietly.

Modifying an existing cluster:
  These options allow you to add or remove nodes within an existing cluster.
  New nodes will not participate in any existing databases.  See online
  documentation for more information.

  --add-hosts HOST,HOST..., -A HOST,HOST...
                        A comma-separated list of hosts to add to the cluster
  --remove-hosts HOST,HOST..., -R HOST,HOST...
                        A comma-separated list of hosts to remove from the cluster

System users:
  Vertica runs as the database admin (DBA) user, a system user account.  This
  is also the user which may run Administration Tools (adminTools). These
  options specify the system user and system group used for this purpose.  The
  user and group will be created, if they do not exist.

  --dba-user USER, -u USER
                        The DBA system user name. (default: dbadmin)
  --dba-user-home DIR, -l DIR
                        The DBA system user home. (default: /home/<DBA>)
  --dba-user-password PASSWORD, -p PASSWORD
                        The DBA system user password. (default: prompt)
  --dba-user-password-disabled
                        Disable the DBA system user password.
  --dba-group GROUP, -g GROUP
                        The DBA system group name. (default: verticadba)

Miscellaneous options:
  --data-dir DIR, -d DIR
                        The default data directory for new databases (default: <DBA home>) When defined, also restricts filesystem compatibility checks to the
                        filesystem containing the data directory
  --tmp-dir DIR         The temporary location used for various DBA actions. This is NOT the temporary data location for your database. (default: /tmp)
  --install-package-dependencies
                        Use the high-level OS package manager (like yum/dnf) to automatically install vertica package dependencies. Only works with yum/dnf/apt.

Navigating the cluster:
  In order to complete the specified operations, this program requires access
  to each of the cluster hosts.  Specify authentication credentials with these
  options.  By default, you will be prompted for the password if required.

  When the SUDO_USER environment variable is set, install_vertica attempts to ssh as
  that user.  This is the case when invoked with `sudo`.  Otherwise, install_vertica
  will ssh as root.  The credentials provided with these options must match
  the ssh user.

  --ssh-password PASSWORD, -P PASSWORD
                        The password for ssh authentication in the cluster
  --ssh-identity FILE, -i FILE
                        The ssh identify file for ssh authentication in the cluster
  --ssh-conn-timeout SSH_CONN_TIMEOUT, -t SSH_CONN_TIMEOUT
                        SSH connection timeout in secs( whole numbers only )

Networking options:
  Vertica uses the network for three purposes: data exchange, cluster
  control messaging, and client communication.  By default, a single
  network and UDP broadcast (control messaging only) will be used.
  These options allow you to configure the defaults for new databases,
  but will not affect already-created databases.  See the online
  documentation for more details.

  --point-to-point, -T  For control messaging, use direct UDP messages rather than UDP broadcast. Affects new databases only.
  --control-network BCAST_ADDR, -S BCAST_ADDR
                        For control messaging, use a specific network. Specify via broadcast address, subnet, or 'default'.
  --spread-logging, -w  Enable control message logging (spread logging). Affects new databases only. (not recommended)
  --large-cluster SPREAD_COUNT, -2 SPREAD_COUNT
                        Maximum number of Control Nodes for new databases. Control Nodes run spread for database coordination.
  --ipv6, -6            Create an ipv6 cluster.
  --ipv4, -4            Create an ipv4 cluster. (default)

Silent installation:
  Installation options can be saved to or loaded from a configuration
  file in order to assist with automation and repeated installs.

  --config-file FILE, -z FILE
                        Read options from a configuration file
  --record-config FILE, -B FILE
                        Write options to a configuration file and exit

System and cluster prerequisites:
  System and cluster prerequisites are checked by install_vertica.  These
  options adjust if the prerequisites are checked and how the results
  are handled.

  --failure-threshold {HINT,WARN,FAIL,HALT,NONE}
                        Stop installation for any failures of this severity or worse (default: WARN)
  --no-system-configuration
                        By default, simple system configurations that need to be adjusted to conform to the Vertica installation will be changed on your behalf. To
                        prevent any system configuration changes, use this option.
  --ignore-aws-instance-type
                        (AWS only) Not recommended. Ignore the instance type reported by AWS meta data.
基本安装:
大致了解参数使用情况,开始正式安装,执行基本安装:
cd /soft
/opt/vertica/sbin/install_vertica --host 192.168.56.100 --rpm vertica-11.0.1-2.x86_64.RHEL6.rpm --dba-user dbadmin
静默安装:
/opt/vertica/sbin/install_vertica --record-config /tmp/vertica-inst.prp --accept-eula --dba-user-password dbadmin
/opt/vertica/sbin/install_vertica --config-file /tmp/vertica-inst.prp
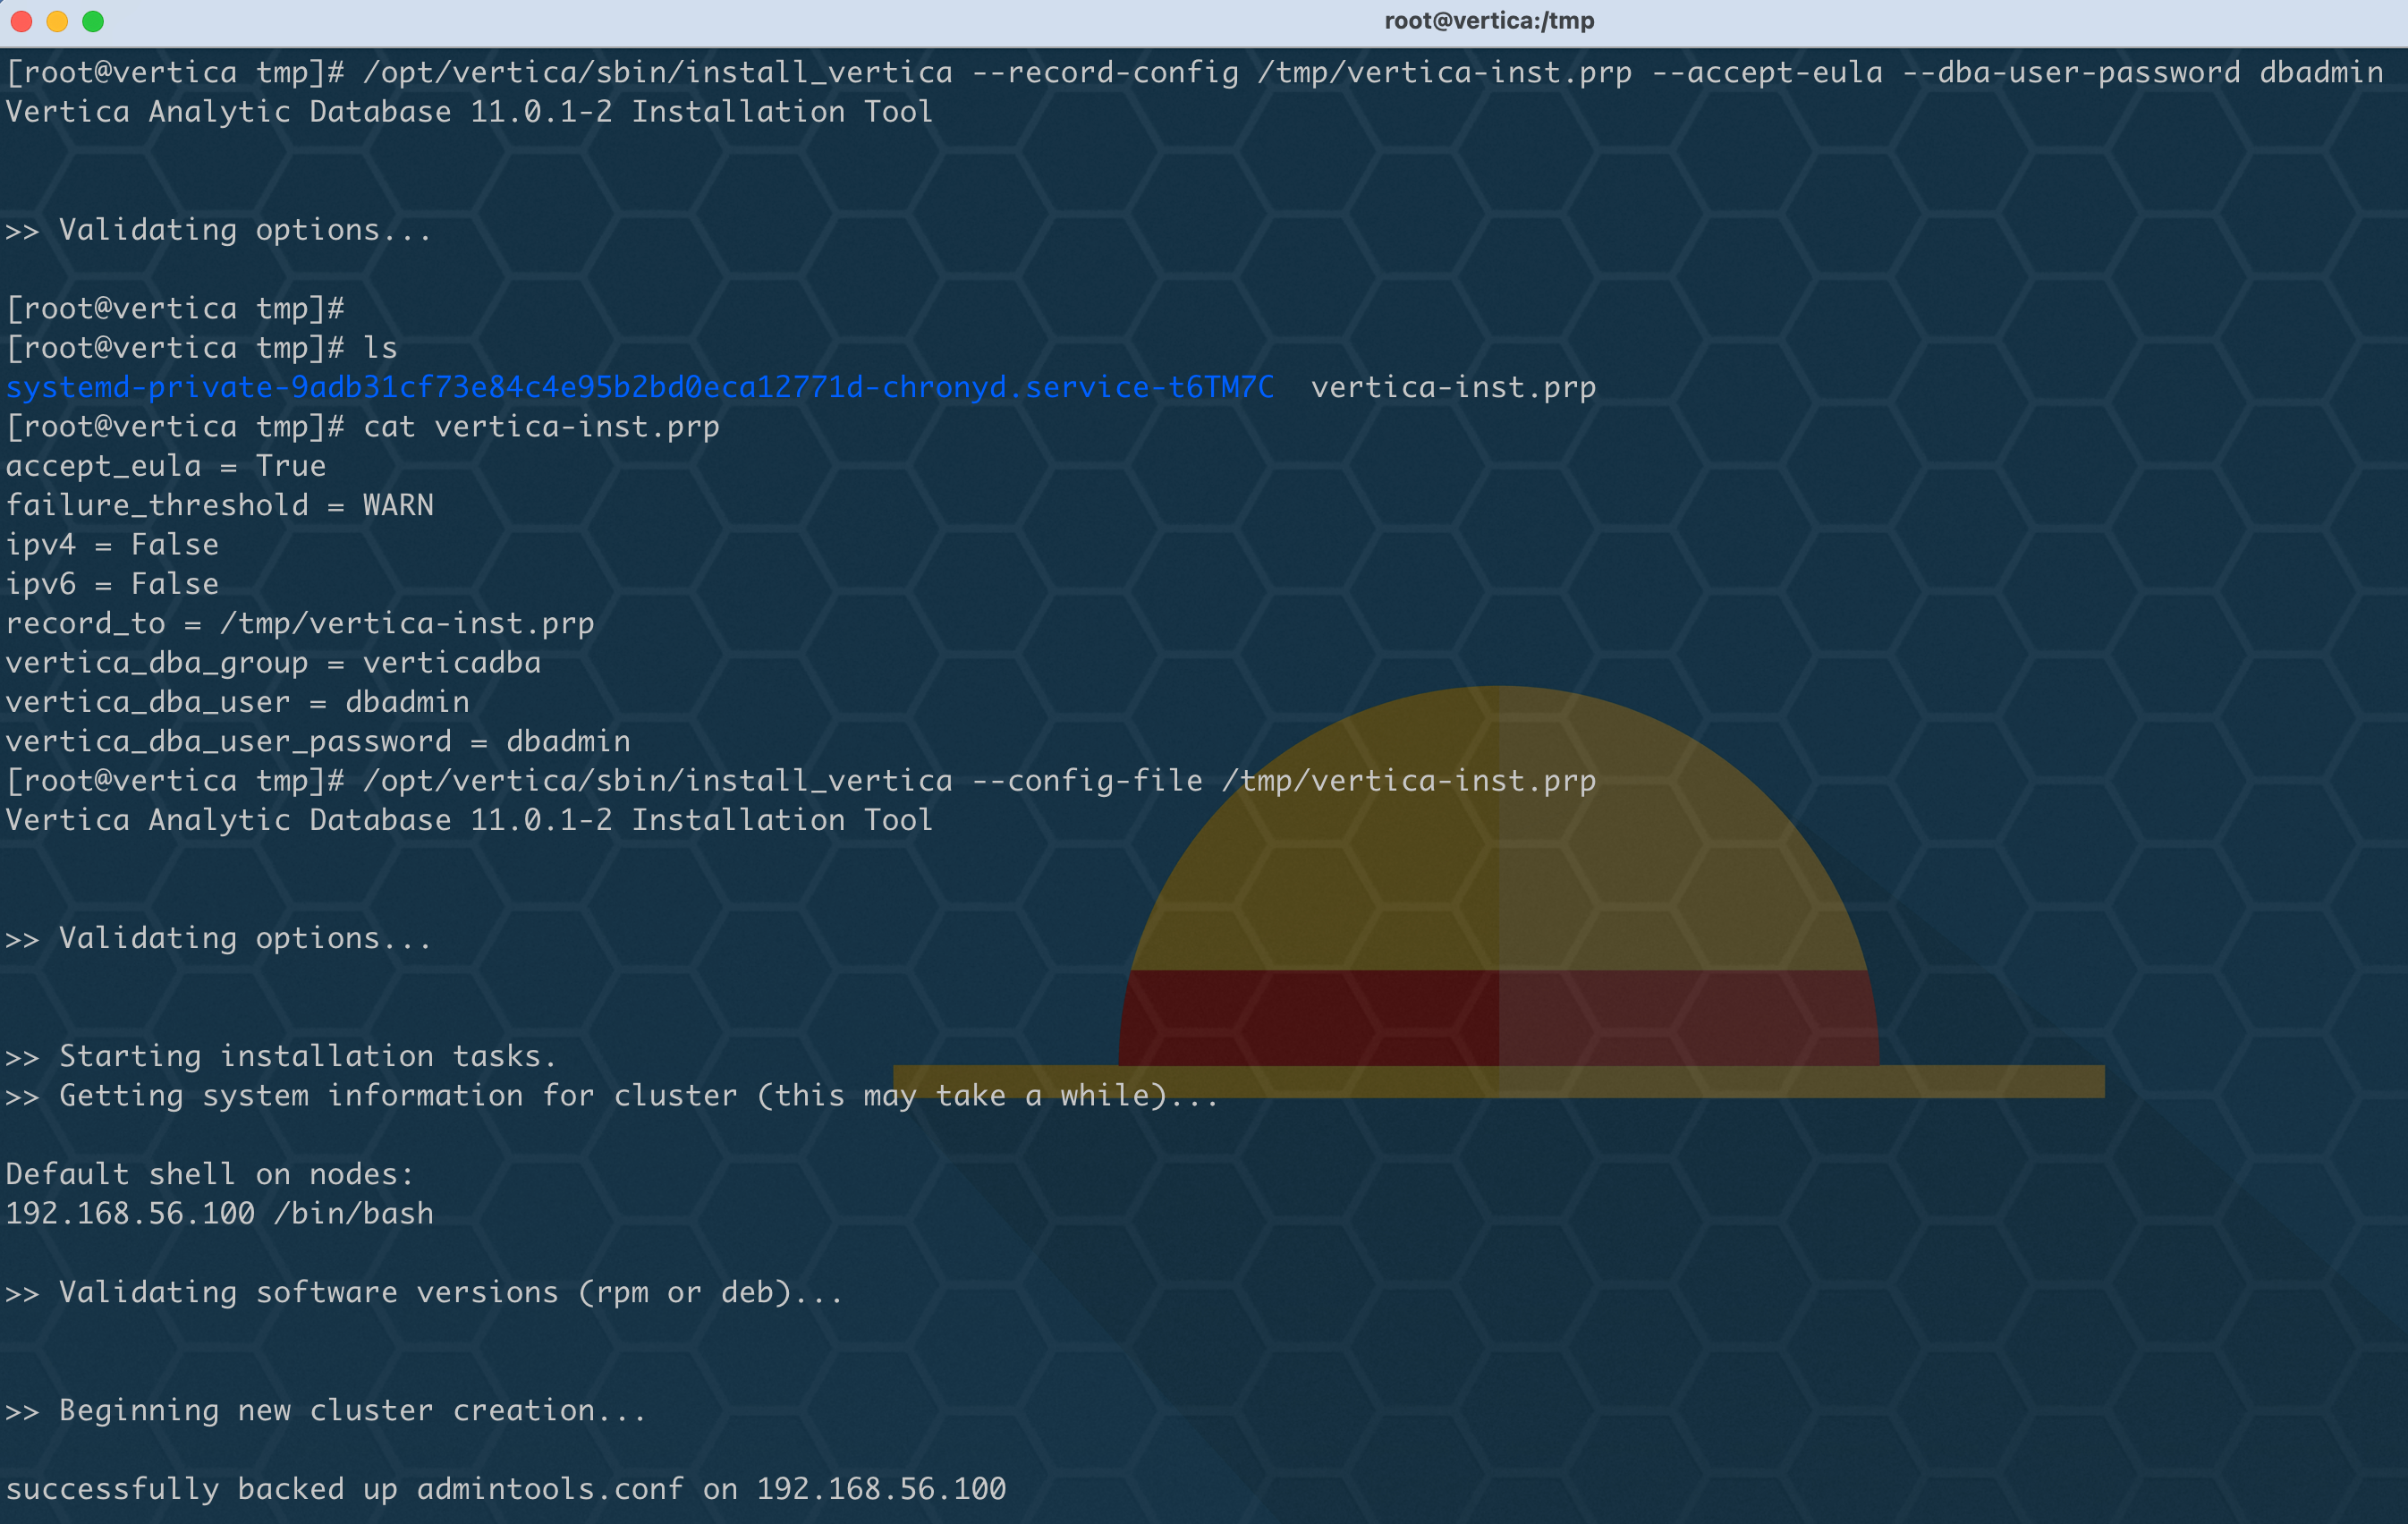
当执行完之后,显示如下即为成功:
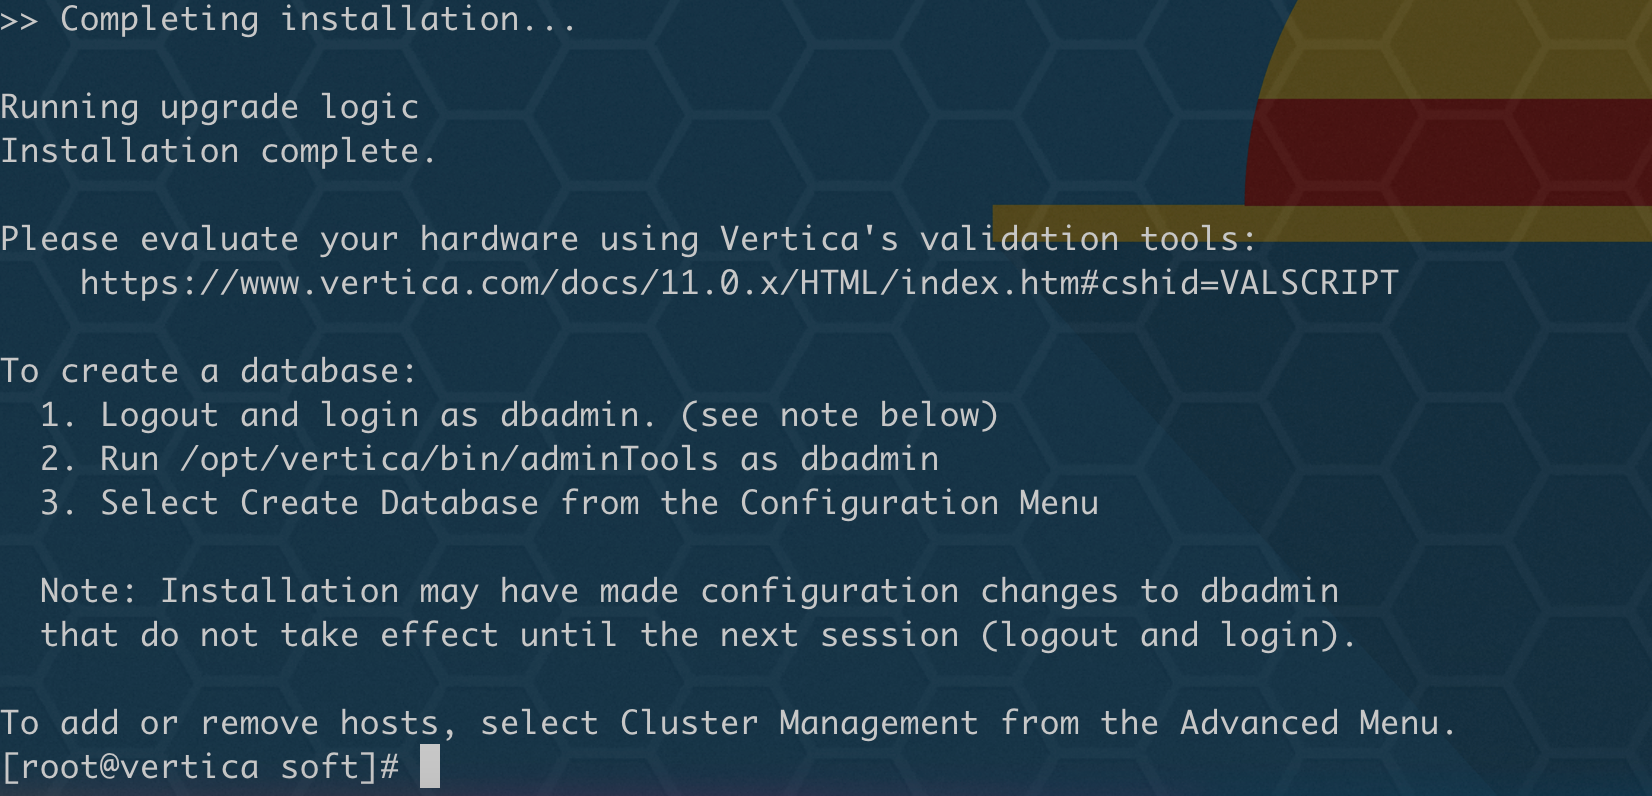
📢 注意: 操作系统环境设置根据我的步骤就不会错,否则根据实际报错进行排查修改即可!
4、初始化创建数据库
根据提示进入 dbadmin 创建数据库:
su - dbadmin
/opt/vertica/bin/adminTools
执行之后,跳出图形化配置界面:
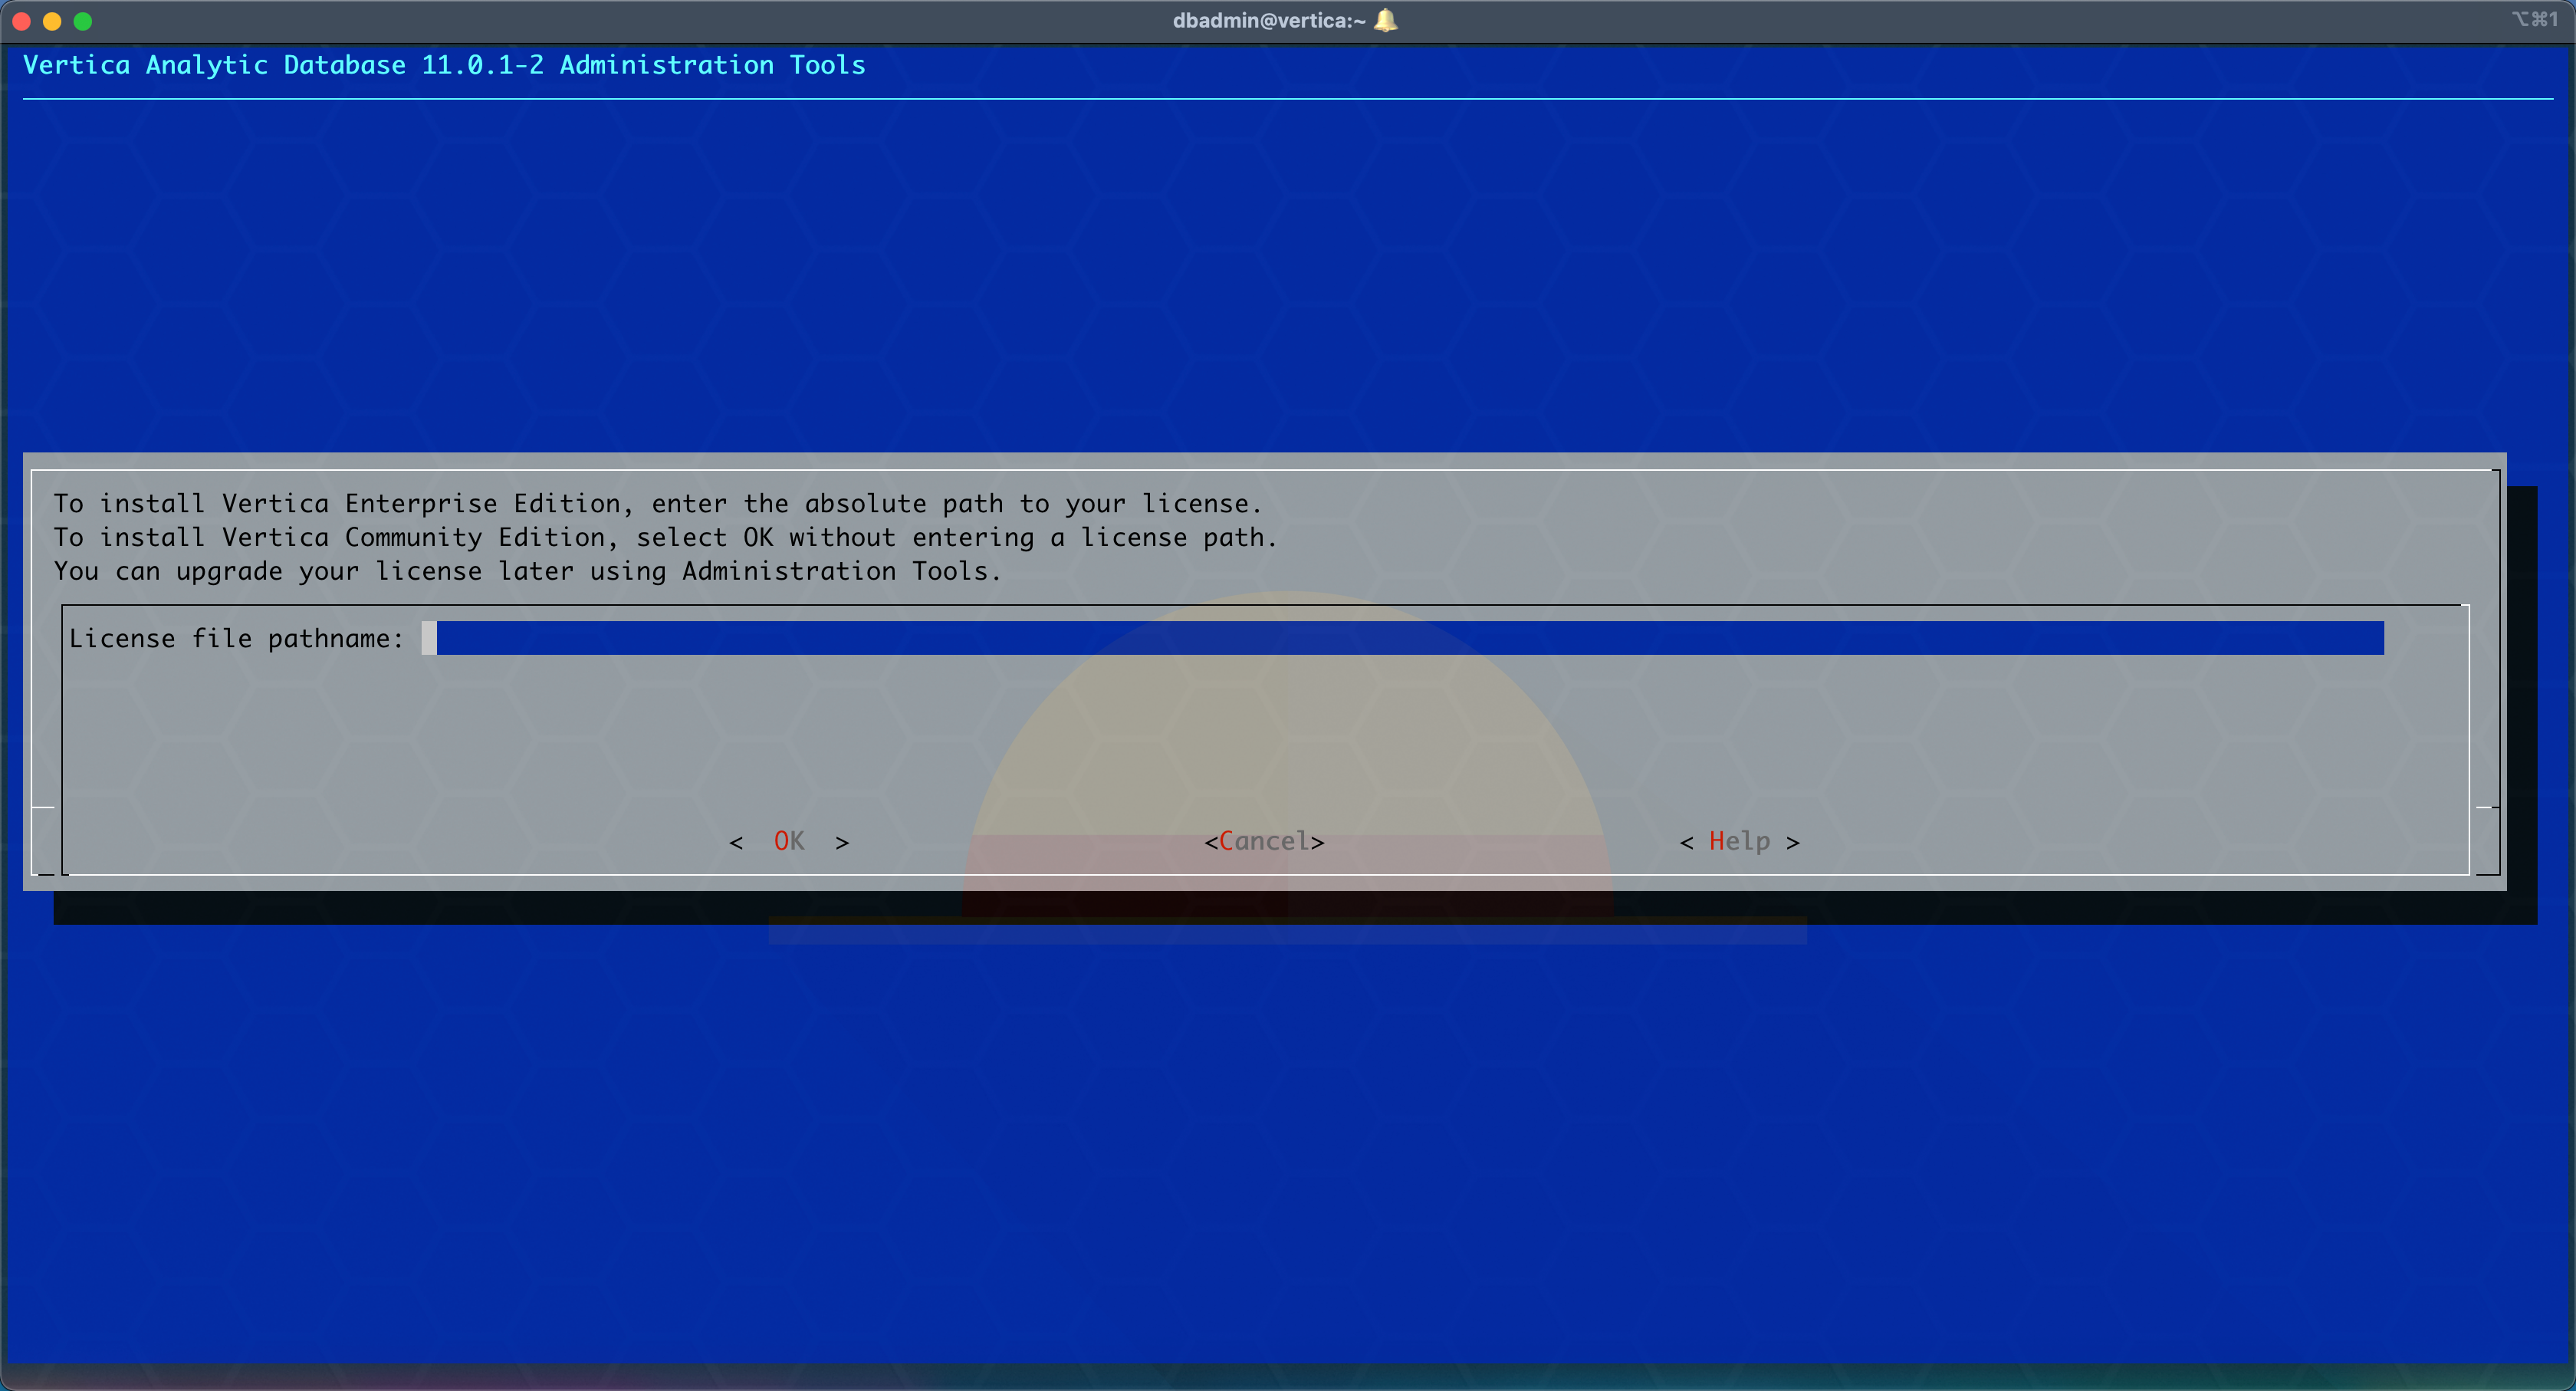
由于是社区版,不需要 license,因此直接 Tab键 选择 OK 回车进入下一步:

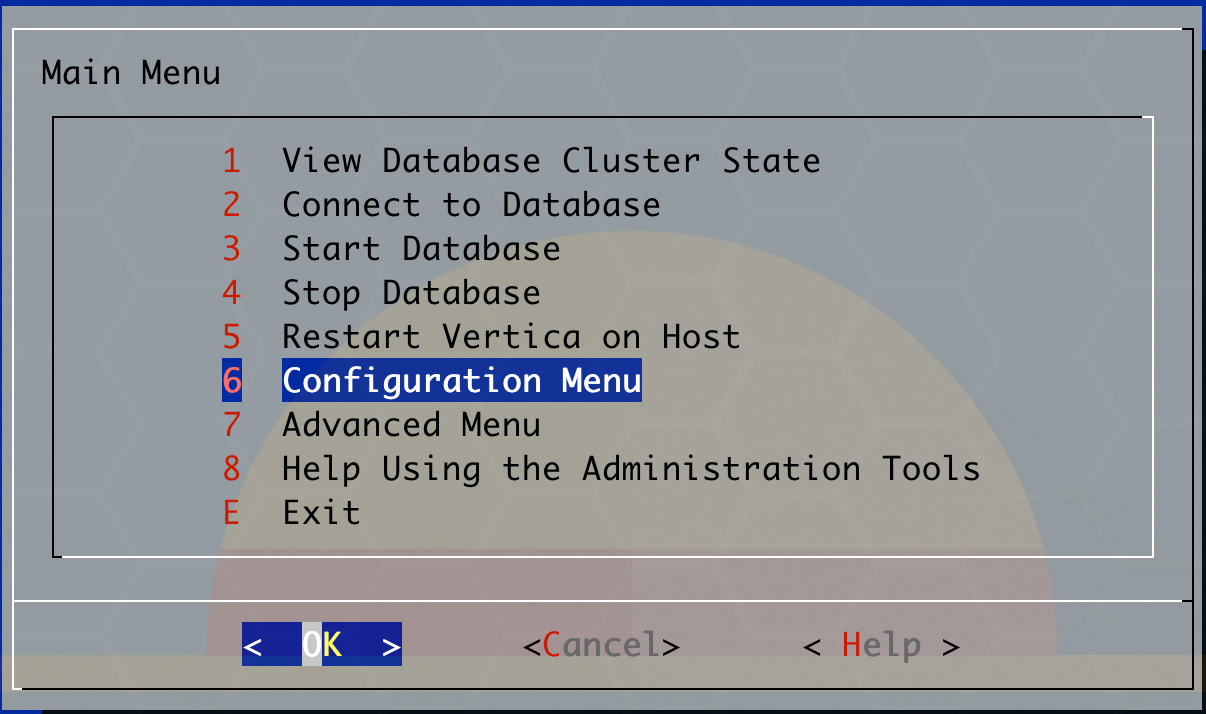
使用上下键切换到 Accpet,回车键选择之后,Tab键 选择 OK 回车进入下一步:

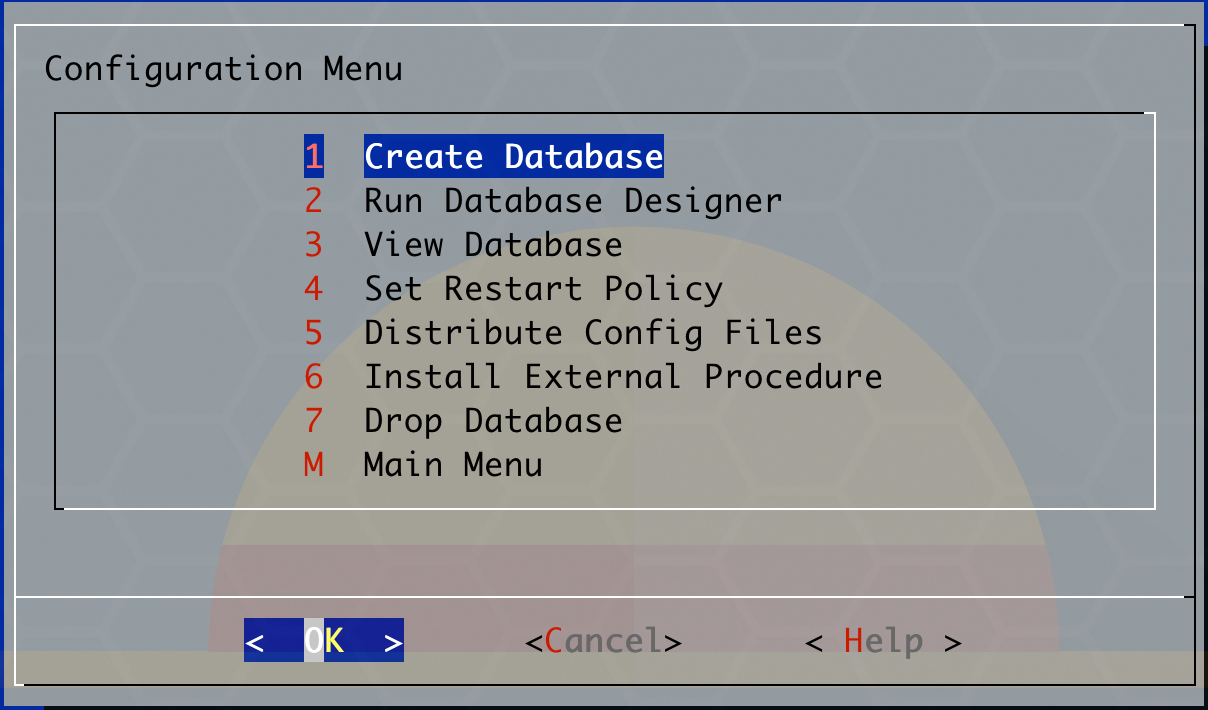
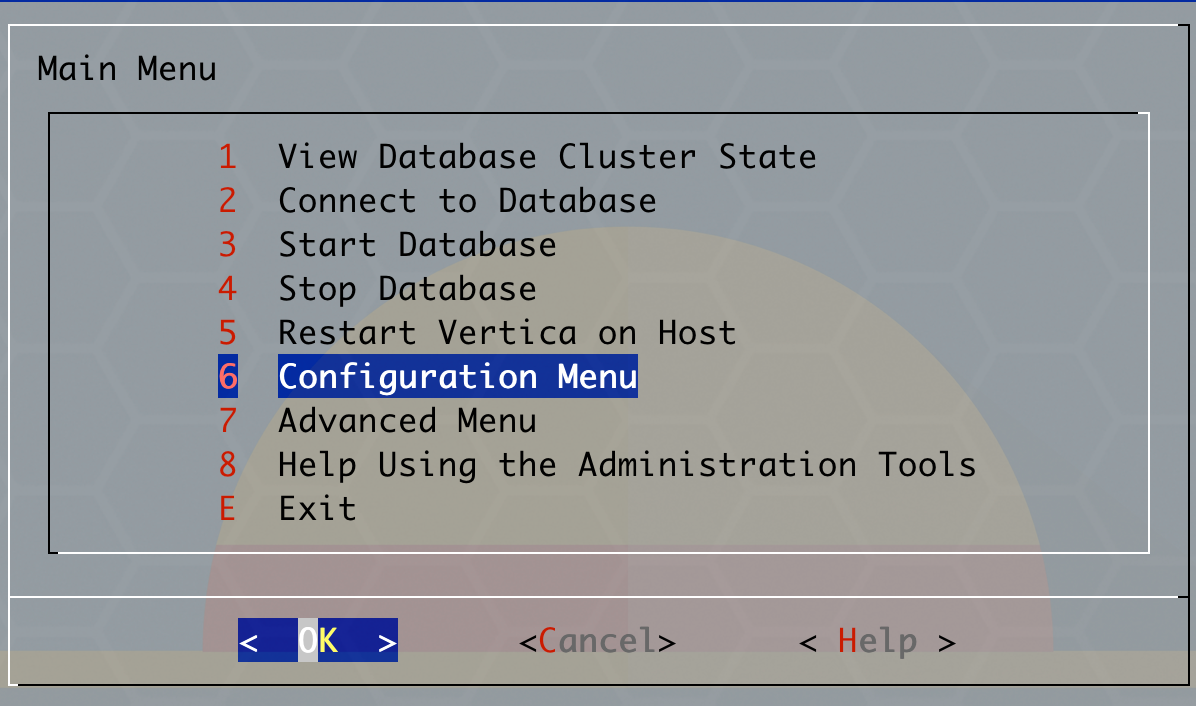
使用上下键切换到 Configuration Menu,Tab键 选择 OK 回车进入下一步:
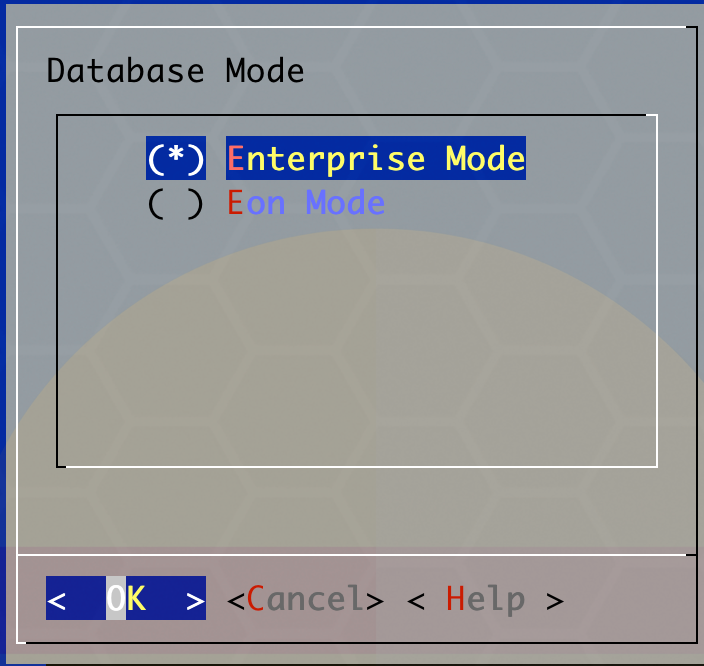
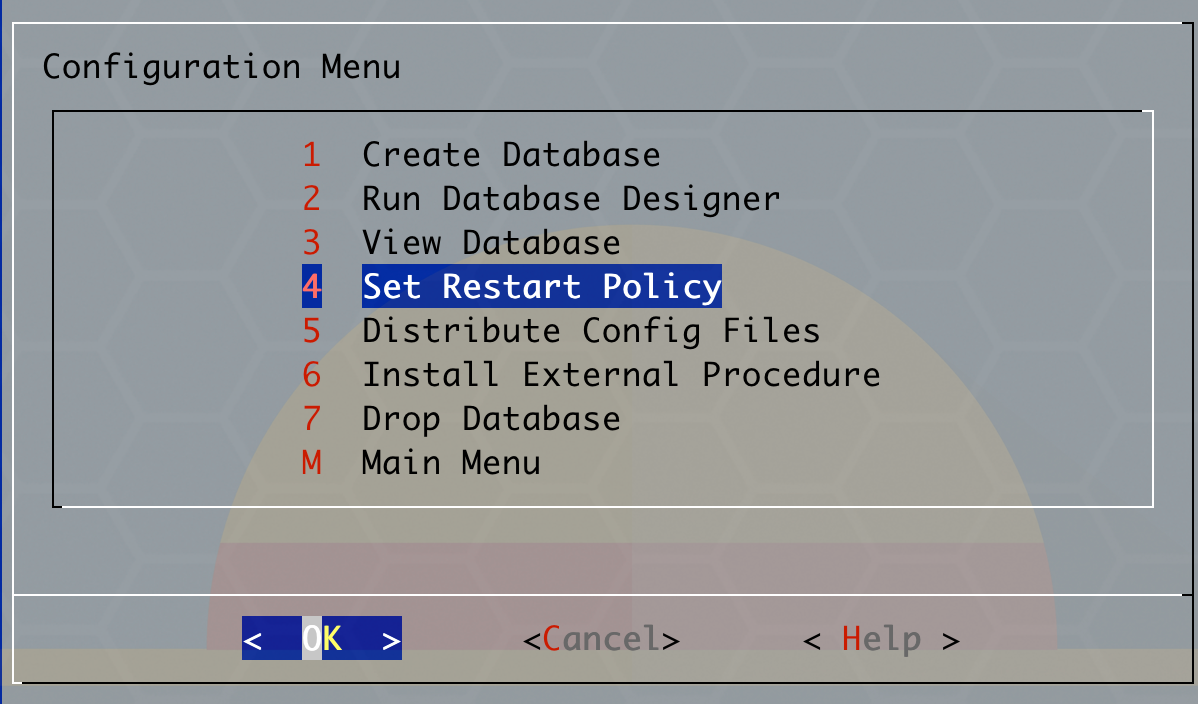
选择创建数据库,企业版:
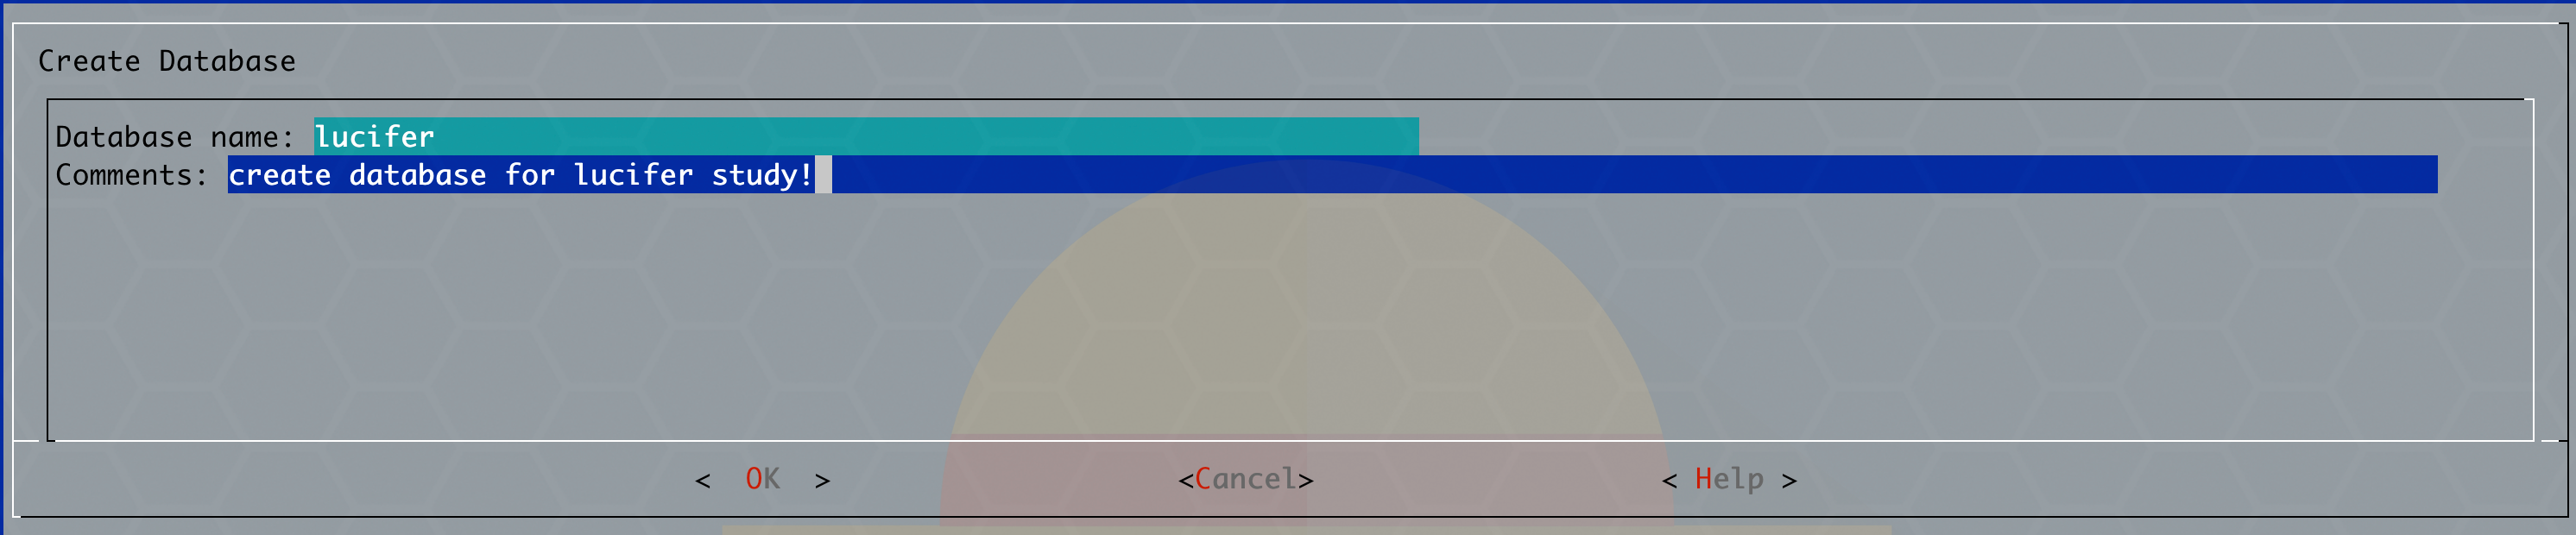
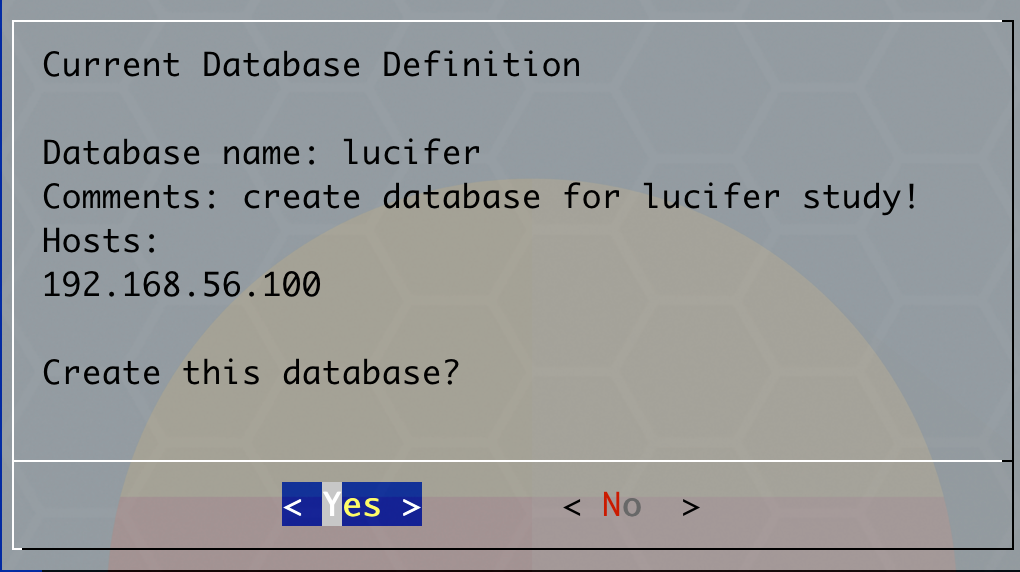
输入数据库名称 lucifer,Tab键 选择 OK 回车进入下一步:
输入两次数据库的连接密码,Tab键 选择 OK 回车进入下一步:

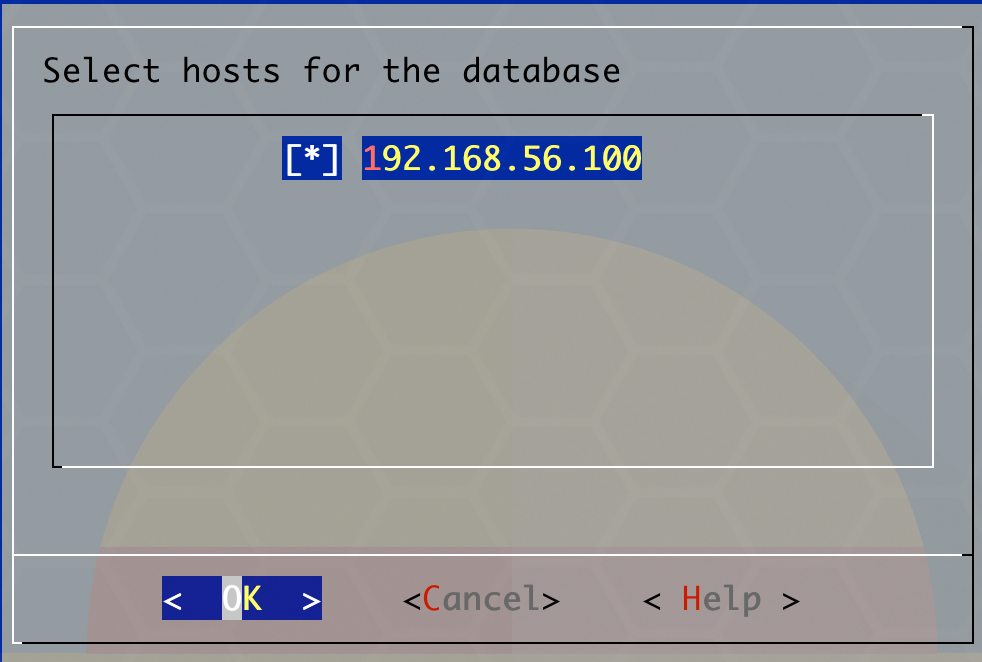
默认当前主机 IP:
选择日志文件和数据文件存放目录,默认 /home/dbadmin:

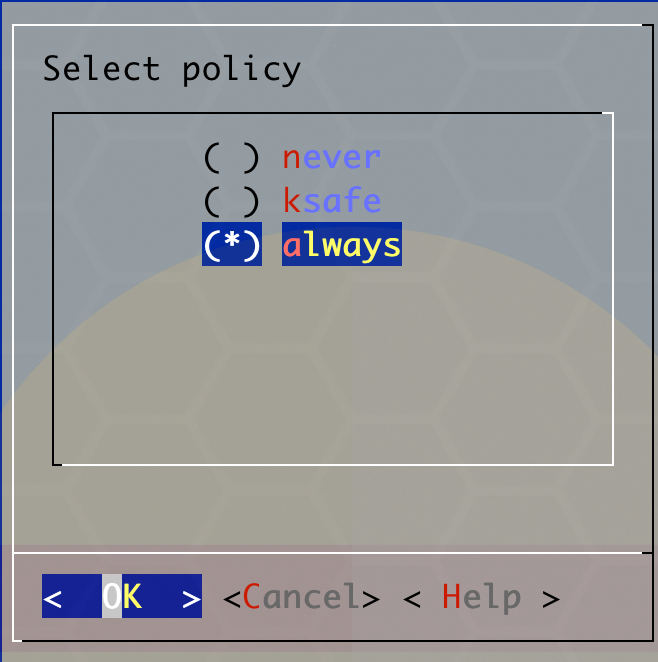
单节点或两节点无法设置 k-safe,默认即可:

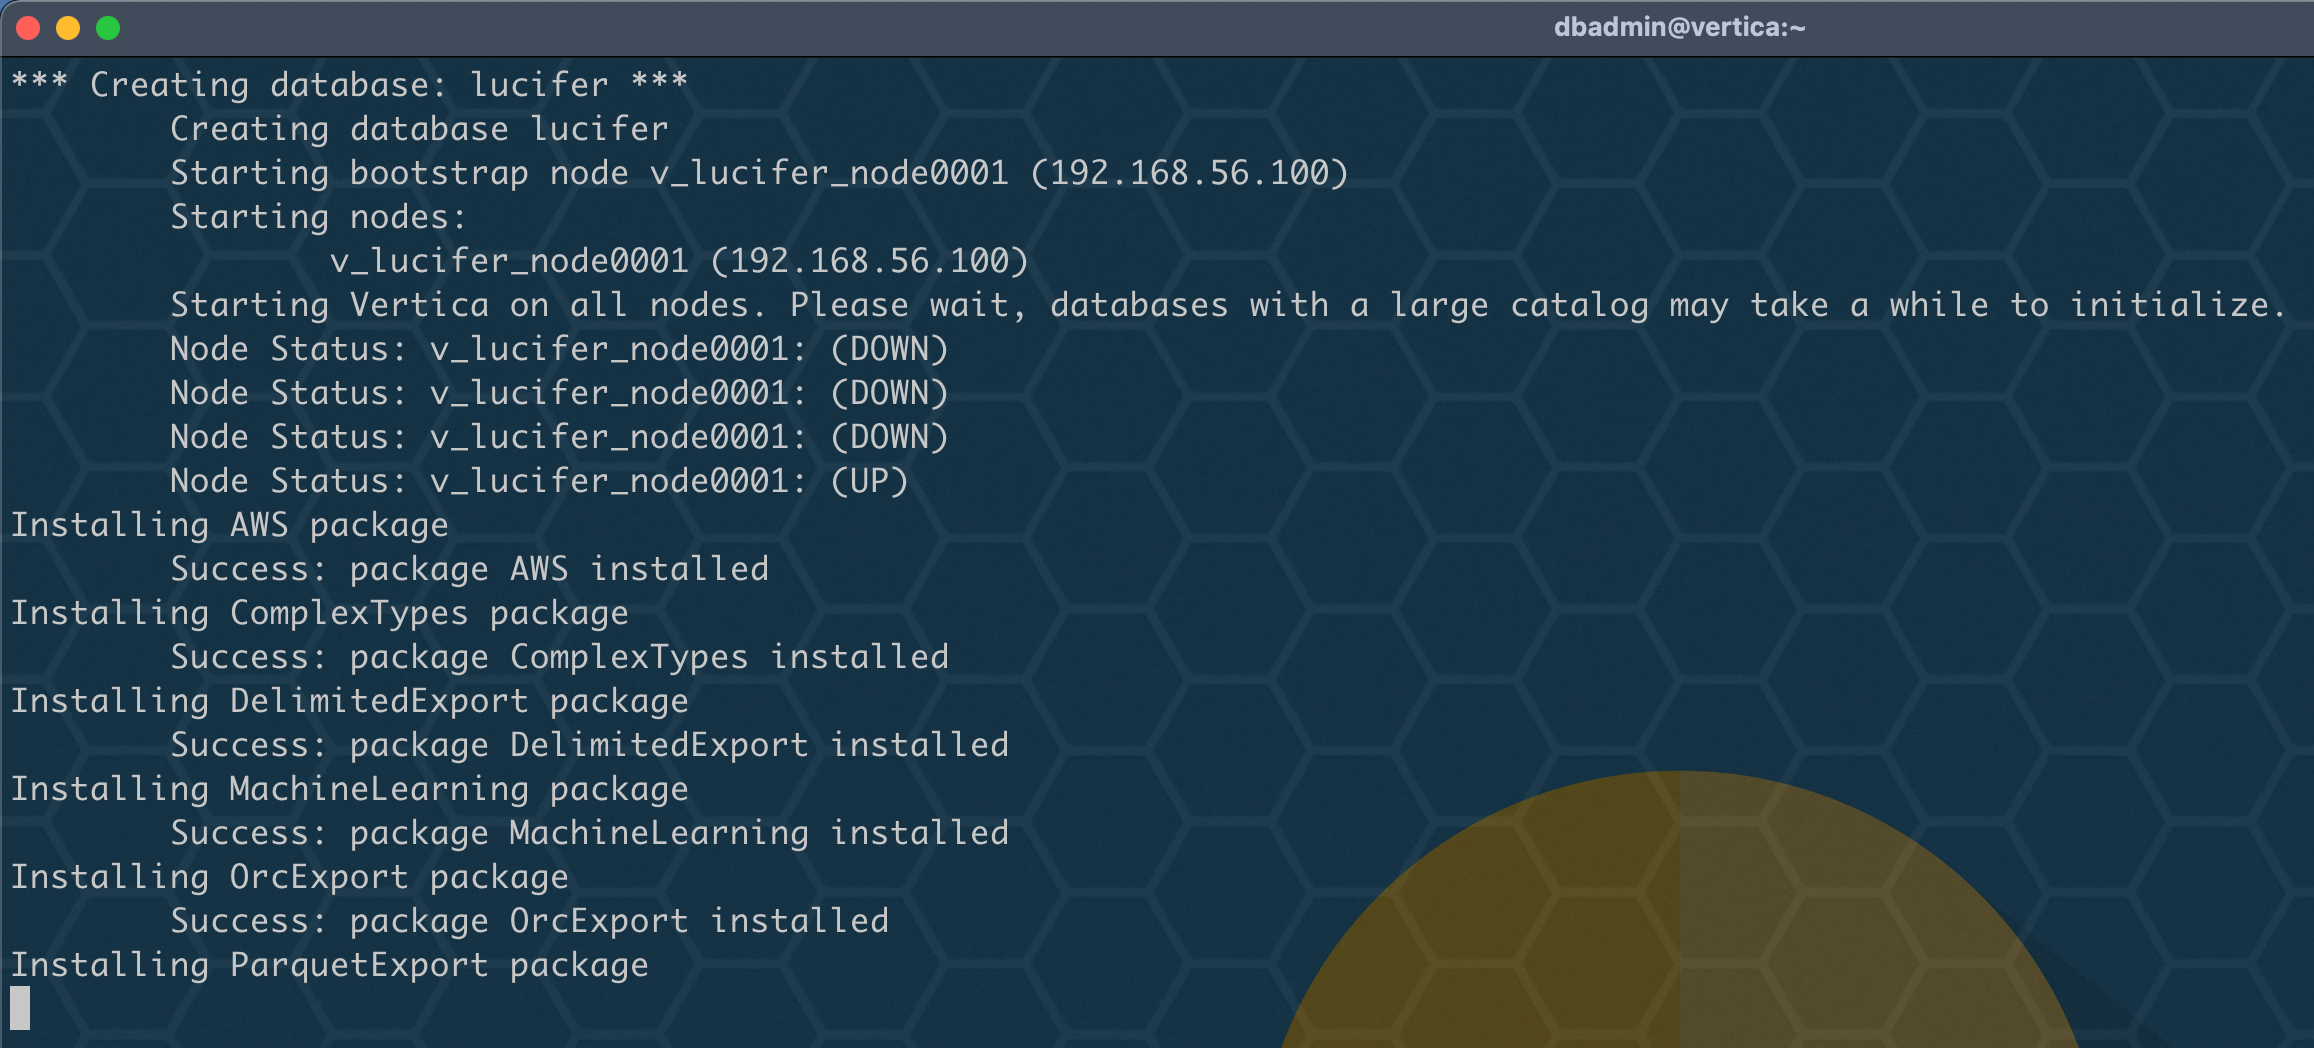
开始创建数据库:
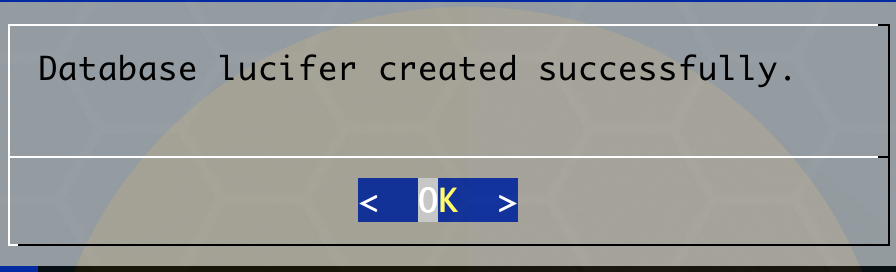
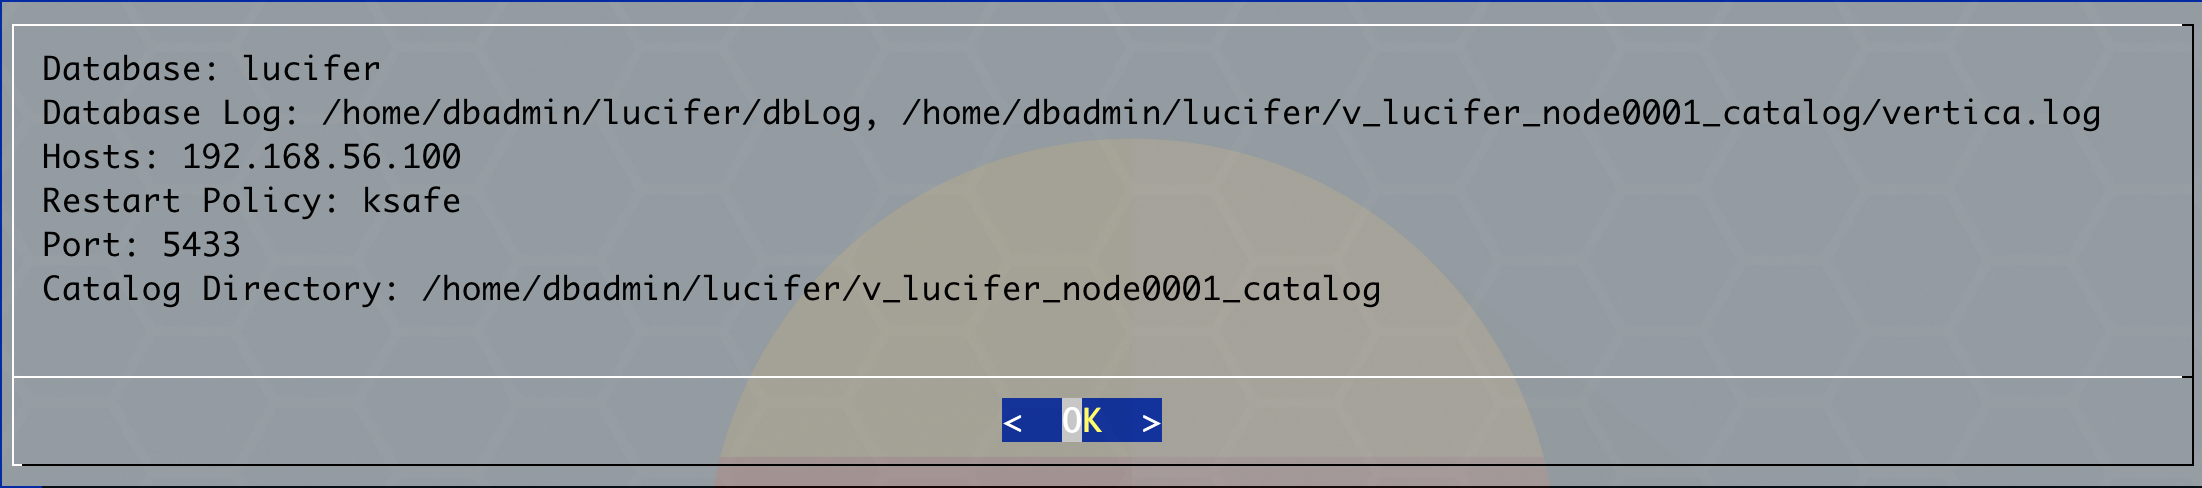
数据库创建成功:
可以通过图形化连接数据:


至此,数据库已创建成功!
五、优化配置
1、配置环境变量
cat<<EOF>>/home/dbadmin/.bash_profile
export VT_HOME=/opt/vertica/bin
alias vsql='vsql lucifer dbadmin'
EOF
. ~/.bash_profile
2、免密连接数据库
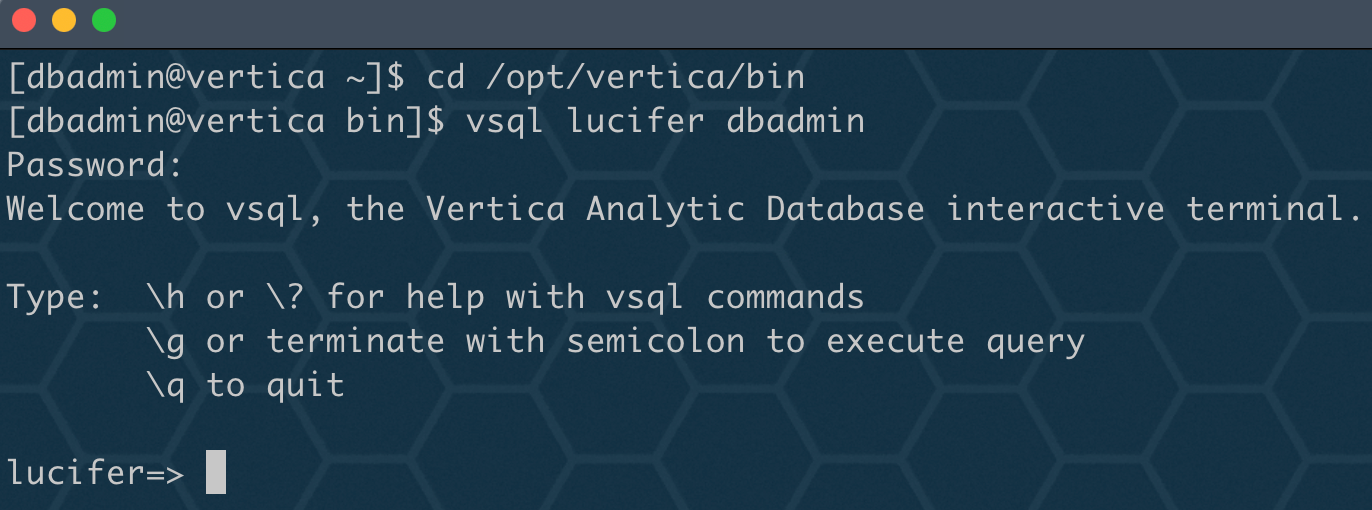
正常连接数据库:
vsql lucifer dbadmin #顺序是数据库,用户名,不能颠倒
配置免密:
cat<<EOF>>~/.pgpass
#hostname:port:database:username:password
*:5433:lucifer:dbadmin:vertica
# *表示任何装了Vertica的主机IP
EOF
chmod 600 ~/.pgpass
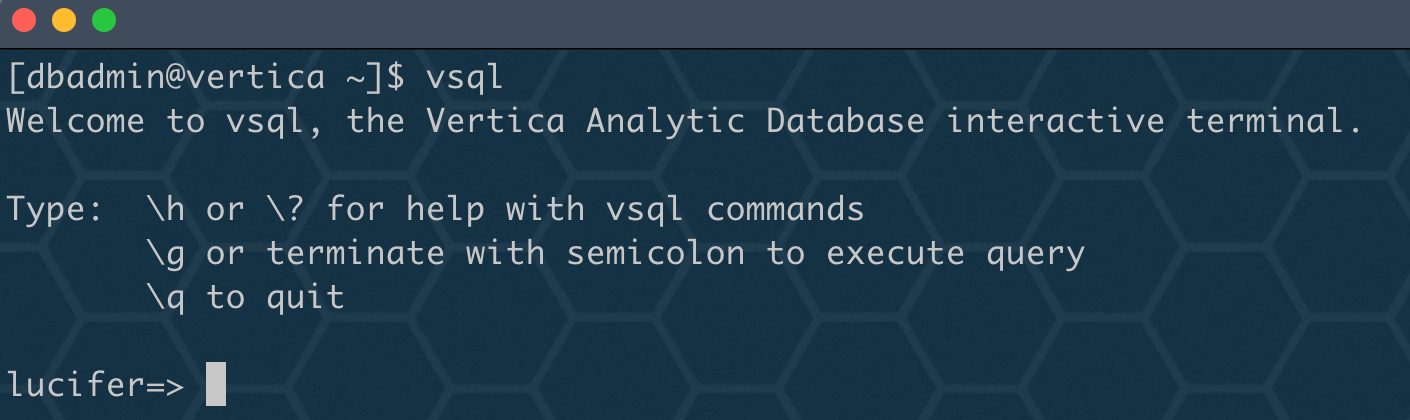
测试连接:
vsql
3、配置开机自启
使用 adminTools 命令开启图形化界面:
adminTools
设置开机自启:


数据库已设置为开机自启!
写在最后
单节点 Vertica 11 社区版安装就结束了,由于网上没有过多相关文章,只能自己对着官方文档一步步摸索安装,总算是安装成功了,接下来会尝试安装集群版本,敬请期待!886~
📚 推荐阅读:DBA 学习之路
如果这篇文章对你有帮助,推荐访问我的 Oracle DBA 系统学习站点,涵盖 100 天完整学习路线:
- 🔧 Oracle 安装部署 · RMAN 备份恢复 · Data Pump 数据迁移
- 🏗️ RAC 高可用 · DataGuard 容灾 · 多租户架构
- 🔍 故障排查 · 升级迁移 · GoldenGate 数据同步
