



简介: 在有状态应用中,MySQL是我们最常见也是最常用的。本文我们将实战部署一个一组多从的MySQL集群。

镜像下载、域名解析、时间同步请点击 阿里巴巴开源镜像站
一、配置准备
1. configMap
#application/mysql/mysql-configmap.yaml
apiVersion: v1
kind: ConfigMap
metadata:
  name: mysql
  labels:
    app: mysql
data:
  master.cnf: |
    # Apply this config only on the master.
    [mysqld]
    log-bin
  slave.cnf: |
    # Apply this config only on slaves.
    [mysqld]
    super-read-only
configMap可以将配置文件和镜像解耦开。
上面的配置意思是,创建一个master.cnf文件配置内容为:log-bin,即开启bin-log日志,供主节点使用。
创建一个slave.cnf文件配置内容为:super-read-only,设为该节点只读,供备用节点使用。
2. service
# application/mysql/mysql-services.yaml
# Headless service for stable DNS entries of StatefulSet members.
apiVersion: v1
kind: Service
metadata:
  name: mysql
  labels:
    app: mysql
spec:
  ports:
  - name: mysql
    port: 3306
  clusterIP: None
  selector:
    app: mysql
---
# Client service for connecting to any MySQL instance for reads.
# For writes, you must instead connect to the master: mysql-0.mysql.
apiVersion: v1
kind: Service
metadata:
  name: mysql-read
  labels:
    app: mysql
spec:
  ports:
  - name: mysql
    port: 3306
  selector:
    app: mysql
创建一个服务名为mysql的headless类型的service。
创建一个服务名为mysql-read的service
3. StatefulSet
#application/mysql/mysql-statefulset.yaml
apiVersion: apps/v1
kind: StatefulSet
metadata:
  name: mysql
spec:
  selector:
    matchLabels:
      app: mysql
  serviceName: mysql
  replicas: 3
  template:
    metadata:
      labels:
        app: mysql
    spec:
      # 设置初始化容器,进行一些准备工作
      initContainers:
      - name: init-mysql
        image: mysql:5.7
        # 为每个MySQL节点配置service-id
        # 如果节点序号是0,则使用master的配置, 其余节点使用slave的配置
        command:
        - bash
        - "-c"
        - |
          set -ex
          # Generate mysql server-id from pod ordinal index.
          [[ `hostname` =~ -([0-9]+)$ ]] || exit 1
          ordinal=${BASH_REMATCH[1]}
          echo [mysqld] > /mnt/conf.d/server-id.cnf
          # Add an offset to avoid reserved server-id=0 value.
          echo server-id=$((100 + $ordinal)) >> /mnt/conf.d/server-id.cnf
          # Copy appropriate conf.d files from config-map to emptyDir.
          if [[ $ordinal -eq 0 ]]; then
            cp /mnt/config-map/master.cnf /mnt/conf.d/
          else
            cp /mnt/config-map/slave.cnf /mnt/conf.d/
          fi
        volumeMounts:
        - name: conf
          mountPath: /mnt/conf.d
        - name: config-map
          mountPath: /mnt/config-map
      - name: clone-mysql
        image: gcr.io/google-samples/xtrabackup:1.0
        # 为除了节点序号为0的主节点外的其它节点,备份前一个节点的数据
        command:
        - bash
        - "-c"
        - |
          set -ex
          # Skip the clone if data already exists.
          [[ -d /var/lib/mysql/mysql ]] && exit 0
          # Skip the clone on master (ordinal index 0).
          [[ `hostname` =~ -([0-9]+)$ ]] || exit 1
          ordinal=${BASH_REMATCH[1]}
          [[ $ordinal -eq 0 ]] && exit 0
          # Clone data from previous peer.
          ncat --recv-only mysql-$(($ordinal-1)).mysql 3307 | xbstream -x -C /var/lib/mysql
          # Prepare the backup.
          xtrabackup --prepare --target-dir=/var/lib/mysql
        volumeMounts:
        - name: data
          mountPath: /var/lib/mysql
          subPath: mysql
        - name: conf
          mountPath: /etc/mysql/conf.d
      containers:
      - name: mysql
        image: mysql:5.7
        # 设置支持免密登录
        env:
        - name: MYSQL_ALLOW_EMPTY_PASSWORD
          value: "1"
        ports:
        - name: mysql
          containerPort: 3306
        volumeMounts:
        - name: data
          mountPath: /var/lib/mysql
          subPath: mysql
        - name: conf
          mountPath: /etc/mysql/conf.d
        resources:
          # 设置启动pod需要的资源,官方文档上需要500m cpu,1Gi memory。
          # 我本地测试的时候,会因为资源不足,报1 Insufficient cpu, 1 Insufficient memory错误,所以我改小了点
          requests:
            # m是千分之一的意思,100m表示需要0.1个cpu
            cpu: 100m
            # Mi是兆的意思,需要100M 内存
            memory: 100Mi
        livenessProbe:
          # 使用mysqladmin ping命令,对MySQL节点进行探活检测
          # 在节点部署完30秒后开始,每10秒检测一次,超时时间为5秒
          exec:
            command: ["mysqladmin", "ping"]
          initialDelaySeconds: 30
          periodSeconds: 10
          timeoutSeconds: 5
        readinessProbe:
          # 对节点服务可用性进行检测, 启动5秒后开始,每2秒检测一次,超时时间1秒
          exec:
            # Check we can execute queries over TCP (skip-networking is off).
            command: ["mysql", "-h", "127.0.0.1", "-e", "SELECT 1"]
          initialDelaySeconds: 5
          periodSeconds: 2
          timeoutSeconds: 1
      - name: xtrabackup
        image: gcr.io/google-samples/xtrabackup:1.0
        ports:
        - name: xtrabackup
          containerPort: 3307
        # 开始进行备份文件校验、解析和开始同步
        command:
        - bash
        - "-c"
        - |
          set -ex
          cd /var/lib/mysql
          # Determine binlog position of cloned data, if any.
          if [[ -f xtrabackup_slave_info && "x$(<xtrabackup_slave_info)" != "x" ]]; then
            # XtraBackup already generated a partial "CHANGE MASTER TO" query
            # because we're cloning from an existing slave. (Need to remove the tailing semicolon!)
            cat xtrabackup_slave_info | sed -E 's/;$//g' > change_master_to.sql.in
            # Ignore xtrabackup_binlog_info in this case (it's useless).
            rm -f xtrabackup_slave_info xtrabackup_binlog_info
          elif [[ -f xtrabackup_binlog_info ]]; then
            # We're cloning directly from master. Parse binlog position.
            [[ `cat xtrabackup_binlog_info` =~ ^(.*?)[[:space:]]+(.*?)$ ]] || exit 1
            rm -f xtrabackup_binlog_info xtrabackup_slave_info
            echo "CHANGE MASTER TO MASTER_LOG_FILE='${BASH_REMATCH[1]}',\
                  MASTER_LOG_POS=${BASH_REMATCH[2]}" > change_master_to.sql.in
          fi
          # Check if we need to complete a clone by starting replication.
          if [[ -f change_master_to.sql.in ]]; then
            echo "Waiting for mysqld to be ready (accepting connections)"
            until mysql -h 127.0.0.1 -e "SELECT 1"; do sleep 1; done
            echo "Initializing replication from clone position"
            mysql -h 127.0.0.1 \
                  -e "$(<change_master_to.sql.in), \
                          MASTER_HOST='mysql-0.mysql', \
                          MASTER_USER='root', \
                          MASTER_PASSWORD='', \
                          MASTER_CONNECT_RETRY=10; \
                        START SLAVE;" || exit 1
            # In case of container restart, attempt this at-most-once.
            mv change_master_to.sql.in change_master_to.sql.orig
          fi
          # Start a server to send backups when requested by peers.
          exec ncat --listen --keep-open --send-only --max-conns=1 3307 -c \
            "xtrabackup --backup --slave-info --stream=xbstream --host=127.0.0.1 --user=root"
        volumeMounts:
        - name: data
          mountPath: /var/lib/mysql
          subPath: mysql
        - name: conf
          mountPath: /etc/mysql/conf.d
        resources:
          requests:
            cpu: 100m
            memory: 100Mi
      volumes:
      - name: conf
        emptyDir: {}
      - name: config-map
        configMap:
          name: mysql
  # 设置PVC
  volumeClaimTemplates:
  - metadata:
      name: data
    spec:
      accessModes: ["ReadWriteOnce"]
      resources:
        requests:
          storage: 1Gi
主从节点的配置和启动都在上面的yaml文件中定义好了,接下来需要逐个创建即可。
二、创建所需资源
//创建configMap
kubectl apply -f configMap.yaml
//创建service
kubectl apply -f service.yaml
//创建statefulSet
kubectl apply -f statefulSet.yaml

执行完毕后可以使用以下命令监测创建情况。
kubectl get pods --watch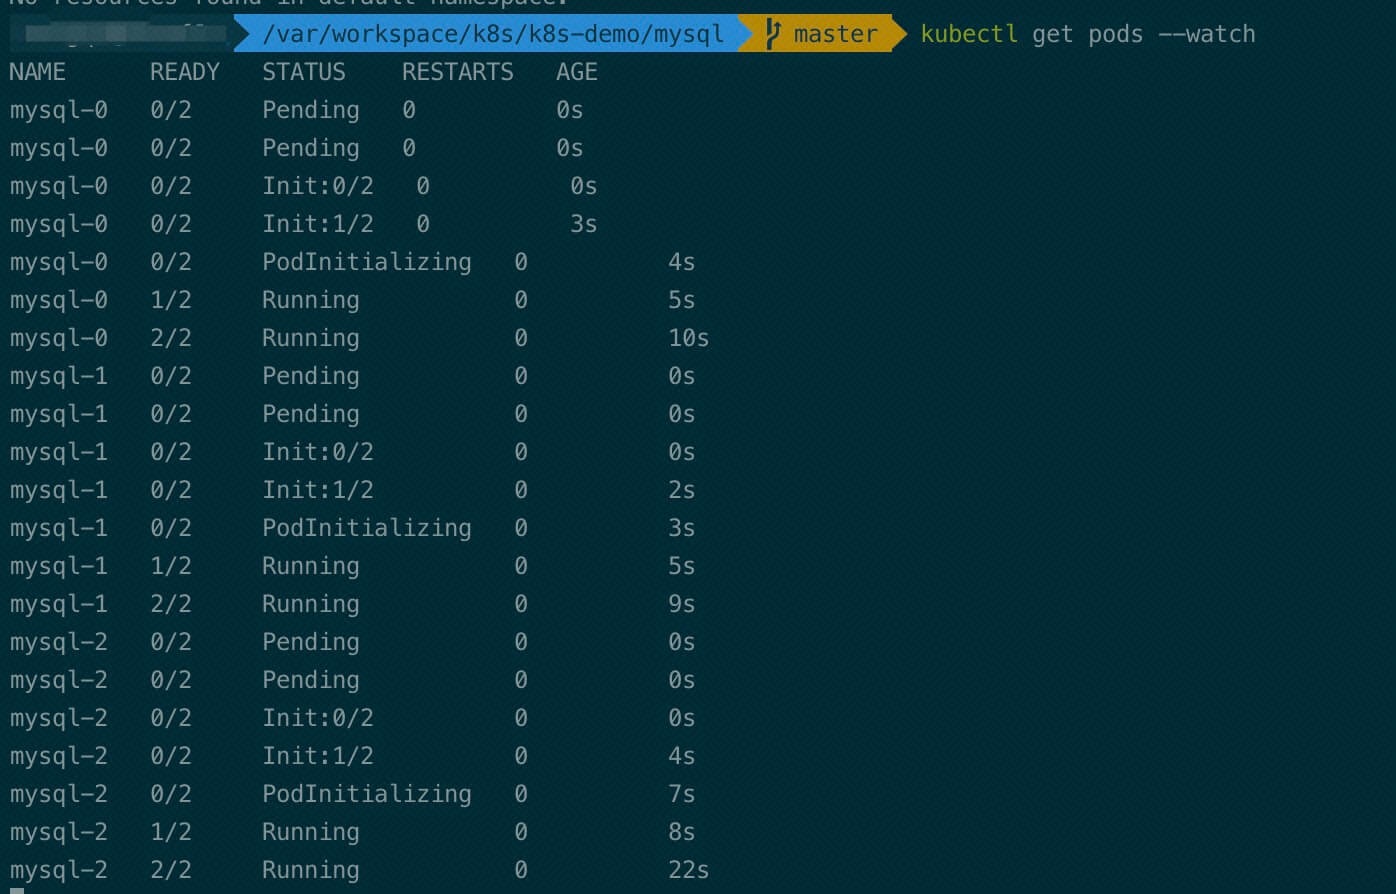
三、测试主库
1. 进入pod进行操作
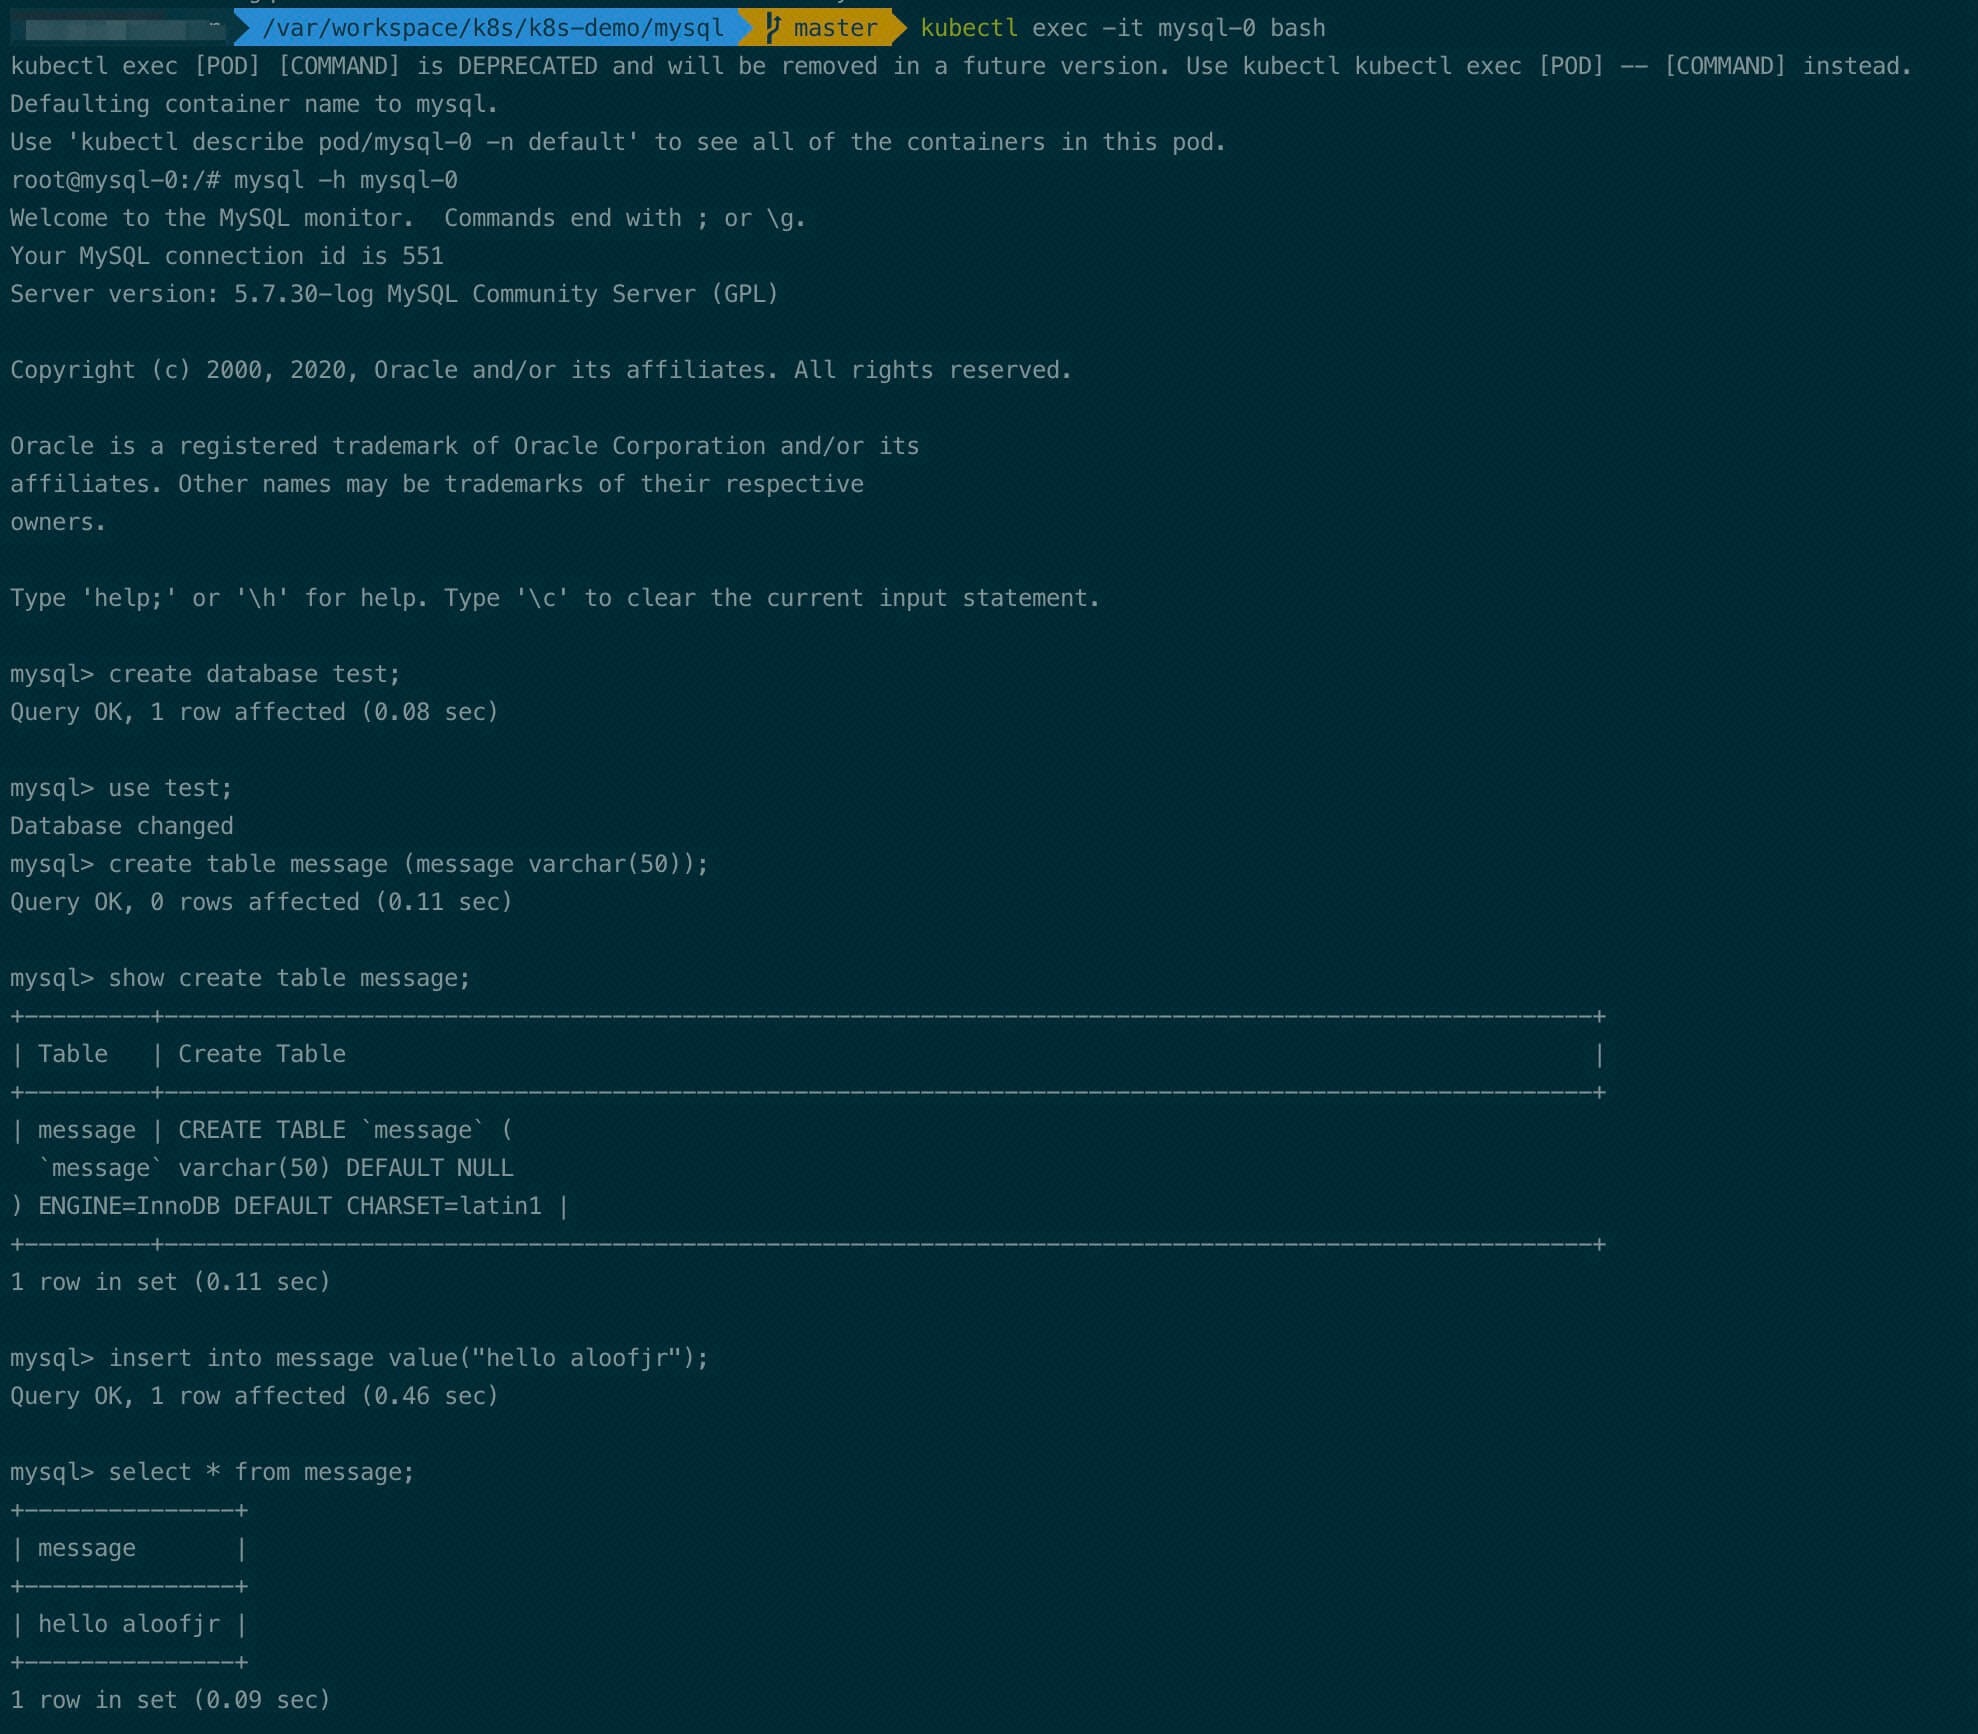
进入到pod mysql-0中,进行测试
kubectl exec -it mysql-0 bash2. 用mysql-client链接mysql-0
mysql -h mysql-03. 创建库、表
//创建数据库test
create database test;
//使用test库
use test;
//创建message表
create table message (message varchar(50));
//查看message表结构
show create table message;
4. 插入数据
//插入
insert into message value("hello aloofjr");
//查看
select * from message;
四、测试备库
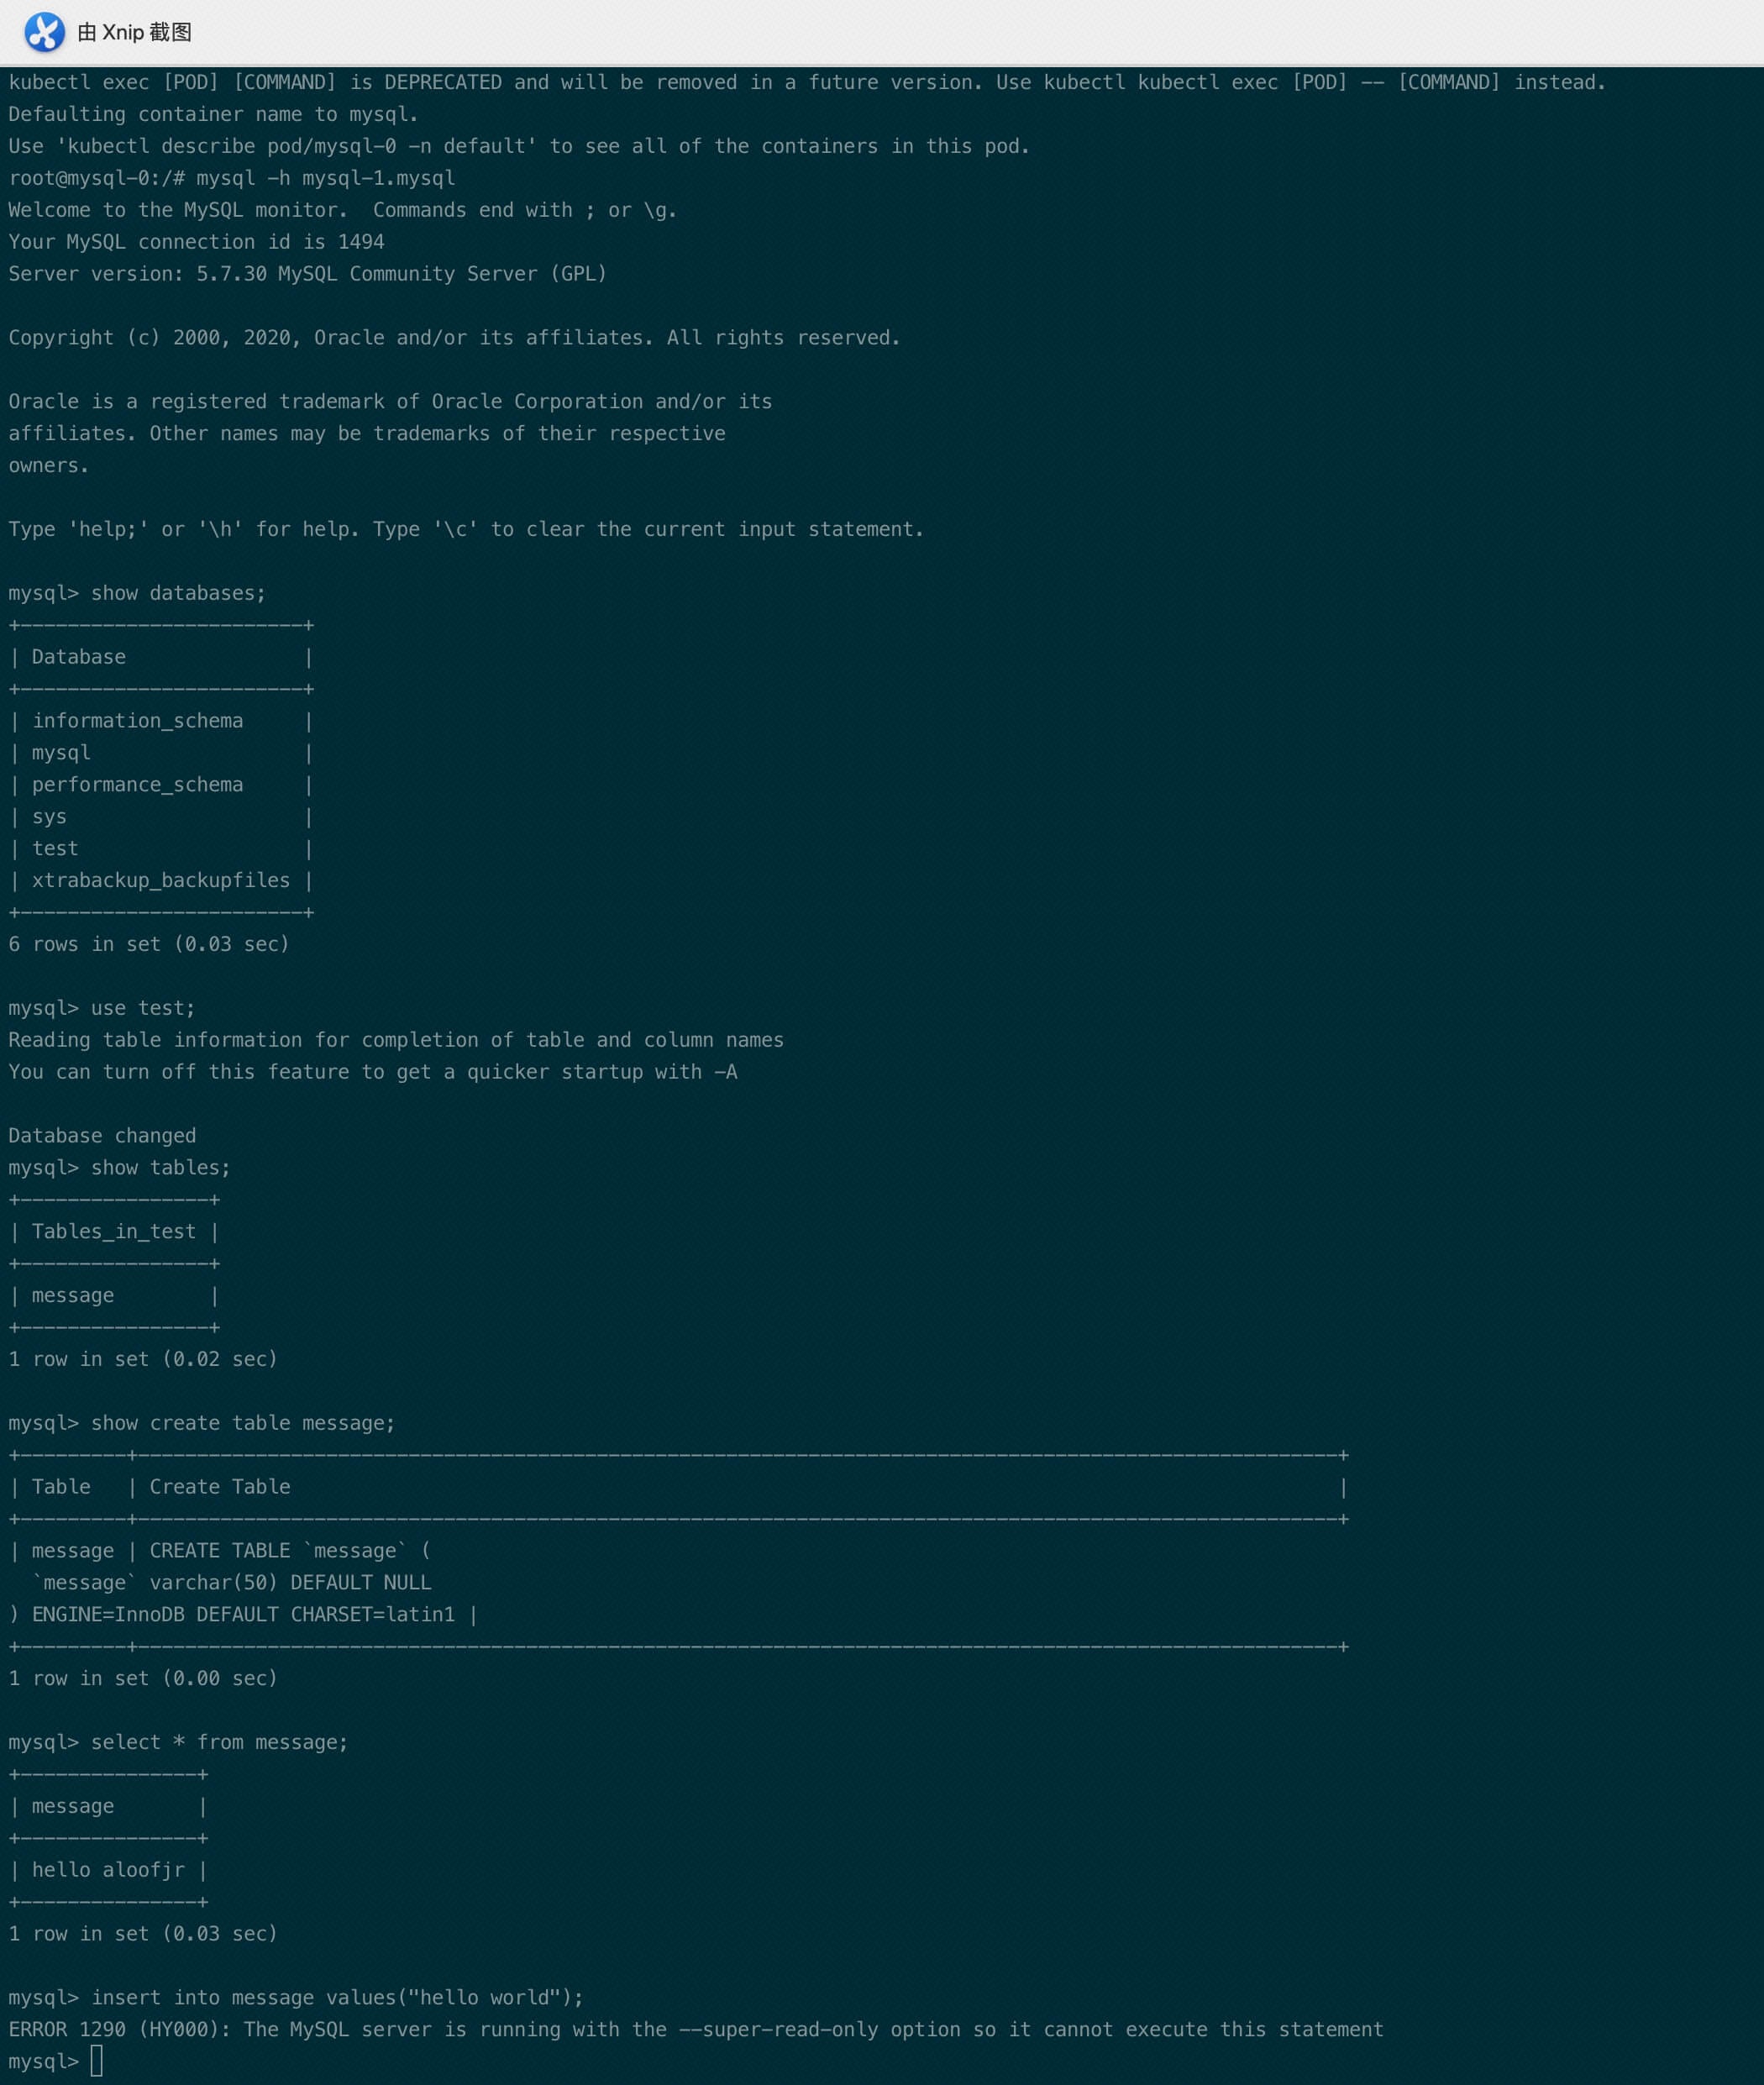
1. 连接mysql-1
mysql -h mysql-1.mysql2. 查看库、表结构
//查看数据库列表
show databases;
//使用test库
use test;
//查看表列表
show tables;
//查看message表结构
show create table message;
3. 读取数据
//查看
select * from message;
4. 写入数据
insert into message values("hello world");此时会报错 ERROR 1290 (HY000): The MySQL server is running with the --super-read-only option so it cannot execute this statement
这是因为mysql-1是一个只读备库,无法进行写操作。
五、测试mysql-read服务
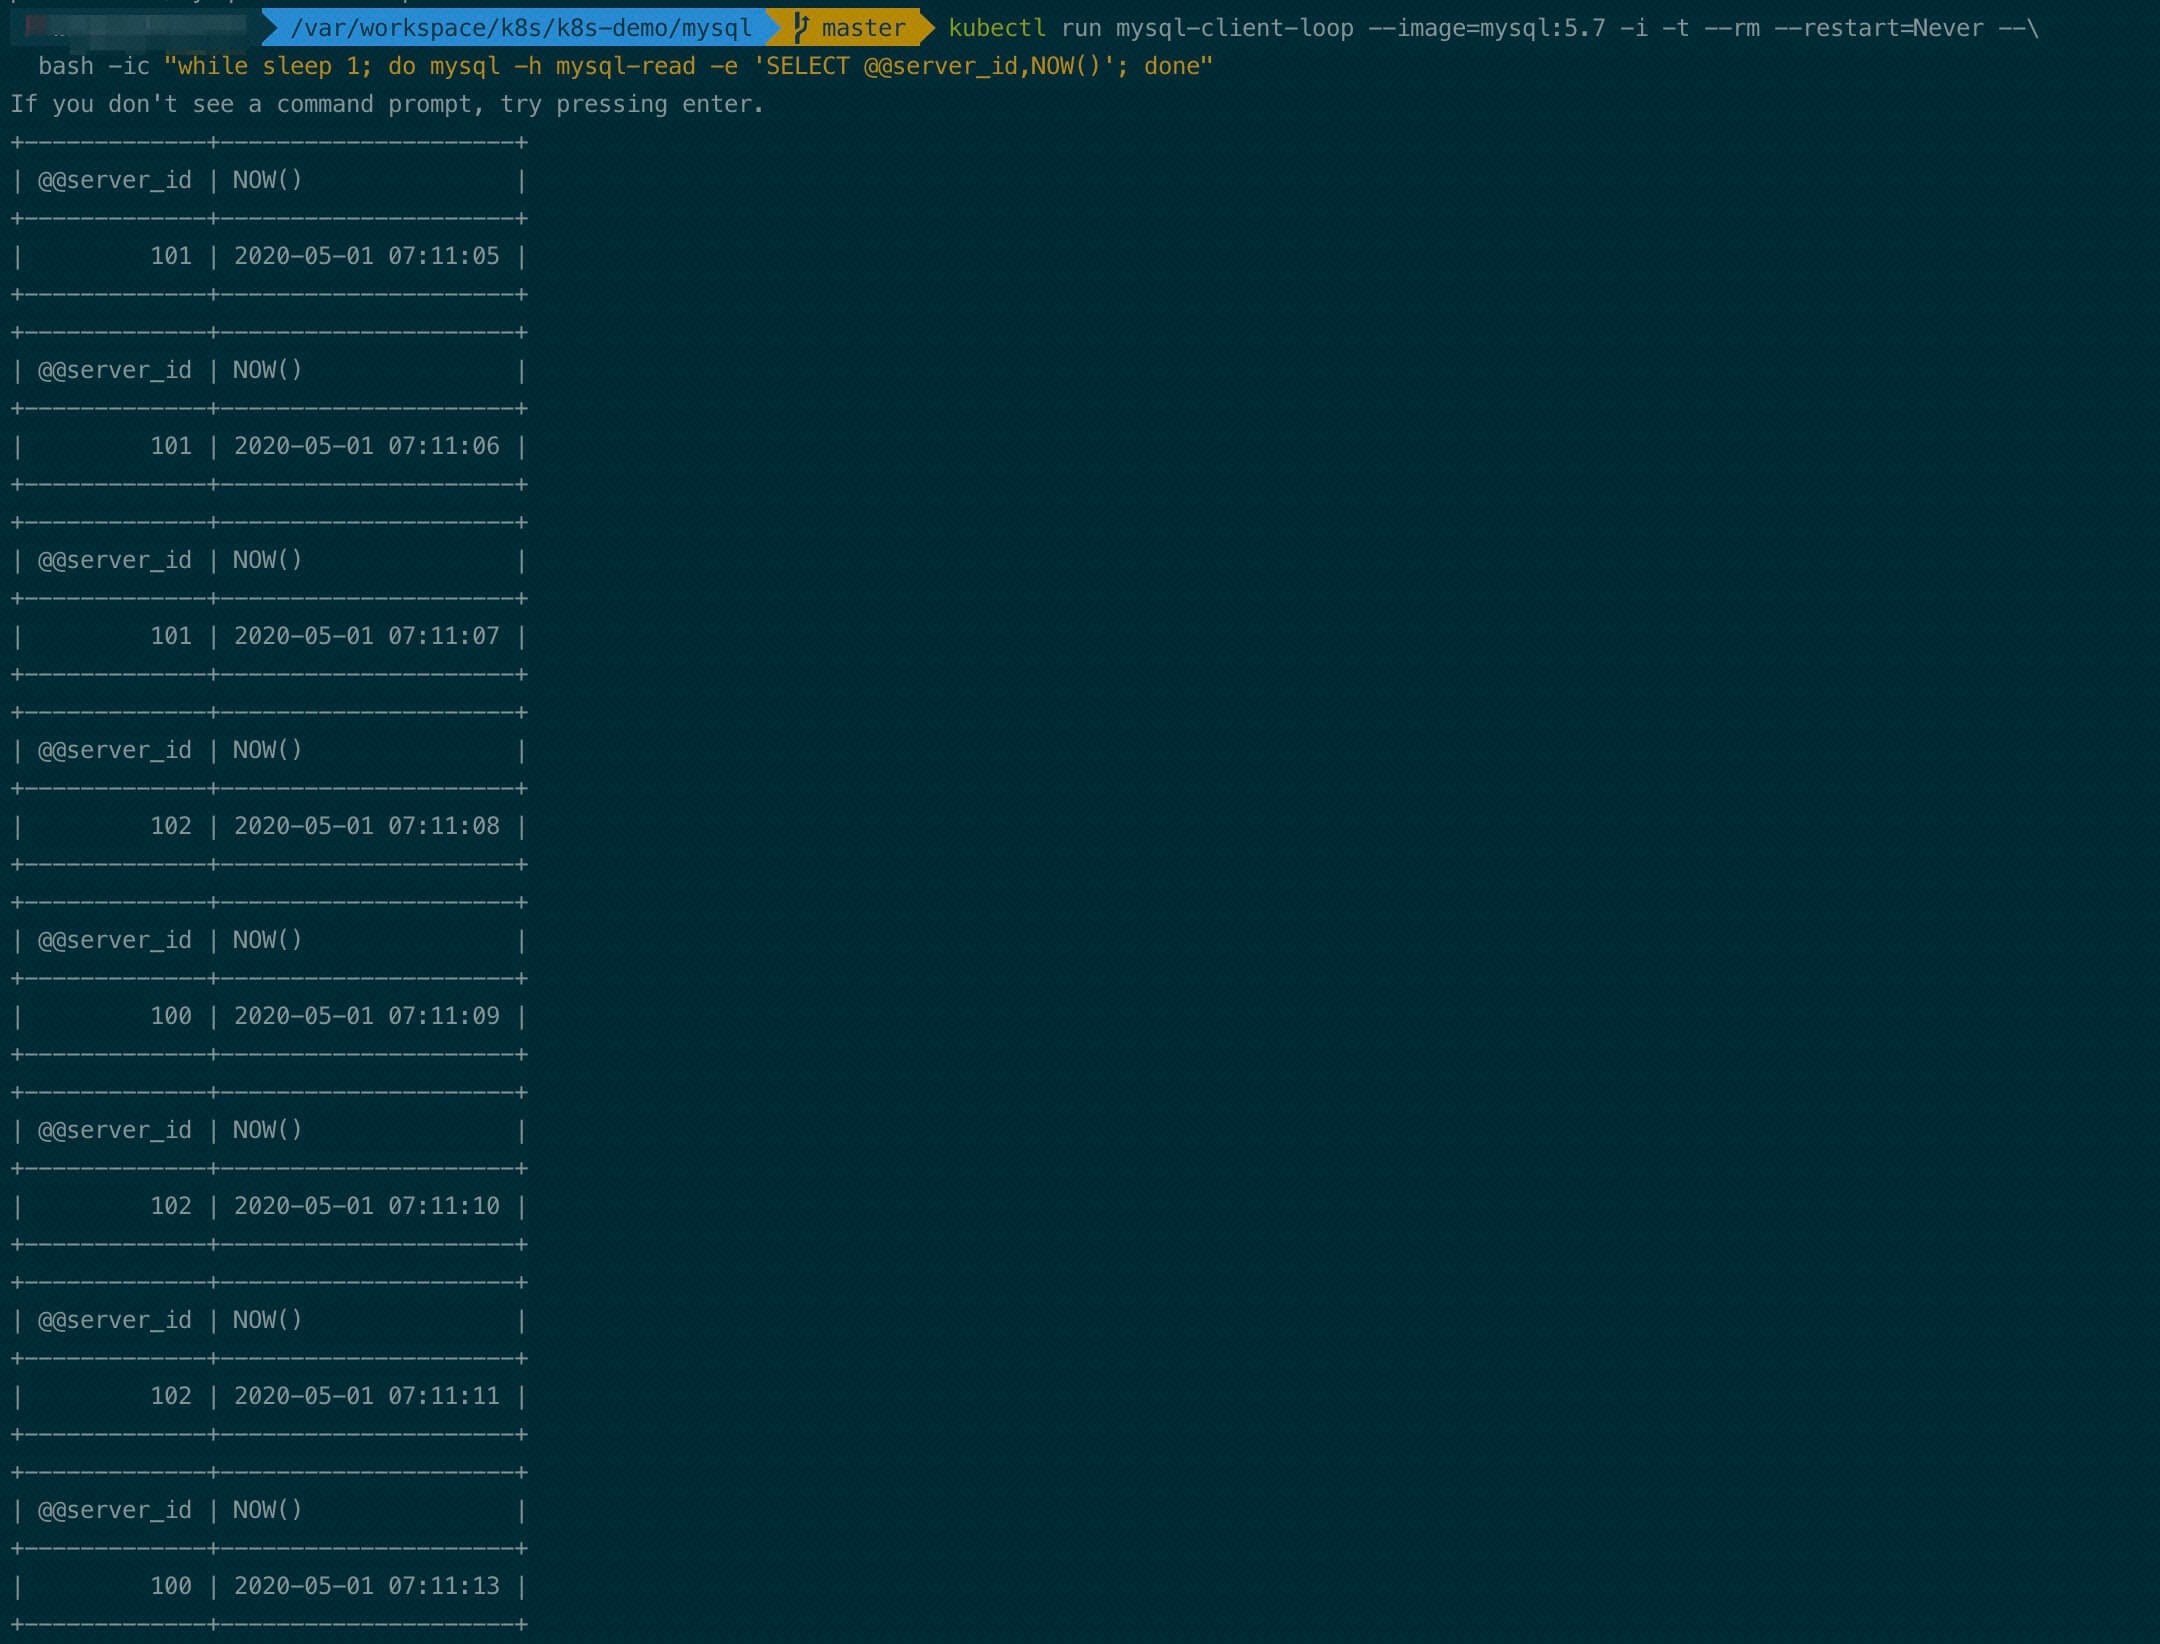
kubectl run mysql-client-loop --image=mysql:5.7 -i -t --rm --restart=Never --\
  bash -ic "while sleep 1; do mysql -h mysql-read -e 'SELECT @@server_id,NOW()'; done"
每秒查询一次数据库,可以观察到,调度到不同的server-id,即pod节点
六、扩缩容
//扩容至5副本
kubectl scale statefulset mysql  --replicas=5
//缩容只2副本
kubectl scale statefulset mysql  --replicas=2
七、清理
kubectl delete statefulset mysql
kubectl delete configmap,service,pvc -l app=mysql
八、总结
上面就是通过k8s部署一个一主多从mysql集群的过程,其中有几个重要知识点:
- 通过configMap可以将配置和镜像解耦
- 通过initContainers在pod启动前,做一些初始化工作
- 通过requests设置pod所需的cpu和memory
- 通过livenessProbe进行pod节点探活
- 通过readnessProbe进行pod可用性检测
本文中用到的yaml文件见我的GitHub仓库AloofJr
