


上图是线上集成Facebook的Fresco图片框架而导致的一个异常,bugly异常统计历史累计1409次。
在Fresco的gitHub上issue的提问比比皆是,但有效的解决方案却是少之又少,基本上都是不靠谱的,Fresco官方甚至每次回答这个问题时都是新版本已解决等等,但是问题依旧。
跟同事讨论提到,可以尝试通过分析源码捕获这个崩溃异常再做操作,即使so文件找不到图片不显示也行,不要让应用崩溃!
按照这个思路下载了Fresco的源码,准备啃一口它的源码了,当然我肯定想要以最小的代价解决这个问题,所以百度大法搞起,瞧一瞧看有没有人解决这个问题,很遗憾百度上找出来的也是没啥用,那只能祭出绝招Google大法了。
在Google搜索中找到了这么一条信息,跳过发现还是Fresco的github上issue,本来都打算退出了,但瞄了瞄,这一瞄找到了解决办法。
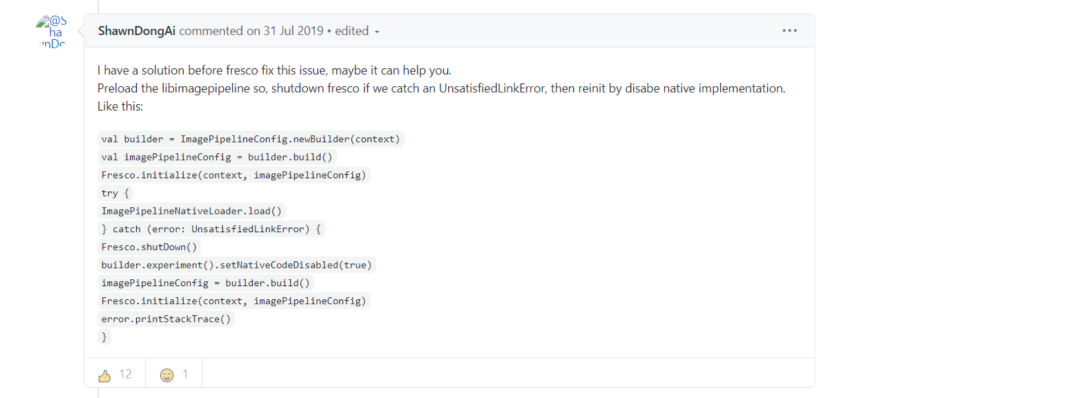
这位大佬说他有一个解决方案,并且给出了代码(虽然是Kotlin写的,但是我会告诉你我学过kotlin?)而且还点出了造成这个错误的原因是libimagepipeline.so文件,如果我们捕获到这个异常并尝试处理它就能解决这个问题,这和讨论的思路相同了,而且看到下面的点赞量,我立马想试试了。
代码量很少总共就这么多,核心的其实就几行,添加后打包测试,通过云测提供的云真机,对修改后的方案进行验证,效果很好,出现崩溃的机子在安装新包后运行正常且图片正常加载,效果棒棒哒!
解决了问题,我们来研究一下导致整个问题的根本原因是什么,不能只拿结果不管过程。
根据异常分析报错的原因是so库加载失败,CPU架构找不到对应的so文件,通过bugly异常分析中看到:so文件加载失败后,Fresco调用了libimagepipeline.so文件下的SoLoader native方法,这个时候问题就来了,so文件已经加载失败了,它怎么去找内部的方法呢?自然就报错了。
而上面通过简单的几行代码就解决了这个问题,是怎么做到呢?这几行代码的作用是什么呢!我们来分析一下。
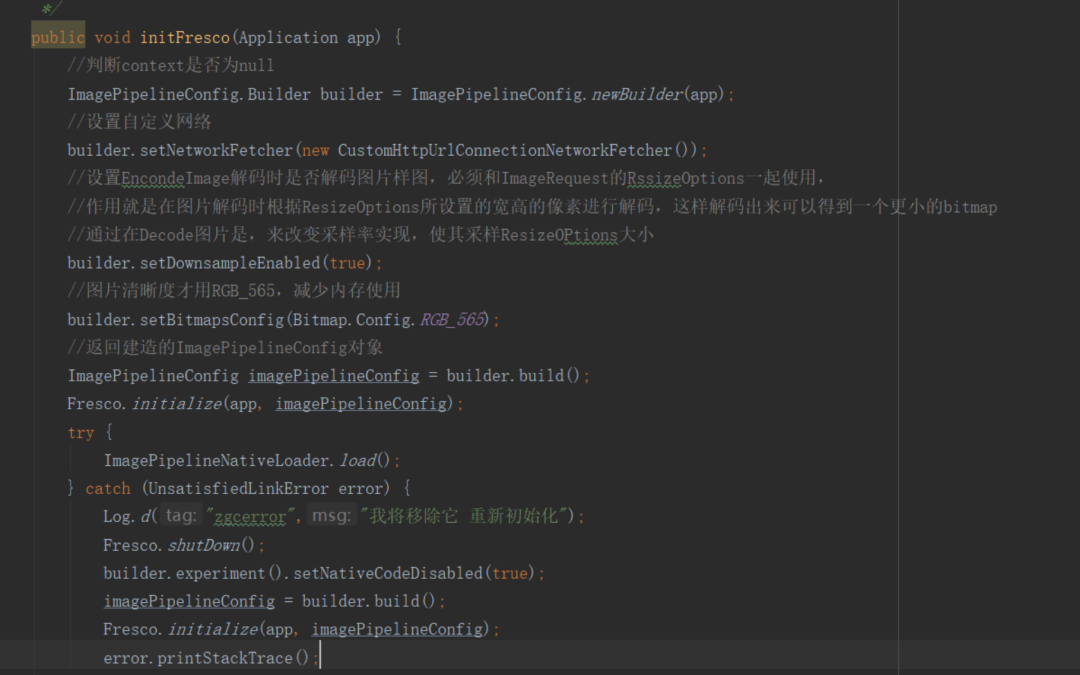
1.ImagePipelineNativeLoader.load();
这个方法我们从名字都能看出来是native方法初始化,进入方法里面
public class ImagePipelineNativeLoader {public static final String DSO_NAME = "imagepipeline";public static final List<String> DEPENDENCIES;static {List<String> dependencies = new ArrayList<String>();DEPENDENCIES = Collections.unmodifiableList(dependencies);}public static void load() {SoLoader.loadLibrary("imagepipeline");}}
我们可以看到它就是加载so文件中的方法,新的解决方案是把它放到初始化时调用,如果此时so文件加载失败就会报UnsatisfiedLinkError 异常,这个时候我们可以通过捕获这个异常来进行一些自己的操作!
那么在修改前发生异常的fresco源码中此方法在哪调用呢 ?通过追踪源码我们发现
// 获取ImagePipeline对象 Fresco的一些配置包括缓存策略及编码等等的配置就在这里面加载ImagePipeline mImagePipeline = Fresco.getImagePipeline();=================进入源码==================================/** Gets the image pipeline instance. */public static ImagePipeline getImagePipeline() {return getImagePipelineFactory().getImagePipeline();}//这一段都是初始化配置信息等等一些操作public ImagePipeline getImagePipeline() {if (mImagePipeline == null) {mImagePipeline =new ImagePipeline(getProducerSequenceFactory(),mConfig.getRequestListeners(),mConfig.getIsPrefetchEnabledSupplier(),getBitmapMemoryCache(),getEncodedMemoryCache(),getMainBufferedDiskCache(),getSmallImageBufferedDiskCache(),mConfig.getCacheKeyFactory(),mThreadHandoffProducerQueue,Suppliers.of(false),mConfig.getExperiments().isLazyDataSource());}return mImagePipeline;}此处省略若干方法,经过一系列的追踪private MemoryChunkPool getMemoryChunkPool(@MemoryChunkType int memoryChunkType) {switch (memoryChunkType) {case NATIVE_MEMORY:return getNativeMemoryChunkPool();case BUFFER_MEMORY:return getBufferMemoryChunkPool();default:throw new IllegalArgumentException("Invalid MemoryChunkType");}}可以看到 这地方了Fresco的缓存模式被分为了两种,一种是native层缓存 一种是磁盘缓存,我们进入它的native缓存调用的方法里面看看发生了什么public NativeMemoryChunkPool getNativeMemoryChunkPool() {if (mNativeMemoryChunkPool == null) {mNativeMemoryChunkPool =new NativeMemoryChunkPool(mConfig.getMemoryTrimmableRegistry(),mConfig.getMemoryChunkPoolParams(),mConfig.getMemoryChunkPoolStatsTracker());}return mNativeMemoryChunkPool;}这个方法返回了一个NativeMemoryChunkPool这东西,进去后发现public class NativeMemoryChunkPool extends MemoryChunkPool {public NativeMemoryChunkPool(MemoryTrimmableRegistry memoryTrimmableRegistry,PoolParams poolParams,PoolStatsTracker nativeMemoryChunkPoolStatsTracker) {super(memoryTrimmableRegistry, poolParams, nativeMemoryChunkPoolStatsTracker);}@Overrideprotected NativeMemoryChunk alloc(int bucketedSize) {return new NativeMemoryChunk(bucketedSize);}}它的alloc方法调用了nativeMemoryChunk 看着名字我们就怀疑它就是初始化ImagePipelineNativeLoader.load()的地方,进去后果不其然/*** Wrapper around chunk of native memory.** <p>This class uses JNI to obtain pointer to native memory and read/write data from/to it.** <p>Native code used by this class is shipped as part of libimagepipeline.so @ThreadSafe*/@DoNotStrippublic class NativeMemoryChunk implements MemoryChunk, Closeable {private static final String TAG = "NativeMemoryChunk";static {ImagePipelineNativeLoader.load();}/*** Address of memory chunk wrapped by this NativeMemoryChunk*/private final long mNativePtr;}
到此我们可以确定当Fresco加载图片时会加载它里面的配置信息,而最终调用它的native方法,来设置缓存策略,我们也是因为so文件加载失败后,依然让它选择这种缓存策略,这样就会导致它崩溃,因为它压根找不到so文件下的方法。
接着往下看捕获异常后我们先是调用了Fresco.shutDown();方法它只不过是把Fresco的配置全部重置,以便于后面重新初始化,看后面。
2.ImagePipelineConfig.experiment().setNativeCodeDisabled(true);
看一看它干了些什么
/*** If true, the pipeline will use alternative implementations without native code.** @param nativeCodeDisabled set true for disabling native implementation.* @return The Builder itself for chaining*/public ImagePipelineConfig.Builder setNativeCodeDisabled(boolean nativeCodeDisabled) {mNativeCodeDisabled = nativeCodeDisabled;return mConfigBuilder;}
通过注释可以看到,这个方法可以设置让fresco禁止以native缓存策略加载。
我们刚才看到Fresco分了两种缓存策略如果我们禁止了它,那它会选择另外一种方式吗?继续追踪源码探索。
private static int getMemoryChunkType(final Builder builder, final ImagePipelineExperiments imagePipelineExperiments) {if (builder.mMemoryChunkType != null) {return builder.mMemoryChunkType;} else if (imagePipelineExperiments.isNativeCodeDisabled()) {return MemoryChunkType.BUFFER_MEMORY;} else {return MemoryChunkType.NATIVE_MEMORY;}}
我们可以看到isNativeCodeDisabled
变量默认是false,而它默认选择了MemoryChunkType.NATIVE_MEMORY
缓存策略,我们变量改成true后它就选择了MemoryChunkType.BUFFER_MEMORY
缓存,再回到之前的
private MemoryChunkPool getMemoryChunkPool(@MemoryChunkType int memoryChunkType) {switch (memoryChunkType) {case NATIVE_MEMORY:return getNativeMemoryChunkPool();case BUFFER_MEMORY:return getBufferMemoryChunkPool();default:throw new IllegalArgumentException("Invalid MemoryChunkType");}}
这个地方另外一种缓存策略
/*** Wrapper around chunk using a direct ByteBuffer in native memory. A direct ByteBuffer is composed* of a Java {@link ByteBuffer} object allocated on the Java heap and the underlying buffer which is* in native memory.** <p>The buffer in native memory will be released when the Java object gets garbage collected.*/public class BufferMemoryChunk implements MemoryChunk, Closeable {private static final String TAG = "BufferMemoryChunk";/** Internal representation of the chunk */private ByteBuffer mBuffer;/** Size of the ByteBuffer */private final int mSize;/** Unique identifier of the chunk */private final long mId;public BufferMemoryChunk(final int size) {}}
通过这个类的注释我们可以看到它说这个是一个在java内存中创建的一个缓冲区,存在于本机内存中。
到这里基本上就能明白为什么捕获异常后修改这个参数为true就能修复这个崩溃,它直接修改了 Fresco的缓存策略让它从native缓存替换到了本机磁盘缓存,这样即使你找不到so文件在加载失败的情况下依旧可以正常的使用它而不是直接崩溃。
虽然问题已经验证崩溃已修改并且程序能够正常运行,但是我还是有几个疑问:
如果可以通过这样的方式来达到修复此问题,为什么Fresco官方不采纳这个意见,也不做出优化呢?
在崩溃的机器上我们捕获异常并且修改缓存策略后让Fresco的缓存策略从native层替换到了磁盘缓存,这样是否让Fresco对于OOM的处理变的不在那么友好?
native层缓存和磁盘缓存两种的优缺点是什么呢?
虽然目前云真机上测试是能够正常通过,上线后,面对多种真机类型的结果我们拭目以待。
拖地先生,从事互联网技术工作,在这里每周两篇文章,聊聊日常的实践和心得。往期推荐:

如果对你有帮助,让大家也看看呗~
