


1.Ambari介绍
Apache Ambari是一种基于Web的工具,支持Apache Hadoop集群的供应、管理和监控。Ambari已支持大多数Hadoop组件,包括HDFS、MapReduce、Hive、Pig、 Hbase、Zookeeper、Sqoop和Hcatalog等。
详细内容参见
https://docs.cloudera.com/HDPDocuments/Ambari-2.7.4.0/bk_ambari-installation/content/ch_Installing_Ambari.html
2.环境准备
节点IP及映射
192.168.21.129 master192.168.21.130 node1192.168.21.131 node2
3台均安装好jdk
yum install -y java-1.8.0-openjdk-devel
添加java环境变量
vi /etc/profile
添加内容
export JAVA_HOME=/usr/lib/jvm/java-1.8.0-openjdk-1.8.0.232.b09-0.el7_7.x86_64export PATH=$PATH:$JAVA_HOME/binexport CLASSPATH=.:$JAVA_HOME/lib/tools.jar:$JAVA_HOME/lib/dt.jar
3台执行下该文件
source /etc/profilefor a in {1..2} ; do scp /etc/profile node$a:/etc/profile ; donefor a in {1..2}; do ssh root@node$a source /etc/profile; done
系统初始化参数
cat >> /etc/sysctl.conf << EOFfs.file-max=1000000net.ipv4.tcp_max_tw_buckets = 6000net.ipv4.tcp_sack = 1net.ipv4.tcp_window_scaling = 1net.ipv4.tcp_rmem = 4096 87380 4194304net.ipv4.tcp_wmem = 4096 16384 4194304net.ipv4.tcp_max_syn_backlog = 16384net.core.netdev_max_backlog = 32768net.core.somaxconn = 32768net.core.wmem_default = 8388608net.core.rmem_default = 8388608net.core.rmem_max = 16777216net.core.wmem_max = 16777216net.ipv4.tcp_timestamps = 1net.ipv4.tcp_fin_timeout = 20net.ipv4.tcp_synack_retries = 2net.ipv4.tcp_syn_retries = 2net.ipv4.tcp_syncookies = 1#net.ipv4.tcp_tw_len = 1net.ipv4.tcp_tw_reuse = 1net.ipv4.tcp_mem = 94500000 915000000 927000000net.ipv4.tcp_max_orphans = 3276800net.ipv4.ip_local_port_range = 1024 65000net.nf_conntrack_max = 6553500net.netfilter.nf_conntrack_max = 6553500net.netfilter.nf_conntrack_tcp_timeout_close_wait = 60net.netfilter.nf_conntrack_tcp_timeout_fin_wait = 120net.netfilter.nf_conntrack_tcp_timeout_time_wait = 120net.netfilter.nf_conntrack_tcp_timeout_established = 3600net.ipv6.conf.all.disable_ipv6 = 1net.ipv6.conf.default.disable_ipv6 = 1kernel.numa_balancing = 0kernel.shmmax = 68719476736kernel.printk = 5kernel.sysrq = 1vm.overcommit_memory = 0vm.swappiness = 0EOF
文件描述符和用户最大进程数
### 调整文件描述符cat >> /etc/security/limits.conf <<EOF* soft nproc 65535* hard nproc 65535* soft nofile 65535* hard nofile 65535EOF##用户进程限制cat >> /etc/security/limits.d/20-nproc.conf <<EOF* soft nproc 8192root soft nproc unlimitedEOF
3.网络配置
修改 hostname
master执行
hostnamectl set-hostname master
依次修改所有节点 node[1-3]上分别执行
hostnamectl set-hostname node1
vi /etc/hosts
增加如下内容
192.168.21.129 master192.168.21.130 node1192.168.21.131 node2
拷贝到其他两台机器上
for a in {1..2} ; do scp /etc/hosts node$a:/etc/hosts ; done
4.SSH 免密码登录
1.在集群master的 /etc/ssh/sshd_config 文件去掉以下选项的注释
vi /etc/ssh/sshd_config
RSAAuthentication yes #开启私钥验证 PubkeyAuthentication yes #开启公钥验证
2.将集群master 修改后的 /etc/ssh/sshd_config 通过 scp 命令复制发送到集群的每一个节点
for a in {1..2} ; do scp /etc/ssh/sshd_config node$a:/etc/ssh/sshd_config ; done
3.生成公钥、私钥
1.在集群的每一个节点节点输入命令 ssh-keygen -t rsa -P '',生成 key,一律回车
ssh-keygen -t rsa -P ''
4.在集群的master 节点输入命令
将集群每一个节点的公钥id_rsa.pub放入到自己的认证文件中authorized_keys;
ssh root@master cat /root/.ssh/id_rsa.pub >> /root/.ssh/authorized_keysfor a in {1..2}; do ssh root@node$a cat /root/.ssh/id_rsa.pub >> /root/.ssh/authorized_keys; done
5.在集群的master 节点输入命令
将自己的认证文件 authorized_keys 通过 scp 命令复制发送到每一个节点上去: /root/.ssh/authorized_keys`
for a in {1..2}; do scp /root/.ssh/authorized_keys root@node$a:/root/.ssh/authorized_keys ; done
6.在集群的每一个节点节点输入命令
接重启ssh服务
sudo systemctl restart sshd.service
7.验证 ssh 无密登录
开一个其他窗口测试下能否免密登陆
例如:在node3
ssh root@node2
exit 退出
5.服务环境准备
关闭SELINUX
vi /etc/selinux/config
将 SELINUX=enforcing 改为 SELINUX=disabled
设置后需要重启才能生效
PS 我是修改node1 的 /etc/selinux/config 后,把配置文件复制到其他节点
for a in {1..2}; do scp /etc/selinux/config root@node$a:/etc/selinux/config ; done
关闭防火墙(各台均执行)
systemctl stop firewalld.servicesystemctl disable firewalld
6.安装配置 MySql
yum install -y wgetwget -i -c http://dev.mysql.com/get/mysql57-community-release-el7-10.noarch.rpmrpm -ivh mysql57-community-release-el7-10.noarch.rpm#安装mysqlyum -y install mysql-community-serversystemctl enable mysqldsystemctl start mysqld.servicesystemctl status mysqld.servicegrep "password" /var/log/mysqld.log#这一步骤看到了mysql的初始密码,用于下一步输入root密码登录mysql -uroot -p
进入mysql客户端后执行
#降低密码复杂度要求set global validate_password_policy=0;set global validate_password_length=1;set global validate_password_special_char_count=0;set global validate_password_mixed_case_count=0;set global validate_password_number_count=0;select @@validate_password_number_count,@@validate_password_mixed_case_count,@@validate_password_number_count,@@validate_password_length;#设置密码为passwordALTER USER 'root'@'localhost' IDENTIFIED BY 'password';grant all privileges on *.* to 'root'@'%' identified by 'password' with grant option;#使设置生效flush privileges;exit
卸载用完多余的安装包
yum -y remove mysql57-community-release-el7-10.noarch
下载mysql驱动,放到master的
/usr/share/java/mysql-connector-java.jar
位置
for a in {1..2} ; do scp /usr/share/java/mysql-connector-java.jar node$a:/usr/share/java/mysql-connector-java.jar ; done
7.下载repo(配置本地源)
https://docs.cloudera.com/HDPDocuments/Ambari-2.7.4.0/bk_ambari-installation/content/download_the_ambari_repo_lnx7.html
yum install -y wgetwget -nv http://public-repo-1.hortonworks.com/ambari/centos7/2.x/updates/2.7.4.0/ambari.repo -O /etc/yum.repos.d/ambari.repowget -nv http://public-repo-1.hortonworks.com/HDP/centos7/3.x/updates/3.1.4.0/hdp.repo -O /etc/yum.repos.d/hdp.repo
安装httpd本地源
yum -y install httpdsystemctl restart httpdsystemctl enable httpd
此时浏览器访问http://ip/即可看到站点首页
网站目录为/var/www/html/,目前为空
mkdir /var/www/html/ambarimkdir /var/www/html/hdpmkdir /var/www/html/hdp/HDP-UTILS-1.1.0.22
下载
http://public-repo-1.hortonworks.com/ambari/centos7/2.x/updates/2.7.4.0/ambari-2.7.4.0-centos7.tar.gz
http://public-repo-1.hortonworks.com/HDP/centos7/3.x/updates/3.1.4.0/HDP-3.1.4.0-centos7-rpm.tar.gz
http://public-repo-1.hortonworks.com/HDP-UTILS-1.1.0.22/repos/centos7/HDP-UTILS-1.1.0.22-centos7.tar.gz
http://public-repo-1.hortonworks.com/HDP-GPL/centos7/3.x/updates/3.1.4.0/HDP-GPL-3.1.4.0-centos7-gpl.tar.gz
tar -zxvf ambari-2.7.4.0-centos7.tar.gz -C /var/www/html/ambari/tar -zxvf HDP-3.1.4.0-centos7-rpm.tar.gz -C /var/www/html/hdp/tar -zxvf HDP-GPL-3.1.4.0-centos7-gpl.tar.gz -C /var/www/html/hdp/tar -zxvf HDP-UTILS-1.1.0.22-centos7.tar.gz -C /var/www/html/hdp/HDP-UTILS-1.1.0.22/
添加ambari本地源
vi /etc/yum.repos.d/ambari.repo
修改内容如下
#VERSION_NUMBER=2.7.4.0-118[ambari-2.7.4.0]#json.url = http://public-repo-1.hortonworks.com/HDP/hdp_urlinfo.jsonname=ambari Version - ambari-2.7.4.0baseurl=http://192.168.21.129/ambari/ambari/centos7/2.7.4.0-118gpgcheck=1gpgkey=http://192.168.21.129/ambari/ambari/centos7/2.7.4.0-118/RPM-GPG-KEY/RPM-GPG-KEY-Jenkinsenabled=1priority=1
8.安装ambari
https://docs.cloudera.com/HDPDocuments/Ambari-2.7.4.0/bk_ambari-installation/content/set_up_the_ambari_server.html
yum install ambari-serverambari-server setup
不推荐直接用内嵌的postgresql,因为其他服务还要用mysql
[root@localhost download]# ambari-server setupUsing python /usr/bin/pythonSetup ambari-serverChecking SELinux...SELinux status is 'enabled'SELinux mode is 'permissive'WARNING: SELinux is set to 'permissive' mode and temporarily disabled.OK to continue [y/n] (y)? yCustomize user account for ambari-server daemon [y/n] (n)? yEnter user account for ambari-server daemon (root):Adjusting ambari-server permissions and ownership...Checking firewall status...Checking JDK...[1] Oracle JDK 1.8 + Java Cryptography Extension (JCE) Policy Files 8[2] Custom JDK==============================================================================Enter choice (1): 2WARNING: JDK must be installed on all hosts and JAVA_HOME must be valid on all hosts.WARNING: JCE Policy files are required for configuring Kerberos security. If you plan to use Kerberos,please make sure JCE Unlimited Strength Jurisdiction Policy Files are valid on all hosts.Path to JAVA_HOME: /usr/lib/jvm/java-1.8.0-openjdk-1.8.0.242.b08-0.el7_7.x86_64/jreValidating JDK on Ambari Server...done.Check JDK version for Ambari Server...JDK version found: 8Minimum JDK version is 8 for Ambari. Skipping to setup different JDK for Ambari Server.Checking GPL software agreement...GPL License for LZO: https://www.gnu.org/licenses/old-licenses/gpl-2.0.en.htmlEnable Ambari Server to download and install GPL Licensed LZO packages [y/n] (n)? yCompleting setup...Configuring database...Enter advanced database configuration [y/n] (n)? yConfiguring database...==============================================================================Choose one of the following options:[1] - PostgreSQL (Embedded)[2] - Oracle[3] - MySQL / MariaDB[4] - PostgreSQL[5] - Microsoft SQL Server (Tech Preview)[6] - SQL Anywhere[7] - BDB==============================================================================Enter choice (1): 3Hostname (localhost):Port (3306):Database name (ambari):Username (ambari):Enter Database Password (bigdata):Configuring ambari database...Enter full path to custom jdbc driver: /opt/ambari/mysql-connector-java-5.1.48.jarCopying /opt/ambari/mysql-connector-java-5.1.48.jar to /usr/share/javaConfiguring remote database connection properties...WARNING: Before starting Ambari Server, you must run the following DDL directly from the database shell to create the schema: /var/lib/ambari-server/resources/Ambari-DDL-MySQL-CREATE.sqlProceed with configuring remote database connection properties [y/n] (y)? yExtracting system views........Ambari repo file contains latest json url http://public-repo-1.hortonworks.com/HDP/hdp_urlinfo.json, updating stacks repoinfos with it...Adjusting ambari-server permissions and ownership...Ambari Server 'setup' completed successfully.
把mysql驱动放到指定位置(安装组件有用到)
cp mysql-connector-java-5.1.48.jar /usr/share/java/mysql-connector-java.jar
初始化数据库
#先进入mysql客户端mysql -uroot -p
执行如下sql
create database ambari;use ambarisource /var/lib/ambari-server/resources/Ambari-DDL-MySQL-CREATE.sqlCREATE USER 'ambari'@'localhost' IDENTIFIED BY 'bigdata';CREATE USER 'ambari'@'%' IDENTIFIED BY 'bigdata';GRANT ALL PRIVILEGES ON ambari.* TO 'ambari'@'localhost';GRANT ALL PRIVILEGES ON ambari.* TO 'ambari'@'%';FLUSH PRIVILEGES;
9.启动
仅从master机器上启动即可:
ambari-server start
出现Server started listening on 8080
表示成功
如果主机启动监听8080,但超时失败,需要netstat -tunlp找到8080端口的进程号,kill -9 pid停掉已启动的占用端口进程方可。
10.进入web页面继续部署
访问
http://192.168.81.147:8080/
用户名密码都是admin
点击 “LAUNCH INSTALL WIZARD”,开始创建一个集群
起一个名字 下一步
Repositories里移除掉其他系统,只保留redhat7,修改为本地源,下一步
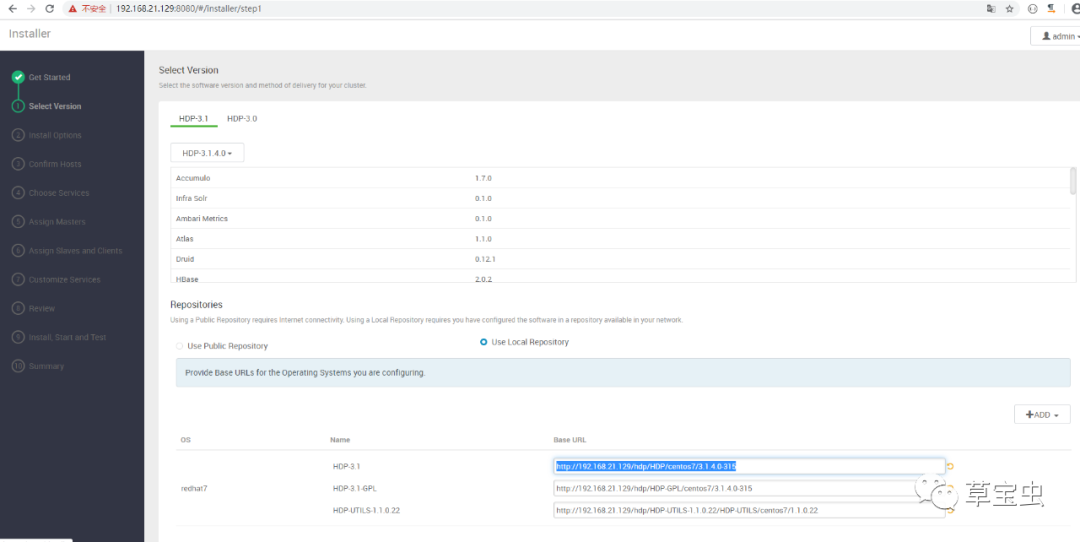
http://192.168.21.129/hdp/HDP/centos7/3.1.4.0-315
http://192.168.21.129/hdp/HDP-GPL/centos7/3.1.4.0-315
http://192.168.21.129/hdp/HDP-UTILS-1.1.0.22/HDP-UTILS/centos7/1.1.0.22
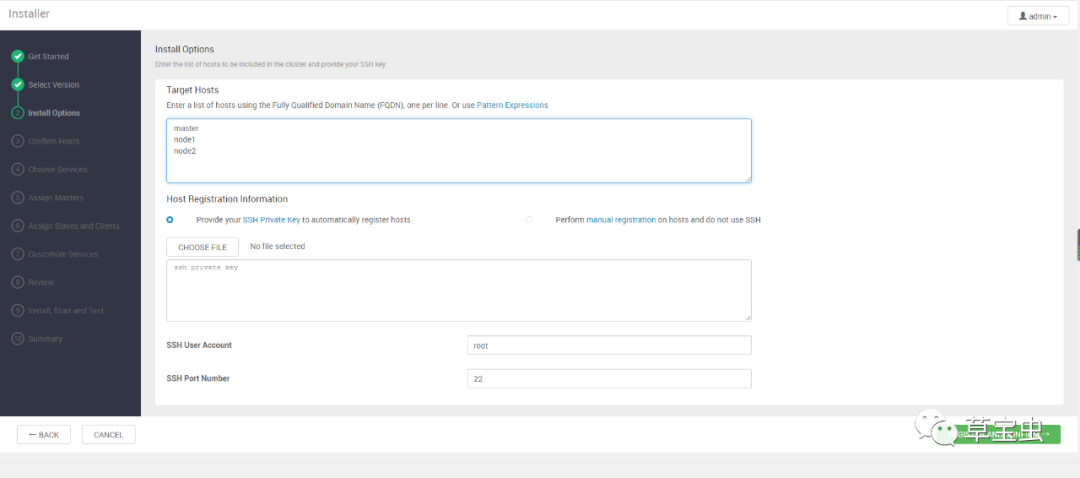
Target Hosts里填写其他IP,如
master
node1
node2
SSH Private Key这个文本框里,把cat /root/.ssh/id_rsa 的内容拷贝过来
下一步等待安装
安装第一次有可能失败,
从机报错
Host registration aborted. Ambari Agent host cannot reach Ambari Server 'localhost:8080'. Please check the network connectivity between the Ambari Agent host and the Ambari Server
看上面日志,scp拷贝/usr/lib/ambari-server/lib/ambari_server/setupAgent.py这个文件,然后执行
vi /usr/lib/ambari-server/lib/ambari_server/setupAgent.py
辑下这个文件
(expected_hostname, passPhrase, hostname, user_run_as, projectVersion, server_port) = retcode["parsed_args"]
hostname="192.168.21.129"
server_port=8080
retcode = checkServerReachability(hostname, server_port)
添加标红一行,指定hostname
再retry一次就好了
报错
Ambari agent machine hostname (localhost.localdomain) does not match expected ambari server hostname (node1). Aborting registration. Please check hostname, hostname -f and /etc/hosts file to confirm your hostname is setup correctly
一台主机名不对(漏掉了),改名即可
#三台从机上会出现/var/lib/ambari-agent/目录
下一步选择需要安装的服务,此步骤选择一些自己需要的服务,
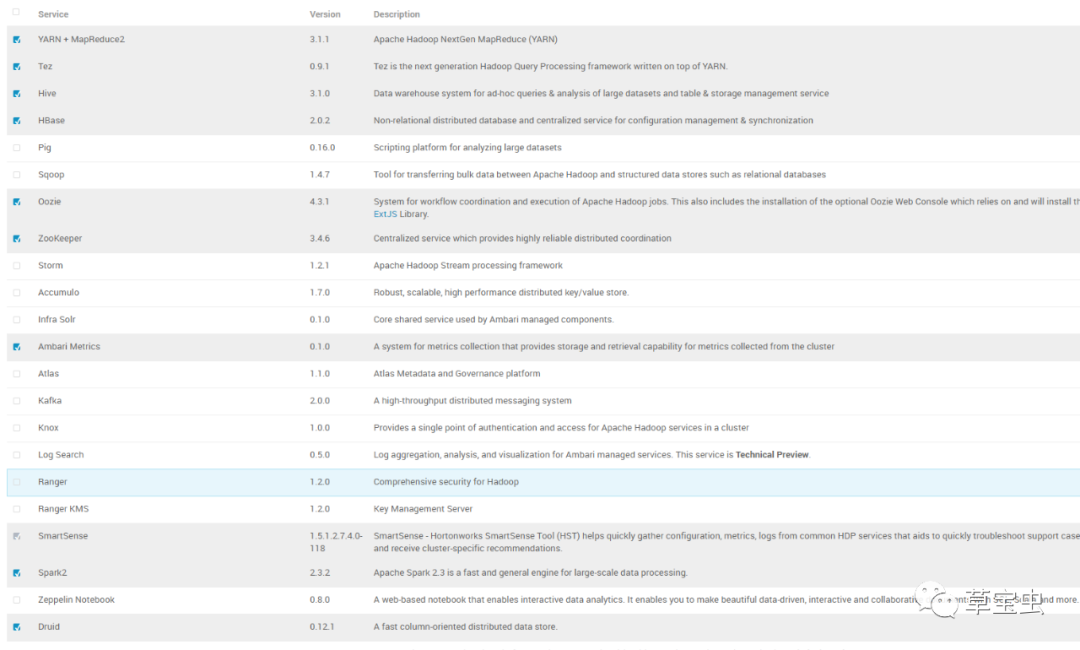
下一步下一步输入密码再下一步
适当的分配下服务器上的服务,下一步
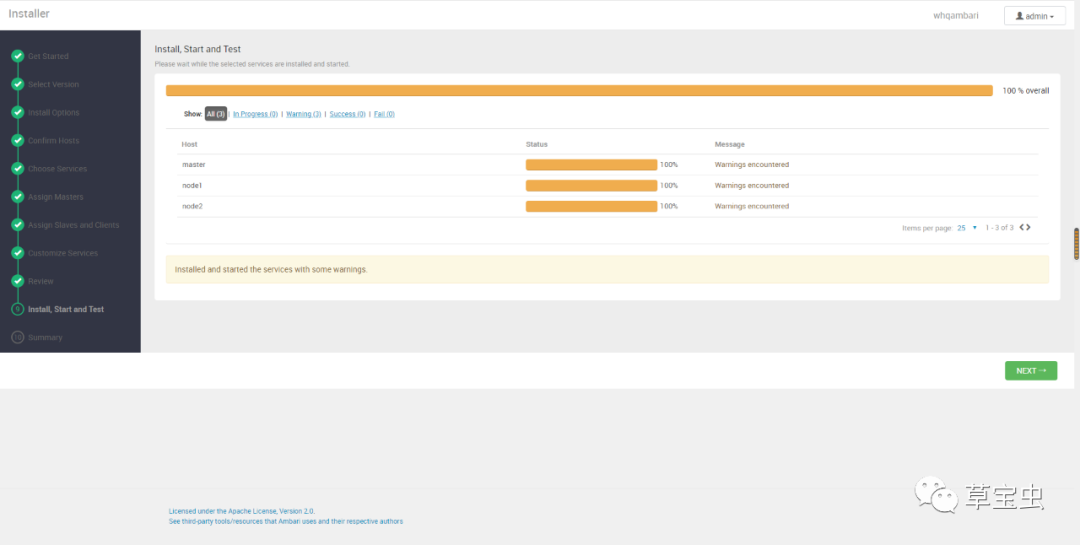
各种下一步……Install, Start and Test界面等待安装
Hive Client安装报错
Failed to download file from http://master:8080/resources/mysql-connector-java.jar due to HTTP error: HTTP Error 404: Not Found
解决
cd /var/lib/ambari-server/resources/ln /usr/share/java/mysql-connector-java.jar mysql-connector-java.jar
安装完毕如下
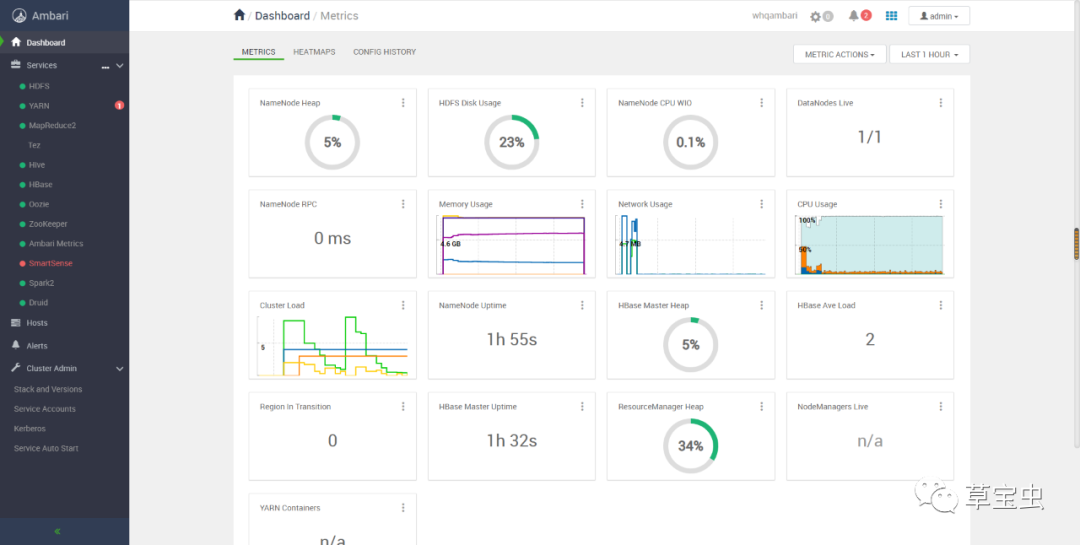
下一步进入系统页面
11.维护
重启系统后ambari-server和ambari-agent会自动启动
查看状态
ambari-server status
ambari-agent status
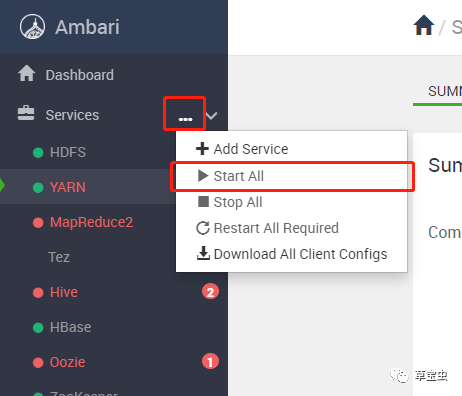
但是内部其他服务可能会启动失败,一片红
可以沿着服务依赖关系启动
Zookeeper——HDFS——YARN
或者直接StartAll、Restart All启动/重启所有服务
atlas启动报错
node1
resource_management.core.exceptions.ExecutionFailed: Execution of 'source /usr/hdp/current/atlas-server/conf/atlas-env.sh ; /usr/hdp/current/atlas-server/bin/atlas_start.py' returned 255. Exception: [Errno 2] No such file or directory
Traceback (most recent call last): File "/usr/hdp/current/atlas-server/bin/atlas_start.py", line 163, in <module> returncode = main() File "/usr/hdp/current/atlas-server/bin/atlas_start.py", line 73, in main mc.expandWebApp(atlas_home) File "/usr/hdp/3.1.4.0-315/atlas/bin/atlas_config.py", line 160, in expandWebApp jar(atlasWarPath) File "/usr/hdp/3.1.4.0-315/atlas/bin/atlas_config.py", line 213, in jar process = runProcess(commandline) File "/usr/hdp/3.1.4.0-315/atlas/bin/atlas_config.py", line 249, in runProcess p = subprocess.Popen(commandline, stdout=stdoutFile, stderr=stderrFile, shell=shell) File "/usr/lib64/python2.7/subprocess.py", line 711, in __init__ errread, errwrite) File "/usr/lib64/python2.7/subprocess.py", line 1327, in _execute_child raise child_exception OSError: [Errno 2] No such file or directory
问题排查
vi /usr/hdp/3.1.4.0-315/atlas/bin/atlas_config.py
249行前
debug ("Executing : %s" % str(commandline))
改为
print ("Executing : %s" % str(commandline))
发现调用了jar命令,这个在jdk目录下,需要安装jdk,jre不包含该功能,并且修改java_home目录
vi /etc/ambari-server/conf/ambari.properties
NodeManager补装
默认的安装只会在node2上安装NodeManager,运行计算任务时只有NodeManager工作,按一般情况均需在node1上安装NodeManager。
Host——node1——Add选择NodeManager即可进行安装,安装后启动即可。
