



参考:https://open.oceanbase.com/docs/community/oceanbase-database/V3.1.1/deploy-the-distributed-oceanbase-cluster
环境规划
环境是这样的,只有一台虚拟机,配置16c80G,准备使用docker来模拟出4台CentOS主机,搭建OceanBase 3.1.1社区版的集群。OBServer每台至少需要8G内存,否则不能启动。
具体配置如下所示:
| 主机名 | IP | 端口 | 主机映射端口 | Zone | 作用 |
|---|---|---|---|---|---|
| lhrob1 | 172.72.8.11 | 2881 | 28811 | zone1 | OB Server1 |
| lhrob2 | 172.72.8.12 | 2881 | 28812 | zone2 | OB Server2 |
| lhrob3 | 172.72.8.13 | 2881 | 28813 | zone3 | OB Server3 |
| lhrobproxy | 172.72.8.14 | 2883 | 28814 | 用于OBD、OBProxy、OBClient、mysql客户端、时间服务器等 |
初始化准备
申请环境
 1docker network create --subnet=172.72.8.0/16  lhrob-network
 2docker network inspect lhrob-network
 3
 4
 5docker rm -f lhrob1 lhrob2 lhrob3 lhrobproxy
 6
 7docker run -d --name lhrob1 -h lhrob1 \
 8  --net=lhrob-network --ip 172.72.8.11 \
 9  -p 28811:2881 \
10  -v /sys/fs/cgroup:/sys/fs/cgroup \
11  --privileged=true lhrbest/lhrcentos76:8.5 \
12  /usr/sbin/init
13
14docker run -d --name lhrob2 -h lhrob2 \
15  --net=lhrob-network --ip 172.72.8.12 \
16  -p 28812:2881 \
17  -v /sys/fs/cgroup:/sys/fs/cgroup \
18  --privileged=true lhrbest/lhrcentos76:8.5 \
19  /usr/sbin/init
20
21
22docker run -d --name lhrob3 -h lhrob3 \
23  --net=lhrob-network --ip 172.72.8.13 \
24  -p 28813:2881 \
25  -v /sys/fs/cgroup:/sys/fs/cgroup \
26  --privileged=true lhrbest/lhrcentos76:8.5 \
27  /usr/sbin/init
28
29
30docker run -d --name lhrobproxy -h lhrobproxy \
31  --net=lhrob-network --ip 172.72.8.14 \
32  -p 28814:2883 \
33  -v /sys/fs/cgroup:/sys/fs/cgroup \
34  --privileged=true lhrbest/lhrcentos76:8.5 \
35  /usr/sbin/init
36
37
38
39docker exec -it lhrobproxy bash
配置时钟源
参考:https://open.oceanbase.com/docs/community/oceanbase-database/V3.1.1/optional-configuring-clock-sources
如果您使用集群安装 OceanBase,则需要保证集群内各机器的时间同步。否则集群无法启动,服务在运行时也会出现异常。如果您已配置 NTP 时钟同步,则无需重新配置。
OceanBase 集群中的服务器时间必须保持一致,否则会导致 OceanBase 集群无法启动,运行时也会出现故障。物理机与时钟服务器的误差在 50ms 以下可认为时钟是同步状态,OceanBase 集群最大容忍误差不能超过 100ms。当超过 100ms 时,会出现无主情况。恢复时钟同步后。重启 OceanBase 集群, 可以恢复正常。
部署 OceanBase 集群时,各个 OBServer 的 RPC 允许的时钟偏差最大是100ms。
这里以“172.72.8.14”为时间服务器,其它3台OBServer同步该机器的时间:
1yum install ntp ntpdate -y
2ntpq -4p
3ntpstat
4timedatectl
1、修改“172.72.8.14”为时间服务器/etc/ntp.conf
 1# For more information about this file, see the man pages
 2# ntp.conf(5), ntp_acc(5), ntp_auth(5), ntp_clock(5), ntp_misc(5), ntp_mon(5).
 3
 4driftfile /var/lib/ntp/drift
 5
 6#新增:日志目录
 7logfile /var/log/ntpd.log
 8
 9# Permit time synchronization with our time source, but do not
10# permit the source to query or modify the service on this system.
11restrict default nomodify notrap nopeer noquery
12
13# Permit all access over the loopback interface.  This could
14# be tightened as well, but to do so would effect some of
15# the administrative functions.
16restrict 127.0.0.1
17restrict ::1
18
19#新增:这一行的含义是授权172.72.8.0网段上的所有机器可以从这台机器上查询和同步时间.
20restrict 172.72.8.0 mask 255.255.255.0 nomodify notrap
21
22# Hosts on local network are less restricted.
23#restrict 192.168.1.0 mask 255.255.255.0 nomodify notrap
24
25# Use public servers from the pool.ntp.org project.
26# Please consider joining the pool (http://www.pool.ntp.org/join.html).
27#server 0.centos.pool.ntp.org iburst
28#server 1.centos.pool.ntp.org iburst
29#server 2.centos.pool.ntp.org iburst
30#server 3.centos.pool.ntp.org iburst
31
32#新增:时间服务器列表.
33server 0.cn.pool.ntp.org iburst
34server 1.cn.pool.ntp.org iburst
35server 2.cn.pool.ntp.org iburst
36server 3.cn.pool.ntp.org iburst
37
38#新增:当外部时间不可用时,使用本地时间
39server 127.0.0.1 iburst
40fudge 127.0.0.1 stratum 10
41
42
43#broadcast 192.168.1.255 autokey        # broadcast server
44#broadcastclient                        # broadcast client
45#broadcast 224.0.1.1 autokey            # multicast server
46#multicastclient 224.0.1.1              # multicast client
47#manycastserver 239.255.254.254         # manycast server
48#manycastclient 239.255.254.254 autokey # manycast client
49
50# Enable public key cryptography.
51#crypto
52
53includefile /etc/ntp/crypto/pw
54
55# Key file containing the keys and key identifiers used when operating
56# with symmetric key cryptography.
57keys /etc/ntp/keys
58
59# Specify the key identifiers which are trusted.
60#trustedkey 4 8 42
61
62# Specify the key identifier to use with the ntpdc utility.
63#requestkey 8
64
65# Specify the key identifier to use with the ntpq utility.
66#controlkey 8
67
68# Enable writing of statistics records.
69#statistics clockstats cryptostats loopstats peerstats
70
71# Disable the monitoring facility to prevent amplification attacks using ntpdc
72# monlist command when default restrict does not include the noquery flag. See
73# CVE-2013-5211 for more details.
74# Note: Monitoring will not be disabled with the limited restriction flag.
75disable monitor
配置开机启动:
 1systemctl enable ntpd
 2systemctl is-enabled ntpd
 3
 4ntpdate -u 1.cn.pool.ntp.org
 5systemctl restart ntpd
 6
 7
 8[root@lhrobproxy /]# ntpstat
 9synchronised to NTP server (84.16.73.33) at stratum 2
10   time correct to within 98 ms
11   polling server every 64 s
其它客户端,修改“/etc/ntp.conf”,注释server开头的行,并添加如下行:
1server 172.72.8.14
2
3restrict 172.72.8.14 nomodify notrap noquery
4
5server 127.0.0.1
6fudge 127.0.0.1 stratum 10
配置开机启动:
1systemctl enable ntpd
2systemctl restart ntpd
客户端配置自动同步:
1crontab -e
2* * * * * /usr/sbin/ntpdate -u 172.72.8.14 & > /dev/null
配置内核参数
4个节点都运行:
 1cat >> /etc/security/limits.conf <<"EOF"
 2root soft nofile 655350
 3root hard nofile 655350
 4* soft nofile 655350
 5* hard nofile 655350
 6* soft stack 20480
 7* hard stack 20480
 8* soft nproc 655360
 9* hard nproc 655360
10* soft core unlimited
11* hard core unlimited
12EOF
13
14
15echo "fs.aio-max-nr=1048576" >>  /etc/sysctl.conf
16
17sysctl -p
如果只是测试,您可以只设置 fs.aio-max-nr=1048576
。
创建用户
1useradd -U admin -d /home/admin -s /bin/bash
2echo "admin:lhr" | chpasswd
3
4chown -R admin:admin /home/admin
5
6
7echo "admin       ALL=(ALL)       NOPASSWD: ALL" >> /etc/sudoers
设置无密码SSH登陆
可以使用rac上的sshUserSetup.sh快速配置,只在lhrobproxy上运行:
1sh sshUserSetup.sh -user admin -hosts "lhrob1 lhrob2 lhrob3 lhrobproxy" -advanced exverify -confirm
安装集群
在lhrobproxy操作:
安装OBD
1yum install -y yum-utils
2yum-config-manager --add-repo https://mirrors.aliyun.com/oceanbase/OceanBase.repo
3yum install -y ob-deploy
设置yaml的配置文件
OBD根据这个yaml文件即可自动创建集群
 1cat > /tmp/obd_observer_obproxy.yaml <<"EOF"
 2## Only need to configure when remote login is required
 3user:
 4    username: admin                    #用户名,前提三个节点保持一致
 5    password: lhr                #密码 ,前提三个节点保持一致
 6    key_file:        #密钥,可省略
 7
 8####################    下面是 observer搭建参数  ##############################
 9oceanbase-ce:
10  servers:
11    - name: z1         # zone名
12      # Please don't use hostname, only IP can be supported
13      ip: 172.72.8.11    # OB1 地址
14    - name: z2
15      ip: 172.72.8.12    # OB2 地址
16    - name: z3
17      ip: 172.72.8.13    # OB3 地址
18  global:
19    mysql_port: 2881            # 数据库端口
20    rpc_port: 2882              # 远程访问的协议端口号
21    home_path: /home/admin/oceanbase      # 软件目录
22    #data_dir: /data      # 数据目录
23    #redo_dir: /redo      # redo目录
24    devname: eth0             # 设置要部署节点的网卡
25    memory_limit: 8G
26    system_memory: 2G             # 系统剩余保留内存2G
27    lower_case_table_names: 1   # 数据库不区分大小写
28    foreign_key_checks: 0       # DML 语句不检查外建约束,DDL 操作不受影响
29    sys_bkgd_migration_retry_num: 5        # 副本迁移失败时最多重试次数。
30    stack_size: 512K               # 设置程序函数调用栈的大小。 磁盘要512k 对齐,如果不是可能会启动失败
31    cpu_count: 16                  # cpu 16核
32    cache_wash_threshold: 1G       # 设置触发缓存清理的容量阈值。如果内存空间小于指定值时,内存空间将被清理。
33    __min_full_resource_pool_memory: 1073741824      # 默认普通租户的内存最小规格必须大于等于 5 GB,这里设置成1G,就说明我可以最低设置租户内存为1G
34    workers_per_cpu_quota: 10                         #  用于设置分配给每个 CPU 配额的工作线程数量。
35    schema_history_expire_time: 1d                # 元数据历史数据过期时间。
36    net_thread_count: 4                           # 设置网络 I/O 线程数,The value of net_thread_count had better be same as cpu's core number.
37    major_freeze_duty_time: Disable
38    minor_freeze_times: 10                        # 多少次小合并触发一次全局合并。
39    enable_separate_sys_clog: True           # 是否把系统事务日志与用户事务日志分开存储。
40    enable_merge_by_turn: FALSE
41    datafile_size: 5G
42    # datafile_disk_percentage: 0.1              # 数据库系统初始化用于存储数据,例如这里设置了40,表示百分之四十,如果我单节点是1TB的,约400多G空间将会被立即占用
43    syslog_level: INFO                          # 日志警报级别
44    enable_syslog_recycle: True               # 开启回收系统日志的功能
45    max_syslog_file_count: 4                  # 日志文件数量
46    log_dir_size_threshold: 1G
47    cluster_id: 1                             # 集群ID
48    # observer cluster name, consistent with obproxy's cluster_name
49    appname: lhrob311cluster                  # 集群名,要与下面obproxy的对应一致
50    root_password: lhr
51    proxyro_password: lhr
52    ###下面设置节点信息
53  z1:
54    zone: zone1               # 设置节点所在的 Zone 的名字
55  z2:
56    zone: zone2
57  z3:
58    zone: zone3
59########################## 以下是obrpoxy的 搭建参数 ######################3
60obproxy:
61  servers:
62    - 127.0.0.1
63  global:
64    listen_port: 2883
65    prometheus_listen_port: 2884
66    home_path: /home/admin/obproxy
67    # oceanbase root server list
68    # format: ip:mysql_port,ip:mysql_port
69    rs_list: 172.72.8.11:2881;172.72.8.12:2881;172.72.8.13:2881
70    enable_cluster_checkout: false
71EOF
使用OBD初始化集群
 1sh /etc/profile.d/obd.sh
 2
 3obd cluster deploy lhrob311cluster -c /tmp/obd_observer_obproxy.yaml -f
 4
 5obd cluster list
 6obd cluster display lhrob311cluster
 7
 8obd cluster start lhrob311cluster
 9
10-- 修改参数
11obd cluster edit-config  lhrob311cluster
执行过程:
  1[root@lhrobproxy soft]# obd cluster deploy lhrob311cluster -c /tmp/obd_observer_obproxy.yaml -f
  2Update OceanBase-community-stable-el7 ok
  3Update OceanBase-development-kit-el7 ok
  4Download oceanbase-ce-3.1.1-4.el7.x86_64.rpm (46.21 M): 100% [###############################################################################################################################################################################################################################################################################################################################################################################################################################################################################################################################################################################################################################################################################################################################################################################################################################################################################################################################################] Time: 0:00:18   2.58 MB/s
  5Package oceanbase-ce-3.1.1 is available.
  6Download obproxy-3.1.0-1.el7.x86_64.rpm (7.70 M): 100% [#####################################################################################################################################################################################################################################################################################################################################################################################################################################################################################################################################################################################################################################################################################################################################################################################################################################################################################################################################################] Time: 0:00:01   4.62 MB/s
  7Package obproxy-3.1.0 is available.
  8install oceanbase-ce-3.1.1 for local ok
  9install obproxy-3.1.0 for local ok
 10+-----------------------------------------------------------------------------+
 11|                                   Packages                                  |
 12+--------------+---------+---------+------------------------------------------+
 13| Repository   | Version | Release | Md5                                      |
 14+--------------+---------+---------+------------------------------------------+
 15| oceanbase-ce | 3.1.1   | 4.el7   | f19f8bfb67723712175fb0dfd60579196b3168f1 |
 16| obproxy      | 3.1.0   | 1.el7   | 0b17cf0459a3b53c5a2febb6572894d183154c64 |
 17+--------------+---------+---------+------------------------------------------+
 18Repository integrity check ok
 19Parameter check ok
 20Open ssh connection ok
 21Remote oceanbase-ce-3.1.1-f19f8bfb67723712175fb0dfd60579196b3168f1 repository install ok
 22Remote oceanbase-ce-3.1.1-f19f8bfb67723712175fb0dfd60579196b3168f1 repository lib check !!
 23[WARN] z1(172.72.8.11) oceanbase-ce-3.1.1-f19f8bfb67723712175fb0dfd60579196b3168f1 require: libmariadb.so.3
 24[WARN] z2(172.72.8.12) oceanbase-ce-3.1.1-f19f8bfb67723712175fb0dfd60579196b3168f1 require: libmariadb.so.3
 25[WARN] z3(172.72.8.13) oceanbase-ce-3.1.1-f19f8bfb67723712175fb0dfd60579196b3168f1 require: libmariadb.so.3
 26
 27Remote obproxy-3.1.0-0b17cf0459a3b53c5a2febb6572894d183154c64 repository install ok
 28Remote obproxy-3.1.0-0b17cf0459a3b53c5a2febb6572894d183154c64 repository lib check ok
 29Try to get lib-repository
 30Download oceanbase-ce-libs-3.1.1-4.el7.x86_64.rpm (155.15 K): 100% [#########################################################################################################################################################################################################################################################################################################################################################################################################################################################################################################################################################################################################################################################################################################################################################################################################################################################################################################################################] Time: 0:00:00   1.87 MB/s
 31Package oceanbase-ce-libs-3.1.1 is available.
 32install oceanbase-ce-libs-3.1.1 for local ok
 33Use oceanbase-ce-libs-3.1.1-58384f7ab4ee736e9d530f4bdd63c20ced0e7aba for oceanbase-ce-3.1.1-f19f8bfb67723712175fb0dfd60579196b3168f1
 34Remote oceanbase-ce-libs-3.1.1-58384f7ab4ee736e9d530f4bdd63c20ced0e7aba repository install ok
 35Remote oceanbase-ce-3.1.1-f19f8bfb67723712175fb0dfd60579196b3168f1 repository lib check ok
 36Cluster status check ok
 37Initializes observer work home ok
 38Initializes obproxy work home ok
 39lhrob311cluster deployed
 40
 41[root@lhrobproxy soft]# obd cluster list
 42+------------------------------------------------------------------------+
 43|                              Cluster List                              |
 44+-----------------+------------------------------------+-----------------+
 45| Name            | Configuration Path                 | Status (Cached) |
 46+-----------------+------------------------------------+-----------------+
 47| lhrob311cluster | /root/.obd/cluster/lhrob311cluster | deployed        |
 48+-----------------+------------------------------------+-----------------+
 49
 50[root@lhrobproxy soft]# obd cluster start lhrob311cluster
 51Get local repositories and plugins ok
 52Open ssh connection ok
 53Cluster param config check ok
 54Check before start observer ok
 55[WARN] (172.72.8.11) clog and data use the same disk (/)
 56[WARN] (172.72.8.12) clog and data use the same disk (/)
 57[WARN] (172.72.8.13) clog and data use the same disk (/)
 58
 59Check before start obproxy ok
 60Start observer ok
 61observer program health check ok
 62Connect to observer ok
 63Initialize cluster
 64Cluster bootstrap ok
 65Wait for observer init ok
 66+-----------------------------------------------+
 67|                    observer                   |
 68+-------------+---------+------+-------+--------+
 69| ip          | version | port | zone  | status |
 70+-------------+---------+------+-------+--------+
 71| 172.72.8.11 | 3.1.1   | 2881 | zone1 | active |
 72| 172.72.8.12 | 3.1.1   | 2881 | zone2 | active |
 73| 172.72.8.13 | 3.1.1   | 2881 | zone3 | active |
 74+-------------+---------+------+-------+--------+
 75
 76Start obproxy ok
 77obproxy program health check ok
 78Connect to obproxy ok
 79Initialize cluster
 80+---------------------------------------------+
 81|                   obproxy                   |
 82+-----------+------+-----------------+--------+
 83| ip        | port | prometheus_port | status |
 84+-----------+------+-----------------+--------+
 85| 127.0.0.1 | 2883 | 2884            | active |
 86+-----------+------+-----------------+--------+
 87lhrob311cluster running
 88[root@lhrobproxy soft]# obd cluster list
 89+------------------------------------------------------------------------+
 90|                              Cluster List                              |
 91+-----------------+------------------------------------+-----------------+
 92| Name            | Configuration Path                 | Status (Cached) |
 93+-----------------+------------------------------------+-----------------+
 94| lhrob311cluster | /root/.obd/cluster/lhrob311cluster | running         |
 95+-----------------+------------------------------------+-----------------+
 96[root@lhrobproxy soft]#
 97
 98[root@lhrobproxy soft]# netstat -tulnp| grep 288
 99tcp        0      0 0.0.0.0:2883            0.0.0.0:*               LISTEN      8048/obproxy
100tcp        0      0 0.0.0.0:2884            0.0.0.0:*               LISTEN      8048/obproxy
101
102-- 剩余节点类似
103[root@lhrob1 log]# netstat -tulnp| grep 288
104tcp        0      0 0.0.0.0:2881            0.0.0.0:*               LISTEN      8244/observer
105tcp        0      0 0.0.0.0:2882            0.0.0.0:*               LISTEN      8244/observer
配置obproxy
https://open.oceanbase.com/articles/1100243
obproxy跟OB集群通信是使用sys租户内的一个内部账户proxyro。这个账户需要创建。
obproxy启动后,默认用 root@proxysys 登录,密码为空。需要改密码(通过proxy参数obproxy_sys_password指定)。
obproxy启动后,还需要修改proxyro的密码(通过proxy参数observer_sys_password指定),设置为跟OB集群里创建的proxyro密码一致才能链接那个OB集群。
 1mysql -h127.1 -uroot@sys -P2881 -plhr -c -A oceanbase
 2
 3create user proxyro identified by 'lhr';
 4alter user proxyro identified by 'lhr';
 5grant select on *.* to proxyro;
 6
 7
 8
 9mysql -h127.1 -uroot@proxysys -P2883 -p
10alter proxyconfig set obproxy_sys_password='lhr';
11alter proxyconfig set observer_sys_password='lhr';
12show proxyconfig like '%sys_password%';
13
14
15mysql -h127.1 -uroot@sys -P2883 -plhr -c -A oceanbase
16mysql -uroot@sys -plhr -h192.168.66.35 -P28814
17
18select * from oceanbase.__all_server;
19show full processlist;
安装客户端
1yum install -y obclient mariadb mariadb-libs mariadb-devel
可以查询:
1mysql -uroot@proxysys#lhrob311cluster -p -h192.168.66.35 -P28814
2obclient -h 127.0.0.1  -uroot@proxysys -P2883
3obclient -h 127.0.0.1  -uroot@proxysys#lhrob311cluster -P2883
4
5
6mysql -uroot@sys -plhr -h192.168.66.35 -P28811
7mysql -uroot@sys -plhr -h192.168.66.35 -P28814
如下:
 1C:\Users\lhrxxt>mysql -uroot@sys -plhr -h192.168.66.35 -P28814
 2mysql: [Warning] Using a password on the command line interface can be insecure.
 3Welcome to the MySQL monitor.  Commands end with ; or \g.
 4Your MySQL connection id is 92
 5Server version: 5.6.25 OceanBase 3.1.1 (r4-8c615943cbd25a6f7b8bdfd8677a13a21709a05e) (Built Oct 21 2021 10:33:14)
 6
 7Copyright (c) 2000, 2020, Oracle and/or its affiliates. All rights reserved.
 8
 9Oracle is a registered trademark of Oracle Corporation and/or its
10affiliates. Other names may be trademarks of their respective
11owners.
12
13Type 'help;' or '\h' for help. Type '\c' to clear the current input statement.
14
15MySQL [(none)]> show databases;
16+--------------------+
17| Database           |
18+--------------------+
19| oceanbase          |
20| information_schema |
21| mysql              |
22| SYS                |
23| LBACSYS            |
24| ORAAUDITOR         |
25| test               |
26+--------------------+
277 rows in set (0.64 sec)
28
29MySQL [(none)]> create database lhrdb;
30Query OK, 1 row affected (0.62 sec)
31
32MySQL [(none)]> select * from oceanbase.__all_server;
33+----------------------------+----------------------------+-------------+----------+----+-------+------------+-----------------+--------+-----------------------+------------------------------------------------------------------------+-----------+--------------------+--------------+----------------+-------------------+
34| gmt_create                 | gmt_modified               | svr_ip      | svr_port | id | zone  | inner_port | with_rootserver | status | block_migrate_in_time | build_version                                                          | stop_time | start_service_time | first_sessid | with_partition | last_offline_time |
35+----------------------------+----------------------------+-------------+----------+----+-------+------------+-----------------+--------+-----------------------+------------------------------------------------------------------------+-----------+--------------------+--------------+----------------+-------------------+
36| 2021-11-03 10:07:29.148223 | 2021-11-03 15:36:29.125523 | 172.72.8.11 |     2882 |  1 | zone1 |       2881 |               0 | active |                     0 | 3.1.1_4-8c615943cbd25a6f7b8bdfd8677a13a21709a05e(Oct 21 2021 10:33:14) |         0 |   1635907362335045 |            0 |              1 |                 0 |
37| 2021-11-03 10:07:28.665950 | 2021-11-03 15:36:29.126133 | 172.72.8.12 |     2882 |  2 | zone2 |       2881 |               0 | active |                     0 | 3.1.1_4-8c615943cbd25a6f7b8bdfd8677a13a21709a05e(Oct 21 2021 10:33:14) |         0 |   1635907363335302 |            0 |              1 |                 0 |
38| 2021-11-03 10:07:28.675445 | 2021-11-03 15:36:29.126735 | 172.72.8.13 |     2882 |  3 | zone3 |       2881 |               1 | active |                     0 | 3.1.1_4-8c615943cbd25a6f7b8bdfd8677a13a21709a05e(Oct 21 2021 10:33:14) |         0 |   1635907362334795 |            0 |              1 |                 0 |
39+----------------------------+----------------------------+-------------+----------+----+-------+------------+-----------------+--------+-----------------------+------------------------------------------------------------------------+-----------+--------------------+--------------+----------------+-------------------+
403 rows in set (0.12 sec)
41
42MySQL [(none)]> select
43    -> zone,
44    -> concat(svr_ip, ':', svr_port) as observer,
45    -> concat(cpu_assigned, ' : ', cpu_total) as cpu_summary,
46    -> concat(mem_assigned/(1024*1024*1024),' : ', mem_total/(1024*1024*1024)) as mem_summary_gb,
47    -> concat(disk_assigned/(1024*1024*1024),' : ', disk_total/(1024*1024*1024)) as disk_summary_gb,
48    -> cast(cpu_weight as decimal(5,2)) as c_weight,
49    -> cast(memory_weight as decimal(5,2)) as m_weight,
50    -> cast(disk_weight as decimal(5,2)) as d_weight,
51    -> unit_num
52    -> from oceanbase.__all_virtual_server_stat
53    -> order by zone,observer;
54+-------+------------------+-------------+-----------------+-----------------+----------+----------+----------+----------+
55| zone  | observer         | cpu_summary | mem_summary_gb  | disk_summary_gb | c_weight | m_weight | d_weight | unit_num |
56+-------+------------------+-------------+-----------------+-----------------+----------+----------+----------+----------+
57| zone1 | 172.72.8.11:2882 | 2.5 : 10    | 1.5000 : 6.0000 | 2.0000 : 2.0000 |     0.50 |     0.50 |     0.00 |        1 |
58| zone2 | 172.72.8.12:2882 | 2.5 : 10    | 1.5000 : 6.0000 | 2.0000 : 2.0000 |     0.50 |     0.50 |     0.00 |        1 |
59| zone3 | 172.72.8.13:2882 | 2.5 : 10    | 1.5000 : 6.0000 | 2.0000 : 2.0000 |     0.50 |     0.50 |     0.00 |        1 |
60+-------+------------------+-------------+-----------------+-----------------+----------+----------+----------+----------+
613 rows in set (0.40 sec)
接下来就是创建租户啥的操作,这里不再详细演示。
巡检脚本
可以使用麦老师的OceanBase的巡检脚本(https://www.xmmup.com/shujukuxunjianjiaoben.html) ,脚本目前不是很详细,当然一直在完善中,如下:
1C:\Users\lhrxxt>mysql -uroot@sys -plhr -h192.168.66.35 -P28814 -f --silent < D:\DB_OceanBase_HC_lhr_v7.0.0.sql > D:\lhr_OceanBase_check.html
2mysql: [Warning] Using a password on the command line interface can be insecure.
运行结果:
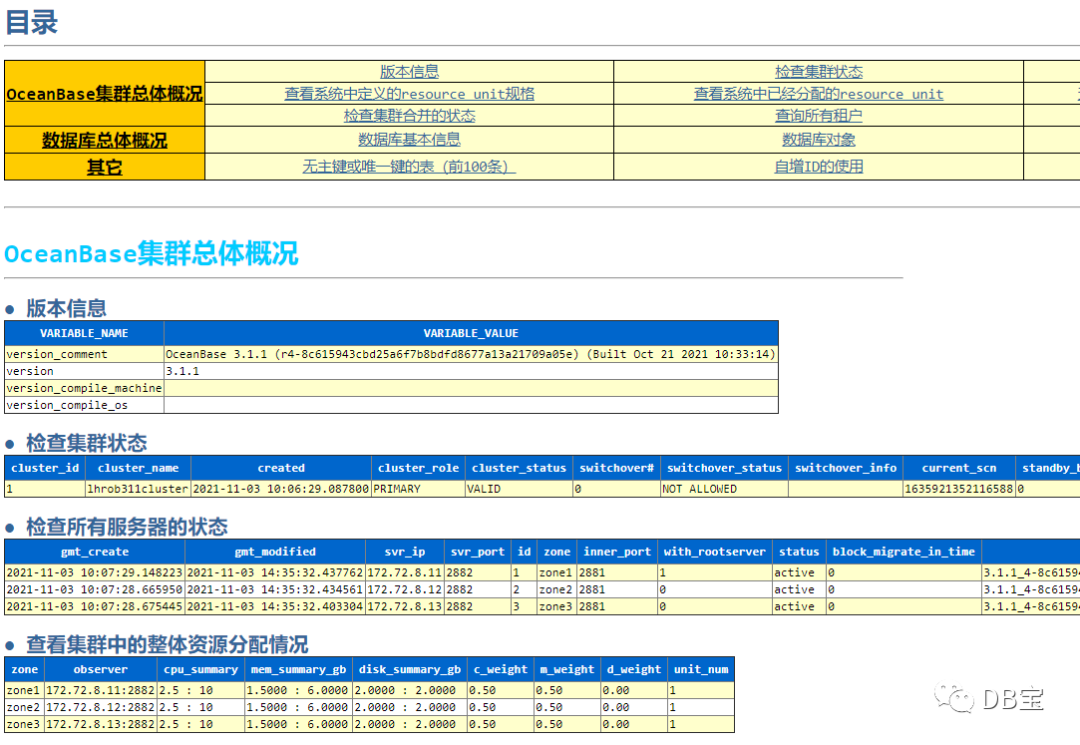
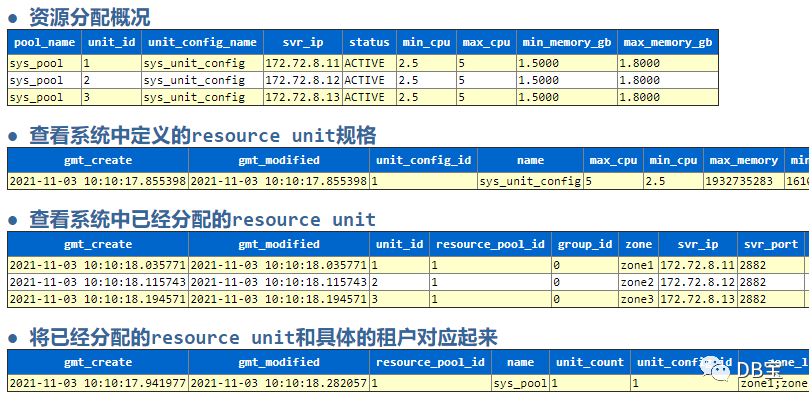
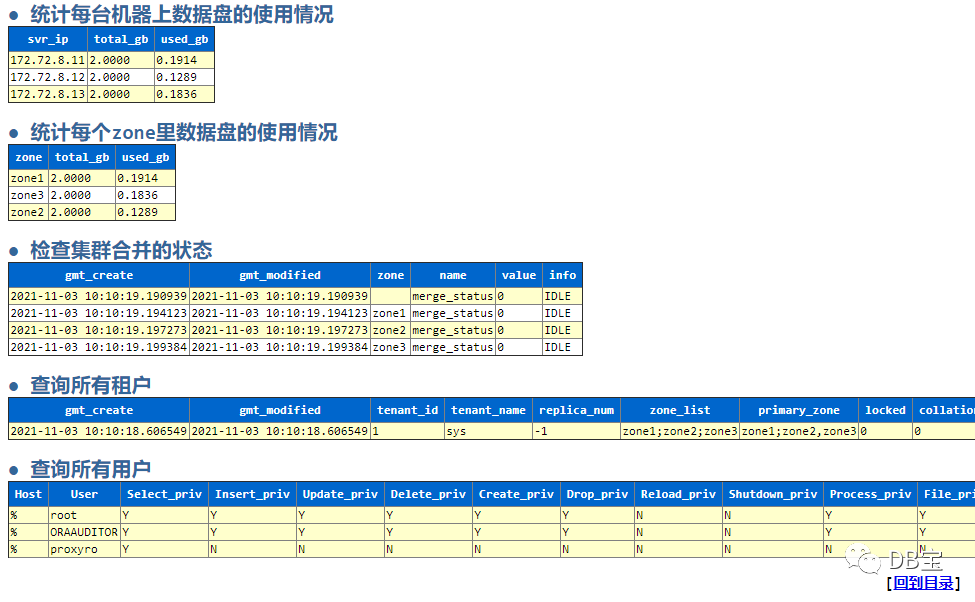
其它不再列举。
这里只列出部分结果,其它的详细内容可以参考:https://share.weiyun.com/5lb2U2M
