


1. 安装gitlab-runner
根据不同架构安装不同版本
# Linux x86-64
sudo curl -L --output /usr/local/bin/gitlab-runner https://gitlab-runner-downloads.s3.amazonaws.com/latest/binaries/gitlab-runner-linux-amd64

# Linux x86
sudo curl -L --output /usr/local/bin/gitlab-runner https://gitlab-runner-downloads.s3.amazonaws.com/latest/binaries/gitlab-runner-linux-386

# Linux arm
sudo curl -L --output /usr/local/bin/gitlab-runner https://gitlab-runner-downloads.s3.amazonaws.com/latest/binaries/gitlab-runner-linux-arm

# Linux arm64
sudo curl -L --output /usr/local/bin/gitlab-runner https://gitlab-runner-downloads.s3.amazonaws.com/latest/binaries/gitlab-runner-linux-arm64

# Linux s390x
sudo curl -L --output /usr/local/bin/gitlab-runner https://gitlab-runner-downloads.s3.amazonaws.com/latest/binaries/gitlab-runner-linux-s390x
添加可执行权限
sudo chmod +x /usr/local/bin/gitlab-runner
创建 gitlab ci 用户
sudo useradd --comment 'GitLab Runner' --create-home gitlab-runner --shell /bin/bash
启动gitlab runner
sudo gitlab-runner install --user=gitlab-runner --working-directory=/home/gitlab-runner
sudo gitlab-runner start
https://docs.gitlab.com/runner/install/linux-manually.html#using-binary-file
2. 复制group token
新建group并新建测试项目,复制group里的ci/cd的token,这样同一个group的项目就可以共享这个runner了
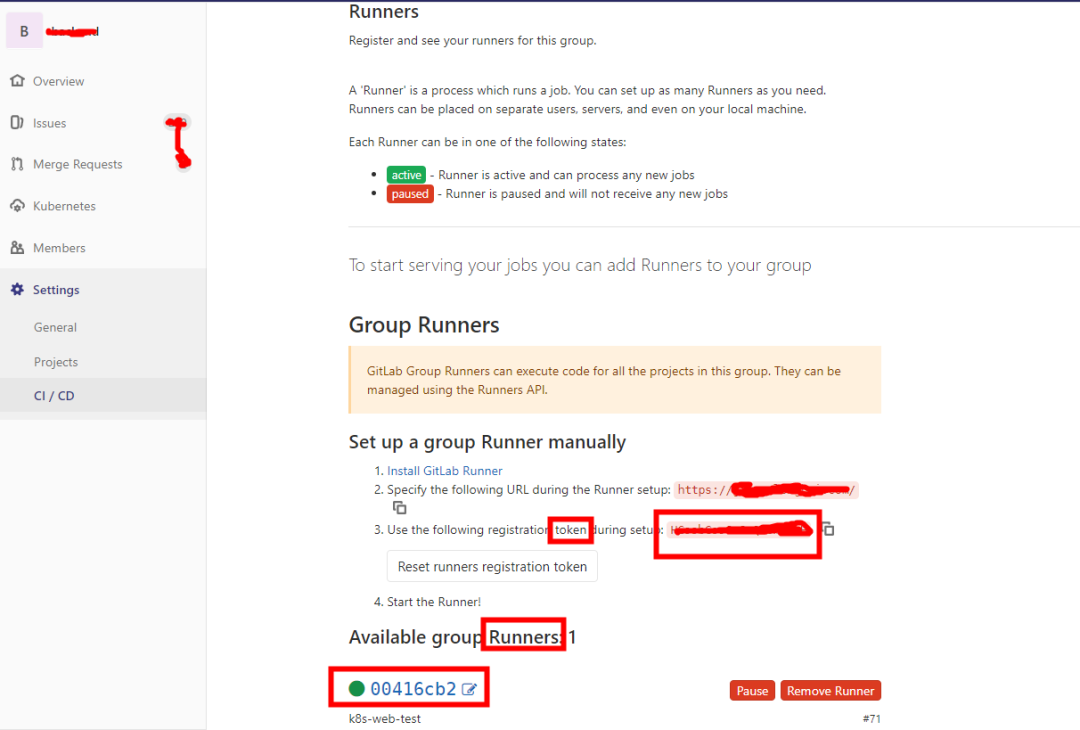
3. 注册group runner
跟上图类似,不过少了设置runner运行无tag的job,需要在注册好的runner设置,下面步骤有讲
[root@master01 ~]# gitlab-runner register
Runtime platform                                    arch=arm64 os=linux pid=8172 revision=e95f89a0 version=13.4.1
Running in system-mode.

Please enter the gitlab-ci coordinator URL (e.g. https://gitlab.com/):
https://git.vickey-wu.com/
Please enter the gitlab-ci token for this runner:
00416cb2
Please enter the gitlab-ci description for this runner:
[master01]: k8s-web-test
Please enter the gitlab-ci tags for this runner (comma separated):
k8s-web-test
Registering runner... succeeded                     runner=FkQRssgH
Please enter the executor: shell, ssh, kubernetes, docker, docker-ssh, parallels, docker-ssh+machine, custom, virtualbox, docker+machine:
kubernetes
Runner registered successfully. Feel free to start it, but if it's running already the config should be automatically reloaded!
4、重启gitlab-runner
如注册时输入有误可以手动修改配置文件
/etc/gitlab-runner/config.toml
,注意:config.toml里的token跟第2步的token不是同一个东西,不要混淆。下面为config.toml文件
https://docs.gitlab.com/runner/executors/kubernetes.html
concurrent = 1
check_interval = 0

[session_server]
  session_timeout = 1800

[[runners]]
  name = "runnername"
  url = "https://git.vickey-wu.com/"
  token = "zYxDXArngAwJnNmBfCfx"
  executor = "kubernetes"
  #clone_url = "http://10.xxx"
  [runners.custom_build_dir]
  [runners.cache]
    [runners.cache.s3]
    [runners.cache.gcs]
  [runners.kubernetes]
    host = ""
    bearer_token_overwrite_allowed = false
    image = ""
    namespace = ""
    namespace_overwrite_allowed = ""
    privileged = false
    image_pull_secrets = ["secretname"]
    #helper_image = "gitlab/gitlab-runner-helper:arm64-efa30e33"
    service_account_overwrite_allowed = ""
    pod_annotations_overwrite_allowed = ""
    [runners.kubernetes.volumes]

      [[runners.kubernetes.volumes.host_path]]
        name = "dockersock"
        mount_path = "/var/run/docker.sock"
        read_only = true

      [[runners.kubernetes.volumes.pvc]]
        name = "maven-pvc"
        mount_path = "/root/.m2/repository"


[[runners]]
  ...
将k8s的证书复制到gitlab-runner目录:
cp -R /root/.kube/ /home/gitlab-runner/
,不然会报错:ERROR: Preparation failed: getting Kubernetes config: invalid configuration: no configuration has been provided注册完成后重启gitlab-runner,命令:
gitlab-runner restart
;
5、设置runner可以运行未指定tag的job
回到第2步的页面就可以看到注册的runner了,同一个group的项目可以共享这个runner,这里还要编辑一下runner,启用Run untagged jobs
6、启用Auto DevOps
新版默认启用,可忽略此步
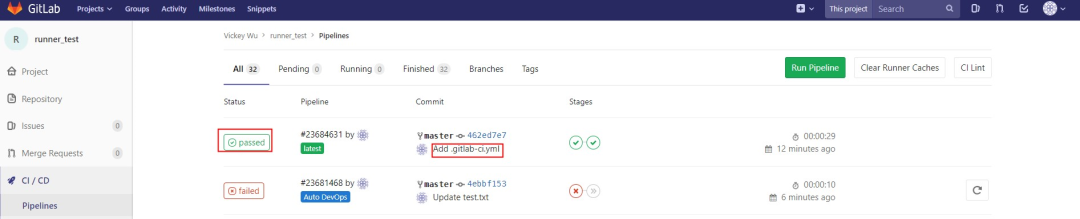
7、编写`.gitlab-ci.yml`
runner注册好了后在项目文件根目录添加.gitlab-ci.yml
文件,没有的话runner不会触发pipeline的job
.gitlab-ci.yml
stages:
    - build
    - test

build:
    stage: build
    image: vickeywu/gbuild:latest
    script:
        - echo "info> sample build complete"
    only:
        - master
    tags:
        - Specific Runners

test:
    stage: test
    image: vickeywu/gtest:latest
    script:
        - echo "info> sample test complete"
    only:
        - master
    tags:
        - Specific Runners
这里需要用到docker image:gbuild:latest和image:gtest:latest,这2个镜像是自定义的镜像,在docker仓库是没有的,
可以参考Chengzi_comm的专栏的第二步(2)用dockerfile build 2个自定义名字的镜像替换掉我这里的gtest:latest等,
也可以拉个系统镜像,然后运行一个容器,在里面安装需要的工具,之后将容器打包成自定义的镜像。
也可以拉我的镜像来测试
docker pull vickeywu/gbuild
,我只上传了一个镜像,如果需要多个,只需自己拉下来重新打个tag就行,参考如何将docker 镜像上传到docker hub仓库报错示意图
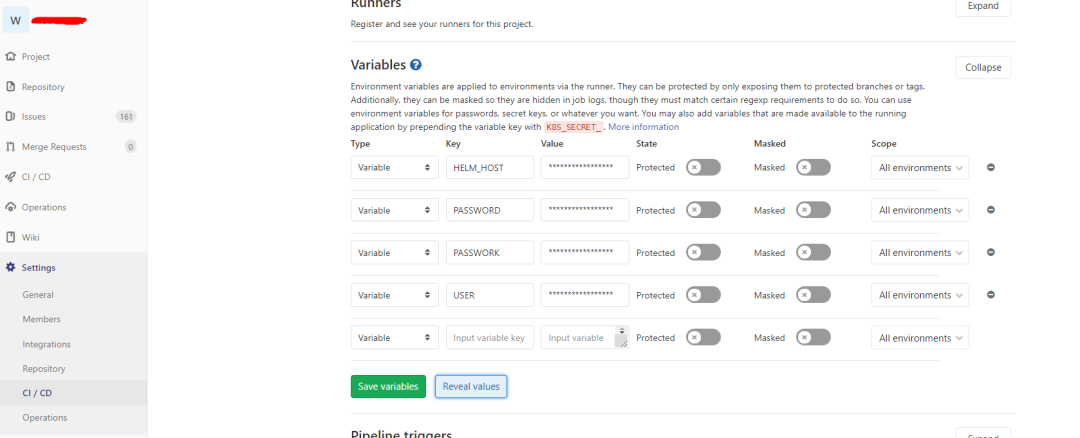
8、设置`.gitlab-ci.yml`环境变量(可选)
gitlab-ci里的变量都在这定义
USER:docker仓库用户名
PASSWORD:docker仓库密码
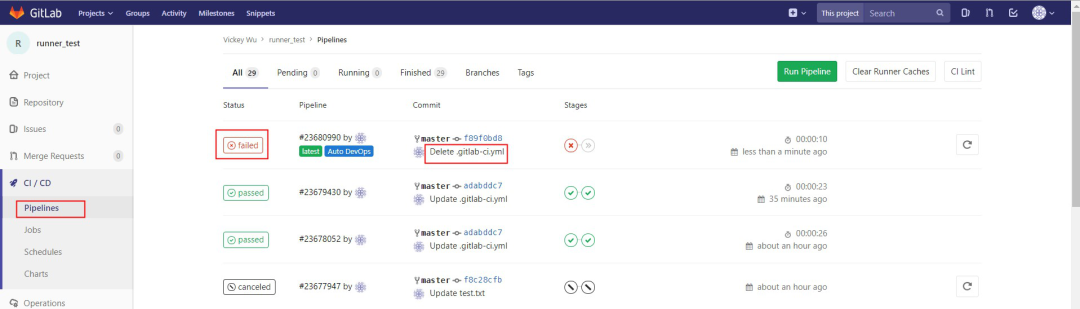
9、runner成功执行job
现在修改项目文件提交之后就会自动调用注册的runner来构建测试代码了
在服务器上也可以看到runner运行时会调用gbuild镜像运行一个临时的容器以测试代码,可以使用kubectl describe
来查看runner日志。
[root@master01 ~]# kubectl get pod |grep runner
runner-6uv2ouz1-project-196-concurrent-19f7gd   2/2     Running   0          24s
[root@master01 ~]# kubectl describe pod runner-6uv2ouz1-project-196-concurrent-19f7gd
......
  Normal  Created    3s    kubelet, ecs-e04e-0013  Created container build
  Normal  Started    2s    kubelet, ecs-e04e-0013  Started container build
  Normal  Pulled     2s    kubelet, ecs-e04e-0013  Container image "gitlab/gitlab-runner-helper:arm64-efa30e33" already present on machine
  Normal  Created    2s    kubelet, ecs-e04e-0013  Created container helper
  Normal  Started    2s    kubelet, ecs-e04e-0013  Started container helper
遇到的报错
ERROR: Preparation failed: getting Kubernetes config: invalid configuration: no configuration has been provided
使用
cp -R /root/.kube/ /home/gitlab-runner/
将k8s的证书复制到gitlab-runner目录即可;查看详细日志可以打开gitlab-runner run
然后用kubectl describe pod runnerxxx
查看pod日志
ERROR: Job failed (system failure): prepare environment: image pull failed: rpc error: code = Unknown desc = Error response from daemon:
检查/etc/gitlab-runner/config.toml文件中的runner是否都配置了
image_pull_secrets = ["secretname"]
,没有就使用kubectl create secret docker-registry secreatname --docker-server=<your-registry-server> --docker-username=<your-name> --docker-password=<your-pword>
创建拉取镜像的secret
参考文章
https://docs.gitlab.com/runner/install/docker.html)
https://docs.gitlab.com/runner/install/linux-repository.html#installing-the-runner
https://docs.gitlab.com/runner/register/
https://docs.gitlab.com/runner/executors/kubernetes.html
https://blog.csdn.net/chengzi_comm/article/details/78778284
