


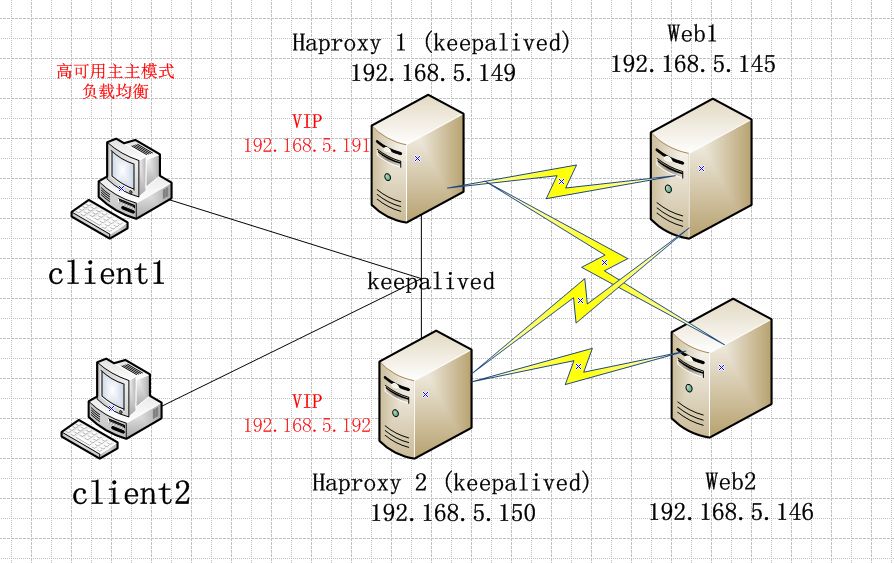
1、环境
四台CentOS7.2操作系统
VIP1 :192.168.5.191
VIP2 :192.168.5.192
Haproxy1:192.168.5.149
Haproxy2:192.168.5.150
web1:192.168.5.145
web2:192.168.5.146
拓扑图
2.Haproxy1 和Haproxy2分别安装haproxy和keepalived
为了快速实验haproxy和keepalived都是yum安装
keepalived的配置
! Configuration File for keepalived
global_defs {
roter_id haproxy-1
#haproxy 2配置
# roter_id haproxy-2
}
vrrp_instance VI_1 {
state MASTER
#haproxy 2配置
# state BACKUP
interface ens33
virtual_router_id 51
priority 100
#haproxy 2配置
# priority 75
advert_int 1
authentication {
auth_type PASS
auth_pass 1111
}
virtual_ipaddress {
192.168.5.191
}
}
vrrp_instance VI_2 {
state BACKUP
#haproxy2配置
#state MASTER
interface ens33
virtual_router_id 52
priority 75
#haproxy2配置
#priority 100
advert_int 1
authentication {
auth_type PASS
auth_pass 1111
}
virtual_ipaddress {
192.168.5.192
}
}
haproxy的添加配置
###统计页面设置
listen status
mode http
##http模式
bind 0.0.0.0:9000
##绑定了9000端口
stats enable
##是否启用状态监控
stats uri /admin?stats
##访问页面的地址
stats auth admin:123456
##访问页面的用户名:admin 密码:123456
stats hide-version
##掩藏haproxy的版本信息
stats admin if TRUE
##通过认证才能管理
stats refresh 30s
##页面30秒自动刷新
stats realm Haproxy\ Statistics
##密码提示文本框
listen haproxy-1
bind 192.168.5.191:80
#监听地址为VIP地址
mode tcp
#设置转发模式为TCP
option forwardfor
server web1 192.168.5.145:80 \
check weight 1
##weight 1 是各访问一次
server web2 192.168.5.146:80 \
check weight 1
#haproxy2机器haproxy的配置
listen haproxy-2
bind 192.168.5.192:80
#监听地址为VIP地址
mode tcp
#设置转发模式为TCP
option forwardfor
server web1 192.168.5.145:80 \
check weight 1
##weight 1 是各访问一次
server web2 192.168.5.146:80 \
check weight 1
3.web1和web2安装apache
web1
echo "web1" > /var/www/html/index.html
web2
echo "web2" > /var/www/html/index.html
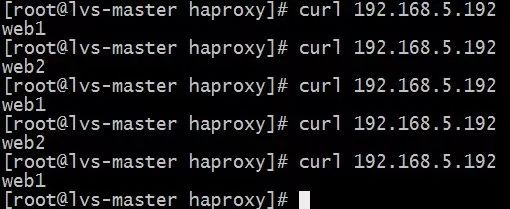
4.测试
curl 192.168.5.191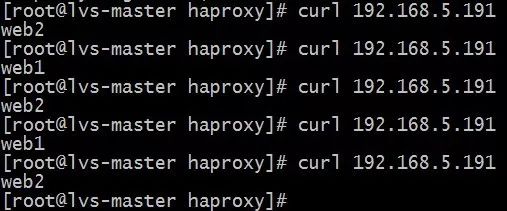
curl 192.168.5.192
模拟Haproxy1宕机,Haproxy1上的VIP漂移到了Haproxy2

