




# curl -Lo minikube https://storage.googleapis.com/minikube/releases/latest/minikube-linux-amd64 && chmod +x minikube
# sudo cp minikube /usr/local/bin && rm minikube
curl -LO https://storage.googleapis.com/kubernetes-release/release/`curl -s https://storage.googleapis.com/kubernetes-release/release/stable.txt`/bin/linux/amd64/kubectl
chmod +x kubectl
mv kubectl /usr/local/bin
yum remove docker \
                  docker-client \
                  docker-client-latest \
                  docker-common \
                  docker-latest \
                  docker-latest-logrotate \
                  docker-logrotate \
                  docker-engine
yum install -y yum-utils \
  device-mapper-persistent-data \
  lvm2

yum-config-manager \
    --add-repo \
    https://download.docker.com/linux/centos/docker-ce.repo
yum install docker-ce docker-ce-cli containerd.io
Download your desired version
Unpack it (tar -zxvf helm-v2.0.0-linux-amd64.tgz)
Find the helm binary in the unpacked directory, and move it to its desired destination (mv linux-amd64/helm /usr/local/bin/helm)
# cat rbac-config.yaml
apiVersion: v1
kind: ServiceAccount
metadata:
  name: tiller
  namespace: kube-system
---
apiVersion: rbac.authorization.k8s.io/v1
kind: ClusterRoleBinding
metadata:
  name: tiller
roleRef:
  apiGroup: rbac.authorization.k8s.io
  kind: ClusterRole
  name: cluster-admin
subjects:
  - kind: ServiceAccount
    name: tiller
    namespace: kube-system
kubectl create -f rbac-config.yaml
serviceaccount "tiller" created
clusterrolebinding "tiller" created
$ helm init --service-account tiller
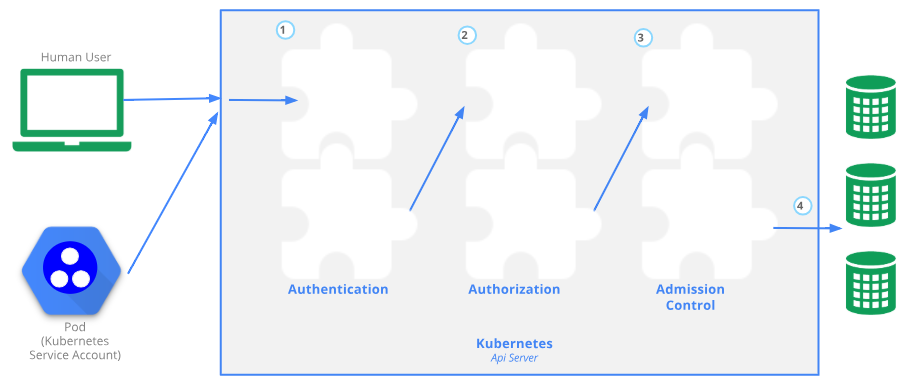
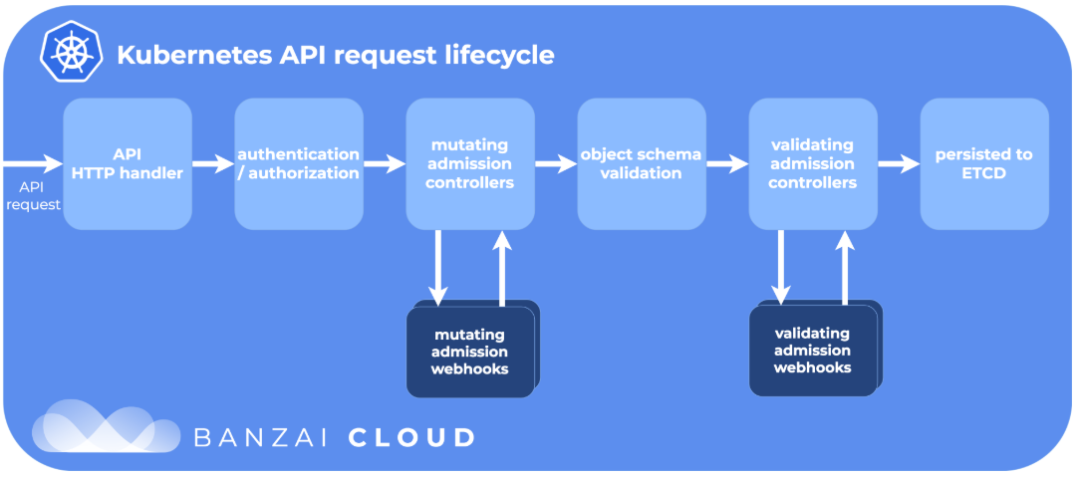
MutatingAdmissionWebhook:可以修改自定义的策略,MutatingAdmissionWebhook的处理一般优先于ValidatingAdmissionWebhook,这样前者修改的内容就可以由后者进行校验
ValidatingAdmissionWebhook: 允许或拒绝客户自定义的策略
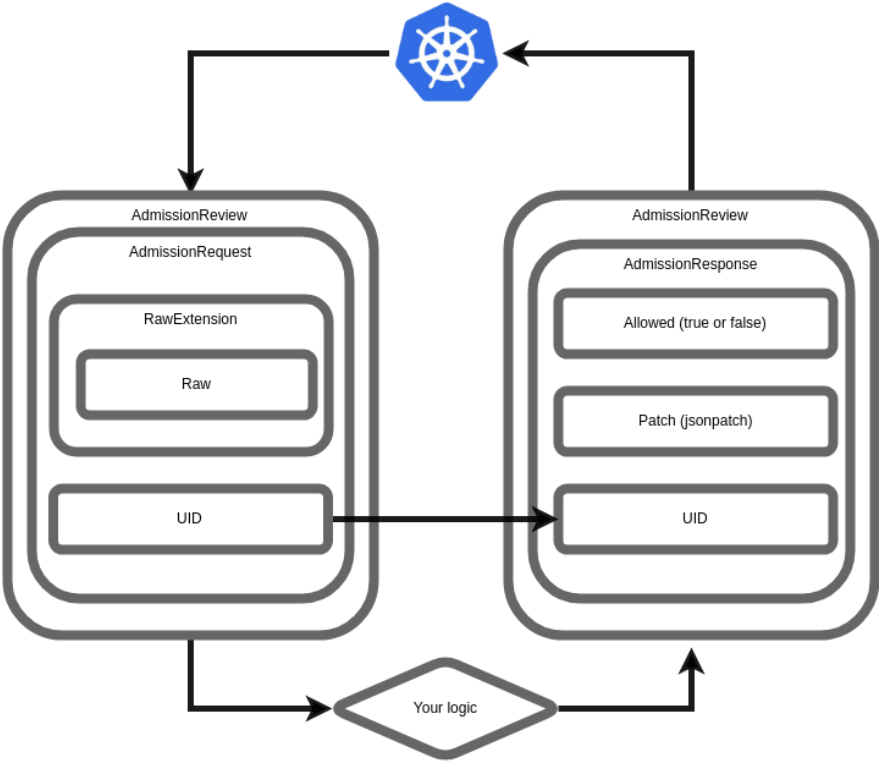
type AdmissionReview struct {
    metav1.TypeMeta `json:",inline"`
    // Request describes the attributes for the admission request.
    // +optional
    Request *AdmissionRequest `json:"request,omitempty" protobuf:"bytes,1,opt,name=request"`
    // Response describes the attributes for the admission response.
    // +optional
    Response *AdmissionResponse `json:"response,omitempty" protobuf:"bytes,2,opt,name=response"`
}
minikube start --vm-driver=none --extra-config=apiserver.enable-admission-plugins="NamespaceLifecycle,LimitRanger,ServiceAccount,DefaultStorageClass,DefaultTolerationSeconds,MutatingAdmissionWebhook,ValidatingAdmissionWebhook,Priority,ResourceQuota"
# ./deployment/webhook-create-signed-cert.sh
# kubectl create -f deployment/deployment.yaml
# kubectl create -f deployment/service.yaml
# cat ./deployment/validatingwebhook.yaml | ./deployment/webhook-patch-ca-bundle.sh > ./deployment/validatingwebhook-ca-bundle.yaml
apiVersion: admissionregistration.k8s.io/v1beta1
kind: ValidatingWebhookConfiguration
metadata:
  name: validation-webhook-example-cfg
  labels:
    app: admission-webhook-example
webhooks:
  - name: required-labels.banzaicloud.com
    clientConfig:
      service:
        name: admission-webhook-example-svc #service名称
        namespace: default
        path: "/validate" #访问的后缀路径
      caBundle: ${CA_BUNDLE} #上述命令生成的认证字段
    rules:
      - operations: [ "DELETE" ] #操作的动作
        apiGroups: ["apps", ""] #api groups
        apiVersions: ["v1"] #api version
        resources: ["pods"] #操作的资源
    namespaceSelector:
      matchLabels:
        admission-webhook-example: enabled # 限制default的命名空间
$ kubectl label namespace default admission-webhook-example=enabled
$ kubectl create -f deployment/validatingwebhook-ca-bundle.yaml

执行 yum install -y socat 可解决如下问题:
an error occurred forwarding 40546 -> 44134: error forwarding port 44134 to pod 3ea221f842e1446a5fd9da9fc29e7e415a1ecb6dd6d07c56f64fb4788f2c3915, uid : unable to do port forwarding: socat not found.
# choose either URL
GOOGLE_URL=https://storage.googleapis.com/etcd
GITHUB_URL=https://github.com/coreos/etcd/releases/download
DOWNLOAD_URL=${GOOGLE_URL}

rm -f /tmp/etcd-${ETCD_VER}-linux-amd64.tar.gz
rm -rf /tmp/etcd-download-test && mkdir -p /tmp/etcd-download-test

curl -L ${DOWNLOAD_URL}/${ETCD_VER}/etcd-${ETCD_VER}-linux-amd64.tar.gz -o /tmp/etcd-${ETCD_VER}-linux-amd64.tar.gz
tar xzvf /tmp/etcd-${ETCD_VER}-linux-amd64.tar.gz -C /tmp/etcd-download-test --strip-components=1
rm -f /tmp/etcd-${ETCD_VER}-linux-amd64.tar.gz

/tmp/etcd-download-test/etcd --version
ETCDCTL_API=3 /tmp/etcd-download-test/etcdctl version
# start a local etcd server
/tmp/etcd-download-test/etcd

# write,read to etcd
ETCDCTL_API=3 /tmp/etcd-download-test/etcdctl --endpoints=localhost:2379 put foo bar
ETCDCTL_API=3 /tmp/etcd-download-test/etcdctl --endpoints=localhost:2379 get foo
安装包地址:https://golang.google.cn/dl/
安装go方式:tar -C /usr/local -xzf go1.11.2.linux-amd64.tar.gz 注意要安装完整包,不能只是bin目录
环境变量配置:
export GOPATH=/root/go
export GOROOT/usr/local/go
export PATH=$PATH:$GOROOT/bin/:$GOPATH/bin
https://github.com/helm/helm/blob/master/docs/install.md
https://container-solutions.com/some-admission-webhook-basics/
https://kubernetes.io/docs/reference/access-authn-authz/extensible-admission-controllers/
https://github.com/kubernetes/kubernetes/tree/master/test/e2e/testing-manifests/statefulset/etcd
https://github.com/morvencao/kube-mutating-webhook-tutorial/blob/master/medium-article.md



●Kubernetes 使用 metric-server 让 HPA 弹性伸缩运行
●运维精华
文章转载自51reboot运维开发,如果涉嫌侵权,请发送邮件至:contact@modb.pro进行举报,并提供相关证据,一经查实,墨天轮将立刻删除相关内容。
