目录
1、健康检查
2、探针类型
Liveness 存活性探针
Readiness 就绪性探针
3、探针执行方式
HTTP
Exec
TCP
4、Liveness-exec 样例
5、readiness-exec 样例
6、iveness-http 样例
7、readiness-http 样例
8、TCP liveness 和 readiness 探针
9、Probe 详细配置
10、健康检查在扩容中的应用 readiness
11、健康检查在滚动更新中的应用
健康检查(Health Check)是让系统知道您的应用实例是否正常工作的简单方法。如果您的应用实例不再工作,则其他服务不应访问该应用或向其发送请求。相反,应该将请求发送到已准备好的应用程序实例,或稍后重试。系统还应该能够使您的应用程序恢复健康状态。
强大的自愈能力是 Kubernetes 这类容器编排引擎的一个重要特性。自愈的默认实现方式是自动重启发生故障的容器。除此之外,用户还可以利用 Liveness 和 Readiness 探测机制设置更精细的健康检查,进而实现如下需求:
零停机部署
避免部署无效的镜像
更加安全的滚动升级
Liveness 存活性探针
Liveness 探针让 Kubernetes 知道你的应用程序是活着还是死了。如果你的应用程序还活着,那么 Kubernetes 就不管它了。如果你的应用程序已经死了,Kubernetes 将删除 Pod 并启动一个新的替换它。
Readiness 就绪性探针
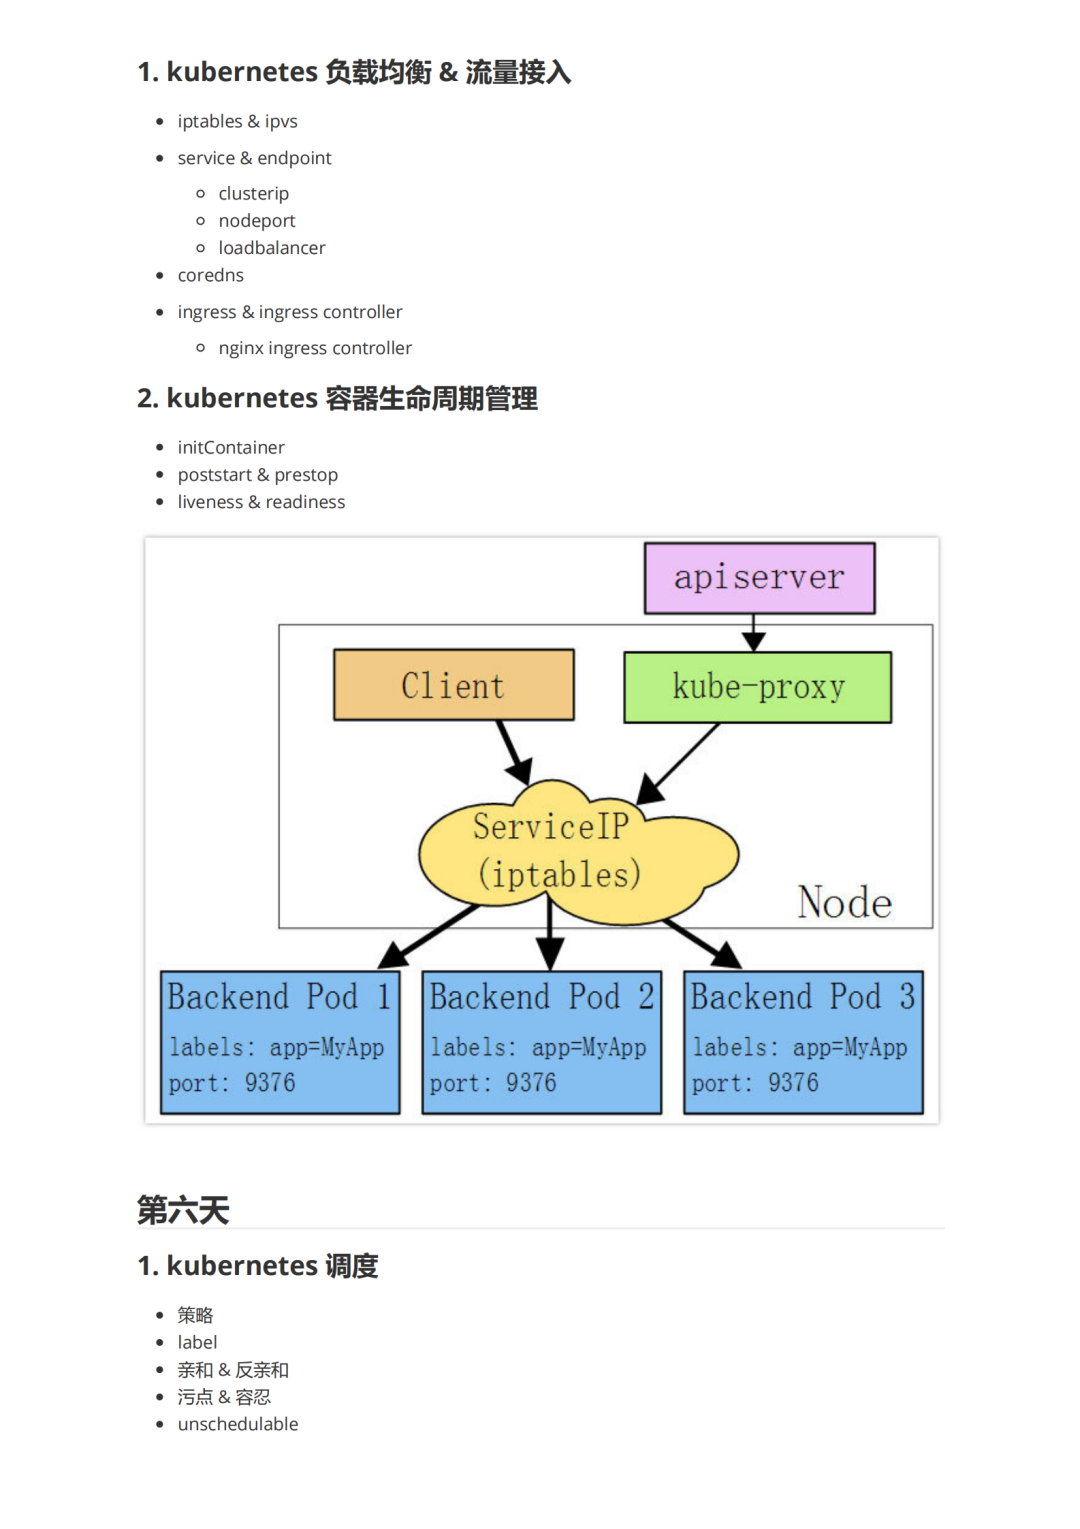
Readiness 探针旨在让 Kubernetes 知道您的应用何时准备好其流量服务。Kubernetes 确保 Readiness 探针检测通过,然后允许服务将流量发送到 Pod。如果 Readiness 探针开始失败,Kubernetes 将停止向该容器发送流量,直到它通过。 判断容器是否处于可用 Ready 状态, 达到 ready 状态表示 pod 可以接受请求, 如果不健康, 从 service 的后端 endpoint 列表中把 pod 隔离出去。
HTTP
HTTP 探针可能是最常见的自定义 Liveness 探针类型。即使您的应用程序不是 HTTP 服务,您也可以在应用程序内创建轻量级 HTTP 服务以响应 Liveness 探针。Kubernetes 去 ping 一个路径,如果它得到的是200或300范围内的 HTTP 响应,它会将应用程序标记为健康。否则它被标记为不健康。
httpget 配置项
host:连接的主机名,默认连接到 pod 的 IP。你可能想在 http header 中设置"Host"而不是使用 IP。
scheme:连接使用的 schema,默认 HTTP。path: 访问的 HTTP server 的 path。
httpHeaders:自定义请求的 header。HTTP 运行重复的header。
port:访问的容器的端口名字或者端口号。端口号必须介于 1 和65535 之间。
Exec
对于 Exec 探针,Kubernetes 则只是在容器内运行命令。如果命令以退出代码0返回,则容器标记为健康。否则,它被标记为不健康。当您不能或不想运行 HTTP 服务时,此类型的探针则很有用,但是必须是运行可以检查您的应用程序是否健康的命令。
TCP
最后一种类型的探针是 TCP 探针,Kubernetes 尝试在指定端口上建立 TCP 连接。如果它可以建立连接,则容器被认为是健康的;否则被认为是不健康的。
如果您有 HTTP 探针或 Command 探针不能正常工作的情况,TCP 探测器会派上用场。例如,gRPC 或 FTP 服务是此类探测的主要候选者。
执行命令。容器的状态由命令执行完返回的状态码确定。如果返回的状态码是0,则认为 pod 是健康的,如果返回的是其他状态码,则认为 pod 不健康,这里不停的重启它。
#cat liveness_exec.yaml
apiVersion: v1
kind: Pod
metadata:
  labels:
    test: liveness-exec
  name: liveness-exec
spec:
  containers:
  - name: liveness-exec
    image: busybox
    args:
    - /bin/sh
    - -c
    - touch /tmp/healthy; sleep 30; rm -rf /tmp/healthy; sleep 600
    livenessProbe:
      exec:
        command:
        - cat
        - /tmp/healthy
      initialDelaySeconds: 5
      periodSeconds: 5
periodSeconds 字段指定 kubelet 应每5秒执行一次活跃度探测。initialDelaySeconds 字段告诉 kubelet 它应该在执行第一个探测之前等待5秒。要执行探测,kubelet 将在 Container 中执行命令 cat /tmp/healthy。如果命令成功,则返回0,并且kubelet 认为 Container 是活动且健康的。如果该命令返回非零值,则 kubelet 会终止容器并重新启动它。
apiVersion: apps/v1
kind: Deployment
metadata:
  name: busybox-deployment
  namespace: default
  labels:
    app: busybox
spec:
  selector:
    matchLabels:
      app: busybox
  replicas: 3
  template:
    metadata:
      labels:
        app: busybox

    spec:
      containers:
      - name: busybox
        image: busybox:latest
        imagePullPolicy: IfNotPresent
        ports:
        - containerPort: 80
        args:
        - /bin/sh
        - -c
        - touch /tmp/healthy; sleep 30; rm -rf /tmp/healthy; sleep 600
        readinessProbe:
          exec:
            command:
            - cat
            - /tmp/healthy
          initialDelaySeconds: 5
          periodSeconds: 5
pod 启动,创建健康检查文件,这个时候是正常的,30s 后删除,ready 变成 0,但 pod 没有被删除或者重启,k8s 只是不管他了,仍然可以登录
[root@k8s-master health]# kubectl get pods
NAME READY STATUS RESTARTS AGE
busybox-deployment-6f86ddd894-l9phc 0/1     Running 0          3m10s
busybox-deployment-6f86ddd894-lh46t 0/1     Running 0          3m
busybox-deployment-6f86ddd894-sz5c2 0/1     Running 0          3m17s
我们再登录进去,手动创建健康检查文件,健康检查通过
[root@k8s-master health]# kubectl get pods
NAME READY STATUS RESTARTS AGE
busybox-deployment-6f86ddd894-l9phc 1/1     Running 0          7m44s
busybox-deployment-6f86ddd894-lh46t 0/1     Running 0          7m34s
busybox-deployment-6f86ddd894-sz5c2 1/1     Running 0          7m51s
[root@k8s-master health]#
[root@k8s-master health]#
[root@k8s-master health]#
[root@k8s-master health]# kubectl exec -it busybox-deployment-6f86ddd894-lh46t /bin/sh
/ # touch tmp/healthy
/ # [root@k8s-master health]# kubeget pods
NAME READY STATUS RESTARTS AGE
busybox-deployment-6f86ddd894-l9phc 1/1     Running 0          8m21s
busybox-deployment-6f86ddd894-lh46t 1/1     Running 0          8m11s
busybox-deployment-6f86ddd894-sz5c2 1/1     Running 0          8m28s
[root@k8s-master health]#
#cat liveness_http.yaml
apiVersion: apps/v1
kind: Deployment
metadata:
  name: nginx-deployment
  namespace: default
  labels:
    app: nginx
spec:
  selector:
    matchLabels:
      app: nginx
  replicas: 2
  template:
    metadata:
      labels:
        app: nginx

    spec:
      containers:
      - name: nginx
        image: nginx
        imagePullPolicy: IfNotPresent
        ports:
        - containerPort: 80
        livenessProbe:
          httpGet:
            path: /index.html
            port: 80
            httpHeaders:
            - name: X-Custom-Header
              value: hello
          initialDelaySeconds: 5
          periodSeconds: 3
创建一个2个副本的 deployment
# cat readiness_http.yaml
apiVersion: apps/v1
kind: Deployment
metadata:
  name: nginx-deployment
  namespace: default
  labels:
    app: nginx
spec:
  selector:
    matchLabels:
      app: nginx
  replicas: 2
  template:
    metadata:
      labels:
        app: nginx

    spec:
      containers:
      - name: nginx
        image: nginx
        imagePullPolicy: IfNotPresent
        ports:
        - containerPort: 80
        readinessProbe:
          httpGet:
            path: /index.html
            port: 80
            httpHeaders:
            - name: X-Custom-Header
              value: hello
          initialDelaySeconds: 5
          periodSeconds: 3
创建一个 svc 能访问
# cat readiness_http_svc.yaml
apiVersion: v1
kind: Service
metadata:
  name: nginx
spec:
  type: NodePort
  ports:
    - port: 80
      nodePort: 30001
  selector: #标签选择器
    app: nginx
服务可以访问
[root@k8s-master health]# kubectl get pods -o wide
NAME READY STATUS RESTARTS AGE IP NODE NOMINATED NODE READINESS GATES
nginx-deployment-7db8445987-9wplj 1/1     Running 0          57s 10.254.1.81   k8s-node-1   <none>           <none>
nginx-deployment-7db8445987-mlc6d 1/1     Running 0          57s 10.254.2.65   k8s-node-2   <none>           <none>
[root@k8s-master health]# kubectl get svc
NAME TYPE CLUSTER-IP EXTERNAL-IP PORT(S) AGE
kubernetes ClusterIP 10.96.0.1       <none>        443/TCP 5d3h
nginx NodePort 10.108.167.58   <none>        80:30001/TCP 27m
[root@k8s-master health]#
[root@k8s-master health]# curl -I 10.6.76.24:30001/index.html
HTTP/1.1 200 OK
Server: nginx/1.17.3
Date: Tue, 03 Sep 2019 04:40:05 GMT
Content-Type: text/html
Content-Length: 612
Last-Modified: Tue, 13 Aug 2019 08:50:00 GMT
Connection: keep-alive
ETag: "5d5279b8-264"
Accept-Ranges: bytes

[root@k8s-master health]# curl -I 10.6.76.23:30001/index.html
HTTP/1.1 200 OK
Server: nginx/1.17.3
Date: Tue, 03 Sep 2019 04:40:11 GMT
Content-Type: text/html
Content-Length: 612
Last-Modified: Tue, 13 Aug 2019 08:50:00 GMT
Connection: keep-alive
ETag: "5d5279b8-264"
Accept-Ranges: bytes
修改 Nginx pod
[root@k8s-master health]# kubectl exec -it nginx-deployment-7db8445987-9wplj /bin/bash
root@nginx-deployment-7db8445987-9wplj:/# cd /usr/share/nginx/html/
root@nginx-deployment-7db8445987-9wplj:/usr/share/nginx/html# ls
50x.html index.html
root@nginx-deployment-7db8445987-9wplj:/usr/share/nginx/html# rm -f index.html
root@nginx-deployment-7db8445987-9wplj:/usr/share/nginx/html#
root@nginx-deployment-7db8445987-9wplj:/usr/share/nginx/html#
root@nginx-deployment-7db8445987-9wplj:/usr/share/nginx/html# nginx -s reload
2019/09/03 03:58:52 [notice] 14#14: signal process started
root@nginx-deployment-7db8445987-9wplj:/usr/share/nginx/html#
root@nginx-deployment-7db8445987-9wplj:/usr/share/nginx/html# exit
[root@k8s-master health]# kubectl get pods -o wide
NAME READY STATUS RESTARTS AGE IP NODE NOMINATED NODE READINESS GATES
nginx-deployment-7db8445987-9wplj 0/1     Running 0          110s 10.254.1.81   k8s-node-1   <none> <none>
nginx-deployment-7db8445987-mlc6d 1/1     Running 0          110s 10.254.2.65   k8s-node-2   <none> <none>
[root@k8s-master health]# curl -I 10.254.1.81/index.html
HTTP/1.1 404 Not Found
Server: nginx/1.17.3
Date: Tue, 03 Sep 2019 03:59:16 GMT
Content-Type: text/html
Content-Length: 153
Connection: keep-alive

[root@k8s-master health]# kubectl describe pod nginx-deployment-7db8445987-9wplj
Events:
  Type Reason Age From Message
  ---- ------ ---- ---- -------
  Normal Scheduled 43m default-scheduler Successfully assigned default/nginx-deployment-7db8445987-9wplj tok8s-node-1
  Normal Pulled 43m kubelet, k8s-node-1  Container image "nginx" already present on machine
  Normal Created 43m kubelet, k8s-node-1  Created container nginx
  Normal Started 43m kubelet, k8s-node-1  Started container nginx
  Warning Unhealthy 3m47s (x771 over 42m) kubelet, k8s-node-1  Readiness probe failed: HTTP probe failed with statuscode: 404
不再分发流量
我们把 Nginx pod 的 index 这个健康检查文件删除,并且把Nginx reload,k8s 根据 readiness 把 ready 变成 0,把它从集群摘除,不再分发流量,我们查看 一下两个 pod 的日志
[root@k8s-master health]# kubectl logs nginx-deployment-7db8445987-mlc6d | tail -10
10.254.1.0 - - [03/Sep/2019:04:43:44 +0000] "HEAD /index.html HTTP/1.1" 200 0 "-" "curl/7.29.0" "-"
10.254.1.0 - - [03/Sep/2019:04:43:45 +0000] "HEAD /index.html HTTP/1.1" 200 0 "-" "curl/7.29.0" "-"
10.254.1.0 - - [03/Sep/2019:04:43:45 +0000] "HEAD /index.html HTTP/1.1" 200 0 "-" "curl/7.29.0" "-"
10.254.2.1 - - [03/Sep/2019:04:43:46 +0000] "GET /index.html HTTP/1.1" 200 612 "-" "kube-probe/1.15" "-"
10.254.2.1 - - [03/Sep/2019:04:43:49 +0000] "GET /index.html HTTP/1.1" 200 612 "-" "kube-probe/1.15" "-"
10.254.2.1 - - [03/Sep/2019:04:43:52 +0000] "GET /index.html HTTP/1.1" 200 612 "-" "kube-probe/1.15" "-"
10.254.2.1 - - [03/Sep/2019:04:43:55 +0000] "GET /index.html HTTP/1.1" 200 612 "-" "kube-probe/1.15" "-"
10.254.2.1 - - [03/Sep/2019:04:43:58 +0000] "GET /index.html HTTP/1.1" 200 612 "-" "kube-probe/1.15" "-"
10.254.2.1 - - [03/Sep/2019:04:44:01 +0000] "GET /index.html HTTP/1.1" 200 612 "-" "kube-probe/1.15" "-"
10.254.2.1 - - [03/Sep/2019:04:44:04 +0000] "GET /index.html HTTP/1.1" 200 612 "-" "kube-probe/1.15" "-"
[root@k8s-master health]# kubectl logs nginx-deployment-7db8445987- | tail -10
nginx-deployment-7db8445987-9wplj nginx-deployment-7db8445987-mlc6d
[root@k8s-master health]# kubectl logs nginx-deployment-7db8445987-9wplj | tail -10
2019/09/03 04:44:11 [error] 15#15: *939 open() "/usr/share/nginx/html/index.html" failed (2: No such file or directory), client: 10.254.1.1, server: localhost, request: "GET /index.html HTTP/1.1", host: "10.254.1.81:80"
10.254.1.1 - - [03/Sep/2019:04:44:11 +0000] "GET /index.html HTTP/1.1" 404 153 "-" "kube-probe/1.15" "-"
10.254.1.1 - - [03/Sep/2019:04:44:14 +0000] "GET /index.html HTTP/1.1" 404 153 "-" "kube-probe/1.15" "-"
2019/09/03 04:44:14 [error] 15#15: *940 open() "/usr/share/nginx/html/index.html" failed (2: No such file or directory), client: 10.254.1.1, server: localhost, request: "GET /index.html HTTP/1.1", host: "10.254.1.81:80"
2019/09/03 04:44:17 [error] 15#15: *941 open() "/usr/share/nginx/html/index.html" failed (2: No such file or directory), client: 10.254.1.1, server: localhost, request: "GET /index.html HTTP/1.1", host: "10.254.1.81:80"
10.254.1.1 - - [03/Sep/2019:04:44:17 +0000] "GET /index.html HTTP/1.1" 404 153 "-" "kube-probe/1.15" "-"
10.254.1.1 - - [03/Sep/2019:04:44:20 +0000] "GET /index.html HTTP/1.1" 404 153 "-" "kube-probe/1.15" "-"
2019/09/03 04:44:20 [error] 15#15: *942 open() "/usr/share/nginx/html/index.html" failed (2: No such file or directory), client: 10.254.1.1, server: localhost, request: "GET /index.html HTTP/1.1", host: "10.254.1.81:80"
2019/09/03 04:44:23 [error] 15#15: *943 open() "/usr/share/nginx/html/index.html" failed (2: No such file or directory), client: 10.254.1.1, server: localhost, request: "GET /index.html HTTP/1.1", host: "10.254.1.81:80"
10.254.1.1 - - [03/Sep/2019:04:44:23 +0000] "GET /index.html HTTP/1.1" 404 153 "-" "kube-probe/1.15" "-"
[root@k8s-master health]#
TCP 检查的配置与 HTTP 检查非常相似,主要对于没有 http 接口的 pod,像 MySQL,Redis,等等
apiVersion: apps/v1
kind: Deployment
metadata:
  name: nginx-deployment
  namespace: default
  labels:
    app: nginx
spec:
  selector:
    matchLabels:
      app: nginx
  replicas: 1
  template:
    metadata:
      labels:
        app: nginx

    spec:
      containers:
      - name: nginx
        image: nginx
        imagePullPolicy: IfNotPresent
        ports:
        - containerPort: 80
        livenessProbe:
          tcpSocket:
            port: 80
          initialDelaySeconds: 5
          periodSeconds: 3
        readinessProbe:
          tcpSocket:
            port: 80
          initialDelaySeconds: 5
          periodSeconds: 3
initialDelaySeconds:容器启动后第一次执行探测是需要等待多少秒。
periodSeconds:执行探测的频率。默认是10秒,最小1秒。
timeoutSeconds:探测超时时间。默认1秒,最小1秒。
successThreshold:探测失败后,最少连续探测成功多少次才被认定为成功。默认是1。对于 liveness 必须是1。最小值是1。
failureThreshold:探测成功后,最少连续探测失败多少次才被认定为失败。默认是3。最小值是1。
HTTP probe 中可以给 httpGet 设置其他配置项:
使用 Liveness 探针时需要配置一个非常重要的设置,就是 initialDelaySeconds 设置。
Liveness 探针失败会导致 Pod 重新启动。在应用程序准备好之前,您需要确保探针不会启动。否则,应用程序将不断重启,永远不会准备好!
对于多副本应用,当执行 Scale Up 操作时,新副本会作为 backend 被添加到 Service 的负责均衡中,与已有副本一起处理客户的请求。考虑到应用启动通常都需要一个准备阶段,比如加载缓存数据,连接数据库等,从容器启动到正真能够提供服务是需要一段时间的。我们可以通过 Readiness 探测判断容器是否就绪,避免将请求发送到还没有 ready 的 backend。
以上面 readiness-http 为例
# cat liveness_http.yaml
apiVersion: apps/v1
kind: Deployment
metadata:
  name: nginx-deployment
  namespace: default
  labels:
    app: nginx
spec:
  selector:
    matchLabels:
      app: nginx
  replicas: 2
  template:
    metadata:
      labels:
        app: nginx

    spec:
      containers:
      - name: nginx
        image: nginx
        imagePullPolicy: IfNotPresent
        ports:
        - containerPort: 80
        livenessProbe:
          httpGet:
            path: /index.html
            port: 80
            httpHeaders:
            - name: X-Custom-Header
              value: hello
          initialDelaySeconds: 5
          periodSeconds: 3
# cat readiness_http_svc.yaml
apiVersion: v1
kind: Service
metadata:
  name: nginx
spec:
  type: NodePort
  ports:
    - port: 80
      nodePort: 30001
  selector: #标签选择器
    app: nginx
容器启动 5 秒之后开始探测。
如果 http://[container_ip]:80/index.html 返回代码不是 200-400,表示容器没有就绪,不接收 Service web-svc 的请求。
每隔 3 秒再探测一次。
直到返回代码为 200-400,表明容器已经就绪,然后将其加入到 web-svc 的负责均衡中,开始处理客户请求。
探测会继续以 5 秒的间隔执行,如果连续发生 3 次失败,容器又会从负载均衡中移除,直到下次探测成功重新加入。
对于生产环境中重要的应用都建议配置 Health Check,保证处理客户请求的容器都是准备就绪的 Service backend。
我们手动扩容一下,在 pod 的健康检查没有通过之前,新起的 pod 就不加入集群
[root@k8s-master health]# kubectl scale deployment nginx-deployment --replicas=5
deployment.extensions/nginx-deployment scaled
[root@k8s-master health]# kubectl get pods
NAME READY STATUS RESTARTS AGE
nginx-deployment-7db8445987-k9df8 0/1     ContainerCreating 0          3s
nginx-deployment-7db8445987-mlc6d 1/1     Running 0          3h14m
nginx-deployment-7db8445987-q5d9k 0/1     ContainerCreating 0          3s
nginx-deployment-7db8445987-w2w2t 0/1     ContainerCreating 0          3s
nginx-deployment-7db8445987-zwj8t 1/1     Running 0          8m4s
现有一个正常运行的多副本应用,接下来对应用进行更新(比如使用更高版本的 image),Kubernetes 会启动新副本,然后发生了如下事件:
l 正常情况下新副本需要 10 秒钟完成准备工作,在此之前无法响应业务请求。
l 但由于人为配置错误,副本始终无法完成准备工作(比如无法连接后端数据库)。
因为新副本本身没有异常退出,默认的 Health Check 机制会认为容器已经就绪,进而会逐步用新副本替换现有副本,其结果就是:当所有旧副本都被替换后,整个应用将无法处理请求,无法对外提供服务。如果这是发生在重要的生产系统上,后果会非常严重。
如果正确配置了 Health Check,新副本只有通过了 Readiness 探测,才会被添加到 Service;如果没有通过探测,现有副本不会被全部替换,业务仍然正常进行。
app.v1模拟一个5个副本的应用
apiVersion: extensions/v1beta1
kind: Deployment
metadata:
  name: app
spec:
  replicas: 5
  template:
    metadata:
      labels:
        run: app
    spec:
      containers:
      - name: app
        image: busybox
        args:
        - /bin/sh
        - -c
        - sleep 10; touch /tmp/healthy; sleep 30000
        readinessProbe:
          exec:
            command:
            - cat
            - /tmp/healthy
          initialDelaySeconds: 10
          periodSeconds: 5
10 秒后副本能够通过 Readiness 探测
[root@k8s-master health]# kubectl apply -f app_v1.yaml
deployment.extensions/app unchanged
[root@k8s-master health]# kubectl get pods
NAME READY STATUS RESTARTS AGE
app-6dd7f876c4-5hvdl 1/1     Running 0          6m17s
app-6dd7f876c4-9vcp7 1/1     Running 0          6m17s
app-6dd7f876c4-k59mm 1/1     Running 0          6m17s
app-6dd7f876c4-trw8f 1/1     Running 0          6m17s
app-6dd7f876c4-wrhz8 1/1     Running 0          6m17s
[root@k8s-master health]#
接下来滚动更新应用
# cat app_v2.yaml
apiVersion: extensions/v1beta1
kind: Deployment
metadata:
  name: app
spec:
  replicas: 5
  template:
    metadata:
      labels:
        run: app
    spec:
      containers:
      - name: app
        image: busybox
        args:
        - /bin/sh
        - -c
        - sleep 30000
        readinessProbe:
          exec:
            command:
            - cat
            - /tmp/healthy
          initialDelaySeconds: 10
          periodSeconds: 5
[root@k8s-master health]# kubectl get pods
NAME READY STATUS RESTARTS AGE
app-6dd7f876c4-5hvdl 1/1     Running 0          14m
app-6dd7f876c4-9vcp7 1/1     Running 0          14m
app-6dd7f876c4-k59mm 1/1     Running 0          14m
app-6dd7f876c4-trw8f 1/1     Running 0          14m
app-6dd7f876c4-wrhz8 1/1
[root@k8s-master health]# kubectl apply -f app_v2.yaml
deployment.extensions/app configured
[root@k8s-master health]# kubectl get pods
NAME READY STATUS RESTARTS AGE
app-6dd7f876c4-5hvdl 1/1     Running 0          14m
app-6dd7f876c4-9vcp7 1/1     Running 0          14m
app-6dd7f876c4-k59mm 1/1     Terminating 0          14m
app-6dd7f876c4-trw8f 1/1     Running 0          14m
app-6dd7f876c4-wrhz8 1/1     Running 0          14m
app-7fbf9d8fb7-g99hn 0/1     ContainerCreating 0          2s
app-7fbf9d8fb7-ltlv5 0/1     ContainerCreating 0          3s
[root@k8s-master health]# kubectl get pods
NAME READY STATUS RESTARTS AGE
app-6dd7f876c4-5hvdl 1/1     Running 0          14m
app-6dd7f876c4-9vcp7 1/1     Running 0          14m
app-6dd7f876c4-k59mm 1/1     Terminating 0          14m
app-6dd7f876c4-trw8f 1/1     Running 0          14m
app-6dd7f876c4-wrhz8 1/1     Running 0          14m
app-7fbf9d8fb7-g99hn 0/1     ContainerCreating 0          9s
app-7fbf9d8fb7-ltlv5 0/1     Running 0          10s
[root@k8s-master health]#
[root@k8s-master health]# kubectl get pods
NAME READY STATUS RESTARTS AGE
app-6dd7f876c4-5hvdl 1/1     Running 0          15m
app-6dd7f876c4-9vcp7 1/1     Running 0          15m
app-6dd7f876c4-trw8f 1/1     Running 0          15m
app-6dd7f876c4-wrhz8 1/1     Running 0          15m
app-7fbf9d8fb7-g99hn 0/1     Running 0          68s
app-7fbf9d8fb7-ltlv5 0/1     Running 0          69s
[root@k8s-master health]#
从 Pod 的 AGE 栏可判断,最后 2 个 Pod 是新副本,目前处于 NOT READY 状态。
旧副本从最初 5个减少到 4 个。
l DESIRED 5 表示期望的状态是 5个 READY 的副本。
l UP-TO-DATE 2 表示当前已经完成更新的副本数:即 2 个新副本。
l AVAILABLE 4 表示当前处于 READY 状态的副本数:即 4个旧副本。
在我们的设定中,新副本始终都无法通过 Readiness 探测,所以这个状态会一直保持下去。
上面我们模拟了一个滚动更新失败的场景。不过幸运的是:Health Check 帮我们屏蔽了有缺陷的副本,同时保留了大部分旧副本,业务没有因更新失败受到影响。滚动更新可以通过参数 maxSurge 和 maxUnavailable 来控制副本替换的数量。
出处:http://dwz.date/dtaE
51Reboot 自动化高阶第十一期火热招生中
详情咨询 wechat Amy:17812796384