一、Nginx基本概念
1、什么是nginx
- Nginx 是一个高性能的Web服务器和反向代理服务器,也可作为邮件代理服务器;
- Nginx由俄罗斯人Igor Sysoev 采用C语言开发编写,第一个版本公布于2004年10月4日;
- Nginx特点占有内存少,并发能力强,以高性能,低消耗闻名,Nginx官方测试为5万并发请求;

2、什么是反向代理
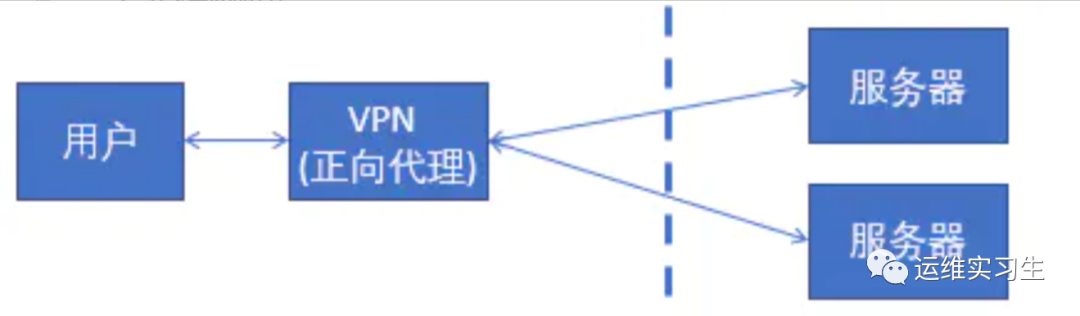
2.1什么是正向代理
正向代理,是在用户端的。比如需要访问某些国外网站,我们可能需要购买vpn。
并且vpn是在我们的用户浏览器端设置的,浏览器先访问vpn地址,vpn地址转发请求,并最后将请求结果原路返回来。
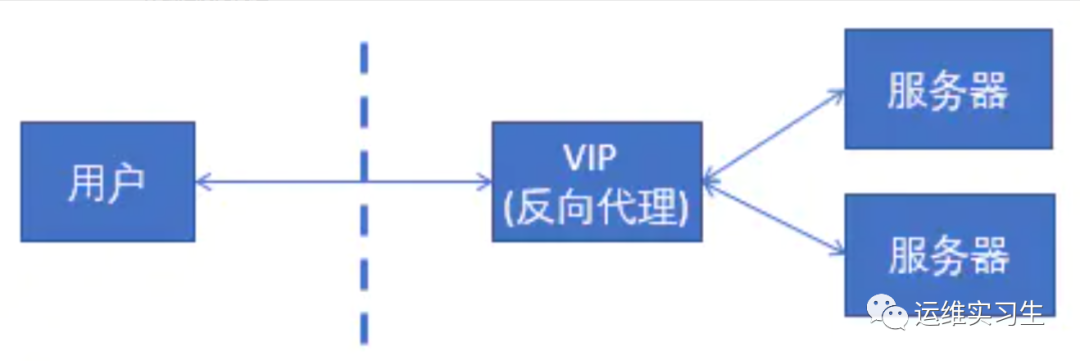
2.2什么是反向代理
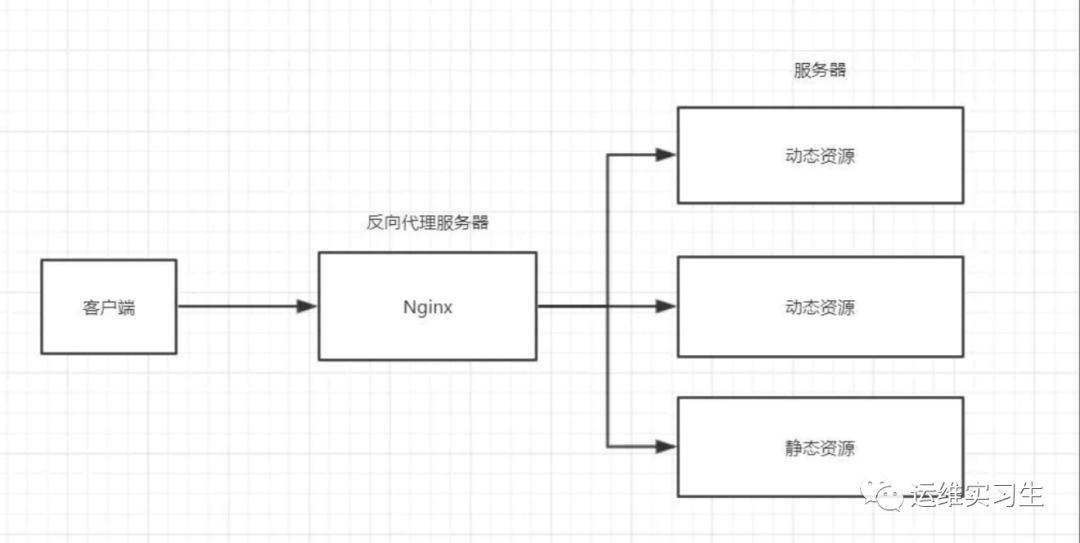
反向代理,其实客户端对代理是无感知的,因为客户端不需要任何配置就可以访问,我们只需要将请求发送到反向代理服务器,由反向代理服务器去选择目标服务器获取数据后,在返回给客户端,此时反向代理服务器和目标服务器对外就是一个服务器,暴露的是代理服务器地址,隐藏了真实服务器 IP 地址。
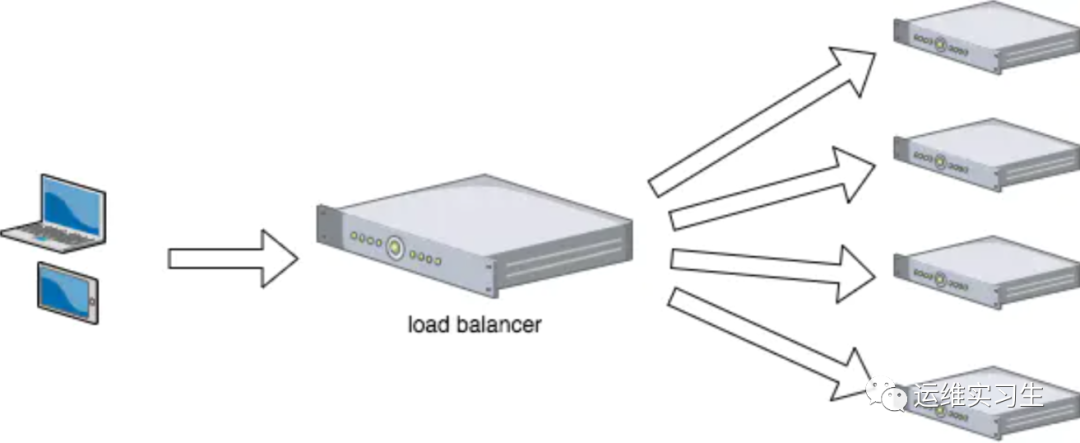
3、什么是负载均衡
负载均衡(Load Balance),意思是将负载(工作任务,访问请求)进行平衡、分摊到多个操作单元(服务器,组件)上进行执行。是解决高性能,单点故障(高可用),扩展性(水平伸缩)的终极解决方案。
4、什么是动静分离
在Web开发中,通常来说,动态资源其实就是指那些后台资源,而静态资源就是指HTML,JavaScript,CSS,img等文件。
一般来说,都需要将动态资源和静态资源分开,将静态资源部署在Nginx上,当一个请求来的时候,如果是静态资源的请求,就直接到nginx配置的静态资源目录下面获取资源,如果是动态资源的请求,nginx利用反向代理的原理,把请求转发给后台应用去处理,从而实现动静分离。
在使用前后端分离之后,可以很大程度的提升静态资源的访问速度,同时在开过程中也可以让前后端开发并行可以有效的提高开发时间,也可以有些的减少联调时间。
二、Nginx基本使用
1、nginx安装
1.1安装nginx依赖包
[root@server ~] yum -y install make zlibzlib-devel gcc-c++ libtool openssl openssl-devel pcregcc编译器 gccopenssl库 openssl,openssl-develpcre库 pcre,pcre-develzlib库 zlib,zlb-devel
1.2安装nginx
[root@server ~] cd /usr/local/[root@server local] lsbin games lib libexec sbin srcetc include lib64 nginx-1.16.1.tar.gz share[root@server local] tar -zxvfnginx-1.16.1.tar.gz[root@server local] cd nginx-1.16.1[root@server nginx-1.16.1] ./configure--prefix=/usr/local/nginx[root@server nginx-1.16.1] make &&make install
1、解压nginx*.tar.gz
2、切换到nginx主目录
3、执行配置命令 ./configure--prefix=/usr/local/nginx (--prefix是指定安装路径)
4、执行命令进行编译
5、执行命令进行安装
1.3启动nginx
[root@server nginx-1.16.1] cd/usr/local/nginx/sbin/[root@server sbin] ./nginx
1、普通启动
切换到nginx安装目录的sbin目录,执行./nginx
2、通过配置文件启动
./nginx -c /usr/local/nginx/conf/nginx.conf
1.4检查
[root@server sbin] ps -ef | grep nginxroot 17806 1 0 00:24 ? 00:00:00 nginx: master process ./nginxnobody 17807 17806 0 00:24 ? 00:00:00 nginx: worker processroot 17809 9820 0 00:25 pts/0 00:00:00 grep --color=auto nginx[root@server sbin] netstat -ntulp | grep 80tcp 0 0 0.0.0.0:80 0.0.0.0:* LISTEN 17806/nginx: master[root@server sbin] ./nginx -c/usr/local/nginx/conf/nginx.conf -tnginx: the configuration file/usr/local/nginx/conf/nginx.conf syntax is oknginx: configuration file/usr/local/nginx/conf/nginx.conf test is successful
1、通过进程检查
master进程用于读取配置文件,并且维护管理worker进程
worker进程对请求进行处理
2、通过查看端口
3、检查配置文件
./nginx -c /usr/local/nginx/conf/nginx.conf-t
2、nginx常用命令
杀死进程kill -QUIT 主pidkill -TERM 主pid命令关闭./nginx -s stop重启./nginx -s reload帮助-?,-h : this help-v : showversion and exit-V : show versionand configure options then exit-t : testconfiguration and exit-T : testconfiguration, dump it and exit-q : suppressnon-error messages during configuration testing-ssignal : send signal to a masterprocess: stop, quit, reopen, reload-pprefix : set prefix path (default:/usr/local/nginx/)-cfilename : set configuration file(default: conf/nginx.conf)-gdirectives : set global directives outof configuration file
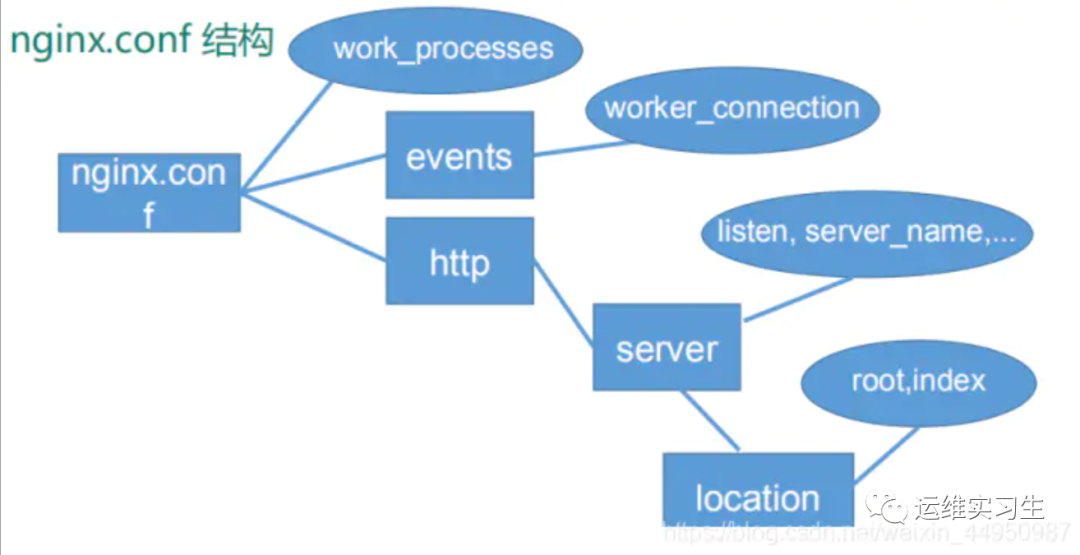
3、nginx配置文件
配置文件路径: [nginx安装路径]/conf/nginx.conf
比如这次环境的路径在/usr/local/nginx/conf/nginx.conf
配置文件内容为
worker_processes 1;events {worker_connections 1024;}http {include mime.types;default_type application/octet-stream;sendfile on;server {listen 80;server_name localhost;location / {root html;index index.html index.htm;}error_page 500 502 503 504 /50x.html;location = /50x.html {root html;}}}
3.1worker配置
从配置文件开始到 events 块之间的内容,主要会设置一些影响 nginx 服务器整体运行的配置指令,主要包括配置运行 Nginx 服务器的用户(组)、允许生成的 worker process 数,进程PID 存放路径、日志存放路径和类型以及配置文件的引入等。
worker_processes 1;
worker_processes 设置nginx可以并发处理进程的大小
3.2events配置
events 块涉及的指令主要影响 Nginx 服务器与用户的网络连接,常用的设置包括是否开启对多 work process下的网络连接进行序列化,是否允许同时接收多个网络连接,选取哪种事件驱动模型来处理连接请求,每个 word process 可以同时支持的最大连接数等。
events {worker_connections 1024;}
worker_connections 设置nginxworker(进程)支持的最大连接数
3.3httpd配置
http {include mime.types;default_type application/octet-stream;sendfile on;server {listen 80;server_name localhost;location / {root html;index index.html index.htm;}error_page 500 502 503 504 /50x.html;location = /50x.html {root html;}}}
这算是 Nginx 服务器配置中最频繁的部分,代理、缓存和日志定义等绝大多数功能和第三方模块的配置都在这里。
需要注意的是: http 块也可以包括http 全局块、server 块。
http全局块
http 全局块配置的指令包括文件引入、MIME-TYPE 定义、日志自定义、连接超时时间、单链接请求数上限等。
server 块
这块和虚拟主机有密切关系,虚拟主机从用户角度看,和一台独立的硬件主机是完全一样的,该技术的产生是为了节省互联网服务器硬件成本。
每个 http 块可以包括多个 server 块,而每个 server 块就相当于一个虚拟主机。
而每个 server 块也分为全局 server 块,以及可以同时包含多个 locaton 块。
1、全局 server 块
最常见的配置是本虚拟机主机的监听配置和本虚拟主机的名称或 IP 配置。
2、 location 块
一个 server 块可以配置多个location 块
这块的主要作用是基于Nginx 服务器接收到的请求字符串(例如 server_name/uri-string),对虚拟主机名称(也可以是 IP 别名)之外的字符串(例如 前面的/uri-string)进行匹配,对特定的请求进行处理。地址定向、数据缓存和应答控制等功能,还有许多第三方模块的配置也在这里进行。
location 指令说明
该指令用于匹配 URL。语法如下:
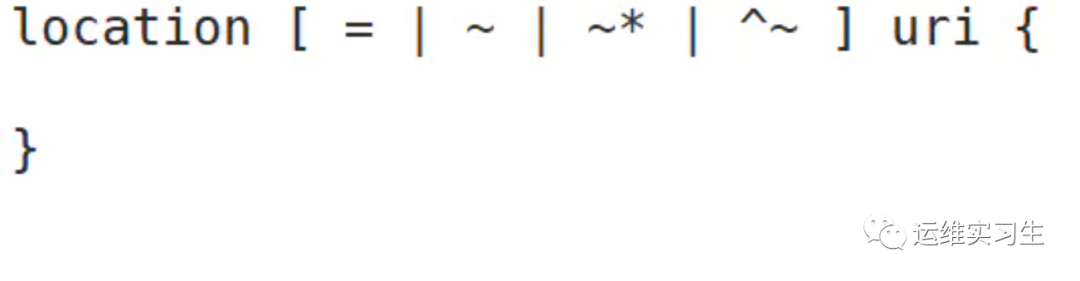
= :用于不含正则表达式的 uri 前,要求请求字符串与uri 严格匹配,如果匹配成功,就停止继续向下搜索并立即处理该请求。
~:用于表示 uri 包含正则表达式,并且区分大小写。
~*:用于表示 uri 包含正则表达式,并且不区分大小写。
^~:用于不含正则表达式的 uri 前,要求 Nginx 服务器找到标识 uri 和请求字符串匹配度最高的location 后,立即使用此 location 处理请求,而不再使用 location块中的正则 uri 和请求字符串做匹配
注意:如果 uri 包含正则表达式,则必须要有~ 或者 ~* 标识。
三、Nginx反向代理配置
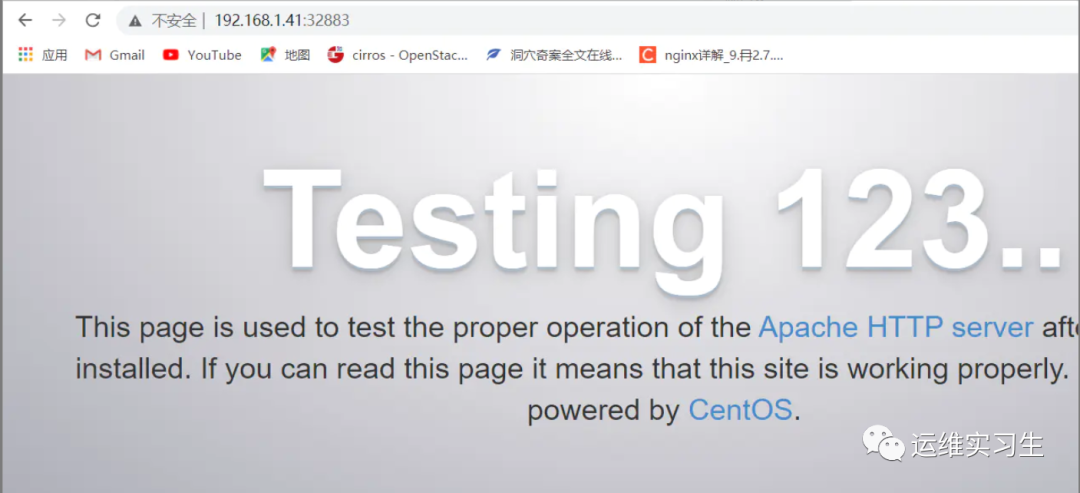
1、反向代理配置实例1
实验环境 192.168.1.41
启动一个tomcat 端口为8080
nginx使用默认端口80
访问 http://192.168.1.41反向代理到 http://192.168.1.41:8080
1启动一个tomcat端口8080
[root@server ~] yum -y install java[root@server local] ls/usr/local/apache-tomcat-7.0.96.tar.gz/usr/local/apache-tomcat-7.0.96.tar.gz[root@server local] tar -zxvfapache-tomcat-7.0.96.tar.gz[root@server local] cd apache-tomcat-7.0.96[root@server apache-tomcat-7.0.96]./bin/startup.sh[root@server apache-tomcat-7.0.96] netstat-ntulp | grep 8080tcp6 0 0 :::8080 :::* LISTEN 9851/java
2配置nginx.conf
[root@server nginx] vim conf/nginx.confserver {listen 80;server_name 192.168.1.41;location / {proxy_pass http://192.168.1.41:8080;index index.html index.htm;}}[root@server nginx] ./sbin/nginx
3验证

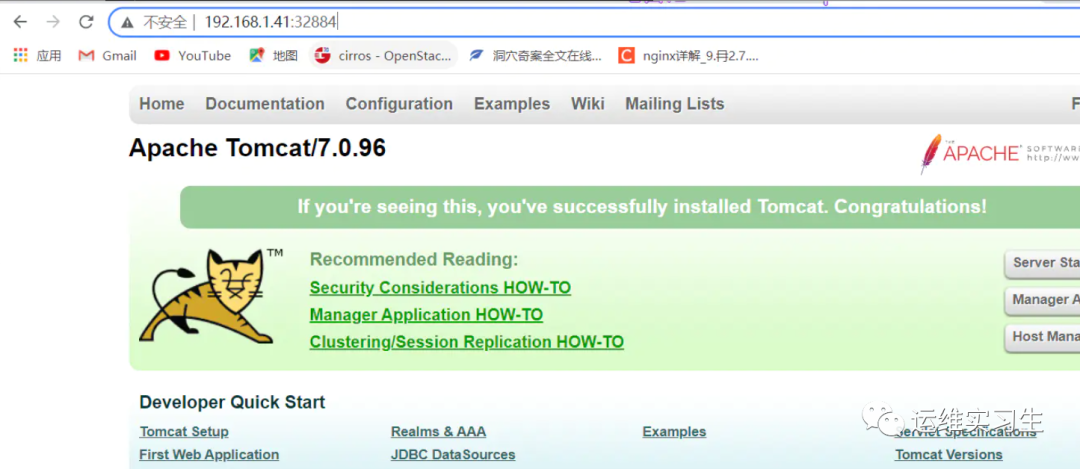
2、反向代理配置实例2
实验环境 192.168.1.41
启动两个tomcat 端口为8081,8082
nginx使用端口32880
访问 http://192.168.1.41:32880/test1/ 反向代理到http://192.168.1.41:8081/test1
访问 http://192.168.1.41:32880/test2 反向代理到http://192.168.1.41:8082/test2
1启动两个tomcat 端口为8081,8082
[root@server local] cd /usr/local/[root@server local] cp -rvf apache-tomcat-7.0.96tomcat1[root@server local] cp -rvfapache-tomcat-7.0.96 tomcat2[root@server local] cd tomcat1[root@server tomcat1] vim conf/server.xml<Server port="8006"shutdown="SHUTDOWN"<Connector port="8081"protocol="HTTP/1.1"connectionTimeout="20000"redirectPort="8443" /[root@server tomcat1] mkdir webapps/test1[root@server tomcat1] echo test1 webapps/test1/index.html[root@server tomcat1] ./bin/startup.shTomcat started.[root@server tomcat1] cd ../tomcat2[root@server tomcat2] vim conf/server.xml<Server port="8007"shutdown="SHUTDOWN"<Connector port="8082"protocol="HTTP/1.1"connectionTimeout="20000"redirectPort="8443" /[root@server tomcat2] mkdir webapps/test2[root@server tomcat2] echo test2 webapps/test2/index.html[root@server tomcat2] ./bin/startup.shTomcat started.[root@server tomcat2] netstat -ntulp | grep808tcp6 0 0 :::8081 :::* LISTEN 10072/javatcp6 0 0 :::8082 :::* LISTEN 10136/java
2配置nginx.conf
[root@server tomcat2] vim/usr/local/nginx/conf/nginx.confserver {listen 32880;server_name 192.168.1.41;location /test1 {proxy_pass http://192.168.1.41:8081;}location /test2 {proxy_pass http://192.168.1.41:8082;}}[root@server tomcat2] /usr/local/nginx/sbin/nginx-s reload
3验证


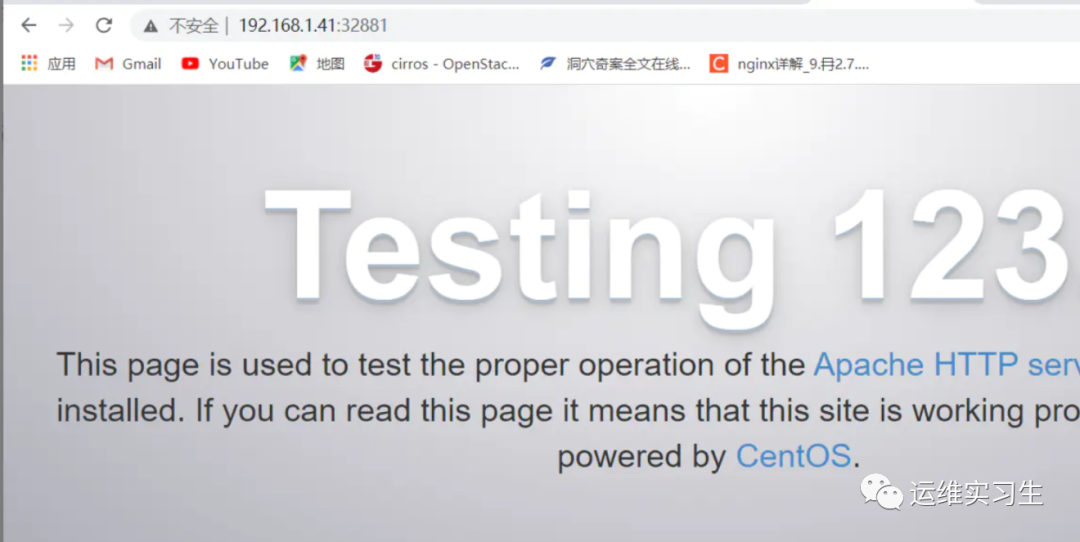
3、反向代理配置实例3
实验环境192.168.1.41 192.168.1.42
在192.168.1.42启动一个httpd 端口为80
nginx使用端口32881
访问http://192.168.1.41:32881反向代理到http://192.168.1.42:80
1在192.168.1.42启动一个httpd 端口为80
[root@localhost ~] yum -y install httpd[root@localhost ~] systemctl start httpd
2配置nginx.conf
[root@server ~] vim/usr/local/nginx/conf/nginx.confserver {listen 32881;server_name 192.168.1.41;location / {proxy_pass http://192.168.1.42:80;index index.html index.htm;}}[root@server ~] /usr/local/nginx/sbin/nginx-s reload
3验证
四、Nginx负载均衡配置
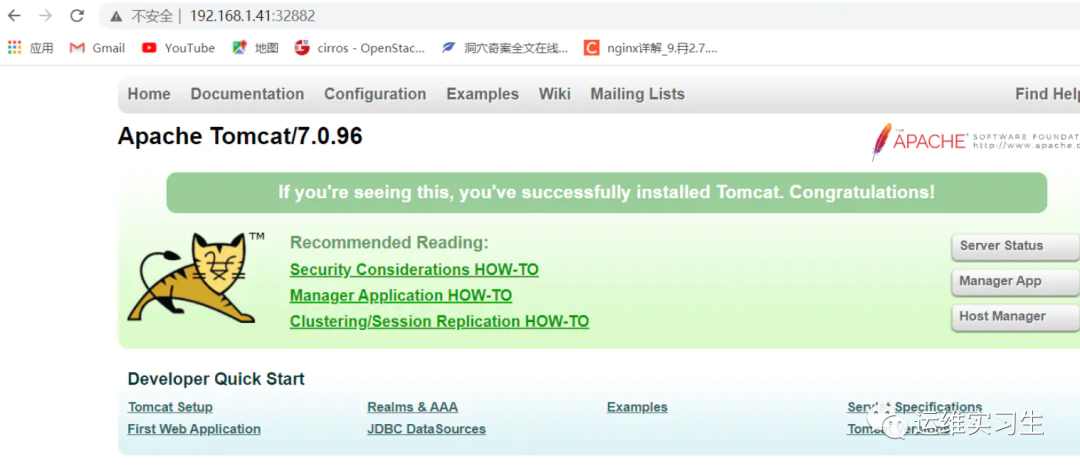
1、负载均衡配置实例1
实验环境 192.168.1.41
启动两个tomcat 端口为8083 8085
nginx端口使用32882
访问http://192.168.1.41:32882负载均衡到http://192.168.1.41:8083和http://192.168.1.41:8085
1启动一个tomcat端口8080
[root@server local] cd /usr/local/[root@server local] cp -rvfapache-tomcat-7.0.96 tomcat3[root@server local] cp -rvfapache-tomcat-7.0.96 tomcat5[root@server local] cd tomcat3[root@server tomcat13 vim conf/server.xml<Server port="8008"shutdown="SHUTDOWN"<Connector port="8083"protocol="HTTP/1.1"connectionTimeout="20000"redirectPort="8443" /[root@server tomcat3] ./bin/startup.shTomcat started.[root@server tomcat5] cd ../tomcat4[root@server tomcat5] vim conf/server.xml<Server port="8010"shutdown="SHUTDOWN"<Connector port="8085"protocol="HTTP/1.1"connectionTimeout="20000"redirectPort="8443" /[root@server tomcat5] ./bin/startup.shTomcat started.[root@server tomcat5] netstat -ntulp | grep808tcp6 0 0 :::8083 :::* LISTEN 10072/javatcp6 0 0 :::8085 :::* LISTEN 10136/java
2配置nginx.conf
[root@server ~] vim/usr/local/nginx/conf/nginx.confupstream myserver1{ip_hash;server 192.168.1.41:8083 weight=1;server 192.168.1.41:8085 weight=1;}server{listen 32882;server_name 192.168.1.41;location / {proxy_pass http://myserver1;}}[root@server ~] /usr/local/nginx/sbin/nginx-s reload
3验证
这样看不出效果,因为两个tomcat都长得一样,如果想要有更直观得效果,可以给两个tomcat编写不同得代码。
2、负载均衡配置实例2
实验环境 192.168.1.41 192.168.1.42 192.168.1.43
在192.168.1.42启动一个httpd,在192.168.1.43启动一个httpd
nginx端口使用32883
访问http://192.168.1.41:32883负载均衡到http://192.168.1.42和http://192.168.1.43
1在192.168.1.42启动一个httpd,在192.168.1.43启动一个httpd
[root@client1 ~] yum -y install httpd[root@client1 ~] systemctl start httpd[root@client2 ~] yum -y install httpd[root@client2 ~] systemctl start httpd
2配置nginx.conf
upstream myserver2{server 192.168.1.42:80 weight=1;server 192.168.1.43:80 weight=1;}server{listen 32883;server_name 192.168.1.41;location / {proxy_pass http://myserver2;}}[root@server ~] /usr/local/nginx/sbin/nginx-s reload
3验证
这样看不出效果,因为两个http都长得一样,如果想要有更直观得效果,可以给两个http编写不同得代码。
3、负载均衡策略
1、轮询(默认)
每个请求按时间顺序逐一分配到不同的后端服务器,如果后端服务器 down 掉,能自动剔除。
2、weight
weight 代表权,重默认为 1,权重越高被分配的客户端越多
指定轮询几率,weight 和访问比率成正比,用于后端服务器性能不均的情况。
3、ip_hash
每个请求按访问 ip 的 hash 结果分配,这样每个访客固定访问一个后端服务器,可以解决session 的问题。例如:
4、fair(第三方)
按后端服务器的响应时间来分配请求,响应时间短的优先分配。
五、Nginx动静分离配置
实验环境 192.168.1.41 192.168.1.42
在192.168.1.42启动一个tomcat,默认端口8080,模拟动态资源
在192.168.1.42启动一个httpd,默认端口80,放置一些图片模拟静态资源
nginx端口使用32884
访问http://192.168.1.41:32884直接跳转192.168.1.42:8080访问动态资源
访问http://192.168.1.41:32884/image直接跳转192.168.1.42/image访问静态资源
1在192.168.1.42启动一个tomcat,默认端口8080,模拟动态资源
在192.168.1.42启动一个httpd,默认端口80,放置一些图片模拟静态资源
[root@client1 local] ls/usr/local/apache-tomcat-7.0.96.tar.gz/usr/local/apache-tomcat-7.0.96.tar.gz[root@client1 local] tar -zxvfapache-tomcat-7.0.96.tar.gz[root@client1 local] cdapache-tomcat-7.0.96[root@client1 apache-tomcat-7.0.96]./bin/startup.shTomcat started.[root@client1 apache-tomcat-7.0.96] netstat-ntulp | grep 8080tcp6 0 0 :::8080 :::* LISTEN 43444/java[root@client1 apache-tomcat-7.0.96] cd/var/www/html/[root@client1 html] mkdir image[root@client1 html] ls image/60ce3e23bbebfdf3a58c54705030e6f9cbcca934.jpgAutumn_in_Kanas_by_Wang_Jinyu.jpgBalloon_by_Matt_Benson.jpgBeach_by_Samuel_Scrimshaw.jpgbeijing.jpgdesktop.jpgf0df38ae0d5d668e448d12640810ee2065a6df64.jpg
2配置nginx.conf
server {listen 32884;server_name 192.168.1.41;location / {proxy_pass http://192.168.1.42:8080;index index.html index.htm;}location /image {proxy_pass http://192.168.1.42:80;index index.html index.htm;}[root@server ~] /usr/local/nginx/sbin/nginx-s reload
3验证

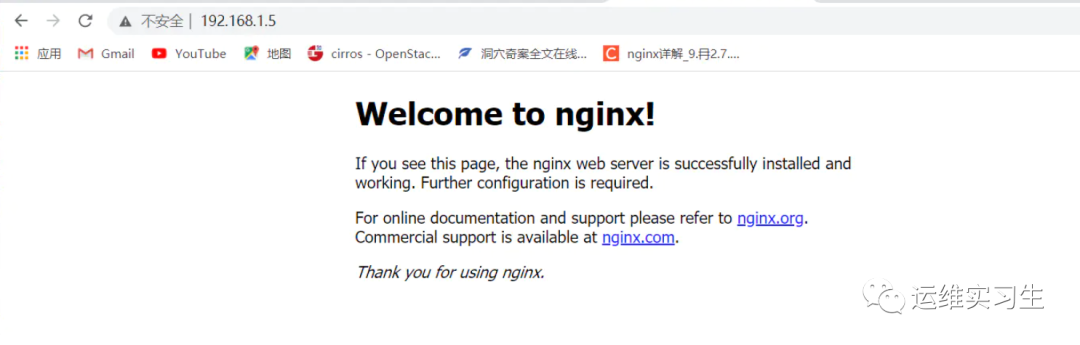
六、Nginx高可用配置
实验环境192.168.1.41 192.168.1.42
1在两个节点运行nginx和keepalived,nginx参照 安装nginx和运行nginx
[root@server ~] yum -y install keepalived[root@client1 ~] yum -y install keepalived
2配置master节点
[root@master ~] cp/etc/keepalived/keepalived.conf /etc/keepalived/keepalived.conf.bak[root@server ~] vim /etc/keepalived/keepalived.confvrrp_script chk_http_port {script "/usr/local/src/nginx_check.sh"interval 2weight 2}vrrp_instance VI_1 {state MASTERinterface ens33virtual_router_id 51priority 100advert_int 1authentication {auth_type PASSauth_pass 1111}track_script {chk_http_port}virtual_ipaddress {192.168.1.5}[root@client1 ~] vim/usr/local/src/nginx_check.sh!/bin/bashA=`ps -C nginx --no-header |wc -l`if [ $A -eq 0 ];thensystemctl start nginxif [ `ps -C nginx --no-header |wc -l` -eq 0 ];thenkillall keepalivedfifi[root@client1 ~] systemctl start keepalived
3配置backup节点
[root@client1 ~] cp/etc/keepalived/keepalived.conf /etc/keepalived/keepalived.conf.bak[root@client1 ~] vim/etc/keepalived/keepalived.confvrrp_script chk_http_port {script "/usr/local/src/nginx_check.sh"interval 2weight 2}vrrp_instance VI_1 {state BACKUPinterface ens33virtual_router_id 51priority 99advert_int 1authentication {auth_type PASSauth_pass 1111}track_script {chk_http_port}virtual_ipaddress {192.168.1.5}[root@client1 ~] vim/usr/local/src/nginx_check.sh!/bin/bashA=`ps -C nginx --no-header |wc -l`if [ $A -eq 0 ];thensystemctl start nginxif [ `ps -C nginx --no-header |wc -l` -eq 0 ];thenkillall keepalivedfifi[root@client1 ~] systemctl start keepalived
4验证
七、Nginx原理
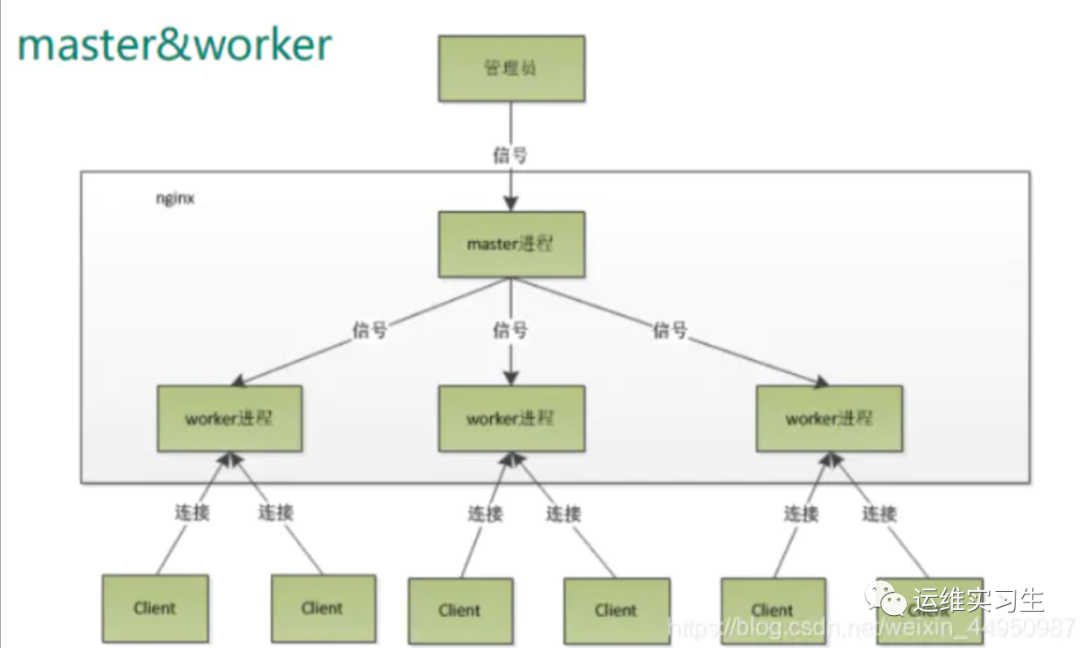
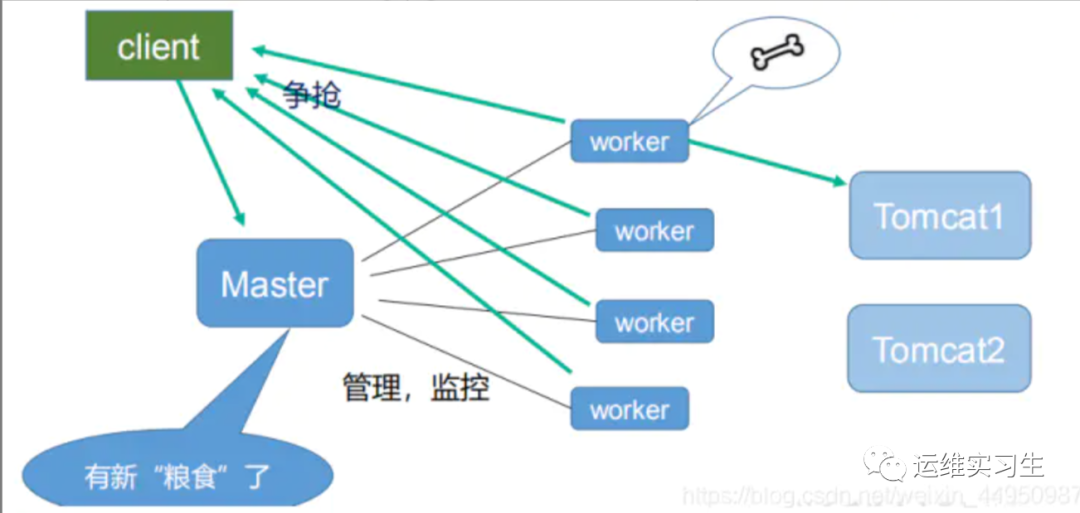
master-workers 的机制的好处
首先,对于每个 worker 进程来说,独立的进程,不需要加锁,所以省掉了锁带来的开销,同时在编程以及问题查找时,也会方便很多。其次,采用独立的进程,可以让互相之间不会影响,一个进程退出后,其它进程还在工作,服务不会中断, master 进程则很快启动新的worker 进程。当然, worker 进程的异常退出,肯定是程序有 bug 了,异常退出,会导致当前 worker 上的所有请求失败,不过不会影响到所有请求,所以降低了风险
需要设置多少个 worker
Nginx 同 redis 类似都采用了 io 多路复用机制,每个worker 都是一个独立的进程,但每个进程里只有一个主线程,通过异步非阻塞的方式来处理请求,即使是千上万个请求也不在话下。每个 worker 的线程可以把一个 cpu 的性能发挥到极致。所以 worker 数和服务器的 cpu数相等是最为适宜的。设少了会浪费 cpu,设多了会造成 cpu 频繁切换上下文带来的损耗。
设置 worker 数量
worker_processes 4
work 绑定 cpu(4 work 绑定 4cpu)。
worker_cpu_affinity 0001 0010 0100 1000
work 绑定 cpu (4 work 绑定 8cpu 中的 4 个) 。
worker_cpu_affinity 0000001 0000001000000100 00001000
连接数 worker_connection
这个值是表示每个 worker 进程所能建立连接的最大值,所以,一个 nginx 能建立的最大连接数,应该是 worker_connections * worker_processes。当然,这里说的是最大连接数,对于HTTP请 求 本 地 资 源 来 说 , 能 够 支 持 的 最 大 并 发 数 量 是 worker_connections* worker_processes,如果是支持 http1.1 的浏览器每次访问要占两个连接,所以普通的静态访问最大并发数是: worker_connections * worker_processes /2,而如果是 HTTP 作 为反向代理来说,最大并发数量应该是worker_connections * worker_processes/4。因为作为反向代理服务器,每个并发会建立与客户端的连接和与后端服务的连接,会占用两个连接。