



背景
在前面的《Spring进阶-Bean生命周期(上)》
中提到过BeanPostProcessor
,不过限于篇幅原因并没有细讲。那么什么是BeanPostProcessor?我们经常说Spring有很好的扩展性,那么这个扩展性体现在哪里呢?本文的主要内容就是来介绍什么是BeanPostProcessor。
BeanPostProcessor
废话不多说我们直接看源码,源码内容如下:
public interface BeanPostProcessor {

 @Nullable
 default Object postProcessBeforeInitialization(Object bean, String beanName) throws BeansException {
  return bean;
 }

 @Nullable
 default Object postProcessAfterInitialization(Object bean, String beanName) throws BeansException {
  return bean;
 }

}
从源码可以看出,BeanPostProcessor就是一个接口而已,而它提供了两个方法。其中从名字可以看出,这两个方法调用的时机分别为Bean的初始化之前和Bean的初始化之后。现在我们知道了这个特性,那么这有什么用呢?下面我使用Spring中的一个场景来举例说明。在使用Spring时,我们可以通过ApplicationContextAware
将ApplicationContentx
注入到我们的Bean中,例如下面的示例代码:
public class BeanPostProcessorDemo1 {
    public static void main(String[] args) {
        //创建IOC容器
        AnnotationConfigApplicationContext context = new AnnotationConfigApplicationContext("com.buydeem.share.beanpostprocessor");
        //从容器中获取UserService实例
        UserService userService = context.getBean(UserService.class);
        System.out.println("userService.getApplicationContext() == context : " + (userService.getApplicationContext() == context));

    }
}

@Component
class UserService implements ApplicationContextAware {
    private ApplicationContext applicationContext;

    @Override
    public void setApplicationContext(ApplicationContext applicationContext) throws BeansException {
        this.applicationContext = applicationContext;
    }

    public ApplicationContext getApplicationContext() {
        return applicationContext;
    }
}
对于上面的的示例,最后的打印结果如下:
userService.getApplicationContext() == context : true
那么UserService示例中的ApplicationContext是如何被设置进去的呢?首先我们可以确定一定,肯定是通过ApplicationContextAware#setApplicationContext()
方法设置进去的,但是谁在什么时候回调的该方法,将ApplicationContext设置进去的呢?直接看源码:
class ApplicationContextAwareProcessor implements BeanPostProcessor {

 private final ConfigurableApplicationContext applicationContext;

 private final StringValueResolver embeddedValueResolver;

 public ApplicationContextAwareProcessor(ConfigurableApplicationContext applicationContext) {
  this.applicationContext = applicationContext;
  this.embeddedValueResolver = new EmbeddedValueResolver(applicationContext.getBeanFactory());
 }


 @Override
 @Nullable
 public Object postProcessBeforeInitialization(Object bean, String beanName) throws BeansException {
  if (!(bean instanceof EnvironmentAware || bean instanceof EmbeddedValueResolverAware ||
    bean instanceof ResourceLoaderAware || bean instanceof ApplicationEventPublisherAware ||
    bean instanceof MessageSourceAware || bean instanceof ApplicationContextAware)){
   return bean;
  }

  AccessControlContext acc = null;

  if (System.getSecurityManager() != null) {
   acc = this.applicationContext.getBeanFactory().getAccessControlContext();
  }

  if (acc != null) {
   AccessController.doPrivileged((PrivilegedAction<Object>) () -> {
    invokeAwareInterfaces(bean);
    return null;
   }, acc);
  }
  else {
   invokeAwareInterfaces(bean);
  }

  return bean;
 }

 private void invokeAwareInterfaces(Object bean) {
  if (bean instanceof EnvironmentAware) {
   ((EnvironmentAware) bean).setEnvironment(this.applicationContext.getEnvironment());
  }
  if (bean instanceof EmbeddedValueResolverAware) {
   ((EmbeddedValueResolverAware) bean).setEmbeddedValueResolver(this.embeddedValueResolver);
  }
  if (bean instanceof ResourceLoaderAware) {
   ((ResourceLoaderAware) bean).setResourceLoader(this.applicationContext);
  }
  if (bean instanceof ApplicationEventPublisherAware) {
   ((ApplicationEventPublisherAware) bean).setApplicationEventPublisher(this.applicationContext);
  }
  if (bean instanceof MessageSourceAware) {
   ((MessageSourceAware) bean).setMessageSource(this.applicationContext);
  }
  if (bean instanceof ApplicationContextAware) {
   ((ApplicationContextAware) bean).setApplicationContext(this.applicationContext);
  }
 }

}
上面的源码中我们只需要关注两个方法即可,postProcessBeforeInitialization
方法它是在初始化之前调用,该方法主要用来判断当前的Bean类型是不是XXXAware类型中的一种,如果是则调用invokeAwareInterfaces
方法。而该方法则是调用XXXAware的setXXX方法,通过接口回调将XXX设置到实例中。
那从哪里佐证BeanPostProcessor中的两个接口回调方法是在实例化前后回调的呢?如果看了之前Bean生命周期的朋友可能有印象,Bean初始化方法的源码如下:
 protected Object initializeBean(String beanName, Object bean, @Nullable RootBeanDefinition mbd) {
  if (System.getSecurityManager() != null) {
   AccessController.doPrivileged((PrivilegedAction<Object>) () -> {
    invokeAwareMethods(beanName, bean);
    return null;
   }, getAccessControlContext());
  }
  else {
   invokeAwareMethods(beanName, bean);
  }

  Object wrappedBean = bean;
  if (mbd == null || !mbd.isSynthetic()) {
   wrappedBean = applyBeanPostProcessorsBeforeInitialization(wrappedBean, beanName);
  }

  try {
   invokeInitMethods(beanName, wrappedBean, mbd);
  }
  catch (Throwable ex) {
   throw new BeanCreationException(
     (mbd != null ? mbd.getResourceDescription() : null),
     beanName, "Invocation of init method failed", ex);
  }
  if (mbd == null || !mbd.isSynthetic()) {
   wrappedBean = applyBeanPostProcessorsAfterInitialization(wrappedBean, beanName);
  }

  return wrappedBean;
 }
该方法中分别有两个方法为:applyBeanPostProcessorsBeforeInitialization和applyBeanPostProcessorsAfterInitialization
,这个两个方法就是BeanPostProcessor的回调之处。它们的源码如下:
 @Override
 public Object applyBeanPostProcessorsBeforeInitialization(Object existingBean, String beanName)
   throws BeansException {

  Object result = existingBean;
  for (BeanPostProcessor processor : getBeanPostProcessors()) {
   Object current = processor.postProcessBeforeInitialization(result, beanName);
   if (current == null) {
    return result;
   }
   result = current;
  }
  return result;
 }

 @Override
 public Object applyBeanPostProcessorsAfterInitialization(Object existingBean, String beanName)
   throws BeansException {

  Object result = existingBean;
  for (BeanPostProcessor processor : getBeanPostProcessors()) {
   Object current = processor.postProcessAfterInitialization(result, beanName);
   if (current == null) {
    return result;
   }
   result = current;
  }
  return result;
 }
如何注册BeanPostProcessor
前面我们讲了使用ApplicationContextAwareProcessor
作为示例介绍了BeanPostProcessor的作用,那么它是如何被注册到容器中的呢?在AbstractApplicationContext#prepareBeanFactory
源码中可以看到下面这行代码:
beanFactory.addBeanPostProcessor(new ApplicationContextAwareProcessor(this));
从源码可以知道,它是通过addBeanPostProcessor
注册到容器中的。如果对于之前《Spring进阶-BeanFactory》有印象的同学知道,这个方法是由ConfigurableBeanFactory
接口提供的。下面我们自己使用一个示例来手动注册一个BeanPostProcessor试试。
public class BeanPostProcessorDemo2 {
    public static void main(String[] args) {
        //创建BeanFactory
        DefaultListableBeanFactory factory = new DefaultListableBeanFactory();
        //定义并注册BeanDefinition
        AbstractBeanDefinition bd = BeanDefinitionBuilder.genericBeanDefinition(Person.class).getBeanDefinition();
        factory.registerBeanDefinition("person",bd);
        //注册BeanPostProcessor
        factory.addBeanPostProcessor(new MyselfBeanPostProcessor());

        Person person = factory.getBean(Person.class);
    }
}

class Person implements InitializingBean {
    private String message = "默认值";

    @Override
    public void afterPropertiesSet() throws Exception {
        message = "afterPropertiesSet()修改后的值";
    }

    public String getMessage() {
        return message;
    }
}

class MyselfBeanPostProcessor implements BeanPostProcessor{
    @Override
    public Object postProcessBeforeInitialization(Object bean, String beanName) throws BeansException {
        if (bean instanceof Person){
            String message = ((Person) bean).getMessage();
            System.out.println("postProcessBeforeInitialization : "+ message);
        }
        return bean;
    }

    @Override
    public Object postProcessAfterInitialization(Object bean, String beanName) throws BeansException {
        if (bean instanceof Person){
            String message = ((Person) bean).getMessage();
            System.out.println("postProcessAfterInitialization : "+ message);
        }
        return bean;
    }
}
示例代码很简单,MyselfBeanPostProcessor实现BeanPostProcessor接口,它主要功能就是在初始化前后打印出Person中message的值。最后的运行结果如下:
postProcessBeforeInitialization : 默认值
postProcessAfterInitialization : afterPropertiesSet()修改后的值
其实注册BeanPostProcessor的实现也很简单,它只有一个实现,位于AbstractBeanFactory#addBeanPostProcessor
中,源码如下:
 public void addBeanPostProcessor(BeanPostProcessor beanPostProcessor) {
  Assert.notNull(beanPostProcessor, "BeanPostProcessor must not be null");
  // Remove from old position, if any
  this.beanPostProcessors.remove(beanPostProcessor);
  // Track whether it is instantiation/destruction aware
  if (beanPostProcessor instanceof InstantiationAwareBeanPostProcessor) {
   this.hasInstantiationAwareBeanPostProcessors = true;
  }
  if (beanPostProcessor instanceof DestructionAwareBeanPostProcessor) {
   this.hasDestructionAwareBeanPostProcessors = true;
  }
  // Add to end of list
  this.beanPostProcessors.add(beanPostProcessor);
 }
从源码可以知道,它就是通过一个List类型的变量beanPostProcessors存储了我们注册的BeanPostProcessor。
BeanPostProcessor子接口
从上面的例子我们了解了什么是BeanPostProcessor,在Spring中它还有一些子接口,这些子接口的功能与BeanPostProcessor类似,不同的在于它们的回调时机与BeanPostProcessor不同,下面的内容就是来分析这些主要的子接口。
MergedBeanDefinitionPostProcessor
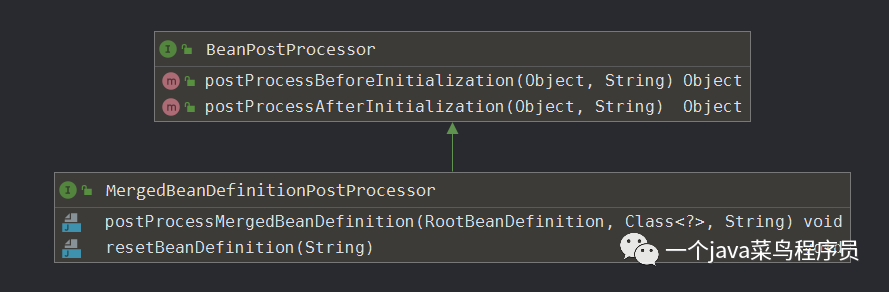
该接口分别有两个方法,其中postProcessMergedBeanDefinition
是在mergeBeanDefinition之后调用,而resetBeanDefinition
则是在Bean被重置的时候使用。
在Spring中我们可以通过@Autowired
、@Value
、@Inject
注解来将依赖注入到Bean中,那么这个功能是如何实现的呢?对于此实现我们可以看AutowiredAnnotationBeanPostProcessor
这个类。
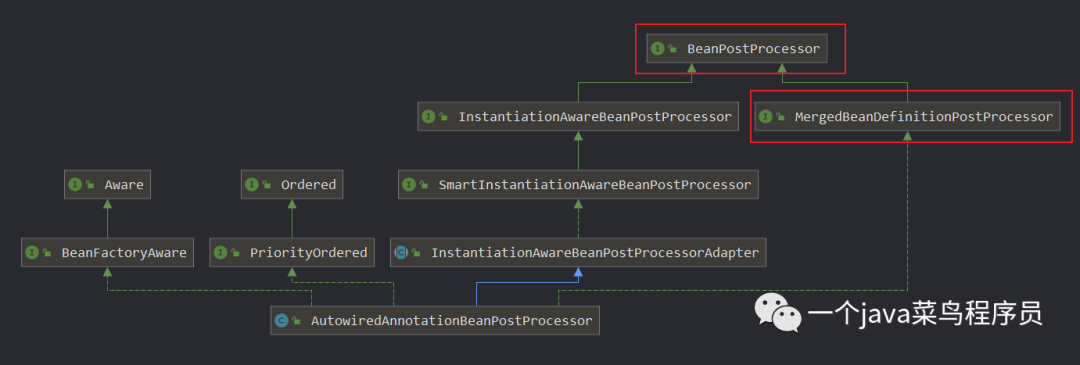
从上图可知该类实现了MergedBeanDefinitionPostProcessor
接口,进而该类实现了postProcessMergedBeanDefinition
方法。@Autowired
等注解正是通过这个方法实现注入类型的预解析,将需要依赖注入的属性信息封装到InjectionMetadata
中。而InjectionMetadata
中包含了类中哪些需要注入的元素已经元素要注入到哪个目标类。有了这些信息,在Bean的生命周期属性赋值
时通过InstantiationAwareBeanPostProcessor#postProcessProperties
完成属性的依赖注入(注意:AutowiredAnnotationBeanPostProcessor也实现了InstantiationAwareBeanPostProcessor#postProcessProperties方法)。
AutowiredAnnotationBeanPostProcessor#postProcessMergedBeanDefinition
 public void postProcessMergedBeanDefinition(RootBeanDefinition beanDefinition, Class<?> beanType, String beanName) {
    //依赖信息解析封装成InjectionMetadata
  InjectionMetadata metadata = findAutowiringMetadata(beanName, beanType, null);
  metadata.checkConfigMembers(beanDefinition);
 }
AutowiredAnnotationBeanPostProcessor#findAutowiringMetadata
  //主要是在从缓存injectionMetadataCache中获取InjectionMetadata信息,
  //还有就是判断是不是需要刷新缓存中的InjectionMetadata信息。
  //buildAutowiringMetadata才是构建InjectionMetadata主要逻辑
 private InjectionMetadata findAutowiringMetadata(String beanName, Class<?> clazz, @Nullable PropertyValues pvs) {
  String cacheKey = (StringUtils.hasLength(beanName) ? beanName : clazz.getName());
  InjectionMetadata metadata = this.injectionMetadataCache.get(cacheKey);
  if (InjectionMetadata.needsRefresh(metadata, clazz)) {
   synchronized (this.injectionMetadataCache) {
    metadata = this.injectionMetadataCache.get(cacheKey);
    if (InjectionMetadata.needsRefresh(metadata, clazz)) {
     if (metadata != null) {
      metadata.clear(pvs);
     }
     metadata = buildAutowiringMetadata(clazz);
          //将InjectionMetadata放入缓存injectionMetadataCache
     this.injectionMetadataCache.put(cacheKey, metadata);
    }
   }
  }
  return metadata;
 }
AutowiredAnnotationBeanPostProcessor#buildAutowiringMetadata
 private InjectionMetadata buildAutowiringMetadata(final Class<?> clazz) {
    //判断类中在方法、字段、类上有没有autowired注解,autowired注解默认情况Spring设置了三种
    //这三种也就是@Autowired、@Value、@Inject,可以通过AutowiredAnnotationBeanPostProcessor默认构造方法验证
  if (!AnnotationUtils.isCandidateClass(clazz, this.autowiredAnnotationTypes)) {
   return InjectionMetadata.EMPTY;
  }

  List<InjectionMetadata.InjectedElement> elements = new ArrayList<>();
  Class<?> targetClass = clazz;

  do {
   final List<InjectionMetadata.InjectedElement> currElements = new ArrayList<>();
      //处理字段上的
   ReflectionUtils.doWithLocalFields(targetClass, field -> {
    MergedAnnotation<?> ann = findAutowiredAnnotation(field);
    if (ann != null) {
     if (Modifier.isStatic(field.getModifiers())) {
      if (logger.isInfoEnabled()) {
       logger.info("Autowired annotation is not supported on static fields: " + field);
      }
      return;
     }
     boolean required = determineRequiredStatus(ann);
     currElements.add(new AutowiredFieldElement(field, required));
    }
   });
      //处理方法上的
   ReflectionUtils.doWithLocalMethods(targetClass, method -> {
    Method bridgedMethod = BridgeMethodResolver.findBridgedMethod(method);
    if (!BridgeMethodResolver.isVisibilityBridgeMethodPair(method, bridgedMethod)) {
     return;
    }
    MergedAnnotation<?> ann = findAutowiredAnnotation(bridgedMethod);
    if (ann != null && method.equals(ClassUtils.getMostSpecificMethod(method, clazz))) {
     if (Modifier.isStatic(method.getModifiers())) {
      if (logger.isInfoEnabled()) {
       logger.info("Autowired annotation is not supported on static methods: " + method);
      }
      return;
     }
     if (method.getParameterCount() == 0) {
      if (logger.isInfoEnabled()) {
       logger.info("Autowired annotation should only be used on methods with parameters: " +
         method);
      }
     }
     boolean required = determineRequiredStatus(ann);
     PropertyDescriptor pd = BeanUtils.findPropertyForMethod(bridgedMethod, clazz);
     currElements.add(new AutowiredMethodElement(method, required, pd));
    }
   });

   elements.addAll(0, currElements);
   targetClass = targetClass.getSuperclass();
  }
  while (targetClass != null && targetClass != Object.class);
    //构建InjectionMetadata返回
  return InjectionMetadata.forElements(elements, clazz);
 }
上面就是postProcessMergedBeanDefinition
方法的整个过程,上面主要的事情就是将@Autowired
等注解上的信息解析成InjectionMetadata,然后将其缓存到injectionMetadataCache中以便后面的postProcessProperties
方法回调使用。
postProcessMergedBeanDefinition具体何时调用
前面我只说了MergedBeanDefinitionPostProcessor#postProcessMergedBeanDefinition
方法是在BeanDefinition合并之后调用,而BeanDefinition合并是在Bean实例化
之前发生的,那么该方法是在实例化之前还是实例化之后呢?从源码中是可以知道,它是在实例化之后,属性赋值之前
。
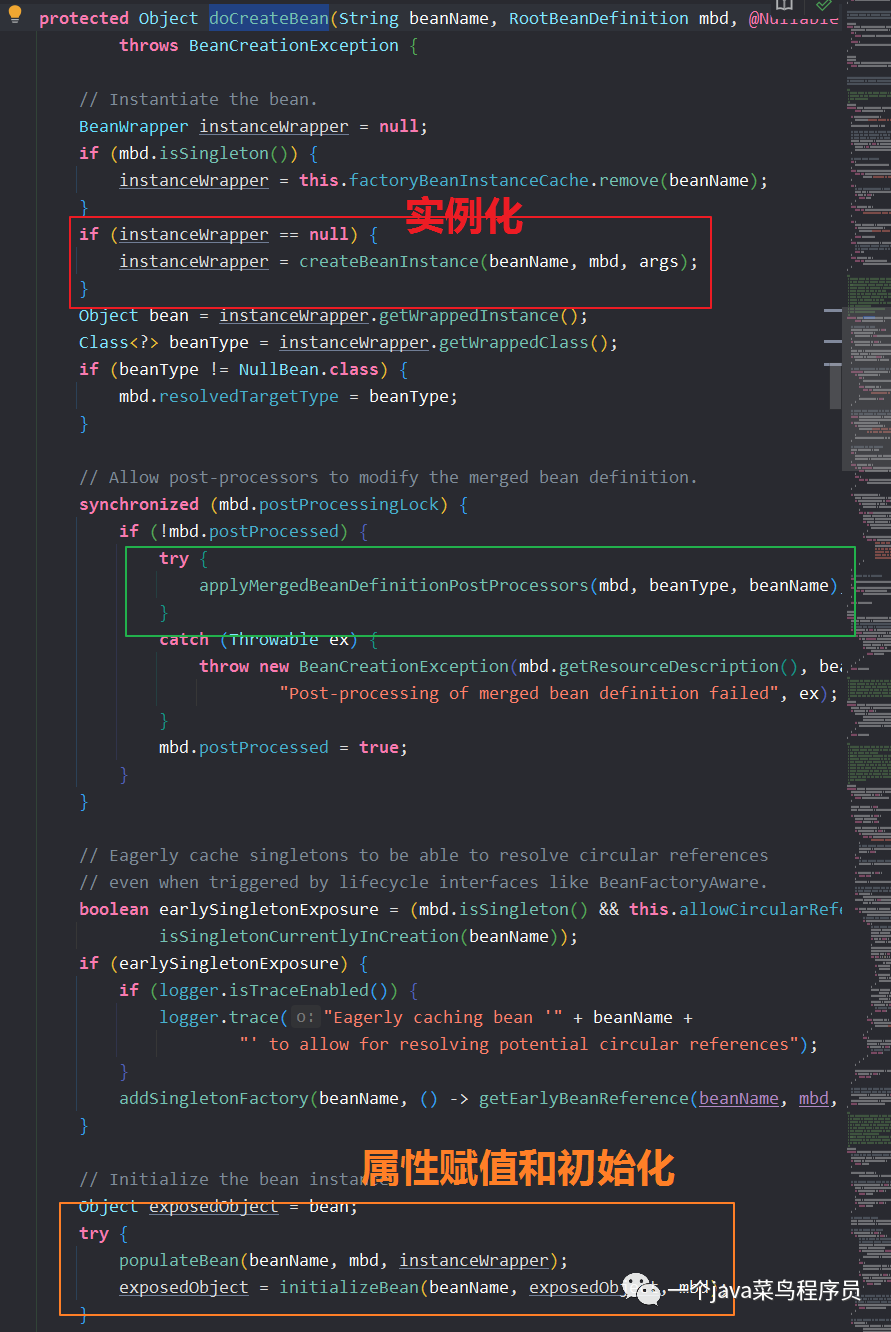
从源码我们可以看出,postProcessMergedBeanDefinition的确是在实例化之后属性赋值之前。
InstantiationAwareBeanPostProcessor
在上面我们讲AutowiredAnnotationBeanPostProcessor
实现时只说了解析依赖的部分,而如何注入的我们并没有说到。而它的依赖注入实现就离不开InstantiationAwareBeanPostProcessor
。
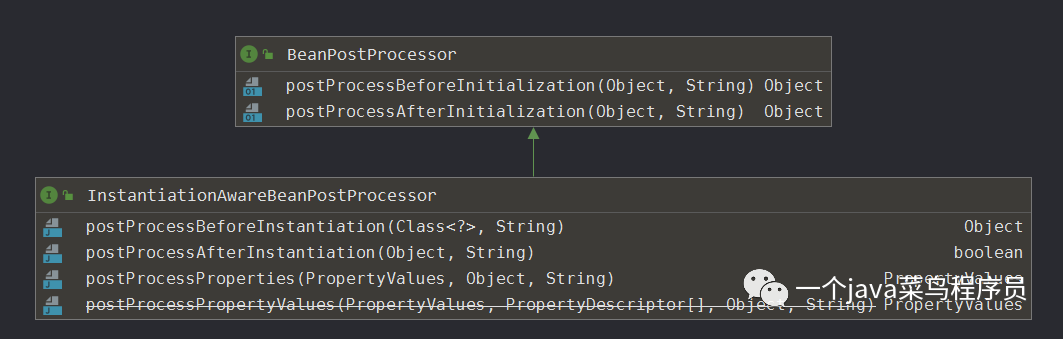
从上图可以看出,该接口同样是BeanPostProcessor的子接口,它一共有三个方法(postProcessPropertyValues已过期这里就不说了)。
postProcessBeforeInstantiation
在Bean实例化之前调用。postProcessAfterInstantiation
在Bean实例化之后调用。postProcessProperties
在属性应用前调用。
public class BeanPostProcessorDemo4 {
    public static void main(String[] args) {
        //创建BeanFactory
        DefaultListableBeanFactory factory = new DefaultListableBeanFactory();
        //注册InstantiationAwareBeanPostProcessor
        factory.addBeanPostProcessor(new MyInstantiationAwareBeanPostProcessor());
        //创建并注册BeanDefinition
        AbstractBeanDefinition beanDefinition = BeanDefinitionBuilder.genericBeanDefinition(Student.class)
                .addPropertyValue("name", "mac")
                .addPropertyValue("classNo", "2101班")
                .getBeanDefinition();
        factory.registerBeanDefinition("mac",beanDefinition);
        //获取实例并打印
        Student student = factory.getBean(Student.class);
        System.out.println(student);
    }
}

class MyInstantiationAwareBeanPostProcessor implements InstantiationAwareBeanPostProcessor{
    @Override
    public Object postProcessBeforeInstantiation(Class<?> beanClass, String beanName) throws BeansException {
        System.out.printf("postProcessBeforeInstantiation: beanClass = %s,beanName = %s%n",beanClass.getSimpleName(),beanName);
        return null;
    }

    @Override
    public boolean postProcessAfterInstantiation(Object bean, String beanName) throws BeansException {
        System.out.printf("postProcessAfterInstantiation: bean = %s,beanName = %s%n",bean,beanName);
        return true;
    }

    @Override
    public PropertyValues postProcessProperties(PropertyValues pvs, Object bean, String beanName) throws BeansException {
        System.out.printf("postProcessProperties: pvs = %s, bean = %s,beanName = %s%n",pvs,bean,beanName);
        return pvs;
    }
}

@Data
class Student {
    private String name;
    private String classNo;

    public Student() {
        System.out.println("无参构造方法被调用");
    }
}
上面示例的运行结果如下:
postProcessBeforeInstantiation: beanClass = Student,beanName = mac
无参构造方法被调用
postProcessAfterInstantiation: bean = Student(name=null, classNo=null),beanName = mac
postProcessProperties: pvs = PropertyValues: length=2; bean property 'name'; bean property 'classNo', bean = Student(name=null, classNo=null),beanName = mac
Student(name=mac, classNo=2101班)
从上面的运行结果可以看出,InstantiationAwareBeanPostProcessor
接口回调的时机的确就是我们前面所说的。
postProcessBeforeInstantiation调用源码
查看AbstractAutowireCapableBeanFactory#createBean()
方法可以找到如下内容:
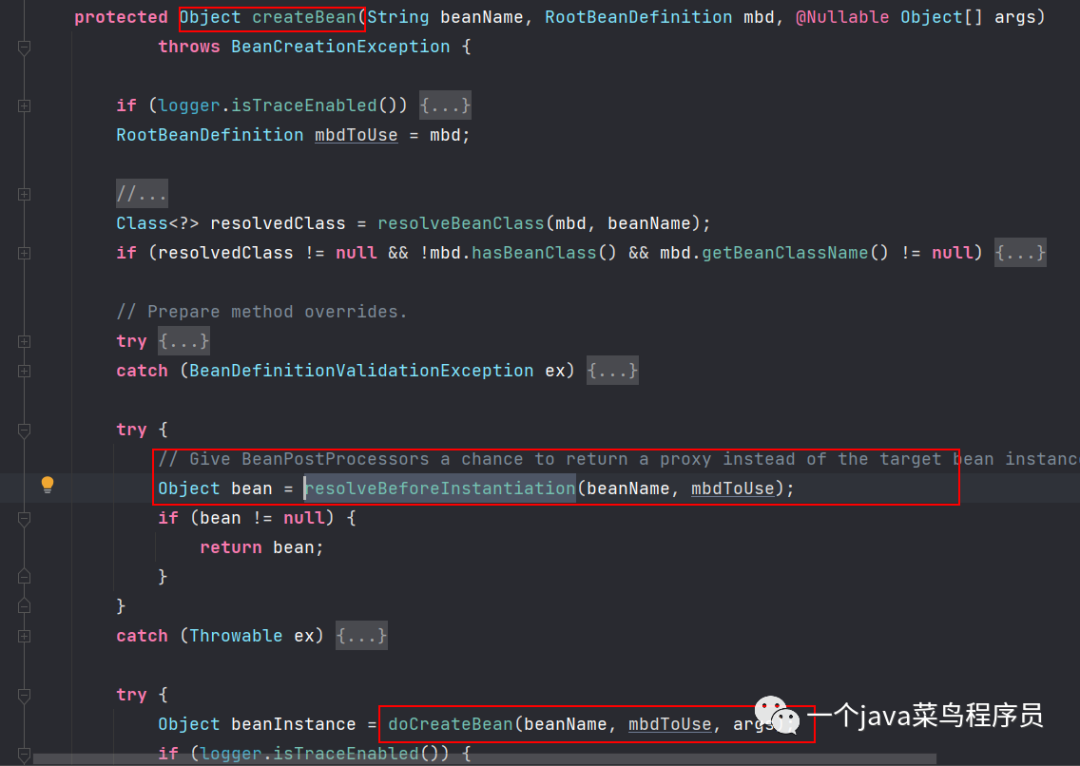
首先我们要确定的是doCreateBean
方法里面才是Bean的实例化、属性赋值和销毁,查看标出的resolveBeforeInstantiation
,它的内容如下:
 protected Object resolveBeforeInstantiation(String beanName, RootBeanDefinition mbd) {
  Object bean = null;
  if (!Boolean.FALSE.equals(mbd.beforeInstantiationResolved)) {
   // Make sure bean class is actually resolved at this point.
   if (!mbd.isSynthetic() && hasInstantiationAwareBeanPostProcessors()) {
    Class<?> targetType = determineTargetType(beanName, mbd);
    if (targetType != null) {
          //调用postProcessBeforeInstantiation
     bean = applyBeanPostProcessorsBeforeInstantiation(targetType, beanName);
     if (bean != null) {
      bean = applyBeanPostProcessorsAfterInitialization(bean, beanName);
     }
    }
   }
   mbd.beforeInstantiationResolved = (bean != null);
  }
  return bean;
 }
而方法applyBeanPostProcessorsBeforeInstantiation
内部实现如下:
 protected Object applyBeanPostProcessorsBeforeInstantiation(Class<?> beanClass, String beanName) {
  for (InstantiationAwareBeanPostProcessor bp : getBeanPostProcessorCache().instantiationAware) {
   Object result = bp.postProcessBeforeInstantiation(beanClass, beanName);
   if (result != null) {
    return result;
   }
  }
  return null;
 }
上面方法就是遍历所有的InstantiationAwareBeanPostProcessor
,然后逐个调用postProcessBeforeInstantiation
方法。通过上述源码可知,如果这个方法返回值不为空,将直接返回结果不会进行后续Bean的实例化、属性赋值和初始化。
postProcessAfterInstantiation调用源码
对于populateBean
这个方法如果看过《Spring进阶-Bean生命周期(上)》
相信你一定不会陌生,这个方法就是Bean属性赋值时候的逻辑。
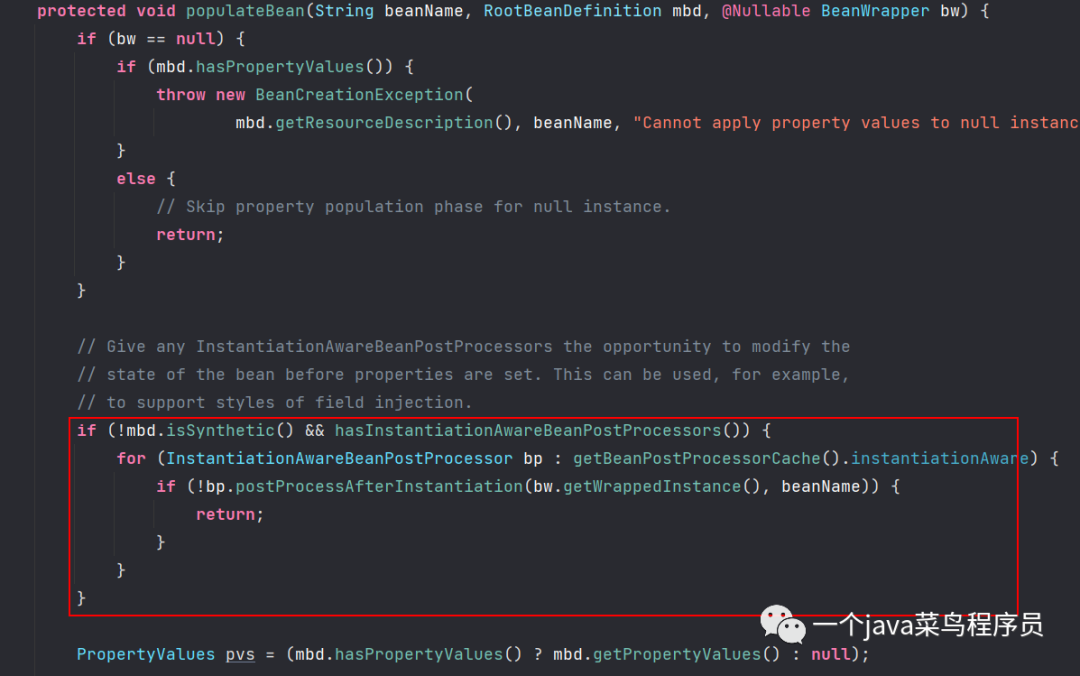
从上面的图中我们可以看到,在属性赋值前就会调用postProcessAfterInstantiation
方法,说明该方法的确是在实例化之后调用的。同时从源码可知,如果该方法返回false
时,则populateBean
后续的属性赋值部分代码都不会再执行,而是直接跳出populateBean
方法。
postProcessProperties调用源码
同样在方法populateBean
后部分有如下源码
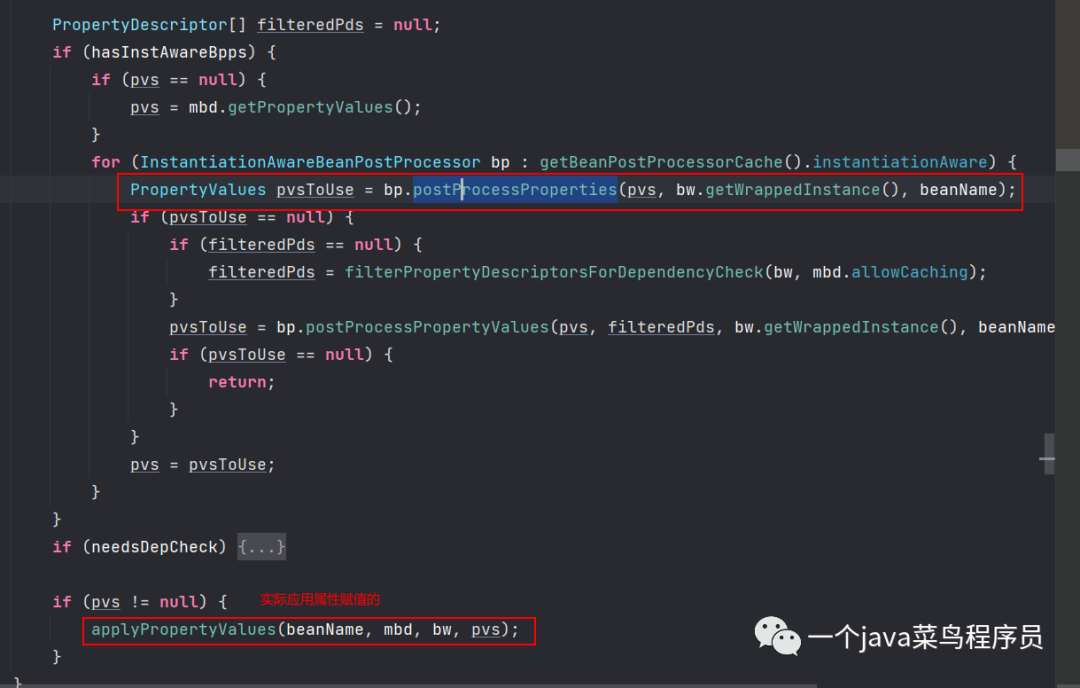
从图中可以看出,此处会调用postProcessProperties
方法,并且该方法是在applyPropertyValues
方法之前。通过该方法我们可以改变PropertyValues
的值从而改变对Bean的属性赋值。
对于前面讲的AutowiredAnnotationBeanPostProcessor
不知道你是否还有印象,前面我们已经说了postProcessMergedBeanDefinition
方法将@Autowired
方式的依赖注入解析出来存放在缓存中了,但是没有说是如何注入依赖的。AutowiredAnnotationBeanPostProcessor
是InstantiationAwareBeanPostProcessor
实现类,我们通过postProcessProperties
来查看它的实现。
 public PropertyValues postProcessProperties(PropertyValues pvs, Object bean, String beanName) {
    //找到对应的InjectionMetadata信息
  InjectionMetadata metadata = findAutowiringMetadata(beanName, bean.getClass(), pvs);
  try {
      //执行依赖注入
   metadata.inject(bean, beanName, pvs);
  }
  catch (BeanCreationException ex) {
   throw ex;
  }
  catch (Throwable ex) {
   throw new BeanCreationException(beanName, "Injection of autowired dependencies failed", ex);
  }
  return pvs;
 }
通过postProcessProperties
回调,AutowiredAnnotationBeanPostProcessor
实现了@Autowired
依赖注入。
DestructionAwareBeanPostProcessor
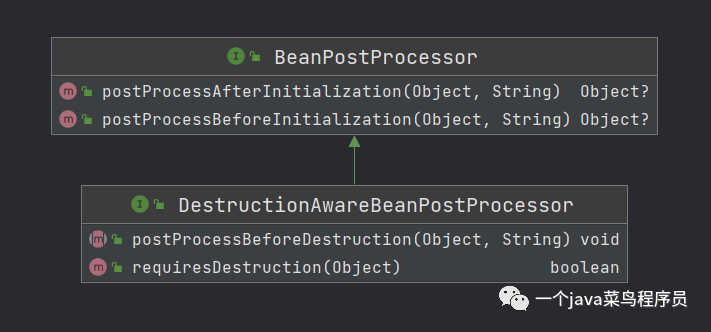
通过名字我们也知道这个BeanPostProcessor与Bean的销毁有关。它一共就两个方法,其中postProcessBeforeDestruction
方法是在Bean销毁之前调用,而requiresDestruction
则是用来判断给定的Bean实例是否需要销毁回调。下面是Bean销毁的相关代码:
 public void destroy() {
    //应用postProcessBeforeDestruction方法
  if (!CollectionUtils.isEmpty(this.beanPostProcessors)) {
   for (DestructionAwareBeanPostProcessor processor : this.beanPostProcessors) {
    processor.postProcessBeforeDestruction(this.bean, this.beanName);
   }
  }
    //省略无关代码
    //调用DisposableBean#destroy方法
    ((DisposableBean) this.bean).destroy();
    //调用BeanDefinition中定义的destroyMethod方法
    invokeCustomDestroyMethod(this.destroyMethod);
 }
上面源码省略了很多东西,不过通过源码我们还是能很清楚的知道在何时调用的。
SmartInstantiationAwareBeanPostProcessor
该接口是InstantiationAwareBeanPostProcessor
的子接口,它的UML结构如下图所示:
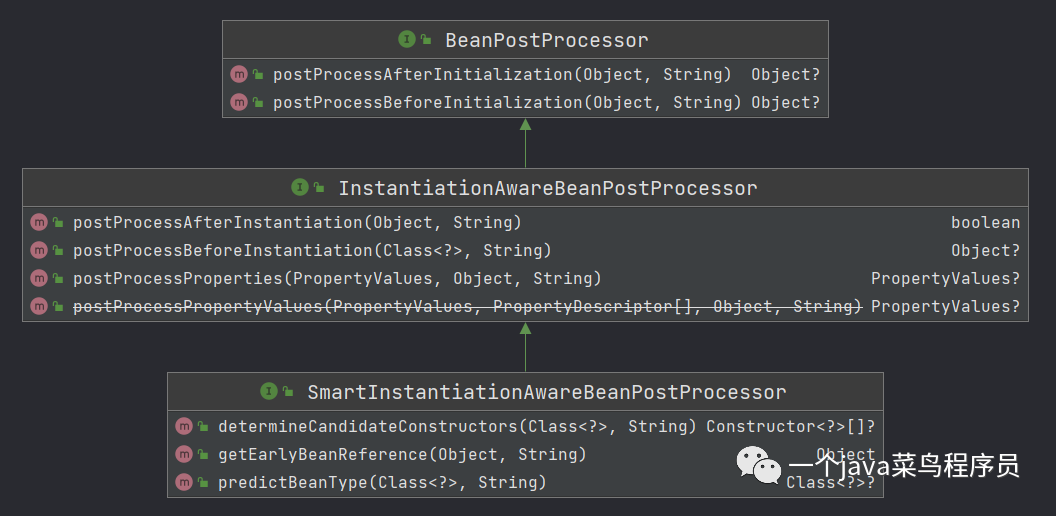
该接口主要提供三个方法:
predictBeanType
:预测Bean的类型,返回第一个预测成功的Class类型,如果不能预测返回nulldetermineCandidateConstructors
:选择合适的构造器,比如目标对象有多个构造器,在这里可以进行一些定制化,选择合适的构造器。getEarlyBeanReference
:获得提前暴露的bean引用。主要用于解决循环引用的问题。
对于SmartInstantiationAwareBeanPostProcessor
而言,该接口基本上用在框架内部。对于determineCandidateConstructors
方法,它的调用就在createBeanInstance
内部,也就是Bean生命周期中的实例化
中。而方法getEarlyBeanReference
调用则在doCreateBean
内部,它位于实例化(createBeanInstance)和属性赋值(populateBean)之间。
小结
通过上面内容的了解,我们明白了BeanPostProcessor的作用。简单来说,它就是在Bean的各个主要生命周期中间提交接口回调,通过接口回调执行扩展逻辑。BeanPostProcessor与Bean的生命周期密不可分,所以结合Bean的生命周期再来看BeanPostProcessor会更加清晰明了。
本文是承接之前《Spring进阶-Bean生命周期(上)》
所写,所以推荐在看本文之前先阅读完前文。后续会在更新一篇《Spring进阶-Bean生命周期(下)》
,将Bean生命周期和BeanPostProcessor做一个综合的讲解。
