


在上文《使用 Docker 运行 DataX 定时全量备份关键数据表》中我们知道了如何运行 DataX 备份程序,接下来我们实现将任务执行结果通过钉钉自定义机器人通知。
DataX 的 Hook 机制
DataX 的代码库,在“common/src/main/java/com/alibaba/datax/common/spi/Hook.java”类中定义了开放的接口:
public interface Hook {/*** 返回名字** @return*/public String getName();/*** TODO 文档** @param jobConf* @param msg*/public void invoke(Configuration jobConf, Map<String, Number> msg);}
在“core/src/main/java/com/alibaba/datax/core/container/util/HookInvoker.java”类中使用 ServiceLoader 机制加载并 Hook 的实现类。
在“core/src/main/java/com/alibaba/datax/core/job/JobContainer.java”类中,当任务结束后调用“HookInvoker”执行了所有的 Hook:
/*** Created by jingxing on 14-8-24.* <p/>* job实例运行在jobContainer容器中,它是所有任务的master,负责初始化、拆分、调度、运行、回收、监控和汇报* 但它并不做实际的数据同步操作*/public class JobContainer extends AbstractContainer {/*** jobContainer主要负责的工作全部在start()里面,包括init、prepare、split、scheduler、* post以及destroy和statistics*/@Overridepublic void start() {LOG.info("DataX jobContainer starts job.");boolean hasException = false;boolean isDryRun = false;try {this.startTimeStamp = System.currentTimeMillis();isDryRun = configuration.getBool(CoreConstant.DATAX_JOB_SETTING_DRYRUN, false);if(isDryRun) {LOG.info("jobContainer starts to do preCheck ...");this.preCheck();} else {userConf = configuration.clone();LOG.debug("jobContainer starts to do preHandle ...");this.preHandle();LOG.debug("jobContainer starts to do init ...");this.init();LOG.info("jobContainer starts to do prepare ...");this.prepare();LOG.info("jobContainer starts to do split ...");this.totalStage = this.split();LOG.info("jobContainer starts to do schedule ...");this.schedule();LOG.debug("jobContainer starts to do post ...");this.post();LOG.debug("jobContainer starts to do postHandle ...");this.postHandle();LOG.info("DataX jobId [{}] completed successfully.", this.jobId);// ⚠️ 执行hook ⚠️this.invokeHooks();}}// 省略}/*** 调用外部hook*/private void invokeHooks() {Communication comm = super.getContainerCommunicator().collect();HookInvoker invoker = new HookInvoker(CoreConstant.DATAX_HOME + "/hook", configuration, comm.getCounter());invoker.invokeAll();}}
其中,“configuration”为对应 job 的 json 配置信息,“comm.getCounter()”存放相关的执行统计。我们通过实现 Hook 接口,就可以拿到相应的信息。
实现 Hook
新建一个项目,将 DataX 的“datax-common-0.0.1-SNAPSHOT.jar”和钉钉的“taobao-sdk-java-auto_1479188381469-20210528.jar”加入到 classpath 中。
然后编写继承 Hook 接口的实现类:DingTalkReport。
public class DingTalkReport implements Hook {private static final Logger LOG = LoggerFactory.getLogger(DingTalkReport.class);private static final SimpleDateFormat dateFormat = new SimpleDateFormat("yyyy-MM-dd HH:mm:ss");@Overridepublic String getName() {return "DingTalkReportHook";}@Overridepublic void invoke(Configuration configuration, Map<String, Number> map) {LOG.debug(configuration.beautify());//{writeSucceedRecords=1248,// readSucceedRecords=1247,// totalErrorBytes=0,// writeSucceedBytes=81477,// byteSpeed=0,// totalErrorRecords=0,// recordSpeed=0,// waitReaderTime=308600221,// writeReceivedBytes=81477,// stage=1,// waitWriterTime=6348796,// percentage=1.0,// totalReadRecords=1247,// writeReceivedRecords=1248,// readSucceedBytes=81477,// totalReadBytes=81477}LOG.debug(map.toString());// 从job的json配置中读取自定义的参数String accessToken = getString(configuration.get("job.dingTalkReporter.accessToken"));String title = getString(configuration.get("job.dingTalkReporter.title"));String secret = getString(configuration.get("job.dingTalkReporter.secret"));String defaultTemplate = "# %s \n > %s \n - 成功读:%d \n - 成功写:%d \n - 等待%d秒";String time = dateFormat.format(System.currentTimeMillis());// 好像没办法拿到执行时间,如果需要更多map中没有的信息,可以改写Hook接口long totalWaitTime = TimeUnit.SECONDS.convert(map.get("waitReaderTime").longValue() + map.get("waitWriterTime").longValue(), TimeUnit.NANOSECONDS);String content = String.format(defaultTemplate, title, time, map.get("readSucceedRecords").longValue(), map.get("writeSucceedRecords").longValue(), totalWaitTime);DingTalkUtil.send(title, content, accessToken, secret);}String getString(Object obj){return null == obj ? "" : String.valueOf(obj);}}
打包
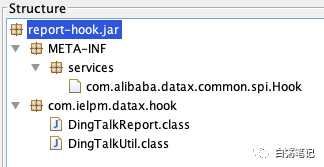
假定包名为:com.bz.datax.hook,在 resources 下创建目录“META_INF/services”,在 services 文件夹下,新建文件“com.alibaba.datax.common.spi.Hook”,文件内容为 Hook 接口实现类的路径。
com.bz.datax.hook.DingTalkReport
然后通过 idea 打包即可。
集成 Hook
引入 Hook 实现包
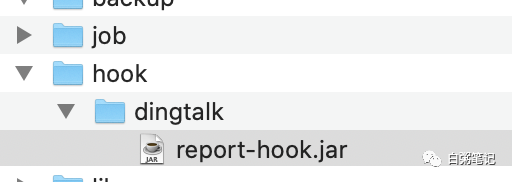
在 DataX 根目录下,新建“hook”文件夹,然后在其下创建“dingtalk”文件夹(也可自定义其他名字),将我们打包好的 jar 包放到“dingtalk”文件夹下。
新增 job 配置
接入钉钉自定义机器人,需要引入额外的配置信息,我们可以在 job 任务描述文件新增钉钉的配置参数“dingTalkReporter”,利用 configuration 类提取即可。
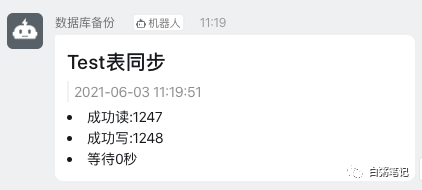
{"job": {"dingTalkReporter": {"accessToken": "d9e5b4f89xxxxxxxxxxx","secret": "SECc008578xxxxxxx","title": "Test表同步"},"setting": {"speed": {"byte":10485760},"errorLimit": {"record": 0,"percentage": 0.02}},……}
其中 accessToken、title 为必填,secret 为选填。
启动效果:
2021-06-03 10:39:08.673 [job-0] INFO HookInvoker - Invoke hook [DingTalkReportHook], path: /datax/hook/dingtalk2021-06-03 10:39:09.415 [job-0] INFO DingTalkUtil - Send DingTalk Message Result:ok-0
通知效果:
参考
完整项目代码参加 Github:https://github.com/mchange/datax-dingtalk-report
钉钉自定义机器人接入文档:https://developers.dingtalk.com/document/app/custom-robot-access
