



此文内容若含有机密信息,请不要擅自使用相关信息或转发给任何人,不然需要负法律责任,并请告知相关人及时删除并修改机密信息,谢谢。
Seata 是一款开源的分布式事务解决方案,致力于提供高性能和简单易用的分布式事务服务。Seata 将为用户提供了 AT、TCC、SAGA 和 XA 事务模式,为用户打造一站式的分布式解决方案。
 一、Seata各事务模式区别简介
个人总结:除了XA,其他模式AT,TCC,SAGA都是补偿型的事务
XA: 业务无侵入、全局锁,完全自动提交和回滚(依靠如数据库的强事务)
AT: 业务无侵入、全局锁,完全自动提交和回滚(seata依靠数据库回滚事务日志)
TCC: 业务有侵入、无锁, 需要手写提交和回滚业务
SATA:业务有侵入、无锁, 需要手写回滚业务
二、Seata的AT模式简介
http://seata.io/zh-cn/docs/dev/mode/at-mode.html
两阶段提交协议的演变:
一阶段:业务数据和回滚日志记录在同一个本地事务中提交,释放本地锁和连接资源。
二阶段:
提交异步化,非常快速地完成。
回滚通过一阶段的回滚日志进行反向补偿。
三、Seata的官网sample运行
1)到官网下载seata
下载地址可以到官网,我这里开始选择了最新的版本结果没成功,但我用1.2.0版本就成功了,暂没研究具体原因,先下载1.2.0版本吧http://seata.io/zh-cn/index.html
下载解压后,
新建seata数据库,执行以下sql文件
/*Navicat MySQL Data TransferSource Server : Test3Source Server Version : 50621Source Host : 172.17.17.13:3306Source Database : seataTarget Server Type : MYSQLTarget Server Version : 50621File Encoding : 65001Date: 2021-10-27 10:03:39*/SET FOREIGN_KEY_CHECKS=0;-- ------------------------------ Table structure for branch_table-- ----------------------------DROP TABLE IF EXISTS `branch_table`;CREATE TABLE `branch_table` (`branch_id` bigint(20) NOT NULL,`xid` varchar(128) NOT NULL,`transaction_id` bigint(20) DEFAULT NULL,`resource_group_id` varchar(32) DEFAULT NULL,`resource_id` varchar(256) DEFAULT NULL,`lock_key` varchar(128) DEFAULT NULL,`branch_type` varchar(8) DEFAULT NULL,`status` tinyint(4) DEFAULT NULL,`client_id` varchar(64) DEFAULT NULL,`application_data` varchar(2000) DEFAULT NULL,`gmt_create` datetime DEFAULT NULL,`gmt_modified` datetime DEFAULT NULL,PRIMARY KEY (`branch_id`) USING BTREE,KEY `idx_xid` (`xid`) USING BTREE) ENGINE=InnoDB DEFAULT CHARSET=utf8 ROW_FORMAT=DYNAMIC;-- ------------------------------ Records of branch_table-- ------------------------------ ------------------------------ Table structure for global_table-- ----------------------------DROP TABLE IF EXISTS `global_table`;CREATE TABLE `global_table` (`xid` varchar(128) NOT NULL,`transaction_id` bigint(20) DEFAULT NULL,`status` tinyint(4) NOT NULL,`application_id` varchar(32) DEFAULT NULL,`transaction_service_group` varchar(32) DEFAULT NULL,`transaction_name` varchar(64) DEFAULT NULL,`timeout` int(11) DEFAULT NULL,`begin_time` bigint(20) DEFAULT NULL,`application_data` varchar(2000) DEFAULT NULL,`gmt_create` datetime DEFAULT NULL,`gmt_modified` datetime DEFAULT NULL,PRIMARY KEY (`xid`) USING BTREE,KEY `idx_gmt_modified_status` (`gmt_modified`,`status`) USING BTREE,KEY `idx_transaction_id` (`transaction_id`) USING BTREE) ENGINE=InnoDB DEFAULT CHARSET=utf8 ROW_FORMAT=DYNAMIC;-- ------------------------------ Records of global_table-- ------------------------------ ------------------------------ Table structure for lock_table-- ----------------------------DROP TABLE IF EXISTS `lock_table`;CREATE TABLE `lock_table` (`row_key` varchar(128) NOT NULL,`xid` varchar(96) DEFAULT NULL,`transaction_id` mediumtext,`branch_id` mediumtext,`resource_id` varchar(256) DEFAULT NULL,`table_name` varchar(32) DEFAULT NULL,`pk` varchar(32) DEFAULT NULL,`gmt_create` datetime DEFAULT NULL,`gmt_modified` datetime DEFAULT NULL,PRIMARY KEY (`row_key`) USING BTREE) ENGINE=InnoDB DEFAULT CHARSET=utf8 ROW_FORMAT=DYNAMIC;-- ------------------------------ Records of lock_table-- ----------------------------
再修改file.config配置文件如下,主要的地方应该是
vgroup_mapping.fsp_tx_group = "default"
和数据库连接字符串的地方
整个配置文件完整配置如下
transport {# tcp udt unix-domain-sockettype = "TCP"#NIO NATIVEserver = "NIO"#enable heartbeatheartbeat = true#thread factory for nettythread-factory {boss-thread-prefix = "NettyBoss"worker-thread-prefix = "NettyServerNIOWorker"server-executor-thread-prefix = "NettyServerBizHandler"share-boss-worker = falseclient-selector-thread-prefix = "NettyClientSelector"client-selector-thread-size = 1client-worker-thread-prefix = "NettyClientWorkerThread"# netty boss thread size,will not be used for UDTboss-thread-size = 1#auto default pin or 8worker-thread-size = 8}shutdown {# when destroy server, wait secondswait = 3}serialization = "seata"compressor = "none"}service {#vgroup->rgroupvgroup_mapping.fsp_tx_group = "default"#only support single nodedefault.grouplist = "127.0.0.1:8091"#degrade current not supportenableDegrade = false#disabledisable = false#unit ms,s,m,h,d represents milliseconds, seconds, minutes, hours, days, default permanentmax.commit.retry.timeout = "-1"max.rollback.retry.timeout = "-1"}client {async.commit.buffer.limit = 10000lock {retry.internal = 75retry.times = 40}report.retry.count = 5}## transaction log store, only used in seata-serverstore {## store mode: file、dbmode = "db"## file store propertyfile {## store location dirdir = "sessionStore"# branch session size , if exceeded first try compress lockkey, still exceeded throws exceptionsmaxBranchSessionSize = 16384# globe session size , if exceeded throws exceptionsmaxGlobalSessionSize = 512# file buffer size , if exceeded allocate new bufferfileWriteBufferCacheSize = 16384# when recover batch read sizesessionReloadReadSize = 100# async, syncflushDiskMode = async}## database store propertydb {## the implement of javax.sql.DataSource, such as DruidDataSource(druid)/BasicDataSource(dbcp) etc.datasource = "druid"## mysql/oracle/postgresql/h2/oceanbase etc.dbType = "mysql"driverClassName = "com.mysql.cj.jdbc.Driver"url = "jdbc:mysql://127.0.0.1:3306/seata?useUnicode=true&characterEncoding=utf8&useSSL=false&&serverTimezone=UTC"user = "root"password = "123456"minConn = 5maxConn = 30globalTable = "global_table"branchTable = "branch_table"lockTable = "lock_table"queryLimit = 100}}
registry.conf完整配置如下
registry {# file 、nacos 、eureka、redis、zk、consul、etcd3、sofatype = "eureka"nacos {application = "seata-server"serverAddr = "localhost"namespace = ""cluster = "default"username = ""password = ""}eureka {serviceUrl = "http://localhost:8761/eureka"# application = "default"application = "fsp_tx_group"weight = "1"}redis {serverAddr = "localhost:6379"db = 0password = ""cluster = "default"timeout = 0}zk {cluster = "default"serverAddr = "127.0.0.1:2181"sessionTimeout = 6000connectTimeout = 2000username = ""password = ""}consul {cluster = "default"serverAddr = "127.0.0.1:8500"}etcd3 {cluster = "default"serverAddr = "http://localhost:2379"}sofa {serverAddr = "127.0.0.1:9603"application = "default"region = "DEFAULT_ZONE"datacenter = "DefaultDataCenter"cluster = "default"group = "SEATA_GROUP"addressWaitTime = "3000"}file {name = "file.conf"}}config {# file、nacos 、apollo、zk、consul、etcd3type = "file"nacos {serverAddr = "localhost"namespace = ""group = "SEATA_GROUP"username = ""password = ""}consul {serverAddr = "127.0.0.1:8500"}apollo {appId = "seata-server"apolloMeta = "http://192.168.1.204:8801"namespace = "application"}zk {serverAddr = "127.0.0.1:2181"sessionTimeout = 6000connectTimeout = 2000username = ""password = ""}etcd3 {serverAddr = "http://localhost:2379"}file {name = "file.conf"}}
进入目录seata-server-1.2.0\seata\bin双击seata-server.bat启动seata
2)请到如下地址下载案例代码
https://github.com/seata/seata-samples
我们需要的是代码中的如下项目
https://github.com/seata/seata-samples/tree/master/springcloud-eureka-seata
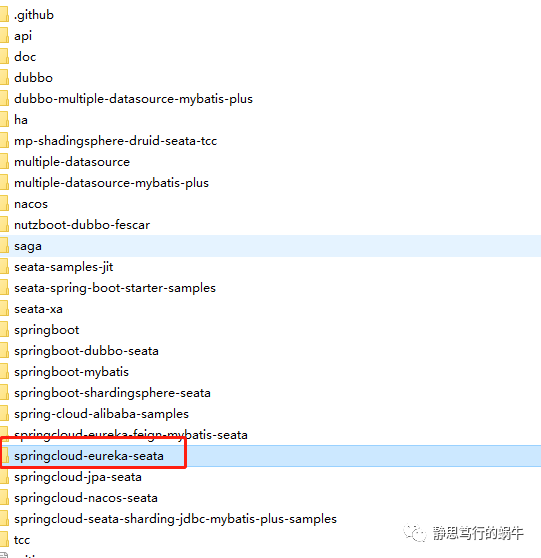
3)用Intellij Idea打开项目
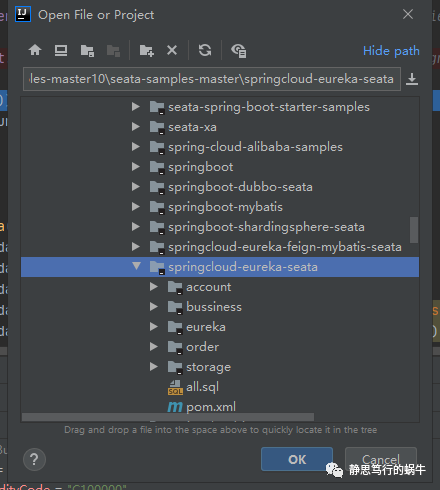
4)修改数据库连接和初始化数据库
我们可以看到每个的项目都是连接的fescar数据库,所以这里我们就把业务数据表放到一个数据库里面(其实按道理应该是放到不同数据库里面更能体现分布式的性质)。
3.1-新建fescar数据库,执行项目里面sql文件,修改每个项目里面配置文件application.properties的数据库连接和用户名密码,有的可能数据库版本不同,连接数据库的字符串会稍有点区别。
3.1-修改application.properties里面的spring.cloud.alibaba.seata.tx-service-group配置为如下
spring.cloud.alibaba.seata.tx-service-group=fsp_tx_group
3.3-修改file.config文件里面的
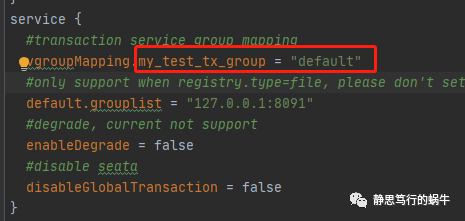
为
vgroupMapping.fsp_tx_group = "fsp_tx_group"
即
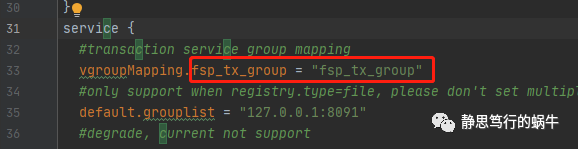
5)修改storage项目的端口,因为我本地的8081端口被占用了
到storage项目项目的application.properties修改如下
server.port=8069
因为其他地方调用了该服务,所以调用方也要修改端口
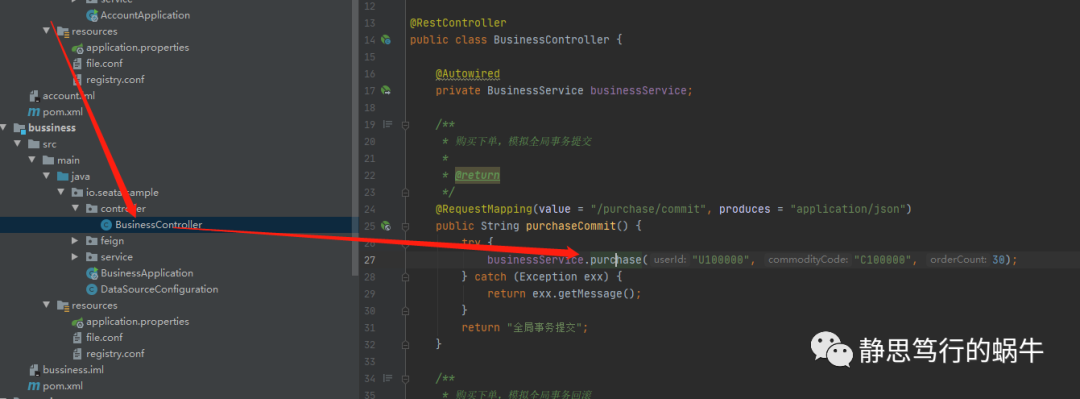
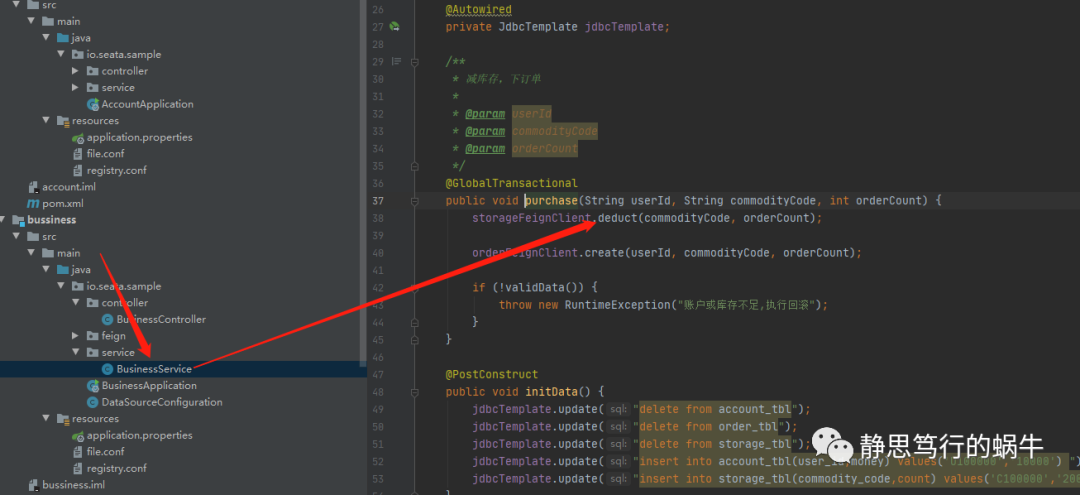
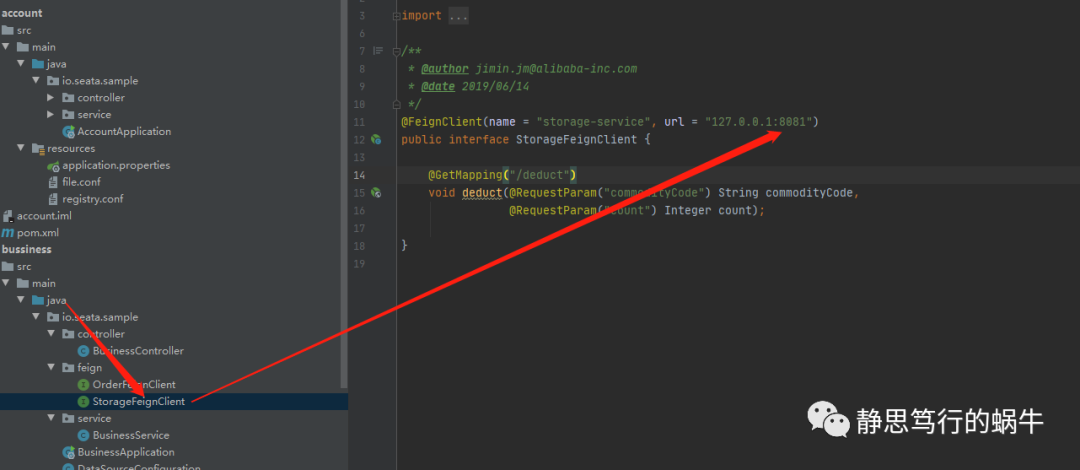
6)这里为了能用接口api直接测试,我们来修改下business项目的controller,
之前是RequestMapping,修改成如下
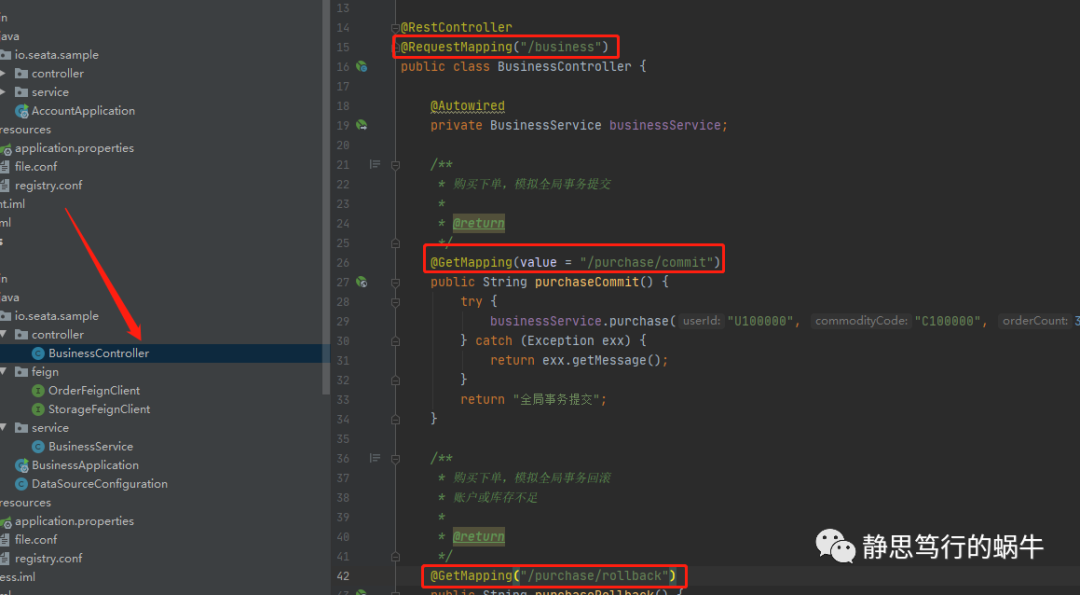
先启动代码中的Eureka项目,再启动其他几个项目如account,storage,order,business
7)访问http://localhost:8084/business/purchase/commit
开始会返回成功
之后会返回
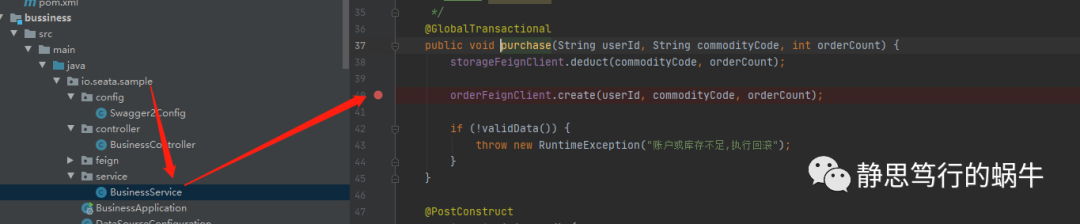
如果想看unlog表里面的临时数据,可以在代码中的业务代码步骤中的中途加一个断点,运行到此处时再查看unlog表就能看到数据,比如断点如下地方,但断点所到之处表示该处代码是还没运行但是打算运行,这时查看unlog表
参考地址:
http://seata.io/zh-cn/docs/overview/what-is-seata.html
https://seata.io/zh-cn/blog/seata-xa-introduce.html

更多分享请关注我的公众号
