


一、Docker软件部署
1.构建yum源
在/etc/yum.repos.d下创建docker-ce.repo
docker-ce.repok可在https://download.docker.com/linux/centos/docker-ce.repo下载
查看仓库中全部docker版本,并选择特定版本安装
[root@node1 yum.repos.d]# yum makecache
Loaded plugins: fastestmirror, product-id, search-disabled-repos, subscription-manager

This system is not registered with an entitlement server. You can use subscription-manager to register.

docker-ce-stable                                                                                                                          | 3.5 kB  00:00:00
Loading mirror speeds from cached hostfile
docker-ce-stable/7/x86_64/primary_db                                                                                                      |  70 kB  00:00:00
docker-ce-stable/7/x86_64/filelists_db                                                                                                    |  29 kB  00:00:00
docker-ce-stable/7/x86_64/other_db                                                                                                        | 122 kB  00:00:00
Metadata Cache Created
[root@node1 yum.repos.d]# yum list  |grep docker
containerd.io.x86_64             1.4.12-3.1.el7                 docker-ce-stable
docker-ce.x86_64                 3:20.10.12-3.el7               docker-ce-stable
docker-ce-cli.x86_64             1:20.10.12-3.el7               docker-ce-stable
docker-ce-rootless-extras.x86_64 20.10.12-3.el7                 docker-ce-stable
docker-ce-selinux.noarch         17.03.3.ce-1.el7               docker-ce-stable
docker-scan-plugin.x86_64        0.12.0-3.el7                   docker-ce-stable
2.安装docker-ce
[root@node1 yum.repos.d]# yum install docker-ce -y
解决安装报错:
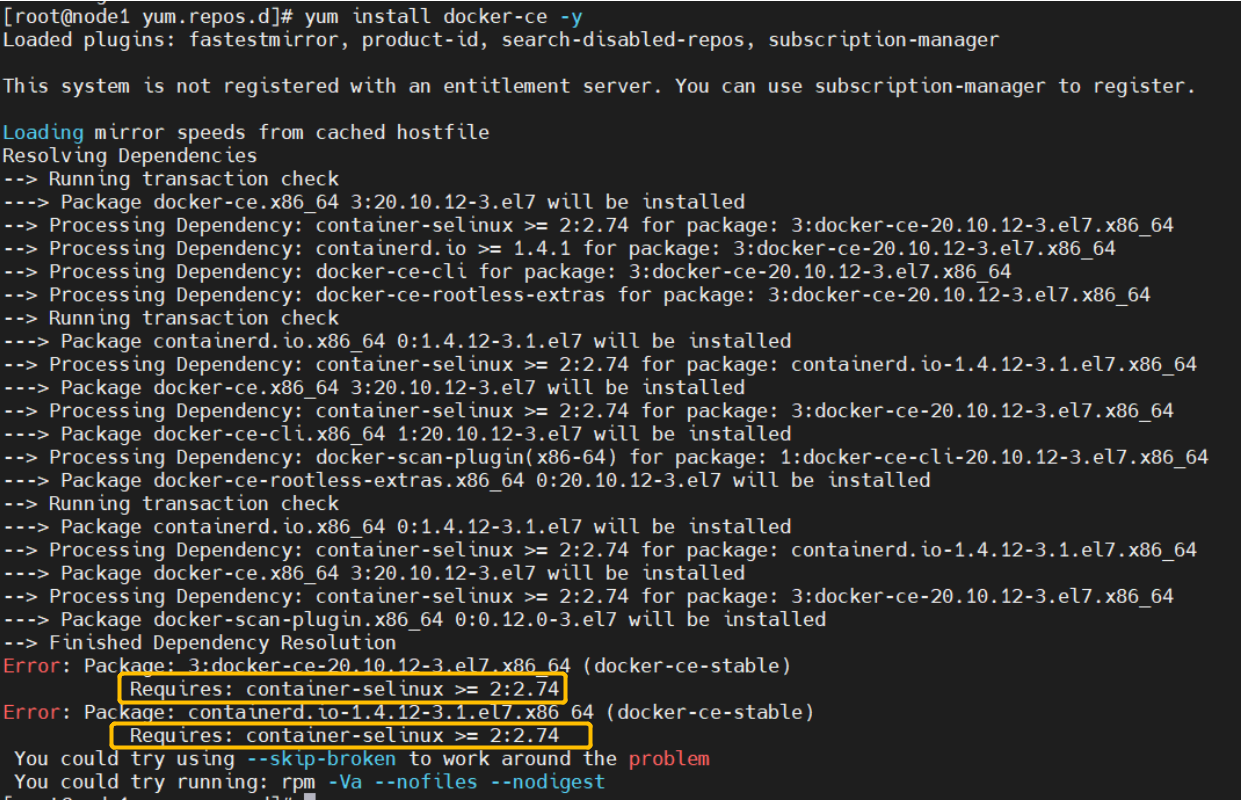
只需要安装container-selinux包,就可以了
[root@localhost ~]# yum install -y container-selinux
  Loaded plugins: fastestmirror
  Loading mirror speeds from cached hostfile

  - base: mirrors.bfsu.edu.cn
  - extras: mirrors.bfsu.edu.cn
  - updates: mirrors.bfsu.edu.cn
    Resolving Dependencies
    --> Running transaction check
    ---> Package container-selinux.noarch 2:2.119.2-1.911c772.el7_8 will be installed
    --> Processing Dependency: selinux-policy-targeted >= 3.13.1-216.el7 for package: 2:container-selinux-2.119.2-1.911c772.el7_8.noarch
    --> Processing Dependency: selinux-policy-base >= 3.13.1-216.el7 for package: 2:container-selinux-2.119.2-1.911c772.el7_8.noarch
    --> Processing Dependency: selinux-policy >= 3.13.1-216.el7 for package: 2:container-selinux-2.119.2-1.911c772.el7_8.noarch
    --> Processing Dependency: policycoreutils-python for package: 2:container-selinux-2.119.2-1.911c772.el7_8.noarch
    --> Running transaction check
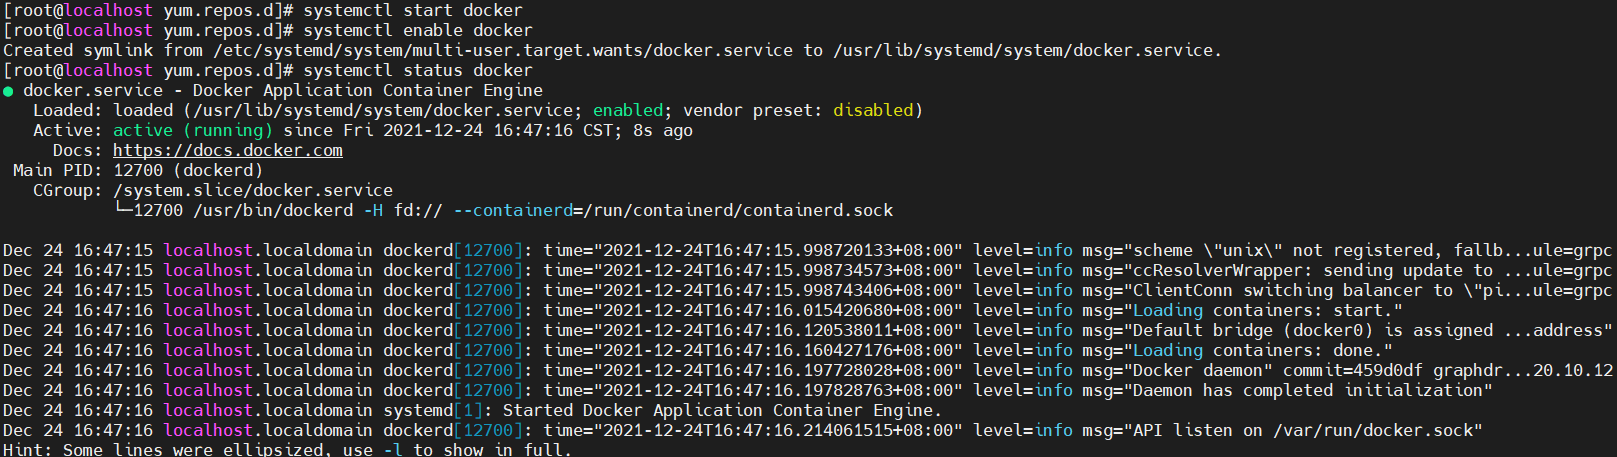
3.启动docker
 systemctl start docker
 systemctl enable docker
 systemctl status docker
二、Docker拉取PG14镜像并构建PG14容器
1.拉取pg14.1镜像
[root@localhost ~]# docker pull postgres:14.1
14.1: Pulling from library/postgres
a2abf6c4d29d: Pull complete
e1769f49f910: Pull complete
33a59cfee47c: Pull complete
461b2090c345: Pull complete
8ed8ab6290ac: Pull complete
495e42c822a0: Pull complete
18e858c71c58: Pull complete
594792c80d5f: Pull complete
794976979956: Pull complete
eb5e1a73c3ca: Pull complete
6d6360292cba: Pull complete
131e916e1a28: Pull complete
b84c0e55930b: Pull complete
Digest: sha256:17286f7ca2590bdfdfa3afd3305d839780c33c4f9af167a45e537f22d3cafcb0
Status: Downloaded newer image for postgres:14.1
docker.io/library/postgres:14.1
2.查看本地PG镜像
[root@localhost ~]# docker images
REPOSITORY   TAG       IMAGE ID       CREATED      SIZE
postgres     14.1      cdbebe091601   2 days ago   374MB
3.映射目录
创建postgresql数据库容器的数据目录路径挂载到的宿主机路径,保证容器销毁后数据还在
[root@localhost ~]# mkdir -p /docker/postgresql/data/
4.运行PG容器
[root@localhost ~]# docker run -d --name postgresql --restart always -v /docker/postgresql/data/:/var/lib/postgresql/data -e POSTGRES_PASSWORD=123456 -p 15432:5432 postgres:14.1
09b45ee81642527ebcdf25c48a25a9e2524068562f889b8a103a915444363c78
-d 表示启动后在后台运行,不启动日志
-name 容器名 表示给容器命名
–restart always 表示如果容器死掉,会自动拉起,可以不配置
-v 宿主机路径:容器内路径 把容器内路径挂载到宿主机路径,保证容器销毁后数据还在
-p 宿主机端口:容器端口 把宿主机端口和容器内端口进行映射
-e POSTGRES_PASSWORD=123456 设置环境变量值,这里设置了数据库的密码
5.查看启动的容器状态
[root@localhost ~]# docker ps
CONTAINER ID   IMAGE           COMMAND                  CREATED         STATUS         PORTS                                         NAMES
09b45ee81642   postgres:14.1   "docker-entrypoint.s…"   8 seconds ago   Up 6 seconds   0.0.0.0:15432->5432/tcp, :::15432->5432/tcp   postgresql
(查看所有的容器用docker ps -a)
6.进入容器查看PG数据库版本
[root@localhost ~]# docker exec -it postgresql bash
root@09b45ee81642:/# su - postgres
postgres@09b45ee81642:~$ psql
psql (14.1 (Debian 14.1-1.pgdg110+1))
Type "help" for help.

postgres=# select version();
                                                           version
-----------------------------------------------------------------------------------------------------------------------------
 PostgreSQL 14.1 (Debian 14.1-1.pgdg110+1) on x86_64-pc-linux-gnu, compiled by gcc (Debian 10.2.1-6) 10.2.1 20210110, 64-bit
(1 row)
-i: 以交互模式运行容器,通常与 -t 同时使用
-t: 为容器重新分配一个伪输入终端,通常与 -i 同时使用;
PG14的docker部署完成
三、Docker部署prometheus容器
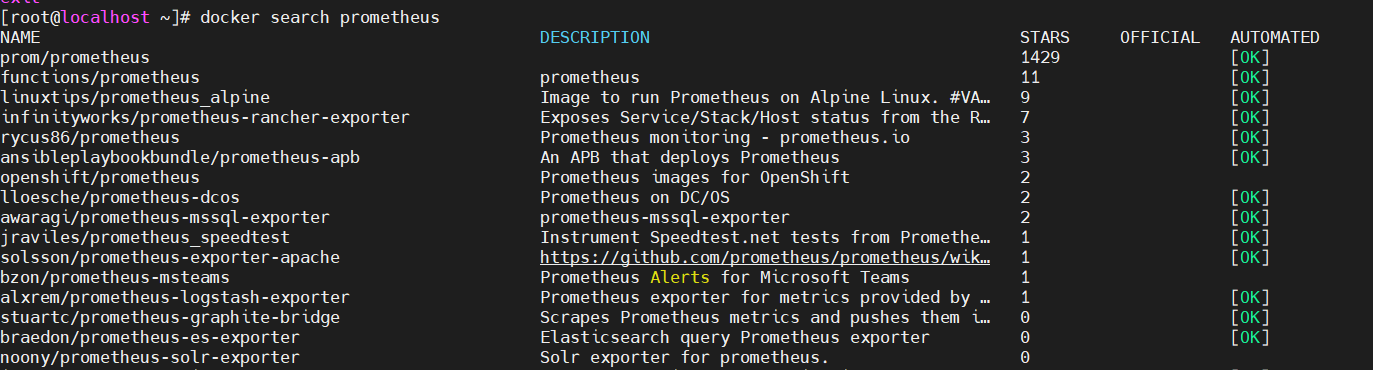
1.搜索prometheus镜像
搜索可用的prometheus镜像,并选择使用数量最多的
[root@localhost ~]# docker search prometheus
2.拉取prometheus镜像
[root@localhost ~]# docker pull prom/prometheus
Using default tag: latest
latest: Pulling from prom/prometheus
3cb635b06aa2: Pull complete
34f699df6fe0: Pull complete
33d6c9635e0f: Pull complete
f2af7323bed8: Pull complete
c16675a6a294: Pull complete
827843f6afe6: Pull complete
3d272942eeaf: Pull complete
7e785cfa34da: Pull complete
05e324559e3b: Pull complete
170620261a59: Pull complete
ec35f5996032: Pull complete
5509173eb708: Pull complete
Digest: sha256:cb9817249c346d6cfadebe383ed3b3cd4c540f623db40c4ca00da2ada45259bb
Status: Downloaded newer image for prom/prometheus:latest
docker.io/prom/prometheus:latest

[root@localhost ~]# docker images
REPOSITORY        TAG       IMAGE ID       CREATED      SIZE
postgres          14.1      cdbebe091601   2 days ago   374MB
prom/prometheus   latest    a3d385fc29f9   6 days ago   201MB
3.开启prometheus容器
[root@localhost ~]#  docker run --name prometheus --privileged=true -di -p 9090:9090 prom/prometheus
708e0cb45bdb16c9ccc5b6d89204c361c6145f03ff7bf3e8be78f2941b707e6a
[root@localhost ~]# docker ps

CONTAINER ID   IMAGE             COMMAND                  CREATED             STATUS             PORTS                                         NAMES

708e0cb45bdb   prom/prometheus   "/bin/prometheus --c…"   5 minutes ago       Up 5 minutes       0.0.0.0:9090->9090/tcp, :::9090->9090/tcp     prometheus

09b45ee81642   postgres:14.1     "docker-entrypoint.s…"   About an hour ago   Up About an hour   0.0.0.0:15432->5432/tcp, :::15432->5432/tcp   postgresql
4.bash报错,可以用/bin/sh替代
[root@localhost ~]# docker exec -it prometheus bash
OCI runtime exec failed: exec failed: container_linux.go:380: starting container process caused: exec: "bash": executable file not found in $PATH: unknown
[root@localhost ~]# docker exec -it prometheus /bin/sh

/prometheus $ find / -name prometheus
/bin/prometheus
/etc/prometheus
find: /root: Permission denied
/usr/share/prometheus
find: /proc/tty/driver: Permission denied
/prometheus
5.拉起prometheus
/prometheus $ /bin/prometheus --web.listen-address="0.0.0.0:9090" --config.file="/etc/prometheus/prometheus.yml" --log.level=info
ts=2021-12-24T10:17:39.879Z caller=main.go:478 level=info msg="No time or size retention was set so using the default time retention" duration=15d
ts=2021-12-24T10:17:39.880Z caller=main.go:515 level=info msg="Starting Prometheus" version="(version=2.32.1, branch=HEAD, revision=41f1a8125e664985dd30674e5bdf6b683eff5d32)"
ts=2021-12-24T10:17:39.880Z caller=main.go:520 level=info build_context="(go=go1.17.5, user=root@54b6dbd48b97, date=20211217-22:08:06)"
ts=2021-12-24T10:17:39.880Z caller=main.go:521 level=info host_details="(Linux 3.10.0-693.el7.x86_64 #1 SMP Tue Aug 22 21:09:27 UTC 2017 x86_64 708e0cb45bdb (none))"
ts=2021-12-24T10:17:39.880Z caller=main.go:522 level=info fd_limits="(soft=1048576, hard=1048576)"
ts=2021-12-24T10:17:39.880Z caller=main.go:523 level=info vm_limits="(soft=unlimited, hard=unlimited)"
ts=2021-12-24T10:17:39.883Z caller=web.go:570 level=info component=web msg="Start listening for connections" address=0.0.0.0:9090


/prometheus $ ps -ef | grep prometheus
    1 nobody    0:00 /bin/prometheus --config.file=/etc/prometheus/prometheus.yml --storage.tsdb.path=/prometheus --web.console.libraries=/usr/share/prometheus/console_libraries --web.console.templates=/usr/share/prometheus/consoles
/prometheus $ netstat -altp | grep 9090
tcp        0      0 localhost:58478         localhost:9090          ESTABLISHED 1/prometheus
tcp        0      0 :::9090                 :::*                    LISTEN      1/prometheus
tcp        0      0 ::ffff:127.0.0.1:9090   ::ffff:127.0.0.1:58478  ESTABLISHED 1/prometheus
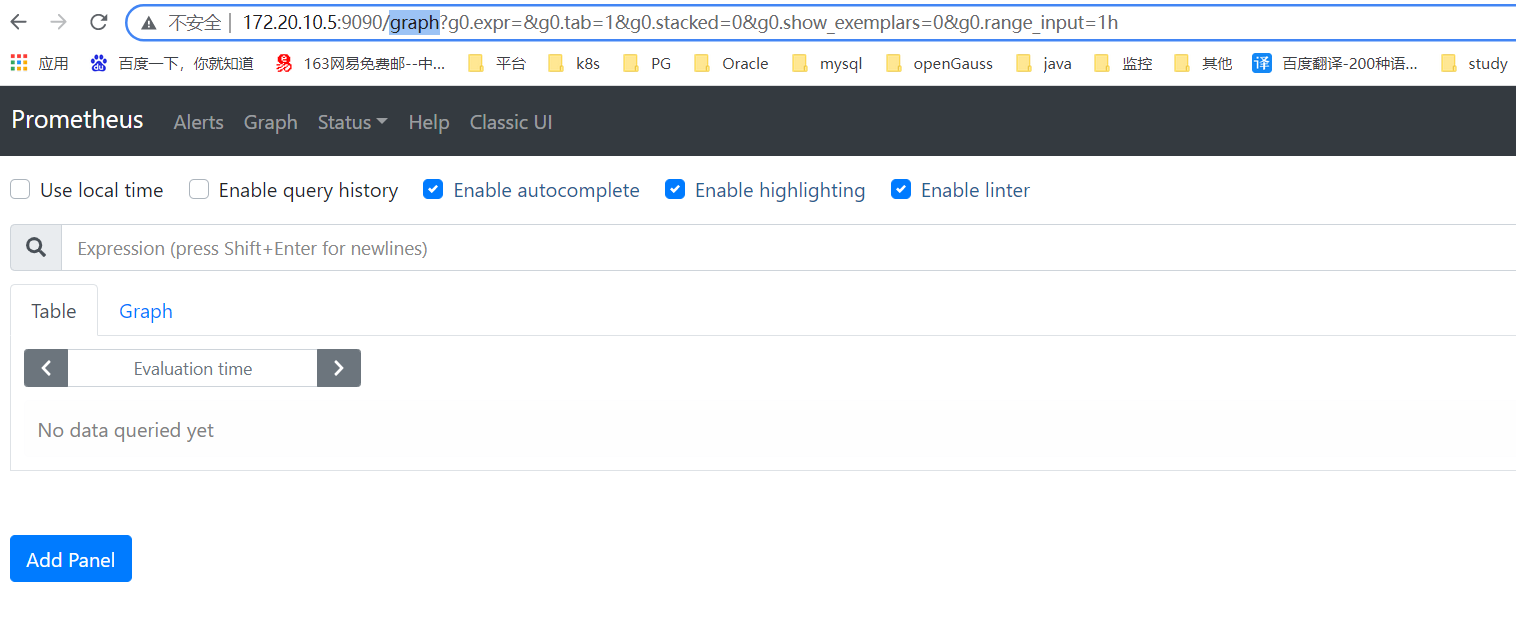
6.去浏览器验证
我的地址为172.20.10.5,所以访问的地址为172.20.10.5:9090
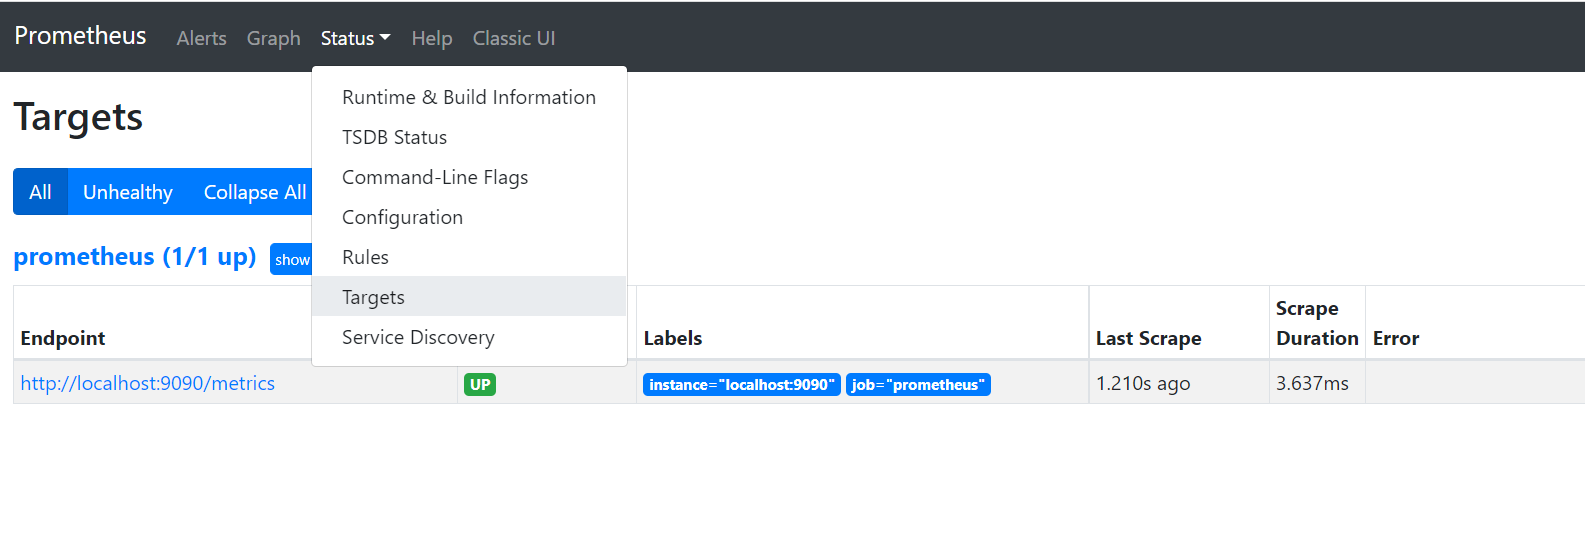
如果配置exporter的话,可以通过如下界面获取exporter的状态,可以点击endpoint,来查看当前抽取到的一些指标,这些指标监控项可以在Graph界面查询值和随时间变化的趋势,可以根据表达式进行处理,或者加入到grafana上边,形成更加直观的界面。
四、Docker部署postgres_exporter容器
1.拉取postgres_exporter
[root@localhost ~]# docker pull wrouesnel/postgres_exporter
Using default tag: latest
latest: Pulling from wrouesnel/postgres_exporter
45b42c59be33: Pull complete
4634a89d50c2: Pull complete
fbcf7c278f83: Pull complete
Digest: sha256:54bd3ba6bc39a9da2bf382667db4dc249c96e4cfc837dafe91d6cc7d362829e0
Status: Downloaded newer image for wrouesnel/postgres_exporter:latest
docker.io/wrouesnel/postgres_exporter:latest

[root@localhost ~]# docker images
REPOSITORY                    TAG       IMAGE ID       CREATED         SIZE
postgres                      14.1      cdbebe091601   2 days ago      374MB
prom/prometheus               latest    a3d385fc29f9   6 days ago      201MB
wrouesnel/postgres_exporter   latest    9fe9d3d02141   10 months ago   88.7MB
2.数据库配置
需在监控的数据库上建立监控用户并执行一下以下命令 。以非超级用户身份运行时候为了能够从pg_stat_activity和pg_stat_replication 作为非超级用户收集指标,必须以超级用户的身份创建功能和视图,并分别为它们分配权限。
postgres=# CREATE USER postgres_exporter WITH PASSWORD 'postgres_exporter123';
CREATE ROLE
postgres=# ALTER USER postgres_exporter SET SEARCH_PATH TO postgres_exporter,pg_catalog;
ALTER ROLE

postgres=# CREATE SCHEMA postgres_exporter AUTHORIZATION postgres_exporter;
CREATE SCHEMA

postgres=# CREATE FUNCTION postgres_exporter.f_select_pg_stat_activity()
RETURNS setof pg_catalog.pg_stat_activity
LANGUAGE sql
SECURITY DEFINER
AS $$
  SELECT * from pg_catalog.pg_stat_activity;
$$;
CREATE FUNCTION

postgres=# CREATE FUNCTION postgres_exporter.f_select_pg_stat_replication()
RETURNS setof pg_catalog.pg_stat_replication
LANGUAGE sql
SECURITY DEFINER
AS $$
  SELECT * from pg_catalog.pg_stat_replication;
$$;
CREATE FUNCTION

postgres=# CREATE VIEW postgres_exporter.pg_stat_replication
AS
  SELECT * FROM postgres_exporter.f_select_pg_stat_replication();
CREATE VIEW

postgres=# CREATE VIEW postgres_exporter.pg_stat_activity
AS
  SELECT * FROM postgres_exporter.f_select_pg_stat_activity();
CREATE VIEW

postgres=# GRANT SELECT ON postgres_exporter.pg_stat_replication TO postgres_exporter;
GRANT

postgres=# GRANT SELECT ON postgres_exporter.pg_stat_activity TO postgres_exporter;
GRANT
修改pg_hba.conf,使能访问数据库,注意密码校验的时候password_encryption参数以及pg_authid里密码的加密方式。
postgres=# show password_encryption;
 password_encryption
---------------------
 scram-sha-256
(1 row)

postgres=# select * from pg_authid where rolname='postgres_exporter';
-[ RECORD 1 ]--+--------------------------------------------------------------------------------------------------------------------------------------
oid            | 16384
rolname        | postgres_exporter
rolsuper       | f
rolinherit     | t
rolcreaterole  | f
rolcreatedb    | f
rolcanlogin    | t
rolreplication | f
rolbypassrls   | f
rolconnlimit   | -1
rolpassword    | SCRAM-SHA-256$4096:1VfD4I+8uxNHv+qDEZACCg==$b/2Wgt6zGMkHPCMk9RIN+aPci8lK0oSYc87Eu8wXfNk=:f8lituzDMMMdb6rMA/5pdiFWC4j/MuS4cAVy/awMjJA=
rolvaliduntil  |
pg_hba.conf加的部分如下
host all postgres_exporter 172.20.10.5/32 scram-sha-256
注意docker容器最简模式里可能使用不了vim或者ps,可以用如下方法解决。如果容器没有权限执行,可以在进入容器时候加上-u 0以root权限进入,再执行如下操作
root@09b45ee81642:/# apt-get update
Get:1 http://security.debian.org/debian-security bullseye-security InRelease [44.1 kB]
Get:2 http://deb.debian.org/debian bullseye InRelease [116 kB]
Get:3 http://security.debian.org/debian-security bullseye-security/main amd64 Packages [102 kB]
Get:4 http://deb.debian.org/debian bullseye-updates InRelease [39.4 kB]
Get:5 http://apt.postgresql.org/pub/repos/apt bullseye-pgdg InRelease [86.7 kB]
Get:6 http://deb.debian.org/debian bullseye/main amd64 Packages [8,183 kB]
Get:7 http://apt.postgresql.org/pub/repos/apt bullseye-pgdg/main amd64 Packages [234 kB]
Get:8 http://deb.debian.org/debian bullseye-updates/main amd64 Packages [2,592 B]
Fetched 8,808 kB in 3min 55s (37.5 kB/s)
Reading package lists... Done

root@09b45ee81642:/# apt-get install -y vim
Reading package lists... Done
Building dependency tree... Done
Reading state information... Done
The following additional packages will be installed:
  libgpm2 vim-common vim-runtime xxd
Suggested packages:
  gpm ctags vim-doc vim-scripts
The following NEW packages will be installed:
  libgpm2 vim vim-common vim-runtime xxd
0 upgraded, 5 newly installed, 0 to remove and 0 not upgraded.
Need to get 8,174 kB of archives.
After this operation, 36.9 MB of additional disk space will be used.
Get:1 http://deb.debian.org/debian bullseye/main amd64 xxd amd64 2:8.2.2434-3+deb11u1 [192 kB]
Get:2 http://deb.debian.org/debian bullseye/main amd64 vim-common all 2:8.2.2434-3+deb11u1 [226 kB]
Get:3 http://deb.debian.org/debian bullseye/main amd64 libgpm2 amd64 1.20.7-8 [35.6 kB]
Get:4 http://deb.debian.org/debian bullseye/main amd64 vim-runtime all 2:8.2.2434-3+deb11u1 [6,226 kB]
Get:5 http://deb.debian.org/debian bullseye/main amd64 vim amd64 2:8.2.2434-3+deb11u1 [1,494 kB]
Fetched 8,174 kB in 7s (1,187 kB/s)

root@09b45ee81642:/# apt-get install -y procps
注意:在对docker里数据库进行配置修改后,需要重启生效时,建议直接将容器重启,不仅节约时间,也避免容器内重启库带来问题。例如:
[root@localhost ~]# docker restart postgresql
postgresql
3.运行容器使postgres_exporter可以抽取数据库指标
[root@localhost ~]#  docker run --name postgres_exporter --net=host -d -e DATA_SOURCE_NAME="postgresql://postgres:123456@172.20.10.5:15432/postgres?sslmode=disable" wrouesnel/postgres_exporter
fdff211e4514859b29fae3d7bf5ecdf2c10083034f2254d522753f2bc20d0dca

[root@localhost ~]# docker ps
CONTAINER ID   IMAGE                         COMMAND                  CREATED             STATUS             PORTS                                         NAMES
be590925e24b   wrouesnel/postgres_exporter   "/postgres_exporter"     5 seconds ago       Up 4 seconds       0.0.0.0:9187->9187/tcp, :::9187->9187/tcp     postgres_exporter
708e0cb45bdb   prom/prometheus               "/bin/prometheus --c…"   About an hour ago   Up About an hour   0.0.0.0:9090->9090/tcp, :::9090->9090/tcp     prometheus
09b45ee81642   postgres:14.1                 "docker-entrypoint.s…"   2 hours ago         Up 2 hours         0.0.0.0:15432->5432/tcp, :::15432->5432/tcp   postgresql
4.修改prometheus里的yml文件,加上postgres_exporter部分
[root@localhost ~]# docker exec -it prometheus /bin/sh

/prometheus $ cd /etc/prometheus/
/etc/prometheus $ ls
console_libraries  consoles           prometheus.yml

/etc/prometheus $ vi prometheus.yml
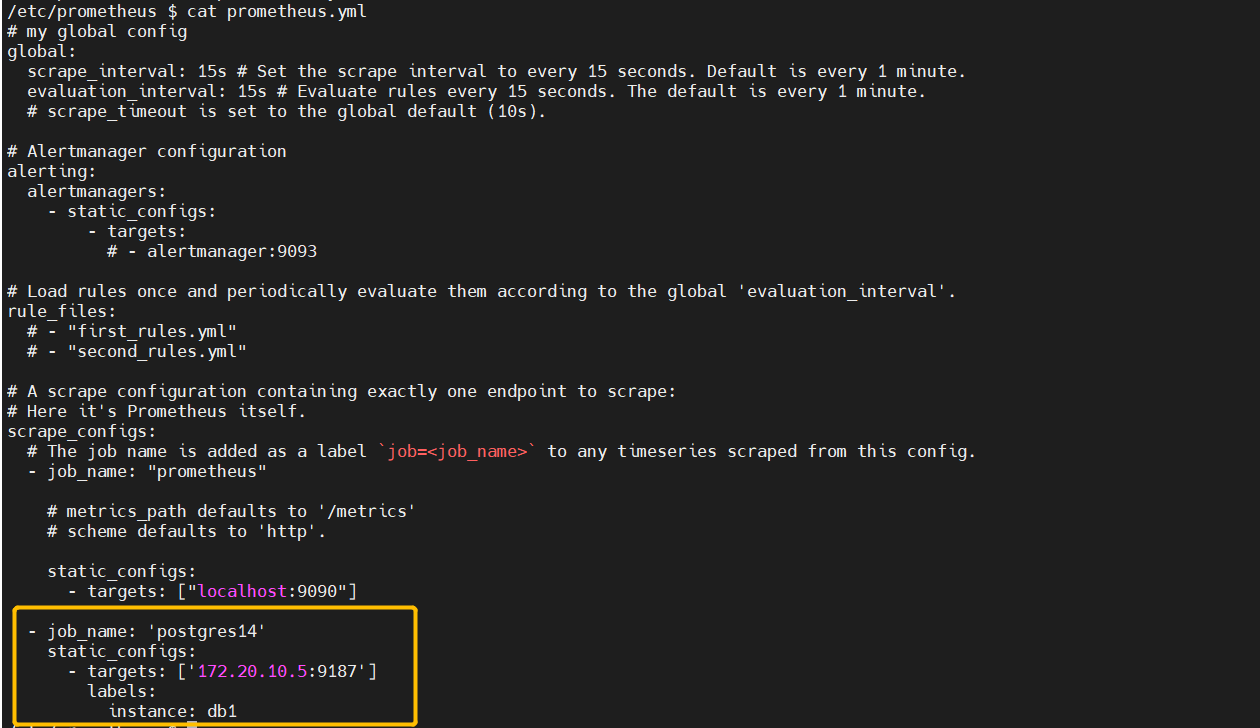
最下边黄框部分是我加的postgres_exporter部分
5.重启prometheus容器
[root@localhost ~]# docker restart prometheus
prometheus
6.浏览器验证
依旧是登录到prometheus的9090端口
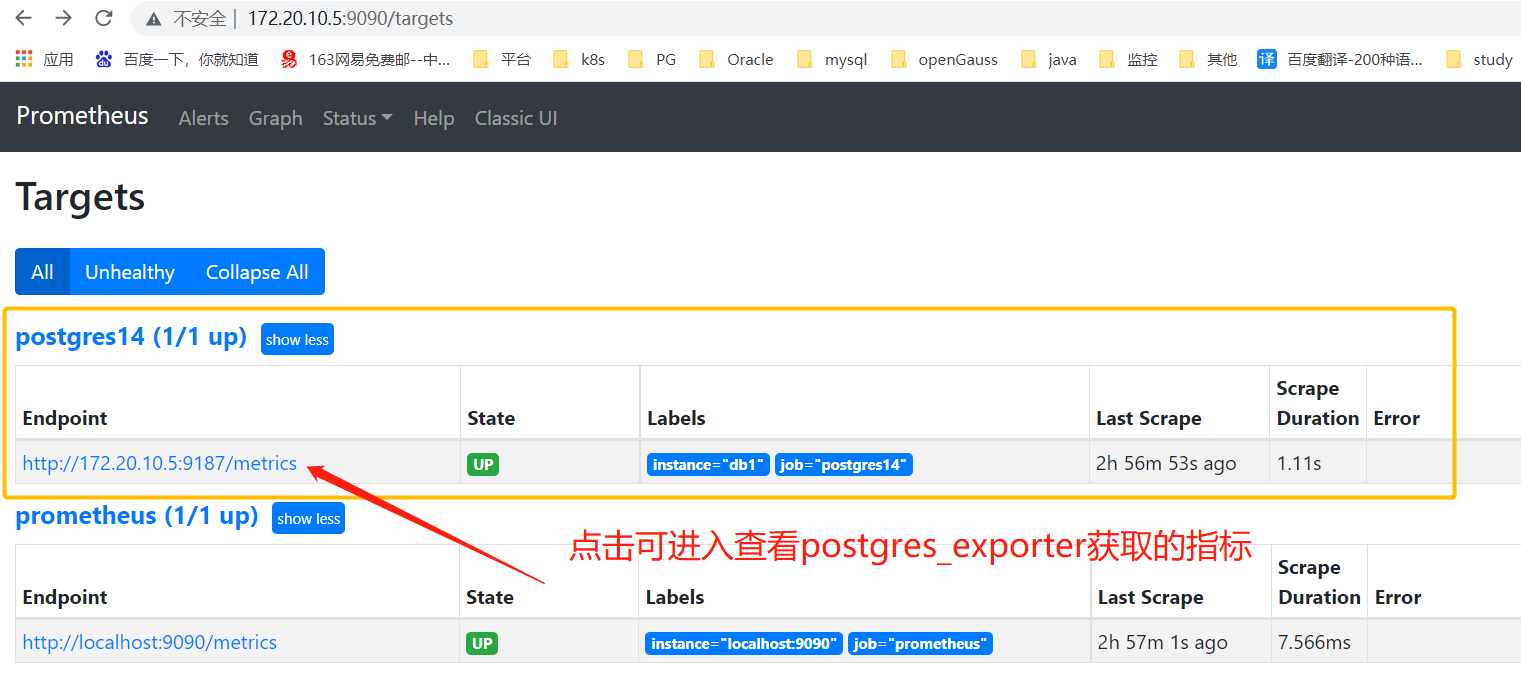
点击查看metrics里指标,部分指标如下。

五、Docker部署grafana容器
1.拉取grafana镜像
[root@localhost ~]# docker pull grafana/grafana:5.1.0
5.1.0: Pulling from grafana/grafana
2a72cbf407d6: Pull complete
89f824064239: Pull complete
b90280be2e0d: Pull complete
Digest: sha256:a6b37f9afdd9782f1e6264acaf3b09519aad454f34ca6b0e863dd9873e11fa67
Status: Downloaded newer image for grafana/grafana:5.1.0
docker.io/grafana/grafana:5.1.0
如果下载太慢的话可以执行参考下边操作再下载,速度会远远加快
[root@localhost ~]# vim /etc/docker/daemon.json

[root@localhost ~]# cat /etc/docker/daemon.json
{
  "registry-mirrors": ["https://9cpn8tt6.mirror.aliyuncs.com"]
}

[root@localhost ~]# systemctl daemon-reload
[root@localhost ~]# systemctl restart docker
2.拉起grafana容器
[root@localhost ~]# docker run --name grafana -d -p 3000:3000 grafana/grafana:5.1.0
37fa23cf597ef65a3fadfc22002b083bda6c917e0c1caadbceb54a78b92be10f

[root@localhost ~]# docker ps
CONTAINER ID   IMAGE                         COMMAND                  CREATED             STATUS          PORTS                                         NAMES
37fa23cf597e   grafana/grafana:5.1.0         "/run.sh"                11 seconds ago      Up 9 seconds    0.0.0.0:3000->3000/tcp, :::3000->3000/tcp     grafana
f5e8d696c988   wrouesnel/postgres_exporter   "/postgres_exporter"     About an hour ago   Up 45 minutes   0.0.0.0:9187->9187/tcp, :::9187->9187/tcp     postgres_exporter
708e0cb45bdb   prom/prometheus               "/bin/prometheus --c…"   4 hours ago         Up 44 minutes   0.0.0.0:9090->9090/tcp, :::9090->9090/tcp     prometheus
09b45ee81642   postgres:14.1                 "docker-entrypoint.s…"   5 hours ago         Up 54 minutes   0.0.0.0:15432->5432/tcp, :::15432->5432/tcp   postgresql
可以看到最终有四个容器。
3.环境检查及网页验证
(1).登录界面
如下是docker的进程,PostgreSQL14数据库的容器端口为5432,映射到了宿主机15432的端口。postgres_expoeter的端口宿主机和容器映射为同样的9187,prometheus的端口宿主机和容器映射为同样的9090,grafana的端口宿主机和容器映射为同样的3000。

我本地的ip为172.20.10.5,访问172.20.10.5:3000
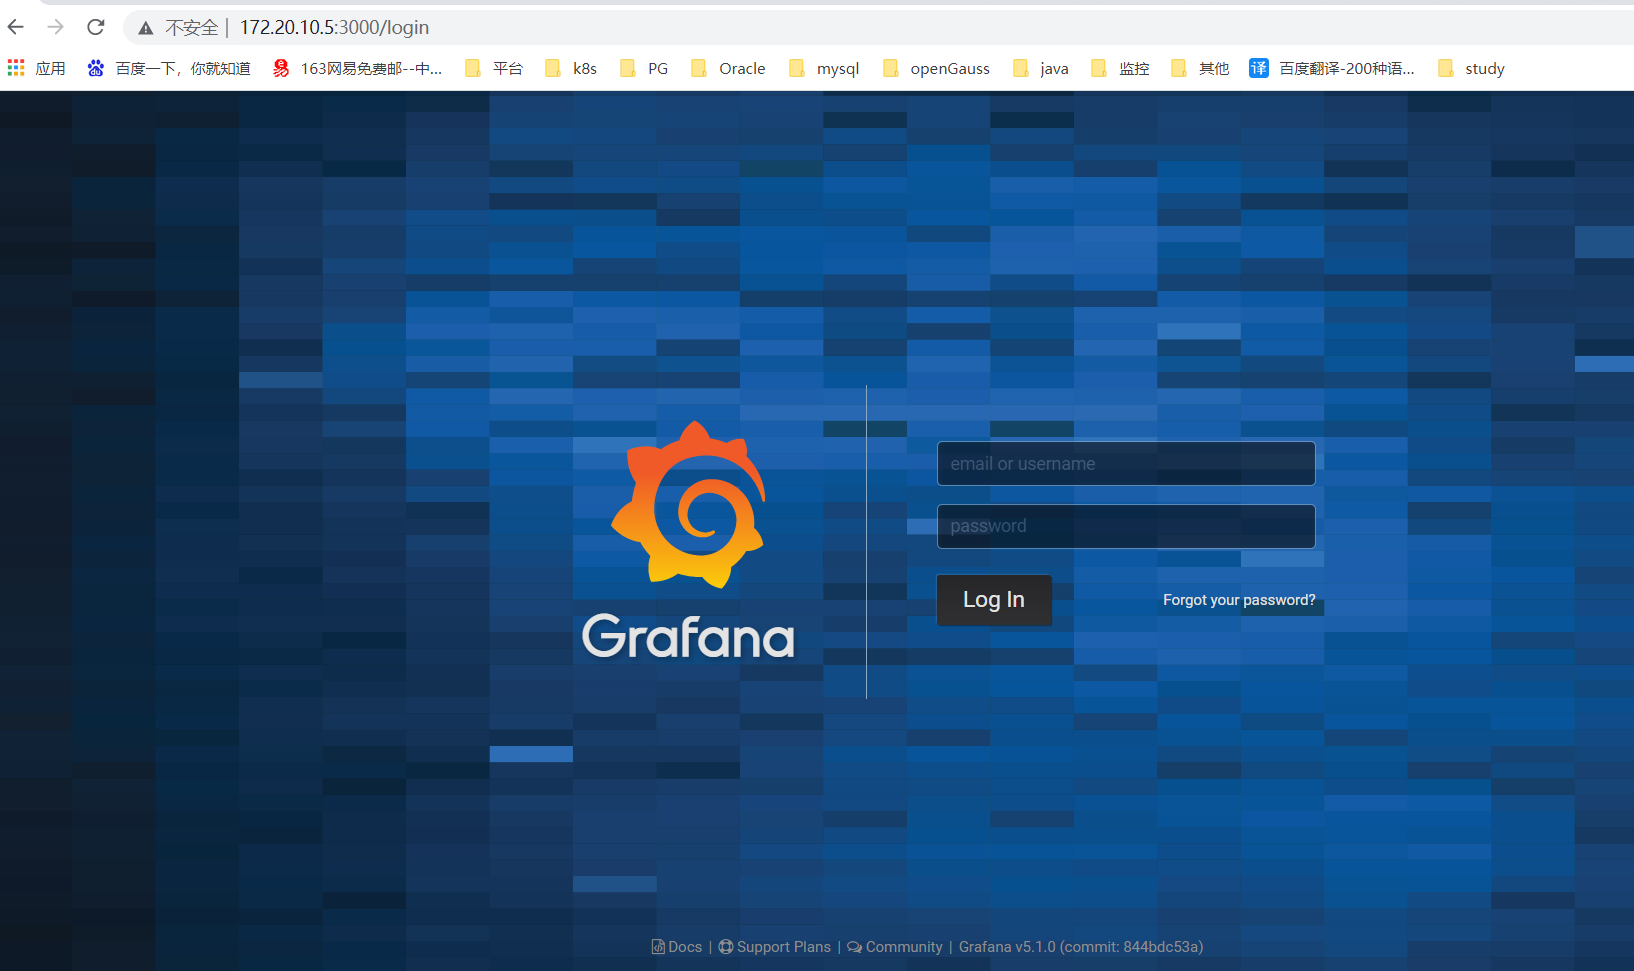
初始用户名密码为admin/admin
进入之后界面为
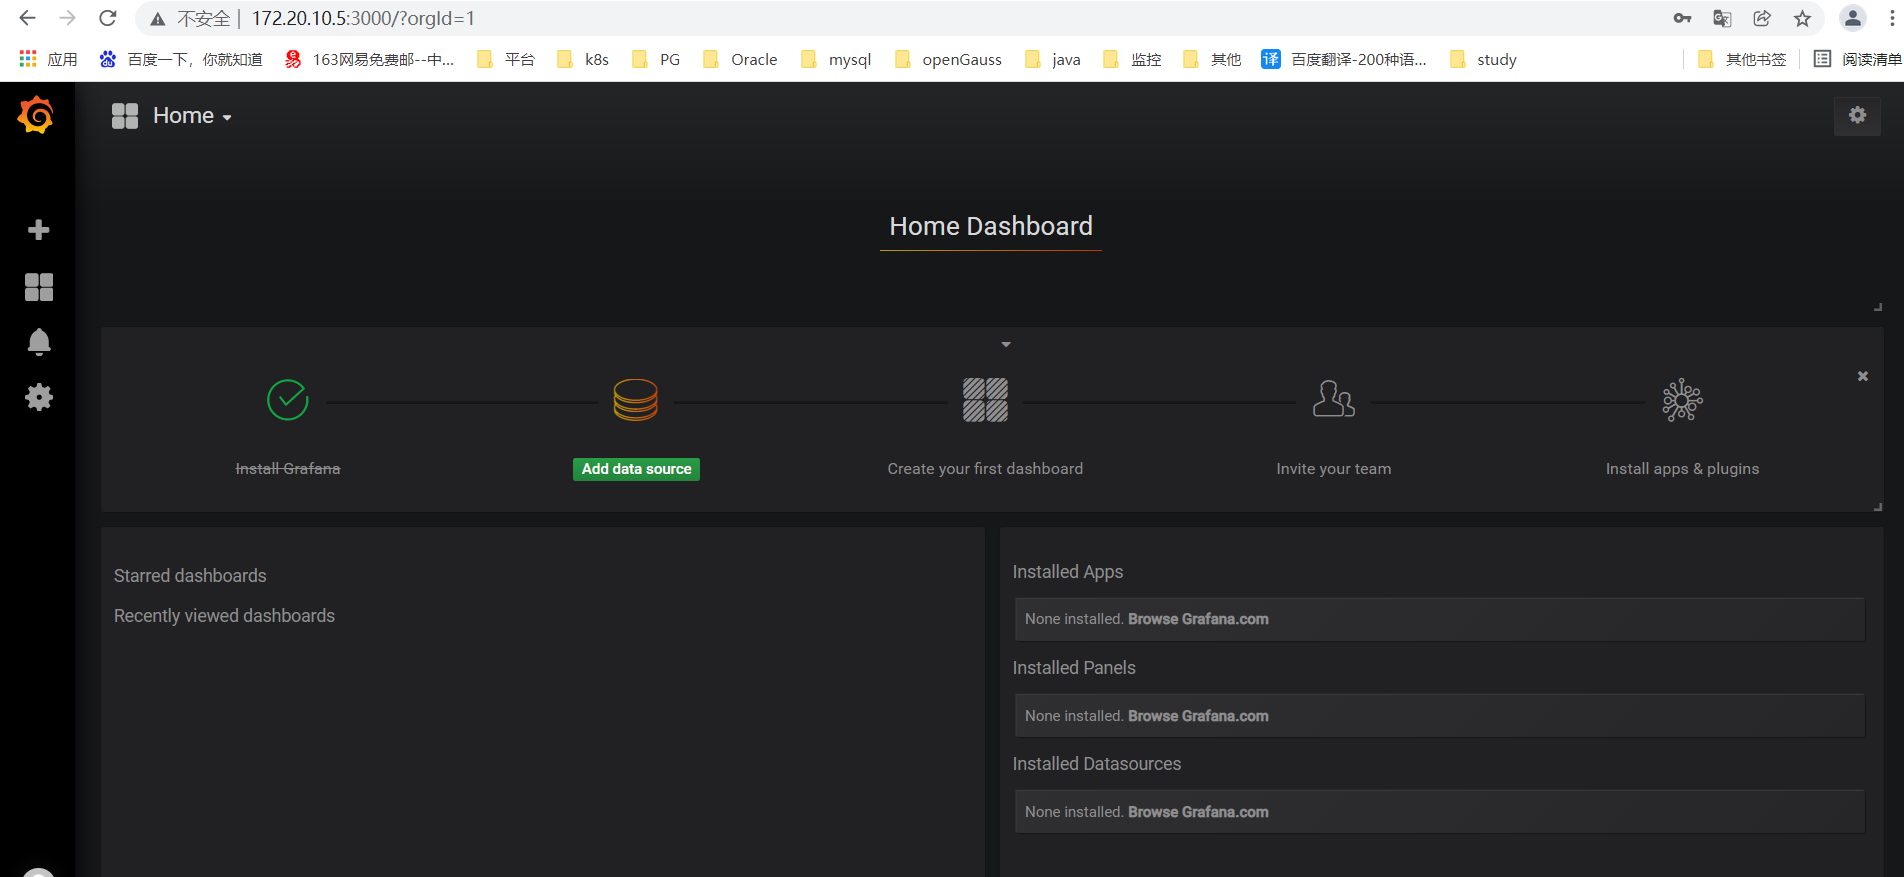
可以创建登录用户
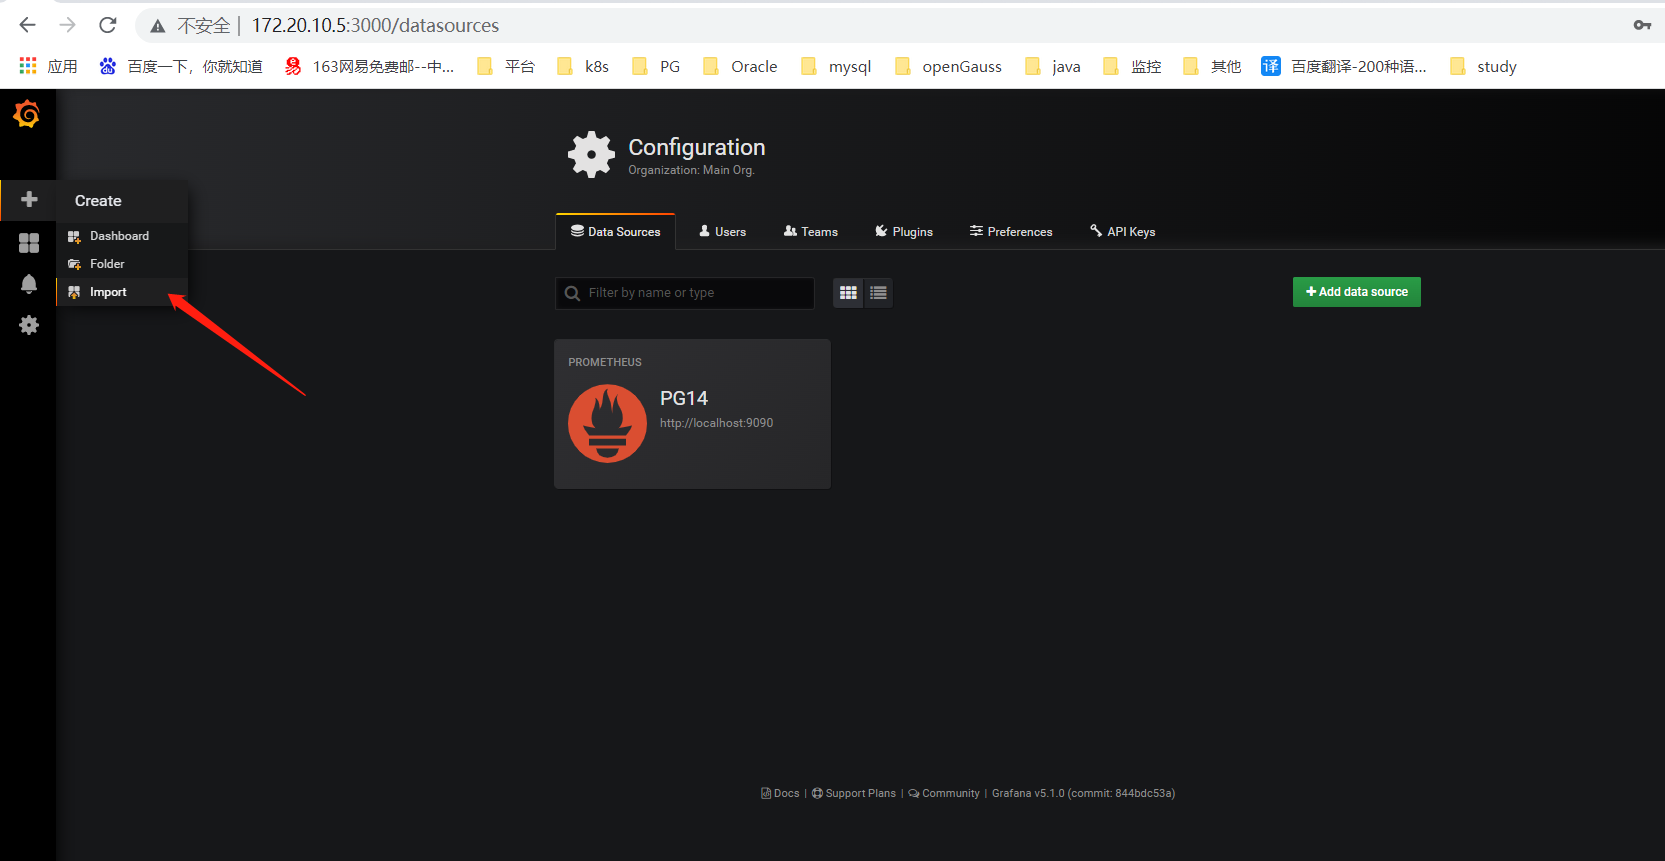
(2).配置数据源
点击Data Sources配置数据源

点击增加
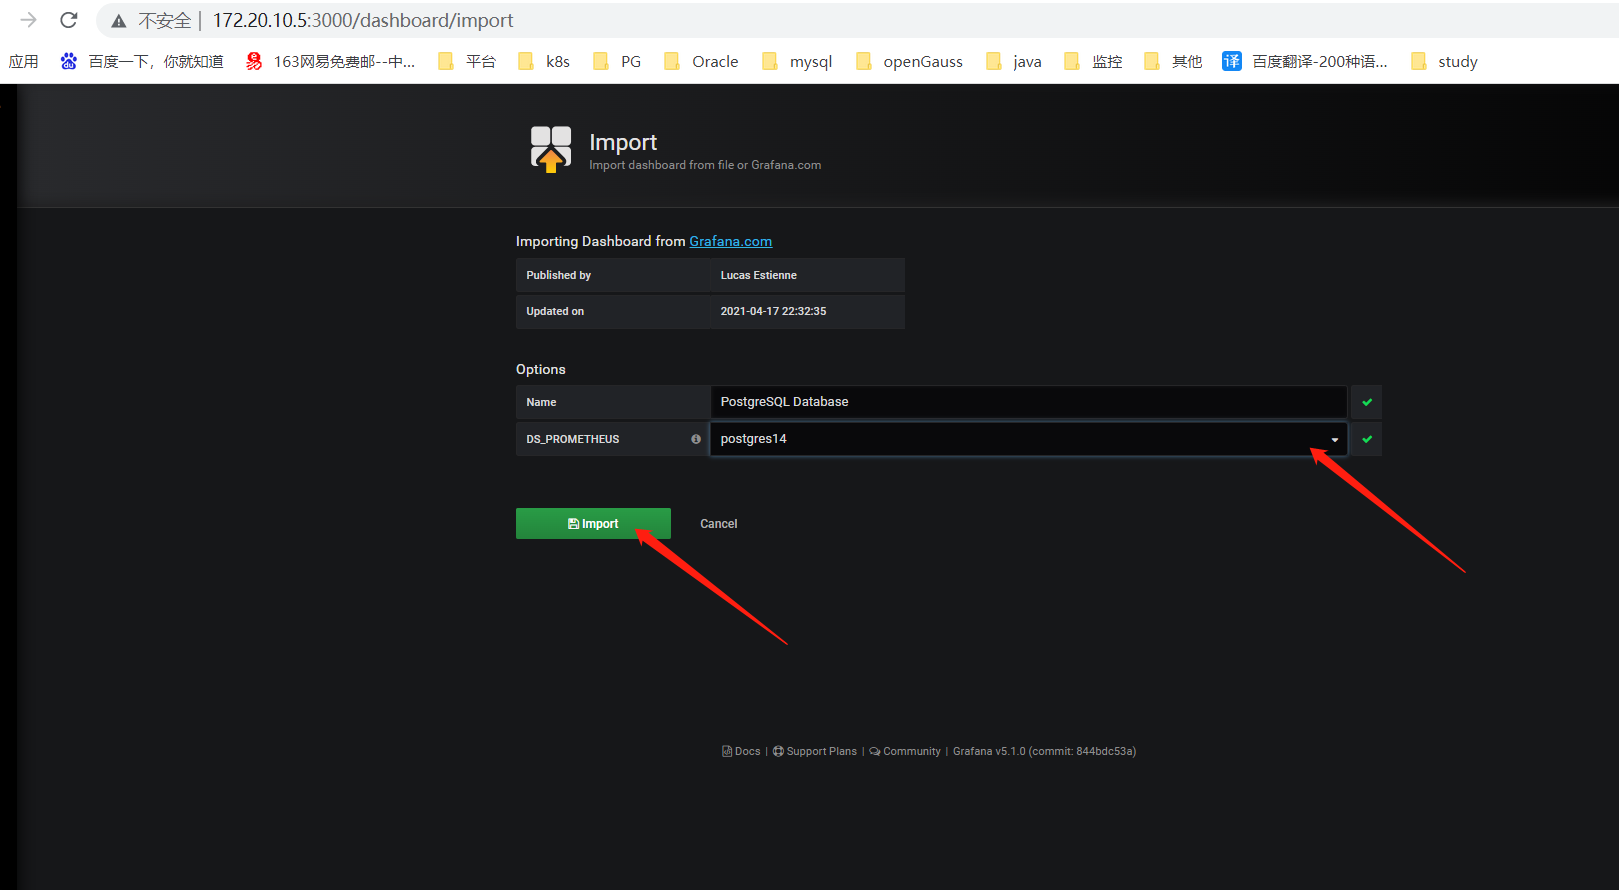
(3).导入面板的json文件或者面板id
点击import
我这里选择的是填写面板id

之后会出现面板的一些信息,点击import
(4).验证
然后选择上边的数据源,实例,数据库。监控界面如图所示。
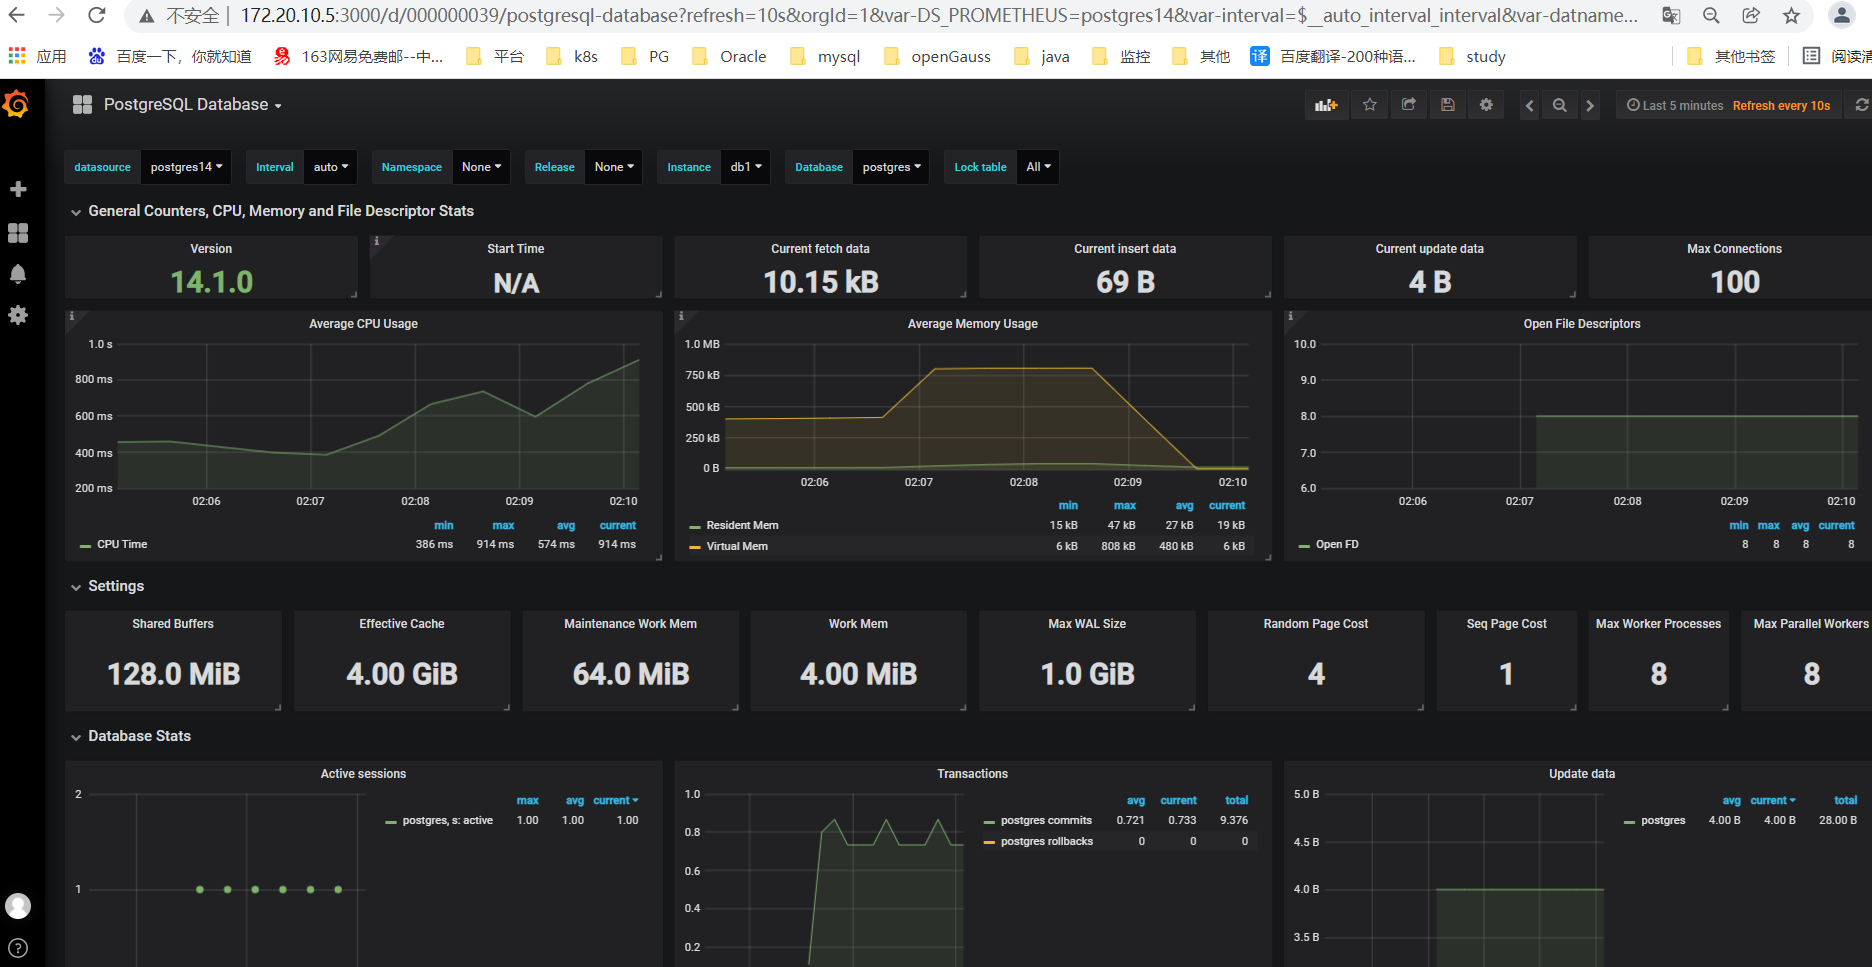
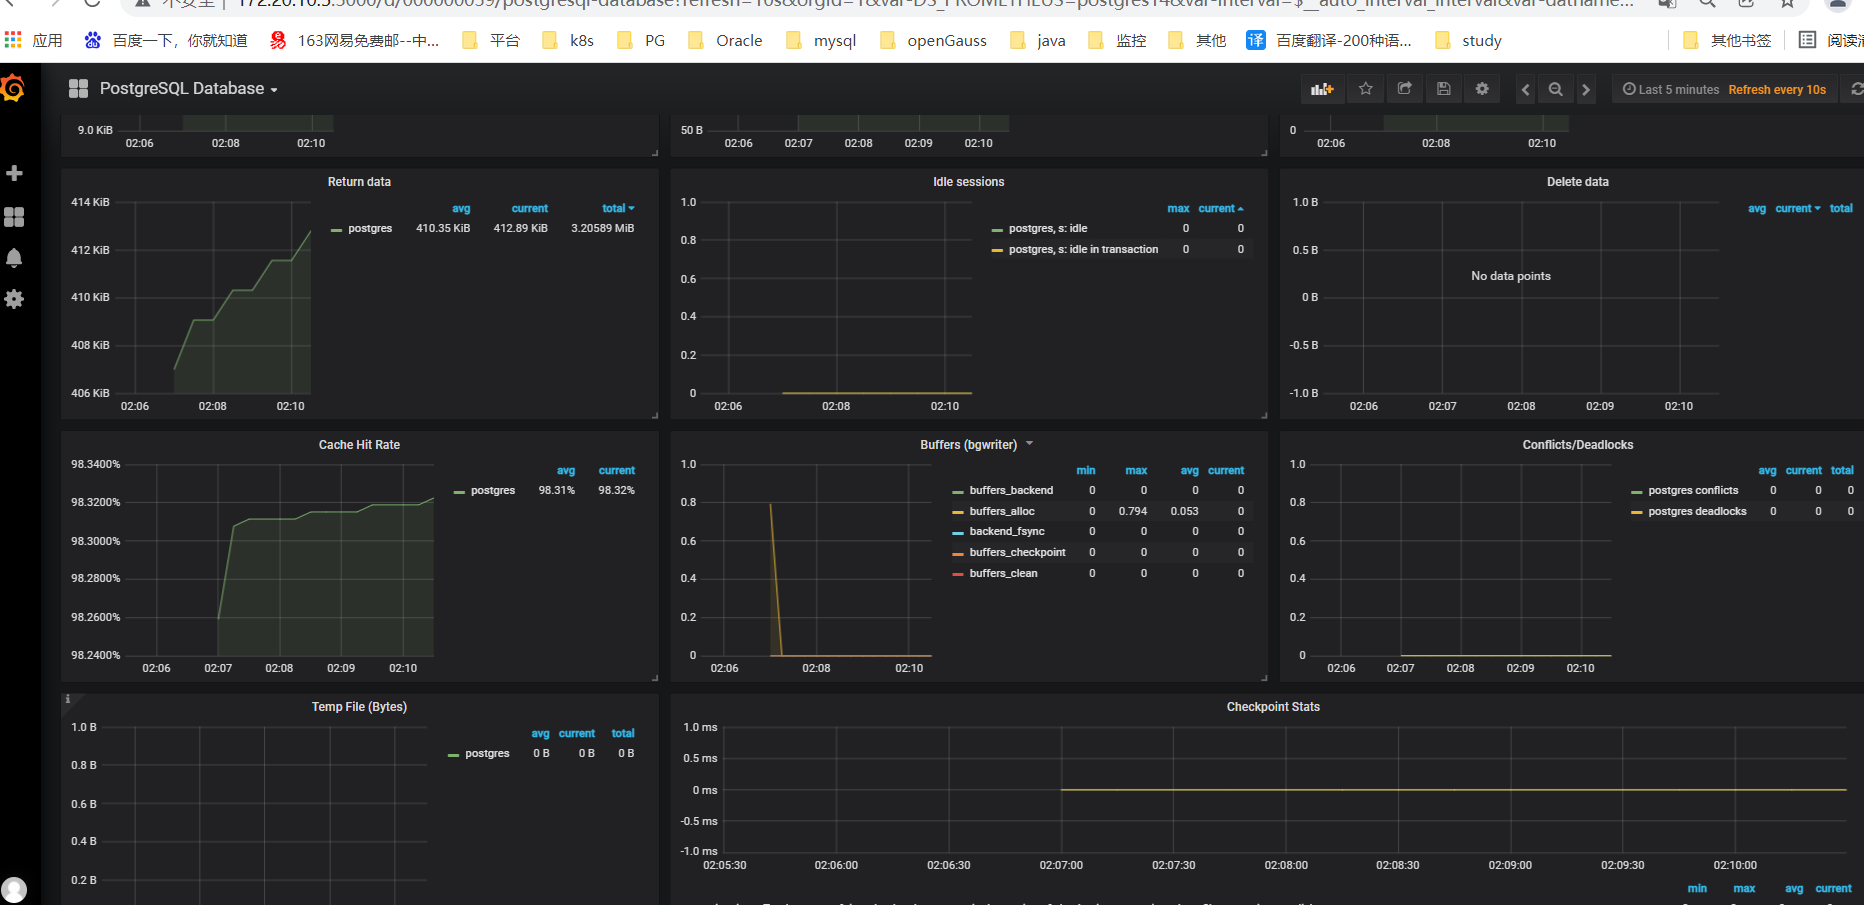
搭建完毕。
六、小结
本文章是用的postgres_exporter的docker镜像搭建的,没有实现指标的自定义。
如果想自定义监控项:
1.可以通过编写ymal文件,并在启动postgres_exporter时候指定 --extend.query-path=""选项,使其根据你的文件获取监控项。
2.使用node_exporter,通过–collector.textfile.directory参数,指定自定义监控项的prom路径,需要配合脚本及crontab,将数据输出到该目录下,并产生.prom文件(需要注意文件权限)
