


——>实验专题<——
一、kubernetes集群搭建-高可用集群
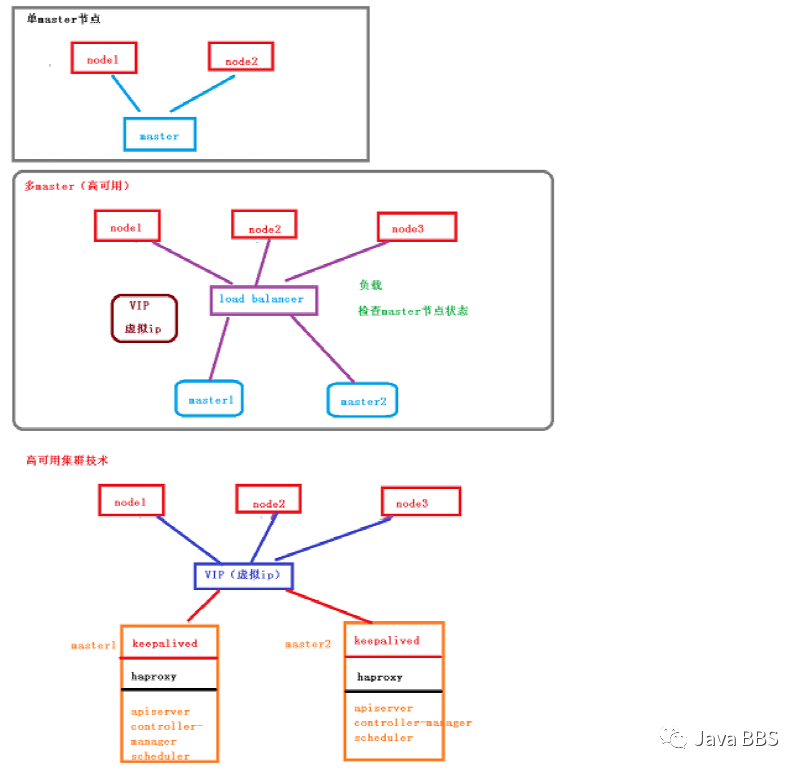
部署规划
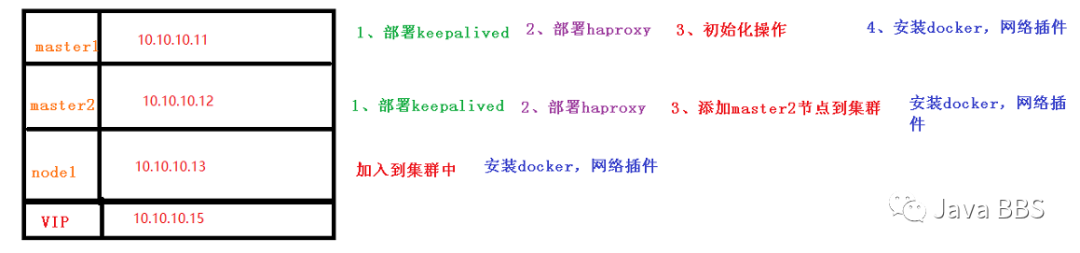
——>部署k8s高可用集群<——
一、环境准备
1.1、关闭防火墙
# 关闭防火墙[root@server11 ~]# systemctl stop firewalld[root@server11 ~]# systemctl disable firewalld
1.2、关闭selinux
# 关闭selinux[root@server11 ~]# sed -i 's/enforcing/disabled/' /etc/selinux/config # 永久setenforce 0 # 临时
1.3、关闭swap
# 关闭swap[root@server11 ~]# swapoff -a # 临时[root@server11 ~]# sed -ri 's/.*swap.*/#&/' /etc/fstab # 永久
1.4、根据规划设置主机名
# 根据规划设置主机名[root@server11 ~]# hostnamectl set-hostname k8s-master1[root@server12 ~]# hostnamectl set-hostname k8s-master2[root@server13 ~]# hostnamectl set-hostname k8s-node1
1.5、在master添加hosts
# 在master添加hosts[root@k8s-master1 ~]# cat >> /etc/hosts << EOF> 10.10.10.15 master.k8s.io k8s-vip> 10.10.10.11 master01.k8s.io k8s-master1> 10.10.10.12 master02.k8s.io k8s-master2> 10.10.10.13 node01.k8s.io k8s-node1> EOF[root@k8s-master2 ~]# cat >> /etc/hosts << EOF> 10.10.10.15 master.k8s.io k8s-vip> 10.10.10.11 master01.k8s.io k8s-master1> 10.10.10.12 master02.k8s.io k8s-master2> 10.10.10.13 node01.k8s.io k8s-node1> EOF
1.6、将桥接的IPv4流量传递到iptables的链
# 将桥接的IPv4流量传递到iptables的链[root@k8s-master1 ~]# cat > /etc/sysctl.d/k8s.conf << EOF> net.bridge.bridge-nf-call-ip6tables = 1> net.bridge.bridge-nf-call-iptables = 1> EOF[root@k8s-master2 ~]# cat > /etc/sysctl.d/k8s.conf << EOF> net.bridge.bridge-nf-call-ip6tables = 1> net.bridge.bridge-nf-call-iptables = 1> EOF[root@k8s-node1 ~]# cat > /etc/sysctl.d/k8s.conf << EOF> net.bridge.bridge-nf-call-ip6tables = 1> net.bridge.bridge-nf-call-iptables = 1> EO[root@k8s-master1 ~]# sysctl --system # 生效[root@k8s-master2 ~]# sysctl --system[root@k8s-node1 ~]# sysctl --system
1.7、时间同步
# 时间同步[root@k8s-master1 ~]# yum install ntpdate -y[root@k8s-master2 ~]# yum install ntpdate -y[root@k8s-node1 ~]# yum install ntpdate -y[root@k8s-master1 ~]# ntpdate time.windows.com24 Feb 19:06:54 ntpdate[11087]: step time server 20.189.79.72 offset -1.957517 sec[root@k8s-master2 ~]# ntpdate time.windows.com24 Feb 19:06:56 ntpdate[10250]: step time server 20.189.79.72 offset -1.956963 sec[root@k8s-node1 ~]# ntpdate time.windows.com24 Feb 19:06:58 ntpdate[10264]: step time server 20.189.79.72 offset -1.958099 sec
3. 所有master节点部署keepalived
3.1 安装相关包和keepalived
[root@k8s-master1 ~]# yum install -y conntrack-tools libseccomp libtool-ltdl[root@k8s-master1 ~]# yum install -y keepalived[root@k8s-master2 ~]# yum install -y conntrack-tools libseccomp libtool-ltdl[root@k8s-master2 ~]# yum install -y keepalived
3.2配置master节点
#master1节点配置[root@k8s-master1 ~]# cat > /etc/keepalived/keepalived.conf <<EOF> ! Configuration File for keepalived>> global_defs {> router_id k8s> }>> vrrp_script check_haproxy {> script "killall -0 haproxy"> interval 3> weight -2> fall 10> rise 2> }>> vrrp_instance VI_1 {> state MASTER> interface ens34> virtual_router_id 51> priority 250> advert_int 1> authentication {> auth_type PASS> auth_pass ceb1b3ec013d66163d6ab> }> virtual_ipaddress {> 10.10.10.15> }> track_script {> check_haproxy> }>> }> EOF#master2节点配置[root@k8s-master2 ~]# cat > /etc/keepalived/keepalived.conf <<EOF> ! Configuration File for keepalived>> global_defs {> router_id k8s> }>> vrrp_script check_haproxy {> script "killall -0 haproxy"> interval 3> weight -2> fall 10> rise 2> }>> vrrp_instance VI_1 {> state MASTER> interface ens34> virtual_router_id 51> priority 250> advert_int 1> authentication {> auth_type PASS> auth_pass ceb1b3ec013d66163d6ab> }> virtual_ipaddress {> 10.10.10.15> }> track_script {> check_haproxy> }>> }> EOF
3.3 启动和检查
#在两台master节点都执行# 启动keepalived[root@k8s-master1 ~]# systemctl start keepalived.service[root@k8s-master2 ~]# systemctl start keepalived.service#设置开机启动[root@k8s-master1 ~]# systemctl enable keepalived.service[root@k8s-master2 ~]# systemctl enable keepalived.service# 查看启动状态[root@k8s-master1 ~]# systemctl status keepalived.service[root@k8s-master2 ~]# systemctl status keepalived.service# 启动后查看master1的网卡信息[root@k8s-master2 ~]# ip a s ens34 #目前在k8s-master2上,当k8s-master挂掉会漂移到k8s-master1上3: ens34: <BROADCAST,MULTICAST,UP,LOWER_UP> mtu 1500 qdisc pfifo_fast state UP group default qlen 1000inet 10.10.10.12/24 brd 10.10.10.255 scope global noprefixroute ens34inet 10.10.10.15/32 scope global ens34valid_lft forever preferred_lft forever
4. 部署haproxy(所有master节点上部署)
4.1 安装
[root@k8s-master1 ~]# yum install -y haproxy[root@k8s-master2 ~]# yum install -y haproxy
4.2 配置
#两台master节点的配置均相同,配置中声明了后端代理的两个master节点服务器,指定了haproxy运行的端口为16443等,因此16443端口为集群的入口[root@k8s-master1 ~]# cat > /etc/haproxy/haproxy.cfg << EOF[root@k8s-master2 ~]# cat > /etc/haproxy/haproxy.cfg << EOF> #---------------------------------------------------------------------> # Global settings> #---------------------------------------------------------------------> global> # to have these messages end up in /var/log/haproxy.log you will> # need to:> # 1) configure syslog to accept network log events. This is done> # by adding the '-r' option to the SYSLOGD_OPTIONS in> # /etc/sysconfig/syslog> # 2) configure local2 events to go to the /var/log/haproxy.log> # file. A line like the following can be added to> # /etc/sysconfig/syslog> #> # local2.* /var/log/haproxy.log> #> log 127.0.0.1 local2>> chroot /var/lib/haproxy> pidfile /var/run/haproxy.pid> maxconn 4000> user haproxy> group haproxy> daemon>> # turn on stats unix socket> stats socket /var/lib/haproxy/stats> #---------------------------------------------------------------------> # common defaults that all the 'listen' and 'backend' sections will> # use if not designated in their block> #---------------------------------------------------------------------> defaults> mode http> log global> option httplog> option dontlognull> option http-server-close> option forwardfor except 127.0.0.0/8> option redispatch> retries 3> timeout http-request 10s> timeout queue 1m> timeout connect 10s> timeout client 1m> timeout server 1m> timeout http-keep-alive 10s> timeout check 10s> maxconn 3000> #---------------------------------------------------------------------> # kubernetes apiserver frontend which proxys to the backends> #---------------------------------------------------------------------> frontend kubernetes-apiserver> mode tcp> bind *:16443> option tcplog> default_backend kubernetes-apiserver> #---------------------------------------------------------------------> # round robin balancing between the various backends> #---------------------------------------------------------------------> backend kubernetes-apiserver> mode tcp> balance roundrobin #负载策略> server master01.k8s.io 10.10.10.11:6443 check #master1节点地址> server master02.k8s.io 10.10.10.12:6443 check #master2节点地址> #---------------------------------------------------------------------> # collection haproxy statistics message> #---------------------------------------------------------------------> listen stats> bind *:1080> stats auth admin:awesomePassword> stats refresh 5s> stats realm HAProxy\ Statistics> stats uri /admin?stats> EOF
4.3 启动和检查
#两台master都启动# 设置开机启动[root@k8s-master1 ~]# systemctl enable haproxy[root@k8s-master2 ~]# systemctl enable haproxy# 开启haproxy[root@k8s-master1 ~]# systemctl start haproxy[root@k8s-master2 ~]# systemctl start haproxy# 查看启动状态[root@k8s-master1 ~]# systemctl status haproxy[root@k8s-master2 ~]# systemctl status haproxy#检查端口[root@k8s-master1 ~]# netstat -lntup|grep haproxytcp 0 0 0.0.0.0:1080 0.0.0.0:* LISTEN 11945/haproxytcp 0 0 0.0.0.0:16443 0.0.0.0:* LISTEN 11945/haproxyudp 0 0 0.0.0.0:34302 0.0.0.0:* 11944/haproxy[root@k8s-master2 ~]# netstat -lntup|grep haproxytcp 0 0 0.0.0.0:1080 0.0.0.0:* LISTEN 11945/haproxytcp 0 0 0.0.0.0:16443 0.0.0.0:* LISTEN 11945/haproxyudp 0 0 0.0.0.0:34302 0.0.0.0:* 11944/haproxy
5. 所有节点安装
Docker/kubeadm/kubelet(Kubernetes
默认CRI(容器运行时)为Docker,因此先安装Docker。)
5.1 安装Docker
[root@k8s-master1 ~]# wget https://mirrors.aliyun.com/docker-ce/linux/centos/docker-ce.repo -O /etc/yum.repos.d/docker-ce.repo[root@k8s-master1 ~]# wget https://mirrors.aliyun.com/docker-ce/linux/centos/docker-ce.repo -O /etc/yum.repos.d/docker-ce.repo[root@k8s-node1 ~]# wget https://mirrors.aliyun.com/docker-ce/linux/centos/docker-ce.repo -O /etc/yum.repos.d/docker-ce.repo[root@k8s-master1 ~]# yum -y install docker-ce-18.06.1.ce-3.el7[root@k8s-master2 ~]# yum -y install docker-ce-18.06.1.ce-3.el7[root@k8s-node1 ~]# yum -y install docker-ce-18.06.1.ce-3.el7[root@k8s-master1 ~]# systemctl enable docker && systemctl start docker[root@k8s-master2 ~]# systemctl enable docker && systemctl start docker[root@k8s-node1 ~]# systemctl enable docker && systemctl start docker[root@k8s-master1 ~]# docker --versionDocker version 18.06.1-ce, build e68fc7a[root@k8s-master2 ~]# docker --versionDocker version 18.06.1-ce, build e68fc7a[root@k8s-node1 ~]# docker --versionDocker version 18.06.1-ce, build e68fc7a[root@k8s-master1 ~]# cat > /etc/docker/daemon.json << EOF> {> "registry-mirrors": ["https://b9pmyelo.mirror.aliyuncs.com"]> }> EOF[root@k8s-master2 ~]# cat > /etc/docker/daemon.json << EOF> {> "registry-mirrors": ["https://b9pmyelo.mirror.aliyuncs.com"]> }> EOF[root@k8s-node1 ~]# cat > /etc/docker/daemon.json << EOF> {> "registry-mirrors": ["https://b9pmyelo.mirror.aliyuncs.com"]> }> EOF[root@k8s-master1 ~]# systemctl restart docker.service[root@k8s-master2 ~]# systemctl restart docker.service[root@k8s-node1 ~]# systemctl restart docker
5.2 添加阿里云YUM软件源
[root@k8s-master1 ~]# cat > /etc/yum.repos.d/kubernetes.repo << EOF> [kubernetes]> name=Kubernetes> baseurl=https://mirrors.aliyun.com/kubernetes/yum/repos/kubernetes-el7-x86_64> enabled=1> gpgcheck=0> repo_gpgcheck=0> gpgkey=https://mirrors.aliyun.com/kubernetes/yum/doc/yum-key.gpg https://mirrors.aliyun.com/kubernetes/yum/doc/rpm-package-key.gpg> EOF[root@k8s-master2 ~]# cat > /etc/yum.repos.d/kubernetes.repo << EOF> [kubernetes]> name=Kubernetes> baseurl=https://mirrors.aliyun.com/kubernetes/yum/repos/kubernetes-el7-x86_64> enabled=1> gpgcheck=0> repo_gpgcheck=0> gpgkey=https://mirrors.aliyun.com/kubernetes/yum/doc/yum-key.gpg https://mirrors.aliyun.com/kubernetes/yum/doc/rpm-package-key.gpg> EOF[root@k8s-node1 ~]# cat > /etc/yum.repos.d/kubernetes.repo << EOF> [kubernetes]> name=Kubernetes> baseurl=https://mirrors.aliyun.com/kubernetes/yum/repos/kubernetes-el7-x86_64> enabled=1> gpgcheck=0> repo_gpgcheck=0> gpgkey=https://mirrors.aliyun.com/kubernetes/yum/doc/yum-key.gpg https://mirrors.aliyun.com/kubernetes/yum/doc/rpm-package-key.gpg> EOF
5.3 安装kubeadm,kubelet和kubectl(所有节点)
# 由于版本更新频繁,这里指定版本号部署:[root@k8s-master1 ~]# yum install -y kubelet-1.16.3 kubeadm-1.16.3 kubectl-1.16.3[root@k8s-master1 ~]# systemctl enable kubelet[root@k8s-master2 ~]# yum install -y kubelet-1.16.3 kubeadm-1.16.3 kubectl-1.16.3[root@k8s-master2 ~]# systemctl enable kubelet[root@k8s-node1 ~]# yum install -y kubelet-1.16.3 kubeadm-1.16.3 kubectl-1.16.3^C[root@k8s-node1 ~]# systemctl enable kubelet
6. 部署Kubernetes Master(在vip所在节点上进行操作,当前环境在k8s-master2节点)
[root@k8s-master2 ~]# ip a s ens343: ens34: <BROADCAST,MULTICAST,UP,LOWER_UP> mtu 1500 qdisc pfifo_fast state UP group default qlen 1000inet 10.10.10.12/24 brd 10.10.10.255 scope global noprefixroute ens34inet 10.10.10.15/32 scope global ens34
6.1 创建kubeadm配置文件
#在具有vip的master上操作,这里为master2[root@k8s-master2 ~]# mkdir /usr/local/kubernetes/manifests -p[root@k8s-master2 ~]# cd /usr/local/kubernetes/manifests/[root@k8s-master2 manifests]# vi kubeadm-config.yamlapiServer:certSANs:- k8s-master1 #master1- k8s-master2 #master2- master.k8s.io #自己定义的名字- 10.10.10.15 #虚拟IP地址- 10.10.10.11 #k8s-master1节点IP地址- 10.10.10.12 #k8s-master2节点IP地址- 127.0.0.1extraArgs:authorization-mode: Node,RBACtimeoutForControlPlane: 4m0sapiVersion: kubeadm.k8s.io/v1beta1certificatesDir: /etc/kubernetes/pkiclusterName: kubernetescontrolPlaneEndpoint: "master.k8s.io:16443"controllerManager: {}dns:type: CoreDNSetcd:local:dataDir: /var/lib/etcdimageRepository: registry.aliyuncs.com/google_containerskind: ClusterConfigurationkubernetesVersion: v1.16.3networking:dnsDomain: cluster.localpodSubnet: 10.244.0.0/16serviceSubnet: 10.1.0.0/16scheduler: {}
6.2 在master2节点执行拉取镜像(有VIP节点上执行)
#报错信息:[root@k8s-master2 manifests]# kubeadm init --config kubeadm-config.yaml[init] Using Kubernetes version: v1.16.3[preflight] Running pre-flight checks[WARNING IsDockerSystemdCheck]: detected "cgroupfs" as the Docker cgroup driver. The recommended driver is "systemd". Please follow the guide at https://kubernetes.io/docs/setup/cri/error execution phase preflight: [preflight] Some fatal errors occurred:[ERROR FileContent--proc-sys-net-ipv4-ip_forward]: /proc/sys/net/ipv4/ip_forward contents are not set to 1[preflight] If you know what you are doing, you can make a check non-fatal with `--ignore-preflight-errors=...`To see the stack trace of this error execute with --v=5 or higher#解决方案:更换docker的daemon.json文件信息,可能源获取不到数据[root@k8s-master1 ~]# tee /etc/docker/daemon.json <<-'EOF'> {> "registry-mirrors": ["https://v16stybc.mirror.aliyuncs.com"],> "exec-opts": ["native.cgroupdriver=systemd"]> }> EOF{"registry-mirrors": ["https://v16stybc.mirror.aliyuncs.com"],"exec-opts": ["native.cgroupdriver=systemd"]}#拉取镜像[root@k8s-master2 manifests]# kubeadm init --config kubeadm-config.yaml[init] Using Kubernetes version: v1.16.3Your Kubernetes control-plane has initialized successfully!#提示kubectl初始化成功了To start using your cluster, you need to run the following as a regular user:mkdir -p $HOME/.kube #第一步:执行做一些基本设置sudo cp -i /etc/kubernetes/admin.conf $HOME/.kube/configsudo chown $(id -u):$(id -g) $HOME/.kube/configYou should now deploy a pod network to the cluster.Run "kubectl apply -f [podnetwork].yaml" with one of the options listed at:https://kubernetes.io/docs/concepts/cluster-administration/addons/You can now join any number of control-plane nodes by copying certificate authorities #第二步:需要加入其它节点and service account keys on each node and then running the following as root:kubeadm join master.k8s.io:16443 --token 6npcq0.ps39u2hwjaae0g31 \--discovery-token-ca-cert-hash sha256:706cb8d93f25dc82e127a6fcf86c6ab27971ee5830659977c0ec0e5171db101e \--control-planeThen you can join any number of worker nodes by running the following on each as root:kubeadm join master.k8s.io:16443 --token 6npcq0.ps39u2hwjaae0g31 \--discovery-token-ca-cert-hash sha256:706cb8d93f25dc82e127a6fcf86c6ab27971ee5830659977c0ec0e5171db101e[root@k8s-master2 ~]# docker images #查看拉取到的镜像REPOSITORY TAG IMAGE ID CREATED SIZEregistry.cn-hangzhou.aliyuncs.com/google_containers/kube-proxy v1.16.3 9b65a0f78b09 15 months ago 86.1MBregistry.cn-hangzhou.aliyuncs.com/google_containers/kube-apiserver v1.16.3 df60c7526a3d 15 months ago 217MBregistry.cn-hangzhou.aliyuncs.com/google_containers/kube-controller-manager v1.16.3 bb16442bcd94 15 months ago 163MBregistry.cn-hangzhou.aliyuncs.com/google_containers/kube-scheduler v1.16.3 98fecf43a54f 15 months ago 87.3MBregistry.cn-hangzhou.aliyuncs.com/google_containers/etcd 3.3.15-0 b2756210eeab 17 months ago 247MBregistry.cn-hangzhou.aliyuncs.com/google_containers/coredns 1.6.2 bf261d157914 18 months ago 44.1MBregistry.cn-hangzhou.aliyuncs.com/google_containers/pause 3.1 da86e6ba6ca1 3 years ago 742kB
按照提示配置环境变量,使用kubectl工具:
#根据提示执行第一步[root@k8s-master2 manifests]# mkdir -p $HOME/.kube[root@k8s-master2 manifests]# sudo cp -i /etc/kubernetes/admin.conf $HOME/.kube/config[root@k8s-master2 manifests]# sudo chown $(id -u):$(id -g) $HOME/.kube/config#查看集群状态[root@k8s-master2 manifests]# kubectl get nodesNAME STATUS ROLES AGE VERSIONk8s-master2 NotReady master 11m v1.16.3
**按照提示保存以下内容,一会要使用:**
#后期在k8s-master执行kubeadm join master.k8s.io:16443 --token 6npcq0.ps39u2hwjaae0g31 \--discovery-token-ca-cert-hash sha256:706cb8d93f25dc82e127a6fcf86c6ab27971ee5830659977c0ec0e5171db101e \--control-plane#后期在k8s-node执行kubeadm join master.k8s.io:16443 --token 6npcq0.ps39u2hwjaae0g31 \--discovery-token-ca-cert-hash sha256:706cb8d93f25dc82e127a6fcf86c6ab27971ee5830659977c0ec0e5171db101e
查看集群状态
[root@k8s-master2 manifests]# kubectl get csNAME AGEscheduler <unknown>controller-manager <unknown>etcd-0 <unknown>[root@k8s-master2 manifests]# kubectl get pods -n kube-systemNAME READY STATUS RESTARTS AGEcoredns-67c766df46-n4vgq 0/1 Pending 0 9m24scoredns-67c766df46-xlq2g 0/1 Pending 0 9m24setcd-k8s-master2 1/1 Running 0 8m20skube-apiserver-k8s-master2 1/1 Running 0 8m45skube-controller-manager-k8s-master2 1/1 Running 0 8m47skube-proxy-8tzb7 1/1 Running 0 9m24skube-scheduler-k8s-master2 1/1 Running 0 8m25s
7.安装集群网络(在vip所在节点上执行部署)
#从官方地址获取到flannel的yaml,在master2上执行[root@k8s-master2 manifests]# mkdir flannel[root@k8s-master2 manifests]# cd flannel[root@k8s-master2 flannel]# wget -c https://raw.githubusercontent.com/coreos/flannel/master/Documentation/kube-flannel.yml#安装flannel网络[root@k8s-master2 flannel]# kubectl apply -f kube-flannel.ymlpodsecuritypolicy.policy/psp.flannel.unprivileged createdclusterrole.rbac.authorization.k8s.io/flannel createdclusterrolebinding.rbac.authorization.k8s.io/flannel createdserviceaccount/flannel createdconfigmap/kube-flannel-cfg createddaemonset.apps/kube-flannel-ds created#检查[root@k8s-master2 flannel]# kubectl get pods -n kube-systemkube-flannel-ds-lr25d 1/1 Running 0 76s[root@k8s-master2 flannel]# kubectl get nodes #网络也是显示ready状态,说明正常NAME STATUS ROLES AGE VERSIONk8s-master2 Ready master 17m v1.16.3
8、master1节点加入集群
8.1 复制密钥及相关文件
#从master2复制密钥及相关文件到master1//跳转到k8s-master1节点,并创建文件夹[root@k8s-master2 flannel]# ssh root@10.10.10.11 mkdir -p /etc/kubernetes/pki/etcdroot@10.10.10.11's password:[root@k8s-master2 flannel]# scp /etc/kubernetes/admin.conf root@10.10.10.11:/etc/kubernetesroot@10.10.10.11's password:admin.conf 100% 5454 3.3MB/s 00:00[root@k8s-master2 flannel]# scp /etc/kubernetes/pki/{ca.*,sa.*,front-proxy-ca.*} root@10.10.10.11:/etc/kubernetes/pkiroot@10.10.10.11's password:ca.crt 100% 1025 622.8KB/s 00:00ca.key 100% 1675 1.0MB/s 00:00sa.key 100% 1679 623.4KB/s 00:00sa.pub 100% 451 194.6KB/s 00:00front-proxy-ca.crt 100% 1038 320.5KB/s 00:00front-proxy-ca.key 100% 1675 689.0KB/s 00:00[root@k8s-master2 flannel]# scp /etc/kubernetes/pki/etcd/ca.* root@10.10.10.11:/etc/kubernetes/pki/etcdroot@10.10.10.11's password:ca.crt 100% 1017 512.2KB/s 00:00ca.key
8.2 master1加入集群
#执行在master1上init后输出的join命令,需要带上参数`--control-plane`表示把master控制节点加入集群[root@k8s-master1 ~]# kubeadm join master.k8s.io:16443 --token 6npcq0.ps39u2hwjaae0g31 --discovery-token-ca-cert-hash sha256:706cb8d93f25dc82e127a6fcf86c6ab27971ee5830659977c0ec0e5171db101e --control-planeTo start administering your cluster from this node, you need to run the following as a regular user:mkdir -p $HOME/.kubesudo cp -i /etc/kubernetes/admin.conf $HOME/.kube/configsudo chown $(id -u):$(id -g) $HOME/.kube/configRun 'kubectl get nodes' to see this node join the cluster.#根据提示添加环境变量[root@k8s-master1 ~]# mkdir -p $HOME/.kube[root@k8s-master1 ~]# sudo cp -i /etc/kubernetes/admin.conf $HOME/.kube/config[root@k8s-master1 ~]# sudo chown $(id -u):$(id -g) $HOME/.kube/config#检查状态[root@k8s-master2 flannel]# kubectl get nodeNAME STATUS ROLES AGE VERSIONk8s-master1 Ready master 85s v1.16.3k8s-master2 Ready master 28m v1.16.3[root@k8s-master2 flannel]# kubectl get pods --all-namespaces #所有全部加入完成NAMESPACE NAME READY STATUS RESTARTS AGEkube-system coredns-67c766df46-n4vgq 1/1 Running 0 28mkube-system coredns-67c766df46-xlq2g 1/1 Running 0 28mkube-system etcd-k8s-master1 1/1 Running 0 105skube-system etcd-k8s-master2 1/1 Running 0 27mkube-system kube-apiserver-k8s-master1 1/1 Running 0 105skube-system kube-apiserver-k8s-master2 1/1 Running 0 27mkube-system kube-controller-manager-k8s-master1 1/1 Running 0 105skube-system kube-controller-manager-k8s-master2 1/1 Running 1 27mkube-system kube-flannel-ds-9sjwh 1/1 Running 0 105skube-system kube-flannel-ds-lr25d 1/1 Running 0 14mkube-system kube-proxy-8tzb7 1/1 Running 0 28mkube-system kube-proxy-f774j 1/1 Running 0 105skube-system kube-scheduler-k8s-master1 1/1 Running 0 105skube-system kube-scheduler-k8s-master2 1/1 Running 1
9. 加入Kubernetes Node
#报错信息:[root@k8s-node1 ~]# kubeadm join master.k8s.io:16443 --token 6npcq0.ps39u2hwjaae0g31 --discovery-token-ca-cert-hash sha256:706cb8d93f25dc82e127a6fcf86c6ab27971ee5830659977c0ec0e5171db101e[preflight] Running pre-flight checks[WARNING Hostname]: hostname "k8s-node1" could not be reached[WARNING Hostname]: hostname "k8s-node1": lookup k8s-node1 on 114.114.114.114:53: no such host#解决方案:[root@k8s-node1 ~]# cat /etc/hosts10.10.10.15 master.k8s.io k8s-vip10.10.10.11 master01.k8s.io k8s-master110.10.10.12 master02.k8s.io k8s-master210.10.10.13 node01.k8s.io k8s-node1#在node1上执行#向集群添加新节点,执行在kubeadm init输出的kubeadm join命令:[root@k8s-node1 ~]# kubeadm join master.k8s.io:16443 --token 6npcq0.ps39u2hwjaae0g31 --discovery-token-ca-cert-hash sha256:706cb8d93f25dc82e127a6fcf86c6ab27971ee5830659977c0ec0e5171db101eThis node has joined the cluster:* Certificate signing request was sent to apiserver and a response was received.* The Kubelet was informed of the new secure connection details.Run 'kubectl get nodes' on the control-plane to see this node join the cluster.#**集群网络重新安装,因为添加了新的node节点**[root@k8s-master2 flannel]# kubectl get nodeNAME STATUS ROLES AGE VERSIONk8s-master1 Ready master 14m v1.16.3k8s-master2 Ready master 41m v1.16.3k8s-node1 NotReady <none> 115s v1.16.3#检查状态[root@k8s-master2 flannel]# kubectl get pods --all-namespaceskube-system kube-flannel-ds-6srvr 0/1 Init:0/1 0 10skube-system kube-flannel-ds-c48zg 1/1 Running 0 10skube-system kube-flannel-ds-hld8w 1/1 Running 0 10s#因为新添加了node节点,所以重新部署一下网络[root@k8s-master2 flannel]# kubectl delete -f kube-flannel.ymlpodsecuritypolicy.policy "psp.flannel.unprivileged" deletedclusterrole.rbac.authorization.k8s.io "flannel" deletedclusterrolebinding.rbac.authorization.k8s.io "flannel" deletedserviceaccount "flannel" deletedconfigmap "kube-flannel-cfg" deleteddaemonset.apps "kube-flannel-ds" deleted[root@k8s-master2 flannel]# kubectl apply -f kube-flannel.yml#检查状态: #都是ready状态说明加入OKNAME STATUS ROLES AGE VERSIONk8s-master1 Ready master 19m v1.16.3k8s-master2 Ready master 46m v1.16.3k8s-node1 Ready <none> 7m4s v1.16.3[root@k8s-master2 flannel]# kubectl get pods --all-namespaceskube-system kube-flannel-ds-6srvr 1/1 Running 0 2m11skube-system kube-flannel-ds-c48zg 1/1 Running 0 2m11skube-system kube-flannel-ds-hld8w 1/1 Running 0 2m11skube-system kube-proxy-4pp2x 1/1 Running 0 6m29s
10. 测试kubernetes集群
#在Kubernetes集群中创建一个pod,验证是否正常运行:[root@k8s-master1 ~]# kubectl create deployment nginx --image=nginxdeployment.apps/nginx created[root@k8s-master1 ~]# kubectl expose deployment nginx --port=80 --target-port=80 --type=NodePortservice/nginx exposed[root@k8s-master1 ~]# kubectl get podsNAME READY STATUS RESTARTS AGEnginx-86c57db685-hfzcg 1/1 Running 0 44s[root@k8s-master1 ~]# kubectl get svcNAME TYPE CLUSTER-IP EXTERNAL-IP PORT(S) AGEkubernetes ClusterIP 10.1.0.1 <none> 443/TCP 52mnginx NodePort 10.1.15.138 <none> 80:30168/TCP 19s#访问地址:http://NodeIP:Porthttp://10.10.10.11:30168/ 输出:Welcome to nginx!http://10.10.10.12:30168/ 输出:Welcome to nginx!http://10.10.10.13:30168/ 输出:Welcome to nginx!#通过虚拟IP访问也是可以访问到的,此刻任何一个master节点节点宕机,都可正常输出,http://10.10.10.15:30168/ 输出:Welcome to nginx!
===============================END====================================
辅助文本
一、环境准备
1.1、关闭防火墙
# 关闭防火墙systemctl stop firewalldsystemctl disable firewalld
1.2、关闭selinux
# 关闭selinuxsed -i 's/enforcing/disabled/' /etc/selinux/config # 永久setenforce 0 # 临时
1.3、关闭swap
# 关闭swapswapoff -a # 临时sed -ri 's/.*swap.*/#&/' /etc/fstab # 永久
1.4、根据规划设置主机名
# 根据规划设置主机名hostnamectl set-hostname <hostname>
1.5、在master添加hosts
# 在master添加hostscat >> /etc/hosts << EOF192.168.44.158 master.k8s.io k8s-vip192.168.44.155 master01.k8s.io master1192.168.44.156 master02.k8s.io master2192.168.44.157 node01.k8s.io node1EOF
1.6、将桥接的IPv4流量传递到iptables的链
# 将桥接的IPv4流量传递到iptables的链cat > /etc/sysctl.d/k8s.conf << EOFnet.bridge.bridge-nf-call-ip6tables = 1net.bridge.bridge-nf-call-iptables = 1EOFsysctl --system # 生效
1.7、时间同步
# 时间同步yum install ntpdate -yntpdate time.windows.com
3. 所有master节点部署keepalived
3.1 安装相关包和keepalived
yum install -y conntrack-tools libseccomp libtool-ltdlyum install -y keepalived
3.2配置master节点
#master1节点配置cat > /etc/keepalived/keepalived.conf <<EOF! Configuration File for keepalivedglobal_defs {router_id k8s}vrrp_script check_haproxy {script "killall -0 haproxy"interval 3weight -2fall 10rise 2}vrrp_instance VI_1 {state MASTERinterface ens33virtual_router_id 51priority 250advert_int 1authentication {auth_type PASSauth_pass ceb1b3ec013d66163d6ab}virtual_ipaddress {192.168.44.158}track_script {check_haproxy}}EOF#master2节点配置cat > /etc/keepalived/keepalived.conf <<EOF! Configuration File for keepalivedglobal_defs {router_id k8s}vrrp_script check_haproxy {script "killall -0 haproxy"interval 3weight -2fall 10rise 2}vrrp_instance VI_1 {state BACKUPinterface ens33virtual_router_id 51priority 200advert_int 1authentication {auth_type PASSauth_pass ceb1b3ec013d66163d6ab}virtual_ipaddress {192.168.44.158}track_script {check_haproxy}}EOF
3.3 启动和检查
#在两台master节点都执行# 启动keepalived$ systemctl start keepalived.service设置开机启动$ systemctl enable keepalived.service# 查看启动状态$ systemctl status keepalived.service# 启动后查看master1的网卡信息ip.a.s.ens33
4. 部署haproxy
4.1 安装
yum install -y haproxy
4.2 配置
#两台master节点的配置均相同,配置中声明了后端代理的两个master节点服务器,指定了haproxy运行的端口为16443等,因此16443端口为集群的入口cat > /etc/haproxy/haproxy.cfg << EOF#---------------------------------------------------------------------# Global settings#---------------------------------------------------------------------global# to have these messages end up in /var/log/haproxy.log you will# need to:# 1) configure syslog to accept network log events. This is done# by adding the '-r' option to the SYSLOGD_OPTIONS in# /etc/sysconfig/syslog# 2) configure local2 events to go to the /var/log/haproxy.log# file. A line like the following can be added to# /etc/sysconfig/syslog## local2.* /var/log/haproxy.log#log 127.0.0.1 local2chroot /var/lib/haproxypidfile /var/run/haproxy.pidmaxconn 4000user haproxygroup haproxydaemon# turn on stats unix socketstats socket /var/lib/haproxy/stats#---------------------------------------------------------------------# common defaults that all the 'listen' and 'backend' sections will# use if not designated in their block#---------------------------------------------------------------------defaultsmode httplog globaloption httplogoption dontlognulloption http-server-closeoption forwardfor except 127.0.0.0/8option redispatchretries 3timeout http-request 10stimeout queue 1mtimeout connect 10stimeout client 1mtimeout server 1mtimeout http-keep-alive 10stimeout check 10smaxconn 3000#---------------------------------------------------------------------# kubernetes apiserver frontend which proxys to the backends#---------------------------------------------------------------------frontend kubernetes-apiservermode tcpbind *:16443option tcplogdefault_backend kubernetes-apiserver#---------------------------------------------------------------------# round robin balancing between the various backends#---------------------------------------------------------------------backend kubernetes-apiservermode tcpbalance roundrobinserver master01.k8s.io 192.168.44.155:6443 checkserver master02.k8s.io 192.168.44.156:6443 check#---------------------------------------------------------------------# collection haproxy statistics message#---------------------------------------------------------------------listen statsbind *:1080stats auth admin:awesomePasswordstats refresh 5sstats realm HAProxy\ Statisticsstats uri /admin?statsEOF
4.3 启动和检查
#两台master都启动# 设置开机启动$ systemctl enable haproxy# 开启haproxy$ systemctl start haproxy# 查看启动状态$ systemctl status haproxy#检查端口netstat -lntup|grep haproxy
5. 所有节点安装
Docker/kubeadm/kubelet(Kubernetes
默认CRI(容器运行时)为Docker,因此先安装Docker。)
5.1 安装Docker
$ wget https://mirrors.aliyun.com/docker-ce/linux/centos/docker-ce.repo -O /etc/yum.repos.d/docker-ce.repo$ yum -y install docker-ce-18.06.1.ce-3.el7$ systemctl enable docker && systemctl start docker$ docker --versionDocker version 18.06.1-ce, build e68fc7a$ cat > /etc/docker/daemon.json << EOF{"registry-mirrors": ["https://b9pmyelo.mirror.aliyuncs.com"]}EOF
5.2 添加阿里云YUM软件源
$ cat > /etc/yum.repos.d/kubernetes.repo << EOF[kubernetes]name=Kubernetesbaseurl=https://mirrors.aliyun.com/kubernetes/yum/repos/kubernetes-el7-x86_64enabled=1gpgcheck=0repo_gpgcheck=0gpgkey=https://mirrors.aliyun.com/kubernetes/yum/doc/yum-key.gpg https://mirrors.aliyun.com/kubernetes/yum/doc/rpm-package-key.gpgEOF
5.3 安装kubeadm,kubelet和kubectl
# 由于版本更新频繁,这里指定版本号部署:$ yum install -y kubelet-1.16.3 kubeadm-1.16.3 kubectl-1.16.3$ systemctl enable kubelet
6. 部署Kubernetes Master
6.1 创建kubeadm配置文件
#在具有vip的master上操作,这里为master1$ mkdir /usr/local/kubernetes/manifests -p$ cd /usr/local/kubernetes/manifests/$ vi kubeadm-config.yamlapiServer:certSANs:- master1- master2- master.k8s.io- 192.168.44.158- 192.168.44.155- 192.168.44.156- 127.0.0.1extraArgs:authorization-mode: Node,RBACtimeoutForControlPlane: 4m0sapiVersion: kubeadm.k8s.io/v1beta1certificatesDir: /etc/kubernetes/pkiclusterName: kubernetescontrolPlaneEndpoint: "master.k8s.io:16443"controllerManager: {}dns:type: CoreDNSetcd:local:dataDir: /var/lib/etcdimageRepository: registry.aliyuncs.com/google_containerskind: ClusterConfigurationkubernetesVersion: v1.16.3networking:dnsDomain: cluster.localpodSubnet: 10.244.0.0/16serviceSubnet: 10.1.0.0/16scheduler: {}
6.2 在master1节点执行
$ kubeadm init --config kubeadm-config.yaml
按照提示配置环境变量,使用kubectl工具:
bashmkdir -p $HOME/.kubesudo cp -i /etc/kubernetes/admin.conf $HOME/.kube/configsudo chown $(id -u):$(id -g) $HOME/.kube/config$ kubectl get nodes$ kubectl get pods -n kube-system
**按照提示保存以下内容,一会要使用:**
bashkubeadm join master.k8s.io:16443 --token jv5z7n.3y1zi95p952y9p65 \--discovery-token-ca-cert-hash sha256:403bca185c2f3a4791685013499e7ce58f9848e2213e27194b75a2e3293d8812 \--control-plane
查看集群状态
bashkubectl get cskubectl get pods -n kube-system
7.安装集群网络
#从官方地址获取到flannel的yaml,在master1上执行bashmkdir flannelcd flannelwget -c https://raw.githubusercontent.com/coreos/flannel/master/Documentation/kube-flannel.yml#安装flannel网络bashkubectl apply -f kube-flannel.yml#检查bashkubectl get pods -n kube-system
8、master2节点加入集群
8.1 复制密钥及相关文件
#从master1复制密钥及相关文件到master2bash# ssh root@192.168.44.156 mkdir -p /etc/kubernetes/pki/etcd# scp /etc/kubernetes/admin.conf root@192.168.44.156:/etc/kubernetes# scp /etc/kubernetes/pki/{ca.*,sa.*,front-proxy-ca.*} root@192.168.44.156:/etc/kubernetes/pki# scp /etc/kubernetes/pki/etcd/ca.* root@192.168.44.156:/etc/kubernetes/pki/etcd
8.2 master2加入集群
#执行在master1上init后输出的join命令,需要带上参数`--control-plane`表示把master控制节点加入集群kubeadm join master.k8s.io:16443 --token ckf7bs.30576l0okocepg8b --discovery-token-ca-cert-hash sha256:19afac8b11182f61073e254fb57b9f19ab4d798b70501036fc69ebef46094aba --control-plane#检查状态kubectl get nodekubectl get pods --all-namespaces
9. 加入Kubernetes Node
#在node1上执行#向集群添加新节点,执行在kubeadm init输出的kubeadm join命令:kubeadm join master.k8s.io:16443 --token ckf7bs.30576l0okocepg8b --discovery-token-ca-cert-hash sha256:19afac8b11182f61073e254fb57b9f19ab4d798b70501036fc69ebef46094aba#**集群网络重新安装,因为添加了新的node节点**#检查状态kubectl get nodekubectl get pods --all-namespaces
10. 测试kubernetes集群
#在Kubernetes集群中创建一个pod,验证是否正常运行:$ kubectl create deployment nginx --image=nginx$ kubectl expose deployment nginx --port=80 --type=NodePort$ kubectl get pod,svc#访问地址:http://NodeIP:Port
END
声明:JavaBBS论坛主要用于IT技术专题的交流学习,为开源技术爱好者提供广泛、权威的技术资料。若您在技术专题有更好的想法或者建议,欢迎交流!!!


推荐阅读
Recommended reading


JavaBBS


Git
→ https://www.javabbs.cn/git
JavaBBS大数据→ https://www.javabbs.cn/dsj
JavaBBS云存储→ https://www.javabbs.cn/ycc
JavaBBS数据库→ https://www.javabbs.cn/sjk
JavaBBS云计算→ https://www.javabbs.cn/yjs
JavaBBSIT.Log→ https://www.javabbs.cn/itl
JavaBBSNginx→ https://www.javabbs.cn/ngx
JavaBBSzabbix→ https://www.javabbs.cn/zbx
JavaBBSJavaSE→ https://www.javabbs.cn/jse JavaBBS社区文章→ https://www.javabbs.cn/bwz
JavaBBS社区资料→ https://www.javabbs.cn/bzl

