


 背景
背景
现网中,我前期是使用了zabbix4.0 +mysql+httpd(同一台主机上) 的架构来做网络设备的监控。
其中90%的hosts是网络设备,都是使用snmp来收集数据,导致mysql收集到的数据非常多,
后来尝试使用 server +proxy的方式来缓解压力,最终的体验效果,是没什么改善。
特别是系统运行一年后,我遇到了下面的突出问题
mysql进程一直占用大量的CPU,有时会出现400%
#虽然我怀疑有可能是历史数据趋势history 设置而导致的问题,但我又想保留趋势数据,以便运维人员查看,所以最终就没有再去修改配置了
#另外一个主要原因是,关系型数据库删除操作是非常费劲 和不愉快的,所以我不想对mysql执行删除历史趋势数据的操作
Required server performance, new values per second 参数 高达 288
#更新到5.0后其实Required server performance 还是没有降下来,磁盘的写入速度还是很高,看来只能使用ssd硬盘来解决这个问题zabbix web登陆系统和graphs图表查看非常缓慢,有时候点开想看到的图需要等1-3分钟,用户体验非常不好
zabbix 5.0 需要安装的组件
目前zabbix 支持时序数据库,而时序数据库本身就是为监控而生;zabibx目前支持的时序数据库是 TimescaleDB,它是postgresql的插件。
于是我准备安装zabbix 5.0版本+ +postgresql+[TimescaleDB]+nginx ,以此来尝试解决我遇到的问题。
注意事项
本教程适合于有一定的linux基础的系统工程师人员查看
我是将所有功能安装在同一台host里,生成环境建议分开部署
目前(2020年7月3日)时序数据库 只有zabbix-server支持,proxy不支持
若需部署了proxy ,proxy如何与时序数据库结合在一起使用,这就需要后来者写教程
个人能力有限,难免有出错和遗漏的地方,欢迎大家反馈问题
说在前面
本教材只是针对如何安装zabbix 5.0,并启用postgresql数据库的时序存储功能
建议优先参考官网的安装教程,遇到问题,再参考本文相关的地方
文章里的优化参数配置仅针对我的环境, 并不是专门讲解优化zabbix的文章
我是使用root用户安装相关程序的,所有文章里有的地方没有使用sudo命令提权
导航目录
[监控]zabbix 5.0 +postgresql(简单优化)+TimescaleDB+中文安装实战教程背景zabbix 5.0 需要安装的组件注意事项说在前面导航目录安装环境配置步骤 初始化环境,关闭防火墙(建议) 更换yum源为阿里云的源(可选) zabbix 5.0 安装 zabbix web 安装 postgresql-11数据库安装 创建zabbix用户和数据库 TimescaleDB安装和使用 将zabbix 用到的表导入zabbix数据库 yum安装的zabbix_sever.config参数配置 yum安装的nginx config文件参数配置 yum安装的php config文件参数配置 重启zabbix相关服务,并设置开机自启动 最后一步,web初始化操作 zabbix 5.0安装完成的效果图常见问题 zabbix5.0 找不到 graphs菜单 zabbix5.0 邮件告警设置其他优化操作 zabbix_server 的log 不输出到磁盘 个人对postgresql 数据库优化 安装时间同步客户端 LVM xfs扩容 查看磁盘使用情况 timescaledb-tune知识补充 postgresql基础知识补充 什么是postgresql-contrib 配置数据库允许远程访问 修改PostgreSQL数据库默认用户postgres的密码 查询数据存储位置 数据库性能优化参考链接
安装环境
虚机配置
MEM 8G
CPU 12( 这个我的设置,你可以设置为4)
硬盘1 50G (自动分区,并安装系统)
硬盘2 800G(LVM 扩容到系统默认的LV root里)
系统详情:CentOS Linux release 7.8.2003 (Core) X86 64位 最小化安装
]# uname -a

Linux localhost.localdomain 3.10.0-957.el7.x86_64 #1 SMP Thu Nov 8 23:39:32 UTC 2018 x86_64 x86_64 x86_64 GNU/Linux
配置步骤
初始化环境,关闭防火墙(建议)
~]#setenforce  0

 ~]#systemctl disable firewalld

~]#systemctl stop firewalld

~]#vi /etc/selinux/config

SELINUX= permissive
更换yum源为阿里云的源(可选)
~]#cd /etc/yum.repos.d

~]#rm -f *

~]# wget -O /etc/yum.repos.d/CentOS-Base.repo  http://mirrors.aliyun.com/repo/Centos-7.repo
注意你若是最小安装系统,是没有wget命令的,所以你可以手动在/etc/yum.repos.d里新建CentOS-Base.repo
具体操作如下:
~]#vi  CentOS-Base.repo

[base]
name=CentOS-$releasever - Base - mirrors.aliyun.com
failovermethod=priority
baseurl=http://mirrors.aliyun.com/centos/$releasever/os/$basearch/
        http://mirrors.aliyuncs.com/centos/$releasever/os/$basearch/
        http://mirrors.cloud.aliyuncs.com/centos/$releasever/os/$basearch/
gpgcheck=1
gpgkey=http://mirrors.aliyun.com/centos/RPM-GPG-KEY-CentOS-7

#released updates
[updates]
name=CentOS-$releasever - Updates - mirrors.aliyun.com
failovermethod=priority
baseurl=http://mirrors.aliyun.com/centos/$releasever/updates/$basearch/
        http://mirrors.aliyuncs.com/centos/$releasever/updates/$basearch/
        http://mirrors.cloud.aliyuncs.com/centos/$releasever/updates/$basearch/
gpgcheck=1
gpgkey=http://mirrors.aliyun.com/centos/RPM-GPG-KEY-CentOS-7

#additional packages that may be useful
[extras]
name=CentOS-$releasever - Extras - mirrors.aliyun.com
failovermethod=priority
baseurl=http://mirrors.aliyun.com/centos/$releasever/extras/$basearch/
        http://mirrors.aliyuncs.com/centos/$releasever/extras/$basearch/
        http://mirrors.cloud.aliyuncs.com/centos/$releasever/extras/$basearch/
gpgcheck=1
gpgkey=http://mirrors.aliyun.com/centos/RPM-GPG-KEY-CentOS-7

#additional packages that extend functionality of existing packages
[centosplus]
name=CentOS-$releasever - Plus - mirrors.aliyun.com
failovermethod=priority
baseurl=http://mirrors.aliyun.com/centos/$releasever/centosplus/$basearch/
        http://mirrors.aliyuncs.com/centos/$releasever/centosplus/$basearch/
        http://mirrors.cloud.aliyuncs.com/centos/$releasever/centosplus/$basearch/
gpgcheck=1
enabled=0
gpgkey=http://mirrors.aliyun.com/centos/RPM-GPG-KEY-CentOS-7

#contrib - packages by Centos Users
[contrib]
name=CentOS-$releasever - Contrib - mirrors.aliyun.com
failovermethod=priority
baseurl=http://mirrors.aliyun.com/centos/$releasever/contrib/$basearch/
        http://mirrors.aliyuncs.com/centos/$releasever/contrib/$basearch/
        http://mirrors.cloud.aliyuncs.com/centos/$releasever/contrib/$basearch/
gpgcheck=1
enabled=0
gpgkey=http://mirrors.aliyun.com/centos/RPM-GPG-KEY-CentOS-7
zabbix 5.0 安装
~]# rpm -Uvh https://repo.zabbix.com/zabbix/5.0/rhel/7/x86_64/zabbix-release-5.0-1.el7.noarch.rpm

~]# yum install -y zabbix-server-pgsql zabbix-agent
zabbix web 安装
web 依赖PHP7 需要 修改一下yum 源里 zabbx.repo 一个参数,
英文原文如下:
Edit file /etc/yum.repos.d/zabbix.repo and enable zabbix-frontend repository
~]# yum install -y  centos-release-scl
~]#yum makecache

###~]#yum list rh-php7\*

#这里enable zabbix-frontend应该就是会自动安装php7
~]#vi  /etc/yum.repos.d/zabbix.repo

[zabbix-frontend]
#enabled=0
enabled=1
~]# yum install -y zabbix-web-pgsql-scl zabbix-nginx-conf-scl
postgresql-11数据库安装
~]#yum install https://download.postgresql.org/pub/repos/yum/reporpms/EL-7-x86_64/pgdg-redhat-repo-latest.noarch.rpm
~]#yum install postgresql11-server postgresql11  postgresql11-contrib

~]#/usr/pgsql-11/bin/postgresql-11-setup initdb
~]#systemctl enable postgresql-11
~]#systemctl start postgresql-11
创建zabbix用户和数据库
~]#sudo -u postgres createuser --pwprompt zabbix

~]#sudo -u postgres createdb -O zabbix zabbix

#

~]# whatis createuser

createuser (1)    - define a new PostgreSQL user account

~]# whatis createdb

createdb (1)     - create a new PostgreSQL database
TimescaleDB安装和使用
官方安装方法https://docs.timescale.com/latest/getting-started/installation/rhel-centos/installation-yum
具体步骤整理如下:
#安装对应的yum rpm包
~]#sudo yum install -y https://download.postgresql.org/pub/repos/yum/11/redhat/rhel-7-x86_64/pgdg-redhat-repo-latest.noarch.rpm

#自我创建对应的repo文件
~]#sudo tee /etc/yum.repos.d/timescale_timescaledb.repo <<EOL
[timescale_timescaledb]
name=timescale_timescaledb
baseurl=https://packagecloud.io/timescale/timescaledb/el/7/\$basearch
repo_gpgcheck=1
gpgcheck=0
enabled=1
gpgkey=https://packagecloud.io/timescale/timescaledb/gpgkey
sslverify=1
sslcacert=/etc/pki/tls/certs/ca-bundle.crt
metadata_expire=300
EOL

#更新yum源
~]#sudo yum update -y

#安装timescaledb-postgresql-11

# Now install appropriate package for PG version

~]#sudo yum install -y timescaledb-postgresql-11

#修改postgresql config文件,使timescaledb这个插件能正常工作

#修改postgremysql数据库配置,启用timescaledb插件
#Configure your database
~]#sudo timescaledb-tune  --pg-config=/usr/pgsql-11/bin/pg_config

#重启数据库的服务
~]#sudo systemctl restart postgresql-11
将zabbix 用到的表导入zabbix数据库
#这个是必须(常规)操作,zabbix_server要用到的表
~]#zcat /usr/share/doc/zabbix-server-pgsql*/create.sql.gz | sudo -u zabbix psql zabbix

#timescaledb 用到的表,添加到数据库中,若没启用timescaledb 功能,就不用做这一步
~]#echo "CREATE EXTENSION IF NOT EXISTS timescaledb CASCADE;" | sudo -u postgres psql zabbix
~]#zcat /usr/share/doc/zabbix-server-pgsql-5.*/timescaledb.sql.gz | sudo -u zabbix psql zabbix

#重启数据库的服务
~]#sudo systemctl restart postgresql-11
yum安装的zabbix_sever.config参数配置
~]#vi /etc/zabbix/zabbix_server.conf

....

DBHost=127.0.0.1
DBName=zabbix
DBUser=zabbix

#注意请替换成你自己的zabbix密码
DBPassword=[your_DBPASSworld]

#我的环境是因为监控了大量主机,必须把对应的cache设置大一点
VMwareCacheSize=2G

#我的环境是因为监控了大量主机,必须把对应的cache设置大一点
CacheSize=2G

#我的环境是因为监控了大量主机,必须把对应的cache设置大一点
HistoryCacheSize=512M
Timeout=4
AlertScriptsPath=/usr/lib/zabbix/alertscripts
ExternalScripts=/usr/lib/zabbix/externalscripts

#这里的数值我修改成了3000
LogSlowQueries=3000
StatsAllowedIP=127.0.0.1
yum安装的nginx config文件参数配置
~]#vi /etc/opt/rh/rh-nginx116/nginx/conf.d/zabbix.conf

server {
        listen          80;
        server_name     www.yourdomain.com;
       #请将 www.yourdomain.com 改成你自己的域名
....

#根据自己的实际情况,修改listen端口,和server_name
#如偶要允许全部域名,对server_name做如下修改
#server_name _;
#也就是将域名,修改成一个下划线'_',代表所有域名都匹配
yum安装的php config文件参数配置
~]#vi /etc/opt/rh/rh-php72/php-fpm.d/zabbix.conf
[zabbix]
user = apache
group = apache

listen = /var/opt/rh/rh-php72/run/php-fpm/zabbix.sock
#listen.acl_users = apache
#增加nginx
listen.acl_users = apache,nginx

listen.allowed_clients = 127.0.0.1

pm = dynamic
pm.max_children = 50
pm.start_servers = 5
pm.min_spare_servers = 5
pm.max_spare_servers = 35

php_value[session.save_handler] = files
php_value[session.save_path]    = /var/opt/rh/rh-php72/lib/php/session/

#这里修改为300
php_value[max_execution_time] = 300
php_value[memory_limit] = 256M
php_value[post_max_size] = 32M
php_value[upload_max_filesize] = 2M
#这里修改为300
php_value[max_input_time] = 300
php_value[max_input_vars] = 10000
#将时区修改为Asia/Shanghai
php_value[date.timezone] = Asia/Shanghai
重启zabbix相关服务,并设置开机自启动
~]#systemctl restart zabbix-server zabbix-agent rh-nginx116-nginx rh-php72-php-fpm

~]#systemctl enable zabbix-server zabbix-agent rh-nginx116-nginx rh-php72-php-fpm
最后一步,web初始化操作
使用浏览器直接访问http://www.yourdomain.com:port
#示例:http://www.yourdomain.com:80/setup.php
#注意:若你的域名是私有域名,记得去改dns,或者修改自己电脑的hosts文件

#增加的格式示例如下:

#192.168.1.1   www.yourdomain.com

#win 位置    C:\Windows\System32\drivers\etc\hosts
#linux 位置   /etc/hosts
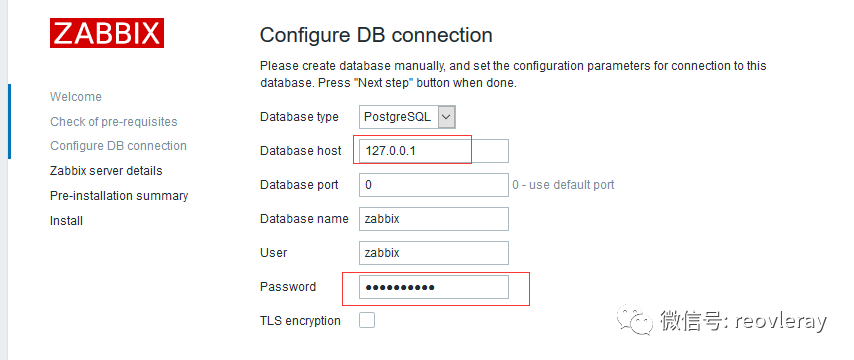
#注意,我这里的database host 设置为127.0.0.01

#这个参数的设置与 postgresql pg_hba.conf 里的配置是有关系的

#具体路径;

#1  /var/lib/pgsql/*/data/postgresql.conf

#2 /var/lib/pgsql/*/data/pg_hba.conf
zabbix 5.0安装完成的效果图

常见问题
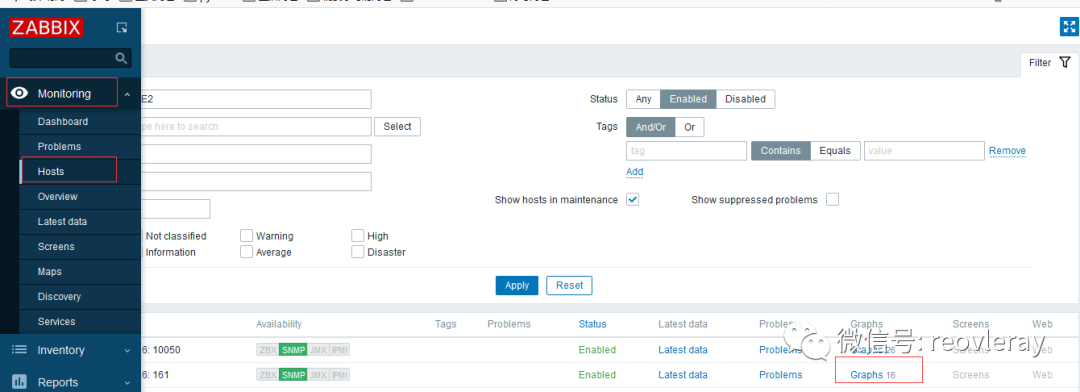
zabbix5.0 找不到 graphs菜单
原因:
zabbix 5.0 与4.0 有极大的不同,5.0是无法从菜单项找到graphs,需从Hosts里找graphs,并且graphs 图形目前支持最大显示50 rows
详情:
4.0(有bar 可以自由选择想暂时的图形,一次只能展示一个)

5.0(无法从菜单项找到graphs,需从Hosts里找graphs,默认只显示50条)
爬坑之路:
2020年7月5日没有找到修改显示的地方,已尝试修改users-> per rows 是无效的
从官网论坛里看到有人在建议将5.0 graphs的功能退回4.0之前,目前(2020年7月5日)官方没有正式回应。
zabbix5.0 若要查看50以后的图形,需要通过Filter->Graphs里选择想展示的图形,若选的超过50个,也只显示前50。

zabbix5.0 邮件告警设置
zabbix 4.0以后就不再需要用户自己写告警邮件脚本了,通过下面的配置即可实现邮件告警,
这里是使用腾讯企业邮箱,
这里是使用腾讯企业邮箱,
这里是使用腾讯企业邮箱
个人邮件设置也类似,记得检查一下告警邮箱是否开启了SMTP POP3相关配置
配置思路:
添加告警媒介(邮件客户端脚本),
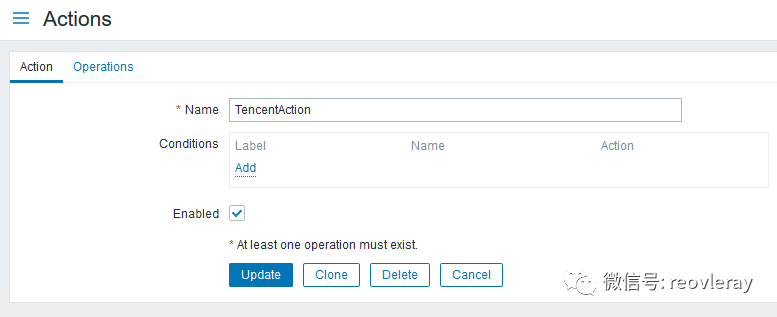
定制动作(遇到什么问题要怎么做),
应用到用户并生效(enable操作)
具体操作:
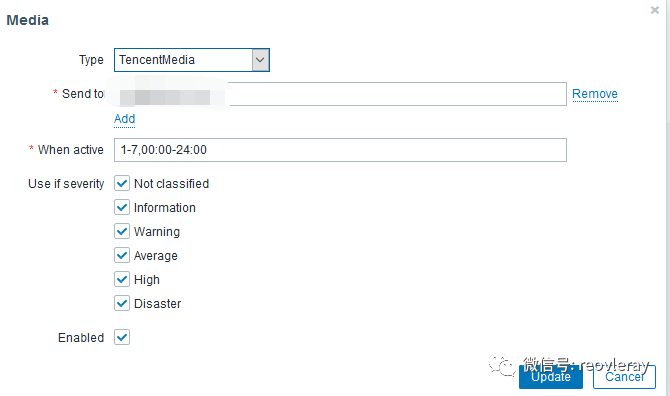
Administration->Media types->Create media type

Configration ->action->create action -->edit yourname->change to Operations and edit
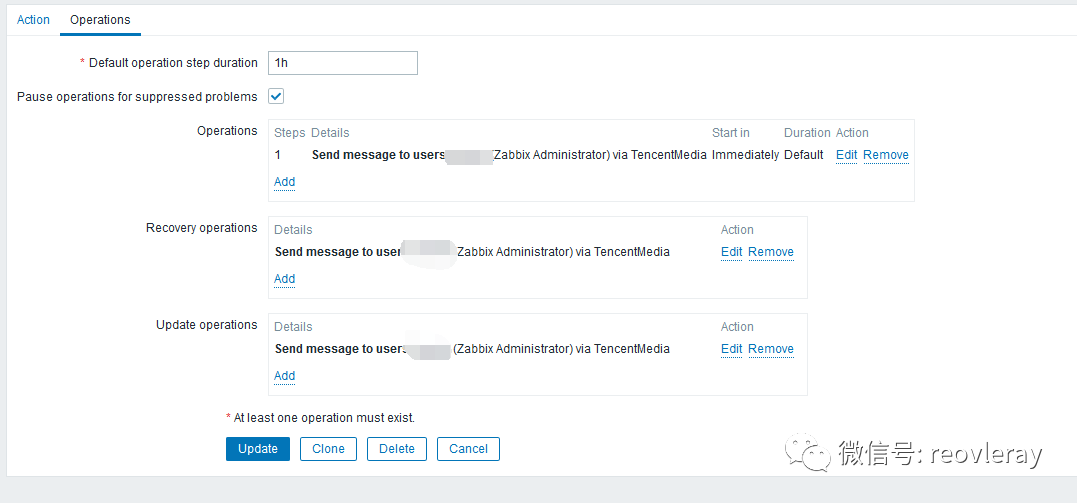
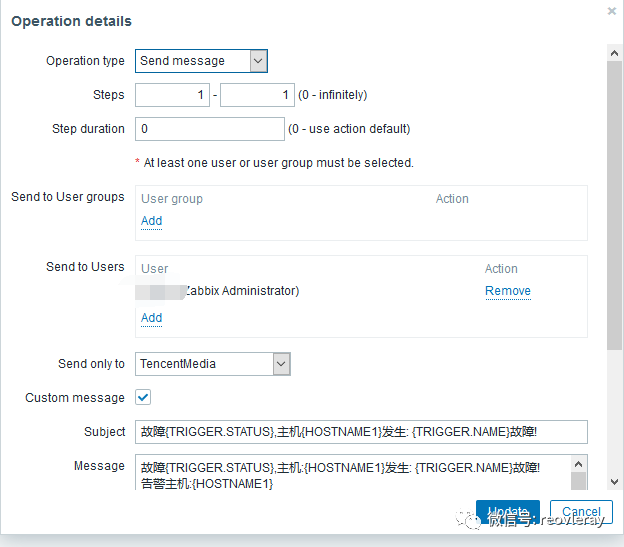
custom message details:
subject:

故障{TRIGGER.STATUS},主机{HOSTNAME1}发生: {TRIGGER.NAME}故障!

Message:

故障{TRIGGER.STATUS},主机:{HOSTNAME1}发生: {TRIGGER.NAME}故障!

告警主机:{HOSTNAME1}

告警时间:{EVENT.DATE} {EVENT.TIME}

告警等级:{TRIGGER.SEVERITY}

告警信息: {TRIGGER.NAME}

告警项目:{TRIGGER.KEY1}

问题详情:{ITEM.NAME}:{ITEM.VALUE}

当前状态:{TRIGGER.STATUS}:{ITEM.VALUE1}

事件ID:{EVENT.ID}
Administration->Users [edit your user config]--select your users-->media->add
其他优化操作
zabbix_server 的log 不输出到磁盘
vi /etc/zabbix/zabbix_server.conf
#LogFile=/var/log/zabbix/zabbix_server.log
LogFile=/dev/null
个人对postgresql 数据库优化
cd /var/lib/pgsql/11/data
vi  postgresql.conf
shared_buffers = 1024MB
#我这里改成1G,但建议大小是主机内存25%
安装时间同步客户端
#安装chrony
 yum -y install chrony
#设置为ntp客户端
echo "server ntp1.aliyun.com iburst ">/etc/chrony.conf
#设置为自启动
systemctl enable chronyd
#启动chronyd服务
 systemctl start chronyd
#查看时间同步状态
chronyc sources -v
LVM xfs扩容
虚机添加硬盘(省略)
不重启的情况下,让系统识别到新增的硬盘
ls /sys/class/scsi_host/
#...
#我这里只有host0-host2,请根据实际情况做如下类似操作

 echo "- - -" > /sys/class/scsi_host/host0/scan
 echo "- - -" > /sys/class/scsi_host/host1/scan
 echo "- - -" > /sys/class/scsi_host/host2/scan
lvm扩容
#创建pv
pvcreate /dev/sdb
#扩展vg
vgextend   centos  /dev/sdb
#扩展lv
lvextend -L +800G /dev/mapper/centos-root
#似乎没用,需要用下面的命令
lvextend -l +100%FREE /dev/mapper/centos-root

#重置root的空间,让扩展生效
resize2fs /dev/mapper/centos-root
#xfs需要多做下面一步
#英文如下解释如下:
#Xby default CentOS 7 uses XFS file system rather than EXT4. No problem – we’ll just use xfs_growfs utility instead of  resize2fs.
xfs_growfs /dev/mapper/centos-root

#查看扩容后的硬盘情况
 df -THl
查看磁盘使用情况
安装步骤
yum provides iostatyum -y install sysstat
查看磁盘情况iostat
查看哪个进程占用磁盘pidstat -d 2
]# iostat
Linux 3.10.0-957.el7.x86_64 (localhost.localdomain)     07/05/2020      _x86_64_        (12 CPU)

avg-cpu:  %user   %nice %system %iowait  %steal   %idle
           0.16    0.00    0.10    0.06    0.00   99.68

Device:            tps    kB_read/s    kB_wrtn/s    kB_read    kB_wrtn
sda               3.22         0.85       209.12     441116  108704594
dm-0              3.32         0.80       208.93     418041  108605492
dm-1              0.00         0.01         0.00       3492         56
sdb               0.00         0.01         0.00       6209       2221
]# iostat -xm
Linux 3.10.0-957.el7.x86_64 (localhost.localdomain)     07/05/2020      _x86_64_        (12 CPU)

avg-cpu:  %user   %nice %system %iowait  %steal   %idle
           0.16    0.00    0.10    0.06    0.00   99.68

Device:         rrqm/s   wrqm/s     r/s     w/s    rMB/s    wMB/s avgrq-sz avgqu-sz   await r_await w_await  svctm  %util
sda               0.00     0.11    0.03    3.19     0.00     0.20   130.58     0.13   41.36   17.29   41.56   7.63   2.45
dm-0              0.00     0.00    0.03    3.30     0.00     0.20   126.26     0.16   49.41   18.51   49.65   7.39   2.45
dm-1              0.00     0.00    0.00    0.00     0.00     0.00    49.62     0.00    5.25    2.91   26.86   3.78   0.00
sdb               0.00     0.00    0.00    0.00     0.00     0.00    19.20     0.00   15.04    2.76   21.41   5.47   0.00
]# pidstat -d 2
Linux 3.10.0-957.el7.x86_64 (localhost.localdomain)     07/05/2020      _x86_64_        (12 CPU)

02:05:56 PM   UID       PID   kB_rd/s   kB_wr/s kB_ccwr/s  Command
02:05:58 PM    26      4325      0.00     58.82      0.00  postmaster
02:05:58 PM    26      4327      0.00     19.61      0.00  postmaster
02:05:58 PM   998      4350      0.00      1.96      1.96  zabbix_server
02:05:58 PM    26     16456      0.00    643.14      0.00  postmaster
02:05:58 PM    26     16457      0.00      3.92      0.00  postmaster
02:05:58 PM    26     16458      0.00     27.45      0.00  postmaster
timescaledb-tune知识补充
timescaledb-tune 是一个自动化配置postgremysql 的config脚本,会将timescaledb的配置追加到config里。
官网原文解释如下:
'''

TimescaleDB works with the default PostgreSQL server configuration settings. However, we find that these settings are typically too conservative and can be limiting when using larger servers with more resources (CPU, memory, disk, etc). Adjusting these settings, either automatically with our tool timescaledb-tune or manually editing your machine's postgresql.conf, can improve performance.


TimescaleDB使用默认的PostgreSQL服务器配置设置。但是,我们发现这些设置通常过于保守,并且在使用具有更多资源(CPU、内存、磁盘等)的大型服务器时可能会受到限制。调整这些设置,或自动使用我们的工具时间刻度调整或手动编辑您的机器postgresql.conf,可以提高性能。

'''
若你不熟悉的情况下,在执行timescaledb-tune命令后,一直选择默认即可
官方参考连接:https://docs.timescale.com/latest/getting-started/configuring
坑点:
官方的教程里 没有--pg-config 参数,有俩种解决方式
测试方法
#使用--dry-run 测试一下timescaledb-tune是否正常运行
[root@localhost ~]$  timescaledb-tune --quiet --yes --dry-run >> postgresql.conf
exit: could not execute `pg_config --version`: exec: "pg_config": executable file not found in $PATH
path环境中添加pg_config
[root@localhost ~]$  sudo find / -name "pg_config" -print
/usr/pgsql-11/bin/pg_config


export PG_HOME=/usr/pgsql-11
export PATH=PATH:PG_HOME/bin
#参考连接:https://www.congcong.us/post/error_pg_config_executable_not_found_problem.html
或者直接带上 --pg-config=/usr/pgsql-11/bin/pg_config
[root@localhost ~]$    timescaledb-tune  --pg-config=/usr/pgsql-11/bin/pg_config
#参考连接:https://www.zabbix-es.com.es/index.php/Instalaci%C3%B3n_Zabbix_4.4_%2B_PostgreSQL_%2B_TimescaleDB_en_CentOS_8
postgresql基础知识补充
什么是postgresql-contrib
#postgresql-contrib或contrib包包含一些不属于核心PostgreSQL包的其他实用程序和功能,

#在大多数情况下,最好将contrib包与PostgreSQL核心一起安装。

#来自 <https://ywnz.com/linuxysjk/5697.html>
配置数据库允许远程访问
需要改2个地方(* 替换成对应的版本,我这里是11)
1  /var/lib/pgsql/*/data/postgresql.conf
2  /var/lib/pgsql/*/data/pg_hba.conf

具体修改:
vi /var/lib/pgsql/*/data/postgresql.conf
找到listen_addresses,改完之后去掉“listen_address”前面的#。
如果想对所有IP开放,则将localhost改为*即可,
如果想仅对部分IP开放,多个IP之间用,(逗号+空格)隔开。
#实例:
listen_addresses = '*'          # what IP address(es) to listen on;
#listen_addresses = 'localhost'         # what IP address(es) to listen on;


 vi  /var/lib/pgsql/*/data/pg_hba.conf
在IPv4 local connections下方添加允许连接的IP。
如果想允许所有IPv4地址,则加入一行host all all 0.0.0.0/0 md5。IPv6方法类似。

#实例:
host    all             all             127.0.0.1/32            md5
host    all             all             172.12.0.0/12            md5
#我这里将host  all  all 127.0.0.1/32  peer 改成了host  all  all  127.0.0.1/32   md5
#为什么要这么做?是为了解决后面web无法连接数据库127.0.0.1:5432

配置修改完了记得重启服务 systemctl restart postgresql-11.service
#来自 <https://www.cnblogs.com/Paul-watermelon/p/10654303.html>
修改PostgreSQL数据库默认用户postgres的密码
PostgreSQL数据库创建一个postgres用户作为数据库的管理员,密码随机,所以需要修改密码,方式如下:
步骤一:登录PostgreSQL
1   sudo -u postgres psql
步骤二:修改登录PostgreSQL密码
1   ALTER USER postgres WITH PASSWORD 'postgres';
注:
• 密码postgres要用引号引起来
• 命令最后有分号
步骤三:退出PostgreSQL客户端
\q

#来自 <https://www.cnblogs.com/kaituorensheng/p/4735191.html>
查询数据存储位置
sudo -u postgres psql

postgres=# SHOW data_directory;

   data_directory

\------------------------

 /var/lib/pgsql/11/data

(1 row)
数据库性能优化
修改shared_buffers的这个参数,是最有效的用于调优的参数,此参数的作用是设置PostgreSQL中用于缓存的专用内存量,建议的设置值为机器总内存大小的25%,但是也可以根据实际情况尝试设置更低和更高的值。
#来自 <[https://blog.cactifans.com/2019/04/04/Zabbix4.2-%E6%96%B0%E5%8A%9F%E8%83%BD%E5%AE%9E%E8%B7%B5-1-%E6%97%B6%E9%97%B4%E5%BA%8F%E5%88%97%E6%95%B0%E6%8D%AE%E5%BA%93-TimescaleDB/](https://blog.cactifans.com/2019/04/04/Zabbix4.2-新功能实践-1-时间序列数据库-TimescaleDB/)>参考链接
https://www.zabbix.com/download?zabbix=5.0&os_distribution=centos&os_version=7&db=postgresql&ws=nginx
https://docs.timescale.com/latest/getting-started/installation/rhel-centos/installation-yum
https://techexpert.tips/zabbix/zabbix-5-timescaledb-installation-ubuntu-linux/
https://umount.net/souce-install-zabbix-5-0-lts-with-nginx-php-7-4-timescaledb-on-centos-7-1-timescaledb/
https://www.zabbix-es.com.es/index.php/Instalaci%C3%B3n_Zabbix_4.4%2B_PostgreSQL%2B_TimescaleDB_en_CentOS_8
https://blog.cactifans.com/2019/04/04/Zabbix4.2-%E6%96%B0%E5%8A%9F%E8%83%BD%E5%AE%9E%E8%B7%B5-1-%E6%97%B6%E9%97%B4%E5%BA%8F%E5%88%97%E6%95%B0%E6%8D%AE%E5%BA%93-TimescaleDB/
https://www.congcong.us/post/error_pg_config_executable_not_found_problem.html
https://www.zabbix-es.com.es/index.php/Instalaci%C3%B3n_Zabbix_4.4%2B_PostgreSQL%2B_TimescaleDB_en_CentOS_8
https://ywnz.com/linuxysjk/5697.html
https://www.cnblogs.com/Paul-watermelon/p/10654303.html
https://www.cnblogs.com/kaituorensheng/p/4735191.html
https://creativecommons.org/licenses/by-nc/4.0/deed.zh#
