在每一个项目的实际开发过程中,都会有一些权限控制方面的功能需要开发.按以往的方式,我们都是自己去写一些过滤器以及Session处理,记住我等功能.上一篇中我们讲了SpringSecurity,其实他就是一个轻量级的.但市面上还是比较主流使用Shiro.功能完善.好用.
| 功能 | 中文 |
| Authentication | 登录 |
| Authorization | 授权 |
| Session Management | 会话管理 |
| Cryptography | 加密 |
| Web Support | web 支持 |
| Concurrency | 多线程授权认证 |
| Caching | 缓冲,提高运速 |
| Testing | 测试 |
Run as | 让已经登录的用户以其他身份操作 |
| Remember Me | 记住我 |
通过Shiro官方提供的 Simple 我们可以看一下入门程式.如要该Simple官方版的可以公众号后台回复[shiroSimple] 获取.
Simple 基本功能介绍
package com.xiaobaibi;

import org.apache.shiro.SecurityUtils;
import org.apache.shiro.authc.*;
import org.apache.shiro.config.IniSecurityManagerFactory;
import org.apache.shiro.mgt.SecurityManager;
import org.apache.shiro.session.Session;
import org.apache.shiro.subject.Subject;
import org.apache.shiro.util.Factory;
import org.slf4j.Logger;
import org.slf4j.LoggerFactory;


/**
 * Simple Quickstart application showing how to use Shiro's API.
 *
 * @since 0.9 RC2
 */
public class Quickstart {

    private static final transient Logger log = LoggerFactory.getLogger(Quickstart.class);


    public static void main(String[] args) {

        // 通过工厂方式获取 INI 文件,返回一个SecurityManager实例
        // ini 文件中配置了 用户名,密码,角色
        Factory<SecurityManager> factory = new IniSecurityManagerFactory("classpath:shiro.ini");
        SecurityManager securityManager = factory.getInstance();

        // 回写当前的SecurityManager实例
        SecurityUtils.setSecurityManager(securityManager);
        // 至此,环境搭建 OK,接下来就是操作 Shiro

        // 获取当前的subject,在程式中打交道的就是subject
        Subject currentUser = SecurityUtils.getSubject();

        // 测试使用 Session
        Session session = currentUser.getSession();
        // 向 session 中写入一个值
        session.setAttribute("someKey", "aValue");
        // 从 session 中取出上一行写入的值
        String value = (String) session.getAttribute("someKey");
        if (value.equals("aValue")) {
            log.info("---------公众号:小败笔的颠沛流离------------- Retrieved the correct value! [" + value + "]");
        }

        // 判断当前用户是否已经登录
        if (!currentUser.isAuthenticated()) {
            // 把用户信息封装成 Token
            UsernamePasswordToken token = new UsernamePasswordToken("lonestarr", "vespa");
            // 记住我
            token.setRememberMe(true);
            try {
                // 执行登录,是否成功取决于shiro.ini 文件中第43行
                currentUser.login(token);
            } catch (UnknownAccountException uae) {
                log.info("There is no user with username of " + token.getPrincipal());
            } catch (IncorrectCredentialsException ice) {
                log.info("Password for account " + token.getPrincipal() + " was incorrect!");
            } catch (LockedAccountException lae) {
                log.info("The account for username " + token.getPrincipal() + " is locked.  " +
                        "Please contact your administrator to unlock it.");
            }
            // ... catch more exceptions here (maybe custom ones specific to your application?
            catch (AuthenticationException ae) {
                //unexpected condition?  error?
            }
        }

        // 登录成功日志
        log.info("User [" + currentUser.getPrincipal() + "] logged in successfully.");

        // 测试用户是否有某有一个角色
        if (currentUser.hasRole("schwartz")) {
            log.info("May the Schwartz be with you!");
        } else {
            log.info("Hello, mere mortal.");
        }

        // 是否具备某一种行为,即某一种功能的权限
        if (currentUser.isPermitted("lightsaber:wield")) {
            log.info("You may use a lightsaber ring.  Use it wisely.");
        } else {
            log.info("Sorry, lightsaber rings are for schwartz masters only.");
        }

        // 是否具备某一种行为,即某一种功能的权限,
        // 区别 : 这个层级比较高
        if (currentUser.isPermitted("winnebago:drive:eagle5")) {
            log.info("You are permitted to 'drive' the winnebago with license plate (id) 'eagle5'.  " +
                    "Here are the keys - have fun!");
        } else {
            log.info("Sorry, you aren't allowed to drive the 'eagle5' winnebago!");
        }

        // 登出
        currentUser.logout();
        // 退出系统
        System.exit(0);
    }
}
1> 创建一个普通的 Maven web 项目.
pom.xml:
<?xml version="1.0" encoding="UTF-8"?>

<project xmlns="http://maven.apache.org/POM/4.0.0" xmlns:xsi="http://www.w3.org/2001/XMLSchema-instance"
         xsi:schemaLocation="http://maven.apache.org/POM/4.0.0 http://maven.apache.org/xsd/maven-4.0.0.xsd">
    <modelVersion>4.0.0</modelVersion>

    <groupId>com.xiaobaibi</groupId>
    <artifactId>shiro-hello</artifactId>
    <version>1.0-SNAPSHOT</version>
    <packaging>war</packaging>

    <name>shiro-hello Maven Webapp</name>
    <!-- FIXME change it to the project's website -->
    <url>http://www.example.com</url>

    <properties>
        <project.build.sourceEncoding>UTF-8</project.build.sourceEncoding>
        <maven.compiler.source>1.7</maven.compiler.source>
        <maven.compiler.target>1.7</maven.compiler.target>
    </properties>

    <dependencies>

        <dependency>
            <groupId>org.apache.shiro</groupId>
            <artifactId>shiro-core</artifactId>
            <version>1.4.0</version>
        </dependency>

        <dependency>
            <groupId>org.slf4j</groupId>
            <artifactId>slf4j-api</artifactId>
            <version>1.7.5</version>
        </dependency>
        <dependency>
            <groupId>org.slf4j</groupId>
            <artifactId>slf4j-log4j12</artifactId>
            <version>1.7.5</version>
        </dependency>
        <!-- https://mvnrepository.com/artifact/org.slf4j/slf4j-nop -->
        <dependency>
            <groupId>org.slf4j</groupId>
            <artifactId>slf4j-nop</artifactId>
            <version>1.7.5</version>
            <scope>test</scope>
        </dependency>
        <!-- https://mvnrepository.com/artifact/org.slf4j/slf4j-simple -->
        <dependency>
            <groupId>org.slf4j</groupId>
            <artifactId>slf4j-simple</artifactId>
            <version>1.7.5</version>
            <scope>test</scope>
        </dependency>

        <!-- https://mvnrepository.com/artifact/commons-logging/commons-logging -->
        <dependency>
            <groupId>commons-logging</groupId>
            <artifactId>commons-logging</artifactId>
            <version>1.2</version>
        </dependency>


        <dependency>
            <groupId>junit</groupId>
            <artifactId>junit</artifactId>
            <version>4.11</version>
            <scope>test</scope>
        </dependency>
    </dependencies>

    <build>
        <finalName>shiro-hello</finalName>
        <pluginManagement><!-- lock down plugins versions to avoid using Maven defaults (may be moved to parent pom) -->
            <plugins>
                <plugin>
                    <artifactId>maven-clean-plugin</artifactId>
                    <version>3.1.0</version>
                </plugin>
                <!-- see http://maven.apache.org/ref/current/maven-core/default-bindings.html#Plugin_bindings_for_war_packaging -->
                <plugin>
                    <artifactId>maven-resources-plugin</artifactId>
                    <version>3.0.2</version>
                </plugin>
                <plugin>
                    <artifactId>maven-compiler-plugin</artifactId>
                    <version>3.8.0</version>
                </plugin>
                <plugin>
                    <artifactId>maven-surefire-plugin</artifactId>
                    <version>2.22.1</version>
                </plugin>
                <plugin>
                    <artifactId>maven-war-plugin</artifactId>
                    <version>3.2.2</version>
                </plugin>
                <plugin>
                    <artifactId>maven-install-plugin</artifactId>
                    <version>2.5.2</version>
                </plugin>
                <plugin>
                    <artifactId>maven-deploy-plugin</artifactId>
                    <version>2.8.2</version>
                </plugin>
            </plugins>
        </pluginManagement>
    </build>
</project>
3> 创建一个包名,把官方提供的Quickstart.java(即2.1中的Java程式)复制进去.
4> 将官方提供的shiro.ini与 log4j.properties 复制到 resources 文件夹下.
5> 直接就可以 RunQuickstart中的 java main 方法.
3.1 环境搭建.
1> 创建普通的 Maven web 项目.
2> pom.xml 导入 spring 与 shiro 的jar 包
<?xml version="1.0" encoding="UTF-8"?>

<project xmlns="http://maven.apache.org/POM/4.0.0" xmlns:xsi="http://www.w3.org/2001/XMLSchema-instance"
         xsi:schemaLocation="http://maven.apache.org/POM/4.0.0 http://maven.apache.org/xsd/maven-4.0.0.xsd">
    <modelVersion>4.0.0</modelVersion>

    <groupId>xiaobaibi</groupId>
    <artifactId>spring-shiro</artifactId>
    <version>1.0-SNAPSHOT</version>
    <packaging>war</packaging>

    <name>spring-shiro Maven Webapp</name>
    <!-- FIXME change it to the project's website -->
    <url>http://www.example.com</url>

    <properties>
        <project.build.sourceEncoding>UTF-8</project.build.sourceEncoding>
        <maven.compiler.source>1.7</maven.compiler.source>
        <maven.compiler.target>1.7</maven.compiler.target>
    </properties>

    <dependencies>
        <!--shiro 开始-->
        <!--shiro 核心-->
        <dependency>
            <groupId>org.apache.shiro</groupId>
            <artifactId>shiro-core</artifactId>
            <version>1.4.0</version>
        </dependency>
        <!--web 支持-->
        <dependency>
            <groupId>org.apache.shiro</groupId>
            <artifactId>shiro-web</artifactId>
            <version>1.4.0</version>
        </dependency>
        <!--缓冲-->
        <dependency>
            <groupId>org.apache.shiro</groupId>
            <artifactId>shiro-ehcache</artifactId>
            <version>1.4.0</version>
        </dependency>
        <!--Spring 支持-->
        <dependency>
            <groupId>org.apache.shiro</groupId>
            <artifactId>shiro-spring</artifactId>
            <version>1.4.0</version>
        </dependency>
        <!--shiro 结束-->

        <!--Spring 开始-->
        <dependency>
            <groupId>org.springframework</groupId>
            <artifactId>spring-aop</artifactId>
            <version>5.1.4.RELEASE</version>
        </dependency>
        <dependency>
            <groupId>org.springframework</groupId>
            <artifactId>spring-beans</artifactId>
            <version>5.1.4.RELEASE</version>
        </dependency>
        <dependency>
            <groupId>org.springframework</groupId>
            <artifactId>spring-context</artifactId>
            <version>5.1.4.RELEASE</version>
        </dependency>
        <dependency>
            <groupId>org.springframework</groupId>
            <artifactId>spring-context-support</artifactId>
            <version>5.1.4.RELEASE</version>
        </dependency>
        <dependency>
            <groupId>org.springframework</groupId>
            <artifactId>spring-core</artifactId>
            <version>5.1.4.RELEASE</version>
        </dependency>
        <dependency>
            <groupId>org.springframework</groupId>
            <artifactId>spring-jdbc</artifactId>
            <version>5.1.4.RELEASE</version>
        </dependency>
        <dependency>
            <groupId>org.springframework</groupId>
            <artifactId>spring-orm</artifactId>
            <version>5.1.4.RELEASE</version>
        </dependency>
        <dependency>
            <groupId>org.springframework</groupId>
            <artifactId>spring-web</artifactId>
            <version>5.1.4.RELEASE</version>
        </dependency>
        <dependency>
            <groupId>org.springframework</groupId>
            <artifactId>spring-webmvc</artifactId>
            <version>5.1.4.RELEASE</version>
        </dependency>
        <dependency>
            <groupId>org.springframework</groupId>
            <artifactId>spring-tx</artifactId>
            <version>5.1.4.RELEASE</version>
        </dependency>
        <dependency>
            <groupId>org.springframework</groupId>
            <artifactId>spring-aspects</artifactId>
            <version>5.1.4.RELEASE</version>
        </dependency>
        <dependency>
            <groupId>org.springframework</groupId>
            <artifactId>spring-expression</artifactId>
            <version>5.1.4.RELEASE</version>
        </dependency>
        <!--Spring 结束-->

        <!--日志开始-->
        <dependency>
            <groupId>org.slf4j</groupId>
            <artifactId>slf4j-api</artifactId>
            <version>1.7.5</version>
        </dependency>
        <dependency>
            <groupId>org.slf4j</groupId>
            <artifactId>slf4j-log4j12</artifactId>
            <version>1.7.5</version>
        </dependency>
        <!-- https://mvnrepository.com/artifact/org.slf4j/slf4j-nop -->
        <dependency>
            <groupId>org.slf4j</groupId>
            <artifactId>slf4j-nop</artifactId>
            <version>1.7.5</version>
            <scope>test</scope>
        </dependency>
        <!-- https://mvnrepository.com/artifact/org.slf4j/slf4j-simple -->
        <dependency>
            <groupId>org.slf4j</groupId>
            <artifactId>slf4j-simple</artifactId>
            <version>1.7.5</version>
            <scope>test</scope>
        </dependency>
        <!-- https://mvnrepository.com/artifact/commons-logging/commons-logging -->
        <dependency>
            <groupId>commons-logging</groupId>
            <artifactId>commons-logging</artifactId>
            <version>1.2</version>
        </dependency>
        <!--日志结束-->

        <dependency>
            <groupId>junit</groupId>
            <artifactId>junit</artifactId>
            <version>4.11</version>
            <scope>test</scope>
        </dependency>
    </dependencies>

    <build>
        <finalName>spring-shiro</finalName>
        <pluginManagement><!-- lock down plugins versions to avoid using Maven defaults (may be moved to parent pom) -->
            <plugins>
                <plugin>
                    <artifactId>maven-clean-plugin</artifactId>
                    <version>3.1.0</version>
                </plugin>
                <!-- see http://maven.apache.org/ref/current/maven-core/default-bindings.html#Plugin_bindings_for_war_packaging -->
                <plugin>
                    <artifactId>maven-resources-plugin</artifactId>
                    <version>3.0.2</version>
                </plugin>
                <plugin>
                    <artifactId>maven-compiler-plugin</artifactId>
                    <version>3.8.0</version>
                </plugin>
                <plugin>
                    <artifactId>maven-surefire-plugin</artifactId>
                    <version>2.22.1</version>
                </plugin>
                <plugin>
                    <artifactId>maven-war-plugin</artifactId>
                    <version>3.2.2</version>
                </plugin>
                <plugin>
                    <artifactId>maven-install-plugin</artifactId>
                    <version>2.5.2</version>
                </plugin>
                <plugin>
                    <artifactId>maven-deploy-plugin</artifactId>
                    <version>2.8.2</version>
                </plugin>
            </plugins>
        </pluginManagement>
    </build>
</project>
3> WEB-INF 下创建spring-servlet.xml
<?xml version="1.0" encoding="UTF-8"?>
<beans xmlns="http://www.springframework.org/schema/beans"
       xmlns:xsi="http://www.w3.org/2001/XMLSchema-instance" xmlns:mvc="http://www.springframework.org/schema/mvc"
       xmlns:context="http://www.springframework.org/schema/context"
       xsi:schemaLocation="http://www.springframework.org/schema/beans http://www.springframework.org/schema/beans/spring-beans.xsd http://www.springframework.org/schema/mvc http://www.springframework.org/schema/mvc/spring-mvc.xsd http://www.springframework.org/schema/context http://www.springframework.org/schema/context/spring-context.xsd">
    <bean class="org.springframework.web.servlet.view.InternalResourceViewResolver" >
        <property name="prefix" value="/"></property>
        <property name="suffix" value=".jsp"></property>
    </bean>
    <!--开启注解-->
    <mvc:annotation-driven></mvc:annotation-driven>
    <mvc:default-servlet-handler></mvc:default-servlet-handler>
    <!--配置扫描路径-->
    <context:component-scan base-package="com.xiaobaibi"/>
</beans>
4> 创建一个 shiroRealm,实现Realm
package com.xiaobaibi.utils;

import org.apache.shiro.authc.AuthenticationException;
import org.apache.shiro.authc.AuthenticationInfo;
import org.apache.shiro.authc.AuthenticationToken;
import org.apache.shiro.realm.Realm;

public class ShiroRealm implements Realm {
    @Override
    public String getName() {
        return null;
    }

    @Override
    public boolean supports(AuthenticationToken authenticationToken) {
        return false;
    }

    @Override
    public AuthenticationInfo getAuthenticationInfo(AuthenticationToken authenticationToken) throws AuthenticationException {
        return null;
    }
}
5> resources 下创建spring的配置文件
applicationContext.xml.
这个配置是 shiro 的主要配置文件.要求掌握.
<?xml version="1.0" encoding="UTF-8"?>
<beans xmlns="http://www.springframework.org/schema/beans"
       xmlns:xsi="http://www.w3.org/2001/XMLSchema-instance"
       xsi:schemaLocation="http://www.springframework.org/schema/beans http://www.springframework.org/schema/beans/spring-beans.xsd">
    <!--核心组件-securityManager,非常关键.-->
    <bean id="securityManager" class="org.apache.shiro.web.mgt.DefaultWebSecurityManager">
        <!--缓冲管理器-->
        <property name="cacheManager" ref="cacheManager"/>
        <!---->
        <property name="realm" ref="jdbcRealm"/>
        <property name="sessionManager" ref="sessionManager"/>
    </bean>

    <bean id="sessionManager" class="org.apache.shiro.web.session.mgt.DefaultWebSessionManager">
        <property name="sessionIdUrlRewritingEnabled" value="false"/>
    </bean>

    <!--缓冲管理器-->
    <bean id="cacheManager" class="org.apache.shiro.cache.ehcache.EhCacheManager">
        <!--需要加入缓冲的配置文件-->
        <property name="cacheManagerConfigFile" value="classpath:ehcache.xml"/>
    </bean>

    <!-- 配置一个实现了 org.apache.shiro.realm.Realm 接口的类 -->
    <bean id="jdbcRealm" class="com.xiaobaibi.utils.ShiroRealm">

    </bean>

    <!-- 生命周期 Bean 管理器,他可以自动的调用 SpringIOC 窗口的生命周期方法-->
    <bean id="lifecycleBeanPostProcessor" class="org.apache.shiro.spring.LifecycleBeanPostProcessor"/>

    <!-- 启用 Shiro 在 Spring 中的注解,前提是必须配置了 lifecycleBeanPostProcessor-->
    <bean class="org.springframework.aop.framework.autoproxy.DefaultAdvisorAutoProxyCreator"
          depends-on="lifecycleBeanPostProcessor"/>
    <bean class="org.apache.shiro.spring.security.interceptor.AuthorizationAttributeSourceAdvisor">
        <property name="securityManager" ref="securityManager"/>
    </bean>

    <!-- ShiroFilter 这个必须与 web.xml 中的 Filter 的名称一样 -->
    <bean id="shiroFilter" class="org.apache.shiro.spring.web.ShiroFilterFactoryBean">
        <property name="securityManager" ref="securityManager"/>
        <!--登录页面-->
        <property name="loginUrl" value="/login.jsp"/>
        <!--登录成功主页-->
        <property name="successUrl" value="/list.jsp"/>
        <!--没有权限的页面-->
        <property name="unauthorizedUrl" value="/unauthorized.jsp"/>
        <!--配置过滤页面与访问权限-->
        <property name="filterChainDefinitions">
            <value>
                <!--
                    anon:可以被匿名访问
                    authc:认证之后才可以被访问
                -->
                /login.jsp = anon
                /** = authc
            </value>
        </property>
    </bean>
</beans>
6> web.xml 加入Spring 的监听
<?xml version="1.0" encoding="UTF-8"?>
<!--<!DOCTYPE web-app PUBLIC-->
<!--"-//Sun Microsystems, Inc.//DTD Web Application 2.3//EN"-->
<!--"http://java.sun.com/dtd/web-app_2_3.dtd" >-->

<web-app xmlns:xsi="http://www.w3.org/2001/XMLSchema-instance"
         xmlns="http://java.sun.com/xml/ns/javaee"
         xsi:schemaLocation="http://java.sun.com/xml/ns/javaee
        http://java.sun.com/xml/ns/javaee/web-app_3_0.xsd"
         id="WebApp_ID" version="3.0">
    <display-name>Archetype Created Web Application</display-name>

    <!--加入 spring 的配置文件-->
    <context-param>
        <param-name>contextConfigLocation</param-name>
        <param-value>classpath:applicationContext.xml</param-value>
    </context-param>
    <!--加入 spring 的监听-->
    <listener>
        <listener-class>org.springframework.web.context.ContextLoaderListener</listener-class>
    </listener>
    <!--加入 Spring 的 Servlet-->
    <servlet>
        <servlet-name>spring</servlet-name>
        <servlet-class>org.springframework.web.servlet.DispatcherServlet</servlet-class>
        <load-on-startup>1</load-on-startup>
    </servlet>
    <servlet-mapping>
        <servlet-name>spring</servlet-name>
        <url-pattern>/</url-pattern>
    </servlet-mapping>
    <!--加入 shiro 的过滤器-->
    <filter>
        <filter-name>shiroFilter</filter-name>
        <filter-class>org.springframework.web.filter.DelegatingFilterProxy</filter-class>
        <init-param>
            <param-name>targetFilterLifecycle</param-name>
            <param-value>true</param-value>
        </init-param>
    </filter>
    <filter-mapping>
        <filter-name>shiroFilter</filter-name>
        <url-pattern>/*</url-pattern>
    </filter-mapping>
</web-app>
7> ehcache.xml,在resources文件夹下创建ehcache.xml.
8> 至此,springshiro的基本配置已经完成.[百度云地址:springshiro - 001.zip]
shiroFilter 解读:
程式通过 shiroFilter 来拦截过滤所有的用户url请求,他是请求的入口.负责读取配置文件,然后判断 url是否需要登录/权限等要求.
Web.xml中的shiroFilter必须与applicationContext.xml名称一致.如果不一致.系统启动的时候会报找不到过滤器异常.
url 请求地址配置
格式 : url = 拦截器[参数]
| anon | 可以被匿名访问 |
| authc | 认证之后才可以被访问 |
Url模式与Ant风格模式.
Ant 通配符支持 ? * ** ,通配符之间不包括目录分隔符"/".
| 通配符 | 含义 | 例 |
| ? | 匹配一个字符 | /admin? 将可以匹配到 /admin1,/admin2,但不匹配 /admin,/admin/ |
| * | 匹配0个或多个字符串 | /admin* 将匹配 /admin,/admin12等,但不匹配/admin/1这样的 |
| ** | 匹配路径中的0个或多个路径 | /admin** 将匹配以 /admin开头的所有路径地址. |
URL匹配顺序:
Url权限采取第一次匹配优先的方式.从头开始使用第一个匹配到的url模式对应的拦截器链.
例:
| /admin? = anon |
| /admin** = authc |
| /logout = logout |
以上两个拦截规则,当我们的一个请求地址为 /admin1进来的时候两个规则都匹配.但程式会按第一个来执行.
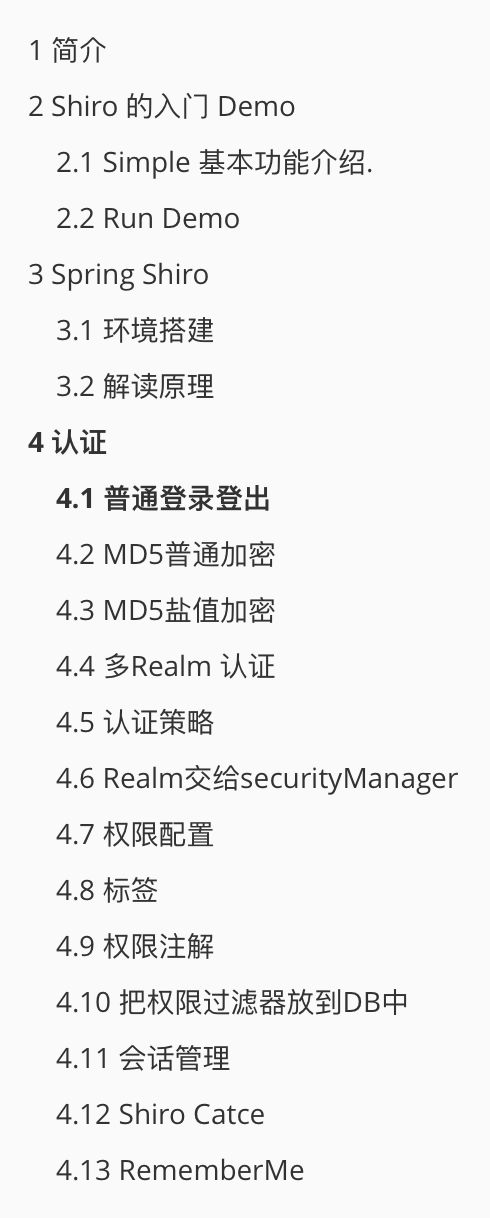
这一期我们说了一下Shiro的基础知识.内容相对比较杂乱.但很重要.为了避免与实际使用混淆,本期先不讲Shiro的使用.一定要熟记这一篇的知识内容.下期我们来具体讲一下Shiro的使用.内容不多,为了方便大家理解我们分2~3期来讲.内容如下截图。

需要获取Shiro密码Demo的同学可以在公众号后台回复
[ shirodemo ]获取官方的Demo与小编的Demo;