上一期我们讲了Cloud中Zuul路由网关映射,有兴趣的同学可以看一下.
config分布式配置中心,主要内容有以下几点:
1:什么是config分布式配置中心.
2:Config Server Demo.
3:配置读取规则.
4:Config Client Demo.
5:Config Server + Client整合.
因为每个微服务都有各自的一个applicaiton.yml,当一个服务过大时,大量的配置文件会给运维造成很大的压力.所以我们需要一个轻量级的config管理解决方案.
SpringCloud Config为微服务架构中的微服务提供集中化的外部配置支持.配置服务器为各个不同微服务应用的所有环境提供了一个中心化的外部配置.
第一步:创建一个github项目
Clone到本地文件夹
第二步:
创建一个application.yml,通过上面的三个命令上传到github
 1spring:
 2 profiles:
 3  active:
 4   -dev
 5---
 6spring:
 7 profiles: dev
 8 application:
 9  name: msc-config-dev
10---
11spring:
12 profiles: test
13 application:
14  name: msc-config-test
第二步:创建一个新的模块:
取名:msc-config-5001

pom.xml
(加入 Config Server Maven 配置信息)
 1<?xml version="1.0" encoding="UTF-8"?>
 2<project xmlns="http://maven.apache.org/POM/4.0.0"
 3         xmlns:xsi="http://www.w3.org/2001/XMLSchema-instance"
 4         xsi:schemaLocation="http://maven.apache.org/POM/4.0.0 http://maven.apache.org/xsd/maven-4.0.0.xsd">
 5    <parent>
 6        <artifactId>msc-master</artifactId>
 7        <groupId>com.xiaobaibi</groupId>
 8        <version>1.0-SNAPSHOT</version>
 9    </parent>
10    <modelVersion>4.0.0</modelVersion>
11
12    <artifactId>msc-config-5001</artifactId>
13    <dependencies>
14        <!--Spring Cloud Config 开始-->
15        <dependency>
16            <groupId>org.springframework.cloud</groupId>
17            <artifactId>spring-cloud-config-server</artifactId>
18        </dependency>
19        <!--Spring Cloud Config 结束-->
20        <!--SpringBoot 图形化监控 开始-->
21        <dependency>
22            <groupId>org.springframework.boot</groupId>
23            <artifactId>spring-boot-starter-actuator</artifactId>
24        </dependency>
25        <!--SpringBoot 图形化监控 结束-->
26        <!--Eureka -开始-->
27        <dependency>
28            <groupId>org.springframework.cloud</groupId>
29            <artifactId>spring-cloud-starter-eureka</artifactId>
30        </dependency>
31        <!--Eureka -结束-->
32        <!-- hystrix容错 -->
33        <dependency>
34            <groupId>org.springframework.cloud</groupId>
35            <artifactId>spring-cloud-starter-hystrix</artifactId>
36        </dependency>
37        <dependency>
38            <groupId>org.springframework.cloud</groupId>
39            <artifactId>spring-cloud-starter-config</artifactId>
40        </dependency>
41        <!--web场景-->
42        <dependency>
43            <groupId>org.springframework.boot</groupId>
44            <artifactId>spring-boot-starter-web</artifactId>
45        </dependency>
46        <!-- 热部署插件 -->
47        <dependency>
48            <groupId>org.springframework</groupId>
49            <artifactId>springloaded</artifactId>
50        </dependency>
51        <dependency>
52            <groupId>org.springframework.boot</groupId>
53            <artifactId>spring-boot-devtools</artifactId>
54        </dependency>
55    </dependencies>
56</project>
application.yml(告诉程式 git 地址在哪里)
告诉程式我们需要连接到github的ssh地址
 1server:
 2  port: 5001
 3spring:
 4  application:
 5    name: msc-config
 6  cloud:
 7    config:
 8      server:
 9        git:
10          uri: git@github.com:xiaobaibi/msc-config.git
主启动类:加入以下注解
@EnableConfigServer
 1package com.xiaobaibi;
 2
 3import org.springframework.boot.SpringApplication;
 4import org.springframework.boot.autoconfigure.SpringBootApplication;
 5import org.springframework.cloud.config.server.EnableConfigServer;
 6
 7@SpringBootApplication
 8// 开启 ConfigServer
 9@EnableConfigServer
10public class MscConfig_App_5001 {
11
12    public static void main(String[] args) {
13        SpringApplication.run(MscConfig_App_5001.class,args);
14    }
15}
启动服务测试:
我们可以通过我们刚刚启动的服务器来查询存放在gibhub上面的配置文档
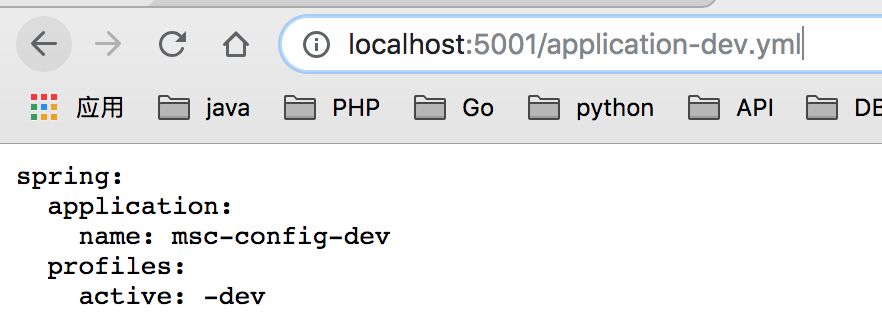
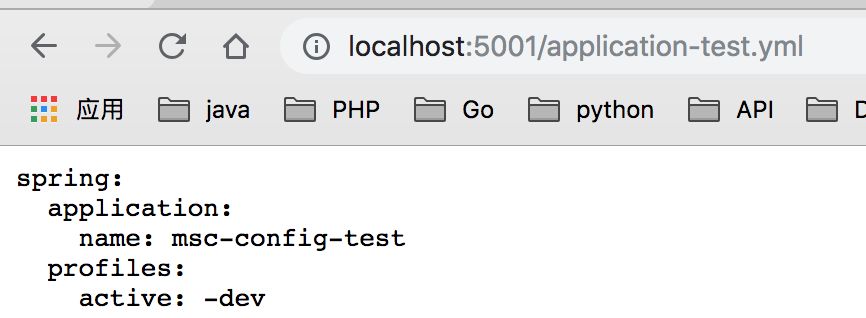
可以查看我们上一个连载中讲的boot中profile的文件命名。
1/{application}/{profile}[/{label}]
2/{application}/{profile}.yml
3/{label}/{application}-{profile}.yml
4/{application}-{profile}.properties
5/{label}/{application}-{profile}.properties
我们需要先创建一个msc-config-client.yml文件并且上传到github上面,内容如下:
 1spring:
 2 profiles:
 3  active:
 4   -dev
 5---
 6server:
 7 port: 8101
 8spring:
 9 profiles: dev
10 application:
11  name: msc-config-dev
12eureka:
13  client:
14    service-url:
15      defaultZone: http://eureka7001-dev.com:7001/eureka/
16---
17server:
18 port: 8102
19spring:
20 profiles: test
21 application:
22  name: msc-config-test
23eureka:
24  client:
25    service-url:
26      defaultZone: http://eureka7001-test.com:7001/eureka/
第一步:创建一个新的模块:
取名:msc-config-client-5101
Pom.xml与Server端唯一差别:
去除
1<dependency>
2    <groupId>org.springframework.cloud</groupId>
3    <artifactId>spring-cloud-config-server</artifactId>
4</dependency>
剩余:
 1<?xml version="1.0" encoding="UTF-8"?>
 2<project xmlns="http://maven.apache.org/POM/4.0.0"
 3         xmlns:xsi="http://www.w3.org/2001/XMLSchema-instance"
 4         xsi:schemaLocation="http://maven.apache.org/POM/4.0.0 http://maven.apache.org/xsd/maven-4.0.0.xsd">
 5    <parent>
 6        <artifactId>msc-master</artifactId>
 7        <groupId>com.xiaobaibi</groupId>
 8        <version>1.0-SNAPSHOT</version>
 9    </parent>
10    <modelVersion>4.0.0</modelVersion>
11
12    <artifactId>msc-config-5001</artifactId>
13
14    <dependencies>
15        <!--Spring Cloud Config Server端 开始-->
16        <dependency>
17            <groupId>org.springframework.cloud</groupId>
18            <artifactId>spring-cloud-config-server</artifactId>
19        </dependency>
20        <!--Spring Cloud Config Server端 结束-->
21        <!--SpringBoot 图形化监控 开始-->
22        <dependency>
23            <groupId>org.springframework.boot</groupId>
24            <artifactId>spring-boot-starter-actuator</artifactId>
25        </dependency>
26        <!--SpringBoot 图形化监控 结束-->
27        <!--Eureka -开始-->
28        <dependency>
29            <groupId>org.springframework.cloud</groupId>
30            <artifactId>spring-cloud-starter-eureka</artifactId>
31        </dependency>
32        <!--Eureka -结束-->
33        <!-- hystrix容错 -->
34        <dependency>
35            <groupId>org.springframework.cloud</groupId>
36            <artifactId>spring-cloud-starter-hystrix</artifactId>
37        </dependency>
38        <dependency>
39            <groupId>org.springframework.cloud</groupId>
40            <artifactId>spring-cloud-starter-config</artifactId>
41        </dependency>
42        <!--web场景-->
43        <dependency>
44            <groupId>org.springframework.boot</groupId>
45            <artifactId>spring-boot-starter-web</artifactId>
46        </dependency>
47        <!-- 热部署插件 -->
48        <dependency>
49            <groupId>org.springframework</groupId>
50            <artifactId>springloaded</artifactId>
51        </dependency>
52        <dependency>
53            <groupId>org.springframework.boot</groupId>
54            <artifactId>spring-boot-devtools</artifactId>
55        </dependency>
56    </dependencies>
57</project>
第二步:在src/main/resources下创建:bootstrap.yml
Bootstrap.yml配置信息
1spring:
2  cloud:
3    config:
4      name: msc-config-client # 这个名称就是刚才在gitHub里面创建的文件名
5      profile: dev
6      label: master
7      uri: http://localhost:5001 # 我们的config server端地址,因为我们需要通过服务端获取github上面的文件
创建application.yml,对该模块进行命名
1spring:
2  application:
3    name: msc-config-client
我们创建一个请求来查看服务抓到的配置信息:
该请求内容:我们抓取配置文件中的AppName,Eureka地址.以及启动port
 1package com.xiaobaibi.rest;
 2
 3import org.springframework.beans.factory.annotation.Value;
 4import org.springframework.web.bind.annotation.RequestMapping;
 5import org.springframework.web.bind.annotation.RestController;
 6
 7@RestController
 8public class ConfigClientRest {
 9
10    @Value("${spring.application.name}")
11    private String applicationName;
12
13    @Value("${eureka.client.service-url.defaultZone}")
14    private String eurekaServers;
15
16    @Value("${server.port}")
17    private String port;
18
19    @RequestMapping(value = "/config")
20    public String getConfig(){
21        System.out.println("applicationName: " + applicationName);
22        System.out.println("eurekaServers: " + eurekaServers);
23        System.out.println("server.port: " + port);
24        String str = "applicationName: " + applicationName + "\t eurekaServers: " + eurekaServers ;
25        return str;
26    }
27}
启动测试:
启动顺序:
1:msc-config-5001
2:msc-config-client-5101
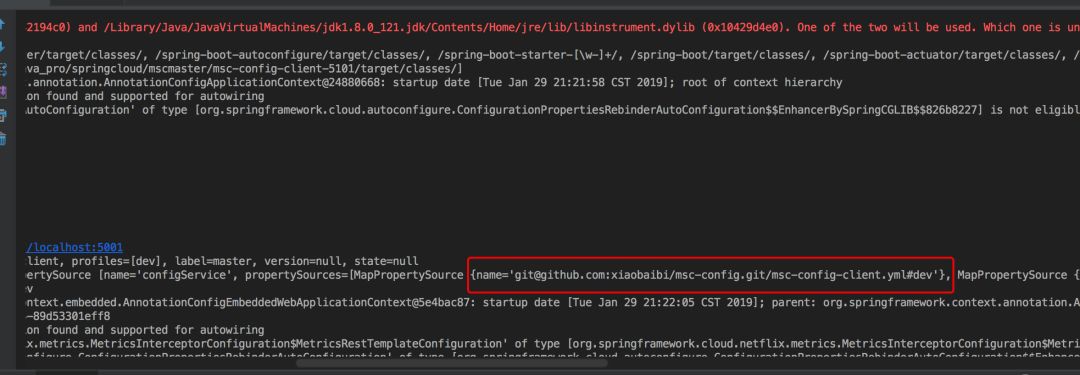
启动Console中可以看见,客户端服务在从github上面抓取我们指定名称的配置yml:
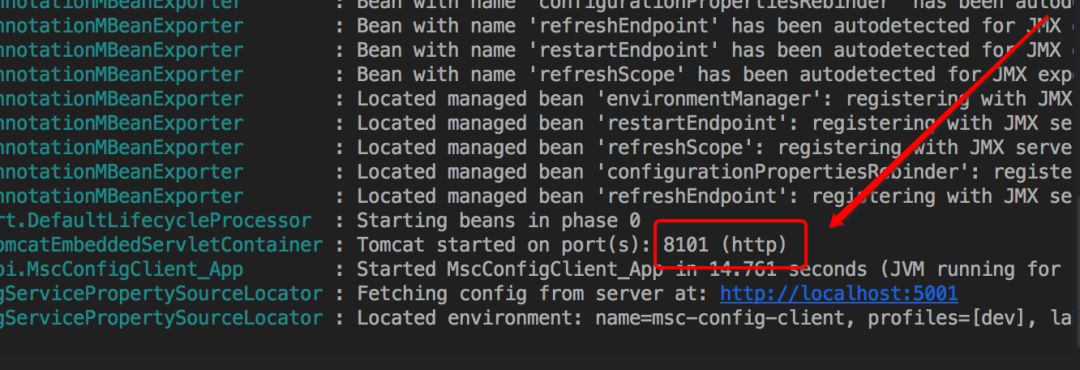
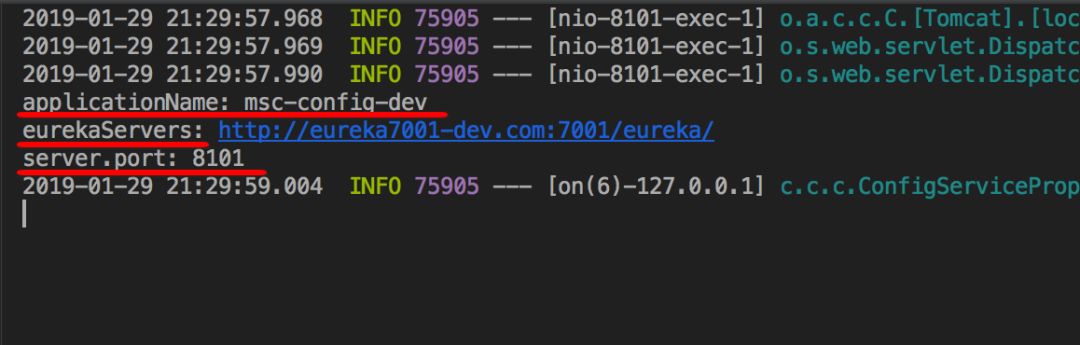
启动完成我们可以看见,端口正是我们在github上面文件中的dev环境下的端口信息:
访问我们写的Controller请求:
http://localhost:8101/config
发现可以正常获取到github上面的配置信息
切换环境:
我们在客户端bootstrap.yml中通过修改profile来切换到test(必须是github的配置文件中存在的.)
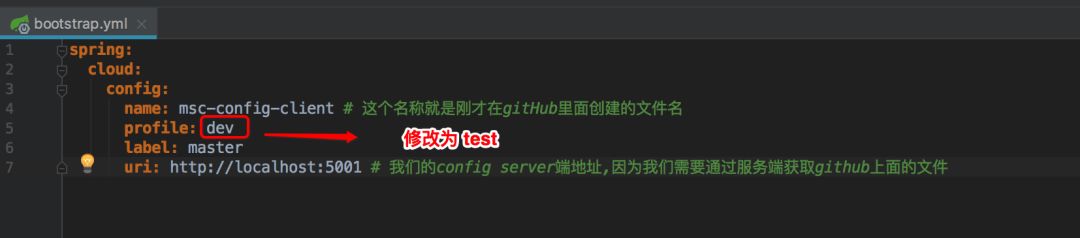
启动服务Console中可以看见服务的端口已经变成了8102

上面的案例我们讲了Config服务端与客户端的使用,本次我们上面的服务端不变,还是依靠他来当我们的服务端.我们把我们之前写的Eureka服务端与部门后台服务端进行整合;
首先我们创建两个新的模块(除application.yml外,其他配置与原模块相同)
1msc-config-eureka-server-7001
2msc-config-api-department-12001
配置
准备github文件:
我们演示的模块有两个,所以我们在github上面创建两个配置文件,分别给上面的两个模块
 1spring:
 2  profiles:
 3    active:
 4     -dev
 5---
 6server:
 7  port: 7001
 8spring:
 9 profiles: dev
10 application:
11  name: msc-config-eureka-server-dev
12eureka:
13  instance:
14    hostname: eureka7001.com
15  client:
16#   因为自己本身就是一个服务,这里需要设置不将自己注册到Eureka
17    register-with-eureka: false
18#   表示自己就是注册中心.职责就是维护服务,不需要进行检索.
19    fetch-registry: false
20    service-url:
21      defaultZone: http://localhost:7001/eureka/
22---
23server:
24  port: 7001
25spring:
26 profiles: test
27 application:
28  name: msc-config-eureka-server-dev
29eureka:
30  instance:
31    hostname: eureka7001.com
32  client:
33#   因为自己本身就是一个服务,这里需要设置不将自己注册到Eureka
34    register-with-eureka: false
35#   表示自己就是注册中心.职责就是维护服务,不需要进行检索.
36    fetch-registry: false
37    service-url:
38      defaultZone: http://localhost:7001/eureka/
 1spring:
 2  profiles:
 3    active:
 4     -dev
 5---
 6server:
 7  port: 12001
 8mybatis:
 9  # mybatis 配置文件存放位置
10  config-location: classpath:mybatis/mybatis.cfg.xml
11  # 我们的实体类的存放位置
12  type-aliases-package: com.xiaobaibi.bean
13  # ORM 映射文件
14  mapper-locations:
15  - classpath:mybatis/mapper/**/*.xml
16spring:
17  profiles: dev
18  application:
19#  微服务名称(重复)
20    name: msc-department
21  datasource:
22    type: com.alibaba.druid.pool.DruidDataSource
23    driver-class-name: org.gjt.mm.mysql.Driver
24    url: jdbc:mysql://192.168.93.155:3306/xiaobaibi01
25    username: root
26    password: root
27    dbcp2:
28#    最少连接数据
29      min-idle: 5
30#    初始化连接数
31      initial-size: 5
32#    最大连接数
33      max-total: 5
34#    超时时间
35      max-wait-millis: 200
36eureka:
37  client:
38    service-url:
39      defaultZone: http://localhost:7001/eureka
40  instance:
41#   在 Eureka 页面中显示的URL名称
42    instance-id: msc-department-12001
43#   在 Eureka 页面中显示的URL名称中是否以真实LocalIP显示
44    prefer-ip-address: true
45# 将本服务注册到Eureka Server中
46
47info:
48  app.name: msc-api-department-12001
49  company.name: www.xiaobaibi.com
50  build.artifactId: $project.artifactId$
51  build.version: $project.version$
52
53---
54server:
55  port: 12001
56mybatis:
57  # mybatis 配置文件存放位置
58  config-location: classpath:mybatis/mybatis.cfg.xml
59  # 我们的实体类的存放位置
60  type-aliases-package: com.xiaobaibi.bean
61  # ORM 映射文件
62  mapper-locations:
63  - classpath:mybatis/mapper/**/*.xml
64spring:
65  profiles: test
66  application:
67#  微服务名称(重复)
68    name: msc-department
69  datasource:
70    type: com.alibaba.druid.pool.DruidDataSource
71    driver-class-name: org.gjt.mm.mysql.Driver
72    url: jdbc:mysql://192.168.93.155:3306/xiaobaibi02
73    username: root
74    password: root
75    dbcp2:
76#    最少连接数据
77      min-idle: 5
78#    初始化连接数
79      initial-size: 5
80#    最大连接数
81      max-total: 5
82#    超时时间
83      max-wait-millis: 200
84eureka:
85  client:
86    service-url:
87      defaultZone: http://localhost:7001/eureka
88  instance:
89#   在 Eureka 页面中显示的URL名称
90    instance-id: msc-department-12001
91#   在 Eureka 页面中显示的URL名称中是否以真实LocalIP显示
92    prefer-ip-address: true
93# 将本服务注册到Eureka Server中
94
95info:
96  app.name: msc-api-department-12001
97  company.name: www.xiaobaibi.com
98  build.artifactId: $project.artifactId$
99  build.version: $project.version$
我们将我们创建好的两个文件上传到github上面.
用到三个指令:
| 添加 | git add . |
| 提交 | git commit -m "交版信息" |
| 推送 | git push origin master |
修改新创建的两个模块
msc-config-eureka-server-7001:
第一步:pom.xml中加入springCloud Config的客户端GVA坐标;
新加:
1<!--Spring Cloud Config-->
2<dependency>
3    <groupId>org.springframework.cloud</groupId>
4    <artifactId>spring-cloud-starter-config</artifactId>
5</dependency>
新加config配置后整体:
 1<?xml version="1.0" encoding="UTF-8"?>
 2<project xmlns="http://maven.apache.org/POM/4.0.0"
 3         xmlns:xsi="http://www.w3.org/2001/XMLSchema-instance"
 4         xsi:schemaLocation="http://maven.apache.org/POM/4.0.0 http://maven.apache.org/xsd/maven-4.0.0.xsd">
 5    <parent>
 6        <artifactId>msc-master</artifactId>
 7        <groupId>com.xiaobaibi</groupId>
 8        <version>1.0-SNAPSHOT</version>
 9    </parent>
10    <modelVersion>4.0.0</modelVersion>
11
12    <artifactId>msc-config-eureka-server-7001</artifactId>
13    <dependencies>
14        <!--Eureka-Server-->
15        <dependency>
16            <groupId>org.springframework.cloud</groupId>
17            <artifactId>spring-cloud-starter-eureka-server</artifactId>
18            <!--<version>1.3.5.RELEASE</version>-->
19        </dependency>
20        <!--热部署-->
21        <dependency>
22            <groupId>org.springframework</groupId>
23            <artifactId>springloaded</artifactId>
24        </dependency>
25        <dependency>
26            <groupId>org.springframework.boot</groupId>
27            <artifactId>spring-boot-devtools</artifactId>
28        </dependency>
29        <!--Spring Cloud Config-->
30        <dependency>
31            <groupId>org.springframework.cloud</groupId>
32            <artifactId>spring-cloud-starter-config</artifactId>
33        </dependency>
34    </dependencies>
35</project>
第二步:创建并修改application.yml
1# 只保留一个服务名称就可以了
2spring:
3  application:
4    name: msc-config-eureka-server-7001
创建并修改bootstrap.yml(切记:这里面的name配置信息就是github上面的文件名)
1spring:
2  cloud:
3    config:
4      name: msc-config-eureka-server # 这个名称就是在gitHub里面创建的文件名
5      profile: dev
6      label: master
7      uri: http://localhost:5001 # 我们的config server端地址,因为我们需要通过服务端获取github上面的文件
msc-config-eureka-server-7001:
第一步:由于我们旧的部门服务端已经有了config的配置,所以不需要再加,最好先检查一下有没有.没有则加.
第二步:创建并修改application.yml
1spring:
2  application:
3    name: msc-config-api-department-12001
创建并修改bootstrap.yml(切记:这里面的name配置信息就是github上面的文件名)
1spring:
2  cloud:
3    config:
4      name: msc-config-api-department # 这个名称就是刚才在gitHub里面创建的文件名
5      profile: dev
6      label: master
7      uri: http://localhost:5001 # 我们的config server端地址,因为我们需要通过服务端获取github上面的文件
启动测试
启动顺序:
1msc-config-5001(Config 服务端)
2msc-config-eureka-server-7001(Config客户端Eureka服务端)
3msc-config-api-department-12001(Config客户端部门后台服务端)
启动成功:
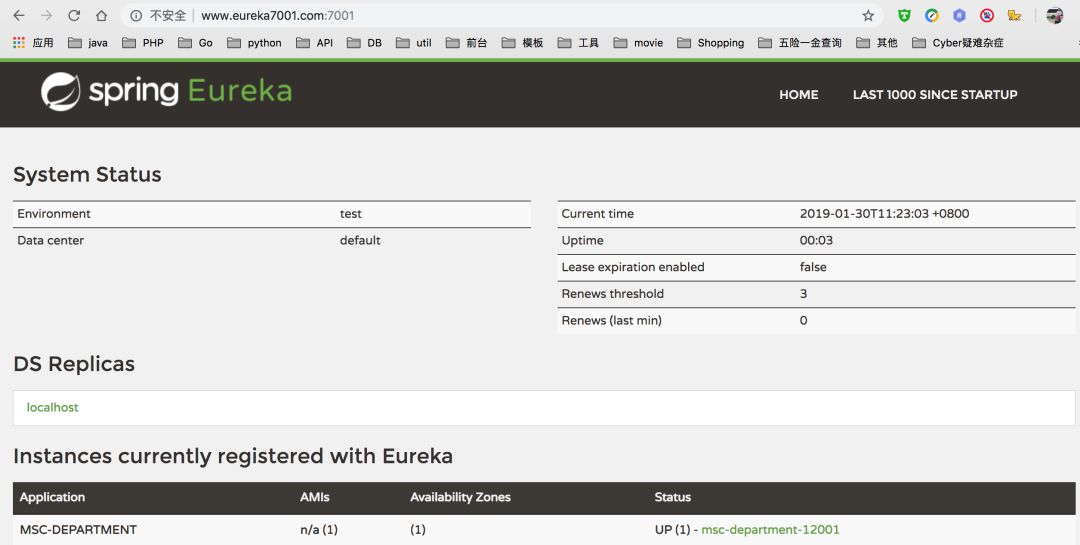
我们访问我们的部门后台地址,请求正常
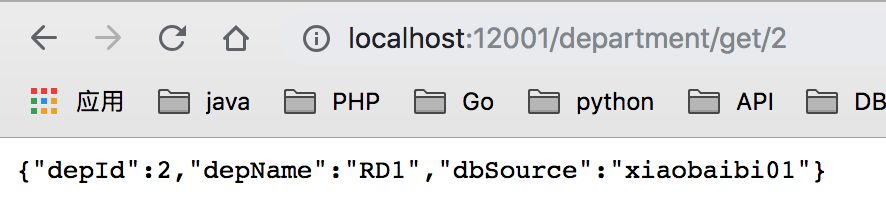
SpringCloud Config在项目中实用性非常的强,大大降低了运维的复杂度,值得我们每一位同学去学习并且掌握他。
公众号回复
[ scdemo] : 本期Demo程式;
[ 2021] : SpringCloud视频地址.
[sbsw] :小编所用的JDK,Maven,IDEA.
[mysql] 或 [mysql.exe]获取mysql的安装包与安装教程.
原创不易,点个赞分享出去吧.感谢支持.