


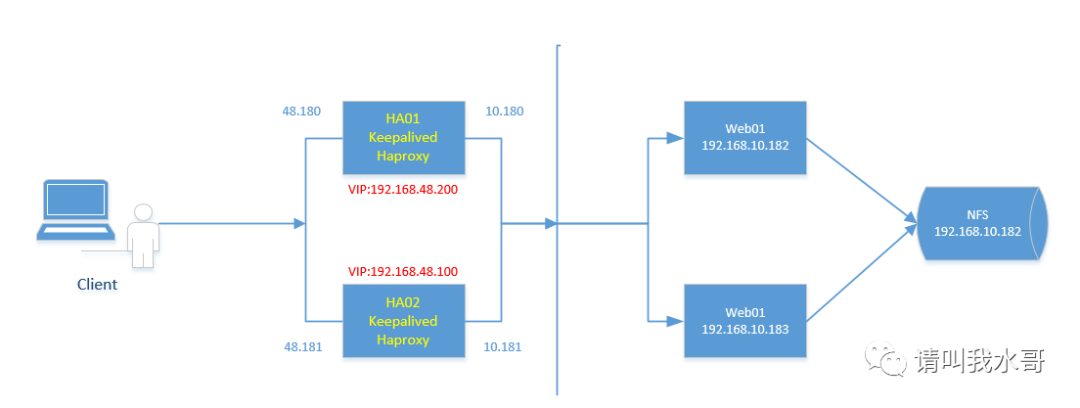
一、Haproxy+Keepalived主主模式的高可用环境
1.1 环境准备
1.2 NFS配置
1.3 web服务器配置
1. 4. haproxy安装配置
1.4.1 haproxy安装
1.4.2 haproxy配置内容
1.5 keepalived安装配置
1.6 配置结果确认
1.7 访问测试
二、Haproxy+Keepalived主从模式的高可用环境
一、Haproxy+Keepalived主主模式的高可用环境
1.1 环境准备
1.2 NFS配置
//以web01作为服务端,web02作为客户端,进行网站目录数据同步1)NFS安装[root@web01 /]# yum -y install nfs-utils rpcbind[root@web01 /]# mkdir /data[root@web01 /]# cat /etc/exports/data 192.168.10.0/24(rw,sync,root_squash) //可读写,同步模式,客户端以root访问时被限制为普通用户[root@web01 /]# systemctl start rpcbind.service[root@web01 /]# systemctl enable rpcbind.service[root@web01 /]# systemctl start nfs.service[root@web01 /]# systemctl enable nfs.service2) 客户端挂载[root@web02 ~]# showmount -e 192.168.10.182Export list for 192.168.10.182:/data 192.168.10.0/24[root@web02 ~]# mkdir /data[root@web02 ~]# mount -t nfs 192.168.10.182:/data /data[root@web02 ~]# df -hT |grep /data192.168.10.182:/data nfs4 2.0T 1.5G 2.0T 1% /data
1.3 web服务器配置
1)修改后端web01 web02两个网站根目录[root@web01 ~]# cat /etc/nginx/conf.d/default.conf |grep "/data"root /data;[root@web01 ~]# nginx -s reload[root@web02 ~]# cat /etc/nginx/conf.d/default.conf |grep "/data"root /data;[root@web02 ~]# nginx -s reload2)添加测试页[root@web01 ~]# cat /data/index.htmlthis is test page
1. 4. haproxy安装配置
1.4.1 haproxy安装
//haproxy01在之前的文章里面已经配置,现在准备haproxy02[root@localhost ~]# yum -y install gcc gcc-c++ pcre-devel openssl-devel systemd-devel[root@haproxy02 opt]# tar zxvf haproxy-2.2.2.tar.gz[root@haproxy02 opt]# cd haproxy-2.2.2/[root@haproxy02 haproxy-2.2.2]# make TARGET=linux-glibc PREFIX=/usr/local/haproxy USE_OPENSSL=1 ADDLIB=-lz USE_PCRE=1 USE_ZLIB=1 USE_SYSTEMD=1[root@haproxy02 haproxy-2.2.2]# make install PREFIX=/usr/local/haproxy[root@haproxy02 haproxy-2.2.2]# cp contrib/systemd/haproxy.service.in /usr/lib/systemd/system/haproxy.service[root@haproxy02 haproxy-2.2.2]# ln -s /usr/local/haproxy/sbin/haproxy /usr/sbin/haproxy[root@haproxy02 haproxy-2.2.2]# cd /usr/local/haproxy/[root@haproxy02 haproxy]# mkdir conf[root@haproxy02 conf]# cat /usr/lib/systemd/system/haproxy.service[Unit]Description=HAProxy Load BalancerAfter=network-online.targetWants=network-online.target[Service]ExecStartPre=/usr/sbin/haproxy -f /usr/local/haproxy/conf/haproxy.cfg -c -qExecStart=/usr/sbin/haproxy -Ws -f /usr/local/haproxy/conf/haproxy.cfg -p /run/haproxy.pidExecReload=/bin/kill -USR2 $MAINPIDKillMode=mixedRestart=alwaysSuccessExitStatus=143Type=notify[Install]WantedBy=multi-user.target[root@haproxy02 etc]# cat /etc/rsyslog.conf$ModLoad imudp$UDPServerRun 514local0.* /var/log/haproxy.log[root@haproxy02 etc]# touch /var/log/haproxy.log[root@haproxy02 etc]# systemctl restart rsyslog.service//如果没有配置文件,可以拷贝示例文件[root@haproxy02 haproxy]# cp /opt/haproxy-2.2.2/examples/option-http_proxy.cfg conf/haproxy.cfg//这里使用haproxy01已经准备好的文件[root@haproxy01 haproxy]# scp conf/haproxy.cfg root@192.168.48.181:/usr/local/haproxy/conf///启动haproxy服务[root@haproxy02 conf]# systemctl status haproxy && systemctl enable haproxy
1.4.2 haproxy配置内容
两个haproxy配置需要一样
globalmaxconn 20000ulimit-n 65535log 127.0.0.1 local0 infouid 1gid 1chroot /usr/local/haproxynbproc 1daemonpidfile /run/haproxy.piddefaultslog globalmode httpoption redispatchstats uri /haproxystats refresh 30sstats realm haproxy-statusstats auth admin:123456stats hide-versiontimeout connect 5000timeout client 50000timeout server 50000option httpchk GET /index.htmlfrontend test-httpbind :80mode httplog globaloption httplogoption dontlognulloption forwardforoption httpclosedefault_backend nginxbackend nginxmode httpbalance roundrobinoption redispatchoption httpcloseoption forwardforretries 2server web01 192.168.10.182:80 weight 1 check inter 2000 rise 3 fall 5server web02 192.168.10.183:80 weight 1 check inter 2000 rise 3 fall 5
1.5 keepalived安装配置
1)安装配置[root@haproxy01 haproxy]# yum -y install keepalived[root@haproxy01 keepalived]# cat keepalived.conf! Configuration File for keepalivedglobal_defs {notification_email {root@localhost}notification_email_from Alexandre.Cassen@firewall.locsmtp_server 127.0.0.1smtp_connect_timeout 30router_id LVS_DEVEL}vrrp_script check_haproxy {script "/root/check_haproxy.sh"interval 2weight 2}vrrp_instance VI_1 {state MASTERinterface ens33virtual_router_id 51priority 100advert_int 1authentication {auth_type PASSauth_pass 1111}track_script {check_haproxy}virtual_ipaddress {192.168.48.200}notify_master "/root/clean_arp.sh 192.168.48.200"}vrrp_instance VI_2 {state BACKUPinterface ens33virtual_router_id 52priority 99advert_int 1authentication {auth_type PASSauth_pass 1111}virtual_ipaddress {192.168.48.100}notify_master "/root/clean_arp.sh 192.168.48.100"}2)拷贝配置到备节点[root@haproxy01 keepalived]# scp keepalived.conf root@192.168.48.181:/etc/keepalived///备节点配置文件主要调整vrrp_instance VI_1{state BACKUPvirtual_router_id 51priority 99}vrrp_instance VI_2{state MASTERvirtual_router_id 52priority 100}3)脚本配置[root@haproxy01 ~]# cat check_haproxy.sh //keepalived会定期检查脚本(判断haproxy是否正常运行)#!/bin/bashstatus=`systemctl is-active haproxy`if [ ${status} != "active" ];thensystemctl start haproxysleep 3if [ `systemctl is-active haproxy` != "active" ];thensystemctl stop haproxyfifi[root@haproxy01 ~]# cat clean_arp.sh //主要用作keepalived启动的时候判断ip是否存在,如果存在则不启动keepalived#/bin/shVIP=$1gateway=192.168.48.2arping -I ens33 -c 5 -s $VIP $gateway &> /dev/null//arping用来向局域网内的其它主机发送ARP请求的指令,它可以用来测试局域网内的某个IP是否已被使用4)启动keepalived,haproxy[root@haproxy01 ~]# systemctl start keepalived.service && systemctl enable keepalived.service[root@haproxy01 ~]# systemctl start haproxy && systemctl enable haproxy
1.6 配置结果确认
1)主主架构模式下的vip是否生效[root@haproxy01 ~]# ip addr |grep ens332: ens33: <BROADCAST,MULTICAST,UP,LOWER_UP> mtu 1500 qdisc pfifo_fast state UP qlen 1000inet 192.168.48.180/24 brd 192.168.48.255 scope global ens33inet 192.168.48.200/32 scope global ens33[root@haproxy02 ~]# ip addr |grep ens332: ens33: <BROADCAST,MULTICAST,UP,LOWER_UP> mtu 1500 qdisc pfifo_fast state UP qlen 1000inet 192.168.48.181/24 brd 192.168.48.255 scope global ens33inet 192.168.48.100/32 scope global ens332)keepalived主备切换测试,查看vip是否漂移[root@haproxy01 ~]# systemctl stop keepalived[root@haproxy02 ~]# ip addr |grep ens332: ens33: <BROADCAST,MULTICAST,UP,LOWER_UP> mtu 1500 qdisc pfifo_fast state UP qlen 1000inet 192.168.48.181/24 brd 192.168.48.255 scope global ens33inet 192.168.48.100/32 scope global ens33inet 192.168.48.200/32 scope global ens33//再次切换[root@haproxy02 ~]# systemctl stop keepalived.service[root@haproxy01 ~]# ip addr |grep ens332: ens33: <BROADCAST,MULTICAST,UP,LOWER_UP> mtu 1500 qdisc pfifo_fast state UP qlen 1000inet 192.168.48.180/24 brd 192.168.48.255 scope global ens33inet 192.168.48.200/32 scope global ens33inet 192.168.48.100/32 scope global ens333)haproxy停止,测试keepalive的监测服务脚本是否生效[root@haproxy01 ~]# systemctl stop haproxy[root@haproxy01 ~]# while true;do systemctl is-active haproxy && sleep 1;done //循环下,为了看效果activeinactive //已经停止activating //然后检测到,被keepalived启动activatingactiveactive4)haproxy测似,关闭后端nginx[root@web01 ~]# systemctl stop nginxC:\Users\cs>curl 192.168.48.200this is test pageC:\Users\cs>curl 192.168.48.100this is test page
1.7 访问测试
//客户端访问C:\Users\cs>curl 192.168.48.100this is test pageC:\Users\cs>curl 192.168.48.200this is test page
haproxy监控页面访问
vip192.168.48.200访问
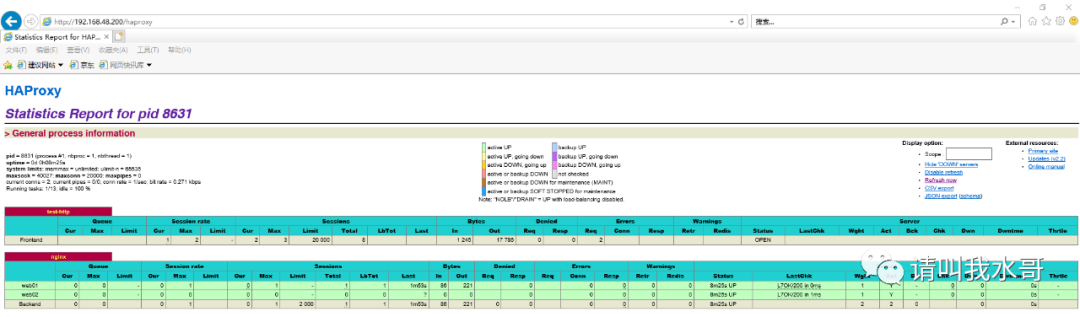
vip192.168.48.100访问

二、Haproxy+Keepalived主从模式的高可用环境
主从模式相对于主主模式主要区别只在于keepalived的配置不同,其他的配置都和主主模式下的一样,并且主从环境下只有一个VIP(默认在Master端配置)
1)在上面的配置中主备删除keepalived.conf的vrrp_instace VI_2
2) 重新启动keepalived会发现在主节点上面有一个vip,备节点没有
3) 当主节点故障,vip会漂移到备用节点
和主主模式大同小异这里就不做演示了。
文章转载自请叫我水哥,如果涉嫌侵权,请发送邮件至:contact@modb.pro进行举报,并提供相关证据,一经查实,墨天轮将立刻删除相关内容。
