一、实验说明
1.1 实验一拓扑图
1.2 实验二拓扑图
二、haproxy的http(七层代理),https(四层代理)
2.1 关闭SElinux、配置防火墙
2.2 安装haproxy2.2
2.2.1 安装编译工具
2.2.2 安装 haproxy
2.2.3 初始化haproxy
2.2.4 配置文件haproxy.cfg
2.2.5 后端web配置
2.2.6 openssl申请证书说明
2.2.7 dns配置
2.2.8 访问测试
三、haproxy的http(七层代理),https(七层代理)
3.1 后端web配置
3.2 haproxy的证书申请
3.3 haproxy.cfg配置如下
3.4 测试截图
四、haproxy监控页面
一、实验说明
实验将通过以下两种方式进行:
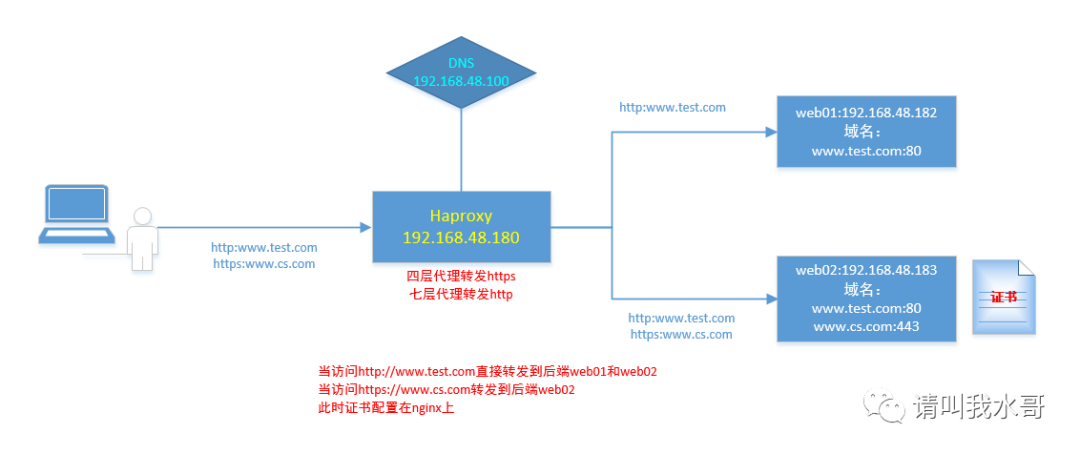
haproxy关于对https的代理有两种操作:
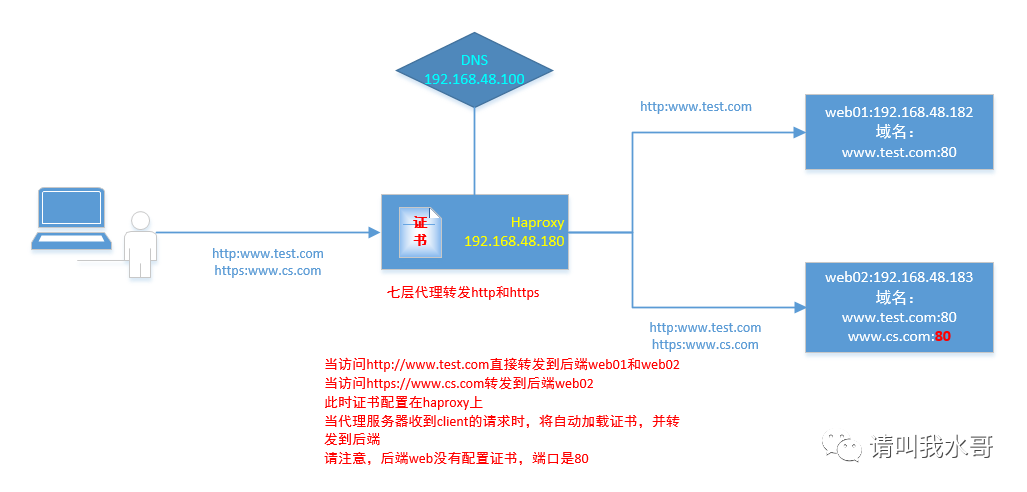
1. haproxy本身提供ssl证书,客户端访问的时候自动加载ssl证书,然后通过七层转发规则,转发到后端web
2. haproxy不提供证书,通过tcp即四层代理(相当于haproxy就纯粹代理转发),后端web需要配置好ssl。(https代理一般选择这个模式,比较常用)
1.1 实验一拓扑图
1.2 实验二拓扑图
环境说明:
haproxy服务器IP:192.168.48.180
web01:192.168.48.182
web02:192.168.48.183
DNS:192.168.48.100
注意:haproxy与nginx区别
haproxy代理配置:根据域名进行转发(即后端机器不管部署多少个域名,都可以直接在haproxy配置文件里通过域名对域名方式直接指定)
nginx代理配置:根据端口进行转发(即后端机器部署多个域名时,在前面nginx配置里通过upstream负载到不同的端口上)
二、haproxy的http(七层代理),https(四层代理)
2.1 关闭SElinux、配置防火墙
[root@haproxy ~]# getenforceDisabled//如果有防火墙,需要允许组播地址通信(224.0.0.18)-A INPUT -s 公网网段/24 -d 224.0.0.18 -j ACCEPT-A INPUT -s 私网网段/24 -d 224.0.0.18 -j ACCEPT-A INPUT -s 公网网段/24 -p vrrp -j ACCEPT-A INPUT -s 私网网段/24 -p vrrp -j ACCEPT-A INPUT -p tcp -m state --state NEW -m tcp --dport 80 -j ACCEPT-A INPUT -p tcp -m state --state NEW -m tcp --dport 443 -j ACCEPT//这里我们关闭防火墙[root@haproxy ~]# systemctl stop firewalld[root@haproxy ~]# iptables -F
2.2 安装haproxy2.2
下载地址:www.haproxy.org,目前2020-07月更新的最新稳定版2.2.2,开发版本2.3
2.2.1 安装编译工具
[root@localhost ~]# yum groupinstall "Development Tools" pcre-devel openssl-devel
2.2.2 安装 haproxy
下载 haproxy,放到/opt目录下
[root@haproxy opt]# tar zxvf haproxy-2.2.2.tar.gz[root@haproxy opt]# cd haproxy-2.2.2[root@haproxy haproxy-2.2.2]# lsBRANCHES contrib doc include LICENSE Makefile reg-tests scripts SUBVERS VERDATECHANGELOG CONTRIBUTING examples INSTALL MAINTAINERS README ROADMAP src tests VERSION//可以看到Makefile文件已经存在,所以可以直接编译,不需要执行configure//INSTALL文件是安装手册//doc里面提供了配置文件手册,管理手册等[root@haproxy haproxy-2.2.2]# make TARGET=linux-glibc PREFIX=/usr/local/haproxy USE_OPENSSL=1 ADDLIB=-lz USE_PCRE=1 USE_ZLIB=1 USE_SYSTEMD=1//这里提供参数,参考安装包里面的INSTALL文件[root@haproxy haproxy-2.2.2]# make install PREFIX=/usr/local/haproxy
2.2.3 初始化haproxy
[root@haproxy opt]# cd /opt/haproxy-2.2.2/contrib/systemd[root@haproxy systemd]# cp haproxy.service.in /usr/lib/systemd/system/haproxy.service//haproxy启动脚本调整后如下[root@haproxy systemd]# cat /usr/lib/systemd/system/haproxy.service[Unit]Description=HAProxy Load BalancerAfter=network-online.target[Service]ExecStartPre=/usr/sbin/haproxy -f /usr/local/conf/haproxy.cfg -c -qExecStart=/usr/sbin/haproxy -Ws -f /usr/local/conf/haproxy.cfg -p /run/haproxy.pidExecReload=/bin/kill -USR2 $MAINPIDKillMode=mixedRestart=alwaysSuccessExitStatus=143Type=notify //如果没有在前面编译时添加USE_SYSTEMD=1,需要修改此参数Type=forking[Install]WantedBy=multi-user.target//拷贝示例文件到相关目录[root@haproxy examples]# cp option-http_proxy.cfg /usr/local/haproxy/conf/haproxy.cfg[root@haproxy examples]# mv errorfiles/ /usr/local/haproxy/[root@haproxy errorfiles]# ls400.http 403.http 408.http 500.http 502.http 503.http 504.http README[root@haproxy conf]# ln -s /usr/local/haproxy/sbin/haproxy /usr/sbin/haproxy
2.2.4 配置文件haproxy.cfg
[root@haproxy conf]# cp haproxy.cfg haproxy.cfg.bak[root@haproxy conf]# cat haproxy.cfgglobalmaxconn 20000ulimit-n 65535 //设置每个进程的文件描述符,默认情况下,自动计算的,建议手动设置大小。log 127.0.0.1 local0uid rootgid rootchroot /usr/local/haproxy //修改为haproxy的安装目录nbproc 1 //只创建一个进程,推荐的模式操作daemon //进程到后台运行,推荐模式pidfile /run/haproxy.piddefaultslog global //配置为全局日志,会收到启动和推出,以及所有代理的日志mode httpbalance roundrobinretries 3option redispatchstats uri /haproxystats refresh 30sstats realm haproxy-statusstats auth admin:123456statu hide-versiontimeout connect 5000 //设置服务器连接尝试成功等待的最大时间。timeout client 50000 //设置客户端的最大不活动时间 毫秒,建议和服务器超时相等timeout server 50000 //设置服务器端的最大不活动时间。option httpchk GET /index.html//http代理配置frontend test-http-fbind :80mode httpoption httplogoption dontlognull //禁止或禁用空连接的日志记录(没有数据传输的连接不会记录日志,主要是为了避免对后端server进行端口扫描和探测的日志太多)option forwardforoption httpclose //HAProxy将关闭与服务器的连接,当收到请求和响应时,立即发送给客户端acl test_1 hdr_beg(host) -i www.test.comuse_backend test-http test_1backend test-httpmode httpbalance roundrobinoption httpcloseoption forwardforretries 2option redispatch //在连接失败的情况下启用或禁用会话重分发(就是cookie指定的服务器宕机,客户端一直保持访问,这个参数会破坏持久性,重新分配到新的服务器)server web01 192.168.10.182:80 weight 1 check inter 2000 rise 3 fall 5server web02 192.168.10.183:80 weight 1 check inter 2000 rise 3 fall 5//https代理配置frontend test-https-fmode tcp //tcp代表四层代理,http代表七层代理bind *:443 //代理443端口default_backend test-https //转发到后端组backend test-httpsmode tcp //tcp代理server web02 192.168.48.183:443//配置文件检查[root@haproxy conf]# haproxy -c -f haproxy.cfgConfiguration file is valid//日志配置[root@haproxy conf]# vim /etc/rsyslog.conf$ModLoad imudp$UDPServerRun 514local0.* /var/log/haproxy.log[root@haproxy haproxy]# systemctl restart rsyslog.service//在启停haproxy的日志如下[root@haproxy ~]# tailf /var/log/haproxy.logAug 24 14:12:14 localhost haproxy[11016]: Proxy test-proxy started.Aug 24 14:12:14 localhost haproxy[11016]: Proxy test-proxy-srv started.
2.2.5 后端web配置
关于ssl配置可参考阿里云帮助文档
https://help.aliyun.com/document_detail/98728.html?spm=a2c4g.11186623.6.638.2e3813d2VX8PZ8
如果正式环境可以申请阿里云ssl证书,当然也可以申请阿里云免费证书(上一家公司就是搞的免费证书,用起来一点毛病没有)
https://help.aliyun.com/document_detail/156645.html?spm=5176.11065259.1996646101.searchclickresult.3ca629b0Aqzib6
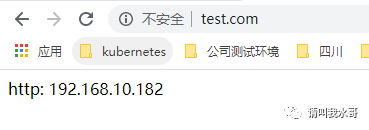
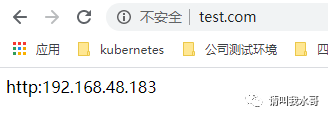
1)web01配置如下[root@web01 ~]# cat /etc/nginx/conf.d/default.confserver {server_name test.com www.test.com; //增加这一行}[root@web01 ~]# cat /usr/share/nginx/html/index.htmlhttp: 192.168.10.1822)web02配置如下//http的配置如下[root@web01 ~]# cat /etc/nginx/conf.d/default.confserver {listen 80;server_name www.test.com; //增加这一行location / {root /usr/share/nginx/test; //修改网页数据存放路径index index.html index.htm;}//https的配置如下[root@web01 ~]# openssl req -new -out cs3.csr -nodes //这一步是生成私钥文件(会在所在目录自动生产privkey.pem)和证书请求文件cs3.csr[root@web01 ~]# openssl x509 -req -in cs3.csr -signkey privkey.pem -out cs3.crt //生成x509证书,可以指定-days 365,指定证书时间[root@web02 nginx]# ls cs.csr privkey.pem cs3.crtcs3.crt cs.csr privkey.pem[root@web02 nginx]# cat conf.d/ssl.conf //此文件yum安装后,会在conf.d目录下有个示例文件,取消注释就可使用。无需多余配置# HTTPS server#server {listen 443 ssl;server_name www.cs.com; //添加ssl_certificate cs3.crt; //这里如果使用相对路径。路径在/etc/nginx下ssl_certificate_key privkey.pem; //这里如果使用相对路径。路径在/etc/nginx下ssl_session_cache shared:SSL:1m;ssl_session_timeout 5m;ssl_ciphers HIGH:!aNULL:!MD5;ssl_prefer_server_ciphers on;location / {root /usr/share/nginx/html; //修改index index.html index.htm;}}
2.2.6 openssl申请证书说明
//详细申请步骤//生成私钥文件[root@web02 ssl]# openssl genrsa -des3 -out cs.key 1024Generating RSA private key, 1024 bit long modulus.......................++++++e is 65537 (0x10001)Enter pass phrase for cs.key: 输入密码Verifying - Enter pass phrase for cs.key: 输入密码//生成证书请求文件[root@web02 ssl]# openssl req -new -key cs.key -out cs.csrEnter pass phrase for cs.key: //输入密码You are about to be asked to enter information that will be incorporatedinto your certificate request.What you are about to enter is what is called a Distinguished Name or a DN.There are quite a few fields but you can leave some blankFor some fields there will be a default value,If you enter '.', the field will be left blank.-----Country Name (2 letter code) [XX]:cn //国家名State or Province Name (full name) []:chengdu //省名Locality Name (eg, city) [Default City]:chengdu //城市名Organization Name (eg, company) [Default Company Ltd]:cs //公司名Organizational Unit Name (eg, section) []:yunwei //部门名Common Name (eg, your name or your server's hostname) []:www.cs.com //域名(必填项目,必须与申请域名对应)Email Address []: //邮箱Please enter the following 'extra' attributesto be sent with your certificate requestA challenge password []: //回车An optional company name []: //回车//生成x509证书[root@web02 ssl]# openssl x509 -req -days 365 -in cs.csr -signkey cs.key -out cs.crtSignature oksubject=/C=cn/ST=chengdu/L=chengdu/O=cs/OU=yunwei/CN=www.cs.comGetting Private keyEnter pass phrase for cs.key: 输入密码[root@web02 ssl]# lscs.crt cs.csr cs.key
2.2.7 dns配置
我这里借助工具ensp完成,dns安装配置不是重点,没有单独配置。
ensp dns server:192.168.48.100
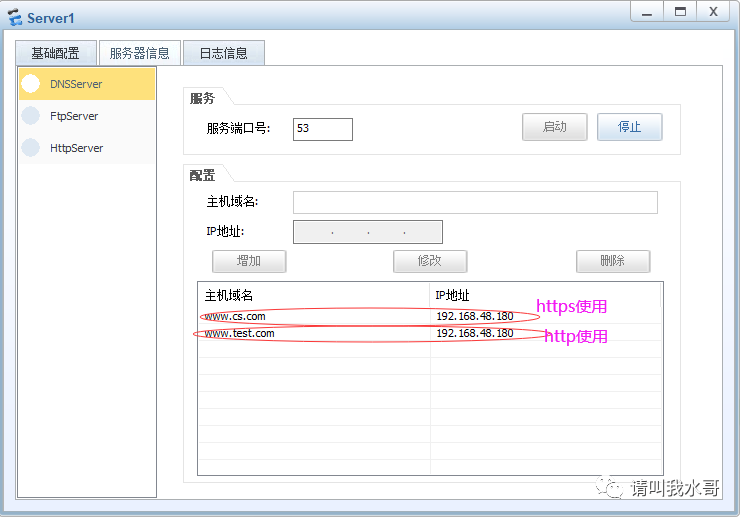
//服务器都和web配置dns指向192.168.48.100[root@haproxy haproxy]# cat /etc/resolv.conf# Generated by NetworkManagernameserver 192.168.48.100[root@web01 ~]# cat /etc/resolv.conf# Generated by NetworkManagernameserver 192.168.48.100[root@web02 ~]# cat /etc/resolv.conf# Generated by NetworkManagernameserver 192.168.48.100
2.2.8 访问测试
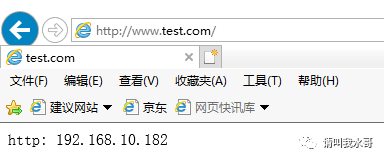
http访问测试:(web02的页面内容忘了改,用的以前测试页面了。为了显示效果更好,建议更换页面测试下)
(生产环境应该使用共享存储,保证两个页面内容一致。使用轮询,页面刷新会在后端服务器来回循环)
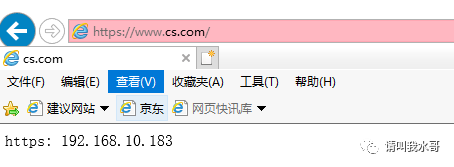
https访问测试:
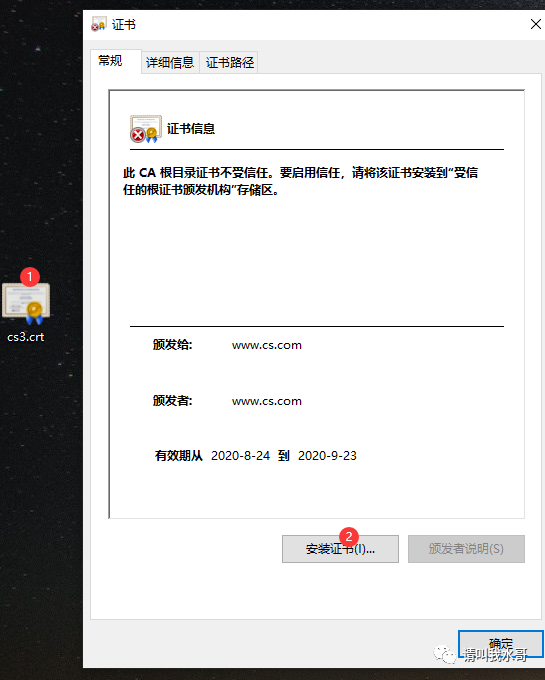
(这里haproxy只是进行代理转发)由于在访问的时候提示证书问题,所以手动导入证书后测试后成功.下载服务器上面cs3.crt证书文件到windows
后面都选择默认下一步即可:
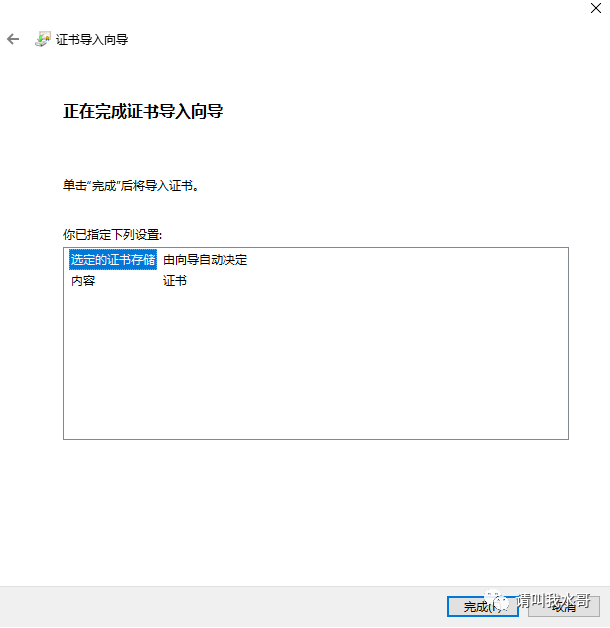
点击完成,显示导入成功

打开网页测试:
三、haproxy的http(七层代理),https(七层代理)
3.1 后端web配置
后端web层不做ssl,进行正常的http访问即可
[root@web02 conf.d]# mv ssl.conf ssl.conf.bak[root@web02 conf.d]# cp default.conf cs.conf[root@web02 conf.d]# vim cs.conf[root@web02 conf.d]# cat cs.confserver {listen 80;server_name www.cs.com; //修改域名location / {root /usr/share/nginx/html; //修改为cs的网页目录index index.html index.htm;}[root@web02 conf.d]# systemctl restart nginx
3.2 haproxy的证书申请
[root@haproxy haproxy]# mkdir ssl[root@haproxy haproxy]# lsconf doc errorfiles sbin share ssl[root@haproxy haproxy]# cd ssl/[root@haproxy ssl]# openssl genrsa -des3 -out cs.key 1024 //生成一个密钥文件[root@haproxy ssl]# openssl req -new -key cs.key -out cs.csr[root@haproxy ssl]# openssl x509 -req -in cs.csr -signkey cs.pem -out cs.crt //生成x509证书,可以指定-days 365,指定证书时间[root@web02 nginx]# ls cs.csr privkey.pem cs3.crt//生成pem文件[root@haproxy ssl]# cat cs.key cs.crt |tee cs.pem//这里haproxy需要同时使用密钥文件和证书文件,所以合并到pem里面[root@haproxy haproxy]# ls ssl/cs.crt cs.csr cs.key cs.pem[root@haproxy haproxy]#
3.3 haproxy.cfg配置如下
主要在前面配置的机器增加或者修改内容如下:
frontend test-https-fmode httpbind *:443 ssl crt /usr/local/haproxy/ssl/cs.pemoption httpcloseoption forwardfor#http-request add-header X-Proto https //参考说明文档configure.txtdefault_backend test-httpsbackend test-httpsmode httpbalance roundrobinoption redispatchoption httpcloseoption forwardforretries 2server web02 192.168.48.183:80 weight 1 check inter 2000 rise 3 fall 5
3.4 测试截图
http测试:
上面有缓存,换个QQ浏览器试试

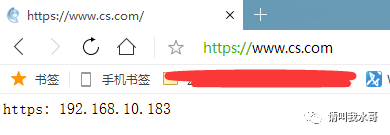
https测试:
(测试的时候可能缓存问题,多换个浏览器测试下)
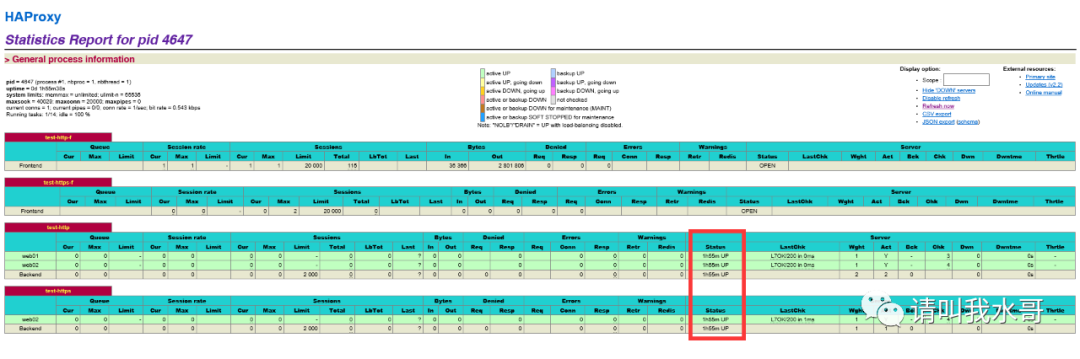
四、haproxy监控页面
访问http://192.168.48.180/haproxy