


一、概述
本文将介绍如何给oracle数据库打最新补丁,数据库版本为11.2.0.4单实例,操作系统为redhat6.5
二、下载相关升级包
1. 登录MOS,查阅(ID 2118136.2),下载最新补丁包
PSU (Patch Set Update),数据库补丁
2. 搜索"Patch 6880880",下载最新opatch
opatch是安装补丁的程序,数据库软件安装完成后,就自带了opatch,但是版本太旧了,所以这里下载最新的opatch
至此已下载两个文件
p6880880_112000_Linux-x86-64.zip:opatch升级包
p29913194_112040_Linux-x86-64.zip:数据库补丁
三、升级opatch
opatch的升级比较简单,就是个文件覆盖
3. 查看原始opatch信息
[oracle@orasingle
~]$ cd $ORACLE_HOME/OPatch
[oracle@orasingle OPatch]$ ./opatch version # 查看版本信息
OPatch Version: 11.2.0.3.4
OPatch succeeded.
[oracle@orasingle OPatch]$ ./opatch lsinventory # 查看打补丁的情况
Oracle Interim Patch Installer version 11.2.0.3.4
Copyright (c) 2012, Oracle Corporation. All rights reserved.
Oracle Home : /u01/app/oracle/product/11.2.0/db_1
Central Inventory : /u01/app/oraInventory
from : /u01/app/oracle/product/11.2.0/db_1/oraInst.loc
OPatch version : 11.2.0.3.4
OUI version : 11.2.0.4.0
Log file location : /u01/app/oracle/product/11.2.0/db_1/cfgtoollogs/opatch/opatch2019-12-25_14-26-47PM_1.log
Lsinventory Output file location : /u01/app/oracle/product/11.2.0/db_1/cfgtoollogs/opatch/lsinv/lsinventory2019-12-25_14-26-47PM.txt
--------------------------------------------------------------------------------
Installed Top-level Products (1):
Oracle Database 11g 11.2.0.4.0
There are 1 products installed in this Oracle Home.
There are no Interim patches installed in this Oracle Home.
--------------------------------------------------------------------------------
OPatch succeeded.
4. 备份原opatch
[oracle@orasingle
~]$ cd $ORACLE_HOME
[oracle@orasingle db_1]$ mv OPatch OPatch.bak
5. 解压新下载的opatch包
将下载的opatch包上传到oracle的家目录
[oracle@orasingle db_1]$ cd ~
[oracle@orasingle ~]$ unzip p6880880_112000_Linux-x86-64.zip -d $ORACLE_HOME
6. 再来查看opatch信息
[oracle@orasingle
~]$ cd $ORACLE_HOME/OPatch
[oracle@orasingle OPatch]$ ./opatch version # 查看版本信息
OPatch Version: 11.2.0.3.21
OPatch succeeded.
至此opatch升级完毕
四、打数据库补丁
7. 关闭em、监听、数据库
[oracle@orasingle ~]$ emctl stop dbconsole # 如果没有开启em,这步可以跳过
[oracle@orasingle ~]$ lsnrctl stop
[oracle@orasingle
~]$ sqlplus / as sysdba
SQL> shutdown immediate
SQL> exit
8. 解压新下载的补丁包
将下载的补丁包上传到oracle的家目录
[oracle@orasingle ~]$ cd ~
[oracle@orasingle ~]$ unzip p29913194_112040_Linux-x86-64.zip
9. 校验该补丁包是否与之前的补丁有冲突
[oracle@orasingle
~]$ cd 29913194
[oracle@orasingle 29913194]$ $ORACLE_HOME/OPatch/opatch prereq
CheckConflictAgainstOHWithDetail -ph ./
Oracle Interim Patch Installer version 11.2.0.3.21
Copyright (c) 2019, Oracle Corporation. All rights reserved.
PREREQ session
Oracle Home : /u01/app/oracle/product/11.2.0/db_1
Central Inventory : /u01/app/oraInventory
from : /u01/app/oracle/product/11.2.0/db_1/oraInst.loc
OPatch version : 11.2.0.3.21
OUI version : 11.2.0.4.0
Log file location : /u01/app/oracle/product/11.2.0/db_1/cfgtoollogs/opatch/opatch2019-12-25_14-46-26PM_1.log
Invoking prereq "checkconflictagainstohwithdetail"
Prereq "checkConflictAgainstOHWithDetail" passed.
OPatch succeeded.
由于这个测试库之前并没有打什么补丁,所以这里就不可能有补丁冲突的问题,如果这里显示有冲突,再去mos上查找相关解决方案。
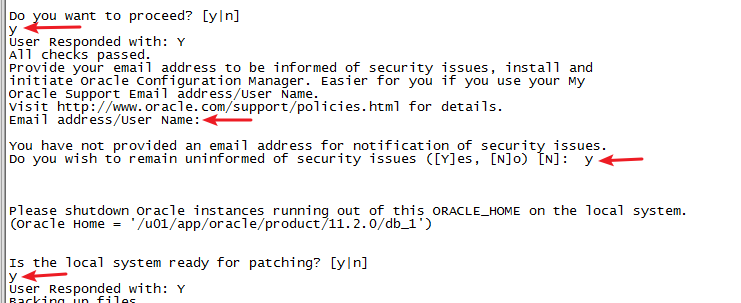
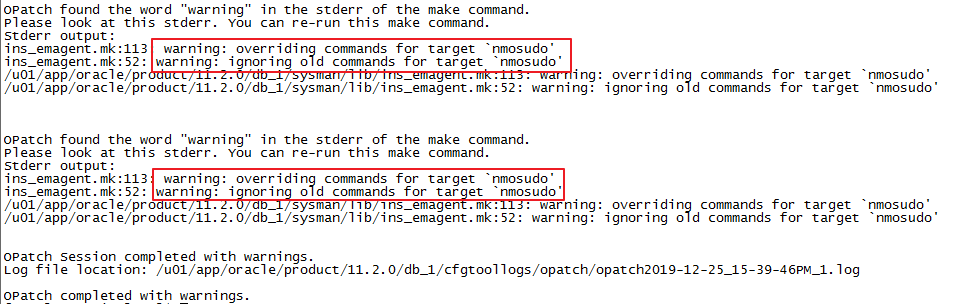
10. 正式升级
[oracle@orasingle 29913194]$ $ORACLE_HOME/OPatch/opatch apply
这里要输入3次y和一次回车,这个是时间耗时比较久的,耐心等待
升级完成后报上面的错误,通过查阅mos(ID 2265726.1),可知这个错误可以被忽略
11. 再次查看打补丁的情况
[oracle@orasingle 29913194]$ $ORACLE_HOME/OPatch/opatch lsinventory # 查看打补丁的情况内容较多,略
12. 启动数据库,并运行sql文件
[oracle@orasingle
29913194]$ cd $ORACLE_HOME/rdbms/admin
[oracle@orasingle admin]$ sqlplus / as sysdba
SQL> startup
SQL> @catbundle.sql psu apply
SQL> quit
执行完后我们可以查到PSU更新信息:
SQL>select * from dba_registry_history;
ACTION_TIME ACTION NAMESPAC VERSION ID BUNDL COMMENTS
------------------------------ -------- -------- ---------- ---------- ----- --------------------
24-AUG-13 12.03.45.119862 PM APPLY SERVER 11.2.0.4 0 PSU Patchset 11.2.0.2.0
13. 启动监听、em
[oracle@orasingle
~]$ lsnrctl start
[oracle@orasingle ~]$ emctl start dbconsole # 如果没有开启em,这步可以跳过
至此数据库打补丁已全部完成!
五、回退数据库补丁
数据库在做变更时,当然要考虑回退方案了,接下来介绍如何回退数据库补丁
14. 关闭em、监听、数据库
[oracle@orasingle ~]$ emctl stop dbconsole # 如果没有开启em,这步可以跳过
[oracle@orasingle ~]$ lsnrctl stop
[oracle@orasingle
~]$ sqlplus / as sysdba
SQL> shutdown immediate
SQL> exit
15. 回退补丁
[oracle@orasingle ~]$ $ORACLE_HOME/OPatch/opatch rollback -id 29913194
这里要输入一次y,时间比较久,耐心等待
这里提示warning,查阅mos(ID 1448337.1),得知可以忽略
16. 启动数据库,并运行sql文件
[oracle@orasingle
29913194]$ cd $ORACLE_HOME/rdbms/admin
[oracle@orasingle admin]$ sqlplus / as sysdba
SQL> startup
SQL> @catbundle_PSU_ORCLTEST_ROLLBACK.sql # 注意这里可能每个人都不一样,orcltest是我的实例名
SQL> quit
17. 再查看打补丁的情况
[oracle@orasingle
~]$ cd $ORACLE_HOME/OPatch
[oracle@orasingle OPatch]$ ./opatch lsinventory # 查看打补丁的情况
OPatch Version: 11.2.0.3.21
OPatch succeeded.
[oracle@orasingle OPatch]$ ./opatch lsinv
Oracle Interim Patch Installer version 11.2.0.3.21
Copyright (c) 2019, Oracle Corporation. All rights reserved.
Oracle Home : /u01/app/oracle/product/11.2.0/db_1
Central Inventory : /u01/app/oraInventory
from : /u01/app/oracle/product/11.2.0/db_1/oraInst.loc
OPatch version : 11.2.0.3.21
OUI version : 11.2.0.4.0
Log file location : /u01/app/oracle/product/11.2.0/db_1/cfgtoollogs/opatch/opatch2019-12-25_16-15-41PM_1.log
Lsinventory Output file location : /u01/app/oracle/product/11.2.0/db_1/cfgtoollogs/opatch/lsinv/lsinventory2019-12-25_16-15-41PM.txt
--------------------------------------------------------------------------------
Local Machine Information::
Hostname: orasingle
ARU platform id: 226
ARU platform description:: Linux x86-64
Installed Top-level Products (1):
Oracle Database 11g 11.2.0.4.0
There are 1 products installed in this Oracle Home.
There are no Interim patches installed in this Oracle Home.
--------------------------------------------------------------------------------
OPatch succeeded.
可以看到补丁都被卸载了
18. 启动监听和em
[oracle@orasingle
~]$ lsnrctl start
[oracle@orasingle ~]$ emctl start dbconsole # 如果没有开启em,这步可以跳过
六、总结
本文给大家介绍了最简单的单实例数据库打补丁步骤,仅作参考,实际应以补丁包中的readme为准
实例二:
操作系统:CentOS
release 6.9 (Final)
数据库版本:Oracle Database 11g Enterprise Edition Release 11.2.0.4.0
数据库环境:单实例
OPatch版本:OPatch Version: 11.2.0.3.4
PSU版本:p29141056
总体思路:
1、下载补丁,上传到服务器,进行解压(PSU、Opatch)
2、停业务,停数据库及监听,先关的DB服务,OEM
3、备份(有条件采用全量备份或停机冷备)
4、补丁安装冲突检查
5、安装PSU数据库代码补丁(即apply)
6、安装PSU数据库补丁(执行SQL)
7、升级RMAN CATALOG数据库(如果用)
8、补丁安装验证
9、启业务,测试应用,完成!
下载所需PSU及Opatch版本(查看README里的补丁所需OPatch的版本,注明需要11.2.0.3.20以上版本)
1.2.1
OPatch Utility
You must use the OPatch utility version 11.2.0.3.20 or later to apply this
patch. Oracle recommends that you use the latest released OPatch version for
11.2, which is available for download from My Oracle Support patch 6880880 by
selecting the 11.2.0.0.0 release.
For information about OPatch documentation, including any known issues, see My
Oracle Support Document 293369.1 OPatch documentation list.
查看当前OPatch的软件版本(版本为11.2.0.3.4),所以我们需要更新OPatch软件版本
patch
set 补丁集
patch set update(PSU)
critical patch update(CPU)
opatch version
更新OPatch软件版本
将压缩包传输到服务器上
unzip p6880880_112000_Linux-x86-64.zip
备份现有的OPatch文件夹,并用刚刚unzip出来的OPatch文件夹替换旧文件夹,然后查看,发现已经可以了。
opatch version
备份数据库(有条件最好进行一次全量备份)
RMAN> run{
2> backup as compressed backupset database format '/backup/rman/whole_opatch_%d_%I_%s_%p';
3> backup as compressed backupset archivelog all format '/backup/rman/arc_opatch_%d_%I_%s_%p' delete input;
4> crosscheck backupset;
5> delete noprompt expired backupset;
6> }
离线安装补丁
查看README,查看冲突性检测
.3.1.4
One-off Patch Conflict Detection and Resolution
For an introduction to the PSU one-off patch concepts, see “Patch Set Updates
Patch Conflict Resolution” in My Oracle Support Document 854428.1 Patch Set
Updates for Oracle Products.
The fastest and easiest way to determine whether you have one-off patches in
the Oracle home that conflict with the PSU, and to get the necessary conflict
resolution patches, is to use the Patch Recommendations and Patch Plans
features on the Patches & Updates tab in My Oracle Support. These features
work in conjunction with the My Oracle Support Configuration Manager. Recorded
training sessions on these features can be found in Document 603505.1.
However, if you are not using My Oracle Support Patch Plans, the My Oracle
Support Conflict Checker tool enables you to upload an OPatch inventory and
check the patches that you want to apply to your environment for conflicts.
If no conflicts are found, you can download the patches. If conflicts are
found, the tool finds an existing resolution to download. If no resolution is
found, it will automatically request a resolution, which you can monitor in the
Plans and Patch Requests region of the Patches & Updates tab.
For more information, see Knowledge Document 1091294.1, How to use the My
Oracle Support Conflict Checker Tool.
Or, use the following steps to manually discover conflicts and resolutions:
Determine whether any currently installed one-off patches conflict with the PSU
patch as follows:
unzip
p29141056_112040_.zip
cd 29141056
opatch prereq CheckConflictAgainstOHWithDetail -ph ./
The report will indicate the patches that conflict with PSU 29141056 and the
patches for which PSU 29141056 is a superset.
Note that Oracle proactively provides PSU one-off patches for common conflicts
with this patch.
Use My Oracle Support Document 1321267.1 Database Patch conflict resolution to
determine, for each conflicting patch, whether a conflict resolution patch is
already available, and if you need to request a new conflict resolution patch
or if the conflict may be ignored.
When all the one-off patches that you have requested are available at My Oracle
Support, proceed with Patch Installation Instructions.
unzip p29141056_112040_.zip
cd 29141056
opatch prereq CheckConflictAgainstOHWithDetail -ph ./
1.3.2
Patch Installation Instructions
If this is not a Oracle RAC environment, shut down all instances and listeners
associated with the Oracle home that you are updating. For more information,
see Oracle Database Administrator’s Guide.
Set your current directory to the directory where the patch is located and then
run the OPatch utility by entering the following commands:
--lsnrctl stop
--sqlplus '/as sysdba'
--shutdown immediate
--unzip
p29141056_112040_<platform>.zip
--cd 29141056
--opatch apply -report(预演)
--opatch apply
执行SQL脚本
-
cd $ORACLE_HOME/rdbms/admin
sqlplus /nolog
SQL> CONNECT / AS SYSDBA
SQL> STARTUP
SQL> @catbundle.sql psu apply
SQL> QUIT
检查patch
opatch lspatches
opatch lsinventory
select to_char(ACTION_TIME,'yyyy-mm-dd hh24:mi:ss'),ACTION,NAMESPACE,VERSION,ID,COMMENTS,BUNDLE_SERIES from registry$history
