


参考资料
社区版官网-文档-学习中心-入门教程:如何手动部署OceanBase集群
教程视频:如何手动部署OceanBase三副本集群.mp4
环境准备
服务器信息
| 操作系统 | 系统版本 | CPU | Memory | 磁盘空间 |
|---|---|---|---|---|
| Linux OS | CentOS Linux release 7.9.2009(core) | 12C | 16GB | 100GB |
部署规划
| 角色 | 角色IP | 备注 |
|---|---|---|
| OBD | 192.168.66.4 | 中控机,自动化部署软件 |
| OBPROXY | 192.168.66.4 | OceanBase访问反向代理 |
| OBCLIENT | 192.168.66.4 | OceanBase命令行客户端 |
| OBSERVER | 192.168.66.1 | OceanBase数据库zone1 |
| OBSERVER | 192.168.66.2 | OceanBase数据库zone2 |
| OBSERVER | 192.168.66.3 | OceanBase数据库zone3 |
NTP服务配置
安装NTP
[root@localhost ~]# yum -y install ntp
配置NTP服务
- 修改所有节点的/etc/ntp.conf
vi /etc/ntp.conf
restrict default nomodify notrap(允许所有网段的客户机进行时间同步)
- 修改主节点的/etc/ntp.conf
在server部分添加如下内容:
server ntp.aliyun.com iburst prefer
server ntp1.aliyun.com iburst
server ntp2.aliyun.com iburst
server ntp3.aliyun.com iburst
注:
iburst表示当server不可达时,以默认发包速率的8倍向服务器发包。
- 修改其他节点的/etc/ntp.conf
在server部分添加如下内容,将server指向主节点:
server 192.168.66.4 iburst
- 启动NTP服务、查看状态
【所有节点】
[root@localhost ~]# service ntpd start
Redirecting to /bin/systemctl start ntpd.service
【NTP主节点】
[root@localhost ~]# ntpstat
synchronised to NTP server (203.107.6.88) at stratum 3
   time correct to within 969 ms
   polling server every 64 s
【其他节点】
[root@localhost ~]# ntpstat
synchronised to NTP server (192.168.66.4) at stratum 4
   time correct to within 973 ms
   polling server every 64 s
- 设置开机启动
[root@localhost ~]# systemctl enable ntpd.service
Created symlink from /etc/systemd/system/multi-user.target.wants/ntpd.service to /usr/lib/systemd/system/ntpd.service.
节点间时间同步检查
[root@localhost etc]# clockdiff 192.168.66.1
.....
host=192.168.66.1 rtt=237(295)ms/0ms delta=-2ms/-2ms Tue Jan 18 13:49:54 2022
[root@localhost etc]# clockdiff 192.168.66.3
...
host=192.168.66.3 rtt=421(315)ms/0ms delta=0ms/0ms Tue Jan 18 13:49:59 2022
注:三节点时间同步误差超过50ms,后面初始化集群一定会失败。
初始化服务器环境
- 内核参数修改
[root@localhost ~]# vi /etc/sysctl.conf

net.core.somaxconn = 2048
net.core.netdev_max_backlog = 10000
net.core.rmem_default = 16777216
net.core.wmem_default = 16777216
net.core.rmem_max = 16777216
net.core.wmem_max = 16777216
net.ipv4.ip_local_port_range = 3500 65535
net.ipv4.ip_forward = 0
net.ipv4.conf.default.rp_filter = 1
net.ipv4.conf.default.accept_source_route = 0
net.ipv4.tcp_syncookies = 0
net.ipv4.tcp_rmem = 4096 87380 16777216
net.ipv4.tcp_wmem = 4096 65536 16777216
net.ipv4.tcp_max_syn_backlog = 16384
net.ipv4.tcp_fin_timeout = 15
net.ipv4.tcp_max_syn_backlog = 16384
net.ipv4.tcp_tw_reuse = 1
net.ipv4.tcp_tw_recycle = 1
net.ipv4.tcp_slow_start_after_idle=0
vm.swappiness = 0
vm.min_free_kbytes = 2097152
vm.max_map_count=655360
fs.aio-max-nr=1048576

使配置生效:
[root@localhost ~]# sysctl -p
- 修改会话变量设置
[root@localhost ~]# vi /etc/security/limits.conf

* soft nofile 655360
* hard nofile 655360
* soft nproc 655360
* hard nproc 655360
* soft core unlimited
* hard core unlimited
* soft stack unlimited
* hard stack unlimited
- 关闭防火墙
[root@localhost ~]# systemctl stop firewalld
[root@localhost ~]# systemctl disable firewalld
- 关闭SELinux
[root@localhost ~]# vi /etc/selinux/config
SELINUX=disabled

使配置立即生效:
[root@localhost ~]# setenforce 0
安装OceanBase软件包
创建admin用户
注:OceanBase建议使用admin用户进行管理维护。
[root@localhost ~]# useradd admin
[root@localhost ~]# passwd admin
Changing password for user admin.
New password:
Retype new password:
passwd: all authentication tokens updated successfully.
添加阿里YUM源
添加阿里yum源:
[root@localhost ~]# yum-config-manager --add-repo https://mirrors.aliyun.com/oceanbase/OceanBase.repo
Loaded plugins: fastestmirror, langpacks
adding repo from: https://mirrors.aliyun.com/oceanbase/OceanBase.repo
grabbing file https://mirrors.aliyun.com/oceanbase/OceanBase.repo to /etc/yum.repos.d/OceanBase.repo
repo saved to /etc/yum.repos.d/OceanBase.repo

更新yum软件包索引:
[root@localhost ~]# yum makecache fast
安装软件
[root@localhost ~]# yum install -y oceanbase-ce-libs.x86_64 oceanbase-ce.x86_64
Loaded plugins: fastestmirror, langpacks
Loading mirror speeds from cached hostfile
 * base: ftp.sjtu.edu.cn
 * extras: mirrors.aliyun.com
 * updates: ftp.sjtu.edu.cn
Resolving Dependencies
--> Running transaction check
---> Package oceanbase-ce.x86_64 0:3.1.2-10000392021123010.el7 will be installed
---> Package oceanbase-ce-libs.x86_64 0:3.1.2-10000392021123010.el7 will be installed
--> Finished Dependency Resolution

Dependencies Resolved

=========================================================================================================================================================================
 Package                               Arch                       Version                                           Repository                                      Size
=========================================================================================================================================================================
Installing:
 oceanbase-ce                          x86_64                     3.1.2-10000392021123010.el7                       oceanbase.community.stable                      46 M
 oceanbase-ce-libs                     x86_64                     3.1.2-10000392021123010.el7                       oceanbase.community.stable                     155 k

Transaction Summary
=========================================================================================================================================================================
Install  2 Packages

Total download size: 47 M
Installed size: 194 M
Downloading packages:
warning: /var/cache/yum/x86_64/7/oceanbase.community.stable/packages/oceanbase-ce-libs-3.1.2-10000392021123010.el7.x86_64.rpm: Header V4 RSA/SHA1 Signature, key ID e9b4a7aa: NOKEY
Public key for oceanbase-ce-libs-3.1.2-10000392021123010.el7.x86_64.rpm is not installed
(1/2): oceanbase-ce-libs-3.1.2-10000392021123010.el7.x86_64.rpm                                                                                   | 155 kB  00:00:00
(2/2): oceanbase-ce-3.1.2-10000392021123010.el7.x86_64.rpm                                                                                        |  46 MB  00:00:02
-------------------------------------------------------------------------------------------------------------------------------------------------------------------------
Total                                                                                                                                     21 MB/s |  47 MB  00:00:02
Retrieving key from http://mirrors.aliyun.com/oceanbase/RPM-GPG-KEY-OceanBase
Importing GPG key 0xE9B4A7AA:
 Userid     : "OceanBase"
 Fingerprint: ef7d e8e3 6987 b60c acf9 9a53 2ff8 45a6 e9b4 a7aa
 From       : http://mirrors.aliyun.com/oceanbase/RPM-GPG-KEY-OceanBase
Running transaction check
Running transaction test
Transaction test succeeded
Running transaction
  Installing : oceanbase-ce-libs-3.1.2-10000392021123010.el7.x86_64                                                                                                  1/2
  Installing : oceanbase-ce-3.1.2-10000392021123010.el7.x86_64                                                                                                       2/2
  Verifying  : oceanbase-ce-libs-3.1.2-10000392021123010.el7.x86_64                                                                                                  1/2
  Verifying  : oceanbase-ce-3.1.2-10000392021123010.el7.x86_64                                                                                                       2/2

Installed:
  oceanbase-ce.x86_64 0:3.1.2-10000392021123010.el7                                oceanbase-ce-libs.x86_64 0:3.1.2-10000392021123010.el7

Complete!
查看安装目录结构
[root@localhost ~]# tree /home/admin/oceanbase/
/home/admin/oceanbase/
├── bin
│   ├── import_time_zone_info.py
│   └── observer
├── etc
│   ├── oceanbase_upgrade_dep.yml
│   ├── priv_checker.py
│   ├── timezone_V1.log
│   ├── upgrade_checker.py
│   ├── upgrade_cluster_health_checker.py
│   ├── upgrade_post_checker.py
│   ├── upgrade_post.py
│   ├── upgrade_pre.py
│   ├── upgrade_rolling_post.py
│   └── upgrade_rolling_pre.py
└── lib
    ├── libaio.so -> libaio.so.1.0.1
    ├── libaio.so.1 -> libaio.so.1.0.1
    ├── libaio.so.1.0.1
    ├── libmariadb.so -> libmariadb.so.3
    └── libmariadb.so.3

3 directories, 17 files
创建部署目录
- 相关目录解释
| 参数或目录 | 值 | 备注 |
|---|---|---|
| observer部署/启动目录 | /home/admin/oceanbase | RPM包自动创建 |
| observer数据总目录 | /home/admin/oceanbase/store/obdemo | 手动创建 |
| observer数据文件实际目录 | /data/obdemo/sstable | 手动创建,通过软链接映射到数据总目录下 |
| observer事务日志实际目录 | /redo/obdemo/{clog,slog,ilog} | 手动创建,通过软链接映射到数据总目录下 |
| observer参数文件目录 | /home/admin/oceanbase/etc | 启动时在启动目录自动创建或自动读取 |
| observer运行日志目录 | /home/admin/oceanbase/log | 启动时在启动目录自动创建 |
- 手动创建目录
[root@localhost ~]# mkdir -p /home/admin/oceanbase/store/obdemo /data/obdemo/{sstable,etc3} /redo/obdemo/{clog,ilog,slog,etc2}
[root@localhost ~]# chown -R admin:admin /data /redo /home/admin/oceanbase
[root@localhost ~]# chmod -R 755 /data /redo /home/admin/oceanbase
[root@localhost ~]# ls -l /home/admin/oceanbase/
total 4
drwxr-xr-x. 2 admin admin   54 Jan 18 14:33 bin
drwxr-xr-x. 2 admin admin 4096 Jan 18 14:33 etc
drwxr-xr-x. 2 admin admin  109 Jan 18 14:33 lib
drwxr-xr-x. 3 admin admin   20 Jan 18 15:45 store
- 创建软链接(生产环境要求数据文件和事务日志文件尽可能独立放置)
[root@localhost ~]# su - admin
Last login: Tue Jan 18 15:44:57 CST 2022 on pts/2
[admin@localhost ~]$ for f in {clog,ilog,slog,etc2}; do ln -s /redo/obdemo/$f ~/oceanbase/store/obdemo/$f ; done
[admin@localhost ~]$ for f in {sstable,etc3}; do ln -s /data/obdemo/$f ~/oceanbase/store/obdemo/$f; done
[admin@localhost ~]$ cd oceanbase/store/obdemo/
[admin@localhost obdemo]$ ls -il
total 0
163235 lrwxrwxrwx. 1 admin admin 17 Jan 18 15:51 clog -> /redo/obdemo/clog
163240 lrwxrwxrwx. 1 admin admin 17 Jan 18 15:51 etc2 -> /redo/obdemo/etc2
163242 lrwxrwxrwx. 1 admin admin 17 Jan 18 15:51 etc3 -> /data/obdemo/etc3
163236 lrwxrwxrwx. 1 admin admin 17 Jan 18 15:51 ilog -> /redo/obdemo/ilog
163239 lrwxrwxrwx. 1 admin admin 17 Jan 18 15:51 slog -> /redo/obdemo/slog
163241 lrwxrwxrwx. 1 admin admin 20 Jan 18 15:51 sstable -> /data/obdemo/sstable
- 查看目录结构
[admin@localhost ~]$ tree ~/oceanbase/store/ /data/ /redo/
/home/admin/oceanbase/store/
└── obdemo
    ├── clog -> /redo/obdemo/clog
    ├── etc2 -> /redo/obdemo/etc2
    ├── etc3 -> /data/obdemo/etc3
    ├── ilog -> /redo/obdemo/ilog
    ├── slog -> /redo/obdemo/slog
    └── sstable -> /data/obdemo/sstable
/data/
└── obdemo
    ├── etc3
    └── sstable
/redo/
└── obdemo
    ├── clog
    ├── etc2
    ├── ilog
    └── slog

15 directories, 0 files
启动OBServer
- 环境变量设置
[admin@localhost ~]$ echo 'export LD_LIBRARY_PATH=$LD_LIBRARY_PATH:~/oceanbase/lib' >> ~/.bash_profile
[admin@localhost ~]$ source .bash_profile
- 启动OB进程
[admin@localhost ~]$ cd ~/oceanbase && bin/observer -i ens192 -p 2881 -P 2882 -z zone1 -d ~/oceanbase/store/obdemo -r '192.168.66.1:2882:2881;192.168.66.2:2882:2881;192.168.66.3:2882:2881' -c 20220118 -n obdemo -o "memory_limit=8G,cache_wash_threshold=1G,__min_full_resource_pool_memory=268435456,system_memory=3G,memory_chunk_cache_size=128M,cpu_count=16,net_thread_count=4,datafile_size=25G,stack_size=1536K,config_additional_dir=/data/obdemo/etc3;/redo/obdemo/etc2" -d ~/oceanbase/store/obdemo
bin/observer -i ens192 -p 2881 -P 2882 -z zone1 -d /home/admin/oceanbase/store/obdemo -r 192.168.66.1:2882:2881;192.168.66.2:2882:2881;192.168.66.3:2882:2881 -c 20220118 -n obdemo -o memory_limit=8G,cache_wash_threshold=1G,__min_full_resource_pool_memory=268435456,system_memory=3G,memory_chunk_cache_size=128M,cpu_count=16,net_thread_count=4,datafile_size=25G,stack_size=1536K,config_additional_dir=/data/obdemo/etc3;/redo/obdemo/etc2 -d /home/admin/oceanbase/store/obdemo
devname: ens192
mysql port: 2881
rpc port: 2882
zone: zone1
data_dir: /home/admin/oceanbase/store/obdemo
rs list: 192.168.66.1:2882:2881;192.168.66.2:2882:2881;192.168.66.3:2882:2881
cluster id: 20220118
appname: obdemo
optstr: memory_limit=8G,cache_wash_threshold=1G,__min_full_resource_pool_memory=268435456,system_memory=3G,memory_chunk_cache_size=128M,cpu_count=16,net_thread_count=4,datafile_size=25G,stack_size=1536K,config_additional_dir=/data/obdemo/etc3;/redo/obdemo/etc2
data_dir: /home/admin/oceanbase/store/obdemo

**参数解析**
-i 指定网卡地址
-p 指定mysql_port监听端口,默认为2881
-P 指定rpc_port,OB各个组件间进行通信的端口,默认为2882
-z 指定节点属于哪个zone
-d 数据总目录
-r 指定RootService_list
-c 指定cluster_id,自定义
-n 指定集群名称,自定义
-o 指定进程的启动参数,可限制资源使用
- 检查进程启动状态
[admin@localhost oceanbase]$ ps -ef | grep observer
admin     2885     1 99 10:39 ?        00:00:27 bin/observer -i ens192 -p 2881 -P 2882 -z zone2 -d /home/admin/oceanbase/store/obdemo -r 192.168.66.1:2882:2881;192.168.66.2:2882:2881;192.168.66.3:2882:2881 -c 20220118 -n obdemo -o memory_limit=8G,cache_wash_threshold=1G,__min_full_resource_pool_memory=268435456,system_memory=3G,memory_chunk_cache_size=128M,cpu_count=16,net_thread_count=4,datafile_size=25G,stack_size=1536K,config_additional_dir=/data/obdemo/etc3;/redo/obdemo/etc2 -d /home/admin/oceanbase/store/obdemo
admin     3478  2844  0 10:40 pts/0    00:00:00 grep --color=auto observer
- 检查端口监听是否正常
[admin@localhost oceanbase]$ netstat -ntlp
(Not all processes could be identified, non-owned process info
 will not be shown, you would have to be root to see it all.)
Active Internet connections (only servers)
Proto Recv-Q Send-Q Local Address           Foreign Address         State       PID/Program name
tcp        0      0 192.168.122.1:53        0.0.0.0:*               LISTEN      -
tcp        0      0 0.0.0.0:22              0.0.0.0:*               LISTEN      -
tcp        0      0 127.0.0.1:631           0.0.0.0:*               LISTEN      -
tcp        0      0 127.0.0.1:25            0.0.0.0:*               LISTEN      -
tcp        0      0 127.0.0.1:6010          0.0.0.0:*               LISTEN      -
tcp        0      0 0.0.0.0:2881            0.0.0.0:*               LISTEN      2885/bin/observer
tcp        0      0 0.0.0.0:2882            0.0.0.0:*               LISTEN      2885/bin/observer
tcp        0      0 0.0.0.0:111             0.0.0.0:*               LISTEN      -
Bootstrap集群
Bootstrap操作
当OB集群节点都正常启动,并且监听正常时,则可以连接到任一节点进行bootstrap集群初始化操作,注意初始密码为空。
[admin@localhost ~]$ obclient -h192.168.66.3 -uroot -P2881 -p -c -A
Enter password:
MySQL [(none)]> set session ob_query_timeout=1000000000; alter system bootstrap ZONE 'zone1' SERVER '192.168.66.1:2882', ZONE 'zone2' SERVER '192.168.66.2:2882', ZONE 'zone3' SERVER '192.168.66.3:2882';
Query OK, 0 rows affected (0.001 sec)
Query OK, 0 rows affected (52.216 sec)
MySQL [(none)]>
设置相关密码
- 集群管理员(默认为空)
MySQL [(none)]> alter user root identified by 'rootPWD123';
Query OK, 0 rows affected (0.077 sec)
- OBPROXY用户(默认OBPROXY连接OceanBase集群时使用proxyro用户,需要手动创建)
MySQL [(none)]> grant select on oceanbase.* to proxyro identified by 'proxyPWD123';
Query OK, 0 rows affected (0.155 sec)
OBProxy部署
部署规划
- 相关目录
| 参数或目录 | 值 | 备注 |
|---|---|---|
| obproxy部署/启动目录 | /home/admin/obproxy-版本号 | RPM包自动创建 |
| obproxy参数文件目录 | /home/admin/obproxy/etc | 启动时在启动目录自动创建或自动读取 |
| obproxy运行日志目录 | /home/admin/obproxy/log | 启动时在启动目录自动创建 |
软件安装
- 创建admin用户
[root@localhost ~]# useradd admin
[root@localhost ~]# passwd admin
Changing password for user admin.
New password:
Retype new password:
passwd: all authentication tokens updated successfully.
- 安装obproxy
[root@localhost ~]# yum install -y obproxy.x86_64
- 查看文件结构
[admin@localhost ~]$ tree ~/obproxy-3.2.0/
/home/admin/obproxy-3.2.0/
└── bin
    ├── obproxy
    └── obproxyd.sh

1 directory, 2 files
启动OBPROXY进程
- 启动obproxy进程
[admin@localhost ~]$ cd ~/obproxy-3.2.0/ && bin/obproxy -r "192.168.66.1:2881;192.168.66.2:2881;192.168.66.3:2881" -p 2883 -o "enable_strict_kernel_release=false,enable_cluster_checkout=false,enable_metadb_used=false" -c obdemo
bin/obproxy -r 192.168.66.1:2881;192.168.66.2:2881;192.168.66.3:2881 -p 2883 -o enable_strict_kernel_release=false,enable_cluster_checkout=false,enable_metadb_used=false -c obdemo
rs list: 192.168.66.1:2881;192.168.66.2:2881;192.168.66.3:2881
listen port: 2883
optstr: enable_strict_kernel_release=false,enable_cluster_checkout=false,enable_metadb_used=false
cluster_name: obdemo

**参数解析**
-r 指定集群rootservers地址,使用2881端口通信
-p 指定obproxy监听端口,默认使用2883
-o 指定obproxy启动参数
-c 指定ob集群名称
- 检查进程启动状态
[admin@localhost obproxy-3.2.0]$ ps -ef | grep obproxy
admin    31683     1  2 09:37 ?        00:00:00 bin/obproxy -r 192.168.66.1:2881;192.168.66.2:2881;192.168.66.3:2881 -p 2883 -o enable_strict_kernel_release=false,enable_cluster_checkout=false,enable_metadb_used=false -c obdemo
admin    31710 31392  0 09:37 pts/1    00:00:00 grep --color=auto obproxy
- 检查OBPROXY监听是否正常
[admin@localhost obproxy-3.2.0]$ netstat -ntlp | grep obproxy
(Not all processes could be identified, non-owned process info
 will not be shown, you would have to be root to see it all.)
tcp        0      0 0.0.0.0:2883            0.0.0.0:*               LISTEN      31683/bin/obproxy
tcp        0      0 0.0.0.0:2884            0.0.0.0:*               LISTEN      31683/bin/obproxy
管理OBPROXY参数
- 修改OBPROXY用户密码(初始密码为空)
[admin@localhost ~]$ obclient -h192.168.66.4 -uroot@proxysys -P2883 -p
Enter password:
Welcome to the OceanBase.  Commands end with ; or \g.
Your MySQL connection id is 1
Server version: 5.6.25

Copyright (c) 2000, 2018, Oracle, MariaDB Corporation Ab and others.

Type 'help;' or '\h' for help. Type '\c' to clear the current input statement.

MySQL [(none)]> alter proxyconfig set obproxy_sys_password='proxySYSPWD123';
Query OK, 0 rows affected (0.003 sec)
- 修改OBPROXY与OceanBase集群的通信用户proxyro的密码
MySQL [(none)]> alter proxyconfig set observer_sys_password='proxyPWD123';
Query OK, 0 rows affected (0.003 sec)

注:
该用户密码需要与之前OBSERVER中所创建的OBPROXY用户密码保持一致。
- 检查是否部署成功(如果能查看所有会话,说明部署成功)
[admin@localhost log]$ obclient -h192.168.66.4 -uroot@sys#obdemo -P2883 -prootPWD123 -c -A oceanbase
Welcome to the OceanBase.  Commands end with ; or \g.
Your MySQL connection id is 19
Server version: 5.6.25 OceanBase 3.1.2 (r10000392021123010-d4ace121deae5b81d8f0b40afbc4c02705b7fc1d) (Built Dec 30 2021 02:47:29)

Copyright (c) 2000, 2018, Oracle, MariaDB Corporation Ab and others.

Type 'help;' or '\h' for help. Type '\c' to clear the current input statement.

MySQL [oceanbase]>
MySQL [oceanbase]> show processlist;
+------+--------+------+--------------------+-----------+-------------+-------------------+-------------------+-------+-------+
| Id   | Tenant | User | Host               | db        | trans_count | svr_session_count | state             | tid   | pid   |
+------+--------+------+--------------------+-----------+-------------+-------------------+-------------------+-------+-------+
|   19 | sys    | root | 192.168.66.4:49096 | oceanbase |           0 |                 1 | MCS_ACTIVE_READER | 31683 | 31683 |
+------+--------+------+--------------------+-----------+-------------+-------------------+-------------------+-------+-------+
1 row in set (0.001 sec)

MySQL [oceanbase]> show full processlist;
+------------+---------+--------+--------------------+-----------+---------+------+--------+-----------------------+--------------+------+--------------+
| Id         | User    | Tenant | Host               | db        | Command | Time | State  | Info                  | Ip           | Port | Proxy_sessid |
+------------+---------+--------+--------------------+-----------+---------+------+--------+-----------------------+--------------+------+--------------+
| 3221751285 | proxyro | sys    | 192.168.66.4:51708 | oceanbase | Sleep   |    7 | SLEEP  | NULL                  | 192.168.66.2 | 2881 |           12 |
| 3221751283 | root    | sys    | 192.168.66.4:51704 | oceanbase | Query   |    0 | ACTIVE | show full processlist | 192.168.66.2 | 2881 |           13 |
| 3221514245 | root    | sys    | 192.168.66.1:57290 | oceanbase | Sleep   | 1104 | SLEEP  | NULL                  | 192.168.66.1 | 2881 |         NULL |
+------------+---------+--------+--------------------+-----------+---------+------+--------+-----------------------+--------------+------+--------------+
3 rows in set (0.020 sec)
创建租户及数据库
创建租户
- 创建资源单元
[admin@localhost log]$ obclient -h192.168.66.4 -uroot@sys#obdemo -P2883 -prootPWD123 -c -A
Welcome to the OceanBase.  Commands end with ; or \g.
Your MySQL connection id is 25
Server version: 5.6.25 OceanBase 3.1.2 (r10000392021123010-d4ace121deae5b81d8f0b40afbc4c02705b7fc1d) (Built Dec 30 2021 02:47:29)

Copyright (c) 2000, 2018, Oracle, MariaDB Corporation Ab and others.

Type 'help;' or '\h' for help. Type '\c' to clear the current input statement.

MySQL [(none)]> CREATE resource unit unit1 max_cpu=4, min_cpu=4, max_memory='1G', min_memory='1G', max_iops=10000, min_iops=1000, max_session_num=1000000,max_disk_size='20G';
Query OK, 0 rows affected (0.019 sec)
- 创建资源池
MySQL [(none)]> CREATE resource pool my_pool unit = 'unit1', unit_num = 1,zone_list=('zone1','zone2','zone3');
Query OK, 0 rows affected (0.051 sec)
- 创建租户
MySQL [(none)]> create tenant obmysql resource_pool_list=('my_pool'), charset='utf8' set ob_tcp_invited_nodes='%', ob_compatibility_mode='mysql';
Query OK, 0 rows affected (4.730 sec)
- 查询租户信息
MySQL [(none)]> SELECT * FROM oceanbase.gv$tenant;
+-----------+-------------+-------------------+-------------------+----------------+---------------+-----------+---------------------------------------------+
| tenant_id | tenant_name | zone_list         | primary_zone      | collation_type | info          | read_only | locality                                    |
+-----------+-------------+-------------------+-------------------+----------------+---------------+-----------+---------------------------------------------+
|         1 | sys         | zone1;zone2;zone3 | zone1;zone2,zone3 |              0 | system tenant |         0 | FULL{1}@zone1, FULL{1}@zone2, FULL{1}@zone3 |
|      1001 | obmysql     | zone1;zone2;zone3 | RANDOM            |              0 |               |         0 | FULL{1}@zone1, FULL{1}@zone2, FULL{1}@zone3 |
+-----------+-------------+-------------------+-------------------+----------------+---------------+-----------+---------------------------------------------+
2 rows in set (0.010 sec)
- 连接租户
[admin@localhost log]$ obclient -h192.168.66.4 -uroot@obmysql#obdemo -P2883 -p -c -A
Enter password:
Welcome to the OceanBase.  Commands end with ; or \g.
Your MySQL connection id is 28
Server version: 5.6.25 OceanBase 3.1.2 (r10000392021123010-d4ace121deae5b81d8f0b40afbc4c02705b7fc1d) (Built Dec 30 2021 02:47:29)

Copyright (c) 2000, 2018, Oracle, MariaDB Corporation Ab and others.

Type 'help;' or '\h' for help. Type '\c' to clear the current input statement.

MySQL [(none)]> show databases;
+--------------------+
| Database           |
+--------------------+
| oceanbase          |
| information_schema |
| mysql              |
| test               |
+--------------------+
4 rows in set (0.009 sec)
MySQL [(none)]> alter user root identified by 'rootPWD123';
Query OK, 0 rows affected (0.106 sec)
创建数据库
MySQL [(none)]> create database yaya;
Query OK, 1 row affected (0.065 sec)

MySQL [(none)]> show databases;
+--------------------+
| Database           |
+--------------------+
| oceanbase          |
| information_schema |
| mysql              |
| test               |
| yaya               |
+--------------------+
5 rows in set (0.003 sec)
创建用户
MySQL [(none)]> use yaya;
Database changed
MySQL [yaya]> grant all privileges * to yaya1 identified by '123456';
uery OK, 0 rows affected (0.165 sec)
MySQL [yaya]> select user from mysql.user;
+------------+
| user       |
+------------+
| root       |
| ORAAUDITOR |
| yaya1      |
+------------+
3 rows in set (0.048 sec)
创建表
[admin@localhost log]$ obclient -h192.168.66.4 -uyaya1@obmysql#obdemo -P2883 -p123456 -c -A yaya
Welcome to the OceanBase.  Commands end with ; or \g.
Your MySQL connection id is 30
Server version: 5.6.25 OceanBase 3.1.2 (r10000392021123010-d4ace121deae5b81d8f0b40afbc4c02705b7fc1d) (Built Dec 30 2021 02:47:29)

Copyright (c) 2000, 2018, Oracle, MariaDB Corporation Ab and others.

Type 'help;' or '\h' for help. Type '\c' to clear the current input statement.

MySQL [yaya]> create table yayatb(name varchar(10),age number);
Query OK, 0 rows affected (0.265 sec)

MySQL [yaya]> insert yayatb values('wangwu',17),('zhaoliu',18);
Query OK, 2 rows affected (0.133 sec)
Records: 2  Duplicates: 0  Warnings: 0

MySQL [yaya]> select * from yayatb;
+---------+------+
| name    | age  |
+---------+------+
| wangwu  |   17 |
| zhaoliu |   18 |
+---------+------+
2 rows in set (0.013 sec)
重启OBSERVER节点
- 节点停服
OceanBase没有提供重启节点的命令,但是提供了节点停服的命令。
alter system stop server '节点ip:2882';
注:
节点停服后,节点上如果有主副本,会自动切换为备副本。节点的备副本依然参与投票,但不会当选为主副本。
通常几秒钟所有分区副本的主备切换就结束了。
- 杀进程
如果是测试环境,可以不用发起节点停服命令,直接强行杀进程。
kill -9 'pidof observer'
- 启动进程
启动节点进程最关键的是在上一次工作目录启动。
cd /home/admin/oceanbase && bin/observer
注:
通常启动的时候不需要再带启动参数,除非这次启动节点是为了修改某个参数,就加上-o带上具体的参数。
进程启动后等待5~10秒再确认进程启动是否成功。
- 启动服务
节点启动还需要一个数据恢复过程,就是应用CLOG的过程。
如果此前对节点停服了,先把节点服务启动。
alter system start server '节点IP:2882';
- 确认节点服务状态
select a.zone,concat(a.svr_ip,':',a.svr_port) observer, cpu_total, (cpu_total-cpu_assigned) cpu_free, round(mem_total/1024/1024/1024) mem_total_gb, round((mem_total-mem_assigned)/1024/1024/1024) mem_free_gb, usec_to_time(b.last_offline_time) last_offline_time, usec_to_time(b.start_service_time) start_service_time, b.status, usec_to_time(b.stop_time) stop_time, b.build_version
from __all_virtual_server_stat a join __all_server b on (a.svr_ip=b.svr_ip and a.svr_port=b.svr_port)
order by a.zone, a.svr_ip;

注:
节点状态 status:升级前没有 inactive 值,升级过程中会有。
节点服务时间 start_service_time 的时间不是默认值(1970-01-01 08:00:00.000000)。如果是,则表示节点还没有恢复结束。
节点停止时间 stop_time 的时间是默认值(1970-01-01 08:00:00.000000)。如果不是,则表示节点被停服( stop server)了,先启动服务(start server)。
一定要确认节点的 start_service_time 正常了才去重启其他 Zone 对应的其他副本所在的机器。同一个 Zone 的多台机器是可以并行重启的。
故障排查
启动OBServer进程失败
- 指定OB进程启动参数之后,查看OB进程状态,如下:
[admin@localhost oceanbase]$ ps -ef | grep observer
admin    19577     1 78 10:48 ?        00:00:06 bin/observer -i ens192 -p 2881 -P 2882 -z zone3 -d /home/admin/oceanbase/store/obdemo -r 192.168.66.1:2882:2881;192.168.66.2:2882:2881;192.168.66.3:2882:2881 -c 20220118 -n obdemo -o memory_limit=8G,cache_wash_threshold=1G,__min_full_resource_pool_memory=268435456,system_memory=3G,memory_chunk_cache_size=128M,cpu_count=16,net_thread_count=4,datafile_size=25G,stack_size=1536K,config_additional_dir=/data/obdemo/etc3;/redo/obdemo/etc2 -d /home/admin/oceanbase/store/obdemo
admin    20085 19446  0 10:49 pts/2    00:00:00 grep --color=auto observer
- 之后检查端口监听状态:
[admin@localhost oceanbase]$ netstat -ntlp
(No info could be read for "-p": geteuid()=1000 but you should be root.)
Active Internet connections (only servers)
Proto Recv-Q Send-Q Local Address           Foreign Address         State       PID/Program name
tcp        0      0 192.168.122.1:53        0.0.0.0:*               LISTEN      -
tcp        0      0 0.0.0.0:22              0.0.0.0:*               LISTEN      -
tcp        0      0 127.0.0.1:631           0.0.0.0:*               LISTEN      -
tcp        0      0 127.0.0.1:25            0.0.0.0:*               LISTEN      -
tcp        0      0 127.0.0.1:6010          0.0.0.0:*               LISTEN      -
tcp        0      0 127.0.0.1:6011          0.0.0.0:*               LISTEN      -
tcp        0      0 0.0.0.0:111             0.0.0.0:*               LISTEN      -
- 发现没有2881和2882端口,再次检查OB进程状态:
[admin@localhost oceanbase]$ ps -ef | grep observer
admin    20150 19446  0 10:55 pts/2    00:00:00 grep --color=auto observer
- OBServer进程没有了,检查observer日志,发现如下报错:
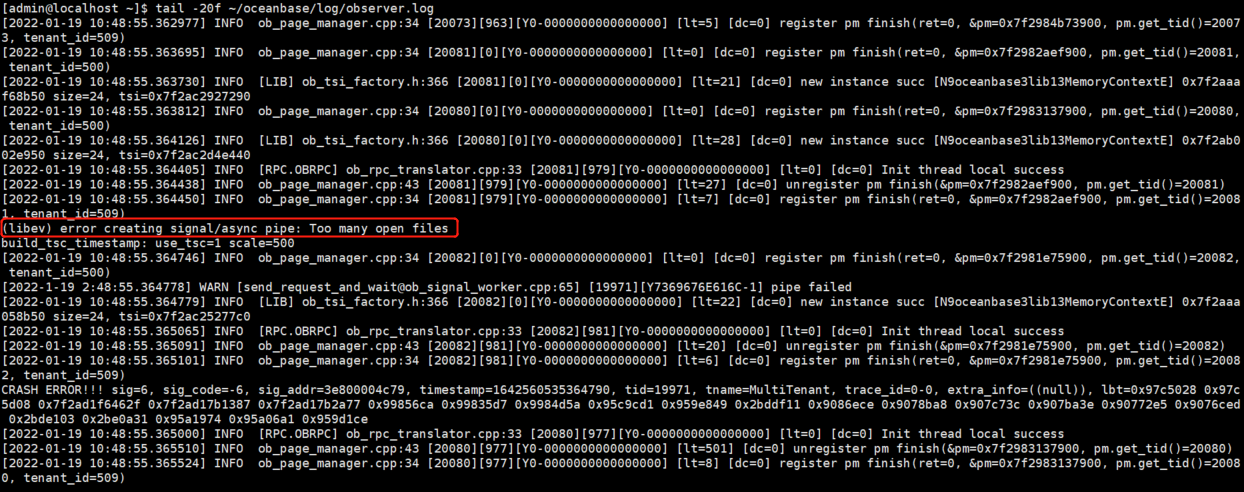
- 按如图错误显示,应该是open files最大进程数参数没有设置,修改系统会话变量设置,修改系统内核参数之后,再次运行OBServer启动指令,OB进程正常启动。
- 服务器参数修改可参照 https://open.oceanbase.com/blog/8600144
Bootstrap失败
- 现象如下
[root@localhost ~]# obclient -h192.168.66.3 -uroot -P2881 -p -c -A
MySQL [(none)]> set session ob_query_timeout=1000000000; alter system bootstrap ZONE 'zone1' SERVER '192.168.66.1:2882', ZONE 'zone2' SERVER '192.168.66.2:2882', ZONE 'zone3' SERVER '192.168.66.3:2882';
Query OK, 0 rows affected (0.001 sec)
ERROR 4012 (HY000): Timeout
- 重新部署
清理目录和数据:
[root@localhost ~]$ kill -9 $(pidof observer)
[root@localhost ~]$ rm -rf ~/oceanbase/store/obdemo/*

注:
bootstrap命令不支持重试,如果在上一个bootstrap命令中已经创建了副本,后面的bootstrap肯定是失败的。
如果节点重置,注意清理掉数据文件目录(sstable)以及事务日志目录(slog、ilog、clog)下内容,把软链接的内容也清理掉。
最后修改时间:2022-01-27 10:15:07
「喜欢这篇文章,您的关注和赞赏是给作者最好的鼓励」
关注作者
【版权声明】本文为墨天轮用户原创内容,转载时必须标注文章的来源(墨天轮),文章链接,文章作者等基本信息,否则作者和墨天轮有权追究责任。如果您发现墨天轮中有涉嫌抄袭或者侵权的内容,欢迎发送邮件至:contact@modb.pro进行举报,并提供相关证据,一经查实,墨天轮将立刻删除相关内容。
