


简介
使用postgresql + etcd + patroni + haproxy + keepalived可以实现PG的高可用集群,其中,以postgresql做数据库,Patroni监控本地的PostgreSQL状态,并将本地PostgreSQL信息/状态写入etcd来存储集群状态,所以,patroni与etcd结合可以实现数据库集群故障切换(自动或手动切换),而haproxy可以实现数据库读写分离+读负载均衡(通过不同端口实现),keepalived实现VIP跳转,对haproxy提供了高可用,防止haproxy宕机。
Etcd用于Patroni节点之间共享信息。Patroni监控本地的PostgreSQL状态。如果主库(Primary)故障,Patroni把一个从库(Standby)拉起来,作为新的主(Primary)数据库, 如果一个故障PostgreSQL被抢救过来了,能够重新自动或手动加入集群。
Patroni基于Python开发的模板,结合DCS(Distributed Configuration Store,例如 ZooKeeper, etcd, Consul )可以定制PostgreSQL高可用方案。Patroni接管PostgreSQL数据库的启停,同时监控本地的PostgreSQL数据库,并将本地的PostgreSQL数据库信息写入DCS。Patroni的主备端是通过是否能获得 leader key 来控制的,获取到了leader key的Patroni为主节点,其它的为备节点。
其中Patroni不仅简单易用而且功能非常强大。
支持自动failover和按需switchover
支持一个和多个备节点
支持级联复制
支持同步复制,异步复制
支持同步复制下备库故障时自动降级为异步复制(功效类似于MySQL的半同步,但是更加智能)
支持控制指定节点是否参与选主,是否参与负载均衡以及是否可以成为同步备机
支持通过
pg_rewind
自动修复旧主支持多种方式初始化集群和重建备机,包括
pg_basebackup
和支持wal_e
,pgBackRest
,barman
等备份工具的自定义脚本支持自定义外部callback脚本
支持REST API
支持通过watchdog防止脑裂
支持k8s,docker等容器化环境部署
支持多种常见DCS(Distributed Configuration Store)存储元数据,包括etcd,ZooKeeper,Consul,Kubernetes
架构规划
部署规划如下:
| 主机 | IP | 组件 | 备注 |
|---|---|---|---|
| lhrpgpatroni71 | 172.72.6.71 | PostgreSQL 13.3 + Patroni 2.1.2 | 主节点,yum安装PG,pip3安装Patroni |
| lhrpgpatroni72 | 172.72.6.72 | PostgreSQL 13.3 + Patroni 2.1.2 | 备节点1,yum安装PG,pip3安装Patroni |
| lhrpgpatroni73 | 172.72.6.73 | PostgreSQL 13.3 + Patroni 2.1.2 | 备节点2,yum安装PG,pip3安装Patroni |
| lhretcd74 | 172.72.6.74 | etcd 3.3.11 | leader,yum安装etcd |
| lhretcd75 | 172.72.6.75 | etcd 3.3.11 | follower,yum安装etcd |
| lhretcd76 | 172.72.6.76 | etcd 3.3.11 | follower,yum安装etcd |
| lhrhaproxyka77 | 172.72.6.77 | HAProxy 1.5.18 + keepalived 1.3.5 | yum安装HAProxy + keepalived主节点 |
| lhrhaproxyka78 | 172.72.6.78 | HAProxy 1.5.18 + keepalived 1.3.5 | yum安装HAProxy + keepalived备节点 |
| lhrmonitor | 172.72.6.79 | Prometheus + Grafana + etcd brower | 已内置普罗米修斯监控软件,需要配置监控PG和HAProxy,etcd浏览 |
| 172.72.6.70 | VIP | 虚拟IP,在172.72.6.77和172.72.6.78之间进行漂移,附着于eth0网卡 |
架构图如下:

拓扑图如下:

本文包括如下几个部分:
1、搭建1主2从的PG流复制环境
2、搭建3节点的etcd集群,并配置etcd-browser WEB可视化界面
3、patroni安装及配置实现switchover和failover故障切换
4、配置HAProxy和Keepalived实现负载均衡+读写分离
5、配置普罗米修斯(prometheus+grafana)监控PG+HAproxy+etcd集群
6、高可用测试
如果配置防火墙,需要开放的端口:
| 程序 | 端口 | 用途 |
|---|---|---|
| PostgreSQL | 5432 | 数据库监听端口 |
| Patroni | 8008 | restapi监听端口 |
| etcd | 2379/2380 | 客户端访问端口和服务监听端口 |
| haproxy | 1080/5000/5001 | Web访问端口和数据库对外服务端口 |
| grafana | 3000 | Web登录端口 |
| prometheus | 9090 | Web登录端口 |
| node_exporter | 9100 | 对外服务端口 |
| postgres_exporter | 9187 | 对外服务端口 |
| haproxy_exporter | 9101 | 对外服务端口 |
环境准备
 1-- 网卡
 2docker network create --subnet=172.72.6.0/24 pg-network
 3
 4
 5-- pg + Patroni
 6docker rm -f lhrpgpatroni71
 7docker run -d --name lhrpgpatroni71 -h lhrpgpatroni71 \
 8  --net=pg-network --ip 172.72.6.71 \
 9  -p 64371:5432 -p 18008:8008 \
10  -v /sys/fs/cgroup:/sys/fs/cgroup \
11  --privileged=true lhrbest/lhrpgall:2.0 \
12  /usr/sbin/init
13
14
15docker rm -f lhrpgpatroni72
16docker run -d --name lhrpgpatroni72 -h lhrpgpatroni72 \
17  --net=pg-network --ip 172.72.6.72 \
18  -p 64372:5432 -p 28008:8008 \
19  -v /sys/fs/cgroup:/sys/fs/cgroup \
20  --privileged=true lhrbest/lhrpgall:2.0 \
21  /usr/sbin/init
22
23
24
25docker rm -f lhrpgpatroni73
26docker run -d --name lhrpgpatroni73 -h lhrpgpatroni73 \
27  --net=pg-network --ip 172.72.6.73 \
28  -p 64373:5432 -p 38008:8008 \
29  -v /sys/fs/cgroup:/sys/fs/cgroup \
30  --privileged=true lhrbest/lhrpgall:2.0 \
31  /usr/sbin/init
32
33
34
35--  etcd
36docker rm -f lhretcd74
37docker run -d --name lhretcd74 -h lhretcd74 \
38  --net=pg-network --ip 172.72.6.74 \
39  -v /sys/fs/cgroup:/sys/fs/cgroup \
40  --privileged=true lhrbest/lhrcentos76:8.5 \
41  /usr/sbin/init
42
43
44docker rm -f lhretcd75
45docker run -d --name lhretcd75 -h lhretcd75 \
46  --net=pg-network --ip 172.72.6.75 \
47  -v /sys/fs/cgroup:/sys/fs/cgroup \
48  --privileged=true lhrbest/lhrcentos76:8.5 \
49  /usr/sbin/init
50
51
52docker rm -f lhretcd76
53docker run -d --name lhretcd76 -h lhretcd76 \
54  --net=pg-network --ip 172.72.6.76 \
55  -v /sys/fs/cgroup:/sys/fs/cgroup \
56  --privileged=true lhrbest/lhrcentos76:8.5 \
57  /usr/sbin/init
58
59
60-- HAProxy + keepalived
61docker rm -f lhrhaproxyka77
62docker run -d --name lhrhaproxyka77 -h lhrhaproxyka77 \
63  --net=pg-network --ip 172.72.6.77 \
64  -p 11080:1080 -p 15000-15001:5000-5001 \
65  -v /sys/fs/cgroup:/sys/fs/cgroup \
66  --privileged=true lhrbest/lhrcentos76:8.5 \
67  /usr/sbin/init
68
69
70docker rm -f lhrhaproxyka78
71docker run -d --name lhrhaproxyka78 -h lhrhaproxyka78 \
72  --net=pg-network --ip 172.72.6.78 \
73  -p 21080:1080 -p 25000-25001:5000-5001 \
74  -v /sys/fs/cgroup:/sys/fs/cgroup \
75  --privileged=true lhrbest/lhrcentos76:8.5 \
76  /usr/sbin/init
77
78
79
80
81
82-- 监控
83docker rm -f lhrmonitor
84docker run -d --name lhrmonitor -h lhrmonitor \
85 --net=pg-network --ip 172.72.6.79 \
86 -p 23389:3389 -p 29090:9090 -p 29093:9093 -p 23000:3000 -p 28000:8000 \
87 -v /sys/fs/cgroup:/sys/fs/cgroup \
88 --privileged=true lhrbest/lhrprometheus:1.0 \
89 /usr/sbin/init
搭建1主2从的流复制环境
详细搭建过程可以参考:PG12高可用之1主2从流复制环境搭建及切换测试:https://www.xmmup.com/dbbao60pg12gaokeyongzhi1zhu2congliufuzhihuanjingdajianjiqiehuanceshi.html
主库操作
配置主库pg_hba.conf
1cat  << EOF > /var/lib/pgsql/13/data/pg_hba.conf
2# TYPE  DATABASE    USER    ADDRESS       METHOD
3local     all       all                    trust
4host      all       all   127.0.0.1/32     trust
5host      all       all    0.0.0.0/0        md5
6host   replication  all    0.0.0.0/0        md5
7EOF
配置主库参数
 1-- 登陆主库环境
 2docker exec -it lhrpgpatroni71 bash
 3
 4-- 该路径也需要在从库创建
 5mkdir -p /postgresql/archive
 6chown -R postgres.postgres /postgresql/archive
 7
 8-- 修改参数
 9cat >> /var/lib/pgsql/13/data/postgresql.conf <<"EOF"
10
11wal_level='replica'
12archive_mode='on'
13archive_command='test ! -f /postgresql/archive/%f && cp %p /postgresql/archive/%f'
14
15max_wal_senders=10
16
17EOF
18
19-- 重启
20systemctl restart postgresql-13.service
21
22-- 查询参数
23select * from pg_settings where name in ('wal_level','archive_mode','archive_command');
主库创建用户
1create role replhr login encrypted password 'lhr' replication;
从库操作
 1mkdir -p /bk
 2chown postgres:postgres /bk
 3
 4su - postgres
 5pg_basebackup -h 172.72.6.71 -p 5432 -U replhr -l bk20220120 -F p -P -R -D /bk
 6
 7
 8cat >> /bk/postgresql.conf <<"EOF"
 9
10primary_conninfo = 'host=172.72.6.71 port=5432 user=replhr password=lhr'
11
12EOF
13
14-- 关闭从库,删除从库的数据文件,并且将备份文件覆盖从库的数据文件
15systemctl stop postgresql-13.service
16rm -rf /var/lib/pgsql/13/data/*
17cp -r /bk/* /var/lib/pgsql/13/data/
18
19
20systemctl start postgresql-13.service
21
检查主从复制
 1-- 主库查看wal日志发送状态
 2select * from pg_stat_replication;
 3
 4-- 从库查看wal日志接收状态
 5select * from pg_stat_wal_receiver;
 6
 7-- 也可以通过该命令查看
 8pg_controldata  | grep state
 9
10-- 也可以查看这个,主库是f代表false ;备库是t,代表true
11select pg_is_in_recovery();
12
13
14postgres=# select * from pg_stat_replication;
15 pid  | usesysid | usename | application_name | client_addr | client_hostname | client_port |         backend_start         | backend_xmin |   state   | sent_lsn  | write_lsn | flush_lsn | replay_lsn | write_lag | flush_lag | replay_lag | sync_priority | sync_state |          reply_time
16------+----------+---------+------------------+-------------+-----------------+-------------+-------------------------------+--------------+-----------+-----------+-----------+-----------+------------+-----------+-----------+------------+---------------+------------+-------------------------------
17 3170 |    16430 | replhr  | walreceiver      | 172.72.6.73 |                 |       45000 | 2022-01-20 14:58:13.769779+08 |              | streaming | 0/7000060 | 0/7000060 | 0/7000060 | 0/7000060  |           |           |            |             0 | async      | 2022-01-20 15:13:14.383888+08
18 3980 |    16430 | replhr  | walreceiver      | 172.72.6.72 |                 |       41278 | 2022-01-20 15:12:09.147278+08 |              | streaming | 0/7000060 | 0/7000060 | 0/7000060 | 0/7000060  |           |           |            |             0 | async      | 2022-01-20 15:13:09.266891+08
19(2 rows)
配置etcd集群
6.74、6.75、6.76操作:
 1-- 安装
 2yum install -y  etcd
 3
 4
 5-- lhretcd74
 6cat > /etc/etcd/etcd.conf <<"EOF"
 7ETCD_DATA_DIR="/var/lib/etcd/default.etcd"
 8ETCD_LISTEN_PEER_URLS="http://172.72.6.74:2380"
 9ETCD_LISTEN_CLIENT_URLS="http://172.72.6.74:2379,http://127.0.0.1:2379"
10ETCD_NAME="etcd74"
11ETCD_INITIAL_ADVERTISE_PEER_URLS="http://172.72.6.74:2380"
12ETCD_ADVERTISE_CLIENT_URLS="http://172.72.6.74:2379"
13ETCD_INITIAL_CLUSTER="etcd74=http://172.72.6.74:2380,etcd75=http://172.72.6.75:2380,etcd76=http://172.72.6.76:2380"
14ETCD_INITIAL_CLUSTER_TOKEN="lhretcd-cluster"
15ETCD_INITIAL_CLUSTER_STATE="new"
16
17EOF
18
19
20
21
22-- lhretcd75
23cat > /etc/etcd/etcd.conf <<"EOF"
24ETCD_DATA_DIR="/var/lib/etcd/default.etcd"
25ETCD_LISTEN_PEER_URLS="http://172.72.6.75:2380"
26ETCD_LISTEN_CLIENT_URLS="http://172.72.6.75:2379,http://127.0.0.1:2379"
27ETCD_NAME="etcd75"
28ETCD_INITIAL_ADVERTISE_PEER_URLS="http://172.72.6.75:2380"
29ETCD_ADVERTISE_CLIENT_URLS="http://172.72.6.75:2379"
30ETCD_INITIAL_CLUSTER="etcd74=http://172.72.6.74:2380,etcd75=http://172.72.6.75:2380,etcd76=http://172.72.6.76:2380"
31ETCD_INITIAL_CLUSTER_TOKEN="lhretcd-cluster"
32ETCD_INITIAL_CLUSTER_STATE="new"
33
34EOF
35
36
37
38
39
40-- lhretcd76
41cat > /etc/etcd/etcd.conf <<"EOF"
42ETCD_DATA_DIR="/var/lib/etcd/default.etcd"
43ETCD_LISTEN_PEER_URLS="http://172.72.6.76:2380"
44ETCD_LISTEN_CLIENT_URLS="http://172.72.6.76:2379,http://127.0.0.1:2379"
45ETCD_NAME="etcd76"
46ETCD_INITIAL_ADVERTISE_PEER_URLS="http://172.72.6.76:2380"
47ETCD_ADVERTISE_CLIENT_URLS="http://172.72.6.76:2379"
48ETCD_INITIAL_CLUSTER="etcd74=http://172.72.6.74:2380,etcd75=http://172.72.6.75:2380,etcd76=http://172.72.6.76:2380"
49ETCD_INITIAL_CLUSTER_TOKEN="lhretcd-cluster"
50ETCD_INITIAL_CLUSTER_STATE="new"
51
52EOF
53
54
55
56systemctl start etcd
57systemctl enable etcd
58systemctl status etcd
59
60
61-- 启动成功后,修改每个配置文件为:
62sed -i 's/ETCD_INITIAL_CLUSTER_STATE="new"/ETCD_INITIAL_CLUSTER_STATE="existing"/g' /etc/etcd/etcd.conf
63
64
65-- 查看状态
66etcdctl member list
67etcdctl cluster-health
端口2379 用于客户端连接,而 2380 用于伙伴通讯。
etcd集群状态:
1[root@lhretcd74 /]# etcdctl member list
278e1f33282f17b1d: name=etcd76 peerURLs=http://172.72.6.76:2380 clientURLs=http://172.72.6.76:2379 isLeader=false
387e0134f0e4088f5: name=etcd75 peerURLs=http://172.72.6.75:2380 clientURLs=http://172.72.6.75:2379 isLeader=false
4e65c83646e82fd9c: name=etcd74 peerURLs=http://172.72.6.74:2380 clientURLs=http://172.72.6.74:2379 isLeader=true
5[root@lhretcd74 /]# etcdctl cluster-health
6member 78e1f33282f17b1d is healthy: got healthy result from http://172.72.6.76:2379
7member 87e0134f0e4088f5 is healthy: got healthy result from http://172.72.6.75:2379
8member e65c83646e82fd9c is healthy: got healthy result from http://172.72.6.74:2379
9cluster is healthy
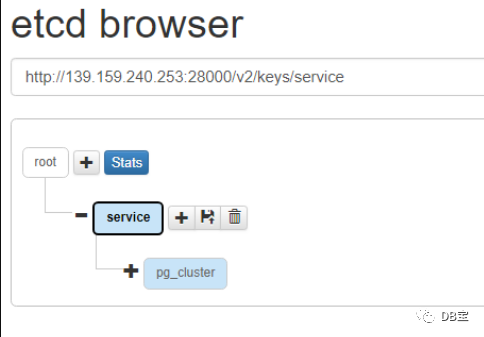
etcd-browser WEB可视化界面
下载地址:https://github.com/henszey/etcd-browser
要启动 etcd-browser,还需要下载安装 nodejs,下载地址:https://nodejs.org/zh-cn/download/
 1docker rm -f lhrmonitor
 2docker run -d --name lhrmonitor -h lhrmonitor \
 3 --net=pg-network --ip 172.72.6.79 \
 4 -p 23389:3389 -p 29090:9090 -p 29093:9093 -p 23000:3000 -p 28000:8000 -p 28800:8800 \
 5 -v /sys/fs/cgroup:/sys/fs/cgroup \
 6 --privileged=true lhrbest/lhrprometheus:1.0 \
 7 /usr/sbin/init
 8
 9
10# 下载安装
11wget https://codeload.github.com/henszey/etcd-browser/zip/refs/heads/master -O etcd-browser-master.zip
12unzip etcd-browser-master.zip -d /usr/local/etcd
13
14wget https://nodejs.org/dist/v16.13.2/node-v16.13.2-linux-x64.tar.xz
15tar -xvf node-v16.13.2-linux-x64.tar.xz -C /usr/local/etcd
16ln -s /usr/local/etcd/node-v16.13.2-linux-x64 /usr/local/etcd/nodejs
17
18
19
20# 修改etcd-browser的配置文件
21vi /usr/local/etcd/etcd-browser-master/server.js
22var etcdHost = process.env.ETCD_HOST || '172.72.6.74';
23var etcdPort = process.env.ETCD_PORT || 2379;
24var serverPort = process.env.SERVER_PORT || 8000;
25
26# 启动etcd-browser
27cd /usr/local/etcd/etcd-browser-master
28nohup /usr/local/etcd/nodejs/bin/node /usr/local/etcd/etcd-browser-master/server.js &
29
30
31[root@lhrmonitor ~]# netstat -tulnp | grep 8000
32tcp6       0      0 :::8000                 :::*                    LISTEN      665/node
谷歌浏览器访问 http://192.168.66.35:8000/
patroni配置
安装相应的Python模块
6.71、6.72、6.73操作:
 1-- -i https://mirrors.aliyun.com/pypi/simple/
 2-- -ihttp://pypi.douban.com/simple/
 3python3 -m pip install --upgrade pip
 4python3 -m pip install psycopg2_binary
 5python3 -m pip install patroni[etcd]
 6
 7
 8-- 验证是否安装成功
 9which patroni
10patronictl --help
配置patroni的yml参数文件
1mkdir -p /app/patroni/etc/
2mkdir -p /app/patroni/log/
3chown postgres.postgres -R /app/patroni/
节点lhrpgpatroni71
需要注意python的yml文件格式,有严格的缩进要求,且以空格进行缩进,不要使用Tab键,缩进控制不好的话,参数配置将出现各种问题。
 1cat > /app/patroni/etc/patroni_config.yml <<"EOF"
 2scope: pg_cluster
 3namespace: /service
 4name: lhrpgpatroni71
 5
 6log:
 7  level: INFO
 8  traceback_level: ERROR
 9  dir: /app/patroni/log
10  file_num: 10
11  file_size: 104857600
12
13restapi:
14  listen: 0.0.0.0:8008
15  connect_address: 172.72.6.71:8008
16
17etcd:
18  host: 172.72.6.74:2379
19
20bootstrap:
21  dcs:
22    ttl: 30
23    loop_wait: 10
24    retry_timeout: 10
25    maximum_lag_on_failover: 1048576
26    max_timelines_history: 0
27    master_start_timeout: 300
28    master_stop_timeout: 0
29    synchronous_mode: false
30    postgresql:
31      use_pg_rewind: true
32      use_slots: true
33      parameters:
34        max_connections: 3000
35        superuser_reserved_connections: 100
36        max_locks_per_transaction: 64
37        max_worker_processes: 2
38        max_prepared_transactions: 0
39        wal_level: logical
40        wal_log_hints: on
41        track_commit_timestamp: off
42        max_wal_senders: 10
43        max_replication_slots: 10
44        listen_addresses: "*"
45        port: 5432
46        cluster_name: "pg_cluster"
47        archive_mode: on
48        archive_command: "test ! -f /postgresql/archive/%f && cp %p /postgresql/archive/%f"
49
50postgresql:
51  listen: 0.0.0.0:5432
52  connect_address: 172.72.6.71:5432
53  data_dir: /var/lib/pgsql/13/data
54  pgpass: /home/postgres/.pgpass
55  pg_ctl_timeout: 60
56  use_pg_rewind: true
57  remove_data_directory_on_rewind_failure: false
58  remove_data_directory_on_diverged_timelines: true
59  authentication:
60    replication:
61      username: replhr
62      password: lhr
63    superuser:
64      username: postgres
65      password: lhr
66
67tags:
68  nofailover: false
69  noloadbalance: false
70  clonefrom: false
71  nosync: false
72EOF
节点lhrpgpatroni72
 1cat > /app/patroni/etc/patroni_config.yml <<"EOF"
 2scope: pg_cluster
 3namespace: /service
 4name: lhrpgpatroni72
 5
 6log:
 7  level: INFO
 8  traceback_level: ERROR
 9  dir: /app/patroni/log
10  file_num: 10
11  file_size: 104857600
12
13restapi:
14  listen: 0.0.0.0:8008
15  connect_address: 172.72.6.72:8008
16
17etcd:
18  host: 172.72.6.75:2379
19
20bootstrap:
21  dcs:
22    ttl: 30
23    loop_wait: 10
24    retry_timeout: 10
25    maximum_lag_on_failover: 1048576
26    max_timelines_history: 0
27    master_start_timeout: 300
28    master_stop_timeout: 0
29    synchronous_mode: false
30    postgresql:
31      use_pg_rewind: true
32      use_slots: true
33      parameters:
34        max_connections: 3000
35        superuser_reserved_connections: 100
36        max_locks_per_transaction: 64
37        max_worker_processes: 2
38        max_prepared_transactions: 0
39        wal_level: logical
40        wal_log_hints: on
41        track_commit_timestamp: off
42        max_wal_senders: 10
43        max_replication_slots: 10
44        listen_addresses: "*"
45        port: 5432
46        cluster_name: "pg_cluster"
47        archive_mode: on
48        archive_command: "test ! -f /postgresql/archive/%f && cp %p /postgresql/archive/%f"
49
50postgresql:
51  listen: 0.0.0.0:5432
52  connect_address: 172.72.6.72:5432
53  data_dir: /var/lib/pgsql/13/data
54  pgpass: /home/postgres/.pgpass
55  pg_ctl_timeout: 60
56  use_pg_rewind: true
57  remove_data_directory_on_rewind_failure: false
58  remove_data_directory_on_diverged_timelines: true
59  authentication:
60    replication:
61      username: replhr
62      password: lhr
63    superuser:
64      username: postgres
65      password: lhr
66
67tags:
68  nofailover: false
69  noloadbalance: false
70  clonefrom: false
71  nosync: false
72EOF
节点lhrpgpatroni73
 1cat > /app/patroni/etc/patroni_config.yml <<"EOF"
 2scope: pg_cluster
 3namespace: /service
 4name: lhrpgpatroni73
 5
 6log:
 7  level: INFO
 8  traceback_level: ERROR
 9  dir: /app/patroni/log
10  file_num: 10
11  file_size: 104857600
12
13restapi:
14  listen: 0.0.0.0:8008
15  connect_address: 172.72.6.73:8008
16
17etcd:
18  host: 172.72.6.76:2379
19
20bootstrap:
21  dcs:
22    ttl: 30
23    loop_wait: 10
24    retry_timeout: 10
25    maximum_lag_on_failover: 1048576
26    max_timelines_history: 0
27    master_start_timeout: 300
28    master_stop_timeout: 0
29    synchronous_mode: false
30    postgresql:
31      use_pg_rewind: true
32      use_slots: true
33      parameters:
34        max_connections: 3000
35        superuser_reserved_connections: 100
36        max_locks_per_transaction: 64
37        max_worker_processes: 2
38        max_prepared_transactions: 0
39        wal_level: logical
40        wal_log_hints: on
41        track_commit_timestamp: off
42        max_wal_senders: 10
43        max_replication_slots: 10
44        listen_addresses: "*"
45        port: 5432
46        cluster_name: "pg_cluster"
47        archive_mode: on
48        archive_command: "test ! -f /postgresql/archive/%f && cp %p /postgresql/archive/%f"
49
50postgresql:
51  listen: 0.0.0.0:5432
52  connect_address: 172.72.6.73:5432
53  data_dir: /var/lib/pgsql/13/data
54  pgpass: /home/postgres/.pgpass
55  pg_ctl_timeout: 60
56  use_pg_rewind: true
57  remove_data_directory_on_rewind_failure: false
58  remove_data_directory_on_diverged_timelines: true
59  authentication:
60    replication:
61      username: replhr
62      password: lhr
63    superuser:
64      username: postgres
65      password: lhr
66
67tags:
68  nofailover: false
69  noloadbalance: false
70  clonefrom: false
71  nosync: false
72EOF
参数解释
参考官方文档:https://patroni.readthedocs.io/en/latest/SETTINGS.html
  1[root@pgtest1 patroni]# cat patroni_config.yml
  2# 集群名称
  3scope: pg_cluster     # 集群名称
  4namespace: /service   # Patroni 将在其中保存有关集群的信息,这个路径是 etcd 存储数据的路径, Default value: "/service"
  5name: pgtest1         # 主机名,对于集群必须是唯一的
  6
  7log:
  8  level: INFO              # 日志级别
  9  traceback_level: ERROR
 10  dir: /enmo/app/patroni/  # 日志写入的目录
 11  file_num: 10             # 要保留的日志数量
 12  file_size: 104857600     # 触发日志滚动的 patoni.log 文件的大小(以字节为单位)
 13
 14restapi:
 15  listen: 192.168.58.10:8008
 16  connect_address: 192.168.58.10:8008
 17
 18etcd:
 19  # Provide host to do the initial discovery of the cluster topology:
 20  # 必须指定host、hosts、url、proxy或 srv 之一
 21  host: 192.168.58.10:2379    # etcd 端点的 host:port
 22
 23bootstrap:
 24  # this section will be written into Etcd:/<namespace>/<scope>/config after initializing new cluster
 25  # and all other cluster members will use it as a `global configuration`
 26  dcs:   # 动态配置(Dynamic configuration)的参数设置,动态配置存储在 DCS(分布式配置存储)中并应用于所有集群节点
 27    ttl: 30
 28    loop_wait: 10
 29    retry_timeout: 10
 30    maximum_lag_on_failover: 1048576 # 如果从库落后于主库超过一定数量的字节,则此设置可确保不会发生故障转移
 31    maximum_lag_on_syncnode: -1
 32    max_timelines_history: 0         # DCS 中保存的最大时间线历史项目数。默认值:0。当设置为 0 时,它会在 DCS 中保留完整的历史记录。
 33    master_start_timeout: 300        # 在触发 failover 之前允许主服务器从故障中恢复的时间(单位:秒)
 34                                     # master 故障的最坏情况故障转移时间是:loop_wait + master_start_timeout + loop_wait
 35    master_stop_timeout: 0           # Patroni 停止 Postgres 时允许等待的秒数,仅在启用 synchronous_mode 时有效。超过参数值,则 Patroni 会向 postmaster 发送 SIGKILL。
 36    synchronous_mode: false          # 打开同步复制模式。在此模式下,一个从库将被选择为同步模式的从库,只有最新的领导者和同步从库才能参与领导者选举。
 37    synchronous_mode_strict          # 如果没有可用的同步副本,则防止禁用同步复制,从而阻止所有客户端写入主服务器。
 38                                 # https://patroni.readthedocs.io/en/latest/replication_modes.html
 39
 40    postgresql:
 41      use_pg_rewind: true            # 是否使用 pg_rewind
 42      use_slots: true                # 是否使用复制槽
 43      parameters:
 44        max_connections: 3000
 45        superuser_reserved_connections: 100   # Patroni 需要使用超级用户访问数据库才能正常运行
 46        max_locks_per_transaction: 64
 47        max_worker_processes: 2
 48        max_prepared_transactions: 0
 49        wal_level: logical
 50        wal_log_hints: on
 51        track_commit_timestamp: off
 52        max_wal_senders: 10
 53        max_replication_slots: 10
 54        wal_keep_size: 4096MB  # wal_keep_size = wal_keep_segments * wal_segment_size = 128 * 32MB
 55        hot_standby: "on"
 56        listen_addresses: "*"
 57        port: 5432
 58        cluster_name: "pg_cluster"
 59        archive_mode: on
 60        archive_command: "cp %p /enmo/pgarch/%f"
 61
 62    # standby_cluster:               # 如果定义了这个部分,我们想要引导一个备用集群
 63      # host: 127.0.0.1              # 远程主机的地址
 64      # port: 1111                   # 远程主机的端口
 65      # primary_slot_name: patroni   # 远程主服务器上用于复制的插槽。此参数是可选的,默认值来自实例名称
 66      # create_replica_methods
 67      # restore_command
 68      # archive_cleanup_command
 69      # recovery_min_apply_delay
 70
 71  initdb:   # 列出要传递给 initdb 的选项
 72    - data-checksums          # 在9.3上需要 pg_rewind 时必须启用
 73    - encoding: UTF8      # 新数据库的默认编码
 74    - locale: UTF8        # 新数据库的默认语言环境
 75    - wal-segsize: 32
 76    - allow-group-access
 77    - pgdata: /enmo/pgdata
 78    - waldir: /enmo/pgwal
 79
 80  pg_hba:   # 应该添加到 pg_hba.conf 的行列表
 81    - host all all 0.0.0.0/0 md5
 82    - host replication replicator 127.0.0.1/32 md5
 83
 84  users:    # 初始化新集群后需要创建的一些额外用户
 85    admin:  # 用户名是admin
 86      password: zalando
 87      options:    # CREATE USER 语句的选项列表
 88        - createrole
 89        - createdb
 90
 91postgresql:
 92  listen: 0.0.0.0:5432                  # Postgres 监听的 IP 地址 + 端口
 93  connect_address: 192.168.58.10:5432
 94  data_dir: /enmo/pgdata                # Postgres 数据目录的位置
 95  # bin_dir: /software/pgsql/bin        # PostgreSQL 二进制文件的路径,默认值是一个空字符串,这意味着 PATH 环境变量将用于查找可执行文件
 96  # config_dir: /software/pgsql/data    # Postgres 配置目录的位置,默认为 data_dir
 97  pgpass: /home/postgres/.pgpass        # 密码文件的路径
 98  pg_ctl_timeout: 60                    # pg_ctl 执行 start,stop 或 restart 时应等待多长时间. 默认值为 60 秒。
 99  use_pg_rewind: true                   # 当它作为副本加入集群时,尝试在前领导者上使用 pg_rewind
100  remove_data_directory_on_rewind_failure: false   # 如果启用此选项,Patroni 将删除 PostgreSQL 数据目录并重新创建副本。否则它会尝试跟随新的领导者。默认值为false
101  remove_data_directory_on_diverged_timelines: false # 如果 Patroni 注意到时间线正在发散并且以前的 master 无法从新 master 开始流式传输,则 Patroni 将删除 PostgreSQL 数据目录并重新创建副本。此选项在 pg_rewind 无法使用时很有用。默认值为false。
102  authentication:    # 用户验证
103    replication:     # 复制用户
104      username: replica
105      password: replica
106    superuser:       # 超级用户
107      username: postgres
108      password: postgres
109    # rewind:        # pg_rewind 用户
110      # username:
111      # password:
112
113tags:
114  nofailover: false     # 控制是否允许此节点参与领导者竞赛并成为领导者
115  noloadbalance: false
116  clonefrom: false
117  nosync: false
118复制
所有节点创建 patroni 服务并启动
创建服务,注意需要配置环境变量,否则启动服务会出现这种报错(FATAL: Patroni requires psycopg2>=2.5.4 or psycopg2-binary) Requires,强制依赖 etcd.service 启动成功,可以视情况而定,etcd不启动,patroni起来后不会自动拉起数据库
 1cat > /usr/lib/systemd/system/patroni.service <<"EOF"
 2[Unit]
 3Description=patroni
 4After=network.target remote-fs.target nss-lookup.target
 5
 6[Service]
 7Type=forking
 8User=postgres
 9Group=postgres
10Environment="PGHOME=/usr/pgsql-13"
11Environment="PGDATA=/var/lib/pgsql/13/data"
12Environment="PGPORT=5432"
13Environment="LD_LIBRARY_PATH=/usr/pgsql-13/lib"
14Environment="PATH=/usr/pgsql-13/bin:/usr/local/bin:/usr/bin"
15ExecStart=/bin/bash -c "patroni /app/patroni/etc/patroni_config.yml >> /app/patroni/log/patroni.log 2>&1 &"
16ExecReload=/bin/kill -s HUP $MAINPID
17ExecStop=/usr/bin/killall patroni
18KillMode=process
19TimeoutSec=30
20Restart=no
21
22[Install]
23WantedBy=multi-user.target
24EOF
25
26# 启动服务
27systemctl daemon-reload
28systemctl restart patroni.service
29systemctl enable patroni.service
30systemctl status patroni.service
31
32# 因为 patroni 会检测 PostgreSQL 数据库是否正常运行,如果没有运行,会自动启动PostgreSQL 数据库,所以可以考虑禁用 PostgreSQL 服务,由 patroni 托管PG的启停
33systemctl disable postgresql-13.service
所有节点设置patronictl别名,方便维护
1echo "alias patronictl='patronictl -c /app/patroni/etc/patroni_config.yml'"  >> /etc/profile
2
3echo "alias patronictl='patronictl -c /app/patroni/etc/patroni_config.yml'"  >> /root/.bashrc
4
5
6source  /etc/profile
7source  /root/.bashrc
在启动patroni之后,建议先使用patronictl禁掉auto failover功能,当启动完毕调试正常后再选择性的启动auto failover功能,因为启用auto failover功能后,killall patroni进程,会导致当前节点的数据库宕掉,如果主库处于生产状态,后果不堪设想。
1# Disable auto failover ,如果没有启动 patroni,执行patronictl pause 会失败
2patronictl pause
3# Resume auto failover,重新启用
4patronictl resume
配置HAProxy和Keepalived
haproxy 使用C语言开发的一个开源软件,是一款具备高并发(一万以上)、高性能的TCP和HTTP负载均衡器,支持基于cookie的持久性,自动故障切换,支持正则表达式及web状态统计。
使用 haproxy 设置端口区分连接主库(5000)和只读从库(5001),且端口上有负载均衡的功能(两个从库)。
haproxy 开源官网 https://www.haproxy.org/
Keepalived 免费开源,用C编写,通过VRRP协议实现多台机器之间的故障转移服务
keepalived 官方文档 https://www.keepalived.org/manpage.html
1-- 安装
2yum install -y haproxy keepalived
配置HAProxy
使用系统自带的RPM安装的默认配置文件是 /etc/haproxy/haproxy.cfg
 1cat > /etc/haproxy/haproxy.cfg <<"EOF"
 2global
 3    log         127.0.0.1 local2
 4    chroot      /var/lib/haproxy
 5    pidfile     /var/run/haproxy.pid
 6    maxconn     5000
 7    user        haproxy
 8    group       haproxy
 9    daemon
10    nbproc      2
11
12defaults
13    mode tcp
14    log  127.0.0.1 local2 err
15    option     tcplog
16    option     dontlognull
17    option     redispatch
18    retries    3
19    maxconn    5000
20    timeout queue           1m
21    timeout connect         10s
22    timeout client          1m
23    timeout server          1m
24    timeout check           5s
25
26listen status
27    bind *:1080
28    mode http
29    log global
30    stats enable
31    stats refresh 30s
32    stats uri /
33    stats realm Private lands
34    stats auth admin:admin
35
36listen master
37    bind *:5000
38    mode tcp
39    option tcplog
40    balance roundrobin
41    option httpchk OPTIONS /master
42    http-check expect status 200
43    default-server inter 3s fall 3 rise 2 on-marked-down shutdown-sessions
44    server pg1 172.72.6.71:5432 maxconn 1000 check port 8008 inter 5000 rise 2 fall 2
45    server pg2 172.72.6.72:5432 maxconn 1000 check port 8008 inter 5000 rise 2 fall 2
46    server pg3 172.72.6.73:5432 maxconn 1000 check port 8008 inter 5000 rise 2 fall 2
47
48listen replicas
49    bind *:5001
50    mode tcp
51    option tcplog
52    balance roundrobin
53    option httpchk OPTIONS /replica
54    http-check expect status 200
55    default-server inter 3s fall 3 rise 2 on-marked-down shutdown-sessions
56    server pg1 172.72.6.71:5432  maxconn 1000 check port 8008 inter 5000 rise 2 fall 2
57    server pg2 172.72.6.72:5432  maxconn 1000 check port 8008 inter 5000 rise 2 fall 2
58    server pg3 172.72.6.73:5432  maxconn 1000 check port 8008 inter 5000 rise 2 fall 2
59EOF
参数说明:
 1# 全局定义
 2global
 3    # log   127.0.0.1 local0 info      # 全局的日志配置,使用log关键字,指定使用127.0.0.1上的syslog服务中的local0日志设备,记录日志等级为info的日志
 4    log         127.0.0.1 local2       # 日志输出配置,所有日志都记录在本机,通过local0输出,需要在rsyslog做配置
 5    chroot      /var/lib/haproxy       # 改变当前工作目录
 6    pidfile     /var/run/haproxy.pid   # 进程PID文件
 7    maxconn     3000                   # 最大连接数
 8    user        haproxy                # 所属用户
 9    group       haproxy                # 所属组
10    daemon                             # 以后台形式运行haproxy
11    nbproc 1                           # haproxy 启动时的进程数,<=CPU的核数,创建多个进程数,可以减少每个进程的任务队列,但是过多的进程数也可能会导致进程的崩溃。
12    stats socket /var/lib/haproxy/stats
13# 默认部分的定义
14defaults
15    mode tcp                           # 模式 mode {tcp|http|health}, tcp是4层, http是7层, health是健康检测, 只会返回ok
16    log 127.0.0.1 local2 err           # 使用 127.0.0.1 上的 syslog 服务的 local2 设备记录错误信息
17    option     tcplog                  # 如果将 mode 设置为 http,那么您必须将 tcplog 更改为 httplog
18    option     dontlognull             # 启用该项,日志中将不会记录空连接。所谓空连接就是在上游的负载均衡器或者监控系统为了探测该服务是否存活可用时,需要定期的连接或者获取某一固定的组件或页面,或者探测扫描端口是否在监听或开放等动作被称为空连接;官方文档中标注,如果该服务上游没有其他的负载均衡器的话,建议不要使用该参数,因为互联网上的恶意扫描或其他动作就不会被记录下来。
19    option     redispatch              # 当 serverId 对应的服务器挂掉后,强制定向到其他健康的服务器
20    option     abortonclose            # 当服务器负载很高的时候,自动结束掉当队列处理比较久的链接
21    retries    3                       # 定义连接后端服务器的失败重连次数,连接失败次数超过此值后将会将对应后端服务器标记为不可用
22    maxconn    3000                    # 默认最大连接数
23    timeout queue           1m         # 当达到服务器的 maxconn 时,连接等待最大时长
24    timeout connect         10s        # 连接超时
25    timeout client          1m         # 客户端非活动状态的超时时长
26    timeout server          1m         # 服务器超时
27    timeout check           5s         # 心跳检测超时
28# 配置haproxy web监控,查看统计信息
29listen status
30    bind *:1080                        # 定义统计页面的端口
31    mode http
32    log global
33    stats enable                       # 通过web看状态信息
34    stats refresh 30s                  # 统计页面自动刷新时间
35    maxconn 10                         # 最大连接数
36    stats uri /                        # 统计页面url,http//ip:1080/ 访问
37    stats realm Private lands          # 设置统计页面认证时的提示内容
38    stats auth admin:Admin2021         # 设置统计页面认证的用户和密码,如果要设置多个,另起一行写入即可
39    stats hide-version                 # 隐藏统计页面上HAProxy的版本信息
40
41listen master
42    bind *:5000                        # 定义haproxy前端部分监听的端口
43    mode tcp
44    option tcplog
45    balance roundrobin                 # 设置负载算法为:轮询算法
46    option httpchk OPTIONS /master
47    http-check expect status 200
48    default-server inter 3s fall 3 rise 2 on-marked-down shutdown-sessions  # inter:间隔3秒做一个检测,fall:3次失败会被踢掉,rise:检查2次
49    server pg1 172.72.6.71:5432  maxconn 1000 check port 8008 inter 5000 rise 2 fall 2
50    server pg2 172.72.6.72:5432  maxconn 1000 check port 8008 inter 5000 rise 2 fall 2
51    server pg3 172.72.6.73:5432  maxconn 1000 check port 8008 inter 5000 rise 2 fall 2
启动HAProxy:
1systemctl start haproxy
2systemctl enable haproxy
3systemctl status haproxy
浏览器访问 HAProxy
浏览器登录 http://192.168.66.35:1080 输入用户名 admin 密码 admin

配置keepalived
使用系统自带的RPM安装的配置文件是 /etc/keepalived/keepalived.conf
 1# keepalived 主节点配置文件
 2cat > /etc/keepalived/keepalived.conf << "EOF"
 3global_defs {
 4    router_id pg1
 5    script_user root
 6    enable_script_security
 7}
 8
 9vrrp_script chk_haproxy {
10    script "/usr/bin/killall -0 haproxy"
11    interval 2
12    weight 5
13    fall 3
14    rise 5
15    timeout 2
16}
17
18vrrp_instance VI_1 {
19    state MASTER
20    interface eth0
21    virtual_router_id 88
22    priority 100
23    advert_int 5
24    authentication {
25        auth_type PASS
26        auth_pass postgres
27    }
28    virtual_ipaddress {
29        172.72.6.70/24 dev eth0 label eth0:1
30    }
31    track_script {
32        chk_haproxy
33    }
34}
35
36EOF
37
38
39
40# keepalived 备节点配置文件
41cat > /etc/keepalived/keepalived.conf << "EOF"
42
43global_defs {
44    router_id pg2
45    script_user root
46    enable_script_security
47}
48
49vrrp_script chk_haproxy {
50    script "/usr/bin/killall -0 haproxy"
51    interval 2
52    weight 5
53    fall 3
54    rise 5
55    timeout 2
56}
57
58vrrp_instance VI_1 {
59    state BACKUP
60    interface eth0
61    virtual_router_id 88
62    priority 99
63    advert_int 5
64    authentication {
65        auth_type PASS
66        auth_pass postgres
67    }
68    virtual_ipaddress {
69        172.72.6.70/24 dev eth0 label eth0:1
70    }
71    track_script {
72        chk_haproxy
73    }
74}
75EOF
参数说明:
 1! Configuration File for keepalived
 2# 全局定义块
 3global_defs {
 4    # 标识服务器的字符串,在局域网内应该是唯一的,不必是主机名,默认是本地主机名
 5    router_id pgtest1
 6    # 设置运行脚本默认用户和组
 7    script_user root
 8    # 如果脚本路径的任一部分对于非root用户来说,都具有可写权限,则不会以root身份运行脚本。
 9    enable_script_security
10}
11# 周期性检查脚本
12vrrp_script chk_haproxy {
13    # 指定要执行的脚本的路径或命令
14    # 通过向进程 haproxy 发送信号 0 ,然后根据返回值来判断 haproxy 进程是否存在
15    script "/usr/bin/killall -0 haproxy"
16    # 脚本调用间隔的秒数,(默认值:1s)
17    interval 2
18    # 指定在多少秒后,脚本被认为执行失败
19    timeout 2
20    # 调整权重优先级,默认为2
21    # keepalived 启动时就做权重运算,priority + weight ,主备端哪边权重大,VIP就在哪边启动
22    weight 5
23    # 执行失败多少次才认为失败
24    fall 3
25    # 执行成功多少次才认为是成功
26    rise 5
27}
28# VRRP实例定义块
29vrrp_instance VI_1 {
30    # 指定该keepalived节点的初始状态
31    state MASTER
32    # vrrp实例绑定的接口,用于发送VRRP包
33    interface ens33
34    # 指定VRRP实例ID,范围是0-255,主备机保持一致
35    virtual_router_id 88
36    # 指定优先级,优先级高的将成为MASTER,备机请填写小于主机的值
37    priority 100
38    # 指定发送VRRP通告的间隔。单位是秒
39    advert_int 5
40    # 指定认证方式
41    authentication {
42        auth_type PASS          # PASS简单密码认证(推荐),AH:IPSEC认证(不推荐)
43        auth_pass postgres      # 指定认证所使用的密码,最多8位。
44    }
45    # 指定VIP地址,主备机保持一致
46    virtual_ipaddress {
47        192.168.58.20/24 dev ens33 label ens33:1
48    }
49    # 添加一个 track 脚本( vrrp_script 配置的脚本)
50    track_script {
51        chk_haproxy
52    }
53}
启动keepalived:
 1systemctl start keepalived
 2systemctl enable keepalived
 3systemctl status keepalived
 4
 5
 6# keepalived启动报错:IPVS: Can't initialize ipvs: Protocol not available
 7lsmod | grep ip_vs
 8modprobe ip_vs
 9modprobe ip_vs_wrr
10lsmod | grep ip_vs
11# 如果是容器,那么宿主机也需要加载ip_vs模块。
启动之后,会发现只有172.72.6.77节点有虚拟IP:
 1[root@lhrhaproxyka77 /]# ifconfig
 2eth0: flags=4163<UP,BROADCAST,RUNNING,MULTICAST>  mtu 1500
 3        inet 172.72.6.77  netmask 255.255.255.0  broadcast 172.72.6.255
 4        ether 02:42:ac:48:06:4d  txqueuelen 0  (Ethernet)
 5        RX packets 72015  bytes 5904300 (5.6 MiB)
 6        RX errors 0  dropped 0  overruns 0  frame 0
 7        TX packets 117213  bytes 22467390 (21.4 MiB)
 8        TX errors 0  dropped 0 overruns 0  carrier 0  collisions 0
 9
10eth0:1: flags=4163<UP,BROADCAST,RUNNING,MULTICAST>  mtu 1500
11        inet 172.72.6.70  netmask 255.255.255.0  broadcast 0.0.0.0
12        ether 02:42:ac:48:06:4d  txqueuelen 0  (Ethernet)
13
14lo: flags=73<UP,LOOPBACK,RUNNING>  mtu 65536
15        inet 127.0.0.1  netmask 255.0.0.0
16        loop  txqueuelen 1000  (Local Loopback)
17        RX packets 1234  bytes 223309 (218.0 KiB)
18        RX errors 0  dropped 0  overruns 0  frame 0
19        TX packets 1234  bytes 223309 (218.0 KiB)
20        TX errors 0  dropped 0 overruns 0  carrier 0  collisions 0
HAProxy 和 Keepalived 日志都记录到 /var/log/messages。
配置普罗米修斯监控
搭建过程参考:
使用Docker分分钟搭建漂亮的prometheus+grafana监控: https://www.xmmup.com/dbbao36shiyongdockerfenfenzhongdajianpiaoliangdeprometheusgrafanajiankong.html
监控利器PMM的使用–监控MySQL、PG、MongoDB、ProxySQL等:https://www.xmmup.com/dbbao41jiankongliqipmmdeshiyong-jiankongmysqlpgmongodbproxysqldeng.html
https://www.modb.pro/db/154937
访问Grafana:http://172.72.6.79:3000/login 用户名和密码都为admin

export下载:https://prometheus.io/docs/instrumenting/exporters/
监控PG集群
https://github.com/prometheus-community/postgres_exporter
 1tar -zxvf postgres_exporter-0.10.1.linux-amd64.tar.gz
 2mv postgres_exporter-0.10.1.linux-amd64/postgres_exporter /usr/local/bin/postgres_exporter
 3
 4
 5useradd pg71
 6useradd pg72
 7useradd pg73
 8
 9su - pg71
10export DATA_SOURCE_NAME="postgresql://postgres:lhr@172.72.6.71:5432/postgres?sslmode=disable"
11nohup postgres_exporter --web.listen-address=":9187" >/dev/null 2>&1 &
12
13
14
15su - pg72
16export DATA_SOURCE_NAME="postgresql://postgres:lhr@172.72.6.72:5432/postgres?sslmode=disable"
17nohup postgres_exporter --web.listen-address=":9188" >/dev/null 2>&1 &
18
19
20
21
22su - pg73
23export DATA_SOURCE_NAME="postgresql://postgres:lhr@172.72.6.73:5432/postgres?sslmode=disable"
24nohup postgres_exporter --web.listen-address=":9189" >/dev/null 2>&1 &
25
26
27
28[root@lhrmonitor /]# netstat -tulnp | grep 918
29tcp6       0      0 :::9187                 :::*                    LISTEN      10829/postgres_expo
30tcp6       0      0 :::9188                 :::*                    LISTEN      10929/postgres_expo
31tcp6       0      0 :::9189                 :::*                    LISTEN      11027/postgres_expo
32[root@lhrmonitor /]#
测试:
1curl http://localhost:9187/metrics
2curl http://localhost:9188/metrics
3curl http://localhost:9189/metrics
Grafana导入监控模板:9628
监控HAProxy
https://github.com/prometheus/haproxy_exporter
 1tar -zxvf haproxy_exporter-0.13.0.linux-amd64.tar.gz
 2mv haproxy_exporter-0.13.0.linux-amd64/haproxy_exporter /usr/local/bin/haproxy_exporter
 3
 4
 5nohup haproxy_exporter --web.listen-address=":9101" --haproxy.scrape-uri="http://admin:admin@172.72.6.77:1080/haproxy?stats;csv"  > /dev/null 2>&1 &
 6nohup haproxy_exporter --web.listen-address=":9102" --haproxy.scrape-uri="http://admin:admin@172.72.6.78:1080/haproxy?stats;csv"  > /dev/null 2>&1 &
 7
 8
 9[root@lhrmonitor /]# netstat -tulnp | grep 91
10tcp        0      0 127.0.0.1:5910          0.0.0.0:*               LISTEN      1346/Xvnc
11tcp6       0      0 :::9187                 :::*                    LISTEN      10829/postgres_expo
12tcp6       0      0 :::9188                 :::*                    LISTEN      10929/postgres_expo
13tcp6       0      0 :::9189                 :::*                    LISTEN      11027/postgres_expo
14tcp6       0      0 :::9100                 :::*                    LISTEN      211/node_exporter
15tcp6       0      0 :::9101                 :::*                    LISTEN      11462/haproxy_expor
16tcp6       0      0 :::9102                 :::*                    LISTEN      11497/haproxy_expor
17[root@lhrmonitor /]#
测试:
1curl http://localhost:9101/metrics
2curl http://localhost:9102/metrics
Grafana导入监控模板:12865
监控etcd集群
prometheus 自带了对etcd的监控,不用安装etcd的exporter。
Grafana导入监控模板:3070、10323
修改prometheus服务端配置文件prometheus.yml
prometheus服务端配置文件prometheus.yml添加客户端,严格注意yml文件配置的格式。
我这里的文件是:/usr/local/prometheus/prometheus.yml
 1# vi /usr/local/prometheus/prometheus.yml
 2
 3# 加到文件最后,注意每行前面的空格不要删除
 4  - job_name: "pg_monitor"
 5    static_configs:
 6      - targets:
 7        - "127.0.0.1:9187"
 8        - "127.0.0.1:9188"
 9        - "127.0.0.1:9189"
10  - job_name: "haproxy_monitor"
11    static_configs:
12      - targets:
13        - "127.0.0.1:9101"
14        - "127.0.0.1:9102"
15  - job_name: "etcd_monitor"
16    static_configs:
17      - targets:
18        - "172.72.6.74:2379"
19        - "172.72.6.75:2379"
20        - "172.72.6.76:2379"
21
22
23# 重新载入配置文件或重启prometheus
24curl -X POST http://127.0.0.1:9090/-/reload
http://172.72.6.79:9090/targets

监控到的数据
PG:

HAProxy:


ETCD:


至此,PostgreSQL高可用之Patroni + etcd + HAProxy + Keepalived + Prometheus + grafana 部署完成。
高可用测试
1. 高可用测试 Keepalived
注意:可以将2个节点的state都配置为backup,将priority都配置为100来避免自动来回切换,而影响客户体验。
| 测试类型 | 测试方式 | 测试命令 | 测试结果 |
|---|---|---|---|
| 进程故障 | 1. 主端killall进程 | killall keepalived | VIP从主端自动转移到备端,5000端口和5001端口连接正常 |
| - | - | systemctl start keepalived | VIP从备端自动转移到主端,5000端口和5001端口连接正常。 |
| - | 2. 备端killall进程 | systemctl stop keepalived | VIP在主端正常运行,5000端口和5001端口连接正常 |
| - | - | systemctl start keepalived | VIP在主端正常运行,5000端口和5001端口连接正常 |
| - | 3. 主端同时kill所有进程 | - | 主端VIP未卸掉,备端也启动VIP,此时主备端均存在VIP(异常现象),5000端口和5001端口连接正常 |
| - | - | systemctl start keepalived | VIP转移到主端正常运行,备端无VIP,5000端口和5001端口连接正常 |
| - | 4. 主端只kill主进程 | kill -9 | VIP从主端自动转移到备端,VIP只在备端启动,5000端口和5001端口连接正常 |
| - | - | systemctl start keepalived | VIP转移到主端正常运行,备端无VIP,5000端口和5001端口连接正常 |
| - | 5. 主端只kill子进程 | - | VIP从主端自动转移到备端,等待主进程自动生成子进程后,VIP从备端自动转移到主端,5000端口和5001端口连接正常 |
| - | 6. 备端kill 进程 | - | IP在主端正常运行,5000端口和5001端口连接正常 |
| 网卡故障 | 1. 主端down网卡 | ifdown eth0 | VIP从主端自动转移到备端,PostgreSQL发生故障转移到其中一个备库,5000端口和5001端口连接正常,patroni和etcd均不显示故障节点 |
| - | 2. 主端up网卡 | ifup eth0 | VIP从备端自动转移到主端,故障节点以备库角色添加到集群,patroni和etcd节点状态显示正常,5000端口和5001端口连接正常 |
| - | 3. 备端down网卡 | ifdown eth0 | VIP在主端正常运行,5000端口和5001端口连接正常,patroni和etcd均不显示故障节点,故障节点上的各个进程还在运行 |
| - | 4. 备端up网卡 | ifup eth0 | patroni和etcd节点状态显示正常 |
2. 高可用测试 HAProxy
| 测试类型 | 测试方式 | 测试命令 | 测试结果 |
|---|---|---|---|
| 进程故障 | 1. 主端killall进程 | killall haproxy | keepalived 未检测 haproxy 进程,自动将VIP从主端转移到备端,5000端口和5001端口连接正常 |
| - | - | systemctl start haproxy | keepalived 检测到 haproxy 进程,自动将VIP从备端转移到主端,5000端口和5001端口连接正常 |
| - | 2. 备端killall进程 | killall haproxy | VIP在主端正常运行,5000端口和5001端口连接正常 |
| - | - | systemctl start haproxy | VIP在主端正常运行,5000端口和5001端口连接正常 |
| - | 3. 主端同时kill所有进程 | - | keepalived 未检测 haproxy 进程,自动将VIP从主端转移到备端,5000端口和5001端口连接正常 |
| - | - | systemctl start haproxy | keepalived 检测到 haproxy 进程,自动将VIP从备端转移到主端,5000端口和5001端口连接正常 |
| - | 4. 主端只kill主进程 | - | keepalived 未检测 haproxy 进程,自动将VIP从主端转移到备端,5000端口和5001端口连接正常 |
| - | - | systemctl start haproxy | keepalived 检测到 haproxy 进程,自动将VIP从备端转移到主端,5000端口和5001端口连接正常 |
| - | 5. 主端只kill子进程 | - | haproxy 的所有进程都死了,keepalived 未检测 haproxy 进程,自动将VIP从主端转移到备端,5000端口和5001端口连接正常 |
| - | - | systemctl start haproxy | keepalived 检测到 haproxy 进程,自动将VIP从备端转移到主端,5000端口和5001端口连接正常 |
3. 高可用测试 Patroni
以下是在Patroni开启了auto failover的情况下进行测试
1[root@pgtest3 ~]# patronictl resume
| 测试类型 | 测试方式 | 测试命令 | 测试结果 |
|---|---|---|---|
| 进程故障 | 1. 主端killall进程 | killall patroni | 1. 触发故障切换到备库其中一个节点,备库另一个节点同步新主库,切换时间在30秒内 2. 原主库(pgtest1)的 PostgreSQL 被关闭 3. etcd haproxy keepalived 在原主库正常运行,VIP 运行在原主库 4. VIP + 5000端口连接切换后的新主库,VIP + 5001端口连接另一个备库 |
| - | - | systemctl start patroni | 原主库(pgtest1)变成新主库(pgtest2)的备库 |
| - | 2. 主库kill patroni 进程 | kill -9 | 1. 触发故障切换到备库其中一个节点,备库另一个节点同步新主库,切换时间在30秒内 2. 原主库(pgtest1)的 PostgreSQL 还在运行,并且是读写模式 3. etcd haproxy keepalived 在原主库正常运行,VIP 运行在原主库 4. VIP + 5000端口连接切换后的新主库,VIP + 5001端口连接另一个备库 |
| - | - | systemctl start patroni | 原主库(pgtest1)被 pg_rewind 成新主库(pgtest2)的备库 |
| - | 3. 一个备库kill patroni 进程 | - | 1. 使用killall,将会同时关闭备库,使用kill,此备库的 PostgreSQL 还在以只读模式运行,且与主库正常同步数据 2. VIP + 5000端口正常连接主库,VIP+5001端口不能连接此备库,可以连接另一个备库 3. 主库与另一个备库不受影响 4. 此备库上的 etcd haproxy keepalived 正常运行 |
| - | - | systemctl start patroni | 自动恢复正常状态,与主库保持同步 |
| - | 4. 两个备库kill patroni 进程 | - | 1. 使用killall,将会同时关闭备库,使用kill,两个备库的 PostgreSQL 还在以只读模式运行,且与主库正常同步数据 2. VIP + 5000端口只连接主库,VIP + 5001端口连接失败 3. 主库不受影响 4. 备库上的 etcd haproxy keepalived 正常运行 |
| - | - | systemctl start patroni | 自动恢复正常状态,与主库保持同步 |
4. 高可用测试 etcd
| 测试类型 | 测试方式 | 测试命令 | 测试结果 |
|---|---|---|---|
| 进程故障 | 1. 主库kill etcd 进程 | - | 不影响主库和备库, patroni 会连接其它节点上的etcd,VIP+5000/5001端口连接正常 |
| - | 2. 一个备库停止 etcd 进程 | - | 不影响主库和备库, patroni 会连接其它节点上的etcd,VIP+5000/5001端口连接正常 |
| - | 3. 两个备库停止 etcd 进程 | - | 此时超过了etcd的最大允许故障节点数,主备库3个节点均以只读模式运行,VIP + 5000端口连接失败,VIP + 5001端口轮询连接主备库3个节点 |
| - | - | 先启动第一个备库的 etcd 进程 | 主库从只读模式切换成读写模式,主从数据同步恢复正常,VIP + 5000/5001端口连接正常 |
| - | - | 再启动第二个备库的 etcd 进程 | 自动恢复正常状态,与主库保持同步 |
5. 高可用测试 PostgreSQL
| 测试类型 | 测试方式 | 测试命令 | 测试结果 |
|---|---|---|---|
| - | 停主库PostgreSQL实例 | - | 主库被Patroni自动拉起,VIP + 5000/5001端口连接正常 |
| - | 停备库PostgreSQL实例 | - | 备库被Patroni自动拉起,VIP + 5000/5001端口连接正常 |
6. 高可用测试 操作系统
| 测试类型 | 测试方式 | 测试命令 | 测试结果 |
|---|---|---|---|
| - | 停PostgreSQL主库主机(同时是haproxy + keepalived 的主机) | reboot | 1. 触发故障切换到备库其中一个节点,备库另一个节点同步新主库,切换时间在30秒内 2. VIP漂移到备库 3. VIP + 5000端口连接切换后的新主库,VIP + 5001端口连接另一个备库 |
| - | - | 启动 | 原主库(pgtest1)变成新主库(pgtest2)的备库,VIP从keepalived的备端自动转移到主端,5000端口和5001端口连接正常 |
| - | 停备库的主机就不测试了 | - | - |
7. 读写分离+负载均衡测试
通过 5000 端口提供读写服务,通过 5001 端口提供只读服务。
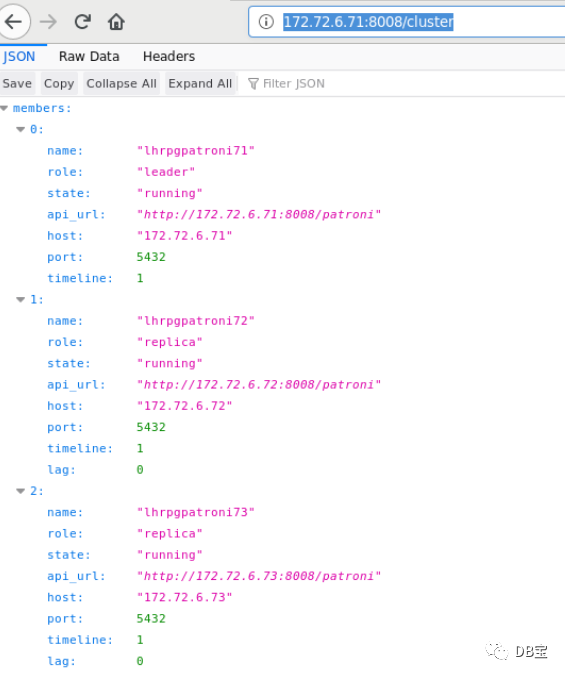
 1[root@lhrpgpatroni71 /]# patronictl list
 2+----------------+-------------+---------+---------+----+-----------+
 3| Member         | Host        | Role    | State   | TL | Lag in MB |
 4+ Cluster: pg_cluster (6981731393302868828) -------+----+-----------+
 5| lhrpgpatroni71 | 172.72.6.71 | Leader  | running |  7 |           |
 6| lhrpgpatroni72 | 172.72.6.72 | Replica | running |  7 |         0 |
 7| lhrpgpatroni73 | 172.72.6.73 | Replica | running |  7 |         0 |
 8+----------------+-------------+---------+---------+----+-----------+
 9
10
11psql -U postgres -h 172.72.6.77 -p5000
12psql -U postgres -h 172.72.6.78 -p5000
13
14
15psql -U postgres -h 172.72.6.77 -p5001
16psql -U postgres -h 172.72.6.78 -p5001
17
18
19for i in $(seq 1 10); do psql 'host=172.72.6.70 port=5000 user=postgres dbname=postgres password=lhr' -c 'select inet_server_addr(),pg_is_in_recovery()'; done | egrep '172'
20
21
22
23[root@db-rac ~]# for i in $(seq 1 10); do psql 'host=172.72.6.70 port=5000 user=postgres dbname=postgres password=lhr' -c 'select inet_server_addr(),pg_is_in_recovery()'; done | egrep '172'
24 172.72.6.71      | f
25 172.72.6.71      | f
26 172.72.6.71      | f
27 172.72.6.71      | f
28 172.72.6.71      | f
29 172.72.6.71      | f
30 172.72.6.71      | f
31 172.72.6.71      | f
32 172.72.6.71      | f
33 172.72.6.71      | f
34[root@db-rac ~]# for i in $(seq 1 10); do psql 'host=172.72.6.70 port=5001 user=postgres dbname=postgres password=lhr' -c 'select inet_server_addr(),pg_is_in_recovery()'; done | egrep '172'
35 172.72.6.72      | t
36 172.72.6.73      | t
37 172.72.6.72      | t
38 172.72.6.72      | t
39 172.72.6.73      | t
40 172.72.6.73      | t
41 172.72.6.72      | t
42 172.72.6.72      | t
43 172.72.6.73      | t
44 172.72.6.72      | t
可以看出,5000是读写,而5001是只读+负载均衡。
8. switchover和failover切换
https://www.modb.pro/db/152388
https://www.modb.pro/db/155433
failover endpoints 允许在没有健康节点时执行手动 failover ,但同时它不允许 switchover 。
switchover endpoint 则相反。它仅在集群健康(有leader)时才起作用,并允许在指定时间安排切换。
switchover操作
 1[root@lhrpgpatroni71 /]# patronictl list
 2+----------------+-------------+---------+---------+----+-----------+
 3| Member         | Host        | Role    | State   | TL | Lag in MB |
 4+ Cluster: pg_cluster (6981731393302868828) -------+----+-----------+
 5| lhrpgpatroni71 | 172.72.6.71 | Leader  | running |  7 |           |
 6| lhrpgpatroni72 | 172.72.6.72 | Replica | running |  7 |         0 |
 7| lhrpgpatroni73 | 172.72.6.73 | Replica | running |  7 |         0 |
 8+----------------+-------------+---------+---------+----+-----------+
 9[root@lhrpgpatroni71 /]# patronictl switchover
10Master [lhrpgpatroni71]:
11Candidate ['lhrpgpatroni72', 'lhrpgpatroni73'] []: lhrpgpatroni72
12When should the switchover take place (e.g. 2022-01-22T20:19 )  [now]:
13Current cluster topology
14+----------------+-------------+---------+---------+----+-----------+
15| Member         | Host        | Role    | State   | TL | Lag in MB |
16+ Cluster: pg_cluster (6981731393302868828) -------+----+-----------+
17| lhrpgpatroni71 | 172.72.6.71 | Leader  | running |  7 |           |
18| lhrpgpatroni72 | 172.72.6.72 | Replica | running |  7 |         0 |
19| lhrpgpatroni73 | 172.72.6.73 | Replica | running |  7 |         0 |
20+----------------+-------------+---------+---------+----+-----------+
21Are you sure you want to switchover cluster pg_cluster, demoting current master lhrpgpatroni71? [y/N]: y
222022-01-22 19:19:49.35893 Successfully switched over to "lhrpgpatroni72"
23[root@lhrpgpatroni71 /]# patronictl list
24+----------------+-------------+---------+---------+----+-----------+
25| Member         | Host        | Role    | State   | TL | Lag in MB |
26+ Cluster: pg_cluster (6981731393302868828) -------+----+-----------+
27| lhrpgpatroni71 | 172.72.6.71 | Replica | running |  8 |         0 |
28| lhrpgpatroni72 | 172.72.6.72 | Leader  | running |  8 |           |
29| lhrpgpatroni73 | 172.72.6.73 | Replica | running |    |   unknown |
30+----------------+-------------+---------+---------+----+-----------+
31[root@lhrpgpatroni71 /]# patronictl list
32+----------------+-------------+---------+---------+----+-----------+
33| Member         | Host        | Role    | State   | TL | Lag in MB |
34+ Cluster: pg_cluster (6981731393302868828) -------+----+-----------+
35| lhrpgpatroni71 | 172.72.6.71 | Replica | running |  8 |         0 |
36| lhrpgpatroni72 | 172.72.6.72 | Leader  | running |  8 |           |
37| lhrpgpatroni73 | 172.72.6.73 | Replica | stopped |    |   unknown |
38+----------------+-------------+---------+---------+----+-----------+
39[root@lhrpgpatroni71 /]# patronictl list
40+----------------+-------------+---------+---------+----+-----------+
41| Member         | Host        | Role    | State   | TL | Lag in MB |
42+ Cluster: pg_cluster (6981731393302868828) -------+----+-----------+
43| lhrpgpatroni71 | 172.72.6.71 | Replica | running |  8 |         0 |
44| lhrpgpatroni72 | 172.72.6.72 | Leader  | running |  8 |           |
45| lhrpgpatroni73 | 172.72.6.73 | Replica | running |  8 |         0 |
46+----------------+-------------+---------+---------+----+-----------+
failover操作
 1[root@lhrpgpatroni71 /]# patronictl list
 2+----------------+-------------+---------+---------+----+-----------+
 3| Member         | Host        | Role    | State   | TL | Lag in MB |
 4+ Cluster: pg_cluster (6981731393302868828) -------+----+-----------+
 5| lhrpgpatroni71 | 172.72.6.71 | Replica | running |  8 |         0 |
 6| lhrpgpatroni72 | 172.72.6.72 | Leader  | running |  8 |           |
 7| lhrpgpatroni73 | 172.72.6.73 | Replica | running |  8 |         0 |
 8+----------------+-------------+---------+---------+----+-----------+
 9+----------------+-------------+---------+---------+----+-----------+
10[root@lhrpgpatroni71 /]#
11[root@lhrpgpatroni71 /]# patronictl failover
12Candidate ['lhrpgpatroni71', 'lhrpgpatroni73'] []: lhrpgpatroni73
13Current cluster topology
14+----------------+-------------+---------+---------+----+-----------+
15| Member         | Host        | Role    | State   | TL | Lag in MB |
16+ Cluster: pg_cluster (6981731393302868828) -------+----+-----------+
17| lhrpgpatroni71 | 172.72.6.71 | Replica | running |  8 |         0 |
18| lhrpgpatroni72 | 172.72.6.72 | Leader  | running |  8 |           |
19| lhrpgpatroni73 | 172.72.6.73 | Replica | running |  8 |         0 |
20+----------------+-------------+---------+---------+----+-----------+
21Are you sure you want to failover cluster pg_cluster, demoting current master lhrpgpatroni72? [y/N]: y
222022-01-22 19:24:19.78911 Successfully failed over to "lhrpgpatroni73"
23+----------------+-------------+---------+---------+----+-----------+
24| Member         | Host        | Role    | State   | TL | Lag in MB |
25+ Cluster: pg_cluster (6981731393302868828) -------+----+-----------+
26| lhrpgpatroni71 | 172.72.6.71 | Replica | running |  8 |         0 |
27| lhrpgpatroni72 | 172.72.6.72 | Replica | stopped |    |   unknown |
28| lhrpgpatroni73 | 172.72.6.73 | Leader  | running |  8 |           |
29+----------------+-------------+---------+---------+----+-----------+
30[root@lhrpgpatroni71 /]# patronictl list
31+----------------+-------------+---------+---------+----+-----------+
32| Member         | Host        | Role    | State   | TL | Lag in MB |
33+ Cluster: pg_cluster (6981731393302868828) -------+----+-----------+
34| lhrpgpatroni71 | 172.72.6.71 | Replica | stopped |    |   unknown |
35| lhrpgpatroni72 | 172.72.6.72 | Replica | running |  9 |         0 |
36| lhrpgpatroni73 | 172.72.6.73 | Leader  | running |  9 |           |
37+----------------+-------------+---------+---------+----+-----------+
38[root@lhrpgpatroni71 /]# patronictl list
39+----------------+-------------+---------+---------+----+-----------+
40| Member         | Host        | Role    | State   | TL | Lag in MB |
41+ Cluster: pg_cluster (6981731393302868828) -------+----+-----------+
42| lhrpgpatroni71 | 172.72.6.71 | Replica | running |  9 |         0 |
43| lhrpgpatroni72 | 172.72.6.72 | Replica | running |  9 |         0 |
44| lhrpgpatroni73 | 172.72.6.73 | Leader  | running |  9 |           |
45+----------------+-------------+---------+---------+----+-----------+
POST /switchover 和 POST /failover 分别对应 Patientictl switchover 和 Patonictl failover 命令。DELETE /switchover 对应 patronictl flush switchover 命令。
基本维护
查询 patroni 集群状态
1[root@lhrpgpatroni71 /]# patronictl list
2+----------------+-------------+---------+---------+----+-----------+
3| Member         | Host        | Role    | State   | TL | Lag in MB |
4+ Cluster: pg_cluster (6981731393302868828) -------+----+-----------+
5| lhrpgpatroni71 | 172.72.6.71 | Leader  | running |  1 |           |
6| lhrpgpatroni72 | 172.72.6.72 | Replica | running |  1 |         0 |
7| lhrpgpatroni73 | 172.72.6.73 | Replica | running |  1 |         0 |
8+----------------+-------------+---------+---------+----+-----------+
http://172.72.6.71:8008/
http://172.72.6.71:8008/patroni

http://172.72.6.71:8008/cluster
http://172.72.6.71:8008/config

使用 etcdctl 查看存储在etcd中的 patroni 动态配置参数
 1[root@lhretcd74 /]# etcdctl get /service/pg_cluster/config | jq
 2{
 3  "ttl": 30,
 4  "loop_wait": 10,
 5  "retry_timeout": 10,
 6  "maximum_lag_on_failover": 1048576,
 7  "max_timelines_history": 0,
 8  "master_start_timeout": 300,
 9  "master_stop_timeout": 0,
10  "synchronous_mode": false,
11  "postgresql": {
12    "use_pg_rewind": true,
13    "use_slots": true,
14    "parameters": {
15      "max_connections": 3000,
16      "superuser_reserved_connections": 100,
17      "max_locks_per_transaction": 64,
18      "max_worker_processes": 2,
19      "max_prepared_transactions": 0,
20      "wal_level": "logical",
21      "wal_log_hints": true,
22      "track_commit_timestamp": false,
23      "max_wal_senders": 10,
24      "max_replication_slots": 10,
25      "listen_addresses": "*",
26      "port": 5432,
27      "cluster_name": "pg_cluster",
28      "archive_mode": true,
29      "archive_command": "test ! -f /postgresql/archive/%f && cp %p /postgresql/archive/%f"
30    }
31  }
32}
33
34[root@lhrpgpatroni71 /]# curl -s http://172.72.6.71:8008/config | jq
35{
36  "ttl": 30,
37  "loop_wait": 10,
38  "retry_timeout": 10,
39  "maximum_lag_on_failover": 1048576,
40  "max_timelines_history": 0,
41  "master_start_timeout": 300,
42  "master_stop_timeout": 0,
43  "synchronous_mode": false,
44  "postgresql": {
45    "use_pg_rewind": true,
46    "use_slots": true,
47    "parameters": {
48      "max_connections": 3000,
49      "superuser_reserved_connections": 100,
50      "max_locks_per_transaction": 64,
51      "max_worker_processes": 2,
52      "max_prepared_transactions": 0,
53      "wal_level": "logical",
54      "wal_log_hints": true,
55      "track_commit_timestamp": false,
56      "max_wal_senders": 10,
57      "max_replication_slots": 10,
58      "listen_addresses": "*",
59      "port": 5432,
60      "cluster_name": "pg_cluster",
61      "archive_mode": true,
62      "archive_command": "test ! -f /postgresql/archive/%f && cp %p /postgresql/archive/%f"
63    }
64  }
65}
patronictl 查看 patroni 动态配置参数
 1[root@lhrpgpatroni71 ~]# patronictl show-config
 2loop_wait: 10
 3master_start_timeout: 300
 4master_stop_timeout: 0
 5max_timelines_history: 0
 6maximum_lag_on_failover: 1048576
 7postgresql:
 8  parameters:
 9    archive_command: test ! -f /postgresql/archive/%f && cp %p /postgresql/archive/%f
10    archive_mode: true
11    cluster_name: pg_cluster
12    listen_addresses: '*'
13    max_connections: 3000
14    max_locks_per_transaction: 64
15    max_prepared_transactions: 0
16    max_replication_slots: 10
17    max_wal_senders: 10
18    max_worker_processes: 2
19    port: 5432
20    superuser_reserved_connections: 100
21    track_commit_timestamp: false
22    wal_level: logical
23    wal_log_hints: true
24  use_pg_rewind: true
25  use_slots: true
26retry_timeout: 10
27synchronous_mode: false
28ttl: 30
通过 patronictl 调整配置参数,在其中一个节点调整,其他节点也会自动调整,并且 patroni 自动进行 reload 操作
1[postgres@lhrpgpatroni71 ~]$ patronictl edit-config
2# 编辑文本
3Apply these changes? [y/N]: y
4Configuration changed
对于需要重启数据库生效的参数,为了减少对生产的影响,可以逐个节点重启,也可以在停机窗口通过 patronictl restart 对整个集群进行重启:
 1# 仅重启当前节点(--any)
 2[root@lhrpgpatroni71 ~]# patronictl restart pg_cluster --any
 3+----------------+-------------+---------+---------+----+-----------+
 4| Member         | Host        | Role    | State   | TL | Lag in MB |
 5+ Cluster: pg_cluster (6981731393302868828) -------+----+-----------+
 6| lhrpgpatroni71 | 172.72.6.71 | Leader  | running |  1 |           |
 7| lhrpgpatroni72 | 172.72.6.72 | Replica | running |  1 |         0 |
 8| lhrpgpatroni73 | 172.72.6.73 | Replica | running |  1 |         0 |
 9+----------------+-------------+---------+---------+----+-----------+
10When should the restart take place (e.g. 2022-01-22T11:14)  [now]:
11Are you sure you want to restart members lhrpgpatroni71, lhrpgpatroni72, lhrpgpatroni73? [y/N]: y
12Restart if the PostgreSQL version is less than provided (e.g. 9.5.2)  []:
13Success: restart on member lhrpgpatroni73
14
15[root@lhrpgpatroni71 ~]# patronictl list
16+----------------+-------------+---------+---------+----+-----------+-----------------+
17| Member         | Host        | Role    | State   | TL | Lag in MB | Pending restart |
18+ Cluster: pg_cluster (6981731393302868828) -------+----+-----------+-----------------+
19| lhrpgpatroni71 | 172.72.6.71 | Leader  | running |  1 |           |                 |
20| lhrpgpatroni72 | 172.72.6.72 | Replica | running |  1 |         0 |                 |
21| lhrpgpatroni73 | 172.72.6.73 | Replica | running |  1 |         0 | *               |
22+----------------+-------------+---------+---------+----+-----------+-----------------+
23
24# 如果节点是 pending 状态的,才会执行重启操作
25[root@lhrpgpatroni71 /]# patronictl restart pg_cluster --any --pending
26+----------------+-------------+---------+---------+----+-----------+-----------------+
27| Member         | Host        | Role    | State   | TL | Lag in MB | Pending restart |
28+ Cluster: pg_cluster (6981731393302868828) -------+----+-----------+-----------------+
29| lhrpgpatroni71 | 172.72.6.71 | Leader  | running |  1 |           |                 |
30| lhrpgpatroni72 | 172.72.6.72 | Replica | running |  1 |         0 |                 |
31| lhrpgpatroni73 | 172.72.6.73 | Replica | running |  1 |         0 | *               |
32+----------------+-------------+---------+---------+----+-----------+-----------------+
33When should the restart take place (e.g. 2022-01-22T11:23)  [now]:
34Are you sure you want to restart members lhrpgpatroni71, lhrpgpatroni72, lhrpgpatroni73? [y/N]: y
35Restart if the PostgreSQL version is less than provided (e.g. 9.5.2)  []:
36Success: restart on member lhrpgpatroni73
37
38
39# 重启所有成员
40[root@lhrpgpatroni71 /]# patronictl restart pg_cluster
41+----------------+-------------+---------+---------+----+-----------+
42| Member         | Host        | Role    | State   | TL | Lag in MB |
43+ Cluster: pg_cluster (6981731393302868828) -------+----+-----------+
44| lhrpgpatroni71 | 172.72.6.71 | Leader  | running |  1 |           |
45| lhrpgpatroni72 | 172.72.6.72 | Replica | running |  1 |         0 |
46| lhrpgpatroni73 | 172.72.6.73 | Replica | running |  1 |         0 |
47+----------------+-------------+---------+---------+----+-----------+
48When should the restart take place (e.g. 2022-01-22T11:24)  [now]:
49Are you sure you want to restart members lhrpgpatroni73, lhrpgpatroni71, lhrpgpatroni72? [y/N]: y
50Restart if the PostgreSQL version is less than provided (e.g. 9.5.2)  []:
51Success: restart on member lhrpgpatroni73
52Success: restart on member lhrpgpatroni71
53Success: restart on member lhrpgpatroni72
54[root@lhrpgpatroni71 /]# patronictl list
55+----------------+-------------+---------+---------+----+-----------+
56| Member         | Host        | Role    | State   | TL | Lag in MB |
57+ Cluster: pg_cluster (6981731393302868828) -------+----+-----------+
58| lhrpgpatroni71 | 172.72.6.71 | Leader  | running |  1 |           |
59| lhrpgpatroni72 | 172.72.6.72 | Replica | running |  1 |         0 |
60| lhrpgpatroni73 | 172.72.6.73 | Replica | running |  1 |         0 |
61+----------------+-------------+---------+---------+----+-----------+
重新初始化 Reinitialize endpoint
只允许在从节点上执行,一旦调用,它将删除数据目录并启动 pg_basebackup 重新初始化指定节点上的 PostgreSQL 数据目录。
The call might fail if Patroni is in a loop trying to recover (restart) a failed Postgres. In order to overcome this problem one can specify {“force”:true} in the request body.
1curl -s http://172.72.6.73:8008/reinitialize -XPOST
2patronictl reinit pg_cluster
重新加载 Reload endpoint
POST /reload 让 Patroni 重新读取和应用配置文件。这相当于向 Patroni 进程发送 SIGHUP 信号。如果您更改了一些需要重新启动 Postgres 的参数(如 shared_buffers),您仍然必须通过调用 POST /restart 或使用 patriotictl restart 明确地重新启动Postgres。
1curl -s http://172.72.6.73:8008/reload -XPOST
2patronictl reload pg_cluster
使用 patronictl 执行数据库查询操作
1[root@lhrpgpatroni71 /]# cat a.sql
2select name from pg_settings limit 2;
3[root@lhrpgpatroni71 /]# patronictl query -f a.sql --username=postgres --password
4Password:
5name
6allow_system_table_mods
7application_name
参考
https://www.modb.pro/topic/152353
https://www.cnblogs.com/VicLiu/p/14333778.html
Patroni 官方文档:https://patroni.readthedocs.io/en/latest/index.html
将独立设备转换为 Patroni 集群:https://patroni.readthedocs.io/en/latest/existing_data.html
PostgreSQL 版本重大升级:https://patroni.readthedocs.io/en/latest/existing_data.html
