


公众号后台回复“面试”,获取精品学习资料

扫描下方海报了解专栏详情

 本文来源投稿:程序员 cxuan
《Java工程师面试突击(第3季)》重磅升级,由原来的70讲增至160讲,内容扩充一倍多,升级部分内容请参见文末

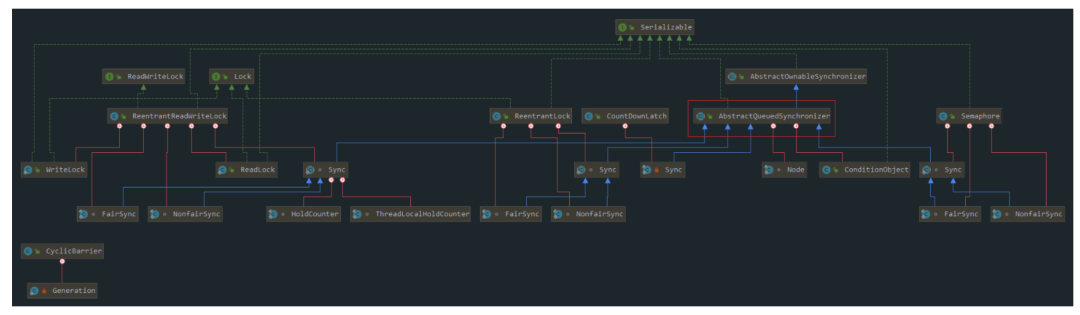
AQS(AbstractQueuedSynchronizer),所谓的
AQS即是抽象的队列式的同步器,内部定义了很多锁相关的方法,我们熟知的
ReentrantLock、
ReentrantReadWriteLock、
CountDownLatch、
Semaphore等都是基于
AQS来实现的。
AQS相关的
UML图:
1
AQS实现原理
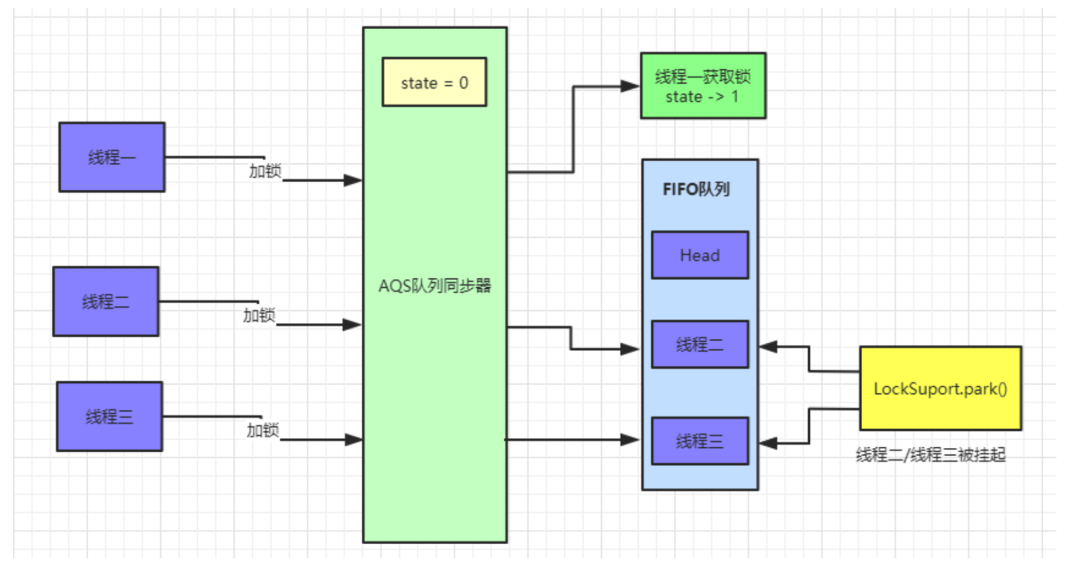
AQS中 维护了一个
volatile int state(代表共享资源)和一个
FIFO线程等待队列(多线程争用资源被阻塞时会进入此队列)。
volatile能够保证多线程下的可见性,当
state=1则代表当前对象锁已经被占有,其他线程来加锁时则会失败,加锁失败的线程会被放入一个
FIFO的等待队列中,比列会被
UNSAFE.park()操作挂起,等待其他获取锁的线程释放锁才能够被唤醒。
state的操作都是通过
CAS来保证其并发修改的安全性。

AQS中提供了很多关于锁的实现方法,
getState():获取锁的标志state值 setState():设置锁的标志state值 tryAcquire(int):独占方式获取锁。尝试获取资源,成功则返回true,失败则返回false。 tryRelease(int):独占方式释放锁。尝试释放资源,成功则返回true,失败则返回false。
ReentrantLock作为突破点通过源码和画图的形式一步步了解
AQS内部实现原理。
2
目录结构
AQS源码:
线程一加锁成功时 AQS
内部实现线程二/三加锁失败时 AQS
中等待队列的数据模型线程一释放锁及线程二获取锁实现原理 通过线程场景来讲解公平锁具体实现原理 通过线程场景来讲解Condition中a wait()
和signal()
实现原理
AQS内部的数据结构和实现原理
3
场景分析
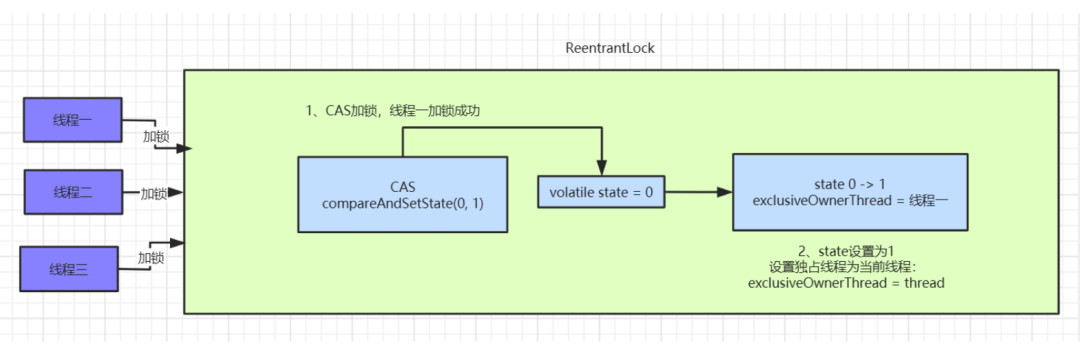
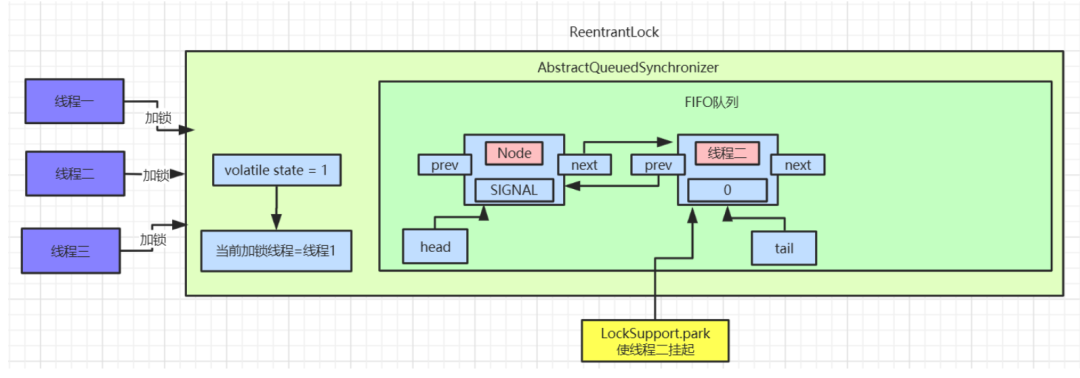
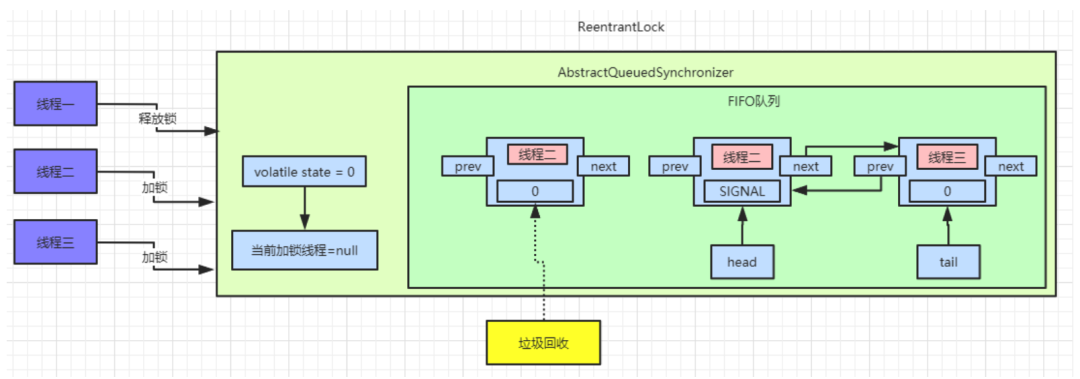
线程一加锁成功
AQS内部数据为:
Node是一个双向链表,这里
SIGNAL是
Node中
waitStatus属性,
Node中还有一个
nextWaiter属性,这个并未在图中画出来,这个到后面
Condition会具体讲解的。
java.util.concurrent.locks.ReentrantLock .NonfairSync:static final class NonfairSync extends Sync {
final void lock() {
if (compareAndSetState(0, 1))
setExclusiveOwnerThread(Thread.currentThread());
else
acquire(1);
}
protected final boolean tryAcquire(int acquires) {
return nonfairTryAcquire(acquires);
}
}
CAS尝试抢占锁,如果抢占成功
state值回被改为1,且设置对象独占锁线程为当前线程。如下所示:
protected final boolean compareAndSetState(int expect, int update) {
    return unsafe.compareAndSwapInt(this, stateOffset, expect, update);
}

protected final void setExclusiveOwnerThread(Thread thread) {
    exclusiveOwnerThread = thread;
}
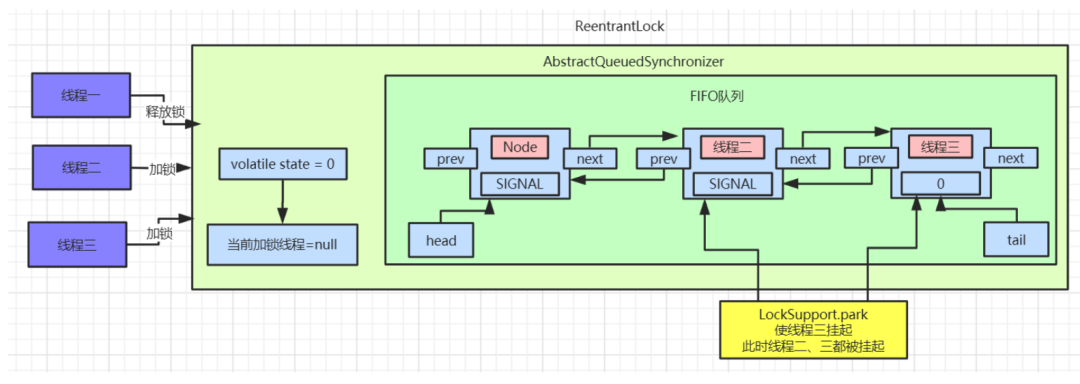
线程二抢占锁失败
state变为1,线程二通过
CAS修改
state变量必然会失败。此时
AQS中
FIFO(First In First Out 先进先出)队列中数据如图所示:
java.util.concurrent.locks.AbstractQueuedSynchronizer.acquire():
public final void acquire(int arg) {
    if (!tryAcquire(arg) &&
        acquireQueued(addWaiter(Node.EXCLUSIVE), arg))
        selfInterrupt();
}
tryAcquire()的具体实现:
java.util.concurrent.locks.ReentrantLock .nonfairTryAcquire():
final boolean nonfairTryAcquire(int acquires) {
    final Thread current = Thread.currentThread();
    int c = getState();
    if (c == 0) {
        if (compareAndSetState(0, acquires)) {
            setExclusiveOwnerThread(current);
            return true;
        }
    }
    else if (current == getExclusiveOwnerThread()) {
        int nextc = c + acquires;
        if (nextc < 0)
            throw new Error("Maximum lock count exceeded");
        setState(nextc);
        return true;
    }
    return false;
}
nonfairTryAcquire()方法中首先会获取
state的值,如果不为0则说明当前对象的锁已经被其他线程所占有,接着判断占有锁的线程是否为当前线程,如果是则累加
state值,这就是可重入锁的具体实现,累加
state值,释放锁的时候也要依次递减
state值。
state为0,则执行
CAS操作,尝试更新
state值为1,如果更新成功则代表当前线程加锁成功。
state修改为1,所以线程二通过
CAS修改
state的值不会成功。加锁失败。
tryAcquire()后会返回false,接着执行
addWaiter(Node.EXCLUSIVE)逻辑,将自己加入到一个
FIFO等待队列中,代码实现如下:
java.util.concurrent.locks.AbstractQueuedSynchronizer.addWaiter():
private Node addWaiter(Node mode) {
    Node node = new Node(Thread.currentThread(), mode);
    Node pred = tail;
    if (pred != null) {
        node.prev = pred;
        if (compareAndSetTail(pred, node)) {
            pred.next = node;
            return node;
        }
    }
    enq(node);
    return node;
}
Node节点,
Node为双向链表。此时等待对内中的
tail指针为空,直接调用
enq(node)方法将当前线程加入等待队列尾部:
private Node enq(final Node node) {
    for (;;) {
        Node t = tail;
        if (t == null) {
            if (compareAndSetHead(new Node()))
                tail = head;
        } else {
            node.prev = t;
            if (compareAndSetTail(t, node)) {
                t.next = node;
                return t;
            }
        }
    }
}
tail指针为空,进入if逻辑,使用
CAS操作设置
head指针,将
head指向一个新创建的
Node节点。此时
AQS中数据:
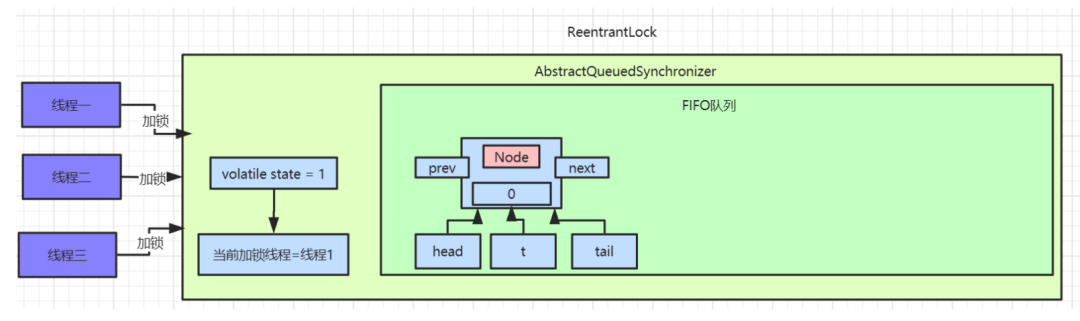
head、
tail、
t都指向第一个
Node元素。
else逻辑,此时已经有了
head节点,这里要操作的就是将线程二对应的
Node节点挂到
head节点后面。此时队列中就有了两个
Node节点:
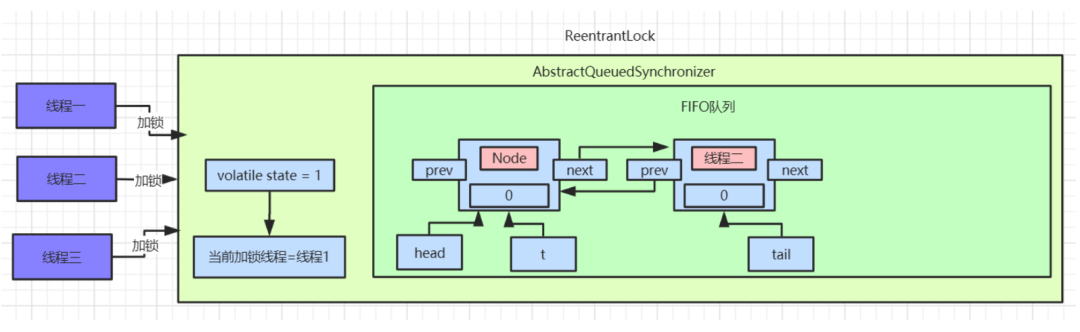
addWaiter()方法执行完后,会返回当前线程创建的节点信息。继续往后执行
acquireQueued(addWaiter(Node.EXCLUSIVE), arg)逻辑,此时传入的参数为线程二对应的
Node节点信息:
java.util.concurrent.locks.AbstractQueuedSynchronizer.acquireQueued():
final boolean acquireQueued(final Node node, int arg) {
    boolean failed = true;
    try {
        boolean interrupted = false;
        for (;;) {
            final Node p = node.predecessor();
            if (p == head && tryAcquire(arg)) {
                setHead(node);
                p.next = null; // help GC
                failed = false;
                return interrupted;
            }
            if (shouldParkAfterFailedAcquire(p, node) &&
                parkAndChecknIterrupt())
                interrupted = true;
        }
    } finally {
        if (failed)
            cancelAcquire(node);
    }
}

private static boolean shouldParkAfterFailedAcquire(Node pred, Node node) {
    int ws = pred.waitStatus;
    if (ws == Node.SIGNAL)
        return true;
    if (ws > 0) {
        do {
            node.prev = pred = pred.prev;
        } while (pred.waitStatus > 0);
        pred.next = node;
    } else {
        compareAndSetWaitStatus(pred, ws, Node.SIGNAL);
    }
    return false;
}

private final boolean parkAndCheckInterrupt() {
    LockSupport.park(this);
    return Thread.interrupted();
}
acquireQueued()这个方法会先判断当前传入的
Node对应的前置节点是否为
head,如果是则尝试加锁。加锁成功过则将当前节点设置为
head节点,然后空置之前的
head节点,方便后续被垃圾回收掉。
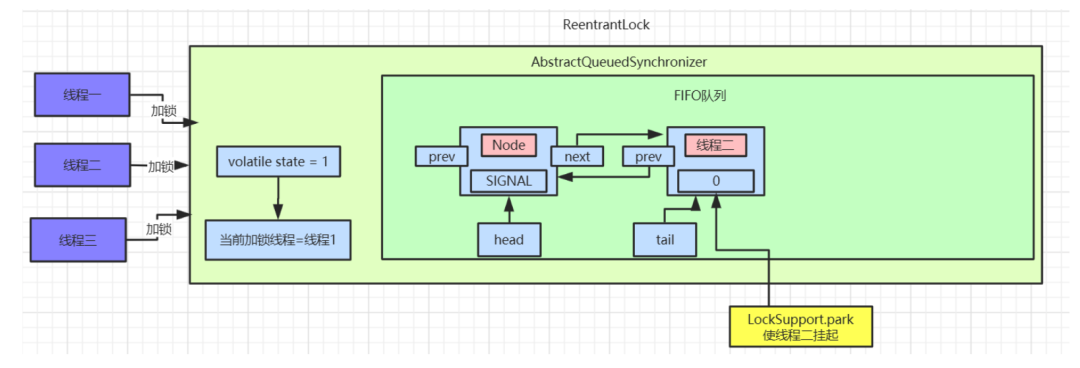
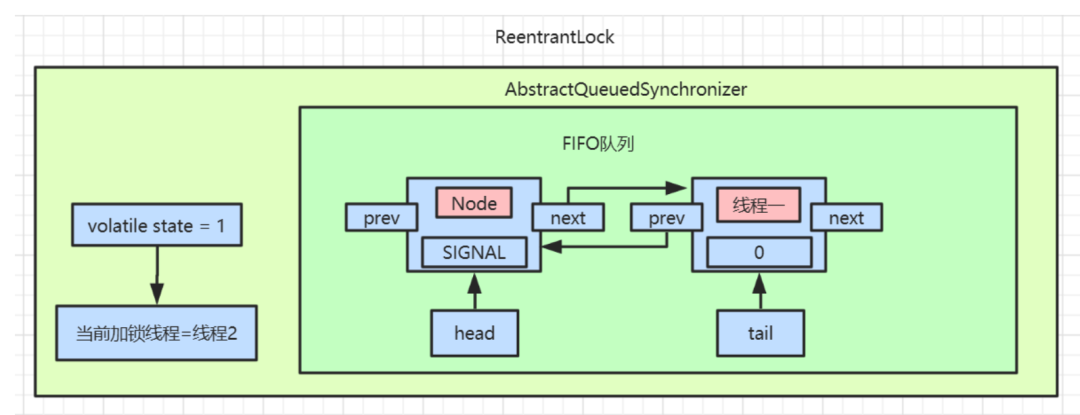
Node的前置节点不是
head节点,就会通过
shouldParkAfterFailedAcquire方法 将
head节点的
waitStatus变为了
SIGNAL=-1,最后执行
parkAndChecknIterrupt方法,调用
LockSupport.park()挂起当前线程。
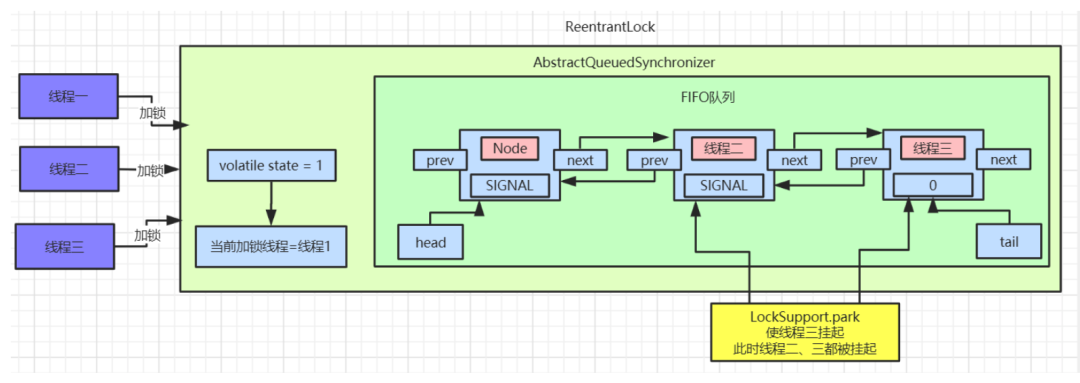
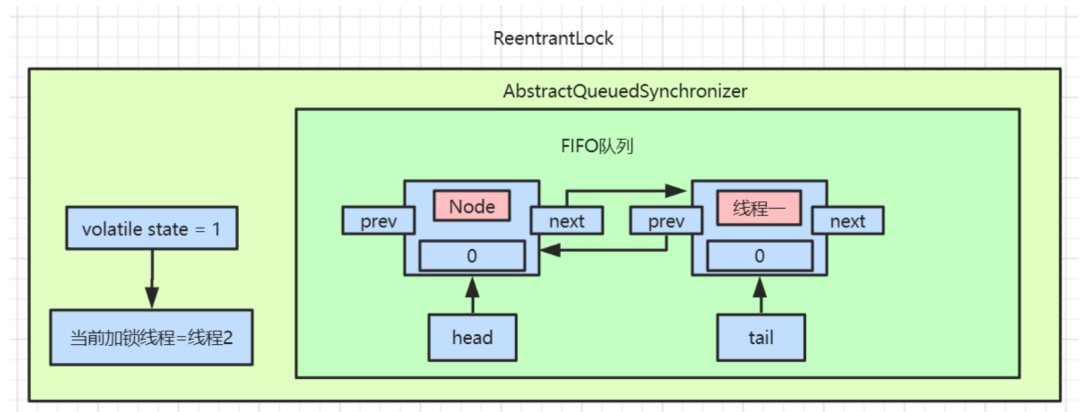
AQS中的数据如下图:
AQS的等待队列里面了,等着其他线程释放锁来唤醒它。
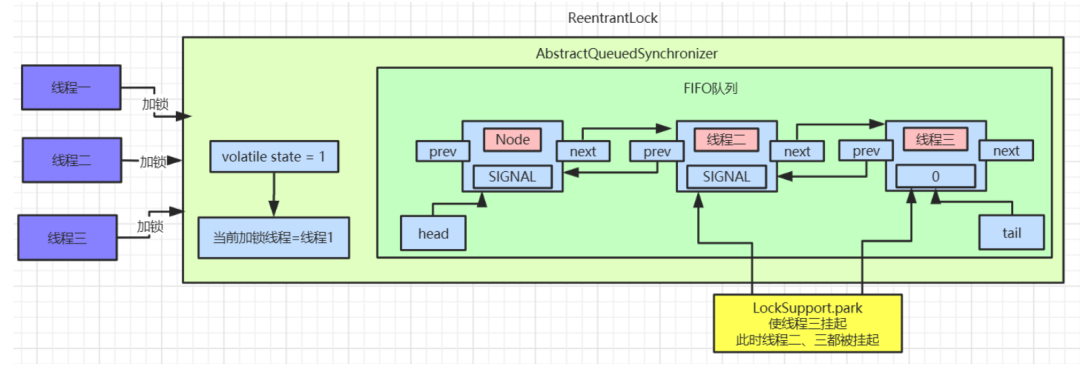
线程三抢占锁失败
addWaiter(Node mode)方法:
private Node addWaiter(Node mode) {
    Node node = new Node(Thread.currentThread(), mode);
    Node pred = tail;
    if (pred != null) {
        node.prev = pred;
        if (compareAndSetTail(pred, node)) {
            pred.next = node;
            return node;
        }
    }
    enq(node);
    return node;
}
tail节点指向线程二,进入
if逻辑后,通过
CAS指令将
tail节点重新指向线程三。
enq()方法执行入队操作,和上面线程二执行方式是一致的,入队后会修改线程二对应的
Node中的
waitStatus=SIGNAL。最后线程三也会被挂起。此时等待队列的数据如图:
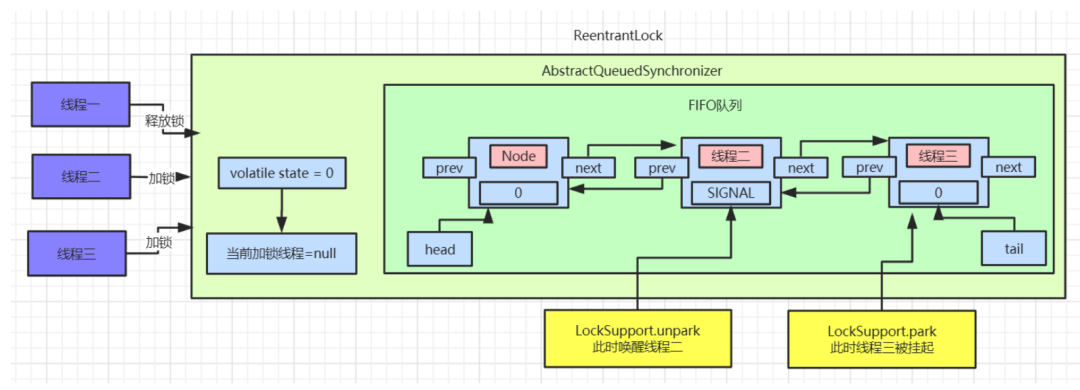
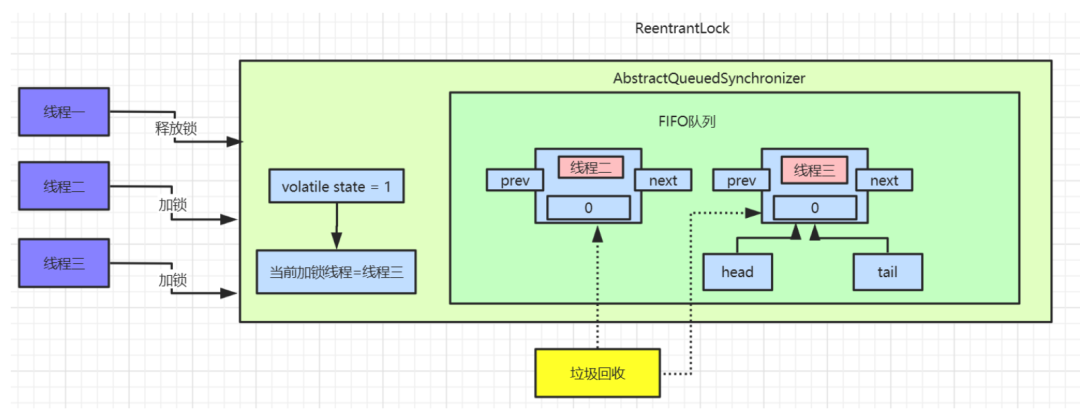
线程一释放锁
head节点的后置节点,也就是我们现在的线程二,具体操作流程如下:
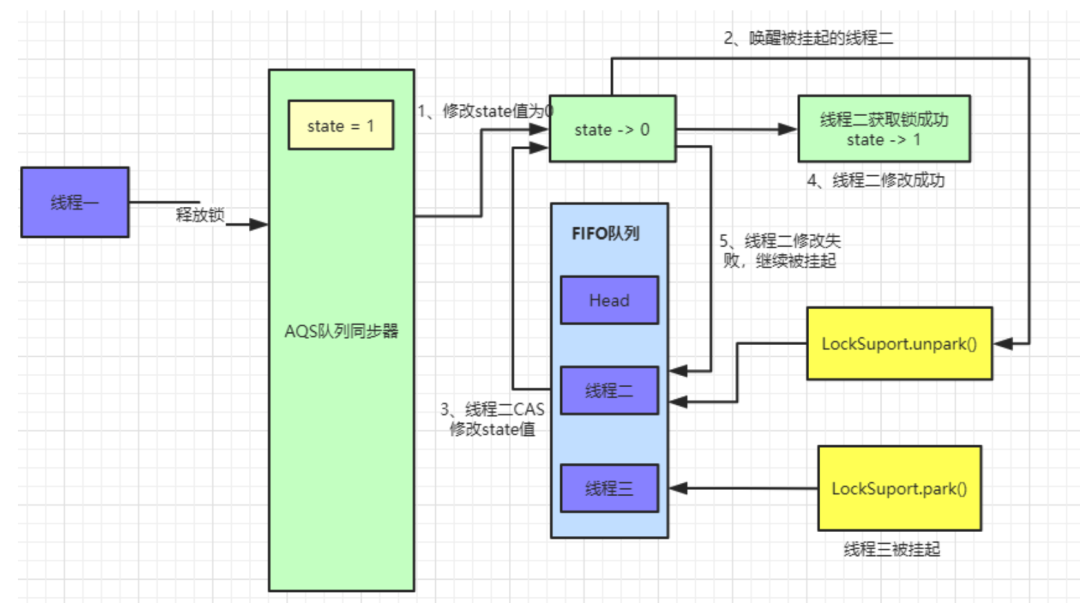
AQS中数据如图:
java.util.concurrent.locks.AbstractQueuedSynchronizer.release()public final boolean release(int arg) {
if (tryRelease(arg)) {
Node h = head;
if (h != null && h.waitStatus != 0)
unparkSuccessor(h);
return true;
}
return false;
}
tryRelease()方法,这个方法具体实现在
ReentrantLock中,如果
tryRelease执行成功,则继续判断
head节点的
waitStatus是否为0
head的
waitStatue为
SIGNAL(-1),这里就会执行
unparkSuccessor()方法来唤醒
head的后置节点,也就是我们上面图中线程二对应的
Node节点。
ReentrantLock.tryRelease()中的具体实现:
protected final boolean tryRelease(int releases) {
    int c = getState() - releases;
    if (Thread.currentThread() != getExclusiveOwnerThread())
        throw new IllegalMonitorStateException();
    boolean free = false;
    if (c == 0) {
        free = true;
        setExclusiveOwnerThread(null);
    }
    setState(c);
    return free;
}
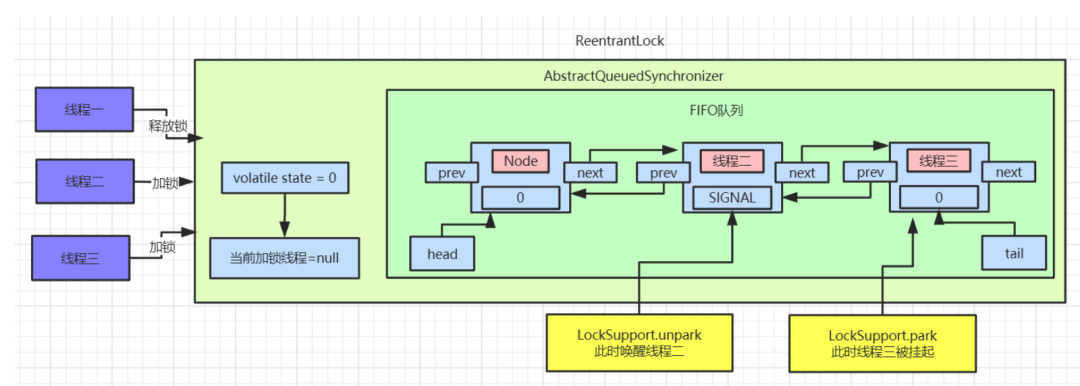
ReentrantLock.tryRelease()后,
state被设置成0,Lock对象的独占锁被设置为null。此时看下
AQS中的数据:
java.util.concurrent.locks.AbstractQueuedSynchronizer.unparkSuccessor()方法,唤醒
head的后置节点:
private void unparkSuccessor(Node node) {
    int ws = node.waitStatus;
    if (ws < 0)
        compareAndSetWaitStatus(node, ws, 0);
    Node s = node.next;
    if (s == null || s.waitStatus > 0) {
        s = null;
        for (Node t = tail; t != null && t != node; t = t.prev)
            if (t.waitStatus <= 0)
                s = t;
    }
    if (s != null)
        LockSupport.unpark(s.thread);
}
head节点的
waitStatus设置为0,然后解除
head节点
next的指向,使
head节点空置,等待着被垃圾回收。
head指针指向线程二对应的
Node节点,且使用
LockSupport.unpark方法来唤醒线程二。
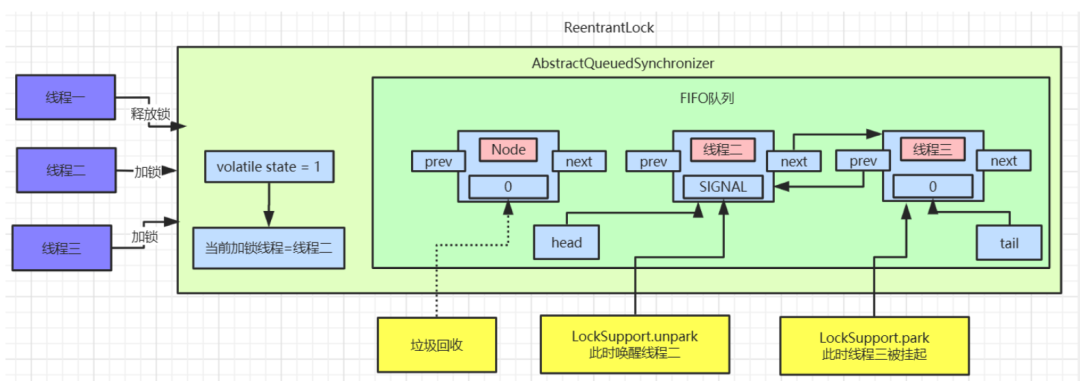
CAS指令修改
state数据。执行完成后可以查看
AQS中数据:
park的地方继续执行,继续执行
acquireQueued()方法。
线程二唤醒继续加锁
final boolean acquireQueued(final Node node, int arg) {
    boolean failed = true;
    try {
        boolean interrupted = false;
        for (;;) {
            final Node p = node.predecessor();
            if (p == head && tryAcquire(arg)) {
                setHead(node);
                p.next = null; // help GC
                failed = false;
                return interrupted;
            }
            if (shouldParkAfterFailedAcquire(p, node) &&
                parkAndCheckInterrupt())
                interrupted = true;
        }
    } finally {
        if (failed)
            cancelAcquire(node);
    }
}
for循环,判断线程二的前置节点是否为
head,如果是则继续使用
tryAcquire()方法来尝试获取锁,其实就是使用
CAS操作来修改
state值,如果修改成功则代表获取锁成功。接着将线程二设置为
head节点,然后空置之前的
head节点数据,被空置的节点数据等着被垃圾回收。
AQS中队列数据如下:
线程二释放锁/线程三加锁
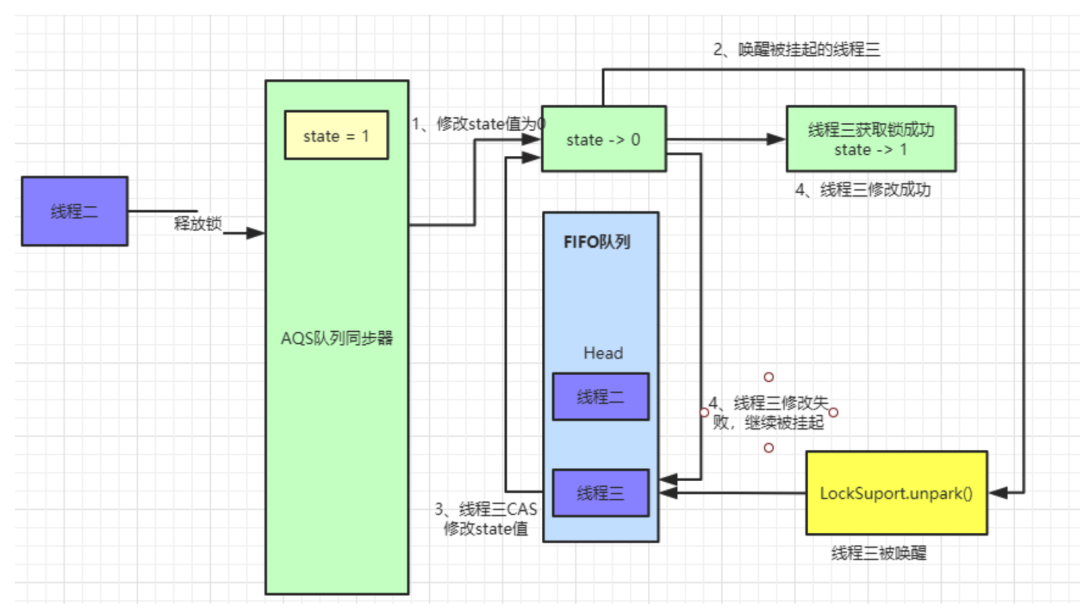
AQS中队列数据如图:
4
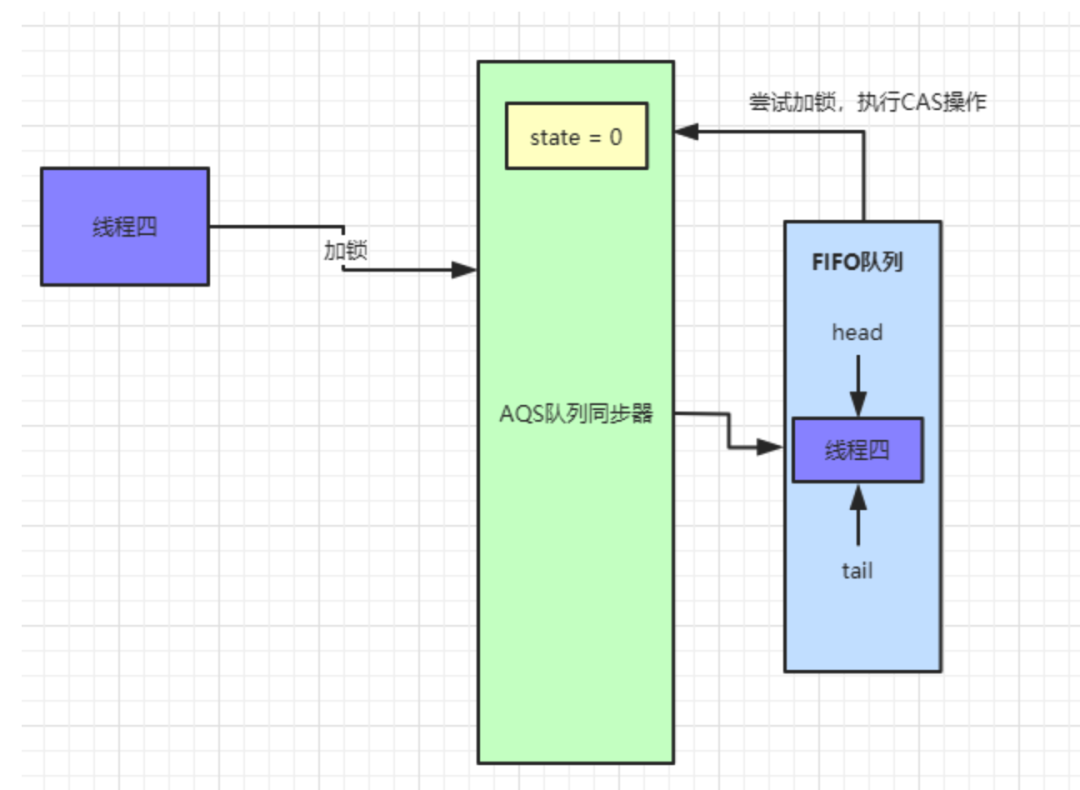
公平锁实现原理
ReentrantLock的默认实现,那我们接着来看一下公平锁的实现原理,这里先用一张图来解释公平锁和非公平锁的区别:
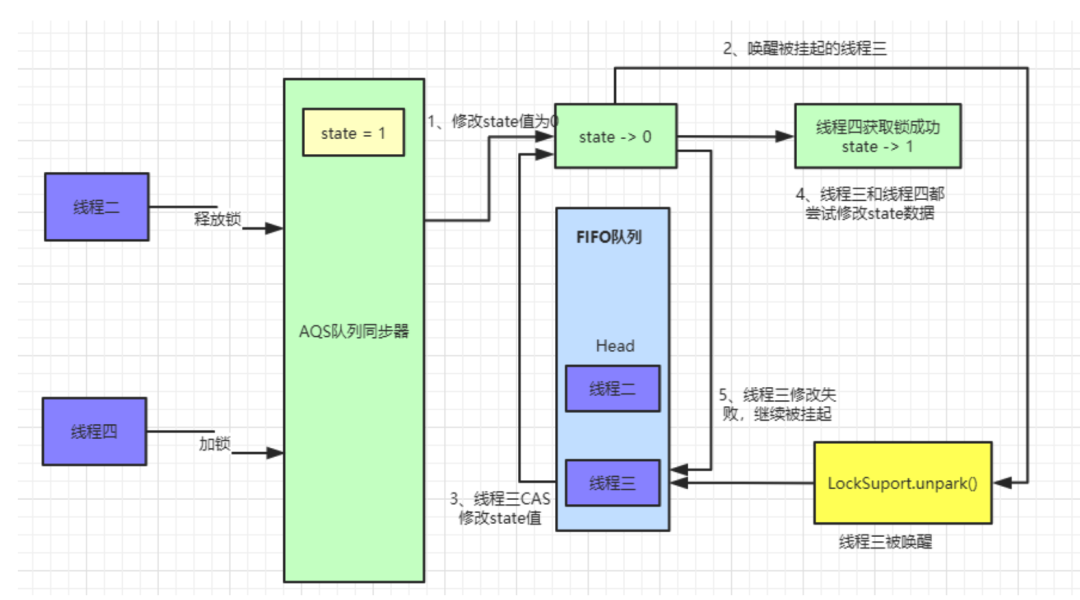
tryAcquire()方法使用
CAS操作来尝试修改
state值,如果此时又来了一个线程四也来执行加锁操作,同样会执行
tryAcquire()方法。
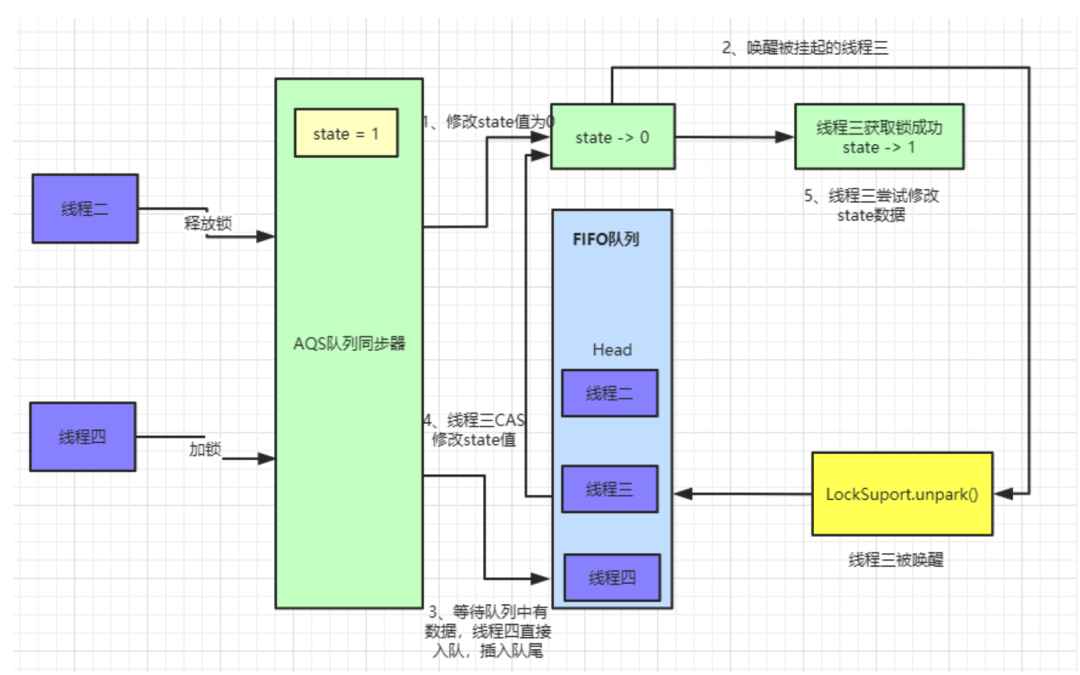
AQS等待队列中是存在节点,如果存在节点则会直接入队等待,具体代码如下.
acquire()方法,只不过公平锁单独实现了
tryAcquire()方法:
#java.util.concurrent.locks.AbstractQueuedSynchronizer.acquire():
public final void acquire(int arg) {
    if (!tryAcquire(arg) &&
        acquireQueued(addWaiter(Node.EXCLUSIVE), arg))
        selfInterrupt();
}
ReentrantLock中公平锁的
tryAcquire()方法
#java.util.concurrent.locks.ReentrantLock.FairSync.tryAcquire():
static final class FairSync extends Sync {
    protected final boolean tryAcquire(int acquires) {
        final Thread current = Thread.currentThread();
        int c = getState();
        if (c == 0) {
            if (!hasQueuedPredecessors() &&
                compareAndSetState(0, acquires)) {
                setExclusiveOwnerThread(current);
                return true;
            }
        }
        else if (current == getExclusiveOwnerThread()) {
            int nextc = c + acquires;
            if (nextc < 0)
                throw new Error("Maximum lock count exceeded");
            setState(nextc);
            return true;
        }
        return false;
    }
}
state值,如果不为0且获取锁的线程不是当前线程,直接返回false代表获取锁失败,被加入等待队列。如果是当前线程则可重入获取锁。
state=0则代表此时没有线程持有锁,执行
hasQueuedPredecessors()判断
AQS等待队列中是否有元素存在,如果存在其他等待线程,那么自己也会加入到等待队列尾部,做到真正的先来后到,有序加锁。具体代码如下:
#java.util.concurrent.locks.AbstractQueuedSynchronizer.hasQueuedPredecessors():
public final boolean hasQueuedPredecessors() {
    Node t = tail;
    Node h = head;
    Node s;
    return h != t &&
        ((s = h.next) == null || s.thread != Thread.currentThread());
}
false代表队列中没有节点或者仅有一个节点是当前线程创建的节点。返回
true则代表队列中存在等待节点,当前线程需要入队等待。
head是否等于
tail,如果队列中只有一个
Node节点,那么
head会等于
tail,接着判断
head的后置节点,这里肯定会是
null,如果此
Node节点对应的线程和当前的线程是同一个线程,那么则会返回
false,代表没有等待节点或者等待节点就是当前线程创建的
Node节点。此时当前线程会尝试获取锁。
head和
tail不相等,说明队列中有等待线程创建的节点,此时直接返回
true,如果只有一个节点,而此节点的线程和当前线程不一致,也会返回
trueCPU唤醒线程的开销,整体的吞吐效率会高点,
CPU也不必取唤醒所有线程,会减少唤起线程的数量
ReentrantLock默认创建非公平锁的原因之一了。
5
Condition实现原理
AQS所提供的核心功能,当然它还有很多其他的特性,这里我们来继续说下
Condition这个组件。
Condition是在
java 1.5中才出现的,它用来替代传统的
Object的
wait()、
notify()实现线程间的协作,相比使用
Object的
wait()、
notify(),使用
Condition中的
await()、
signal()这种方式实现线程间协作更加安全和高效。因此通常来说比较推荐使用
ConditionAbstractQueueSynchronizer中实现了
Condition中的方法,主要对外提供
awaite(Object.wait())和
signal(Object.notify())调用。
Condition Demo示例
/**
 * ReentrantLock 实现源码学习
 * @author 一枝花算不算浪漫
 * @date 2020/4/28 7:20
 */
public class ReentrantLockDemo {
    static ReentrantLock lock = new ReentrantLock();

    public static void main(String[] args) {
        Condition condition = lock.newCondition();

        new Thread(() -> {
            lock.lock();
            try {
                System.out.println("线程一加锁成功");
                System.out.println("线程一执行await被挂起");
                condition.await();
                System.out.println("线程一被唤醒成功");
            } catch (Exception e) {
                e.printStackTrace();
            } finally {
                lock.unlock();
                System.out.println("线程一释放锁成功");
            }
        }).start();

        new Thread(() -> {
            lock.lock();
            try {
                System.out.println("线程二加锁成功");
                condition.signal();
                System.out.println("线程二唤醒线程一");
            } finally {
                lock.unlock();
                System.out.println("线程二释放锁成功");
            }
        }).start();
    }
}
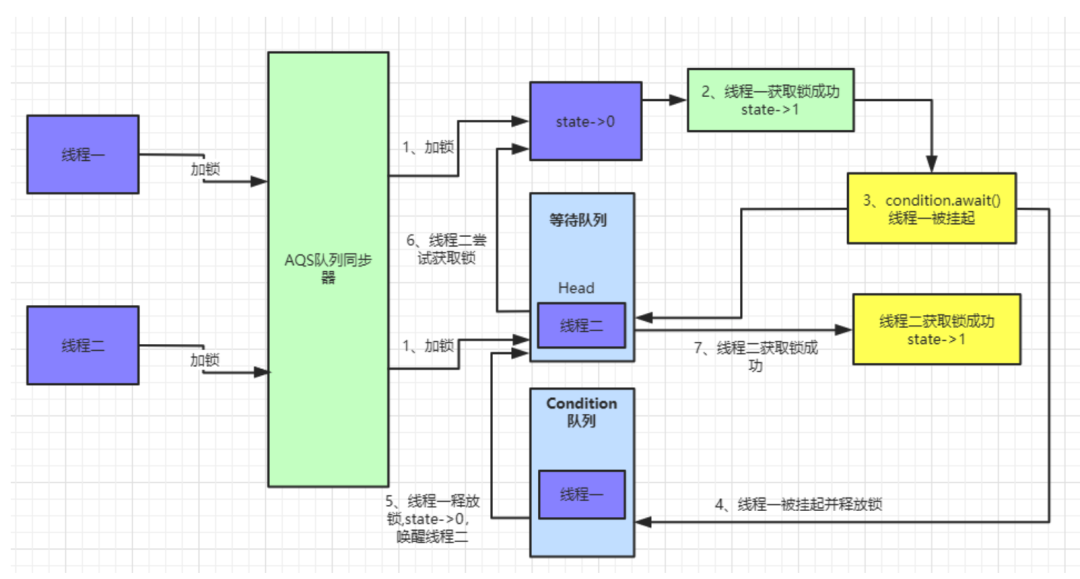
执行结果如下图:
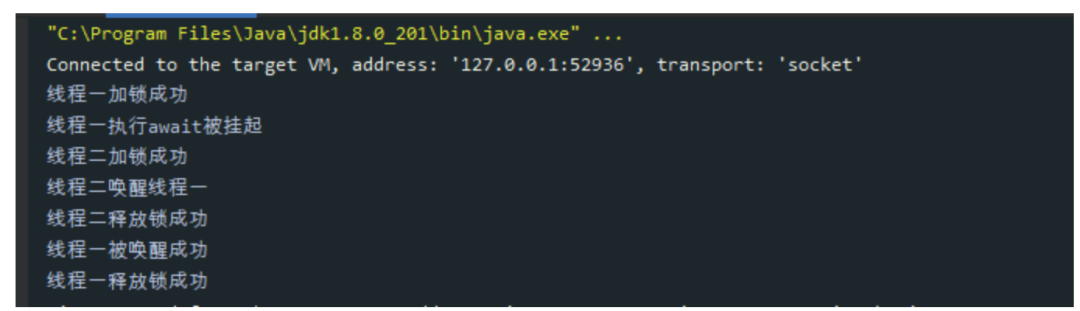
await()方法挂起当前线程并释放锁,线程二获取锁后使用
signal唤醒线程一。
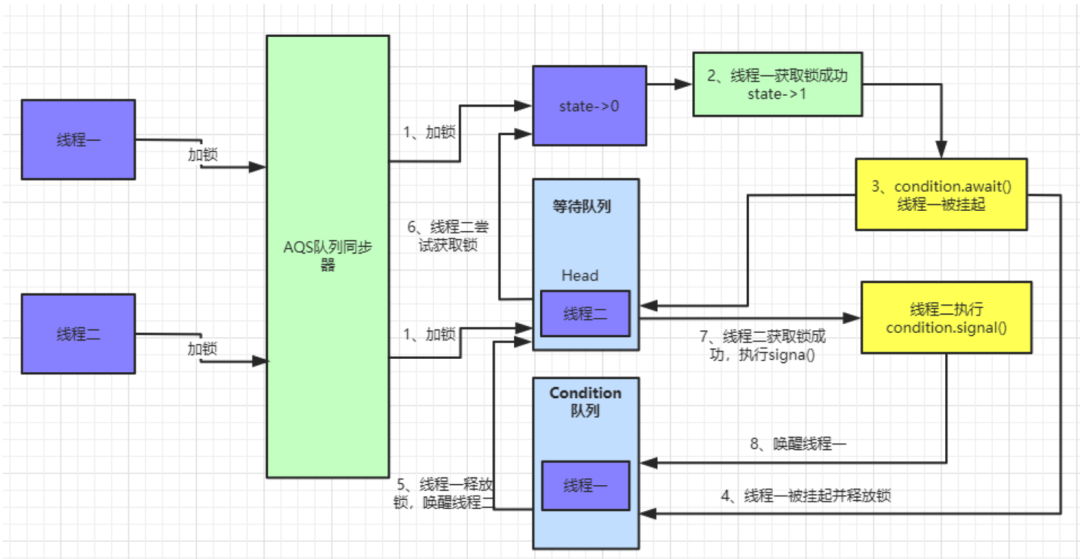
Condition实现原理图解
demo作为实例,执行的流程如下:
await()方法:
#java.util.concurrent.locks.AbstractQueuedSynchronizer.ConditionObject.await():
 public final void await() throws InterruptedException {
    if (Thread.interrupted())
        throw new InterruptedException();
    Node node = addConditionWaiter();
    int savedState = fullyRelease(node);
    int interruptMode = 0;
    while (!isOnSyncQueue(node)) {
        LockSupport.park(this);
        if ((interruptMode = checkInterruptWhileWaiting(node)) != 0)
            break;
    }
    if (acquireQueued(node, savedState) && interruptMode != THROW_IE)
        interruptMode = REINTERRUPT;
    if (node.nextWaiter != null) // clean up if cancelled
        unlinkCancelledWaiters();
    if (interruptMode != 0)
        reportInterruptAfterWait(interruptMode);
}
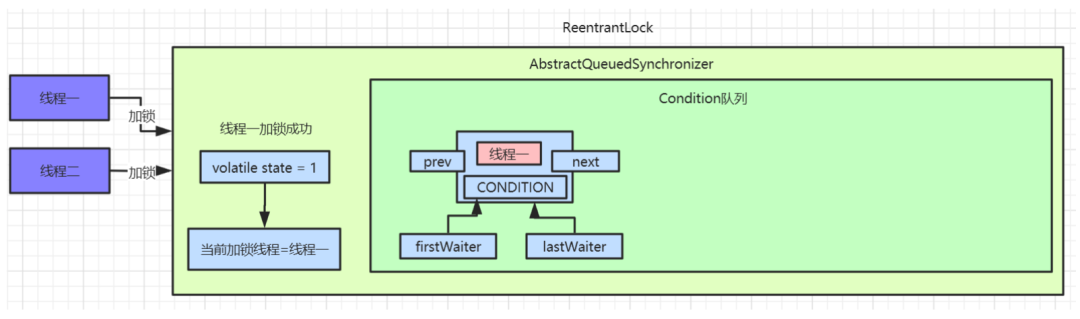
await()方法中首先调用
addConditionWaiter()将当前线程加入到
Condition队列中。
Condition队列中的数据:
private Node addConditionWaiter() {
    Node t = lastWaiter;
    if (t != null && t.waitStatus != Node.CONDITION) {
        unlinkCancelledWaiters();
        t = lastWaiter;
    }
    Node node = new Node(Thread.currentThread(), Node.CONDITION);
    if (t == null)
        firstWaiter = node;
    else
        t.nextWaiter = node;
    lastWaiter = node;
    return node;
}
Node节点,
waitStatus为
CONDITION。接着会释放该节点的锁,调用之前解析过的
release()方法,释放锁后此时会唤醒被挂起的线程二,线程二会继续尝试获取锁。
isOnSyncQueue()方法判断当前节点是否为
Condition队列中的头部节点,如果是则调用
LockSupport.park(this)挂起
Condition中当前线程。此时线程一被挂起,线程二获取锁成功。
signal()方法:
AQS等待队列中已经没有了数据。
public final void signal() {
    if (!isHeldExclusively())
        throw new IllegalMonitorStateException();
    Node first = firstWaiter;
    if (first != null)
        doSignal(first);
}
doSignal()方法来唤醒线程。
private void doSignal(Node first) {
    do {
        if ( (firstWaiter = first.nextWaiter) == null)
            lastWaiter = null;
        first.nextWaiter = null;
    } while (!transferForSignal(first) &&
             (first = firstWaiter) != null);
}

final boolean transferForSignal(Node node) {
    if (!compareAndSetWaitStatus(node, Node.CONDITION, 0))
        return false;

    Node p = enq(node);
    int ws = p.waitStatus;
    if (ws > 0 || !compareAndSetWaitStatus(p, ws, Node.SIGNAL))
        LockSupport.unpark(node.thread);
    return true;
}

/**
 * Inserts node into queue, initializing if necessary. See picture above.
 * @param node the node to insert
 * @return node's predecessor
 */
private Node enq(final Node node) {
    for (;;) {
        Node t = tail;
        if (t == null) { // Must initialize
            if (compareAndSetHead(new Node()))
                tail = head;
        } else {
            node.prev = t;
            if (compareAndSetTail(t, node)) {
                t.next = node;
                return t;
            }
        }
    }
}
transferForSignal()方法来看,通过上面的分析我们知道
Condition队列中只有线程一创建的一个
Node节点,且
waitStatue为
CONDITION,先通过
CAS修改当前节点
waitStatus为0,然后执行
enq()方法将当前线程加入到等待队列中,并返回当前线程的前置节点。
CAS修改当前节点的前置节点
waitStatus为
SIGNAL,并且唤醒当前线程。此时
AQS中等待队列数据为:
await()方法中的 while 循环。
public final void await() throws InterruptedException {
    if (Thread.interrupted())
        throw new InterruptedException();
    Node node = addConditionWaiter();
    int savedState = fullyRelease(node);
    int interruptMode = 0;
    while (!isOnSyncQueue(node)) {
        LockSupport.park(this);
        if ((interruptMode = checkInterruptWhileWaiting(node)) != 0)
            break;
    }
    if (acquireQueued(node, savedState) && interruptMode != THROW_IE)
        interruptMode = REINTERRUPT;
    if (node.nextWaiter != null) // clean up if cancelled
        unlinkCancelledWaiters();
    if (interruptMode != 0)
        reportInterruptAfterWait(interruptMode);
}
waitStatus已经被修改为0,所以执行
isOnSyncQueue()方法会返回
false。跳出
while循环。
acquireQueued()方法,这里之前也有讲过,尝试重新获取锁,如果获取锁失败继续会被挂起。直到另外线程释放锁才被唤醒。
final boolean acquireQueued(final Node node, int arg) {
    boolean failed = true;
    try {
        boolean interrupted = false;
        for (;;) {
            final Node p = node.predecessor();
            if (p == head && tryAcquire(arg)) {
                setHead(node);
                p.next = null; // help GC
                failed = false;
                return interrupted;
            }
            if (shouldParkAfterFailedAcquire(p, node) &&
                parkAndCheckInterrupt())
                interrupted = true;
        }
    } finally {
        if (failed)
            cancelAcquire(node);
    }
}
Condition总结
Condition 可以精准的对多个不同条件进行控制,wait/notify 只能和 synchronized 关键字一起使用,并且只能唤醒一个或者全部的等待队列; Condition 需要使用 Lock 进行控制,使用的时候要注意 lock() 后及时的 unlock(),Condition 有类似于 await 的机制,因此不会产生加锁方式而产生的死锁出现,同时底层实现的是 park/unpark 的机制,因此也不会产生先唤醒再挂起的死锁,一句话就是不会产生死锁,但是 wait/notify 会产生先唤醒再挂起的死锁。
6
总结
ReentrantLock的实现方式和实现原理,而
ReentrantLock底层就是基于
AQS实现的,所以我们也对
AQS有了深刻的理解。
Condition的实现原理,基本上都是使用源码+绘图的讲解方式,尽量让大家更容易去理解。
END
《Java工程师面试突击第三季》加餐部分大纲:(注:1-66讲的大纲请扫描文末二维码,在课程详情页获取)


详细的课程内容,大家可以扫描下方二维码了解:

最后修改时间:2020-05-17 08:13:36
文章转载自石杉的架构笔记,如果涉嫌侵权,请发送邮件至:contact@modb.pro进行举报,并提供相关证据,一经查实,墨天轮将立刻删除相关内容。
