


典型的面向数据库的应用程序设置仅必须与单个操作SQL或RESTful执行一起使用。您的客户一次只能发送一个INSERT或UPDATE查询。我们需要一个高效的解决方案,可以每个客户端每秒处理数千个数据库操作。
在处理来自单一来源(例如物联网或智能家居设备)的数据负载时,批量或批处理操作很有意义。在下一节中,您将了解为什么多次运行查询时为什么需要批处理。
批量操作
在数据库中,您执行的每个操作(SQL中的SELECT或INSERT查询)都将访问要提交的数据库引擎。在每秒有数百个查询的系统中,很难维护数据库和Web应用程序的性能和服务器效率。为了解决这个问题,我们组合了多个查询并将它们一次性发送到数据库。使用PostgreSQL,您应该知道INSERT语句具有多个值,这些语句一次添加:
INSERT INTO table_name (col1, col2, col3)
VALUES
(val1, val2, val3),
(val4, val5, val6),
(val7, val8, val9);
就结果而言,执行此INSERT语句等效于以下三个INSERT语句:
INSERT INTO table_name (col1, col2, col3)
VALUES (val1, val2, val3);

INSERT INTO table_name (col1, col2, col3)
VALUES (val4, val5, val6);

INSERT INTO table_name (col1, col2, col3)
VALUES (val7, val8, val9);
他们的主要区别是他们如何将查询发送到服务器。阅读插入数据以了解有关此方法的更多信息。前一种方法一次性插入三个记录,而后一种方法向数据库引擎发送三个查询以插入三个记录。PostgreSQL将这三个查询隐式包装在三个事务中,从而增加了额外的开销。
JPA批量操作支持
使用我们在之前的文章中创建的JPA模型,我们可以对其进行更新以支持批处理操作,同时继续支持单记录操作。我们之前使用的JPA存储库方法,例如:
- 保存
- 删除
- 更新资料
所有方法都提供了可用于处理记录列表的重载方法。重载的方法提供了对Iterable
更新模型
注意:如果您一直关注此博客的第1部分和第2部分,则应更新Model以及Service和MVC路由的现有类。如果您是第一部分阅读本部分,则可以将代码复制到现有应用程序中。
我们将重写Person 模型以支持实体的顺序ID生成。
package com.demos.crud.data.models;

import javax.persistence.Column;
import javax.persistence.Entity;
import javax.persistence.GeneratedValue;
import javax.persistence.GenerationType;
import javax.persistence.Id;
import javax.persistence.Table;

@Entity
@Table(name = "people")
public class Person {

    @Id
    @GeneratedValue(strategy = GenerationType.SEQUENCE)
    @Column(name = "id")
    public Long id;

    @Column(name = "name")
    public String name;

    @Column(name = "role")
    public String role;

    public Person() {}

    public Person(long id, String name, String role) {
        this.id = id;
        this.name = name;
        this.role = role;
    }

    @Override
    public String toString() {

        StringBuilder builder = new StringBuilder();
        builder.append(String.valueOf(id));
        builder.append(", ");
        builder.append(name);
        builder.append(", ");
        builder.append(role);

        return builder.toString();
    }
}
JPA将使用此实体来启用批量插入。
更新服务和实施
在将Spring Boot MVC连接到我们的JPA储存库之前,我们需要通过一项服务来拦截它,该服务将仅公开必要的功能并隐藏敏感资源,例如JPA储存库。为了解决这个问题,我们创建了一个服务,其中包含我们的MVC将使用的方法:
package com.demos.crud.data.services;

import java.util.List;
import com.demos.crud.data.models.Person;

public interface PeopleService {
    List<Person> findAllPeople();
    Person findById(long id);
    List<Person> findByIds(List<Long> id);

    Person insert(Person p);
    List<Person> insertAll(List<Person> p);

    boolean delete(Long id);
    boolean deleteAll(List<Person> ids);

    boolean update(Person p);
    boolean updateAll(List<Person> p);
}
我们的PeopleService 公开了CRUD函数,适用于单个实体以及应用批处理操作的实体列表。我们将在Java类中为此添加实现,该实现将注入到MVC RESTful控制器中。创建一个新类PeopleServiceImpl 并实现PeopleService 接口以连接到JPA信息库-要了解如何创建该信息库,请检查第2部分。
package com.demos.crud.data.services;

import java.util.List;
import java.util.Optional;
import com.demos.crud.data.models.Person;
import com.demos.crud.data.repositories.PersonRepository;
import org.springframework.beans.factory.annotation.Autowired;
import org.springframework.stereotype.Service;

@Service
public class PeopleServiceImpl implements PeopleService {

    @Autowired
    private PersonRepository repository;

    @Override
    public List<Person> findAllPeople() {
    return (List<Person>)repository.findAll();
    }

    @Override
    public Person findById(long id) {
        Optional<Person> result = repository.findById(id);
        if (result.isPresent()) {
            return result.get();
        } else {
            return null;
        }
    }

    @Override
    public List<Person> findByIds(List<Long> ids) {
        return (List<Person>)repository.findAllById(ids);
    }

    @Override
    public Person insert(Person p) {
        return repository.save(p);
    }

    @Override
    public List<Person> insertAll(List<Person> p) {
        return (List<Person>)repository.saveAll(p);
    }

    @Override
    public boolean delete(Long id) {
        try {
            repository.deleteById(id);
            return true;
        } catch (Exception e) {
            System.out.println(e.getMessage());
            return false;
        }
    }

    @Override
    public boolean deleteAll(List<Person> ids) {

        try {
            repository.deleteAll(ids);
            return true;
        } catch (Exception e) {
            return false;
        }
    }

    @Override
    public boolean update(Person p) {

        try {
            repository.save(p);
            return true;
        } catch (Exception e) {
            System.out.println(e.getMessage());
            return false;
        }
    }

    @Override
    public boolean updateAll(List<Person> p) {
        try {
            repository.saveAll(p);
            return true;
        } catch (Exception e) {
            return false;
        }
    }
}
这是我们将服务连接到JPA存储库并在存储库中执行功能的地方。这里需要注意的几件事:
- JPA存储库使用Java的Iterable
类型作为带有列表的函数的参数。 - 采取Iterable
的JPA存储库方法返回已持久存储在数据库中的实体的Iterable 。 - 您可以根据自己的喜好命名实现的方法,但是将它们命名为存储库的方法很有帮助。但是出于安全原因,应避免将存储库暴露给RESTful控制器。
在上面的代码中,我们使用了List
更新MVC RESTful路由
既然我们已经编写了基础DAO服务,下一步就是将服务连接到我们的RESTful控制器,并创建支持HTTP方法及其在系统中各自操作的HTTP路由。开发批处理支持的端点时要记住两件事:
- 批处理终结点将吸收大量数据。您可以批量接受输入,也可以从端点接受数据后再批量处理数据。我们选择前者,我们接受批量输入(List
)。 - 为单个实体操作创建单独的端点,为批处理操作创建单独的端点是合适的。这可以帮助您的应用程序做出更好的决策,并在批处理任务中执行更好,并减少工作量并为单个实体操作执行SQL语句。
我们牢记这些,并编写RESTful控制器的操作:
package com.demos.crud.controllers.apis;

import java.util.ArrayList;
import java.util.List;
import com.demos.crud.data.models.Person;
import com.demos.crud.data.services.PeopleService;
import org.springframework.beans.factory.annotation.Autowired;
import org.springframework.web.bind.annotation.DeleteMapping;
import org.springframework.web.bind.annotation.GetMapping;
import org.springframework.web.bind.annotation.PathVariable;
import org.springframework.web.bind.annotation.PostMapping;
import org.springframework.web.bind.annotation.PutMapping;
import org.springframework.web.bind.annotation.RequestBody;
import org.springframework.web.bind.annotation.RequestMapping;
import org.springframework.web.bind.annotation.RestController;

@RestController()
@RequestMapping("/api/people")
public class PeopleApiController {

    private static final String REQUEST_NO_BODY = "Request does not contain a body";

    @Autowired
    PeopleService peopleService;

    @GetMapping("")
    public List<Person> getAllPeople() {
        return peopleService.findAllPeople();
    }

    @GetMapping("{id}")
    public Person getPerson(@PathVariable long id) {
        return peopleService.findById(id);
    }

    @PostMapping("")
    public String addPerson(@RequestBody Person person) {
        if(person != null) {
            peopleService.insert(person);
            return "Added a person";
        } else {
            return REQUEST_NO_BODY;
        }
    }

    @PostMapping("bulk")
    public String addPeople(@RequestBody List<Person> people) {
        if(people != null && !people.isEmpty()) {
            peopleService.insertAll(people);
            return String.format("Added %d people.", people.size());
        } else {
            return REQUEST_NO_BODY;
        }
    }

    @DeleteMapping("{id}")
    public String deletePerson(@PathVariable("id") long id) {
        if(id > 0) {
            if(peopleService.delete(id)) {
                return "Deleted the person.";
            } else {
                return "Cannot delete the person.";
            }
        }
        return "The id is invalid for the person.";
    }

    @DeleteMapping("bulk")
    public String deletePeople(@RequestBody List<Person> ids) {
        if(!ids.isEmpty()) {
            if(peopleService.deleteAll(ids)) {
                return "Deleted the person.";
            } else {
                return "Cannot delete the person.";
            }
        }
        return "The request should contain a list of people to be deleted.";
    }

    @PutMapping("")
    public String updatePerson(@RequestBody Person person) {
        if(person != null) {
            peopleService.update(person);
            return "Updated person.";
        } else {
            return REQUEST_NO_BODY;
        }
    }

    @PutMapping("bulk")
    public String updatePeople(@RequestBody List<Person> people) {
        if(people != null) {
            peopleService.updateAll(people);
            return "Updated people.";
        } else {
            return REQUEST_NO_BODY;
        }
    }
}
控制器为在对象列表上运行的每个HTTP动词包含一个附加的“ / bulk”端点。
启用批量支持
要配置的最后一件事是编辑application.properties 文件以为Hibernate操作启用batch_size 。这是用于将查询批量/批量发送到数据库的大小。附加以下配置以启用:
spring.jpa.properties.hibernate.jdbc.batch_size = 5
spring.jpa.properties.hibernate.order_inserts = true
您可以根据系统配置在2到50之间的任意位置配置batch_size 。请注意,较大的批处理大小将需要更多的内存,并可能导致内存溢出。完整的文件是:
## default connection pool
spring.datasource.hikari.connectionTimeout=20000
spring.datasource.hikari.maximumPoolSize=5
spring.jpa.generate-ddl=false

## PostgreSQL
spring.datasource.url=jdbc:<postgresql://172.17.0.2:5432/postgres>
spring.datasource.username=<username>
spring.datasource.password=<password>

# Database schema
spring.datasource.hikari.schema=techwriting
spring.jpa.properties.hibernate.jdbc.batch_size=5
spring.jpa.properties.hibernate.order_inserts=true

# drop and recreate table again, you should comment this in production
spring.jpa.hibernate.ddl-auto=create
请注意,默认连接池设置是临时的,用于测试工作负载和用例,而不是针对生产工作负载的建议设置。您应该咨询您的DBA和Ops团队来确定连接池的设置。
在下一节中,您将看到我们如何将数据传递给这些控制器,以及Spring Boot将如何解析数据以便框架可以对其进行处理。
消费API
我们将使用Postman将查询发送到Java Web应用程序,并使用OmniDB作为PostgreSQL的管理面板来查看数据库表的状态。在开始之前,这是数据库表的状态:
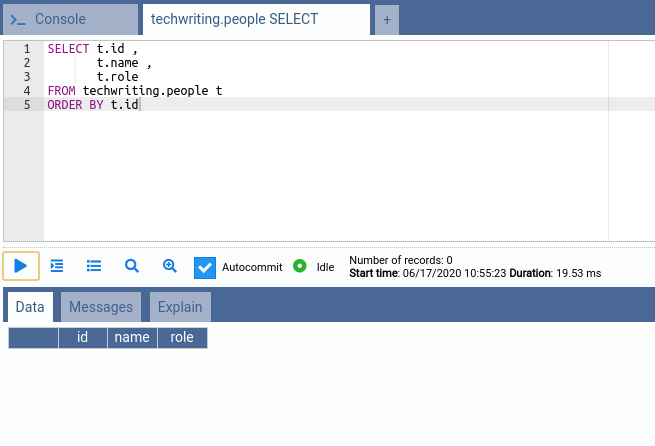
现在,我们将请求发送到Java应用程序的端点,并显示它们如何使表发生突变。
批量插入
我们可以使用POST端点将数据插入数据库中。要使用的端点是“ http://localhost:8080/api/people/bulk ”,我们提交了一个包含人员详细信息的JSON数组。我创建了一个包含11个元素的列表:
[
{
"name": "Person 1",
"role": "Software Engineer"
},
// redundant part removed
{
"name": "Person 11",
"role": "Software Engineer"
}
]
执行代码将在数据库中创建记录。

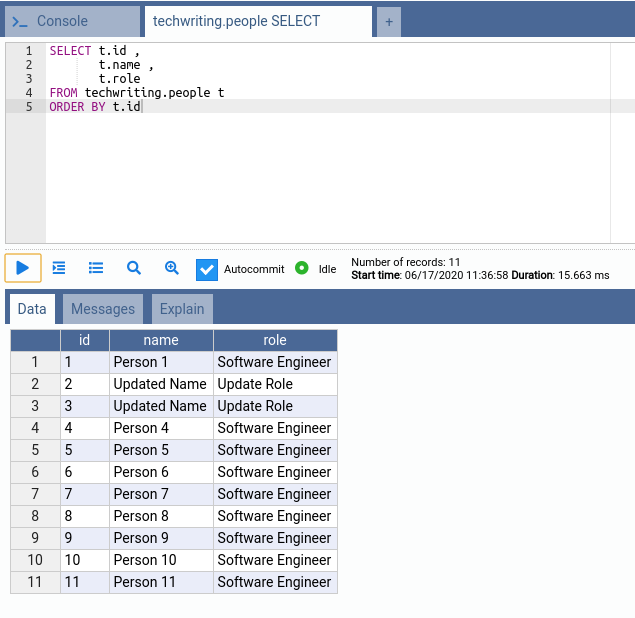
我们的代码已执行,并将列表中的11个人保存到数据库中。我们可以使用OmniDB中的以下SQL查看PostgreSQL表中的内容:
SELECT t.id ,
       t.name ,
       t.role
FROM techwriting.people t
ORDER BY t.id
现在,数据库包含我们在上面的语句中刚刚创建的11条记录;请参阅“ 验证批处理操作”以了解如何在JPA中创建批处理语句。
批量更新
要执行批量更新,我们将使用相同的端点,但发送一个PUT请求。为了进行测试,我们将发送一个包含两个人的HTTP正文及其更新的详细信息:
[
{
“ id”:2,
“ name”:“ Updated Name”,
“ role”:“ Update Role”
},
{
“ id”:3,
“ name”:“ Updated Name”,
“ role”:“ Update Role “
}
]
此请求应更新2个人(ID为2和3)。
现在,我们可以再次使用SQL语句验证数据库表中的数据:
表包含更新的记录。
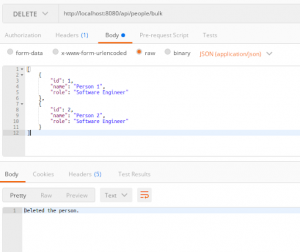
批量删除
同样,我们可以使用相同的端点但对于HTTP使用DELETE动词来批量删除记录。在删除请求中,我们需要发布要删除的人员记录。JPA不包含接受ID类型的列表的删除方法(“长假”情况)。因此,我们需要发送List
[
{
“ id”:1,
“ name”:“ Person 1”,
“ role”:“ Software Engineer”
},
{
“ id”:2,
“ name”:“ Person 2”,
“ role”:“ Software Engineer “
}
]
现在,执行代码将删除表中的记录:
我们可以检查数据库表的状态:
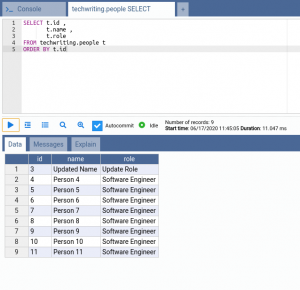
基于此,您可以看到数据已被删除。现在,有趣的一点是验证语句是否已批量执行。
验证批处理操作
我们已经看到了如何编写将执行批处理操作的代码,以验证我们的JPA是否以批处理方式发送查询,我们可以更改application.properties 文件以记录并显示执行,以及它们是否包含批处理操作。将此行添加到application.properties 文件的末尾以显示查询的统计信息:
# enable the query statistics
spring.jpa.properties.hibernate.generate_statistics=true
首先,如果我们对Person实体中的主键使用IDENTITY 生成方式,则将为我们的SQL语句打印以下日志(例如,批量插入操作):
1024993 nanoseconds spent acquiring 1 JDBC connections;
0 nanoseconds spent releasing 0 JDBC connections;
469016 nanoseconds spent preparing 11 JDBC statements;
81414030 nanoseconds spent executing 11 JDBC statements;
0 nanoseconds spent executing 0 JDBC batches;
0 nanoseconds spent performing 0 L2C puts;
0 nanoseconds spent performing 0 L2C hits;
0 nanoseconds spent performing 0 L2C misses;
438674 nanoseconds spent executing 1 flushes (flushing a total of 11 entities and 0 collections);
0 nanoseconds spent executing 0 partial-flushes (flushing a total of 0 entities and 0 collections)
如果将生成策略编辑为SEQUENCE (或其他JPA支持的模式),就像我们在上面的模型中所做的那样,我们将看到:
5330717 nanoseconds spent acquiring 1 JDBC connections;
0 nanoseconds spent releasing 0 JDBC connections;
14316641 nanoseconds spent preparing 12 JDBC statements;
1764945 nanoseconds spent executing 11 JDBC statements;
9864966 nanoseconds spent executing 3 JDBC batches;
0 nanoseconds spent performing 0 L2C puts;
0 nanoseconds spent performing 0 L2C hits;
0 nanoseconds spent performing 0 L2C misses;
34051820 nanoseconds spent executing 1 flushes (flushing a total of 11 entities and 0 collections);
0 nanoseconds spent executing 0 partial-flushes (flushing a total of 0 entities and 0 collections)
通过这种方法,您可以看到执行了3个JDBC批处理。我们的请求中有11个元素,batch_size 为5,因此为该查询进行了3批处理。
原因是,JPA无法预测IDENTITY 生成模式,并且需要从数据库引擎捕获ID。因此,JPA会将每个INSERT发送到数据库以捕获新的主键。因此,Hibernate隐式禁用批处理,并且要使用批处理功能,可以修改主键值的生成。
您可以启用此设置,然后重新运行上面的代码,以从JPA的角度查看如何执行批处理。
阅读本文以了解有关批量操作中主键最佳实践的更多信息。
结论
在本文中,您了解了PostgreSQL数据库中的批量操作以及JPA如何在Spring Boot中通过JPA提供对批量操作的支持。您学习了如何在JPA抽象服务中创建批量支持,如何使用Java类型以及JPA如何在内部将它们映射到PostgreSQL类型。您还学习了如何编写RESTful API以及如何在客户端和服务器应用程序之间共享数据。
