


最近调研了一下ELK,自己也尝试搭建了一套环境,用于学习, 现将整个部署的过程记录下来
现 Filebeat 已经完全替代了 Logstash-Forwarder 成为新一代的日志采集器,越来越多人开始使用它,所以现在基于 Filebeat ELK 架构如下图
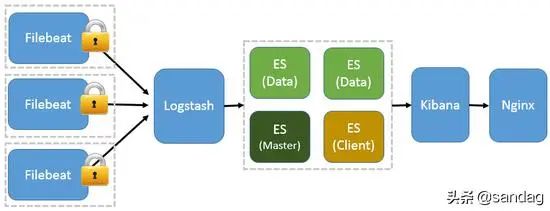
看完了图,再来简单介绍一下ELK
E lasticsearch :简称 ES,是ELK的核心,是基于Apache Lucene的开源数据搜索引擎,可以实时快速的搜索和分析,性能强悍
L ogstash :一个具有实时传输能力的数据收集引擎,用来数据收集、分析、过滤日志的工具,支持多类型日志
K ibana :为Elasticsearch提供了分析和可视化的Web平台 ,可以生成各种维度的表格,图形, Kibana 还可以用于问题分析,可以很快的将异常事件或者事件范围缩小到秒级或者个位数,从TB级别的数据中搜到关键的错误信息
Filebeat : 一个轻量级日志采集器, 早期的 ELK 架构中使用 Logstash 收集、解析日志,但是 Logstash 对内存、cpu、io 等资源消耗比较高, 相比 Logstash,Filebeat 所占系统的 CPU 和内存几乎可以忽略不计
Kafka:一种高吞吐量的分布式发布订阅消息系统, 如果日志量巨大,还需要引入Kafka用以均衡网络传输,降低网络闭塞, 保证数据不丢失,还可以系统之间解耦,具有更好的灵活性和扩展性
版本:
Filebeat:7.8.1LogStash:7.8.1Kibana:7.8.1Elasticsearch:7.8.1Kafka:2.2.2 - 2.12Java:11
在选择对应版本的时候需要注意,ES 7.8.1需要Java 11
Filebeat与Kafka对应版本的选择,官网也有说明,建议Kafka版本在 0.11 和 2.2.2 之间,所以选用了Kafka 2.2.2
Filebea t
1.解压
2.Filebeat配置起来很简单,修改filebeat.yml配置文件如下
定义Filebeat的输入:为目标日志
定义Filebeat的输出:为kakfa,指定topic
# ============================== Filebeat inputs ===============================filebeat.inputs:# Each - is an input. Most options can be set at the input level, so# you can use different inputs for various configurations.# Below are the input specific configurations.- type: log # Change to true to enable this input configuration. enabled: true # Paths that should be crawled and fetched. Glob based paths. paths: - yw/log/*.log# ------------------------------ Logstash Output -------------------------------output.kafka: enable: true hosts: ["localhost:9092"] topic: "test"
2.启动Filebeat,需要指定配置文件,即刚才配置好的filebeat.yml
nohup ./filebeat -c filebeat.yml &
Kafka
1.解压
2.修改配置文件 server.properties,修改如下配置
listeners=PLAINTEXT://localhost:9092
3.如果你没有zookeeper,则可以使用kakfa自带的zookeeper,配置zookeeper
# the directory where the snapshot is stored.dataDir=/tmp/zookeeper# the port at which the clients will connectclientPort=2181# disable the per-ip limit on the number of connections since this is a non-production configmaxClientCnxns=0
4.启动zookeeper
cd binnohup ./zookeeper-server-start.sh ../config/zookeeper.properties &
查看进程是否正确启动
[root@localhost bin]# jps9139 QuorumPeerMain
5.启动Kafka
nohup ./kafka-server-start.sh ../config/server.properties &
查看进程是否正确启动
[root@localhost bin]# jps9139 QuorumPeerMain9683 Kafka
6.查看 topic,在我们配置 Filebeat 的时候定义了topic,当 Kafka 启动后,就会创建 topic
[root@localhost bin]# ./kafka-topics.sh --list --bootstrap-server localhost:9092test
[root@localhost bin]# ./kafka-topics.sh --describe --bootstrap-server localhost:9092 --topic testTopic:test PartitionCount:1 ReplicationFactor:1 Configs:segment.bytes=1073741824 Topic: test Partition: 0 Leader: 0 Replicas: 0 Isr: 0
LogStash
1.解压
2.修改配置文件 config/logstash.yml
node.name: localhost
3.在使用Logstash时,可根据需求创建自己的配置文件
定义 input :Logstash 去接 Filebeat 发送到 Kafka 的数据,配置 Kafka 相关的信息,指定 topic,并指明类型为 json
定义 output : 需要向 ES 中存储,指定ES的地址,并创建索引: test – 年份.月份 ,配置文件如下
注意,需要保证格式的正确,要不然 LogStash会抛出异常
[root@localhost config]# cat test.confinput { kafka { bootstrap_servers => ["localhost:9092"] group_id => "test" topics => ["test"] consumer_threads => 1 codec => json { charset => "UTF-8" } }}output { elasticsearch { hosts => ["localhost:9200"] index => "test-%{+YYYY.MM}" }}
3. 启动 Logstash,需要指定我们自定义的配置文件
cd ../bin/nohup ./logstash -f ../config/test.conf &
查看进程是否启动
[root@localhost bin]# jps9139 QuorumPeerMain9683 Kafka3619 Logstash
Elasticsearch
1.解压
2.创建 elasticsearch 用户(root用户不能启动 elasticsearch )
useradd elasticsearch
3.修改文件拥有用户
chown -R elasticsearch elasticsearch/
切换用户
su - elasticsearch
4.修改配置文件,config/elasticsearch.yml
http.port: 9200
5.修改Jvm配置文件 jvm.options,资源有限,需要限定一下堆的大小
-Xms256m-Xmx512m
6.启动 Elasticsearch
[root@localhost bin]# cd bin[root@localhost bin]# ./elasticsearch
查看进程是否启动
[2020-07-29T21:54:17,410][INFO ][o.e.h.AbstractHttpServerTransport] [localhost.localdomain] publish_address {127.0.0.1:9200}, bound_addresses {[::1]:9200}, {127.0.0.1:9200}[2020-07-29T21:54:17,411][INFO ][o.e.n.Node ] [localhost.localdomain] started
[root@localhost bin]# jps3619 Logstash2516 Kafka2955 QuorumPeerMain3725 Elasticsearch3262 Kafka
7.测试es是否好用
[root@localhost bin]# curl localhost:9200{ "name" : "localhost.localdomain", "cluster_name" : "elasticsearch", "cluster_uuid" : "2dcAImNFTli_lGTHJYx7_A", "version" : { "number" : "7.8.1", "build_flavor" : "default", "build_type" : "tar", "build_hash" : "b5ca9c58fb664ca8bf9e4057fc229b3396bf3a89", "build_date" : "2020-07-21T16:40:44.668009Z", "build_snapshot" : false, "lucene_version" : "8.5.1", "minimum_wire_compatibility_version" : "6.8.0", "minimum_index_compatibility_version" : "6.0.0-beta1" }, "tagline" : "You Know, for Search"}
Kibana
1.解压
2.创建 kibana 用户
useradd kibana
3. 修改文件拥有用户
chown -R kibana kibana/
切换用户
su - kibana
4.修改配置文件 kibana.yml
elasticsearch.hosts: ["http://localhost:9200"]
5.启动 kibana
[root@localhost kibana]# cd bin/[root@localhost bin]# ./kibana
查看是否启动成功,相关信息如下
[01:55:38.282] [info][listening] Server running at http://localhost:5601 [01:55:39.117] [info][server][Kibana][http] http server running at http://localhost:5601
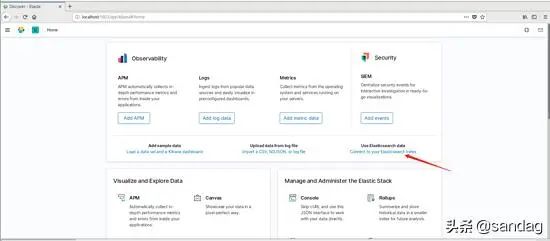
所有组件都启动成功后,打开浏览器输入 localhost:5601 ,查看kibana
接下来就是见证奇迹的时刻,网页成功打开

然后连接自己的ES
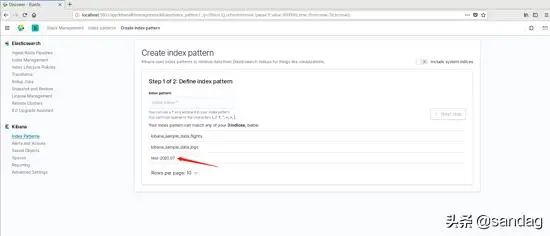
下一步后,找到Logstash中设置好的索引
接下来,就是验证整个流程了
让监控的日志中产生一些数据
[2020-07-29 22:12:49,689] INFO [GroupMetadataManager brokerId=0] Removed 0 expired offsets in 37 milliseconds. (kafka.coordinator.group.GroupMetadataManager)[2020-07-29 22:22:49,645] INFO [GroupMetadataManager brokerId=0] Removed 0 expired offsets in 0 milliseconds. (kafka.coordinator.group.GroupMetadataManager)[2020-07-29 22:32:49,646] INFO [GroupMetadataManager brokerId=0] Removed 0 expired offsets in 1 milliseconds. (kafka.coordinator.group.GroupMetadataManager)[2020-07-29 22:42:49,646] INFO [GroupMetadataManager brokerId=0] Removed 0 expired offsets in 1 milliseconds. (kafka.coordinator.group.GroupMetadataManager)
在 Kafka 中消费一下,是否有消息发送到 topic 上
./kafka-console-consumer.sh --topic test --bootstrap-server localhost:9092{"@timestamp":"2020-07-30T02:43:17.329Z","@metadata":{"beat":"filebeat","type":"_doc","version":"7.8.1"},"ecs":{"version":"1.5.0"},"host":{"ip":["10.46.2.112","fe80::2959:f9cc:2a94:6ddc","192.168.122.1"],"mac":["00:0c:29:4e:57:2e","52:54:00:56:ed:eb","52:54:00:56:ed:eb"],"name":"localhost.localdomain","hostname":"localhost.localdomain","architecture":"x86_64","os":{"family":"redhat","name":"CentOS Linux","kernel":"3.10.0-1062.el7.x86_64","codename":"Core","platform":"centos","version":"7 (Core)"},"id":"17946cedccdd442b845d0cfa8693cc71","containerized":false},"agent":{"version":"7.8.1","hostname":"localhost.localdomain","ephemeral_id":"3a381097-c3fe-4339-b92b-fff537b9a9f2","id":"401bee7f-115f-447d-a1e5-a6b6c57e21a1","name":"localhost.localdomain","type":"filebeat"},"message":"[2020-07-29 22:04:48,914] INFO [GroupCoordinator 0]: Assignment received from leader for group console-consumer-98001 for generation 1 (kafka.coordinator.group.GroupCoordinator)","log":{"offset":668,"file":{"path":"/yw/log/1.log"}},"input":{"type":"log"}}{"@timestamp":"2020-07-30T02:43:17.330Z","@metadata":{"beat":"filebeat","type":"_doc","version":"7.8.1"},"log":{"offset":846,"file":{"path":"/yw/log/1.log"}},"message":"[2020-07-29 22:12:49,689] INFO [GroupMetadataManager brokerId=0] Removed 0 expired offsets in 37 milliseconds. (kafka.coordinator.group.GroupMetadataManager)","input":{"type":"log"},"host":{"architecture":"x86_64","os":{"version":"7 (Core)","family":"redhat","name":"CentOS Linux","kernel":"3.10.0-1062.el7.x86_64","codename":"Core","platform":"centos"},"id":"17946cedccdd442b845d0cfa8693cc71","containerized":false,"ip":["10.46.2.112","fe80::2959:f9cc:2a94:6ddc","192.168.122.1"],"mac":["00:0c:29:4e:57:2e","52:54:00:56:ed:eb","52:54:00:56:ed:eb"],"name":"localhost.localdomain","hostname":"localhost.localdomain"},"agent":{"id":"401bee7f-115f-447d-a1e5-a6b6c57e21a1","name":"localhost.localdomain","type":"filebeat","version":"7.8.1","hostname":"localhost.localdomain","ephemeral_id":"3a381097-c3fe-4339-b92b-fff537b9a9f2"},"ecs":{"version":"1.5.0"}}{"@timestamp":"2020-07-30T02:43:17.330Z","@metadata":{"beat":"filebeat","type":"_doc","version":"7.8.1"},"host":{"architecture":"x86_64","name":"localhost.localdomain","os":{"family":"redhat","name":"CentOS Linux","kernel":"3.10.0-1062.el7.x86_64","codename":"Core","platform":"centos","version":"7 (Core)"},"id":"17946cedccdd442b845d0cfa8693cc71","containerized":false,"ip":["10.46.2.112","fe80::2959:f9cc:2a94:6ddc","192.168.122.1"],"mac":["00:0c:29:4e:57:2e","52:54:00:56:ed:eb","52:54:00:56:ed:eb"],"hostname":"localhost.localdomain"},"message":"[2020-07-29 22:22:49,645] INFO [GroupMetadataManager brokerId=0] Removed 0 expired offsets in 0 milliseconds. (kafka.coordinator.group.GroupMetadataManager)","log":{"offset":1004,"file":{"path":"/yw/log/1.log"}},"input":{"type":"log"},"agent":{"id":"401bee7f-115f-447d-a1e5-a6b6c57e21a1","name":"localhost.localdomain","type":"filebeat","version":"7.8.1","hostname":"localhost.localdomain","ephemeral_id":"3a381097-c3fe-4339-b92b-fff537b9a9f2"},"ecs":{"version":"1.5.0"}}{"@timestamp":"2020-07-30T02:43:17.330Z","@metadata":{"beat":"filebeat","type":"_doc","version":"7.8.1"},"host":{"containerized":false,"ip":["10.46.2.112","fe80::2959:f9cc:2a94:6ddc","192.168.122.1"],"name":"localhost.localdomain","mac":["00:0c:29:4e:57:2e","52:54:00:56:ed:eb","52:54:00:56:ed:eb"],"hostname":"localhost.localdomain","architecture":"x86_64","os":{"family":"redhat","name":"CentOS Linux","kernel":"3.10.0-1062.el7.x86_64","codename":"Core","platform":"centos","version":"7 (Core)"},"id":"17946cedccdd442b845d0cfa8693cc71"},"agent":{"ephemeral_id":"3a381097-c3fe-4339-b92b-fff537b9a9f2","id":"401bee7f-115f-447d-a1e5-a6b6c57e21a1","name":"localhost.localdomain","type":"filebeat","version":"7.8.1","hostname":"localhost.localdomain"},"message":"[2020-07-29 22:32:49,646] INFO [GroupMetadataManager brokerId=0] Removed 0 expired offsets in 1 milliseconds. (kafka.coordinator.group.GroupMetadataManager)","log":{"offset":1161,"file":{"path":"/yw/log/1.log"}},"input":{"type":"log"},"ecs":{"version":"1.5.0"}}{"@timestamp":"2020-07-30T02:43:17.330Z","@metadata":{"beat":"filebeat","type":"_doc","version":"7.8.1"},"host":{"id":"17946cedccdd442b845d0cfa8693cc71","name":"localhost.localdomain","containerized":false,"ip":["10.46.2.112","fe80::2959:f9cc:2a94:6ddc","192.168.122.1"],"mac":["00:0c:29:4e:57:2e","52:54:00:56:ed:eb","52:54:00:56:ed:eb"],"hostname":"localhost.localdomain","architecture":"x86_64","os":{"version":"7 (Core)","family":"redhat","name":"CentOS Linux","kernel":"3.10.0-1062.el7.x86_64","codename":"Core","platform":"centos"}},"agent":{"hostname":"localhost.localdomain","ephemeral_id":"3a381097-c3fe-4339-b92b-fff537b9a9f2","id":"401bee7f-115f-447d-a1e5-a6b6c57e21a1","name":"localhost.localdomain","type":"filebeat","version":"7.8.1"},"message":"[2020-07-29 22:42:49,646] INFO [GroupMetadataManager brokerId=0] Removed 0 expired offsets in 1 milliseconds. (kafka.coordinator.group.GroupMetadataManager)","log":{"offset":1318,"file":{"path":"/yw/log/1.log"}},"input":{"type":"log"},"ecs":{"version":"1.5.0"}}
发现已经消费到了,格式为json,日志具体内容在message中
接下来看一下 es 中有没有数据,在Discover中,找到之前设置好的索引,我们搜索message中带有 INFO 级别的日志
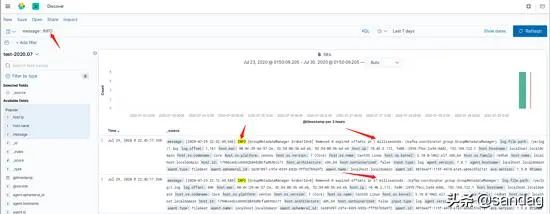
我们想在 INFO 日志中找到那条 37 milliseconds 数据, 只需要添加相关条件即可,如下图所示

至此,简单的一个示例以及完成了
来源:
https://www.toutiao.com/i6857318767244870157/
“IT大咖说”欢迎广大技术人员投稿,投稿邮箱:aliang@itdks.com

IT大咖说 | 关于版权
由“IT大咖说(ID:itdakashuo)”原创的文章,转载时请注明作者、出处及微信公众号。投稿、约稿、转载请加微信:ITDKS10(备注:投稿),茉莉小姐姐会及时与您联系!
感谢您对IT大咖说的热心支持!
相关推荐
推荐文章
