


我的测试环境
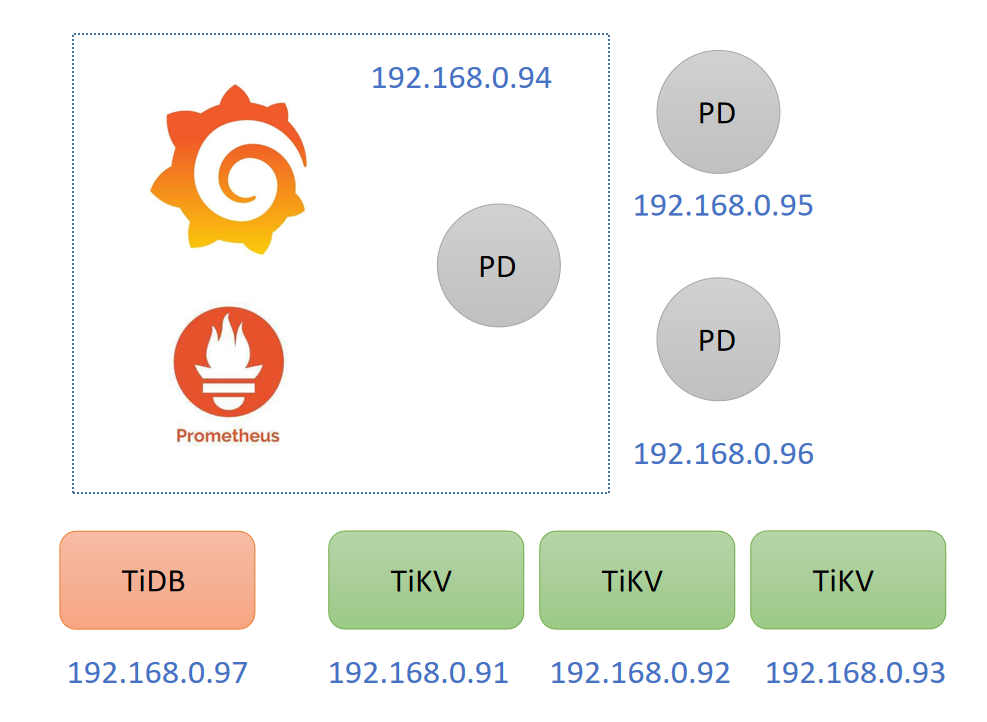
说明: 以下测试使用TiDB Server主机(192.168.0.97) 作为中控机。
使用TiUP部署TiDB,以下均在中控机上操作

1. 下载安装 TiUP 工具
[root@db1 ~]# curl --proto '=https' --tlsv1.2 -sSf https://tiup-mirrors.pingcap.com/install.sh | sh

2. 重新声明全局环境变量
[root@db1 ~]# source /root/.bash_profile
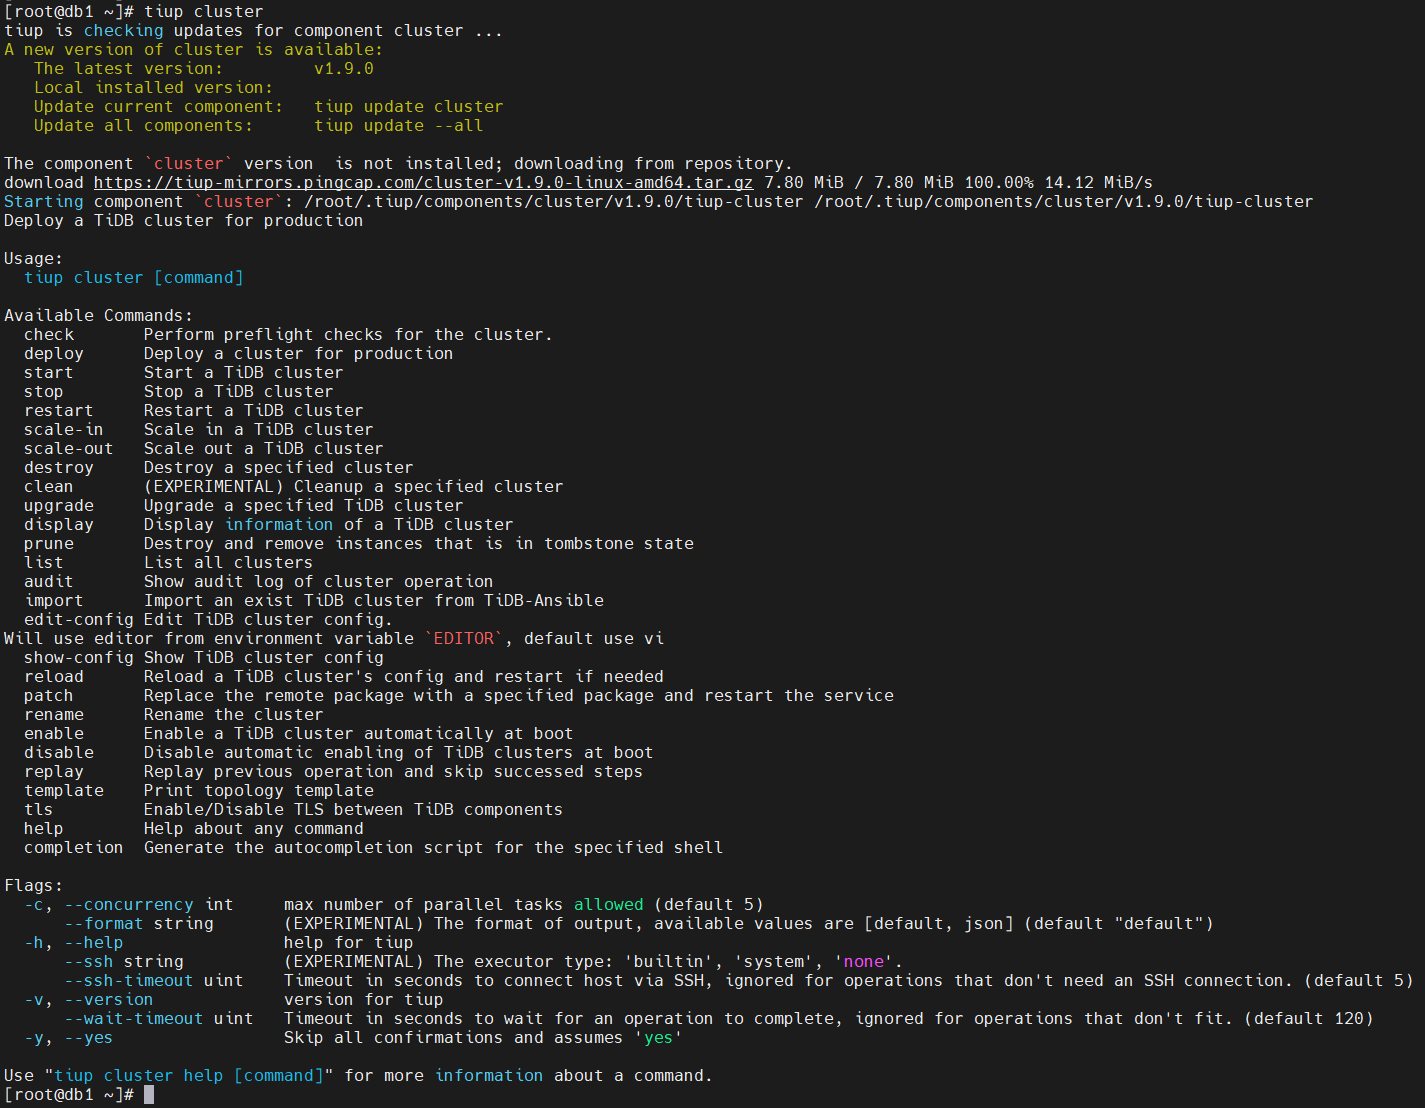
3. 安装 TiUP cluster 组件
[root@db1 ~]# tiup cluster
4. 更新 TiUP 和 TiUP cluster 组件至最新版本
[root@db1 ~]# tiup update --self && tiup update cluster

5. 验证当前 TiUP cluster 版本信息。
查看 TiUP cluster 组件版本:
[root@db1 ~]# tiup --binary cluster
/root/.tiup/components/cluster/v1.9.0/tiup-cluster
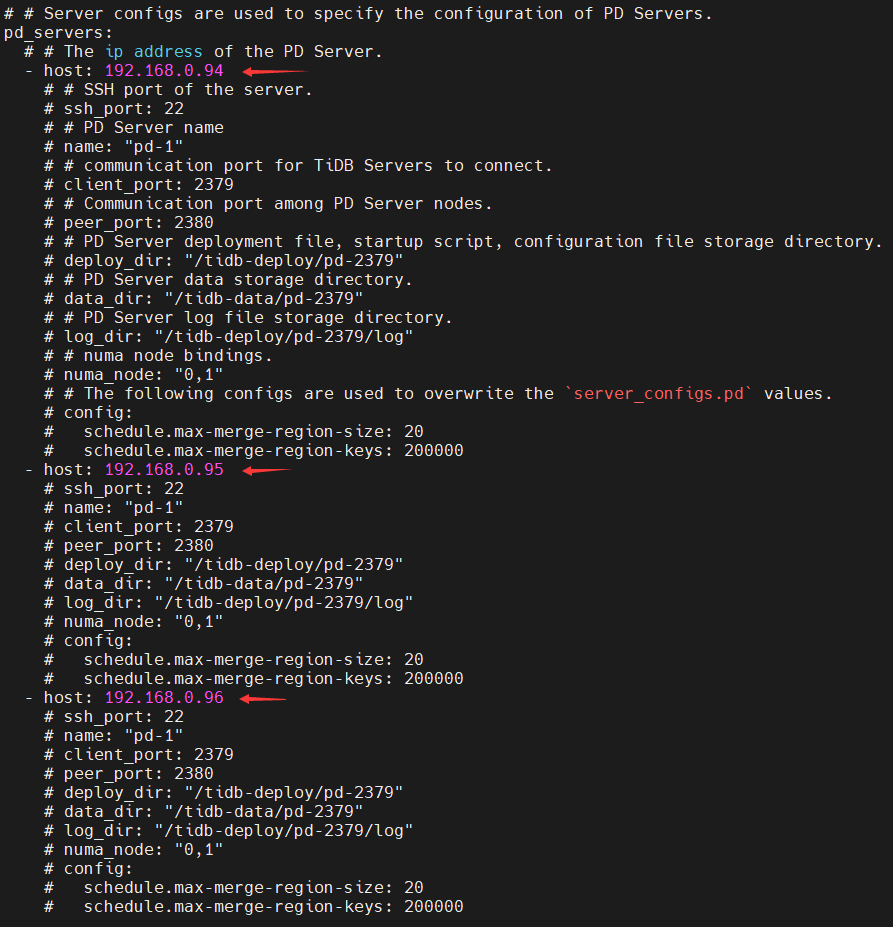
6. 根据不同的集群拓扑,编辑 TiUP 所需的集群初始化配置文件
- 生成集群初始化配置文件的模板:
[root@db1 ~]# tiup cluster template > topology.yaml

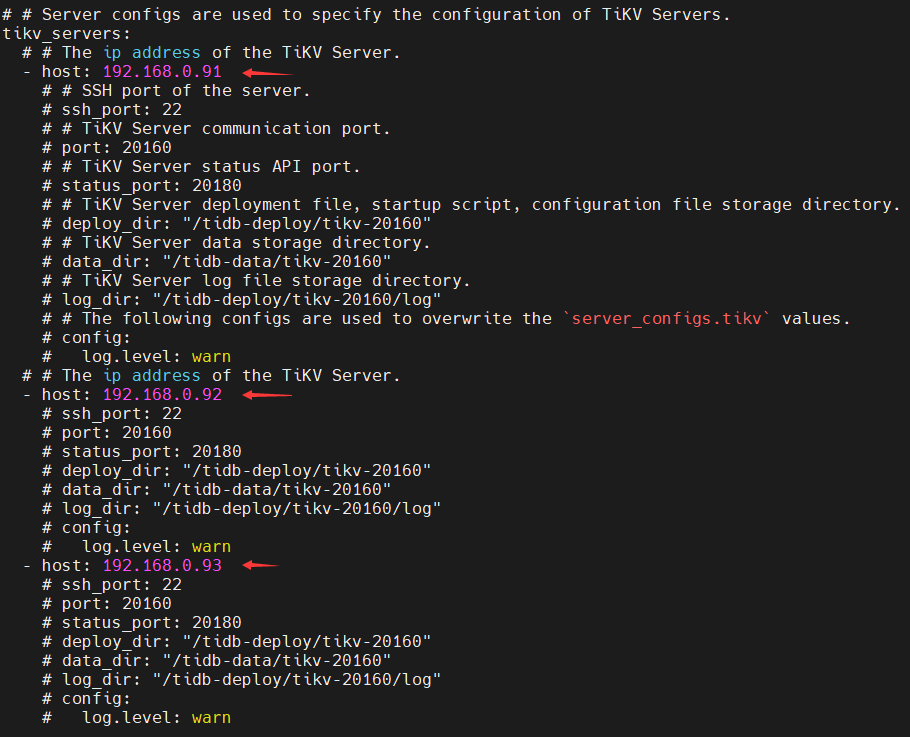
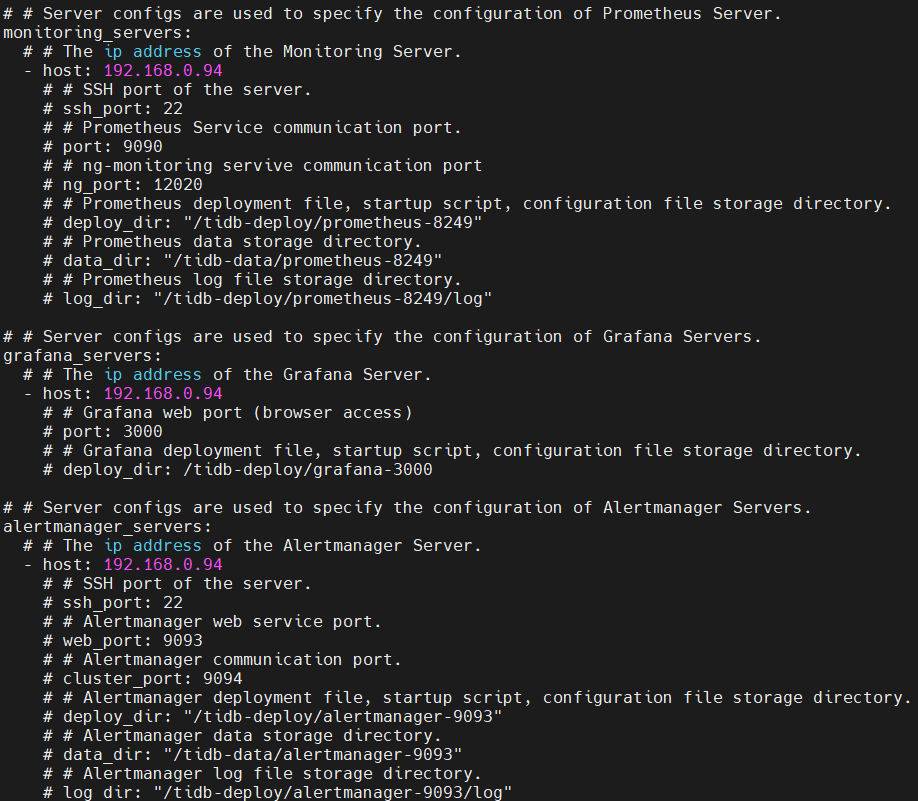
- 编辑 topology.yaml 文件,修改对应的IP地址:
[root@db1 ~]# vi topology.yaml
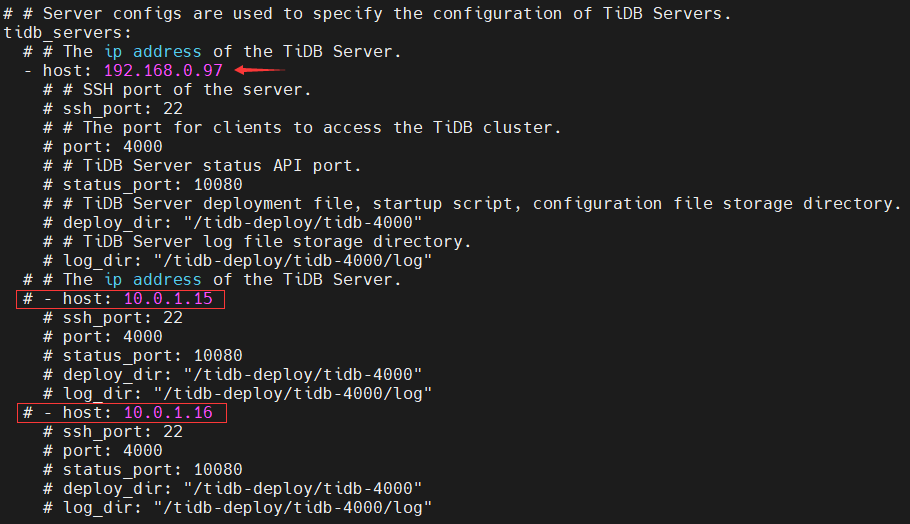
本次实验只有一个 tidb_servers ,将其他 host 注释掉。
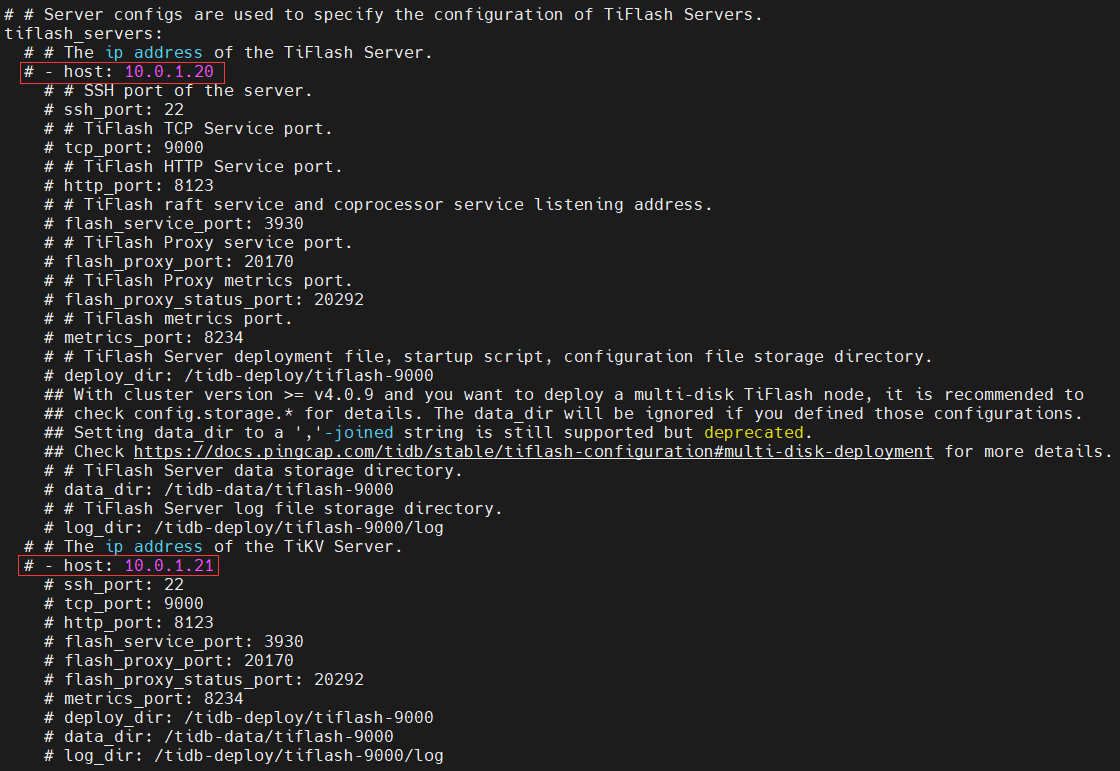
本次实验不涉及 tiflash_servers ,也将其注释掉。
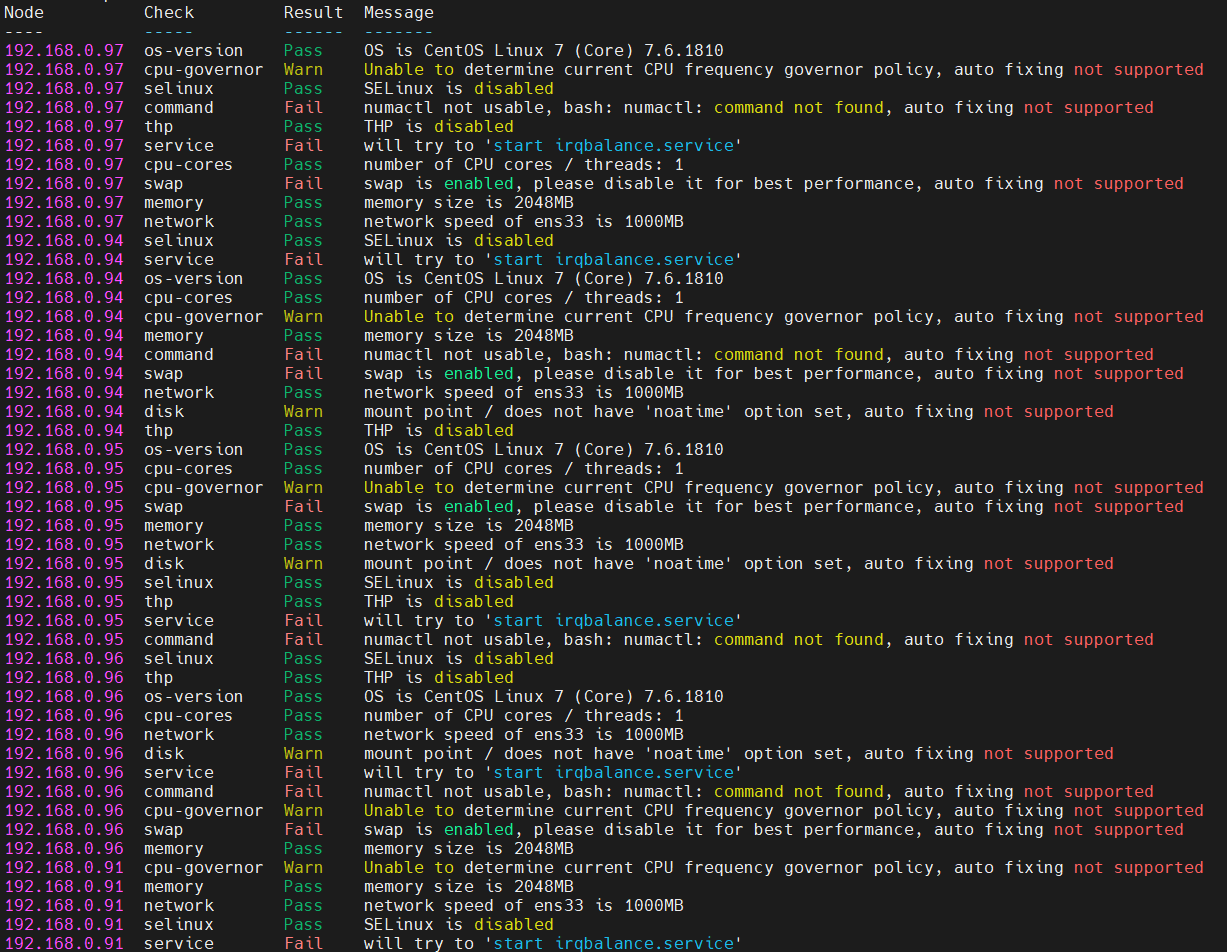
7. 检查和自动修复集群存在的潜在风险
[root@db1 ~]# tiup cluster check ./topology.yaml --apply --user root -p
如果主机之间没有配置互信,可以指定 -p 参数手动输入密码
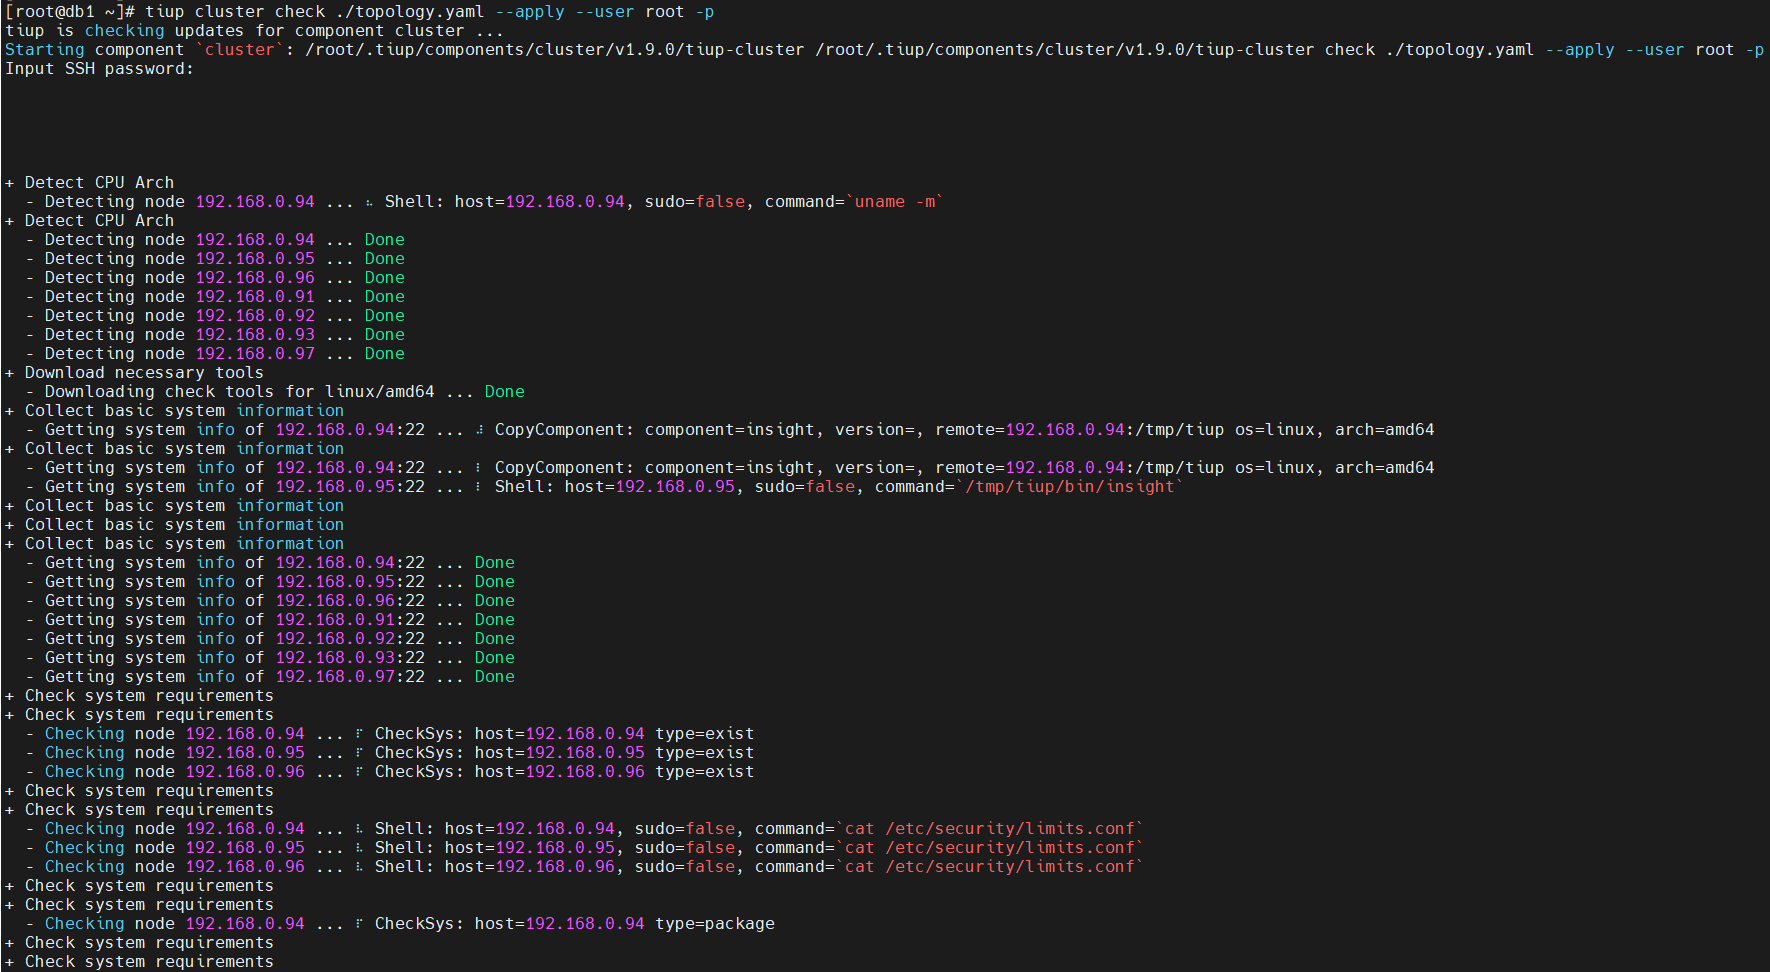
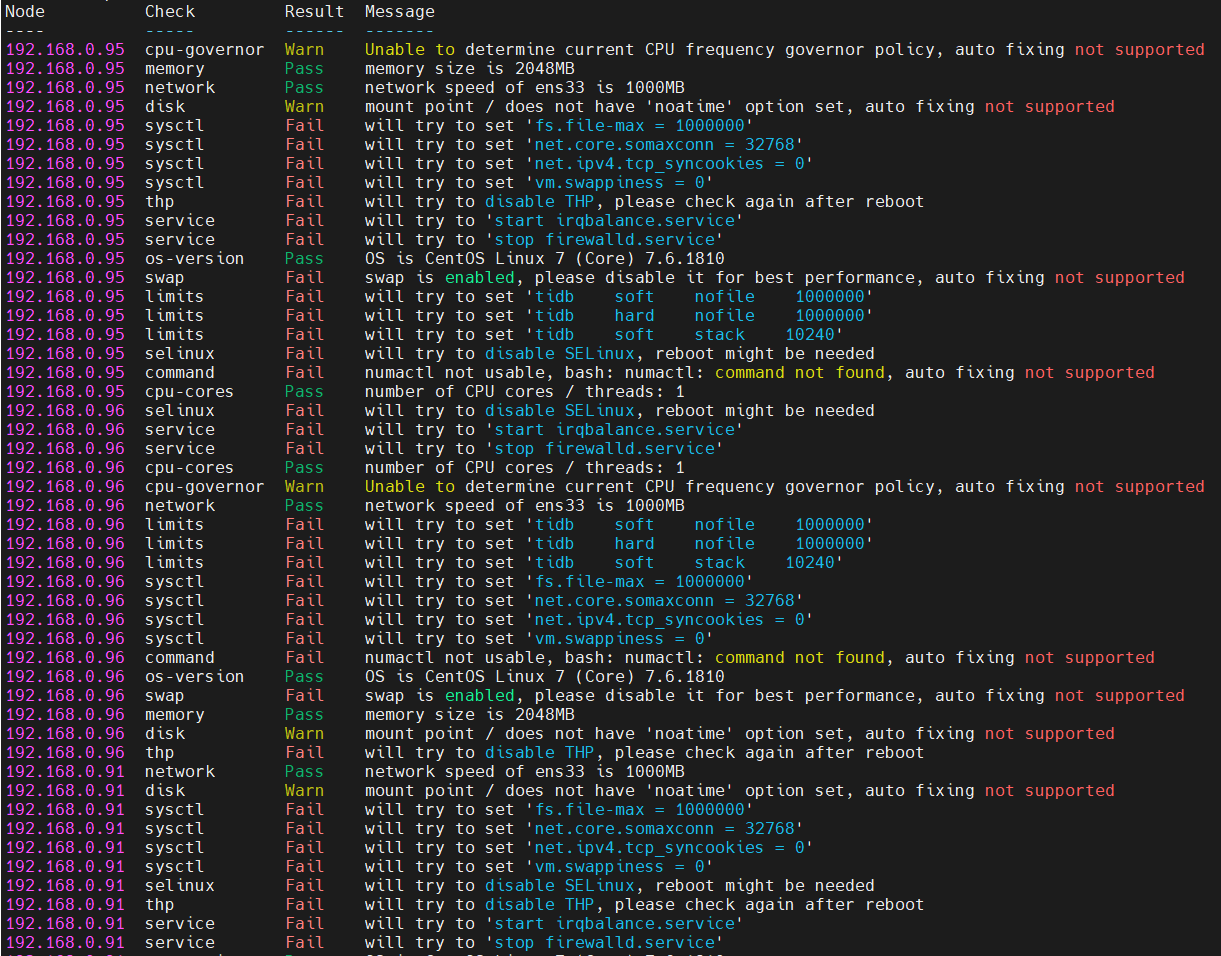
–apply 参数会自动修复检查失败的项,再次执行检查,手动修复失败项。
- 所有节点安装 NUMA 工具
[root@db1 ~]# yum -y install numactl
- 所有节点安装 irqbalance
[root@db1 ~]# yum -y install irqbalance
- 所有节点关闭系统 swap
[root@db1 ~]# echo "vm.swappiness = 0">> /etc/sysctl.conf
[root@db1 ~]# sysctl -p
vm.swappiness = 0
[root@db1 ~]# swapoff -a
[root@db1 ~]# vi /etc/fstab
# 注释加载swap分区的那行记录
#/dev/mapper/centos-swap swap                    swap    defaults        0 0
- 所有节点关闭并禁用防火墙
[root@db1 ~]# systemctl stop firewalld.service
[root@db1 ~]# systemctl disable firewalld.service
再次执行检查
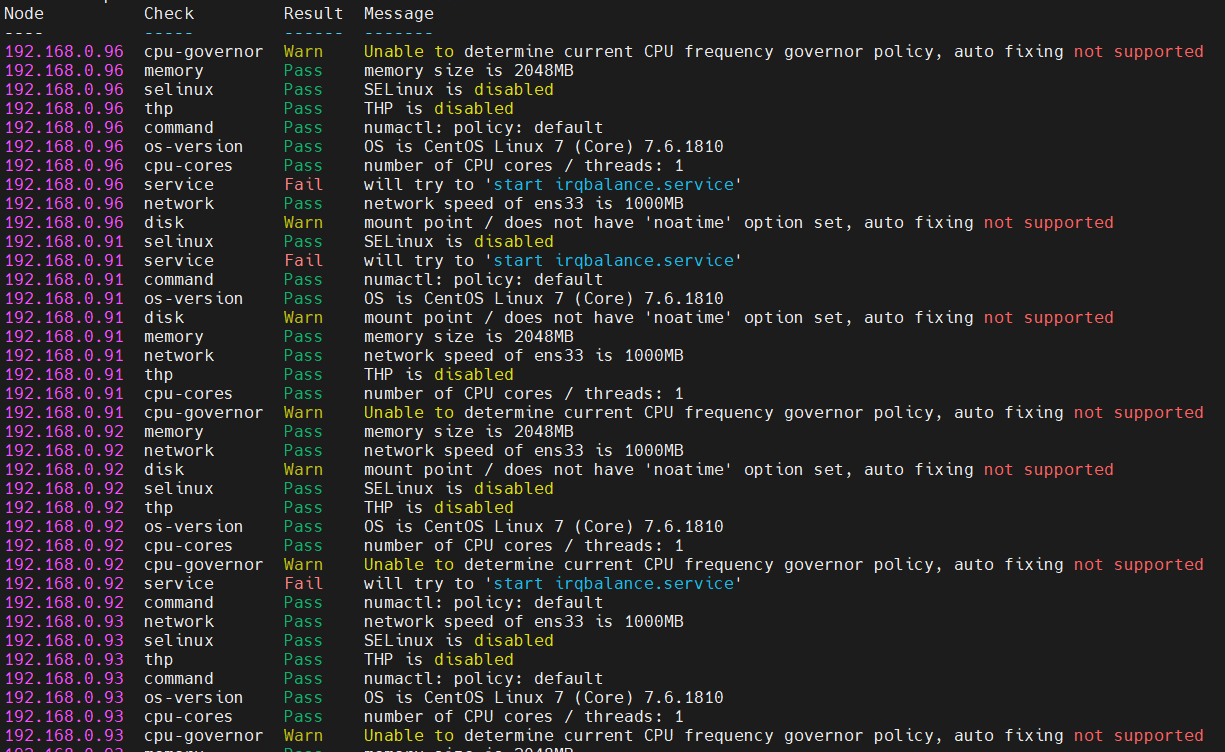
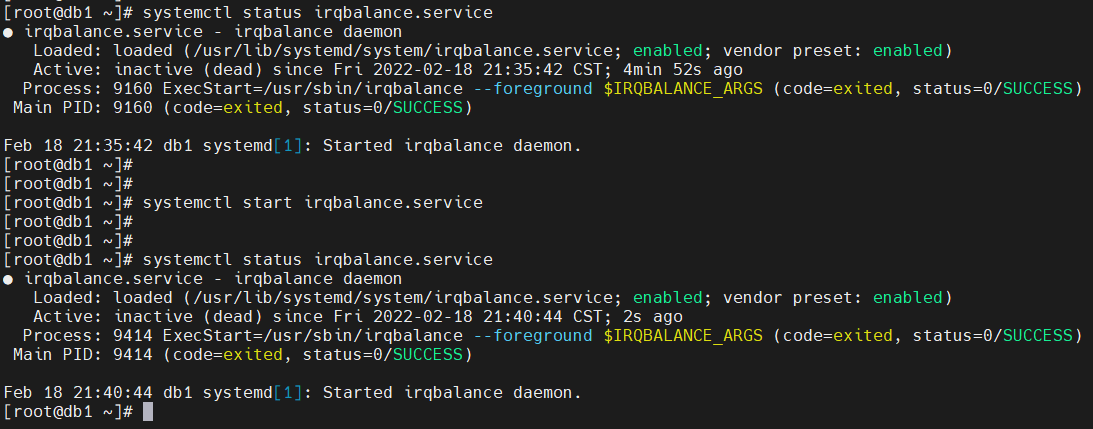
irqbalance.service服务起不来,不知道啥情况,先忽略吧
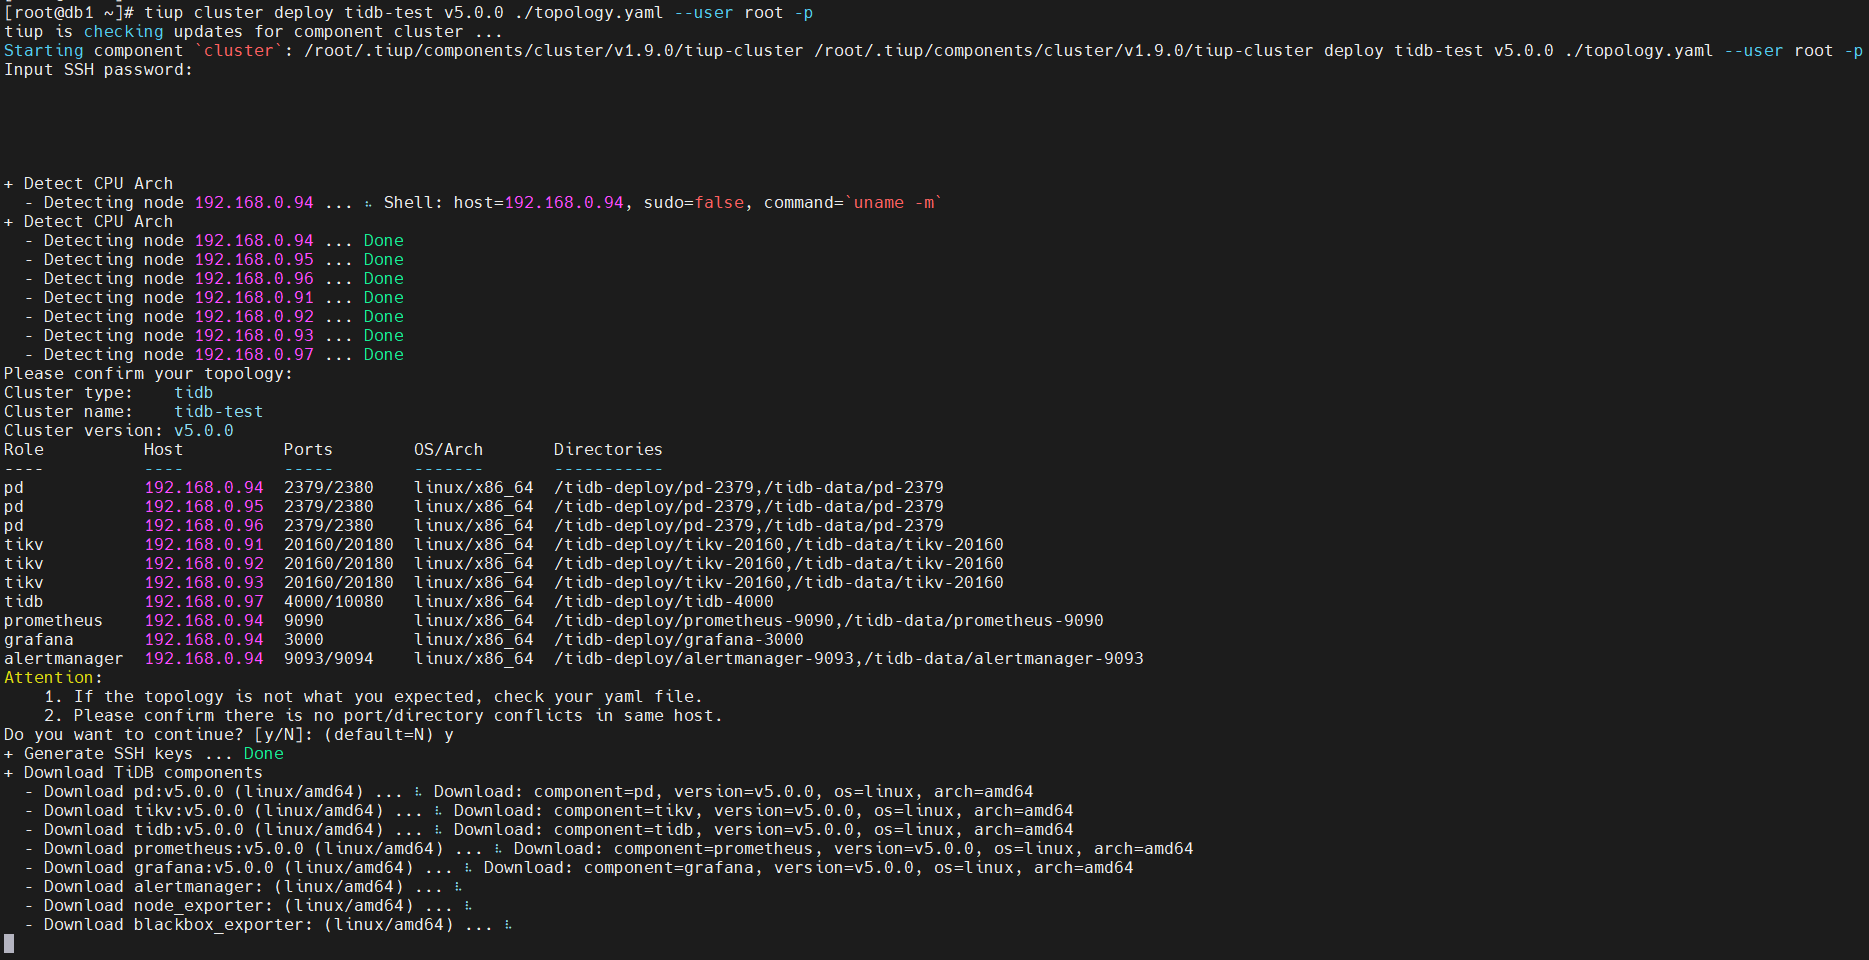
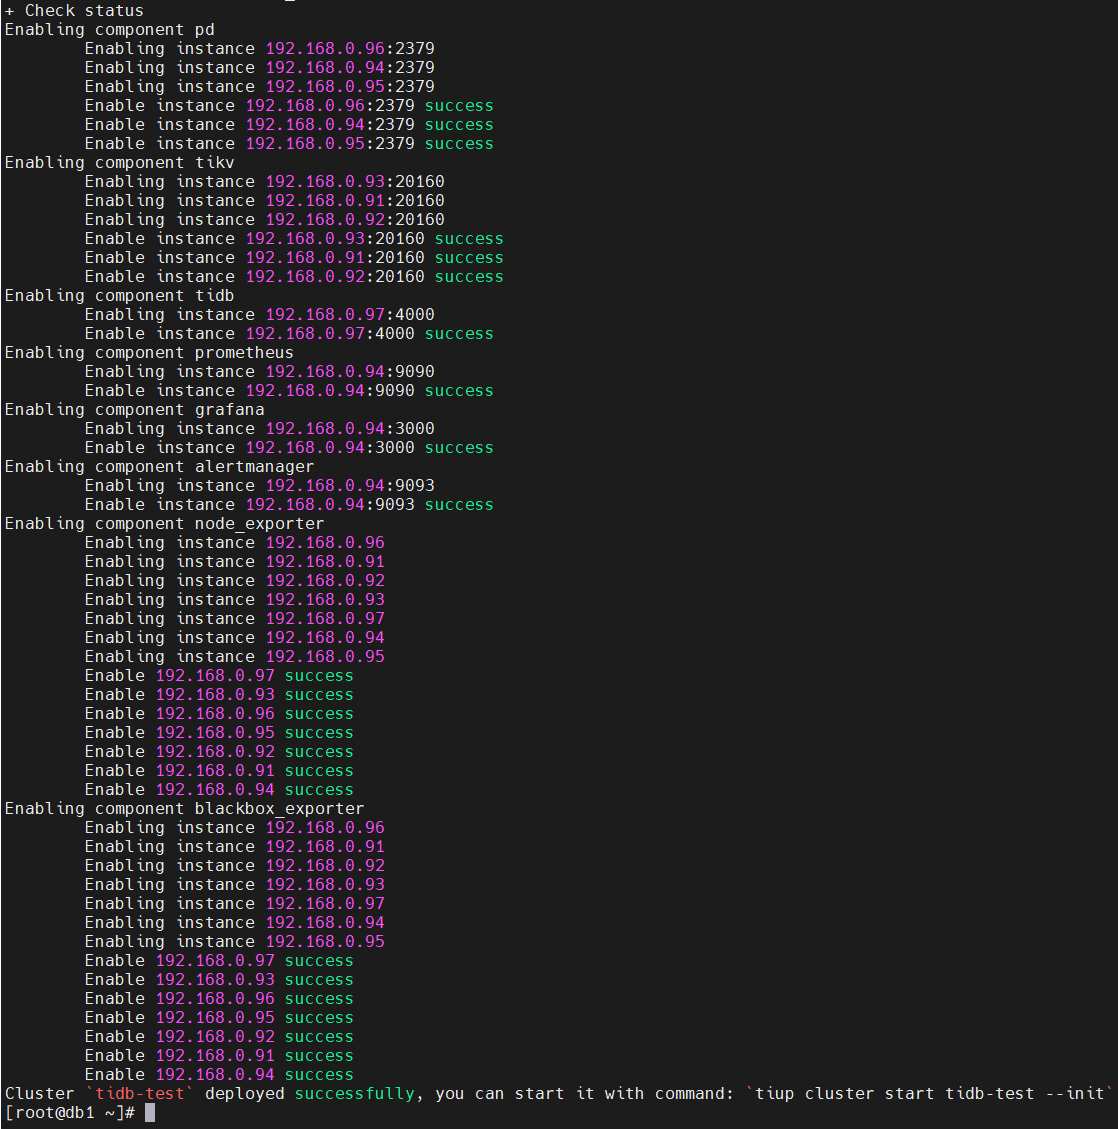
8. 部署 TiDB 集群
[root@db1 ~]# tiup cluster deploy tidb-test v5.0.0 ./topology.yaml --user root -p
9. 查看 TiUP 管理的集群情况
[root@db1 ~]# tiup cluster list

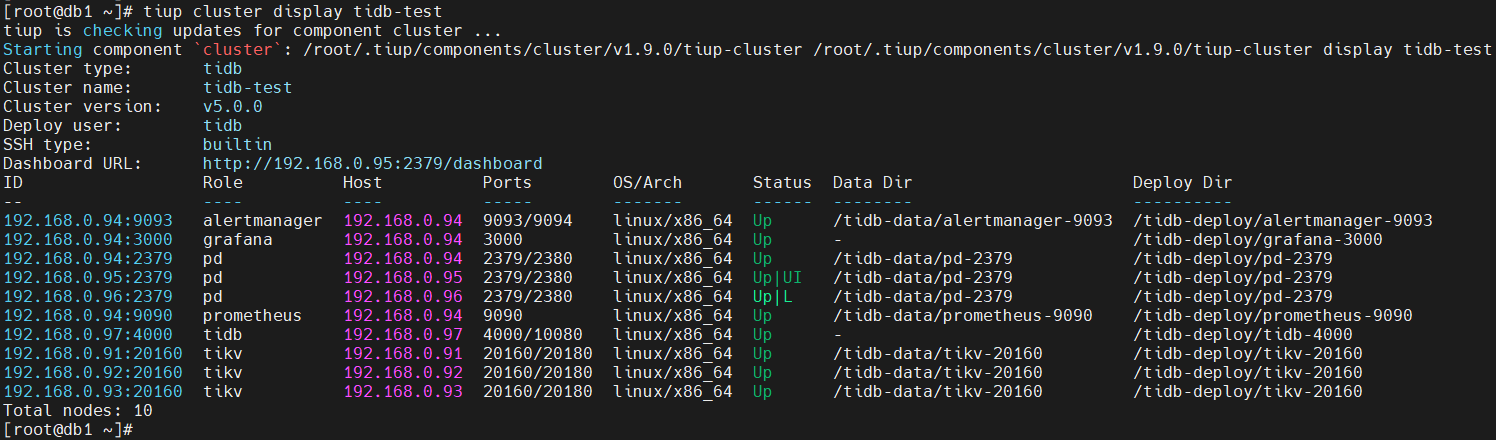
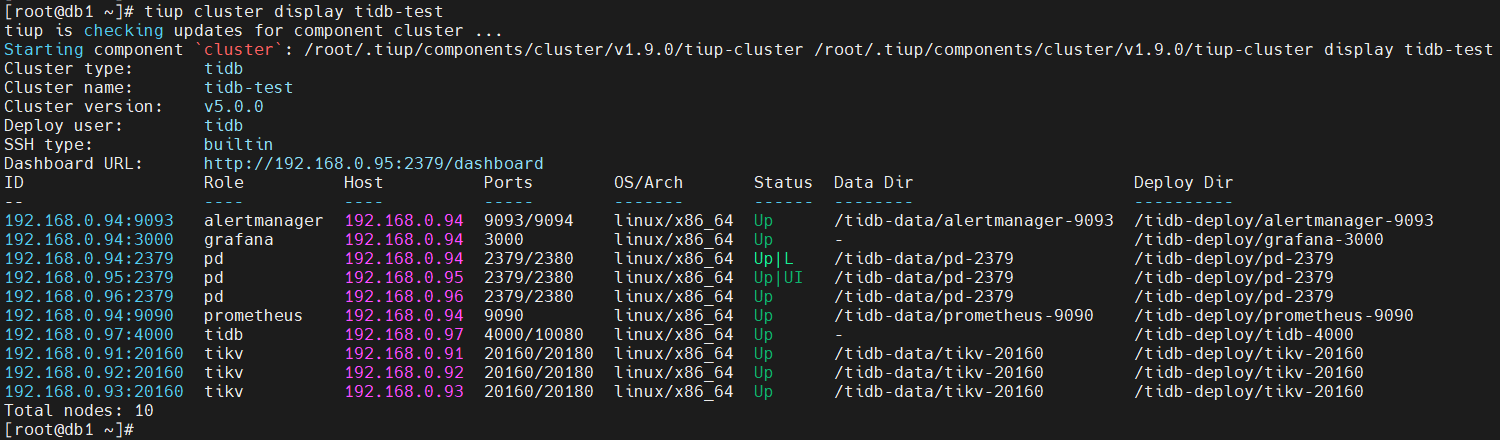
10. 检查 tidb-test 集群情况
[root@db1 ~]# tiup cluster display tidb-test

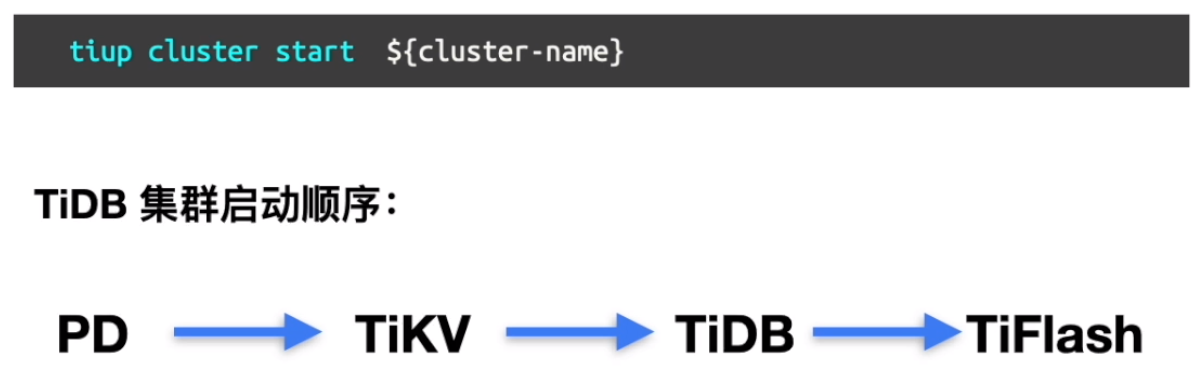
11. 启动集群
[root@db1 ~]# tiup cluster start tidb-test


12. 连接到 TiDB
安装mysql客户端:
[root@db1 ~]# yum -y install http://dev.mysql.com/get/mysql57-community-release-el7-10.noarch.rpm
[root@db1 ~]# rpm --import https://repo.mysql.com/RPM-GPG-KEY-mysql-2022
[root@db1 ~]# yum -y install mysql
使用mysql客户端连接TiDB
[root@db1 ~]# mysql -h 192.168.0.97 -P 4000 -uroot

关闭和启动 TiDB 集群
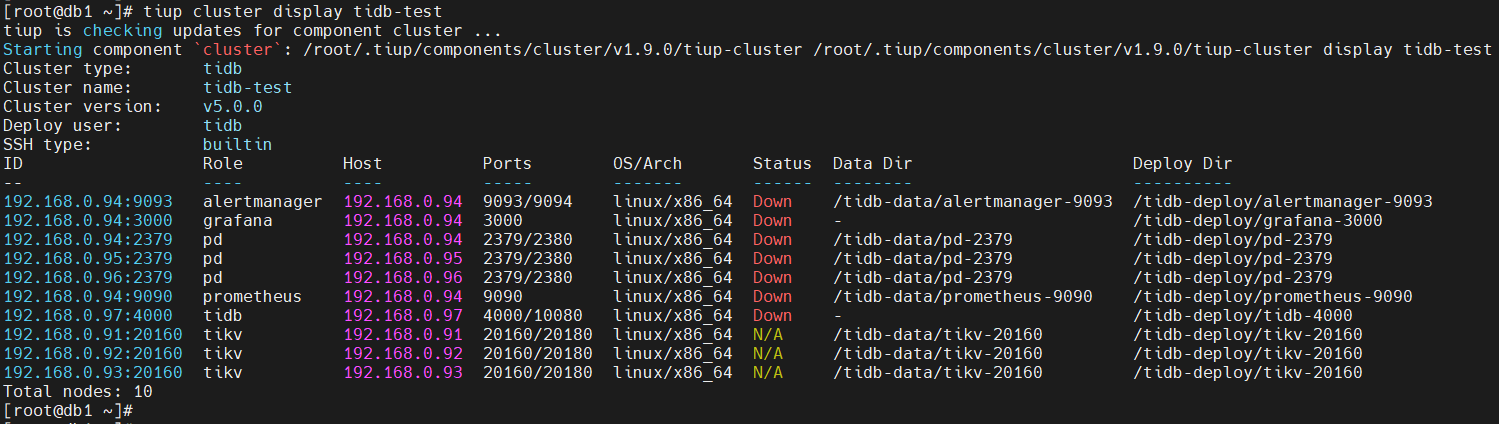
1. 关闭当前 TiDB 数据库集群


[root@db1 ~]# tiup cluster stop tidb-test
tiup is checking updates for component cluster ...
Starting component `cluster`: /root/.tiup/components/cluster/v1.9.0/tiup-cluster /root/.tiup/components/cluster/v1.9.0/tiup-cluster stop tidb-test
Will stop the cluster tidb-test with nodes: , roles: .
Do you want to continue? [y/N]:(default=N) y
+ [ Serial ] - SSHKeySet: privateKey=/root/.tiup/storage/cluster/clusters/tidb-test/ssh/id_rsa, publicKey=/root/.tiup/storage/cluster/clusters/tidb-test/ssh/id_rsa.pub
+ [Parallel] - UserSSH: user=tidb, host=192.168.0.92
+ [Parallel] - UserSSH: user=tidb, host=192.168.0.93
+ [Parallel] - UserSSH: user=tidb, host=192.168.0.97
+ [Parallel] - UserSSH: user=tidb, host=192.168.0.94
+ [Parallel] - UserSSH: user=tidb, host=192.168.0.94
+ [Parallel] - UserSSH: user=tidb, host=192.168.0.94
+ [Parallel] - UserSSH: user=tidb, host=192.168.0.94
+ [Parallel] - UserSSH: user=tidb, host=192.168.0.95
+ [Parallel] - UserSSH: user=tidb, host=192.168.0.96
+ [Parallel] - UserSSH: user=tidb, host=192.168.0.91
+ [ Serial ] - StopCluster
Stopping component alertmanager
        Stopping instance 192.168.0.94
        Stop alertmanager 192.168.0.94:9093 success
Stopping component grafana
        Stopping instance 192.168.0.94
        Stop grafana 192.168.0.94:3000 success
Stopping component prometheus
        Stopping instance 192.168.0.94
        Stop prometheus 192.168.0.94:9090 success
Stopping component tidb
        Stopping instance 192.168.0.97
        Stop tidb 192.168.0.97:4000 success
Stopping component tikv
        Stopping instance 192.168.0.93
        Stopping instance 192.168.0.91
        Stopping instance 192.168.0.92
        Stop tikv 192.168.0.93:20160 success
        Stop tikv 192.168.0.92:20160 success
        Stop tikv 192.168.0.91:20160 success
Stopping component pd
        Stopping instance 192.168.0.96
        Stopping instance 192.168.0.94
        Stopping instance 192.168.0.95
        Stop pd 192.168.0.96:2379 success
        Stop pd 192.168.0.94:2379 success
        Stop pd 192.168.0.95:2379 success
Stopping component node_exporter
        Stopping instance 192.168.0.97
        Stopping instance 192.168.0.94
        Stopping instance 192.168.0.95
        Stopping instance 192.168.0.96
        Stopping instance 192.168.0.91
        Stopping instance 192.168.0.92
        Stopping instance 192.168.0.93
        Stop 192.168.0.97 success
        Stop 192.168.0.94 success
        Stop 192.168.0.93 success
        Stop 192.168.0.96 success
        Stop 192.168.0.95 success
        Stop 192.168.0.92 success
        Stop 192.168.0.91 success
Stopping component blackbox_exporter
        Stopping instance 192.168.0.97
        Stopping instance 192.168.0.94
        Stopping instance 192.168.0.95
        Stopping instance 192.168.0.96
        Stopping instance 192.168.0.91
        Stopping instance 192.168.0.92
        Stopping instance 192.168.0.93
        Stop 192.168.0.97 success
        Stop 192.168.0.93 success
        Stop 192.168.0.94 success
        Stop 192.168.0.96 success
        Stop 192.168.0.92 success
        Stop 192.168.0.95 success
        Stop 192.168.0.91 success
Stopped cluster `tidb-test` successfully
2. 启动当前 TiDB 数据库集群
[root@db1 ~]# tiup cluster start tidb-test
tiup is checking updates for component cluster ...
Starting component `cluster`: /root/.tiup/components/cluster/v1.9.0/tiup-cluster /root/.tiup/components/cluster/v1.9.0/tiup-cluster start tidb-test
Starting cluster tidb-test...
+ [ Serial ] - SSHKeySet: privateKey=/root/.tiup/storage/cluster/clusters/tidb-test/ssh/id_rsa, publicKey=/root/.tiup/storage/cluster/clusters/tidb-test/ssh/id_rsa.pub
+ [Parallel] - UserSSH: user=tidb, host=192.168.0.92
+ [Parallel] - UserSSH: user=tidb, host=192.168.0.93
+ [Parallel] - UserSSH: user=tidb, host=192.168.0.97
+ [Parallel] - UserSSH: user=tidb, host=192.168.0.94
+ [Parallel] - UserSSH: user=tidb, host=192.168.0.94
+ [Parallel] - UserSSH: user=tidb, host=192.168.0.94
+ [Parallel] - UserSSH: user=tidb, host=192.168.0.94
+ [Parallel] - UserSSH: user=tidb, host=192.168.0.95
+ [Parallel] - UserSSH: user=tidb, host=192.168.0.96
+ [Parallel] - UserSSH: user=tidb, host=192.168.0.91
+ [ Serial ] - StartCluster
Starting component pd
        Starting instance 192.168.0.96:2379
        Starting instance 192.168.0.94:2379
        Starting instance 192.168.0.95:2379
        Start instance 192.168.0.95:2379 success
        Start instance 192.168.0.94:2379 success
        Start instance 192.168.0.96:2379 success
Starting component tikv
        Starting instance 192.168.0.93:20160
        Starting instance 192.168.0.91:20160
        Starting instance 192.168.0.92:20160
        Start instance 192.168.0.91:20160 success
        Start instance 192.168.0.92:20160 success
        Start instance 192.168.0.93:20160 success
Starting component tidb
        Starting instance 192.168.0.97:4000
        Start instance 192.168.0.97:4000 success
Starting component prometheus
        Starting instance 192.168.0.94:9090
        Start instance 192.168.0.94:9090 success
Starting component grafana
        Starting instance 192.168.0.94:3000
        Start instance 192.168.0.94:3000 success
Starting component alertmanager
        Starting instance 192.168.0.94:9093
        Start instance 192.168.0.94:9093 success
Starting component node_exporter
        Starting instance 192.168.0.93
        Starting instance 192.168.0.97
        Starting instance 192.168.0.94
        Starting instance 192.168.0.95
        Starting instance 192.168.0.96
        Starting instance 192.168.0.91
        Starting instance 192.168.0.92
        Start 192.168.0.97 success
        Start 192.168.0.93 success
        Start 192.168.0.92 success
        Start 192.168.0.96 success
        Start 192.168.0.95 success
        Start 192.168.0.91 success
        Start 192.168.0.94 success
Starting component blackbox_exporter
        Starting instance 192.168.0.93
        Starting instance 192.168.0.97
        Starting instance 192.168.0.94
        Starting instance 192.168.0.95
        Starting instance 192.168.0.96
        Starting instance 192.168.0.91
        Starting instance 192.168.0.92
        Start 192.168.0.97 success
        Start 192.168.0.91 success
        Start 192.168.0.93 success
        Start 192.168.0.95 success
        Start 192.168.0.92 success
        Start 192.168.0.96 success
        Start 192.168.0.94 success
+ [ Serial ] - UpdateTopology: cluster=tidb-test
Started cluster `tidb-test` successfully
TiDB 的连接管理
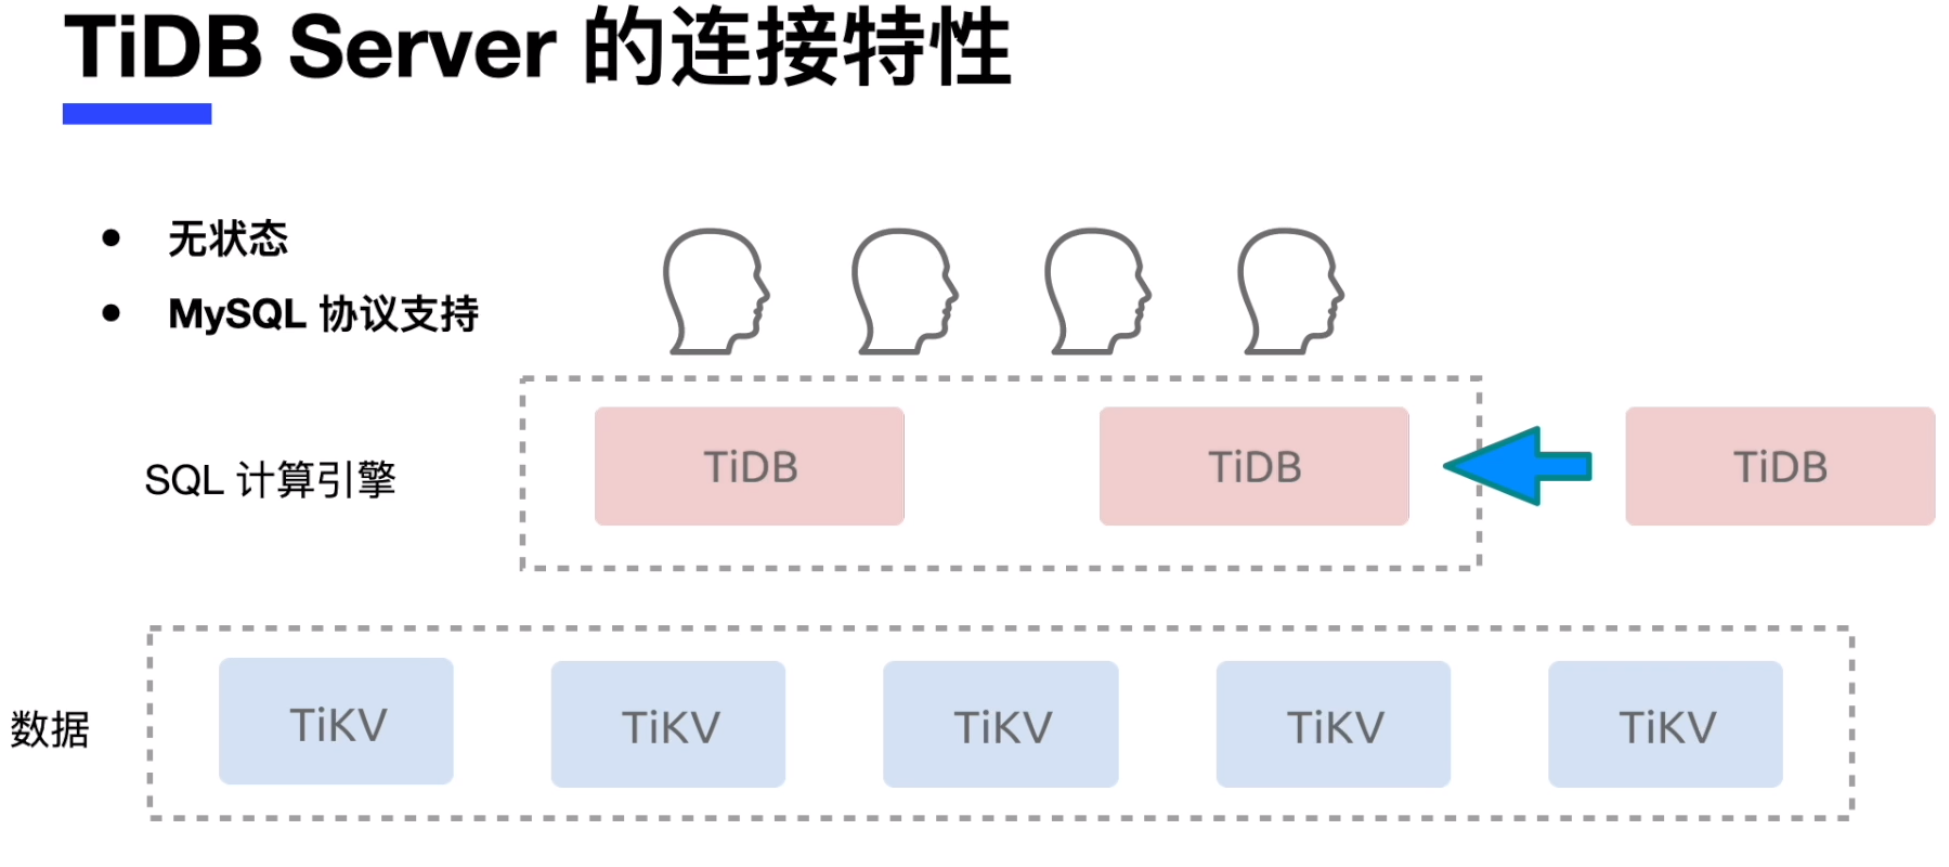
TiDB 100% 兼容MySQL 5.7 协议,支持 MySQL 5.7 常用功能和语法。
1. 使用命令行工具连接 TiDB 数据库
[root@db1 ~]# mysql -h 192.168.0.97 -P 4000 -uroot
Welcome to the MySQL monitor.  Commands end with ; or \g.
Your MySQL connection id is 5
Server version: 5.7.25-TiDB-v5.0.0 TiDB Server (Apache License 2.0) Community Edition, MySQL 5.7 compatible

Copyright (c) 2000, 2022, Oracle and/or its affiliates.

Oracle is a registered trademark of Oracle Corporation and/or its
affiliates. Other names may be trademarks of their respective
owners.

Type 'help;' or '\h' for help. Type '\c' to clear the current input statement.

-- 查看数据库版本
mysql> select tidb_version()\G
*************************** 1. row ***************************
tidb_version(): Release Version: v5.0.0
Edition: Community
Git Commit Hash: bdac0885cd11bdf571aad9353bfc24e13554b91c
Git Branch: heads/refs/tags/v5.0.0
UTC Build Time: 2021-04-06 16:36:29
GoVersion: go1.13
Race Enabled: false
TiKV Min Version: v3.0.0-60965b006877ca7234adaced7890d7b029ed1306
Check Table Before Drop: false
1 row in set (0.00 sec)

-- 查看默认数据库
mysql> show databases;
+--------------------+
| Database           |
+--------------------+
| INFORMATION_SCHEMA |
| METRICS_SCHEMA     |
| PERFORMANCE_SCHEMA |
| mysql              |
| test               |
+--------------------+
5 rows in set (0.00 sec)

-- 创建数据库 tidb
mysql> create database tidb;
Query OK, 0 rows affected (0.09 sec)

-- 查看新创建数据库
mysql> show databases;
+--------------------+
| Database           |
+--------------------+
| INFORMATION_SCHEMA |
| METRICS_SCHEMA     |
| PERFORMANCE_SCHEMA |
| mysql              |
| test               |
| tidb               |
+--------------------+
6 rows in set (0.00 sec)

-- 进入 tidb 数据库
mysql> use tidb
Database changed

-- 执行建表语句,创建表 tab_tidb
mysql> CREATE TABLE tab_tidb (
    ->  id int(11) NOT NULL AUTO_INCREMENT,
    ->  name varchar(20) NOT NULL DEFAULT '',
    ->  age int(11) NOT NULL DEFAULT 0,
    ->  version varchar(20) NOT NULL DEFAULT '',
    ->  PRIMARY KEY (id),
    ->  KEY idx_age (age));
Query OK, 0 rows affected (0.09 sec)

-- 向表中插入数据
mysql> insert into tab_tidb values (1,'TiDB',5,'TiDB-v5.0.0');
Query OK, 1 row affected (0.01 sec)

-- 查看数据
mysql> select * from tab_tidb;
+----+------+-----+-------------+
| id | name | age | version     |
+----+------+-----+-------------+
|  1 | TiDB |   5 | TiDB-v5.0.0 |
+----+------+-----+-------------+
1 row in set (0.01 sec)

-- 退出客户端
mysql> exit
Bye
[root@db1 ~]#
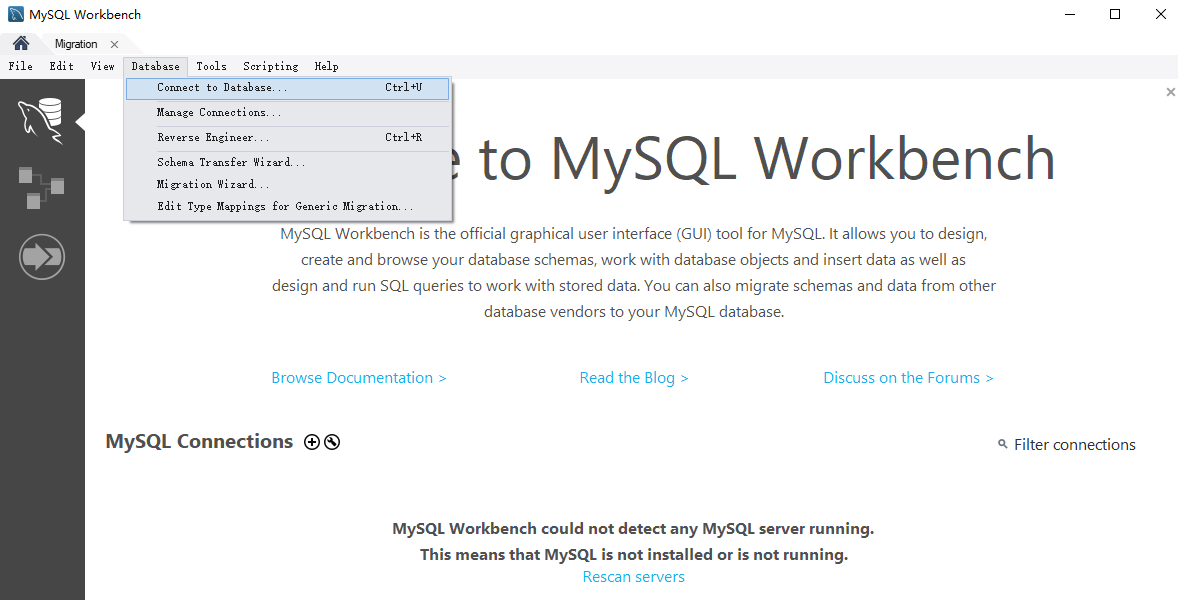
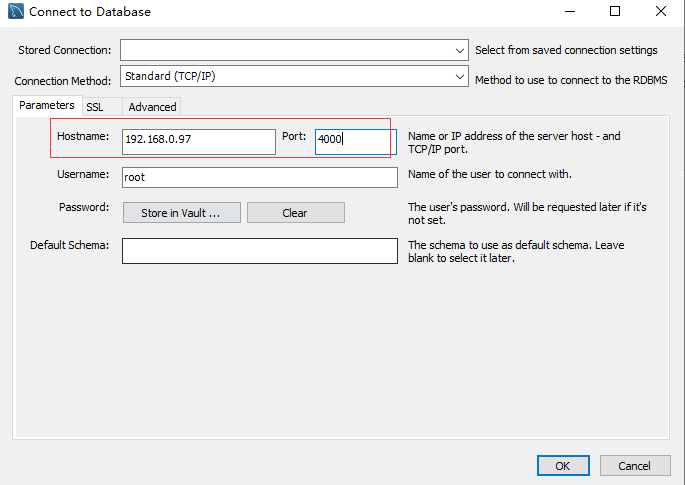
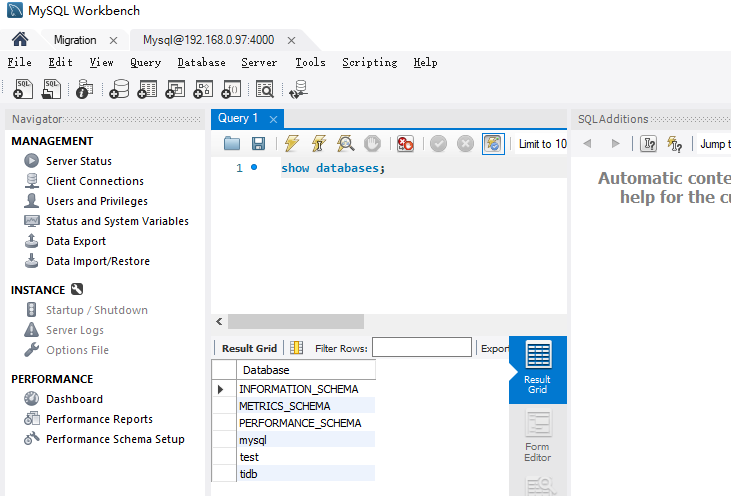
2. 使用 GUI 工具连接 TIDB 数据库

在这个练习中,您将会使用 MySQL Workbench 客户端连接 TiDB 数据库。
3. 监控 TiDB 数据库的连接
mysql> show processlist;
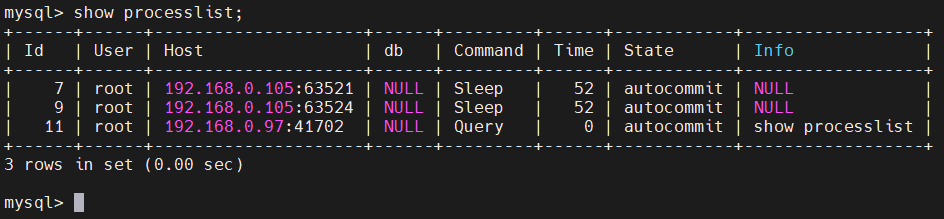
对于结果的解释如下:
Id:连接的 ID,每个连接不同。
User:连接的用户名。
Host :连接的客户端主机名。
db :连接用户所在的数据库,NULL 代表没有在任何 database 中。
Command:连接用户当前的命令动作,Query 代表正在执行,Sleep 代表没有任何操作。
Time:连接时长,单位为秒。
State:连接的提交状态。
Info:命令信息,一般为正在执行的命令,NULL 代表没有执行任何命令。
最后修改时间:2022-02-20 21:11:36
「喜欢这篇文章,您的关注和赞赏是给作者最好的鼓励」
关注作者
【版权声明】本文为墨天轮用户原创内容,转载时必须标注文章的来源(墨天轮),文章链接,文章作者等基本信息,否则作者和墨天轮有权追究责任。如果您发现墨天轮中有涉嫌抄袭或者侵权的内容,欢迎发送邮件至:contact@modb.pro进行举报,并提供相关证据,一经查实,墨天轮将立刻删除相关内容。
