


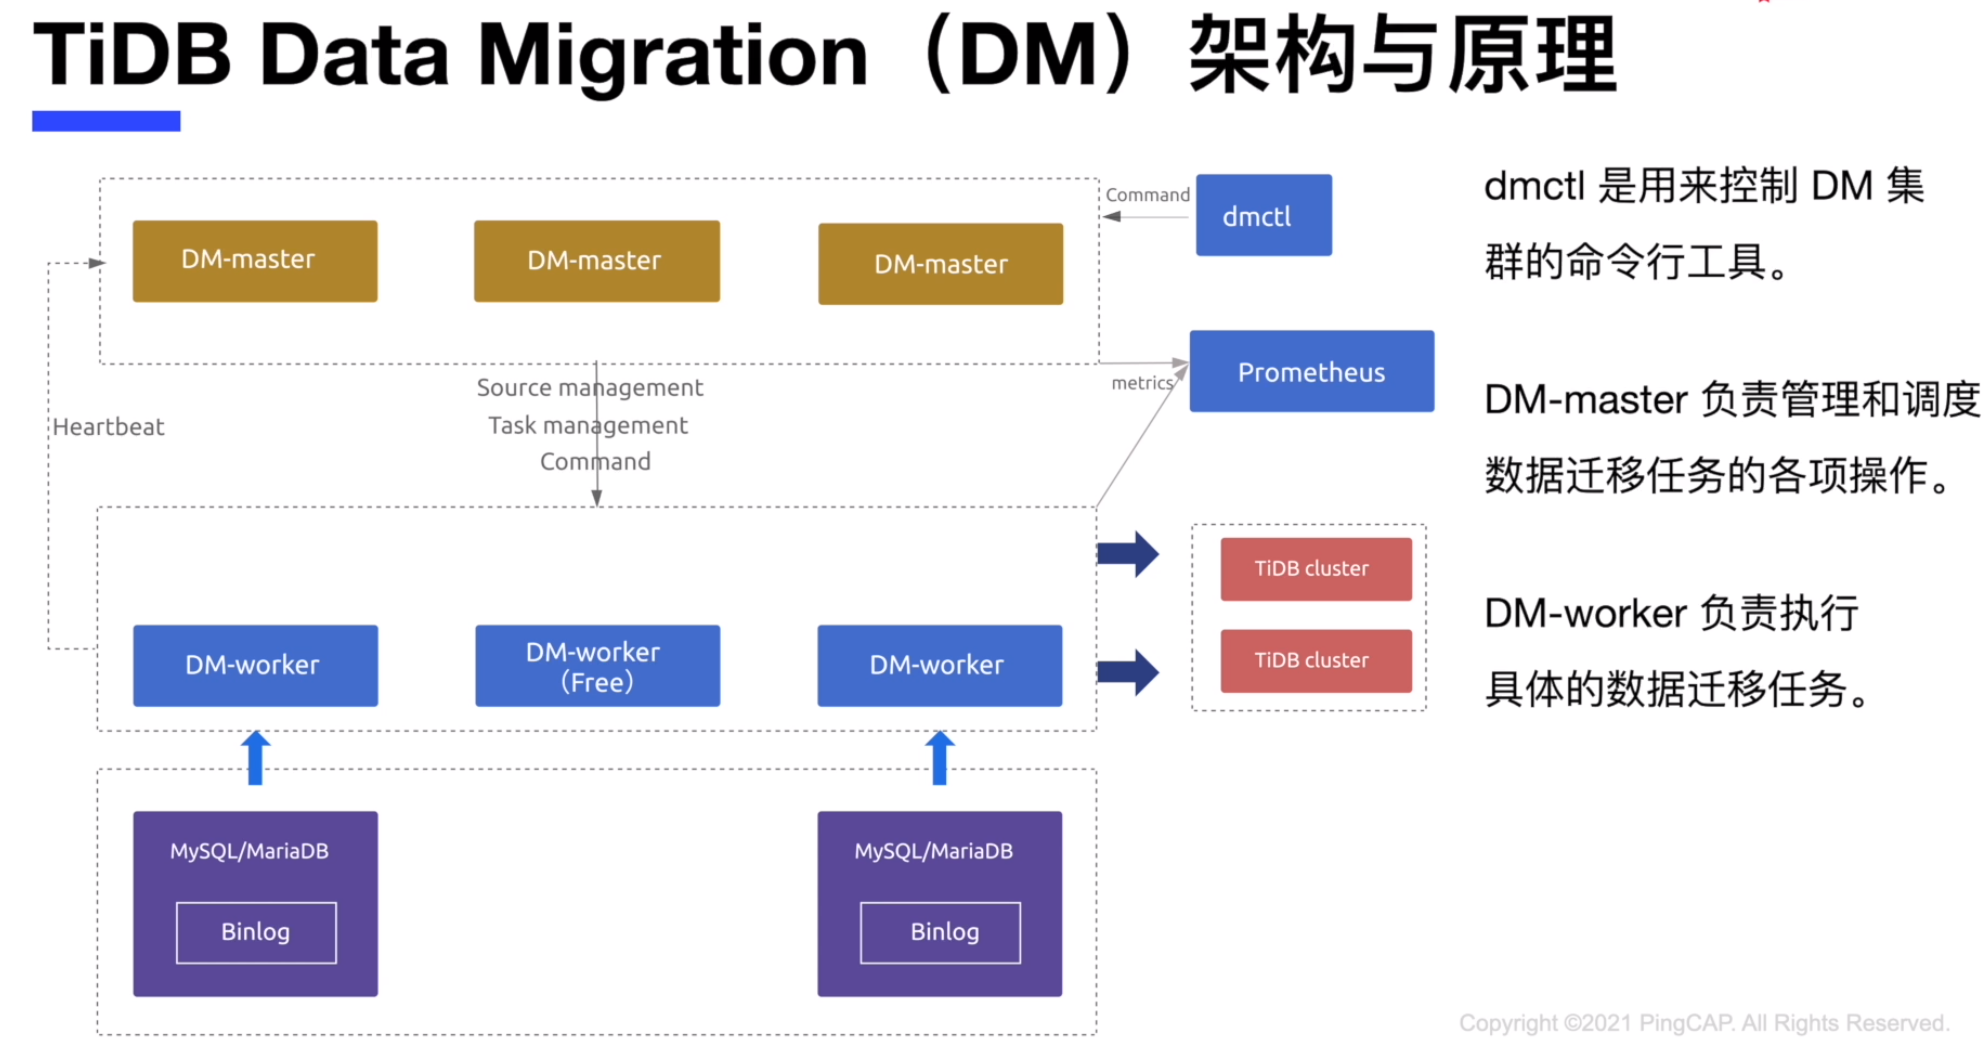
TiDB Data Migration(DM)
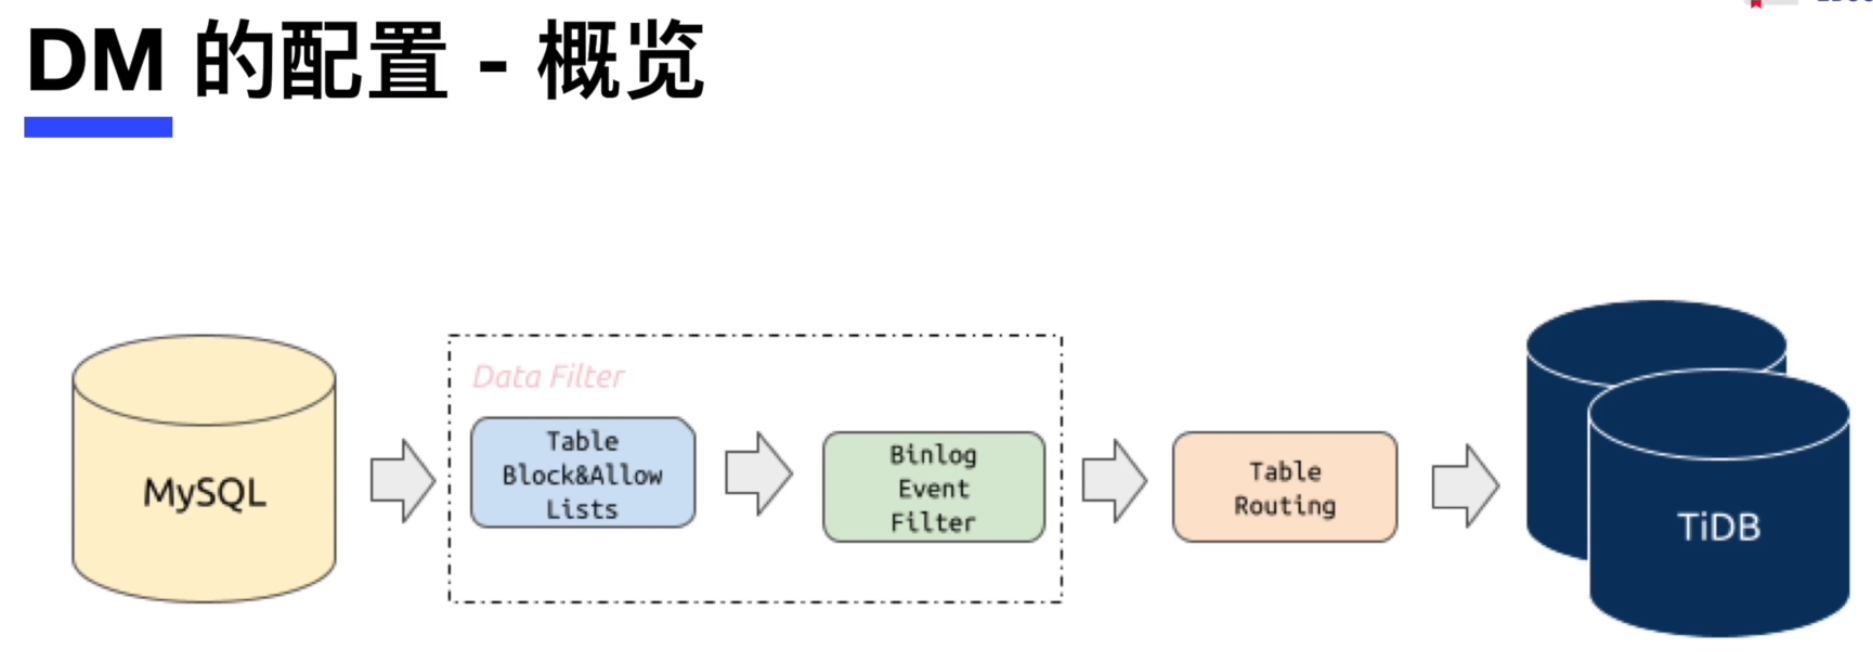
TiDB Data Migration (DM) 是一体化的数据迁移任务管理工具,支持从与 MySQL 协议兼容的数据库(MySQL、MariaDB、Aurora MySQL)到TiDB的数据迁移,支持全量的数据载入和增量的数据传输,同时可以进行表与操作的过滤,并且可以进行分库分表的合并迁移。
- 源头MySQL数据库要开启binlog
- Table Block & Allow Lists : 对表或数据库的过滤
- Binlog Event Filter : 对数据操作(DML,DDL)的过滤
- Table routing : 表的路由,比如源端和目标端的表名不同,就在此处配置
在本课练习中,您将为已有的 TiDB 数据库着手部署一个 Data Migration(DM) 集群,之后将已有的 2 个 MySQL 数据库实例中的数据表同步到 TiDB 数据库中。同时您还会练习 Data Migration(DM) 集群的扩容和缩容等维护工作。
Data Migration(DM)的部署
在练习一中,您将通过 TiUP 工具来为已有的 TiDB 数据库着手部署一个 Data Migration(DM) 集群。
- 已经部署好的 TiBD 数据库集群
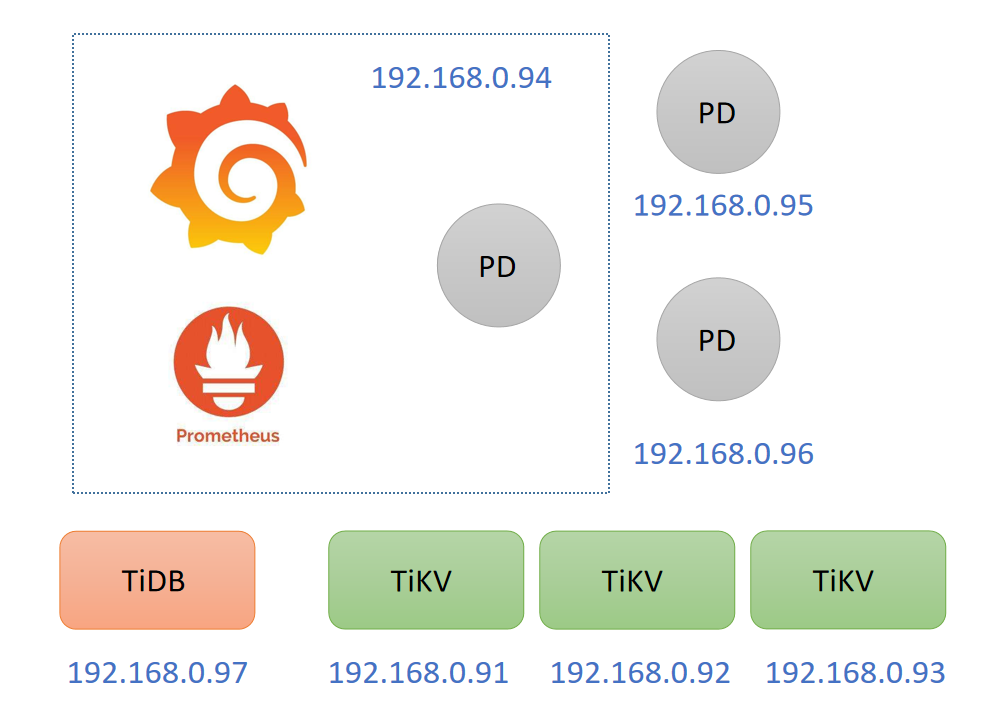
- DM 集群的规划,因系统资源有限,使用PD节点作为DM集群,在TiDB-server节点上部署好 1 个 MySQL 数据库实例,端口号为 3306 ,在 192.168.0.98 上部署好 1 个 MySQL 数据库实例,端口号为 3306 ,作为DM数据同步的两个源头数据库。
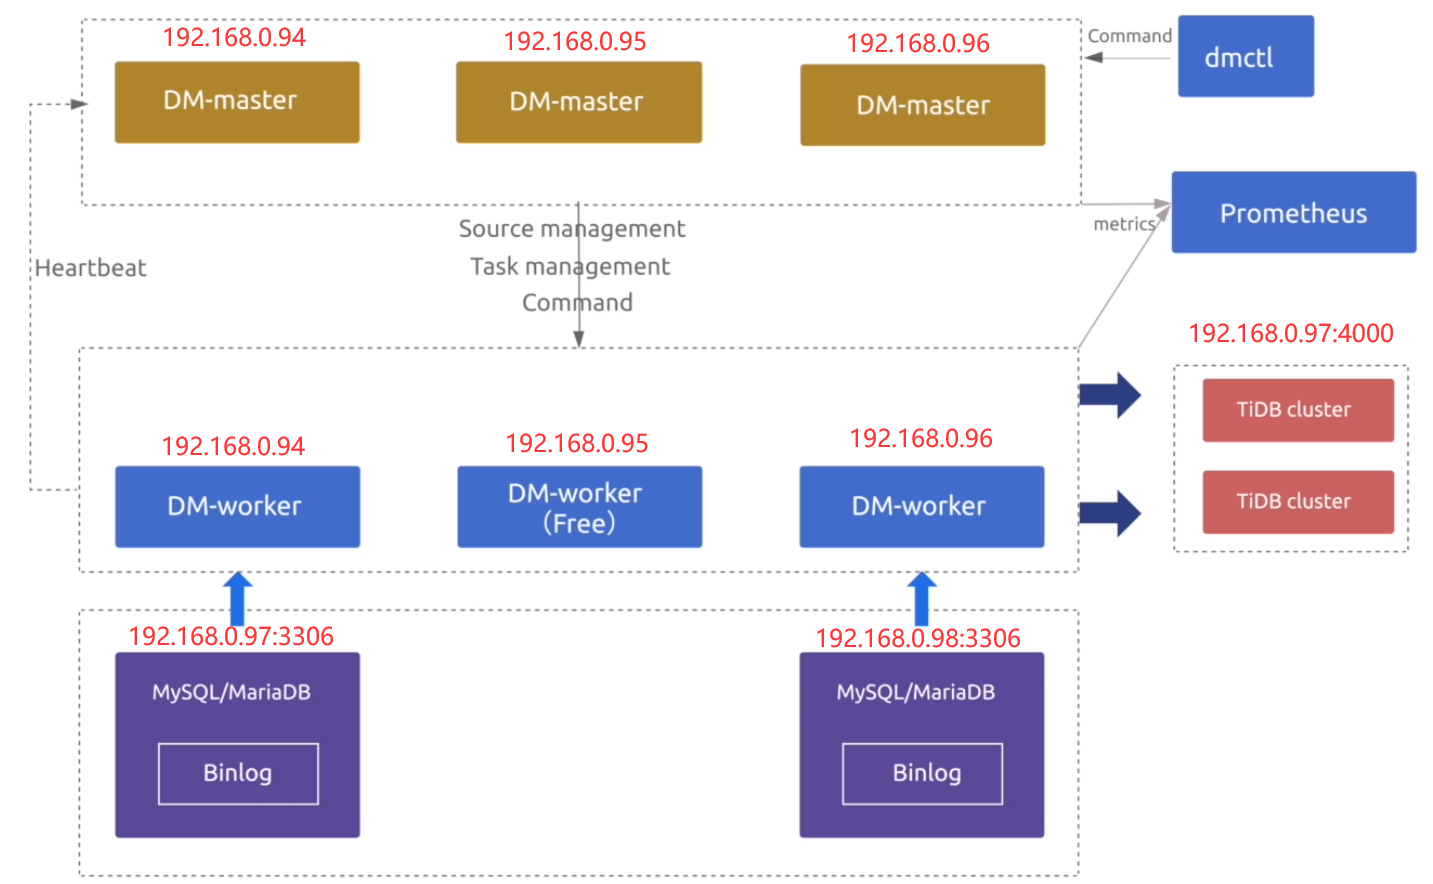
- 在中控节点(192.168.0.97)上通过 tiup 安装 dm 组件
[root@db1 ~]# tiup install dm
download https://tiup-mirrors.pingcap.com/dm-v1.9.0-linux-amd64.tar.gz 7.47 MiB / 7.47 MiB 100.00% 12.43 MiB/s
- 通过 tiup 更新 dm 组件到最新版本
[root@db1 ~]# tiup update --self && tiup update dm
download https://tiup-mirrors.pingcap.com/tiup-v1.9.0-linux-amd64.tar.gz 6.50 MiB / 6.50 MiB 100.00% 14.03 MiB/s
Updated successfully!
component dm version v1.9.0 is already installed
Updated successfully!
- 生成一个初始化配置文件,并准备编辑
[root@db1 ~]# tiup dm template > topology.yaml
tiup is checking updates for component dm ...
Starting component `dm`: /root/.tiup/components/dm/v1.9.0/tiup-dm /root/.tiup/components/dm/v1.9.0/tiup-dm template
- 编辑 topology.yaml 文件, 加入 master_servers, worker_servers, monitoring_servers, grafana_servers 和 alertmanager_servers
[root@db1 ~]# cat topology.yaml
# The topology template is used deploy a minimal DM cluster, which suitable
# for scenarios with only three machinescontains. The minimal cluster contains
# - 3 master nodes
# - 3 worker nodes
# You can change the hosts according your environment
---
global:
  user: "tidb"
  ssh_port: 22
  deploy_dir: "/home/tidb/dm/deploy"
  data_dir: "/home/tidb/dm/data"
  # arch: "amd64"

master_servers:
  - host: 192.168.0.94
  - host: 192.168.0.95
  - host: 192.168.0.96

worker_servers:
  - host: 192.168.0.94
  - host: 192.168.0.95

monitoring_servers:
  - host: 192.168.0.94

grafana_servers:
  - host: 192.168.0.94

alertmanager_servers:
  - host: 192.168.0.94
worker_servers 这里先装两个,留一个后面练习扩容。
- 查看当前可用的 Data Migration(DM) 最新版本,或者其他可用版本
[root@db1 ~]# tiup list dm-master
Available versions for dm-master:
Version                             Installed  Release                    Platforms
-------                             ---------  -------                    ---------
nightly -> v5.5.0-nightly-20220107             2022-01-19T16:01:59+08:00  linux/amd64,linux/arm64
v2.0.0-rc                                      2020-08-21T17:49:08+08:00  linux/amd64,linux/arm64
v2.0.0-rc.2                                    2020-09-01T20:51:29+08:00  linux/amd64,linux/arm64
v2.0.0                                         2020-10-30T16:10:58+08:00  linux/amd64,linux/arm64
v2.0.1                                         2020-12-25T13:22:29+08:00  linux/amd64,linux/arm64
v2.0.3                                         2021-05-11T22:14:31+08:00  linux/amd64,linux/arm64
v2.0.4                                         2021-06-18T16:34:30+08:00  linux/amd64,linux/arm64
v2.0.5                                         2021-07-30T18:46:27+08:00  linux/amd64,linux/arm64
v2.0.6                                         2021-08-13T17:36:06+08:00  linux/amd64,linux/arm64
v2.0.7                                         2021-09-29T16:34:31+08:00  linux/amd64,linux/arm64
v5.3.0                                         2021-11-29T16:50:31+08:00  linux/amd64,linux/arm64
v5.4.0                                         2022-02-14T10:18:30+08:00  linux/amd64,linux/arm64
v5.5.0-nightly-20220107                        2022-01-19T16:01:59+08:00  linux/amd64,linux/arm64
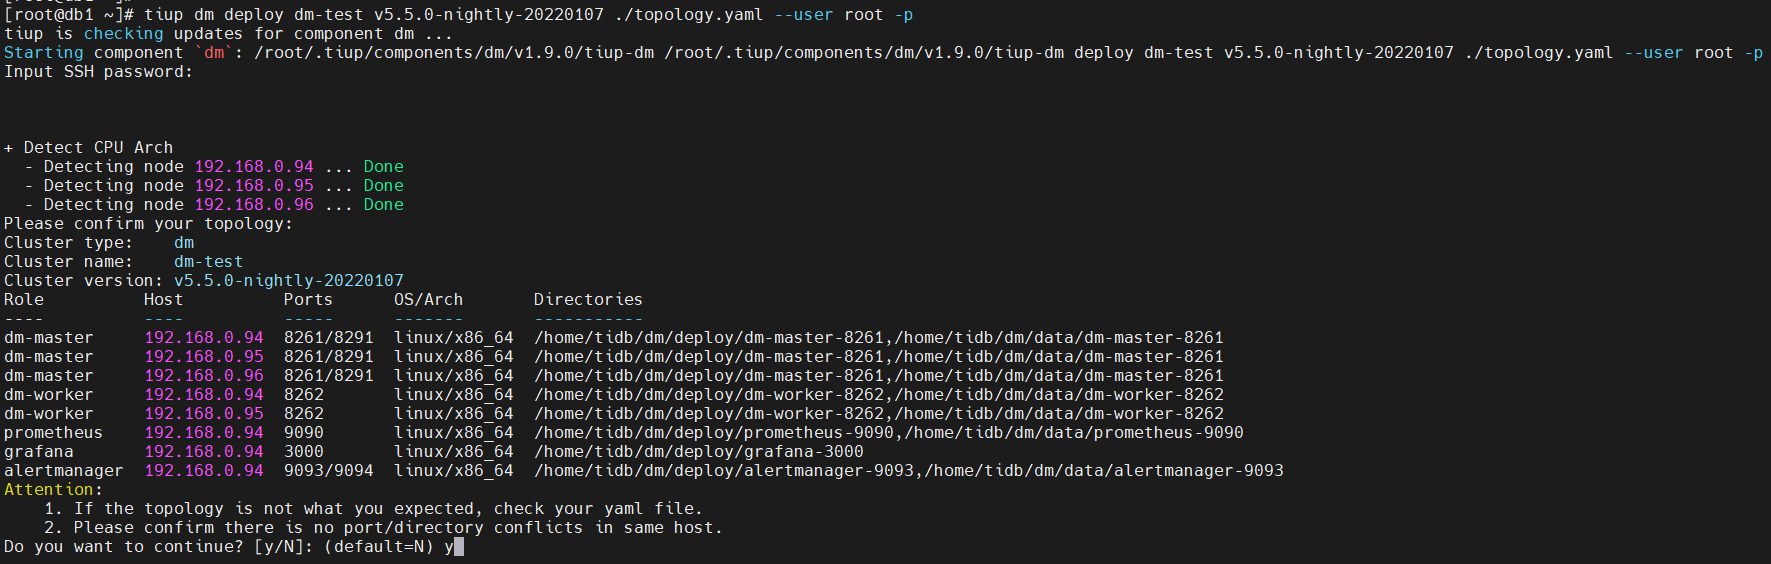
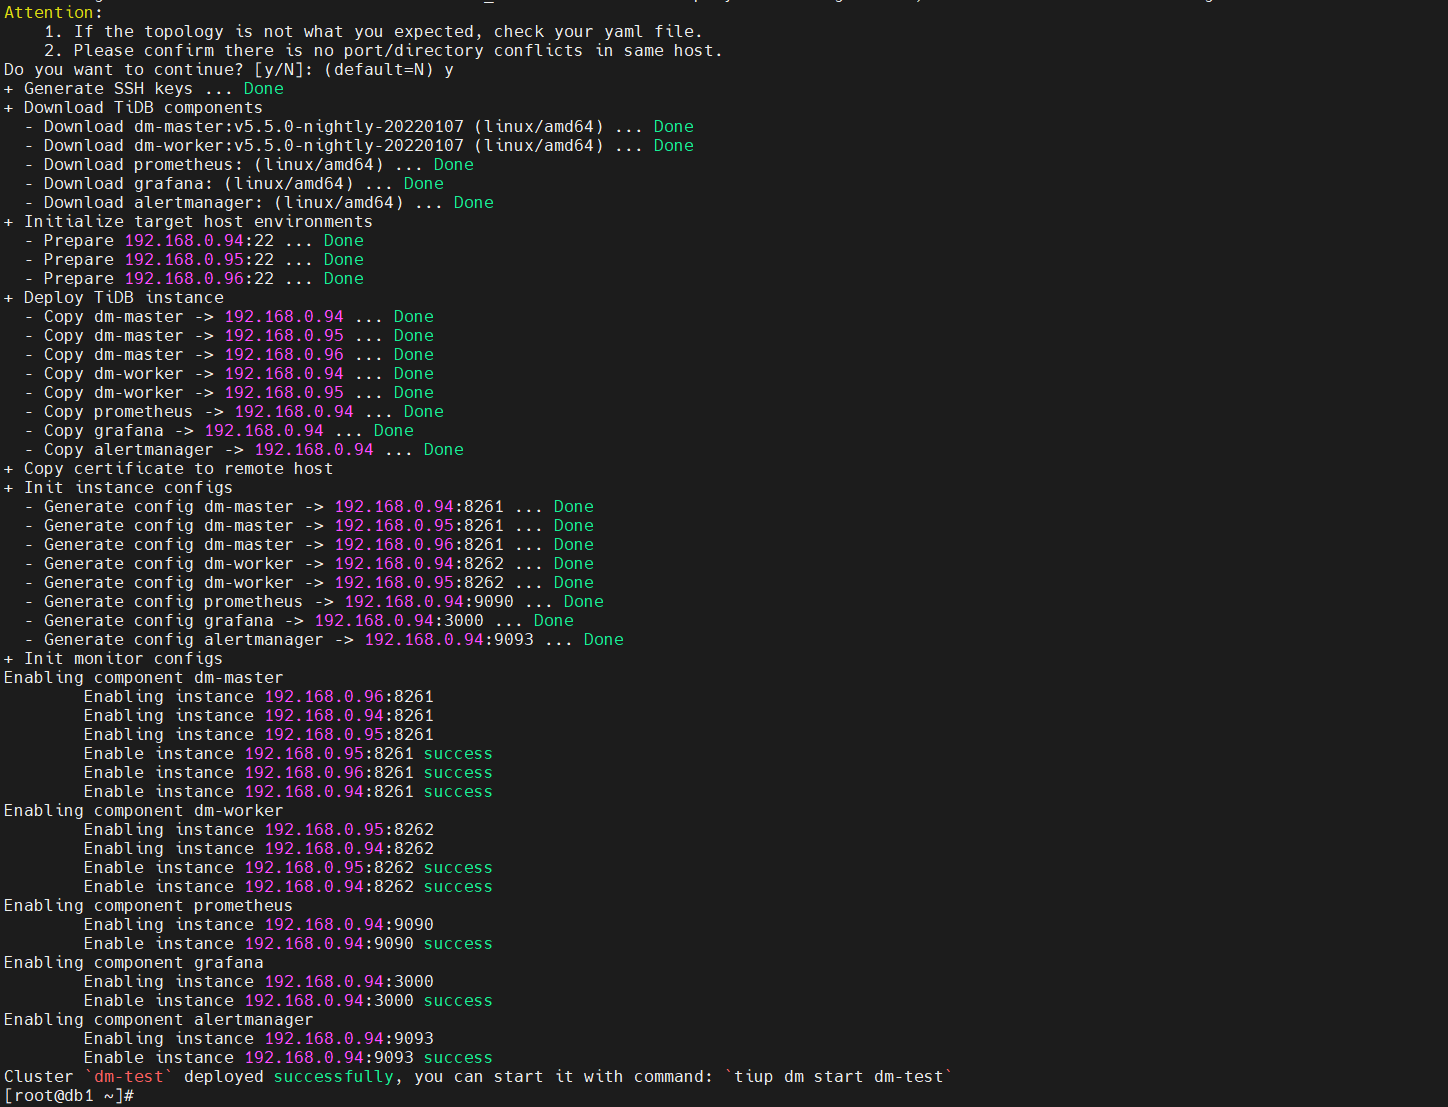
- 部署 Data Migration(DM) 集群,集群名称为 集群 dm-test
[root@db1 ~]# tiup dm deploy dm-test v5.5.0-nightly-20220107 ./topology.yaml --user root -p
- 查看 TiUP 管理的 DM 集群情况
[root@db1 ~]# tiup dm list
tiup is checking updates for component dm ...
Starting component `dm`: /root/.tiup/components/dm/v1.9.0/tiup-dm /root/.tiup/components/dm/v1.9.0/tiup-dm list
Name     User  Version                  Path                                     PrivateKey
----     ----  -------                  ----                                     ----------
dm-test  tidb  v5.5.0-nightly-20220107  /root/.tiup/storage/dm/clusters/dm-test  /root/.tiup/storage/dm/clusters/dm-test/ssh/id_rsa
- 检查部署的集群 dm-test 的状态
[root@db1 ~]# tiup dm display dm-test
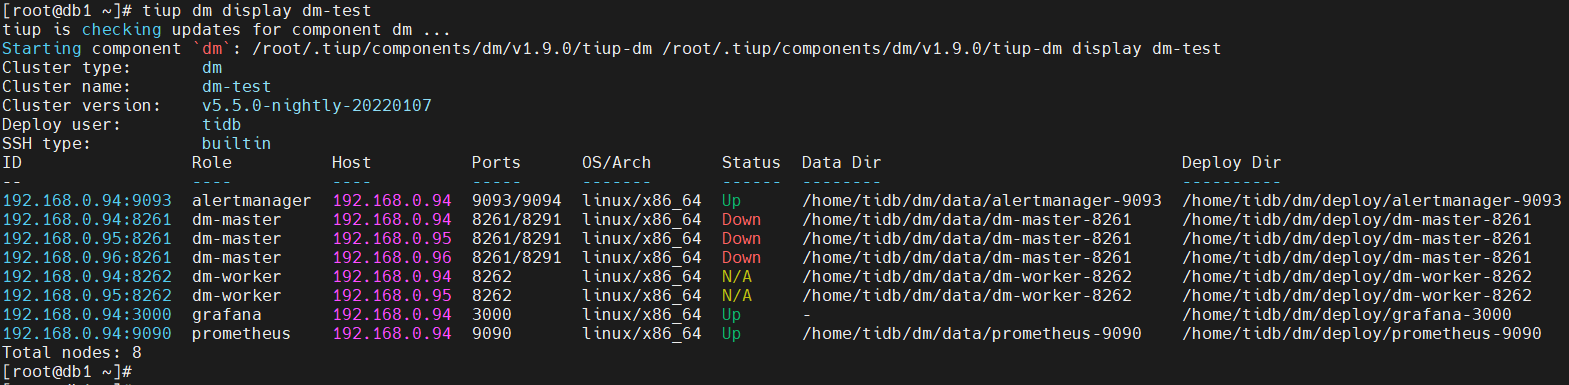
预期输出包括 dm-test 集群中实例 ID、角色、主机、监听端口和状态(由于还未启动, 所以状态为 Down/inactive)、目录信息。
- 启动集群 dm-test
[root@db1 ~]# tiup dm start dm-test
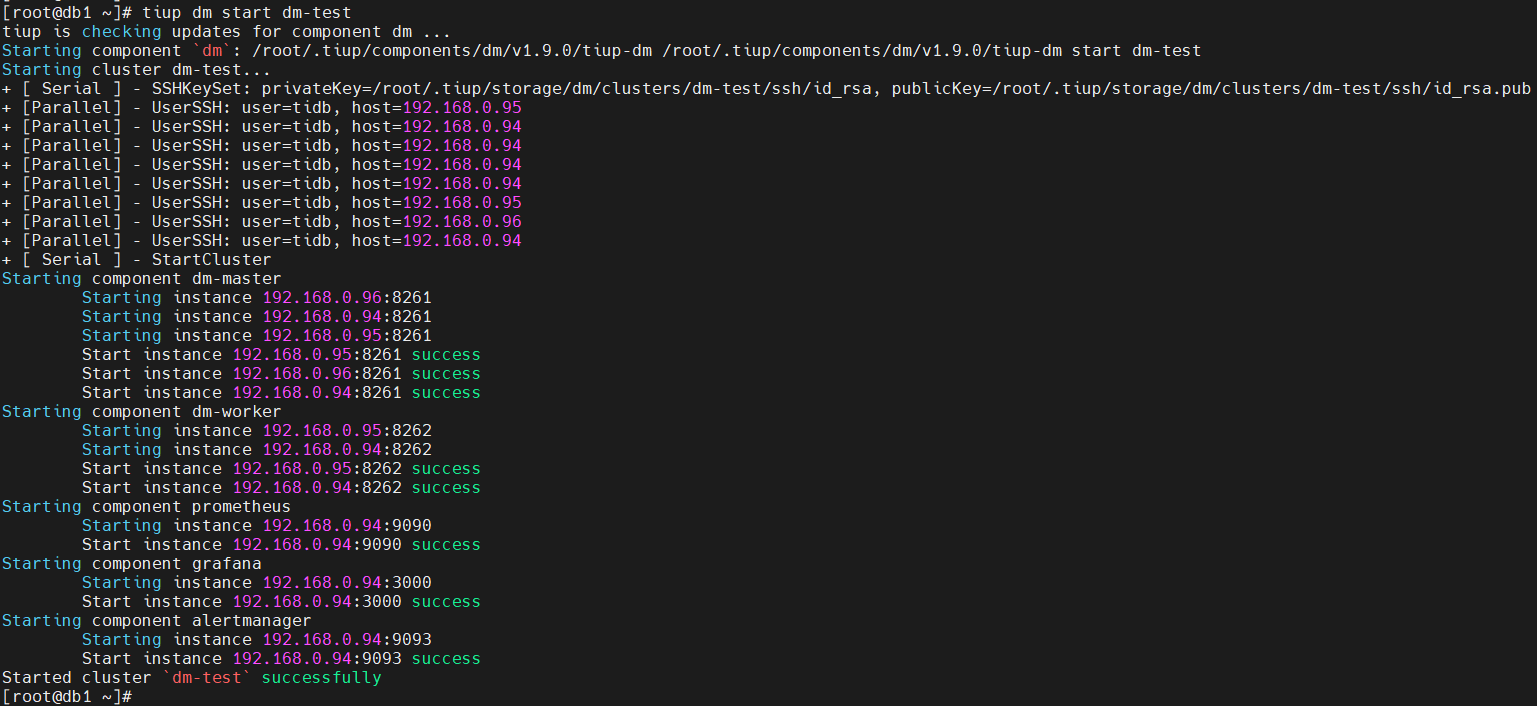
- 检查部署的集群 dm-test 的状态
[root@db1 ~]# tiup dm display dm-test

- 获取集群控制工具 dmctl ,用于后面的练习
[root@db1 ~]# tiup dmctl:v5.5.0-nightly-20220107
The component `dmctl` version v5.5.0-nightly-20220107 is not installed; downloading from repository.
download https://tiup-mirrors.pingcap.com/dmctl-v5.5.0-nightly-20220107-linux-amd64.tar.gz 30.56 MiB / 30.56 MiB 100.00% 10.26 MiB/s
Starting component `dmctl`: /root/.tiup/components/dmctl/v5.5.0-nightly-20220107/dmctl/dmctl /root/.tiup/components/dmctl/v5.5.0-nightly-20220107/dmctl/dmctl
Error: --master-addr not provided, this parameter is required when interacting with the dm-master, you can also use environment variable 'DM_MASTER_ADDR' to specify the value. Use `dmctl --help` to see more help messages
[root@db1 ~]#
创建2个测试 MySQL 数据库实例,作为DM数据同步的两个源头数据库
- 在TiDB-server节点上部署好 1 个 MySQL 数据库实例,端口号为 3306 ,在 192.168.0.98 上部署好 1 个 MySQL 数据库实例,端口号为 3306 ,作为DM数据同步的两个源头数据库。
在两个节点上部署端口号为 3306 的 MySQL 数据库实例,并开启 binlog
[root@db1 ~]# yum -y install http://dev.mysql.com/get/mysql57-community-release-el7-10.noarch.rpm
[root@db1 ~]# rpm --import https://repo.mysql.com/RPM-GPG-KEY-mysql-2022
[root@db1 ~]# yum install -y mysql-server
[root@db1 ~]# systemctl start mysqld
[root@db1 ~]# grep password /var/log/mysqld.log
2022-02-21T06:35:48.116302Z 1 [Note] A temporary password is generated for root@localhost: S.D!8a)EhRDL
2022-02-21T06:35:52.990968Z 2 [Note] Access denied for user 'root'@'localhost' (using password: YES)
[root@db1 ~]# mysql -uroot -p'S.D!8a)EhRDL' -h127.0.0.1 -P3306
mysql> ALTER USER 'root'@'localhost' IDENTIFIED BY '!QAZ2wsx';
mysql> create user 'root'@'192.168.0.97' identified by '!QAZ2wsx';
mysql> grant all privileges on *.* to 'root'@'192.168.0.97';
mysql> exit
[root@db1 ~]# mysql -uroot -p'!QAZ2wsx' -h127.0.0.1 -P3306
mysql> show variables like '%log_bin%';
+---------------------------------+-------+
| Variable_name                   | Value |
+---------------------------------+-------+
| log_bin                         | OFF   |
| log_bin_basename                |       |
| log_bin_index                   |       |
| log_bin_trust_function_creators | OFF   |
| log_bin_use_v1_row_events       | OFF   |
| sql_log_bin                     | ON    |
+---------------------------------+-------+
6 rows in set (0.00 sec)

[root@db1 ~]# vi /etc/my.cnf
# 添加
log-bin=mysql-bin
server-id=1

[root@db1 ~]# systemctl restart mysqld
[root@db1 mysql]# mysql -uroot -p'!QAZ2wsx' -h127.0.0.1 -P3306
mysql> show variables like '%log_bin%';
+---------------------------------+--------------------------------+
| Variable_name                   | Value                          |
+---------------------------------+--------------------------------+
| log_bin                         | ON                             |
| log_bin_basename                | /var/lib/mysql/mysql-bin       |
| log_bin_index                   | /var/lib/mysql/mysql-bin.index |
| log_bin_trust_function_creators | OFF                            |
| log_bin_use_v1_row_events       | OFF                            |
| sql_log_bin                     | ON                             |
+---------------------------------+--------------------------------+
6 rows in set (0.01 sec)
从 MySQL 同步数据到 TiDB
在练习二中,我们将两个 MySQL 数据库实例中的 schema 和表同步到 TiDB 数据库中。
同步规则
- 规则一: MySQL 数据库实例(192.168.0.97)中的 user 库中所有的表同步到 TiDB 数据库的 user_north 中去, 192.168.0.98 中的 user 库中所有的表同步到 TiDB 数据库的 user_east 中去。
- 规则二: MySQL 数据库实例 192.168.0.97 和 192.168.0.98 中的 store 库中的表原样同步到 TiDB 数据库中的 store 库中的表, 但是 192.168.0.98 中的 store 库中的表 store_sz 会同步到 TIDB 的 store_suzhou 表中。
- 规则三: MySQL 数据库实例 192.168.0.97 和 192.168.0.98 中的 salesdb 库中的表 sales 做了分表, 它们会同步到 TiDB 中的 salesdb 库的 sales 表中。 (分表分库规则)
- 规则四: MySQL 数据库实例 192.168.0.97 和 192.168.0.98 中的 user 库不会复制删除操作, user 库中的 trace 表不会复制 truncate ,drop 和 delete 操作,store 库不会复制删除操作,store 库的表不会复制 truncate ,drop 和 delete 操作。
- 规则五:MySQL 数据库实例 192.168.0.97 和 192.168.0.98 中的 log 库不会参与复制。
MySQL 数据库准备, 为 MySQL 数据库开通用户权限,并初始化数据
- 分别连接到 192.168.0.97 和 192.168.0.98 的 MySQL 数据库,创建 ‘root’@‘192.168.0.94’ ,‘root’@‘192.168.0.95’ 和 ‘root’@‘192.168.0.96’ , 并赋予all
privileges 权限(更详细权限请参考文档), 这 3 个用户用于 dm-worker 连接 MySQL 数据库进行全量和增量数据的读取。
[root@db1 ~]# mysql -uroot -p'!QAZ2wsx' -h127.0.0.1 -P3306

drop user 'root'@'192.168.0.94';
create user 'root'@'192.168.0.94' identified by '!QAZ2wsx';
grant all privileges on *.* to 'root'@'192.168.0.94';

drop user 'root'@'192.168.0.95';
create user 'root'@'192.168.0.95' identified by '!QAZ2wsx';
grant all privileges on *.* to 'root'@'192.168.0.95';

drop user 'root'@'192.168.0.96';
create user 'root'@'192.168.0.96' identified by '!QAZ2wsx';
grant all privileges on *.* to 'root'@'192.168.0.96';
注意:上面操作需要在 192.168.0.97 和 192.168.0.98 两个实例中分别执行,192.168.0.96 的DM节点还没有加进来,以后加DM节点时也要注意先创建好用户。
- 分别连接到 192.168.0.97 和 192.168.0.98 的 MySQL 数据库,导入数据库 user,store,log,salesdb。
[root@db1 ~]# mysql -u root -p'!QAZ2wsx' -h 192.168.0.97 -P 3306

drop database log;
create database log;
drop database salesdb;
create database salesdb;
drop database store;
create database store;
drop database user;
create database user;

use log;
create table `messages` (id int primary key,msg varchar(64));
insert into messages values (1,'hello');

use salesdb
create table `sales` (id int primary key,pname varchar(64),cnt int);
insert into sales values (1,'book',100);

use store
create table `store_bj` (id int primary key,pname varchar(64));
create table `store_tj` (id int primary key,pname varchar(64));
insert into store_bj values (1,'book');
insert into store_tj values (1,'cup');

use user
create table `information` (id int primary key,info varchar(64));
create table `trace` (id int primary key,content varchar(64));
insert into information values (1,'tom');
insert into information values (2,'jack');
insert into trace values (1,'login');

[root@db2 ~]# mysql -uroot -p'!QAZ2wsx' -h 192.168.0.98 -P3306

drop database log;
create database log;
drop database salesdb;
create database salesdb;
drop database store;
create database store;
drop database user;
create database user;

use log
create table `messages` (id int primary key,msg varchar(64));

use salesdb
create table `sales` (id int primary key,pname varchar(64),cnt int);
insert into sales values (2,'cup',200);

use store
create table `store_sh` (id int primary key,pname varchar(64));
create table `store_sz` (id int primary key,pname varchar(64));
insert into store_sh values (1,'bike');
insert into store_sz values (1,'hat');

use user
create table `information` (id int primary key,info varchar(64));
create table `trace` (id int primary key,content varchar(64));
insert into information values (1,'andy');
insert into information values (2,'candy');
insert into trace values (1,'error');
TiDB 数据库准备,为 TiDB 数据库开通权限,并准备好数据。
- 在已有 TiDB 数据库中, 创建用户 ‘root’@‘192.168.0.94’ ,‘root’@‘192.168.0.95’ 和 ‘root’@‘192.168.0.96’ ,并赋予 all privileges 权限(更详细权限请参考文档),这 3 个用户用于 dm-worker 连接 TiDB 数据库进行全量和增量数据的导入。
[root@db1 ~]# mysql -h 192.168.0.97 -P 4000 -uroot

drop user 'root'@'192.168.0.94';
create user 'root'@'192.168.0.94' identified by '!QAZ2wsx';
grant all privileges on *.* to 'root'@'192.168.0.94';

drop user 'root'@'192.168.0.95';
create user 'root'@'192.168.0.95' identified by '!QAZ2wsx';
grant all privileges on *.* to 'root'@'192.168.0.95';

drop user 'root'@'192.168.0.96';
create user 'root'@'192.168.0.96' identified by '!QAZ2wsx';
grant all privileges on *.* to 'root'@'192.168.0.96';
- 创建数据库 user_north, user_east, store 和 salesdb, 创建相关表 user_north.information, user_north.trace, user_east.information, user_east.trace, store.store_bj, store.store_tj, store.store_sh, store.tore_suzhou 和 salesdb.sales
[root@db1 ~]# mysql -h 192.168.0.97 -P 4000 -uroot

create database user_north;
create database user_east;
create database store;
create database salesdb;
create database log;

use user_north;
create table information(id int primary key, info varchar(64));
create table trace(id int primary key, content varchar(64));

use user_east
create table information(id int primary key, info varchar(64));
create table trace(id int primary key, content varchar(64));

use store;
create table store_bj(id int primary key, pname varchar(64));
create table store_tj(id int primary key, pname varchar(64));
create table store_sh(id int primary key, pname varchar(64));
create table store_suzhou(id int primary key, pname varchar(64));

use salesdb;
create table sales(id int primary key, pname varchar(64), cnt int);

use log;
create table messages(id int primary key, msg varchar(64));
注意: TiDB 数据库中的数据库和表也可以不预先创建, 在 DM 全量同步数据之前会创建这些数据库和表。
数据准备完毕后,编辑数据源配置文件
- 为用户密码生成密文
[root@db1 ~]# tiup dmctl -encrypt '!QAZ2wsx'
tiup is checking updates for component dmctl ...
A new version of dmctl is available:
   The latest version:         v5.4.0
   Local installed version:
   Update current component:   tiup update dmctl
   Update all components:      tiup update --all

The component `dmctl` version  is not installed; downloading from repository.
download https://tiup-mirrors.pingcap.com/dmctl-v5.4.0-linux-amd64.tar.gz 44.08 MiB / 44.08 MiB 100.00% 9.96 MiB/s
Starting component `dmctl`: /root/.tiup/components/dmctl/v5.4.0/dmctl/dmctl /root/.tiup/components/dmctl/v5.4.0/dmctl/dmctl -encrypt !QAZ2wsx
GxSZt9Mi8JH+P+U2fbsXGUC/F0f/rYPhfg==
[root@db1 ~]#
- 为 192.168.0.97 的 MySQL 实例编辑数据源配置文件
[root@db1 ~]# cat mysql-source-conf1.yaml
source-id: "mysql-replica-01"

from:
  host: "192.168.0.97"
  user: "root"
  password: "GxSZt9Mi8JH+P+U2fbsXGUC/F0f/rYPhfg=="
  port: 3306
- 为 192.168.0.98 的 MySQL 实例编辑数据源配置文件
[root@db1 ~]# cat mysql-source-conf2.yaml
source-id: "mysql-replica-02"

from:
  host: "192.168.0.98"
  user: "root"
  password: "GxSZt9Mi8JH+P+U2fbsXGUC/F0f/rYPhfg=="
  port: 3306
将数据源配置文件加载到 DM 中
- 加载 192.168.0.97 的 MySQL 数据库的配置文件
[root@db1 ~]# tiup dmctl --master-addr=192.168.0.94:8261 operate-source create mysql-source-conf1.yaml
tiup is checking updates for component dmctl ...
Starting component `dmctl`: /root/.tiup/components/dmctl/v5.4.0/dmctl/dmctl /root/.tiup/components/dmctl/v5.4.0/dmctl/dmctl --master-addr=192.168.0.94:8261 operate-source create mysql-source-conf1.yaml
{
    "result": true,
    "msg": "",
    "sources": [
        {
            "result": true,
            "msg": "",
            "source": "mysql-replica-01",
            "worker": "dm-192.168.0.95-8262"
        }
    ]
}
- 加载 192.168.0.98 的 MySQL 数据库的配置文件
[root@db1 ~]# tiup dmctl --master-addr=192.168.0.94:8261 operate-source create mysql-source-conf2.yaml
tiup is checking updates for component dmctl ...
Starting component `dmctl`: /root/.tiup/components/dmctl/v5.4.0/dmctl/dmctl /root/.tiup/components/dmctl/v5.4.0/dmctl/dmctl --master-addr=192.168.0.94:8261 operate-source create mysql-source-conf2.yaml
{
    "result": true,
    "msg": "",
    "sources": [
        {
            "result": true,
            "msg": "",
            "source": "mysql-replica-02",
            "worker": "dm-192.168.0.94-8262"
        }
    ]
}
注意: --master-addr=192.168.0.94:8261 为 DM 集群中的任意一个 master 节点。
- 查看已经加载的数据源
[root@db1 ~]# tiup dmctl --master-addr=192.168.0.94:8261 get-config source mysql-replica-01
tiup is checking updates for component dmctl ...
Starting component `dmctl`: /root/.tiup/components/dmctl/v5.4.0/dmctl/dmctl /root/.tiup/components/dmctl/v5.4.0/dmctl/dmctl --master-addr=192.168.0.94:8261 get-config source mysql-replica-01
{
    "result": true,
    "msg": "",
    "cfg": "enable-gtid: false\nauto-fix-gtid: false\nrelay-dir: relay-dir\nmeta-dir: \"\"\nflavor: mysql\ncharset: \"\"\nenable-relay: false\nrelay-binlog-name: \"\"\nrelay-binlog-gtid: \"\"\nsource-id: mysql-replica-01\nfrom:\n  host: 192.168.0.97\n  port: 3306\n  user: root\n  password: '******'\n  max-allowed-packet: null\n  session: {}\n  security: null\npurge:\n  interval: 3600\n  expires: 0\n  remain-space: 15\nchecker:\n  check-enable: true\n  backoff-rollback: 5m0s\n  backoff-max: 5m0s\n  check-interval: 5s\n  backoff-min: 1s\n  backoff-jitter: true\n  backoff-factor: 2\nserver-id: 429519902\ntracer: {}\ncase-sensitive: true\nfilters: []\n"
}
[root@db1 ~]# tiup dmctl --master-addr=192.168.0.94:8261 get-config source mysql-replica-02
tiup is checking updates for component dmctl ...
Starting component `dmctl`: /root/.tiup/components/dmctl/v5.4.0/dmctl/dmctl /root/.tiup/components/dmctl/v5.4.0/dmctl/dmctl --master-addr=192.168.0.94:8261 get-config source mysql-replica-02
{
    "result": true,
    "msg": "",
    "cfg": "enable-gtid: false\nauto-fix-gtid: false\nrelay-dir: relay-dir\nmeta-dir: \"\"\nflavor: mysql\ncharset: \"\"\nenable-relay: false\nrelay-binlog-name: \"\"\nrelay-binlog-gtid: \"\"\nsource-id: mysql-replica-02\nfrom:\n  host: 192.168.0.98\n  port: 3306\n  user: root\n  password: '******'\n  max-allowed-packet: null\n  session: {}\n  security: null\npurge:\n  interval: 3600\n  expires: 0\n  remain-space: 15\nchecker:\n  check-enable: true\n  backoff-rollback: 5m0s\n  backoff-max: 5m0s\n  check-interval: 5s\n  backoff-min: 1s\n  backoff-jitter: true\n  backoff-factor: 2\nserver-id: 429554122\ntracer: {}\ncase-sensitive: true\nfilters: []\n"
}
- 查看数据源和 dm-worker 的对应关系
[root@db1 ~]# tiup dmctl --master-addr=192.168.0.94:8261 operate-source show
tiup is checking updates for component dmctl ...
Starting component `dmctl`: /root/.tiup/components/dmctl/v5.4.0/dmctl/dmctl /root/.tiup/components/dmctl/v5.4.0/dmctl/dmctl --master-addr=192.168.0.94:8261 operate-source show
{
    "result": true,
    "msg": "",
    "sources": [
        {
            "result": true,
            "msg": "",
            "source": "mysql-replica-01",
            "worker": "dm-192.168.0.95-8262"
        },
        {
            "result": true,
            "msg": "",
            "source": "mysql-replica-02",
            "worker": "dm-192.168.0.94-8262"
        }
    ]
}

按照规则, 配置 DM 任务配置文件 dm-task.yaml
- 任务信息如下
name: "dm-taskX"
task-mode: all
ignore-checking-items: ["auto_increment_ID"]
任务名: dm-taskX,(X 代表任意字符)
复制方式: all(全量 + 增量)
ignore-checking-items: ["auto_increment_ID”]: 忽略自增主键检测。
- 目标 TiDB 数据库配置信息
target-database:
  host: "192.168.0.97"
  port: 4000
  user: "root"
  password: ""
数据库地址:192.168.0.97,端口为:4000,用户名:root,密码为空。
- 配置数据同步规则
规则一: MySQL 数据库实例(192.168.0.97)中的 user 库中所有的表同步到 TiDB 数据库的 user_north 中去, 192.168.0.98 中的 user 库中所有的表同步到 TiDB 数据库的 user_east 中去。
我们使用 Table routings 实现, 如下:
routes:
  instance-1-user-rule:
    schema-pattern: "user"
    target-schema: "user_north"
  instance-2-user-rule:
    schema-pattern: "user"
    target-schema: "user_east"
规则二: MySQL 数据库实例 192.168.0.97 和 192.168.0.98 中的 store 库中的表原样同步到 TiDB 数据库中的 store 库中的表, 但是 192.168.0.98 中的 store 库中的表 store_sz 会同步到 TIDB 的 store_suzhou 表中。
我们使用 Table routings 实现, 如下:
  instance-2-store-rule:
    schema-pattern: "store"
    table-pattern: "store_sz"
    target-schema: "store"
    target-table: "store_suzhou"
规则三: MySQL 数据库实例 192.168.0.97 和 192.168.0.98 中的 salesdb 库中的表 sales 做了分表, 它们会同步到 TiDB 中的 salesdb 库的 sales 表中。 (分表分库规则)
我们使用 Table routings 实现, 如下:
  sale-route-rule:
    schema-pattern: "salesdb"
    target-schema: "salesdb"
规则四: MySQL 数据库实例 192.168.0.97 和 192.168.0.98 中的 user 库不会复制删除操作, user 库中的 trace 表不会复制 truncate ,drop 和 delete 操作,store 库不会复制删除操作,store 库的表不会复制 truncate ,drop 和 delete 操作。
我们使用 Binlog event filter 实现,如下:
filters:
  trace-filter-rule: # user 库中的 trace 表不会复制 truncate ,drop 和 delete 操作
    schema-pattern: "user"
    table-pattern: "trace"
    events: ["truncate table", "drop table", "delete"]
    action: Ignore
  user-filter-rule: # MySQL 数据库实例 3306 和 3307 中的 user 库不会复制删除操作
    schema-pattern: "user"
    events: ["drop database"]
    action: Ignore
  store-filter-rule: # store 库不会复制删除操作,store 库的表不会复制 truncate ,drop 和 delete 操作
    schema-pattern: "store"
    events: ["drop database", "truncate table", "drop table", "delete"]
    action: Ignore
规则五:MySQL 数据库实例 192.168.0.97 和 192.168.0.98 中的 log 库不会参与复制。
我们使用 block allow list 实现,如下:
block-allow-list:
  log-ignored:
    ignore-dbs: ["log"]
- 我们将 MySQL 数据库实例 192.168.0.97 和 192.168.0.98 两个实例关联上述规则:
mysql-instances:
  -
    source-id: "mysql-replica-01"
    route-rules: ["instance-1-user-rule","sale-route-rule"]
    filter-rules: ["trace-filter-rule", "user-filter-rule" , "store-filter-rule"]
    block-allow-list: "log-ignored"
    mydumper-config-name: "global"
    loader-config-name: "global"
    syncer-config-name: "global"
  -
    source-id: "mysql-replica-02"
    route-rules: ["instance-2-user-rule", "instance-2-store-rule","sale-route-rule"]
    filter-rules: ["trace-filter-rule", "user-filter-rule" , "store-filter-rule"]
    block-allow-list: "log-ignored"
    mydumper-config-name: "global"
    loader-config-name: "global"
    syncer-config-name: "global"
- 得出最终配置如下
[root@db1 ~]# cat dm-task.yaml
name: "dm-taskX"
task-mode: all
ignore-checking-items: ["auto_increment_ID"]

target-database:
  host: "192.168.0.97"
  port: 4000
  user: "root"
  password: "GxSZt9Mi8JH+P+U2fbsXGUC/F0f/rYPhfg=="

mysql-instances:
  -
    source-id: "mysql-replica-01"
    route-rules: ["instance-1-user-rule", "sale-route-rule"]
    filter-rules: ["trace-filter-rule", "user-filter-rule", "store-filter-rule"]
    block-allow-list: "log-ignored"
    mydumper-config-name: "global"
    loader-config-name: "global"
    syncer-config-name: "global"
  -
    source-id: "mysql-replica-02"
    route-rules: ["instance-2-user-rule", "instance-2-store-rule", "sale-route-rule"]
    filter-rules: ["trace-filter-rule", "user-filter-rule", "store-filter-rule"]
    block-allow-list: "log-ignored"
    mydumper-config-name: "global"
    loader-config-name: "global"
    syncer-config-name: "global"

# 所有实例的共有配置

routes:
  instance-1-user-rule:
    schema-pattern: "user"
    target-schema: "user_north"
  instance-2-user-rule:
    schema-pattern: "user"
    target-schema: "user_east"
  instance-2-store-rule:
    schema-pattern: "store"
    table-pattern: "store_sz"
    target-schema: "store"
    target-table: "store_suzhou"
  sale-route-rule:
    schema-pattern: "salesdb"
    target-schema: "salesdb"

filters:
  trace-filter-rule:   # user 库中的 trace 表不会复制 truncate ,drop 和 delete 操作
    schema-pattern: "user"
    table-pattern: "trace"
    events: ["truncate table", "drop table", "delete"]
    action: Ignore
  user-filter-rule:    # MySQL 数据库实例 3306 和 3307 中的 user 库不会复制删除操作
    schema-pattern: "user"
    events: ["drop database"]
    action: Ignore
  store-filter-rule:   # store 库不会复制删除操作,store 库的表不会复制 truncate ,drop 和 delete 操作
    schema-pattern: "store"
    events: ["drop database", "truncate table", "drop table", "delete"]
    action: Ignore

block-allow-list:
  log-ignored:
    ignore-dbs: ["log"]

mydumpers:
  global:
    threads: 4
    chunk-filesize: 64

loaders:
  global:
    pool-size: 16
    dir: "./dumped_data"

syncers:
  global:
    worker-count: 16
    batch: 100
    enable-ansi-quotes: true
    safe-mode: false
    compact: false
    multiple-rows: false
对于上游 MySQL 源数据库进行检查,得到期待结果
[root@db1 ~]# tiup dmctl --master-addr=192.168.0.94:8261 check-task dm-task.yaml
遇到的几个报错
[root@db1 ~]# tiup dmctl --master-addr=192.168.0.94:8261  check-task dm-task.yaml
tiup is checking updates for component dmctl ...
Starting component `dmctl`: /root/.tiup/components/dmctl/v5.4.0/dmctl/dmctl /root/.tiup/components/dmctl/v5.4.0/dmctl/dmctl --master-addr=192.168.0.94:8261 check-task dm-task.yaml
{
    "result": false,
    "msg": "[code=20029:class=dm-master:scope=internal:level=medium], Message: mysql-instance(0)'s loader config global not exist in loaders, Workaround: Please check the `loader-config-name` config in task configuration file."
}
解决方法: dm-task.yaml文件中加入 mydumpers、loaders 和 syncers 的配置,具体配置参考手册。
[root@db1 ~]# tiup dmctl --master-addr=192.168.0.94:8261  check-task dm-task.yaml
tiup is checking updates for component dmctl ...
Starting component `dmctl`: /root/.tiup/components/dmctl/v5.4.0/dmctl/dmctl /root/.tiup/components/dmctl/v5.4.0/dmctl/dmctl --master-addr=192.168.0.94:8261 check-task dm-task.yaml
{
    "result": false,
    "msg": "[code=10001:class=dm-master:scope=not-set:level=high], Message: database driver error, RawCause: Error 1045: Access denied for user 'root'@'192.168.0.95' (using password: NO), Workaround: Please check the database connection and the database config in configuration file."
}
原因: dm-task.yaml 文件 target-database 没有配置密码参数password
target-database:
  host: "192.168.0.97"
  port: 4000
  user: "root"
  password: "GxSZt9Mi8JH+P+U2fbsXGUC/F0f/rYPhfg=="
最后通过了
[root@db1 ~]# tiup dmctl --master-addr=192.168.0.94:8261  check-task dm-task.yaml
tiup is checking updates for component dmctl ...
Starting component `dmctl`: /root/.tiup/components/dmctl/v5.4.0/dmctl/dmctl /root/.tiup/components/dmctl/v5.4.0/dmctl/dmctl --master-addr=192.168.0.94:8261 check-task dm-task.yaml
{
    "result": true,
    "msg": "check pass!!!"
}
注意: 开始任务之前会自动执行检查任务。
创建复制任务,并默认开始
[root@db1 ~]# tiup dmctl --master-addr=192.168.0.94:8261 start-task dm-task.yaml
tiup is checking updates for component dmctl ...
Starting component `dmctl`: /root/.tiup/components/dmctl/v5.4.0/dmctl/dmctl /root/.tiup/components/dmctl/v5.4.0/dmctl/dmctl --master-addr=192.168.0.94:8261 start-task dm-task.yaml
{
    "result": true,
    "msg": "",
    "sources": [
        {
            "result": true,
            "msg": "",
            "source": "mysql-replica-01",
            "worker": "dm-192.168.0.95-8262"
        },
        {
            "result": true,
            "msg": "",
            "source": "mysql-replica-02",
            "worker": "dm-192.168.0.94-8262"
        }
    ]
}
查询任务状态,查看是否正常
[root@db1 ~]# tiup dmctl --master-addr=192.168.0.94:8261 query-status dm-task.yaml
遇到的几个报错
"subTaskStatus": [
    {
        "name": "dm-taskX",
        "stage": "Paused",
        "unit": "Dump",
        "result": {
            "isCanceled": false,
            "errors": [
                {
                    "ErrCode": 32001,
                    "ErrClass": "dump-unit",
                    "ErrScope": "internal",
                    "ErrLevel": "high",
                    "Message": "mydumper/dumpling runs with error, with output (may empty): ",
                    "RawCause": "sql: SELECT `VARIABLE_NAME`,`VARIABLE_VALUE` FROM `information_schema`.`GLOBAL_STATUS` LIMIT 1: Error 3167: The 'INFORMATION_SCHEMA.GLOBAL_STATUS' feature is disabled; see the documentation for 'show_compatibility_56'",
                    "Workaround": ""
                }
            ],
            "detail": null
        },
        "unresolvedDDLLockID": "",
        "dump": {
            "totalTables": "186",
            "completedTables": 8,
            "finishedBytes": 601189,
            "finishedRows": 3618,
            "estimateTotalRows": 0
        }
    }
]
原因: 需要在 源头MySQL 数据库实例 192.168.0.97 和 192.168.0.98 中打开 show_compatibility_56。
mysql> show variables like '%show_compatibility_56%';
+-----------------------+-------+
| Variable_name         | Value |
+-----------------------+-------+
| show_compatibility_56 | OFF   |
+-----------------------+-------+
1 row in set (0.01 sec)

mysql> set global show_compatibility_56=on;
Query OK, 0 rows affected (0.00 sec)

mysql> show variables like '%show_compatibility_56%';
+-----------------------+-------+
| Variable_name         | Value |
+-----------------------+-------+
| show_compatibility_56 | ON    |
+-----------------------+-------+
1 row in set (0.01 sec)
重启dm-task任务:
[root@db1 ~]# tiup dmctl --master-addr=192.168.0.94:8261 stop-task dm-task.yaml
[root@db1 ~]# tiup dmctl --master-addr=192.168.0.94:8261 start-task dm-task.yaml
再次查询任务状态,报出以下错误:
"subTaskStatus": [
    {
        "name": "dm-taskX",
        "stage": "Paused",
        "unit": "Load",
        "result": {
            "isCanceled": false,
            "errors": [
                {
                    "ErrCode": 10006,
                    "ErrClass": "database",
                    "ErrScope": "downstream",
                    "ErrLevel": "high",
                    "Message": "file mysql_db.t.0000000000000.sql: execute statement failed: commit",
                    "RawCause": "Error 1062: Duplicate entry '3671' for key 'PRIMARY'",
                    "Workaround": ""
                }
            ],
            "detail": null
        },
        "unresolvedDDLLockID": "",
        "load": {
            "finishedBytes": "449",
            "totalBytes": "18129792",
            "progress": "0.00 %",
            "metaBinlog": "(mysql-bin.000001, 10490)",
            "metaBinlogGTID": ""
        }
    }
]
原因: 192.168.0.97 上的 mysql_db 数据库是本次实验以外的库,本次实验用不上。
解决:1. 删除TiDB的上自增主键 2. 删除 mysql_db,避免对实验产生干扰,但是不知道怎么清理,只删除数据库不能解决问题。
mysql> drop database mysql_db;
Query OK, 0 rows affected (0.22 sec)

# 重启dm-task任务,再次查询任务状态,报出以下错误:
"Message": "file mysql_db.t.0000000000000.sql: execute statement failed: USE `mysql_db`;",
"RawCause": "Error 1049: Unknown database 'mysql_db'"
删除TiDB的上自增主键,因为是load数据初始化加载阶段,可以将此表删除重建。
重启dm-task任务,再次查询任务状态,正常了
[root@db1 ~]# tiup dmctl --master-addr=192.168.0.94:8261 stop-task dm-task.yaml
[root@db1 ~]# tiup dmctl --master-addr=192.168.0.94:8261 start-task dm-task.yaml
[root@db1 ~]# tiup dmctl --master-addr=192.168.0.94:8261 query-status dm-task.yaml
tiup is checking updates for component dmctl ...
Starting component `dmctl`: /root/.tiup/components/dmctl/v5.4.0/dmctl/dmctl /root/.tiup/components/dmctl/v5.4.0/dmctl/dmctl --master-addr=192.168.0.94:8261 query-status dm-task.yaml
{
    "result": true,
    "msg": "",
    "sources": [
        {
            "result": true,
            "msg": "",
            "sourceStatus": {
                "source": "mysql-replica-01",
                "worker": "dm-192.168.0.95-8262",
                "result": null,
                "relayStatus": null
            },
            "subTaskStatus": [
                {
                    "name": "dm-taskX",
                    "stage": "Running",
                    "unit": "Load",
                    "result": null,
                    "unresolvedDDLLockID": "",
                    "load": {
                        "finishedBytes": "8000656",
                        "totalBytes": "18129792",
                        "progress": "44.13 %",
                        "metaBinlog": "(mysql-bin.000001, 10490)",
                        "metaBinlogGTID": ""
                    }
                }
            ]
        },
        {
            "result": true,
            "msg": "",
            "sourceStatus": {
                "source": "mysql-replica-02",
                "worker": "dm-192.168.0.94-8262",
                "result": null,
                "relayStatus": null
            },
            "subTaskStatus": [
                {
                    "name": "dm-taskX",
                    "stage": "Running",
                    "unit": "Sync",
                    "result": null,
                    "unresolvedDDLLockID": "",
                    "sync": {
                        "totalEvents": "0",
                        "totalTps": "0",
                        "recentTps": "0",
                        "masterBinlog": "(mysql-bin.000001, 9522)",
                        "masterBinlogGtid": "",
                        "syncerBinlog": "(mysql-bin.000001, 9522)",
                        "syncerBinlogGtid": "",
                        "blockingDDLs": [
                        ],
                        "unresolvedGroups": [
                        ],
                        "synced": true,
                        "binlogType": "remote",
                        "secondsBehindMaster": "0"
                    }
                }
            ]
        }
    ]
}
检查目标 TiDB 数据库的数据,查看是否数据同步正确
[root@db1 ~]# mysql -h 192.168.0.97 -P 4000 -uroot

mysql> use user_east
Reading table information for completion of table and column names
You can turn off this feature to get a quicker startup with -A

Database changed
mysql> show tables;
+---------------------+
| Tables_in_user_east |
+---------------------+
| information         |
| trace               |
+---------------------+
2 rows in set (0.00 sec)

mysql> select * from information;
+----+-------+
| id | info  |
+----+-------+
|  1 | andy  |
|  2 | candy |
+----+-------+
2 rows in set (0.01 sec)

mysql> select * from trace;
+----+---------+
| id | content |
+----+---------+
|  1 | error   |
+----+---------+
1 row in set (0.00 sec)

mysql> use user_north;
Reading table information for completion of table and column names
You can turn off this feature to get a quicker startup with -A

Database changed
mysql> select * from information;
+----+------+
| id | info |
+----+------+
|  1 | tom  |
|  2 | jack |
+----+------+
2 rows in set (0.01 sec)

mysql> select * from trace;
+----+---------+
| id | content |
+----+---------+
|  1 | login   |
+----+---------+
1 row in set (0.00 sec)

mysql> use store;
Reading table information for completion of table and column names
You can turn off this feature to get a quicker startup with -A

Database changed
mysql> show tables;
+-----------------+
| Tables_in_store |
+-----------------+
| store_bj        |
| store_sh        |
| store_suzhou    |
| store_tj        |
+-----------------+
4 rows in set (0.00 sec)

mysql> select * from store_bj;
+----+-------+
| id | pname |
+----+-------+
|  1 | book  |
+----+-------+
1 row in set (0.07 sec)

mysql> select * from store_tj;
+----+-------+
| id | pname |
+----+-------+
|  1 | cup   |
+----+-------+
1 row in set (0.00 sec)

mysql> select * from store_suzhou;
+----+-------+
| id | pname |
+----+-------+
|  1 | hat   |
+----+-------+
1 row in set (0.01 sec)

mysql> select * from store_sh;
+----+-------+
| id | pname |
+----+-------+
|  1 | bike  |
+----+-------+
1 row in set (0.01 sec)

mysql> use salesdb;
Reading table information for completion of table and column names
You can turn off this feature to get a quicker startup with -A

Database changed
mysql> select * from sales;
+----+-------+------+
| id | pname | cnt  |
+----+-------+------+
|  1 | book  |  100 |
|  2 | cup   |  200 |
+----+-------+------+
2 rows in set (0.00 sec)
对于分表分库复制进行测试
- 在 TiDB 数据库的 salesdb 中查询
[root@db1 ~]# mysql -h 192.168.0.97 -P 4000 -uroot

mysql> select * from sales;
+----+-------+------+
| id | pname | cnt  |
+----+-------+------+
|  1 | book  |  100 |
|  2 | cup   |  200 |
+----+-------+------+
2 rows in set (0.05 sec)
- 在 192.168.0.97 MySQL 数据库的 salesdb 中插入数据
[root@db1 ~]# mysql -u root -p'!QAZ2wsx' -h 192.168.0.97 -P 3306

mysql> use salesdb
Reading table information for completion of table and column names
You can turn off this feature to get a quicker startup with -A

Database changed
mysql> insert into sales values(3,'shose',120);
Query OK, 1 row affected (0.01 sec)

mysql> select * from sales;
+----+-------+------+
| id | pname | cnt  |
+----+-------+------+
|  1 | book  |  100 |
|  3 | shose |  120 |
+----+-------+------+
2 rows in set (0.00 sec)
- 在 TiDB 数据库的 salesdb 中查询
[root@db1 ~]# mysql -h 192.168.0.97 -P 4000 -uroot

mysql> use salesdb
mysql> select * from sales;
+----+-------+------+
| id | pname | cnt  |
+----+-------+------+
|  1 | book  |  100 |
|  2 | cup   |  200 |
|  3 | shose |  120 |
+----+-------+------+
3 rows in set (0.00 sec)
- 在 192.168.0.98 MySQL 数据库的 salesdb 中插入数据
[root@db1 ~]# mysql -u root -p'!QAZ2wsx' -h 192.168.0.98 -P 3306

mysql> use salesdb
Reading table information for completion of table and column names
You can turn off this feature to get a quicker startup with -A

Database changed
mysql> insert into sales values(4, 'paper',1000);
Query OK, 1 row affected (0.01 sec)

mysql> select * from sales;
+----+-------+------+
| id | pname | cnt  |
+----+-------+------+
|  2 | cup   |  200 |
|  4 | paper | 1000 |
+----+-------+------+
2 rows in set (0.00 sec)
- 在 TiDB 数据库的 salesdb 中查询
[root@db1 ~]# mysql -h 192.168.0.97 -P 4000 -uroot

mysql> use salesdb
mysql> select * from sales;
+----+-------+------+
| id | pname | cnt  |
+----+-------+------+
|  1 | book  |  100 |
|  2 | cup   |  200 |
|  3 | shose |  120 |
|  4 | paper | 1000 |
+----+-------+------+
4 rows in set (0.01 sec)
对于单表复制的测试
- 在 192.168.0.97 MySQL 数据库的 user 中插入数据
[root@db1 ~]# mysql -u root -p'!QAZ2wsx' -h 192.168.0.97 -P 3306

mysql> use user
Reading table information for completion of table and column names
You can turn off this feature to get a quicker startup with -A

Database changed
mysql> show tables;
+----------------+
| Tables_in_user |
+----------------+
| information    |
| trace          |
+----------------+
2 rows in set (0.00 sec)

mysql> select * from information;
+----+------+
| id | info |
+----+------+
|  1 | tom  |
|  2 | jack |
+----+------+
2 rows in set (0.00 sec)

mysql> insert into information values(3,'frank');
Query OK, 1 row affected (0.00 sec)

mysql> select * from information;
+----+-------+
| id | info  |
+----+-------+
|  1 | tom   |
|  2 | jack  |
|  3 | frank |
+----+-------+
3 rows in set (0.00 sec)
- 在 TiDB 数据库的 user_north 中查询
[root@db1 ~]# mysql -h 192.168.0.97 -P 4000 -uroot

mysql> use user_north
Reading table information for completion of table and column names
You can turn off this feature to get a quicker startup with -A

Database changed
mysql> select * from information;
+----+-------+
| id | info  |
+----+-------+
|  1 | tom   |
|  2 | jack  |
|  3 | frank |
+----+-------+
3 rows in set (0.00 sec)
对于规则五提到的 log 库不会参与复制的测试
- 在 192.168.0.97 MySQL 数据库的 log 库中插入数据
[root@db1 ~]# mysql -u root -p'!QAZ2wsx' -h 192.168.0.97 -P 3306

mysql> use log
Reading table information for completion of table and column names
You can turn off this feature to get a quicker startup with -A

Database changed
mysql> select * from messages;
+----+-------+
| id | msg   |
+----+-------+
|  1 | hello |
+----+-------+
1 row in set (0.00 sec)

mysql> insert into messages values(2,'world');
Query OK, 1 row affected (0.00 sec)

mysql> select * from messages;
+----+-------+
| id | msg   |
+----+-------+
|  1 | hello |
|  2 | world |
+----+-------+
2 rows in set (0.00 sec)
- 在 TiDB 数据库的 log 库中查询
[root@db1 ~]# mysql -h 192.168.0.97 -P 4000 -uroot

mysql> use log
Reading table information for completion of table and column names
You can turn off this feature to get a quicker startup with -A

Database changed
mysql> select * from messages;
Empty set (0.00 sec)
对于规则四: MySQL 数据库实例 192.168.0.97 和 192.168.0.98 中的 user 库中的 trace 表不会复制 truncate ,drop 和 delete 操作。
- 在 MySQL 数据库实例 192.168.0.97 的 user 库中进行如下操作
[root@db1 ~]# mysql -u root -p'!QAZ2wsx' -h 192.168.0.97 -P 3306

mysql> use user
Reading table information for completion of table and column names
You can turn off this feature to get a quicker startup with -A

Database changed
mysql> select * from trace;
+----+---------+
| id | content |
+----+---------+
|  1 | login   |
+----+---------+
1 row in set (0.00 sec)

mysql> insert into trace values(2,'query');
Query OK, 1 row affected (0.00 sec)

mysql> insert into trace values(3,'log out');
Query OK, 1 row affected (0.00 sec)

mysql> select * from trace;
+----+---------+
| id | content |
+----+---------+
|  1 | login   |
|  2 | query   |
|  3 | log out |
+----+---------+
3 rows in set (0.00 sec)

mysql> delete from trace where id=3;
Query OK, 1 row affected (0.00 sec)

mysql> truncate table trace;
Query OK, 0 rows affected (0.00 sec)

mysql> drop table trace;
Query OK, 0 rows affected (0.01 sec)

mysql> show tables;
+----------------+
| Tables_in_user |
+----------------+
| information    |
+----------------+
1 row in set (0.00 sec)
- 检查 TiDB 数据库中 user_north 库中的 trace 表是否存在
[root@db1 ~]# mysql -h 192.168.0.97 -P 4000 -uroot

mysql> use user_north
Reading table information for completion of table and column names
You can turn off this feature to get a quicker startup with -A

Database changed
mysql> select * from trace;
+----+---------+
| id | content |
+----+---------+
|  1 | login   |
|  2 | query   |
|  3 | log out |
+----+---------+
3 rows in set (0.00 sec)
暂停和恢复 复制任务
- 暂停复制任务
[root@db1 ~]# tiup dmctl --master-addr=192.168.0.94:8261 pause-task dm-task.yaml
tiup is checking updates for component dmctl ...
Starting component `dmctl`: /root/.tiup/components/dmctl/v5.4.0/dmctl/dmctl /root/.tiup/components/dmctl/v5.4.0/dmctl/dmctl --master-addr=192.168.0.94:8261 pause-task dm-task.yaml
{
    "op": "Pause",
    "result": true,
    "msg": "",
    "sources": [
        {
            "result": true,
            "msg": "",
            "source": "mysql-replica-01",
            "worker": "dm-192.168.0.95-8262"
        },
        {
            "result": true,
            "msg": "",
            "source": "mysql-replica-02",
            "worker": "dm-192.168.0.94-8262"
        }
    ]
}
- 在任务暂定的情况下,连接192.168.0.98 的 MySQL 数据库的 user 库中进行如下操作
[root@db2 ~]# mysql -uroot -p'!QAZ2wsx' -h 192.168.0.98 -P3306

mysql> use user
Reading table information for completion of table and column names
You can turn off this feature to get a quicker startup with -A

Database changed
mysql> show tables;
+----------------+
| Tables_in_user |
+----------------+
| information    |
| trace          |
+----------------+
2 rows in set (0.00 sec)

mysql> select * from information;
+----+-------+
| id | info  |
+----+-------+
|  1 | andy  |
|  2 | candy |
+----+-------+
2 rows in set (0.00 sec)

mysql> insert into information values(3,'joe');
Query OK, 1 row affected (0.00 sec)

mysql> select * from information;
+----+-------+
| id | info  |
+----+-------+
|  1 | andy  |
|  2 | candy |
|  3 | joe   |
+----+-------+
3 rows in set (0.00 sec)
- 连接 TiDB 数据库,校验 user_east 库中的 information 表数据是否被复制操作
[root@db1 ~]# mysql -h 192.168.0.97 -P 4000 -uroot

mysql> use user_east
Reading table information for completion of table and column names
You can turn off this feature to get a quicker startup with -A

Database changed
mysql> show tables;
+---------------------+
| Tables_in_user_east |
+---------------------+
| information         |
| trace               |
+---------------------+
2 rows in set (0.00 sec)

mysql> select * from information;
+----+-------+
| id | info  |
+----+-------+
|  1 | andy  |
|  2 | candy |
+----+-------+
2 rows in set (0.00 sec)
我们发现暂停复制后并没有操作被复制。
- 恢复复制任务
[root@db1 ~]# tiup dmctl --master-addr=192.168.0.94:8261 resume-task dm-task.yaml
tiup is checking updates for component dmctl ...
Starting component `dmctl`: /root/.tiup/components/dmctl/v5.4.0/dmctl/dmctl /root/.tiup/components/dmctl/v5.4.0/dmctl/dmctl --master-addr=192.168.0.94:8261 resume-task dm-task.yaml
{
    "op": "Resume",
    "result": true,
    "msg": "",
    "sources": [
        {
            "result": true,
            "msg": "",
            "source": "mysql-replica-01",
            "worker": "dm-192.168.0.95-8262"
        },
        {
            "result": true,
            "msg": "",
            "source": "mysql-replica-02",
            "worker": "dm-192.168.0.94-8262"
        }
    ]
}
- 连接 TiDB 数据库,校验 user_east 库中的 information 表数据是否被复制操作
[root@db1 ~]# mysql -h 192.168.0.97 -P 4000 -uroot

mysql> use user_east
Reading table information for completion of table and column names
You can turn off this feature to get a quicker startup with -A

Database changed

mysql> select * from information;
+----+-------+
| id | info  |
+----+-------+
|  1 | andy  |
|  2 | candy |
|  3 | joe   |
+----+-------+
3 rows in set (0.00 sec)
停止 DM 的复制任务,停止后不能继续同步,需谨慎操作。
[root@db1 ~]# tiup dmctl --master-addr=192.168.0.94:8261 stop-task dm-task.yaml
tiup is checking updates for component dmctl ...
Starting component `dmctl`: /root/.tiup/components/dmctl/v5.4.0/dmctl/dmctl /root/.tiup/components/dmctl/v5.4.0/dmctl/dmctl --master-addr=192.168.0.94:8261 stop-task dm-task.yaml
{
    "op": "Stop",
    "result": true,
    "msg": "",
    "sources": [
        {
            "result": true,
            "msg": "",
            "source": "mysql-replica-01",
            "worker": "dm-192.168.0.95-8262"
        },
        {
            "result": true,
            "msg": "",
            "source": "mysql-replica-02",
            "worker": "dm-192.168.0.94-8262"
        }
    ]
}
- 查询 DM 复制操作是否停止
[root@db1 ~]# tiup dmctl --master-addr=192.168.0.94:8261 query-status dm-task.yaml
tiup is checking updates for component dmctl ...
Starting component `dmctl`: /root/.tiup/components/dmctl/v5.4.0/dmctl/dmctl /root/.tiup/components/dmctl/v5.4.0/dmctl/dmctl --master-addr=192.168.0.94:8261 query-status dm-task.yaml
{
    "result": false,
    "msg": "task dm-taskX has no source or not exist",
    "sources": [
    ]
}
Data Migration(DM)的管理
在练习三中, 我们将练习对于现有正在运行的 DM 集群进行扩容、缩容和状态查询管理。
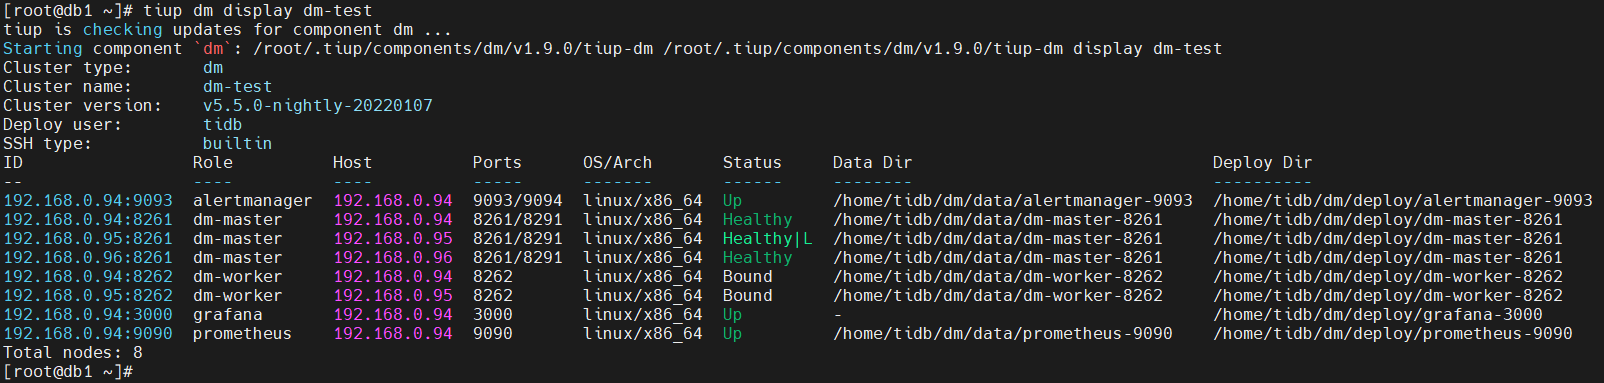
对于现有的 DM 集群进行扩容操作
- 查询当前的 DM 集群配置
[root@db1 ~]# tiup dm display dm-test
- 我们编辑扩容配置文件 dm-scale.yaml ,加入一个 worker 节点
[root@db1 ~]# cat dm-scale.yaml
worker_servers:
  - host: 192.168.0.96
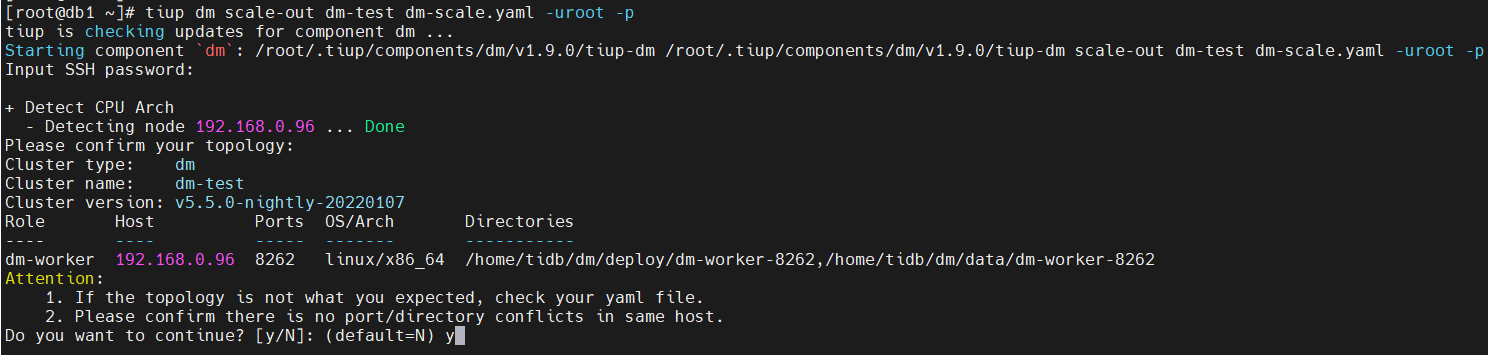
- 使用扩容配置文件,扩容现有 DM 集群
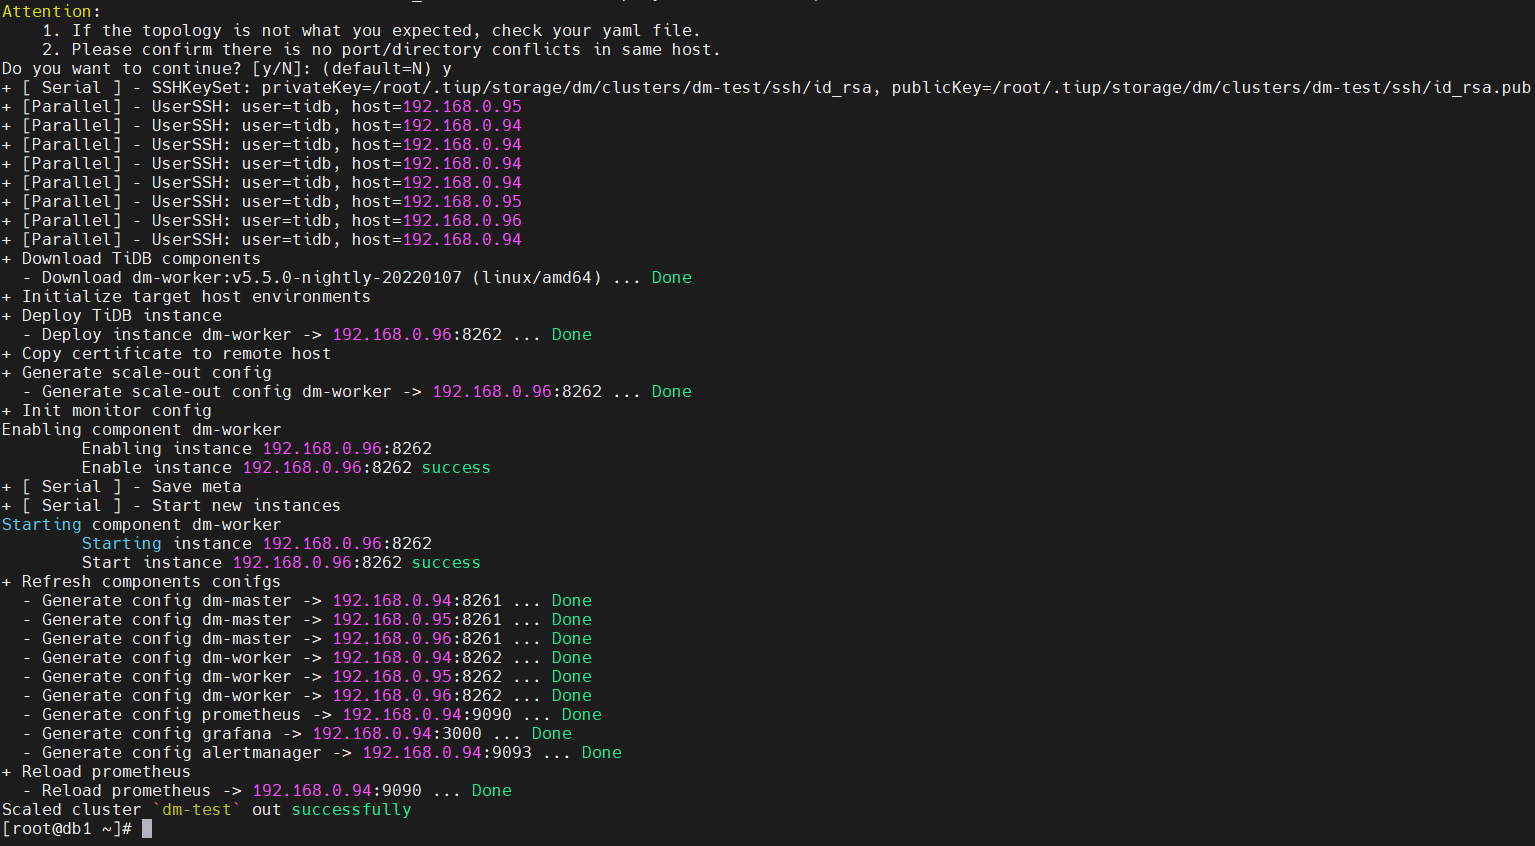
[root@db1 ~]# tiup dm scale-out dm-test dm-scale.yaml -uroot -p
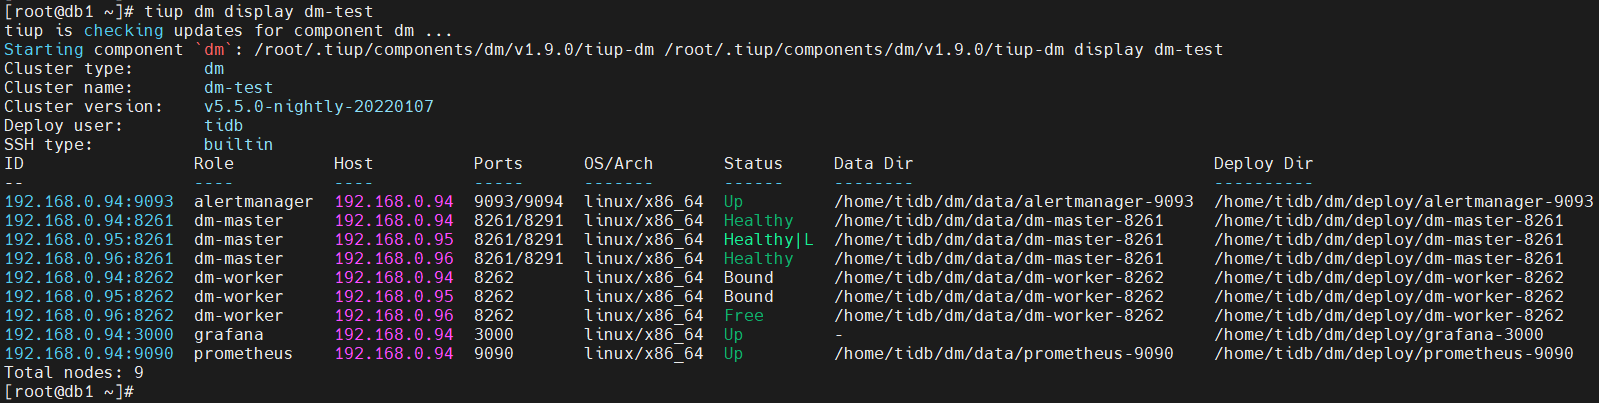
- 查询现有 DM 集群,是否新的 worker 节点加入
[root@db1 ~]# tiup dm display dm-test
缩容现有 DM 集群,将 worker 节点进行下线
[root@db1 ~]# tiup dm scale-in dm-test -N 192.168.0.96:8262
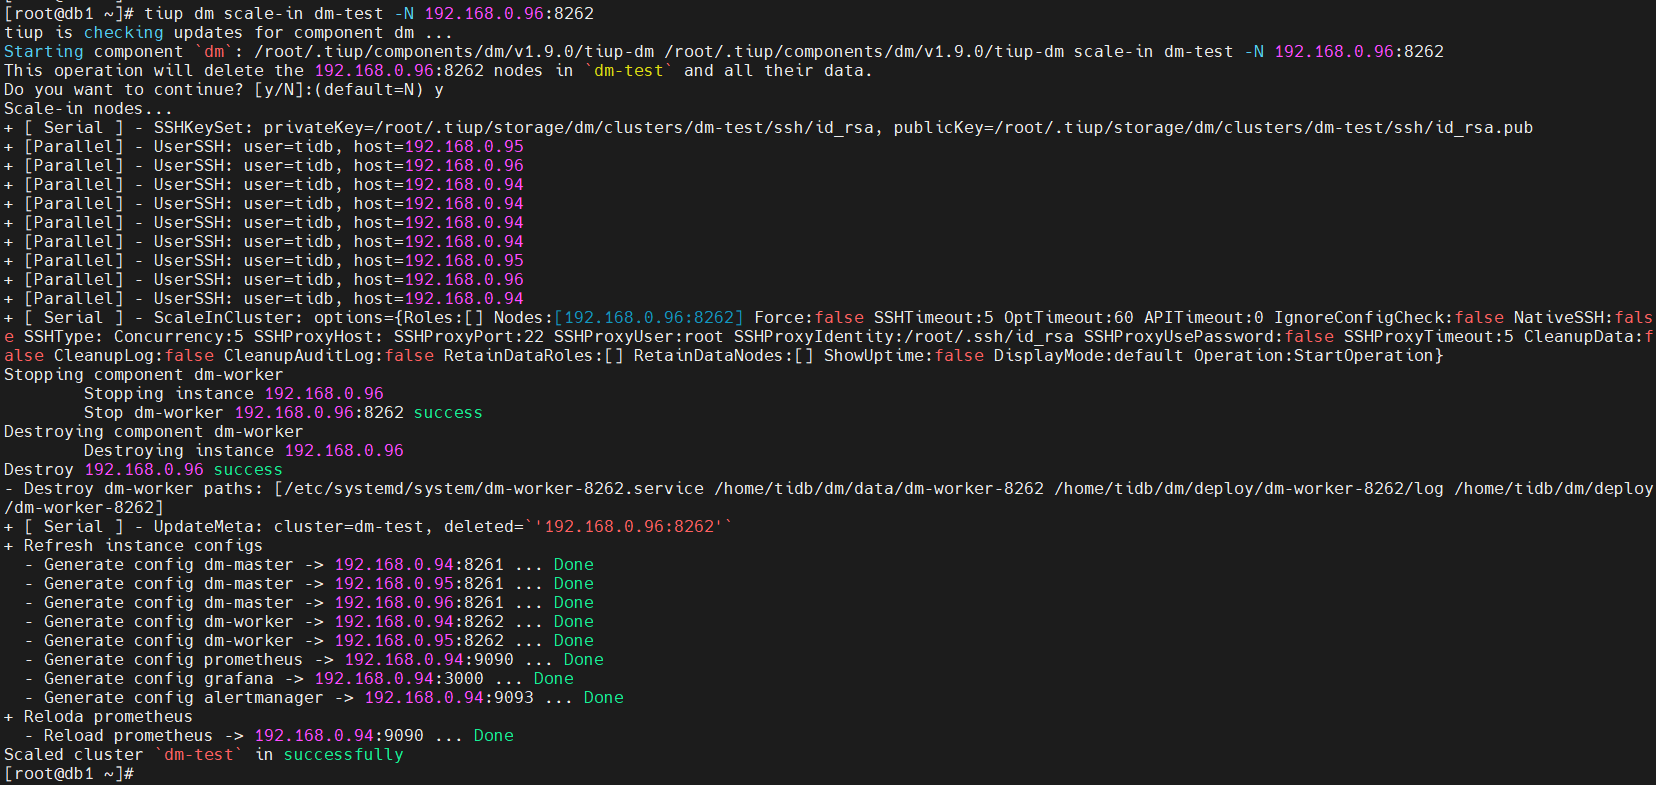
- 查询现有 DM 集群,是否指定的 worker 节点已经下线
[root@db1 ~]# tiup dm display dm-test

