


简介
Pgpool-II是一个在PostgreSQL服务器和PostgreSQL数据库客户端之间工作的中间件。它是根据BSD许可证授权的。它提供以下功能。
连接池
Pgpool-II保存与PostgreSQL服务器的连接,并在具有相同属性(即用户名,数据库,协议版本)的新连接进入时重用它们。它减少了连接开销,并提高了系统的整体吞吐量。
复制
Pgpool-II可以管理多个PostgreSQL服务器。使用复制功能可以在2个或更多物理磁盘上创建实时备份,以便在磁盘发生故障时服务可以继续运行而不会停止服务器。
负载均衡
如果复制了数据库,则在任何服务器上执行SELECT查询都将返回相同的结果。Pgpool-II利用复制功能,通过在多个服务器之间分配SELECT查询来减少每个PostgreSQL服务器的负载,从而提高系统的整体吞吐量。充其量,性能与PostgreSQL服务器的数量成比例地提高。在许多用户同时执行许多查询的情况下,负载平衡最有效。
限制超出连接
PostgreSQL的最大并发连接数有限制,连接在这么多连接后被拒绝。但是,设置最大连接数会增加资源消耗并影响系统性能。pgpool-II对最大连接数也有限制,但额外连接将排队,而不是立即返回错误。
看家狗
Watchdog可以协调多个Pgpool-II,创建一个强大的集群系统,避免单点故障或脑裂。看门狗可以对其他pgpool-II节点执行生命检查,以检测Pgpoll-II的故障。如果活动Pgpool-II发生故障,则可以将备用Pgpool-II提升为活动状态,并接管虚拟IP。
在内存查询缓存中
在内存中查询缓存允许保存一对SELECT语句及其结果。如果有相同的SELECT,Pgpool-II将从缓存中返回值。由于不涉及SQL解析或访问PostgreSQL,因此在内存缓存中使用速度非常快。另一方面,在某些情况下,它可能比正常路径慢,因为它增加了存储缓存数据的一些开销。
Pgpool-II讲PostgreSQL的后端和前端协议,并在后端和前端之间传递消息。因此,数据库应用程序(前端)认为Pgpool-II是实际的PostgreSQL服务器,服务器(后端)将Pgpool-II视为其客户端之一。因为Pgpool-II对服务器和客户端都是透明的,所以现有的数据库应用程序可以与Pgpool-II一起使用。Pgpool-II讲述PostgreSQL的后端和前端协议,并在它们之间传递连接。因此,数据库应用程序(前端)认为Pgpool-II是实际的PostgreSQL服务器,服务器(后端)将Pgpool-II视为其客户端之一。因为Pgpool-II对服务器和客户端都是透明的,所以现有的数据库应用程序可以与Pgpool-II一起使用,几乎不需要更改其源码。
watchdog是pgpool的核心组件,watchdog在 pgpool方案中扮演非常重要的角色,当启动pgpool时会启动watchdog子进程,主要作用为:
和pgpool后端PostgreSQL数据库节点以及远程pgpool节点进行通信。
对远程pgpool节点是否存活进行检查。
当watchdog子进程启动时,对本地pgpool的配置和远程pgpool的配置参数进行检查,并且输出本地和远程pgpool不一致的参数。
当pgpool主节点宕机时,watchdog集群将选举出新的 watchdog主节点。
当pgpool备节点激活成主节点时,watchdog负责将VIP飘移到新的pgpool节点。
相关文章
之前发布过几篇有关pgpool的文章:
【DB宝60】PG12高可用之1主2从流复制环境搭建及切换测试
【DB宝61】PostgreSQL使用Pgpool-II实现读写分离+负载均衡
PostgreSQL高可用之repmgr(1主2从+1witness)+Pgpool-II实现主从切换+读写分离+负载均衡
【DB宝72】pgpool-II和pgpoolAdmin的使用
PG高可用之主从流复制+keepalived 的高可用
有关pgpool-II的相关文档:
pgpool-II 3.2.5手册
pgpool-II-3.2.5入门教程
架构
本节显示了使用Pgpool-II的流式复制配置示例。在本例中,我们使用3台Pgpool-II服务器来管理PostgreSQL服务器,以创建一个健壮的集群系统,并避免单点故障或脑裂。
本配置示例中使用了PostgreSQL 14。所有脚本都经过PostgreSQL 10及更高版本的测试。
我们使用3台安装了CentOS 7.6的服务器,server1、server2、server3。我们在每台服务器上安装PostgreSQL 14和Pgpool II。
我们假设所有Pgpool-II服务器和PostgreSQL服务器都位于同一子网中。
本文架构图如下所示:
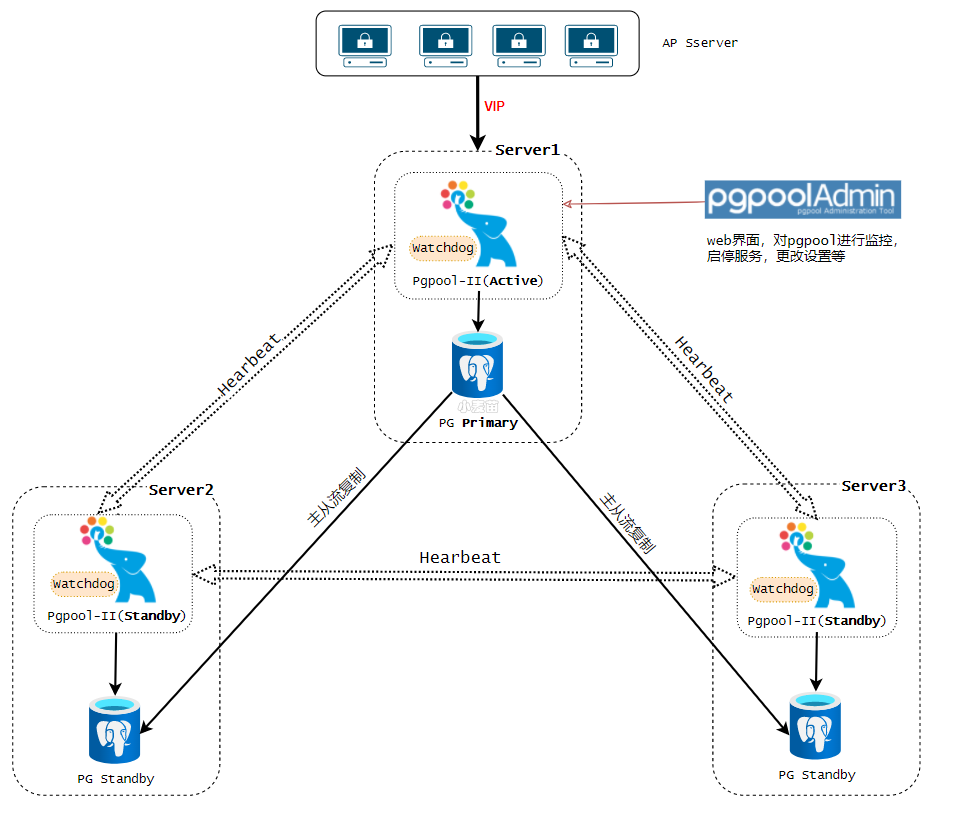
Note: Active, Standby, Primary, Standby 这些角色不是固定的,在后续的切换中是可以改变的。
如果是2个节点,那么架构可以变为:
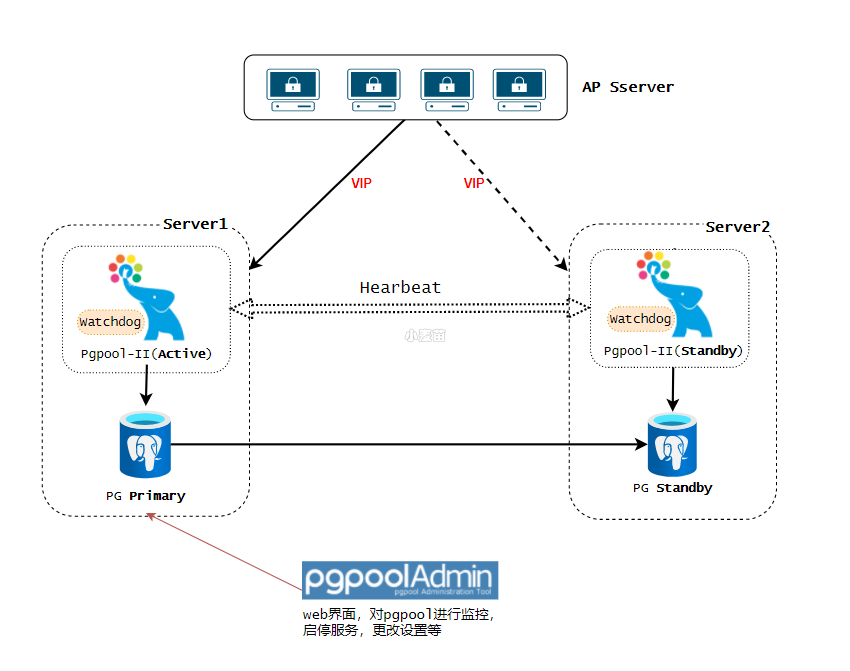
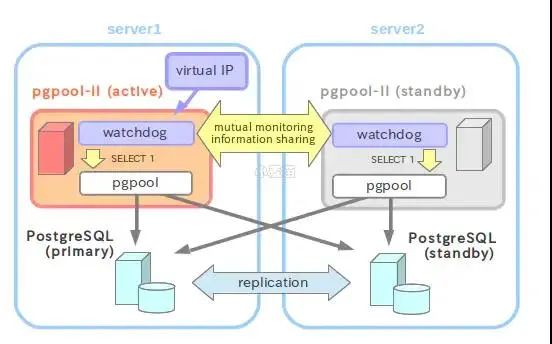
Table 1. 主机及IP地址
Hostname | IPAddress | VirtualIP | 别名 |
lhrpg30 | 172.72.6.30 | 172.72.6.35 | Server1 |
lhrpg31 | 172.72.6.31 | 172.72.6.35 | Server2 |
lhrpg32 | 172.72.6.32 | 172.72.6.35 | Server3 |
Table 2. PostgreSQL版本及配置
Item | Value | Detail |
PostgreSQLVersion | 14.2 | - |
Port | 5432 | - |
$PGDATA | /var/lib/pgsql/14/data | - |
Archivemode | on | /var/lib/pgsql/archivedir |
ReplicationSlots | Enable | - |
Startautomatically | Enable | - |
Table 3. Pgpool-II版本及配置
Item | Value | Detail |
Pgpool-II Version | 4.3.0 | - |
port | 9999 | Pgpool-II accepts connections |
9898 | PCP process accepts connections | |
9000 | watchdog accepts connections | |
9694 | UDP port for receiving Watchdog’s heartbeat signal | |
Config file | /etc/pgpool-II/pgpool.conf | Pgpool-II config file |
Pgpool-II start user | postgres (Pgpool-II 4.1 or later) | Pgpool-II 4.0 or before, the default startup user is root |
Running mode | streaming replication mode | - |
Watchdog | on | Life check method: heartbeat |
Start automatically | Enable | - |
Table 4. 示例脚本
Feature | Script | Detail |
Failover | /etc/pgpool-II/failover.sh.sample | Run by failover_command to perform failover |
/etc/pgpool-II/follow_primary.sh.sample | Run by follow_primary_command to synchronize the Standby with the new Primary after failover. | |
Online recovery | /etc/pgpool-II/recovery_1st_stage.sample | Run by recovery_1st_stage_command to recovery a Standby node |
/etc/pgpool-II/pgpool_remote_start.sample | Run after recovery_1st_stage_command to start the Standby node | |
Watchdog | /etc/pgpool-II/escalation.sh.sample | Run by wd_escalation_command to switch the Active/Standby Pgpool-II safely |
上述脚本包含在RPM包中,可以根据需要进行定制。
-- 网卡docker network create --subnet=172.72.6.0/24 pg-network-- 申请主机docker rm -f lhrpg30docker run -d --name lhrpg30 -h lhrpg30 \--net=pg-network --ip 172.72.6.30 \-p 64330:5432 -p 9930:9999 \-v /sys/fs/cgroup:/sys/fs/cgroup \--privileged=true lhrbest/lhrcentos76:8.5 \/usr/sbin/initdocker rm -f lhrpg31docker run -d --name lhrpg31 -h lhrpg31 \--net=pg-network --ip 172.72.6.31 \-p 64331:5432 -p 9931:9999 \-v /sys/fs/cgroup:/sys/fs/cgroup \--privileged=true lhrbest/lhrcentos76:8.5 \/usr/sbin/initdocker rm -f lhrpg32docker run -d --name lhrpg32 -h lhrpg32 \--net=pg-network --ip 172.72.6.32 \-p 64332:5432 -p 9932:9999 \-v /sys/fs/cgroup:/sys/fs/cgroup \--privileged=true lhrbest/lhrcentos76:8.5 \/usr/sbin/init[root@docker35 ~]# docker psCONTAINER ID IMAGE COMMAND CREATED STATUS PORTS NAMES84113aee6b76 lhrbest/lhrcentos76:8.5 '/usr/sbin/init' 50 seconds ago Up 47 seconds 0.0.0.0:64332->5432/tcp, :::64332->5432/tcp, 0.0.0.0:9932->9999/tcp, :::9932->9999/tcp lhrpg32cb9e1aa0798b lhrbest/lhrcentos76:8.5 '/usr/sbin/init' 52 seconds ago Up 50 seconds 0.0.0.0:64331->5432/tcp, :::64331->5432/tcp, 0.0.0.0:9931->9999/tcp, :::9931->9999/tcp lhrpg31f2b458ef2e7d lhrbest/lhrcentos76:8.5 '/usr/sbin/init' 55 seconds ago Up 52 seconds 0.0.0.0:64330->5432/tcp, :::64330->5432/tcp, 0.0.0.0:9930->9999/tcp, :::9930->9999/tcp lhrpg30
安装Pgpool-II和PostgreSQL 14
我们使用yum来安装Pgpool-II和PostgreSQL 14。
在3台机器都安装,如下:
yum安装PG 14.2
参考:【DB宝67】使用yum来安装PostgreSQL13.3数据库
yum install -y https://download.postgresql.org/pub/repos/yum/reporpms/EL-7-x86_64/pgdg-redhat-repo-latest.noarch.rpmyum install -y postgresql14 postgresql14-server postgresql14-contrib postgresql14-libs/usr/pgsql-14/bin/postgresql-14-setup initdbsystemctl disable postgresql-14systemctl start postgresql-14systemctl status postgresql-14echo 'postgres ALL=(ALL) NOPASSWD: ALL' >> /etc/sudoersecho 'export PS1='[\u@\h \W]$ '' >> /etc/profileecho 'postgres:lhr' | chpasswdecho 'export PATH=/usr/pgsql-14/bin:$PATH' >> /etc/profile
yum安装pgpool-II
https://www.pgpool.net/yum/rpms/
https://www.pgpool.net/mediawiki/index.php/Yum_Repository
https://www.pgpool.net/docs/latest/en/html/install-rpm.html
yum install -y https://www.pgpool.net/yum/rpms/4.3/redhat/rhel-7-x86_64/pgpool-II-release-4.3-1.noarch.rpmyum install -y pgpool-II pgpool-II-pg14-extensions-- 会安装如下四个包:Installing : libmemcached-1.0.16-5.el7.x86_64 1/4Installing : pgpool-II-pcp-4.3.1-1.rhel7.x86_64 2/4Installing : pgpool-II-4.3.1-1.rhel7.x86_64 3/4Installing : pgpool-II-pg14-extensions-4.3.1-1.rhel7.x86_64systemctl disable pgpool-II.service
Note: 如果设置Pgpool-II自动启动,则需要将 search_primary_node_timeout更改为适当的值,以便在服务器启动后启动PostgreSQL。如果Pgpool-II在 search_primary_node_timeout期间无法连接到后端的PostgreSQL,它将失败。
准备工作
在server1操作即可。
配置归档
su - postgresmkdir -p /var/lib/pgsql/archivedir-- 配置允许PG远程登录,注意版本:cat >> /var/lib/pgsql/14/data/postgresql.conf <<'EOF'listen_addresses = '*'port=5432unix_socket_directories='/var/run/postgresql/'logging_collector = onlog_directory = 'pg_log'log_filename = 'postgresql-%a.log'log_truncate_on_rotation = onarchive_mode = onarchive_command = 'cp '%p' '/var/lib/pgsql/archivedir/%f''max_wal_senders = 10max_replication_slots = 10wal_level = replicahot_standby = onwal_log_hints = onpassword_encryption = 'md5'EOFcat > /var/lib/pgsql/14/data/pg_hba.conf << 'EOF'# TYPE DATABASE USER ADDRESS METHODlocal all all trusthost all all ::1/128 trusthost all all 127.0.0.1/32 trusthost all all 172.72.6.0/24 trusthost all all 0.0.0.0/0 md5host replication all 0.0.0.0/0 md5EOFsudo systemctl restart postgresql-14systemctl status postgresql-14
Server1配置用户
Table 6. Users
| User Name | Password | Detail |
|---|---|---|
| repl | repl | PostgreSQL复制用户 |
| pgpool | pgpool | Pgpool-II health check (health_check_user) and replication delay check (sr_check_user) user |
| postgres | postgres | User running online recovery |
psql -U postgres -p 5432
CREATE ROLE pgpool WITH LOGIN;
CREATE ROLE repl WITH REPLICATION LOGIN;
alter user postgres with encrypted password 'lhr';
alter user pgpool with encrypted password 'lhr';
alter user repl with encrypted password 'lhr';
GRANT pg_monitor TO pgpool;
配置互信
chmod +x ./sshUserSetup.sh./sshUserSetup.sh -user root -hosts 'lhrpg30 lhrpg31 lhrpg32' -advanced exverify -confirm./sshUserSetup.sh -user postgres -hosts 'lhrpg30 lhrpg31 lhrpg32' -advanced exverify -confirmcp /var/lib/pgsql/.ssh/id_rsa /var/lib/pgsql/.ssh/id_rsa_pgpoolcp /var/lib/pgsql/.ssh/id_rsa.pub /var/lib/pgsql/.ssh/id_rsa_pgpool.pubchown -R postgres.postgres /var/lib/pgsql/.ssh/cp /root/.ssh/id_rsa /root/.ssh/id_rsa_pgpoolcp /root/.ssh/id_rsa.pub /root/.ssh/id_rsa_pgpool.pub
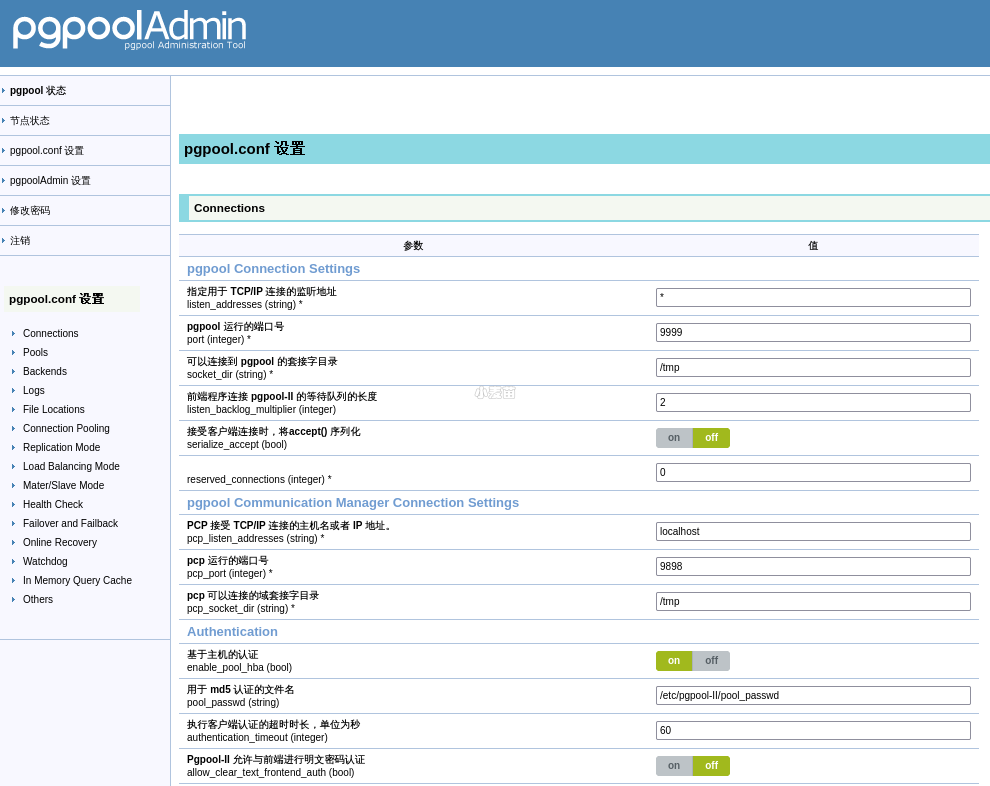
pgpool配置
创建pgpool的密码文件
注意:/var/lib/pgsqll为postgres用的家目录。
-- 配置psql的密码cat > /var/lib/pgsql/.pgpass <<'EOF'172.72.6.30:5432:replication:repl:lhr172.72.6.31:5432:replication:repl:lhr172.72.6.32:5432:replication:repl:lhr172.72.6.35:9999:postgres:pgpool:lhr172.72.6.35:9999:postgres:postgres:lhrlhrpg30:5432:replication:repl:lhrlhrpg31:5432:replication:repl:lhrlhrpg32:5432:replication:repl:lhrlhrpg30:5432:postgres:postgres:lhrlhrpg31:5432:postgres:postgres:lhrlhrpg32:5432:postgres:postgres:lhrEOFchown postgres.postgres /var/lib/pgsql/.pgpasschmod 600 /var/lib/pgsql/.pgpassecho 'localhost:9898:pgpool:lhr' > /var/lib/pgsql/.pcppasschmod 600 /var/lib/pgsql/.pcppasschown postgres.postgres /var/lib/pgsql/.pcppassecho 'pgpool:'`pg_md5 -u=pgpool lhr` >> /etc/pgpool-II/pcp.conf
创建pgpool_node_id
server11.echo '0' > /etc/pgool-II/pgpool_node_id
1.echo '1' > /etc/pgool-II/pgpool_node_id
1.echo '2' > /etc/pgool-II/pgpool_node_id
server2
server3
Pgpool-II参数配置
cat > /etc/pgpool-II/pgpool.conf <<'EOF'backend_clustering_mode = 'streaming_replication'# - pgpool Connection Settings -listen_addresses = '*'port=9999# - Streaming Replication Checksr_check_user = 'pgpool'sr_check_password = ''# - Health Checkhealth_check_period = 5health_check_timeout = 30health_check_user = 'pgpool'health_check_password = 'lhr'health_check_max_retries = 3search_primary_node_timeout = 10min# - Backend Connection Settings -backend_hostname0 = '172.72.6.30'backend_port0 = 5432backend_weight0 = 1backend_data_directory0 = '/var/lib/pgsql/14/data'backend_flag0 = 'ALLOW_TO_FAILOVER'backend_application_name0 = 'server1'backend_hostname1 = '172.72.6.31'backend_port1 = 5432backend_weight1 = 1backend_data_directory1 = '/var/lib/pgsql/14/data'backend_flag1 = 'ALLOW_TO_FAILOVER'backend_application_name0 = 'server2'backend_hostname2 = '172.72.6.32'backend_port2 = 5432backend_weight2 = 1backend_data_directory2 = '/var/lib/pgsql/14/data'backend_flag2 = 'ALLOW_TO_FAILOVER'backend_application_name0 = 'server3'# - Failover configurationfailover_command = '/etc/pgpool-II/failover.sh %d %h %p %D %m %H %M %P %r %R %N %S'follow_primary_command = '/etc/pgpool-II/follow_primary.sh %d %h %p %D %m %H %M %P %r %R'# - Online Recovery Configurationsrecovery_user = 'postgres'recovery_password = 'lhr'recovery_1st_stage_command = 'recovery_1st_stage'# - Client Authentication Configurationenable_pool_hba = onpool_passwd = '/etc/pgpool-II/pool_passwd'# - Watchdog Configurationuse_watchdog = ondelegate_IP = '172.72.6.35'if_up_cmd = '/usr/bin/sudo /sbin/ip addr add $_IP_$/24 dev eth0 label eth0:1'if_down_cmd = '/usr/bin/sudo /sbin/ip addr del $_IP_$/24 dev eth0'arping_cmd = '/usr/bin/sudo /usr/sbin/arping -U $_IP_$ -w 1 -I eth0'hostname0 = '172.72.6.30'wd_port0 = 9000pgpool_port0 = 9999hostname1 = '172.72.6.31'wd_port1 = 9000pgpool_port1 = 9999hostname2 = '172.72.6.32'wd_port2 = 9000pgpool_port2 = 9999wd_lifecheck_method = 'heartbeat'wd_interval = 10heartbeat_hostname0 = '172.72.6.30'heartbeat_port0 = 9694heartbeat_device0 = ''heartbeat_hostname1 = '172.72.6.31'heartbeat_port1 = 9694heartbeat_device1 = ''heartbeat_hostname2 = '172.72.6.32'heartbeat_port2 = 9694heartbeat_device2 = ''wd_heartbeat_keepalive = 2wd_heartbeat_deadtime = 30wd_escalation_command = '/etc/pgpool-II/escalation.sh'# - Where to log -log_destination = 'stderr'logging_collector = onlog_directory = '/var/log/pgpool-II'log_filename = 'pgpool-%Y-%m-%d_%H%M%S.log'log_truncate_on_rotation = onlog_rotation_age = 1dlog_rotation_size = 10MBpid_file_name = '/var/run/postgresql/pgpool.pid'#------------------------------------------------------------------------------# LOAD BALANCING MODE#------------------------------------------------------------------------------load_balance_mode = onEOFcp -p /etc/pgpool-II/failover.sh{.sample,}cp -p /etc/pgpool-II/follow_primary.sh{.sample,}chown postgres:postgres /etc/pgpool-II/{failover.sh,follow_primary.sh}chmod +x /etc/pgpool-II/{failover.sh,follow_primary.sh}cp -p /etc/pgpool-II/recovery_1st_stage.sample /var/lib/pgsql/14/data/recovery_1st_stagecp -p /etc/pgpool-II/pgpool_remote_start.sample /var/lib/pgsql/14/data/pgpool_remote_startchown postgres:postgres /var/lib/pgsql/14/data/{recovery_1st_stage,pgpool_remote_start}chmod +x /var/lib/pgsql/14/data/{recovery_1st_stage,pgpool_remote_start}su - postgrespsql template1 -c 'CREATE EXTENSION pgpool_recovery'psql postgres -c 'CREATE EXTENSION pgpool_recovery'echo 'host all all 0.0.0.0/0 md5' >> /etc/pgpool-II/pool_hba.conf-- cat /etc/pgpool-II/pool_passwdpg_md5 --md5auth --username=pgpool 'lhr'pg_md5 --md5auth --username=postgres 'lhr'cat > /etc/pgpool-II/escalation.sh <<'EOF'#!/bin/bash# This script is run by wd_escalation_command to bring down the virtual IP on other pgpool nodes# before bringing up the virtual IP on the new active pgpool node.set -o xtracePGPOOLS=(172.72.6.30 172.72.6.31 172.72.6.32)VIP=172.72.6.35DEVICE=eth0for pgpool in '${PGPOOLS[@]}'; do[ '$HOSTNAME' = '$pgpool' ] && continuessh -T -o StrictHostKeyChecking=no -o UserKnownHostsFile=/dev/null postgres@$pgpool -i ~/.ssh/id_rsa_pgpool '/usr/bin/sudo /sbin/ip addr del $VIP/24 dev $DEVICE'doneexit 0EOFchown postgres:postgres /etc/pgpool-II/escalation.shchmod +x /etc/pgpool-II/*.shchown postgres:postgres /etc/pgpool-II/*.conf
故障转移配置
在failover_command参数中执行故障转移后要执行的shell脚本。如果我们使用3台PostgreSQL服务器,我们需要指定follow_primary_command,以便在主节点故障转移后运行。对于两台PostgreSQL服务器,不需要设置follow_primary_command
failover_command = '/etc/pgpool-II/failover.sh %d %h %p %D %m %H %M %P %r %R %N %S'follow_primary_command = '/etc/pgpool-II/follow_primary.sh %d %h %p %D %m %H %M %P %r %R'
示例脚本failover.sh和follow_primary.sh安装在/etc/pgpool-II/中。可以使用这些示例文件创建故障转移脚本。
cp -p /etc/pgpool-II/failover.sh{.sample,}cp -p /etc/pgpool-II/follow_primary.sh{.sample,}chown postgres:postgres /etc/pgpool-II/{failover.sh,follow_primary.sh}chmod +x /etc/pgpool-II/{failover.sh,follow_primary.sh}
注意脚本failover.sh
和follow_primary.sh
中的PGHOME是否配置正确。脚本follow_primary.sh
中的PCP_USER为pgpool。
Pgpool-II在线恢复配置
为了使用Pgpool II执行在线恢复,我们指定PostgreSQL用户名和在线恢复命令recovery_1st_stage。因为执行在线恢复需要PostgreSQL中的超级用户权限,所以我们在recovery_user中指定postgres_user。然后,我们在PostgreSQL主服务器(server1)的数据库集群目录中创建recovery_1st_stage和pgpool_remote_start,并添加执行权限。
recovery_user = 'postgres'recovery_password = 'lhr'recovery_1st_stage_command = 'recovery_1st_stage'
在线恢复示例脚本recovery_First_stage和pgpool_remote_start安装在/etc/pgpool II/中。将这些文件复制到主服务器(server1)的数据目录。
cp -p /etc/pgpool-II/recovery_1st_stage.sample /var/lib/pgsql/14/data/recovery_1st_stagecp -p /etc/pgpool-II/pgpool_remote_start.sample /var/lib/pgsql/14/data/pgpool_remote_startchown postgres:postgres /var/lib/pgsql/14/data/{recovery_1st_stage,pgpool_remote_start}
Basically, it should work if you change PGHOME according to PostgreSQL installation directory.
注意脚本recovery_1st_stage
和pgpool_remote_start
中的PGHOME是否配置正确。脚本follow_primary.sh
中的PCP_USER为pgpool。
为了使用在线恢复功能,需要pgpool_recovery、pgpool_remote_start、pgpool_switch_xlog等功能,因此我们需要在PostgreSQL server server1的template1上安装pgpool_recovery。
su - postgrespsql template1 -c 'CREATE EXTENSION pgpool_recovery'
配置/etc/pgpool-II/pool_hba.conf
-- cat /etc/pgpool-II/pool_passwdpg_md5 --md5auth --username=pgpool 'lhr'pg_md5 --md5auth --username=postgres 'lhr'
Watchdog配置
cat > /etc/pgpool-II/escalation.sh <<'EOF'#!/bin/bash# This script is run by wd_escalation_command to bring down the virtual IP on other pgpool nodes# before bringing up the virtual IP on the new active pgpool node.set -o xtracePGPOOLS=(172.72.6.30 172.72.6.31 172.72.6.32)VIP=172.72.6.35DEVICE=eth0for pgpool in '${PGPOOLS[@]}'; do[ '$HOSTNAME' = '$pgpool' ] && continuessh -T -o StrictHostKeyChecking=no -o UserKnownHostsFile=/dev/null postgres@$pgpool -i ~/.ssh/id_rsa_pgpool '/usr/bin/sudo /sbin/ip addr del $VIP/24 dev $DEVICE'doneexit 0EOFchown postgres:postgres /etc/pgpool-II/escalation.shchmod +x /etc/pgpool-II/escalation.sh
启动Pgpool-II
在启动Pgpool-II之前,请先启动PostgreSQL;在关闭PostgreSQL之前,请先关闭Pgpool-II
systemctl start pgpool-II.servicesystemctl status pgpool-II.service
过程:
[root@lhrpg32 data]# systemctl start pgpool-II.service[root@lhrpg32 data]# systemctl status pgpool-II.service● pgpool-II.service - PGPool-II Middleware Between PostgreSQL Servers And PostgreSQL Database ClientsLoaded: loaded (/usr/lib/systemd/system/pgpool-II.service; disabled; vendor preset: disabled)Active: active (running) since Wed 2022-02-23 16:20:55 CST; 373ms agoMain PID: 7279 (pgpool)CGroup: /docker/84113aee6b76f386a21bd9990d098af5a5720410d71245c74998d749926e8385/system.slice/pgpool-II.service├─7279 /usr/bin/pgpool -f /etc/pgpool-II/pgpool.conf -n -D├─7280 pgpool: PgpoolLogger└─7282 pgpool: watchdogFeb 23 16:20:55 lhrpg32 systemd[1]: Started PGPool-II Middleware Between PostgreSQL Servers And PostgreSQL Database Clients.Feb 23 16:20:55 lhrpg32 pgpool[7279]: 2022-02-23 16:20:55.552: main pid 7279: LOG: Backend status file /tmp/pgpool_status does not existFeb 23 16:20:55 lhrpg32 pgpool[7279]: 2022-02-23 16:20:55.553: main pid 7279: LOG: redirecting log output to logging collector processFeb 23 16:20:55 lhrpg32 pgpool[7279]: 2022-02-23 16:20:55.553: main pid 7279: HINT: Future log output will appear in directory '/var/log/pgpool_log'.[root@lhrpg32 data]# systemctl status pgpool-II.service● pgpool-II.service - PGPool-II Middleware Between PostgreSQL Servers And PostgreSQL Database ClientsLoaded: loaded (/usr/lib/systemd/system/pgpool-II.service; disabled; vendor preset: disabled)Active: active (running) since Wed 2022-02-23 16:20:55 CST; 11s agoMain PID: 7279 (pgpool)CGroup: /docker/84113aee6b76f386a21bd9990d098af5a5720410d71245c74998d749926e8385/system.slice/pgpool-II.service├─7279 /usr/bin/pgpool -f /etc/pgpool-II/pgpool.conf -n -D├─7280 pgpool: PgpoolLogger├─7282 pgpool: watchdog├─7288 pgpool: lifecheck├─7289 pgpool: heartbeat receiver├─7290 pgpool: heartbeat sender├─7291 pgpool: heartbeat receiver├─7292 pgpool: heartbeat sender├─7293 pgpool: wait for connection request├─7294 pgpool: wait for connection request├─7295 pgpool: wait for connection request├─7296 pgpool: wait for connection request├─7297 pgpool: wait for connection request├─7298 pgpool: wait for connection request├─7299 pgpool: wait for connection request├─7300 pgpool: wait for connection request├─7301 pgpool: wait for connection request├─7302 pgpool: wait for connection request├─7303 pgpool: wait for connection request├─7304 pgpool: wait for connection request├─7305 pgpool: wait for connection request├─7306 pgpool: wait for connection request├─7307 pgpool: wait for connection request├─7308 pgpool: wait for connection request├─7309 pgpool: wait for connection request├─7310 pgpool: wait for connection request├─7311 pgpool: wait for connection request├─7312 pgpool: wait for connection request├─7313 pgpool: wait for connection request├─7314 pgpool: wait for connection request├─7315 pgpool: wait for connection request├─7316 pgpool: wait for connection request├─7317 pgpool: wait for connection request├─7318 pgpool: wait for connection request├─7319 pgpool: wait for connection request├─7320 pgpool: wait for connection request├─7321 pgpool: wait for connection request├─7322 pgpool: wait for connection request├─7323 pgpool: wait for connection request└─7324 pgpool: wait for connection requestFeb 24 09:33:14 lhrpg30 systemd[1]: Started PGPool-II Middleware Between PostgreSQL Servers And PostgreSQL Database Clients.Feb 24 09:33:14 lhrpg30 pgpool[3256]: 2022-02-24 09:33:14.596: main pid 3256: LOG: Backend status file /tmp/pgpool_status does not existFeb 24 09:33:14 lhrpg30 pgpool[3256]: 2022-02-24 09:33:14.597: main pid 3256: LOG: redirecting log output to logging collector processFeb 24 09:33:14 lhrpg30 pgpool[3256]: 2022-02-24 09:33:14.597: main pid 3256: HINT: Future log output will appear in directory '/var/log/pgpool-II'.Feb 24 09:33:27 lhrpg30 sudo[3330]: postgres : TTY=unknown ; PWD=/ ; USER=root ; COMMAND=/sbin/ip addr add 172.72.6.35/24 dev eth0 label eth0:1Feb 24 09:33:27 lhrpg30 sudo[3332]: postgres : TTY=unknown ; PWD=/ ; USER=root ; COMMAND=/usr/sbin/arping -U 172.72.6.35 -w 1 -I eth0[root@lhrpg30 pgpool-II]# ifconfigeth0: flags=4163<UP,BROADCAST,RUNNING,MULTICAST> mtu 1500inet 172.72.6.30 netmask 255.255.255.0 broadcast 172.72.6.255ether 02:42:ac:48:06:1e txqueuelen 0 (Ethernet)RX packets 34373 bytes 39051830 (37.2 MiB)RX errors 0 dropped 0 overruns 0 frame 0TX packets 27310 bytes 1702331 (1.6 MiB)TX errors 0 dropped 0 overruns 0 carrier 0 collisions 0eth0:1: flags=4163<UP,BROADCAST,RUNNING,MULTICAST> mtu 1500inet 172.72.6.35 netmask 255.255.255.0 broadcast 0.0.0.0ether 02:42:ac:48:06:1e txqueuelen 0 (Ethernet)lo: flags=73<UP,LOOPBACK,RUNNING> mtu 65536inet 127.0.0.1 netmask 255.0.0.0loop txqueuelen 1000 (Local Loopback)RX packets 1907 bytes 500420 (488.6 KiB)RX errors 0 dropped 0 overruns 0 frame 0TX packets 1907 bytes 500420 (488.6 KiB)TX errors 0 dropped 0 overruns 0 carrier 0 collisions 0
节点1已经有VIP了。
配置PostgreSQL主备库
3个节点都启动pgpool:
systemctl start pgpool-II.service
systemctl status pgpool-II.service
首先,我们应该使用Pgpool-II在线恢复功能设置PostgreSQL备用服务器。确保pcp_recovery_node命令使用的recovery_1st_stage和pgpool_remote_start脚本位于PostgreSQL主服务器(server1)的数据库群集目录中。
[postgres@lhrpg30 data]$ pcp_recovery_node -h 172.72.6.30 -p 9898 -U pgpool -n 1
Password:
pcp_recovery_node -- Command Successful

[postgres@lhrpg30 data]$ pcp_recovery_node -h 172.72.6.30 -p 9898 -U pgpool -n 2
Password:
pcp_recovery_node -- Command Successful
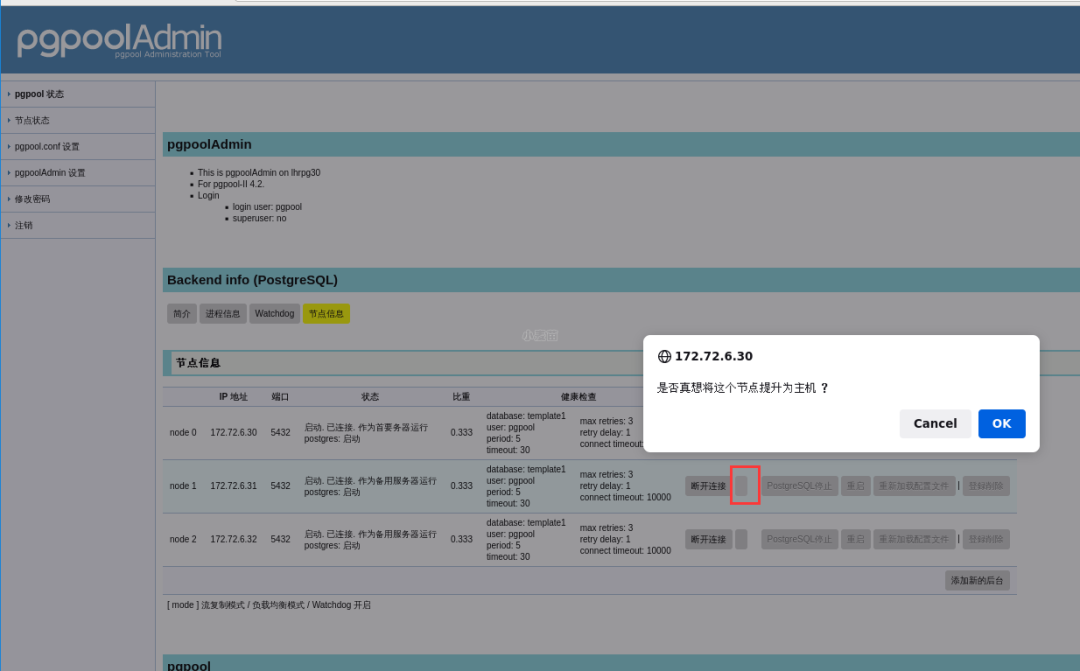
在执行pcp_recovery_node命令后,验证server2和server3是否作为PostgreSQL备用服务器启动。
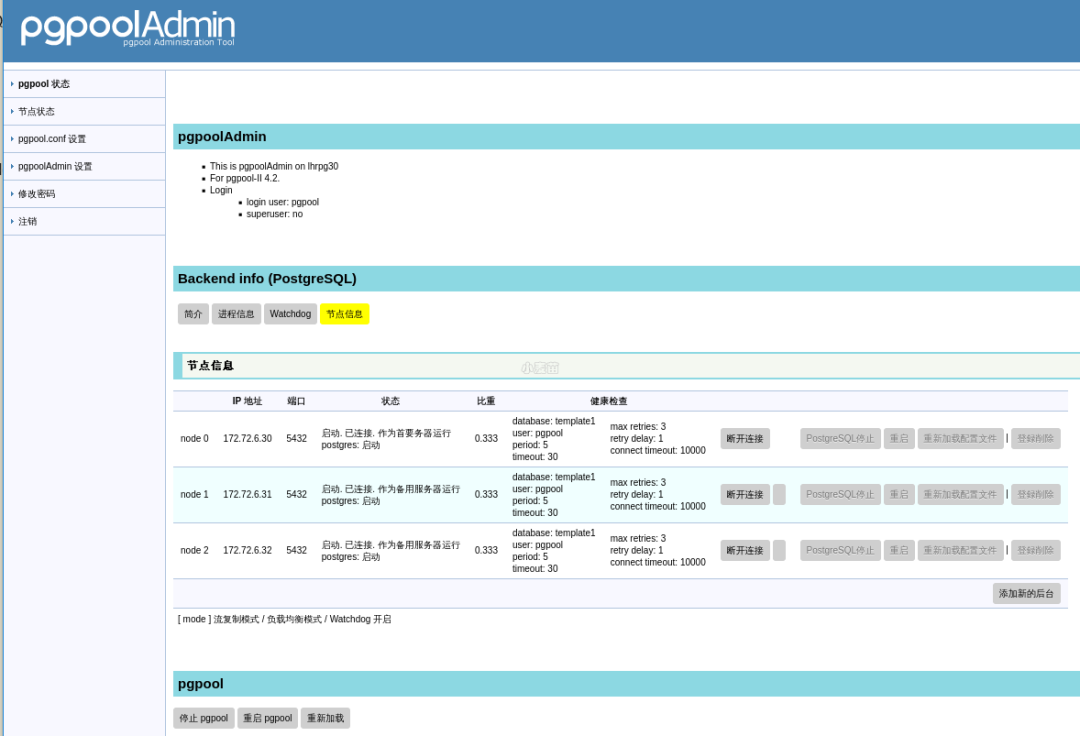
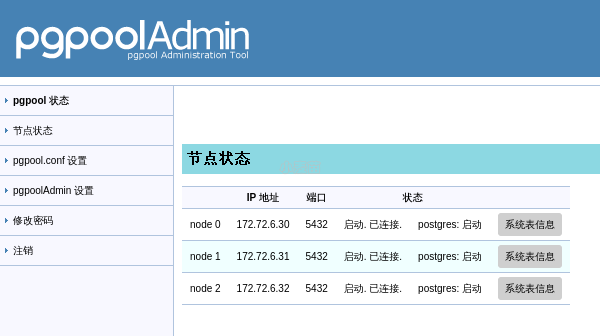
[postgres@lhrpg30 data]$ psql -h 172.72.6.35 -p 9999 -U pgpool postgres -c 'show pool_nodes'
 node_id |  hostname   | port | status | pg_status | lb_weight |  role   | pg_role | select_cnt | load_balance_node | replication_delay | replication_state | replication_sync_state | last_status_change
---------+-------------+------+--------+-----------+-----------+---------+---------+------------+-------------------+-------------------+-------------------+------------------------+---------------------
 0       | 172.72.6.30 | 5432 | up     | up        | 0.333333  | primary | primary | 0          | false             | 0                 |                   |                        | 2022-02-24 10:01:09
 1       | 172.72.6.31 | 5432 | up     | up        | 0.333333  | standby | standby | 0          | false             | 0                 |                   |                        | 2022-02-24 10:50:54
 2       | 172.72.6.32 | 5432 | up     | up        | 0.333333  | standby | standby | 0          | true              | 0                 |                   |                        | 2022-02-24 10:50:54
(3 rows)
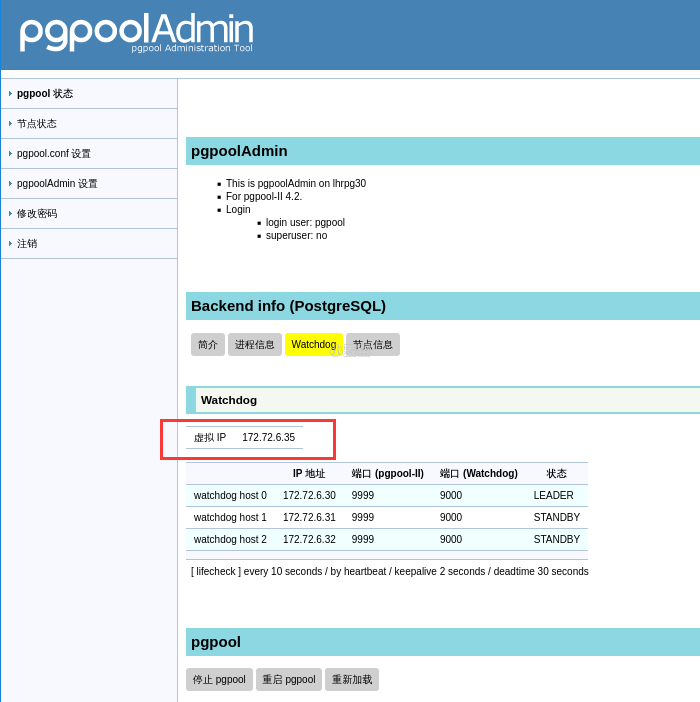
切换active/standby watchdog
[root@lhrpg30 pgpool_log]# pcp_watchdog_info -h 172.72.6.35 -p 9898 -U pgpool
Password:
3 3 YES 172.72.6.30:9999 Linux lhrpg30 172.72.6.30

172.72.6.30:9999 Linux lhrpg30 172.72.6.30 9999 9000 4 LEADER 0 MEMBER #The Pgpool-II server started first became 'LEADER'.
172.72.6.31:9999 Linux lhrpg31 172.72.6.31 9999 9000 7 STANDBY 0 MEMBER #run as standby
172.72.6.32:9999 Linux lhrpg32 172.72.6.32 9999 9000 7 STANDBY 0 MEMBER #run as standby
停止server1节点或者停止server1上的Pgpool-II服务:
[postgres@lhrpg30 data]$ ifconfig
eth0: flags=4163<UP,BROADCAST,RUNNING,MULTICAST>  mtu 1500
        inet 172.72.6.30  netmask 255.255.255.0  broadcast 172.72.6.255
        ether 02:42:ac:48:06:1e  txqueuelen 0  (Ethernet)
        RX packets 13542377  bytes 1195679259 (1.1 GiB)
        RX errors 0  dropped 0  overruns 0  frame 0
        TX packets 9497810  bytes 872759308 (832.3 MiB)
        TX errors 0  dropped 0 overruns 0  carrier 0  collisions 0

eth0:1: flags=4163<UP,BROADCAST,RUNNING,MULTICAST>  mtu 1500
        inet 172.72.6.35  netmask 255.255.255.0  broadcast 0.0.0.0
        ether 02:42:ac:48:06:1e  txqueuelen 0  (Ethernet)

lo: flags=73<UP,LOOPBACK,RUNNING>  mtu 65536
        inet 127.0.0.1  netmask 255.0.0.0
        loop  txqueuelen 1000  (Local Loopback)
        RX packets 59053  bytes 20664387 (19.7 MiB)
        RX errors 0  dropped 0  overruns 0  frame 0
        TX packets 59053  bytes 20664387 (19.7 MiB)
        TX errors 0  dropped 0 overruns 0  carrier 0  collisions 0

[postgres@lhrpg30 data]$
[postgres@lhrpg30 data]$
[postgres@lhrpg30 data]$
[postgres@lhrpg30 data]$ cd
[postgres@lhrpg30 ~]$
[postgres@lhrpg30 ~]$
[postgres@lhrpg30 ~]$ systemctl stop pgpool-II.service
==== AUTHENTICATING FOR org.freedesktop.systemd1.manage-units ===
Authentication is required to manage system services or units.
Authenticating as: root
Password:
==== AUTHENTICATION COMPLETE ===
[postgres@lhrpg30 ~]$
[postgres@lhrpg30 ~]$ ifconfig
eth0: flags=4163<UP,BROADCAST,RUNNING,MULTICAST>  mtu 1500
        inet 172.72.6.30  netmask 255.255.255.0  broadcast 172.72.6.255
        ether 02:42:ac:48:06:1e  txqueuelen 0  (Ethernet)
        RX packets 13543714  bytes 1195859958 (1.1 GiB)
        RX errors 0  dropped 0  overruns 0  frame 0
        TX packets 9499106  bytes 872937513 (832.4 MiB)
        TX errors 0  dropped 0 overruns 0  carrier 0  collisions 0

lo: flags=73<UP,LOOPBACK,RUNNING>  mtu 65536
        inet 127.0.0.1  netmask 255.0.0.0
        loop  txqueuelen 1000  (Local Loopback)
        RX packets 60393  bytes 21167594 (20.1 MiB)
        RX errors 0  dropped 0  overruns 0  frame 0
        TX packets 60393  bytes 21167594 (20.1 MiB)
        TX errors 0  dropped 0 overruns 0  carrier 0  collisions 0

[postgres@lhrpg30 ~]$  pcp_watchdog_info -h 172.72.6.35 -p 9898 -U pgpool
Password:
3 3 YES 172.72.6.32:9999 Linux lhrpg32 172.72.6.32

172.72.6.32:9999 Linux lhrpg32 172.72.6.32 9999 9000 4 LEADER 0 MEMBER
172.72.6.30:9999 Linux lhrpg30 172.72.6.30 9999 9000 10 SHUTDOWN 0 MEMBER
172.72.6.31:9999 Linux lhrpg31 172.72.6.31 9999 9000 7 STANDBY 0 MEMBER
启动server1上的Pgpool-II服务, 该服务会以standby角色运行:
[postgres@lhrpg30 ~]$ sudo systemctl start pgpool-II.service
[postgres@lhrpg30 ~]$  pcp_watchdog_info -h 172.72.6.35 -p 9898 -U pgpool
Password:
3 3 YES 172.72.6.32:9999 Linux lhrpg32 172.72.6.32

172.72.6.32:9999 Linux lhrpg32 172.72.6.32 9999 9000 4 LEADER 0 MEMBER
172.72.6.30:9999 Linux lhrpg30 172.72.6.30 9999 9000 7 STANDBY 0 MEMBER
172.72.6.31:9999 Linux lhrpg31 172.72.6.31 9999 9000 7 STANDBY 0 MEMBER
Failover
[postgres@lhrpg30 ~]$ psql -h 172.72.6.35 -p 9999 -U pgpool postgres -c 'show pool_nodes'
 node_id |  hostname   | port | status | pg_status | lb_weight |  role   | pg_role | select_cnt | load_balance_node | replication_delay | replication_state | replication_sync_state | last_status_change
---------+-------------+------+--------+-----------+-----------+---------+---------+------------+-------------------+-------------------+-------------------+------------------------+---------------------
 0       | 172.72.6.30 | 5432 | up     | up        | 0.333333  | primary | primary | 0          | true              | 0                 |                   |                        | 2022-02-24 10:59:29
 1       | 172.72.6.31 | 5432 | up     | up        | 0.333333  | standby | standby | 0          | false             | 0                 |                   |                        | 2022-02-24 10:59:29
 2       | 172.72.6.32 | 5432 | up     | up        | 0.333333  | standby | standby | 0          | false             | 0                 |                   |                        | 2022-02-24 10:59:29
(3 rows)
停止节点1的PG数据库,
[postgres@lhrpg30 ~]$ pg_ctl -D /var/lib/pgsql/14/data -m immediate stop
waiting for server to shut down.... done
server stopped
在关闭server1
上的PG后,failover自动发生,节点3成为新的主库:
 [postgres@lhrpg30 ~]$  psql -h 172.72.6.35 -p 9999 -U pgpool postgres -c 'show pool_nodes'
 node_id |  hostname   | port | status | pg_status | lb_weight |  role   | pg_role | select_cnt | load_balance_node | replication_delay | replication_state | replication_sync_state | last_status_change
---------+-------------+------+--------+-----------+-----------+---------+---------+------------+-------------------+-------------------+-------------------+------------------------+---------------------
 0       | 172.72.6.30 | 5432 | down   | down      | 0.333333  | standby | unknown | 0          | false             | 0                 |                   |                        | 2022-02-24 11:17:21
 1       | 172.72.6.31 | 5432 | up     | up        | 0.333333  | standby | standby | 0          | true              | 0                 |                   |                        | 2022-02-24 10:59:29
 2       | 172.72.6.32 | 5432 | up     | up        | 0.333333  | primary | primary | 0          | false             | 0                 |                   |                        | 2022-02-24 10:59:29
(3 rows)
在线恢复
恢复之前宕掉的server1主机:
[postgres@lhrpg30 ~]$ pcp_recovery_node -h 172.72.6.35 -p 9898 -U pgpool -n 0
Password:
pcp_recovery_node -- Command Successful
可以看到,server1
作为一个standby存在:
[postgres@lhrpg30 ~]$ psql -h 172.72.6.35 -p 9999 -U pgpool postgres -c 'show pool_nodes'
 node_id |  hostname   | port | status | pg_status | lb_weight |  role   | pg_role | select_cnt | load_balance_node | replication_delay | replication_state | replication_sync_state | last_status_change
---------+-------------+------+--------+-----------+-----------+---------+---------+------------+-------------------+-------------------+-------------------+------------------------+---------------------
 0       | 172.72.6.30 | 5432 | up     | up        | 0.333333  | standby | standby | 0          | false             | 280               |                   |                        | 2022-02-24 11:30:11
 1       | 172.72.6.31 | 5432 | up     | up        | 0.333333  | standby | standby | 0          | false             | 280               |                   |                        | 2022-02-24 10:59:29
 2       | 172.72.6.32 | 5432 | up     | up        | 0.333333  | primary | primary | 0          | true              | 0                 |                   |                        | 2022-02-24 11:30:00
(3 rows)
读写分离+负载均衡
[postgres@lhrpg30 ~]$ for i in $(seq 1 20); do psql -U pgpool -h 172.72.6.35 -p 9999 -d postgres -c 'SELECT inet_server_addr()'; done | egrep '172.'
 172.72.6.31
 172.72.6.32
 172.72.6.32
 172.72.6.30
 172.72.6.30
 172.72.6.30
 172.72.6.31
 172.72.6.31
 172.72.6.30
 172.72.6.31
 172.72.6.30
 172.72.6.31
 172.72.6.32
 172.72.6.31
 172.72.6.30
 172.72.6.31
 172.72.6.31
 172.72.6.31
 172.72.6.31
 172.72.6.32
[postgres@lhrpg30 ~]$ for i in $(seq 1 20); do psql -U pgpool -h 172.72.6.35 -p 9999 -d postgres -c 'SELECT inet_server_addr()'; done | egrep '172.' | grep 31
 172.72.6.31
 172.72.6.31
 172.72.6.31
 172.72.6.31
[postgres@lhrpg30 ~]$ for i in $(seq 1 20); do psql -U pgpool -h 172.72.6.35 -p 9999 -d postgres -c 'SELECT inet_server_addr()'; done | egrep '172.' | grep 32
 172.72.6.32
 172.72.6.32
 172.72.6.32
 172.72.6.32
 172.72.6.32
 172.72.6.32
[postgres@lhrpg30 ~]$ for i in $(seq 1 20); do psql -U pgpool -h 172.72.6.35 -p 9999 -d postgres -c 'SELECT inet_server_addr()'; done | egrep '172.' | grep 30
 172.72.6.30
 172.72.6.30
 172.72.6.30
 172.72.6.30
 172.72.6.30
 172.72.6.30
 172.72.6.30
测试之前,可以考虑修改文件pgpool.conf中的如下参数:
log_statement=all
log_per_node_statement =on
client_min_messages =log
log_min_messages = info
生效:
pgpool reload
测试完成后,修改回原值:
log_statement=off
log_per_node_statement = off
# client_min_messages =notice
# log_min_messages = warning
测试过程:
-- 开3个窗口
psql -U postgres -h 192.168.66.35 -p 9999 -d sbtest

create table test(id int);
insert into test values(1);
select * from test;
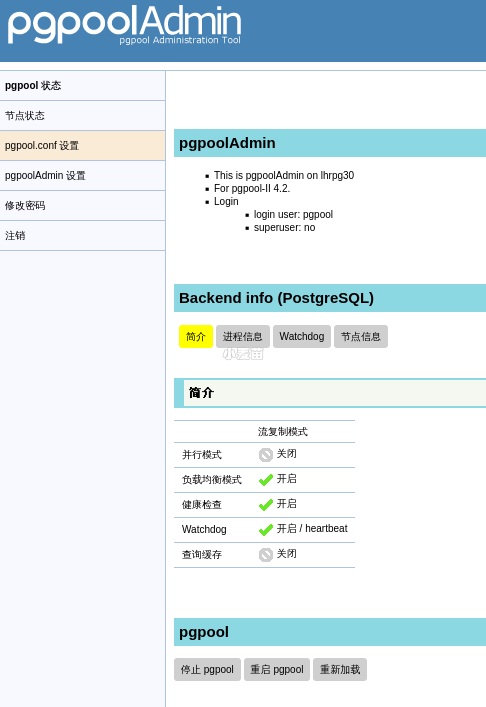
安装pgpoolAdmin
pgpool项目还提供了一个使用PHP写的 Web管理工具,称为“pgpoolAdmin ‘,该Web管理工具可以以 Web界面方式实现pgpool-II 的配置。
The pgpool Administration Tool is management tool of pgpool. It is possible to monitor, start, stop pgpool and change setting for pgpool.
PgpoolAdmin是管理pgpool的WEB界面工具,可以对pgpool进行监控,启停服务,更改设置。
使用yum直接安装:
yum install -y https://www.pgpool.net/yum/rpms/4.3/redhat/rhel-7-x86_64/pgpool-II-release-4.3-1.noarch.rpm
yum install -y pgpoolAdmin
ln -s /usr/share/pgpoolAdmin  /var/www/html/admin

-- 默认安装的php为5.4版本,需要卸载掉,最低版本为:PHP 5.6.0 and higher,否则浏览器会返回500错误
rpm -e  php-common-5.4.16-48.el7.x86_64  --nodeps
rpm -e  php-process-5.4.16-48.el7.x86_64  --nodeps
rpm -e  php-cli-5.4.16-48.el7.x86_64  --nodeps
rpm -e  php-5.4.16-48.el7.x86_64  --nodeps
rpm -e  php-pdo-5.4.16-48.el7.x86_64  --nodeps
rpm -e  php-pgsql-5.4.16-48.el7.x86_64  --nodeps


-- 安装http和php
rpm -Uvh https://dl.fedoraproject.org/pub/epel/epel-release-latest-7.noarch.rpm
rpm -Uvh https://mirror.webtatic.com/yum/el7/webtatic-release.rpm

yum -y install httpd
yum install -y php72w php72w-common php72w-cli php72w-gd php72w-xml php72w-mbstring php72w-ldap \
php72w-pear php72w-xmlrpc php72w-pdo \
php72w-mbstring php72w-pgsql php72w-process


systemctl restart httpd.service
systemctl status httpd.service

php -v


chmod 666  /etc/pgpool-II/pgpool.conf
chmod 666  /etc/pgpool-II/pcp.conf


echo  'pgpooladmin:3996643de967b80174e48fb45d7227b1' >> /etc/pgpool-II/pcp.conf

echo  '*:*:pgpool:lhr' >> /usr/share/httpd/.pcppass
echo  '*:*:pgpooladmin:lhr' >> /usr/share/httpd/.pcppass

chown apache:apache /usr/share/httpd/.pcppass
chmod 0600 /usr/share/httpd/.pcppass


-- 更新pool_passwd:cat /etc/pgpool-II/pool_passwd
pg_md5 --md5auth --username=pgpooladmin 'lhr'


-- 数据库创建用户
create user pgpooladmin login encrypted password 'lhr' superuser;
grant postgres to pgpooladmin;
启动:
[root@lhrpg30 ~]# netstat -tulnp | grep 80
[root@lhrpg30 ~]# systemctl enable httpd
Created symlink from /etc/systemd/system/multi-user.target.wants/httpd.service to /usr/lib/systemd/system/httpd.service.
[root@lhrpg30 ~]# systemctl start httpd
[root@lhrpg30 ~]# systemctl status httpd
● httpd.service - The Apache HTTP Server
   Loaded: loaded (/usr/lib/systemd/system/httpd.service; enabled; vendor preset: disabled)
   Active: active (running) since Thu 2022-02-24 12:52:59 CST; 3s ago
     Docs: man:httpd(8)
           man:apachectl(8)
 Main PID: 27358 (httpd)
   Status: 'Processing requests...'
   CGroup: /docker/7d7822b7277ed674bd973fcd9267cd9c0c28d62d21143aa5650c4e0b2d497253/system.slice/httpd.service
           ├─27358 /usr/sbin/httpd -DFOREGROUND
           ├─27359 /usr/sbin/httpd -DFOREGROUND
           ├─27360 /usr/sbin/httpd -DFOREGROUND
           ├─27361 /usr/sbin/httpd -DFOREGROUND
           ├─27362 /usr/sbin/httpd -DFOREGROUND
           └─27363 /usr/sbin/httpd -DFOREGROUND

Feb 24 12:52:59 lhrpg30 systemd[1]: Starting The Apache HTTP Server...
Feb 24 12:52:59 lhrpg30 httpd[27358]: AH00558: httpd: Could not reliably determine the server's fully qualified domain name, using 172.72.6.30. Set the 'ServerName' directive globally to suppress this message
Feb 24 12:52:59 lhrpg30 systemd[1]: Started The Apache HTTP Server.

[root@lhrpg30 ~]# netstat -tulnp | grep 80
tcp        0      0 0.0.0.0:80              0.0.0.0:*               LISTEN      27358/httpd
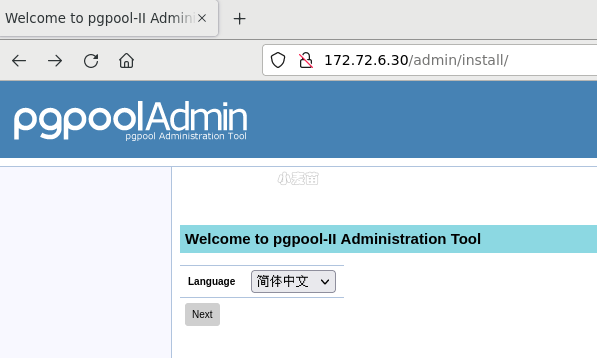
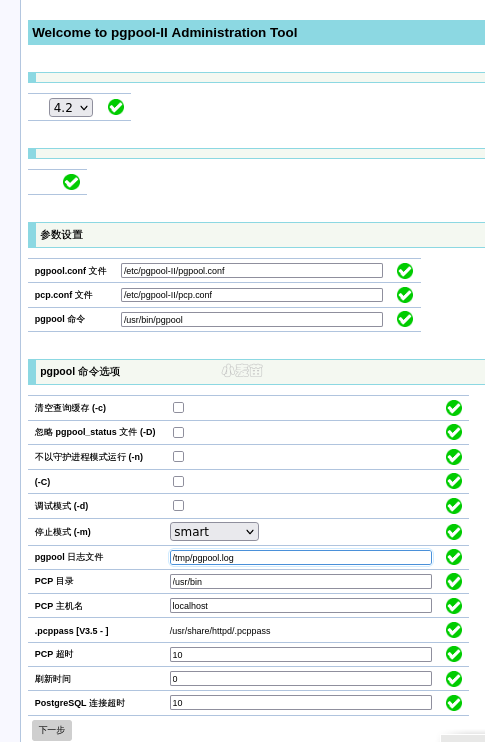
第一次使用,需要进行配置:
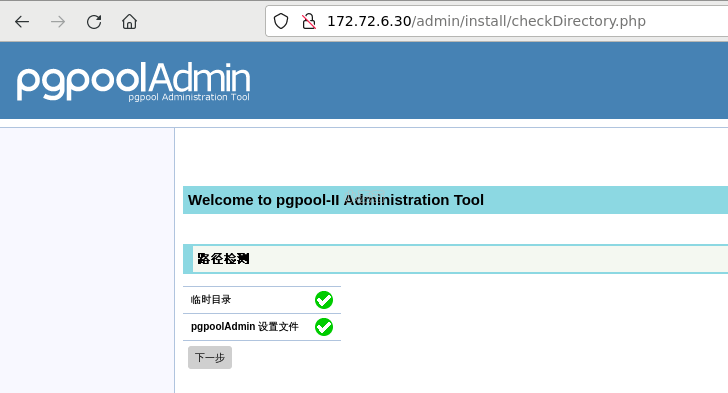
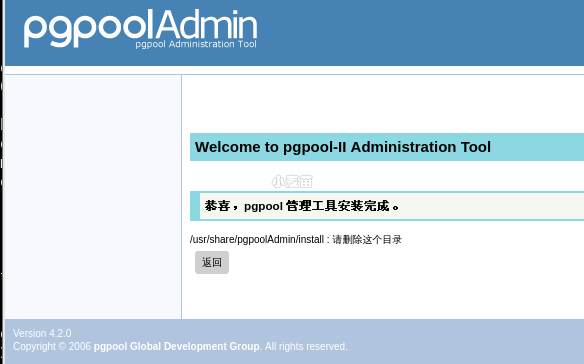
配置完成之后,提示会说删除install目录。
rm -rf /var/www/html/admin/install
最后使用在pcp.conf中的用户名密码登录。
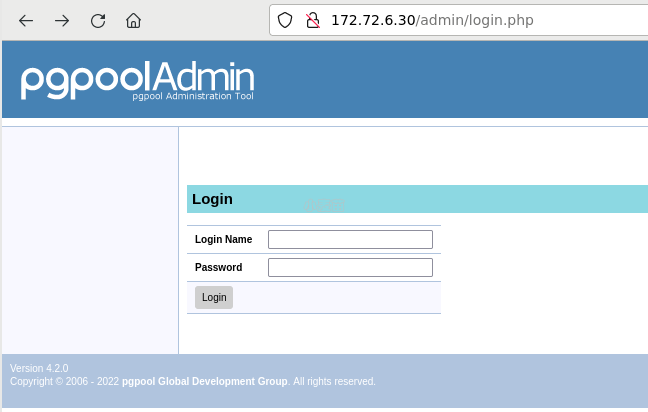
登陆:http://172.72.6.30/admin/login.php ,用户名和密码:pgpooladmin/lhr
可以在界面进行操作进行switchover。
错误解决
可以正常进入登录界面,但是输入用户名和密码后,报错“500 Internal Server Error”,如下:
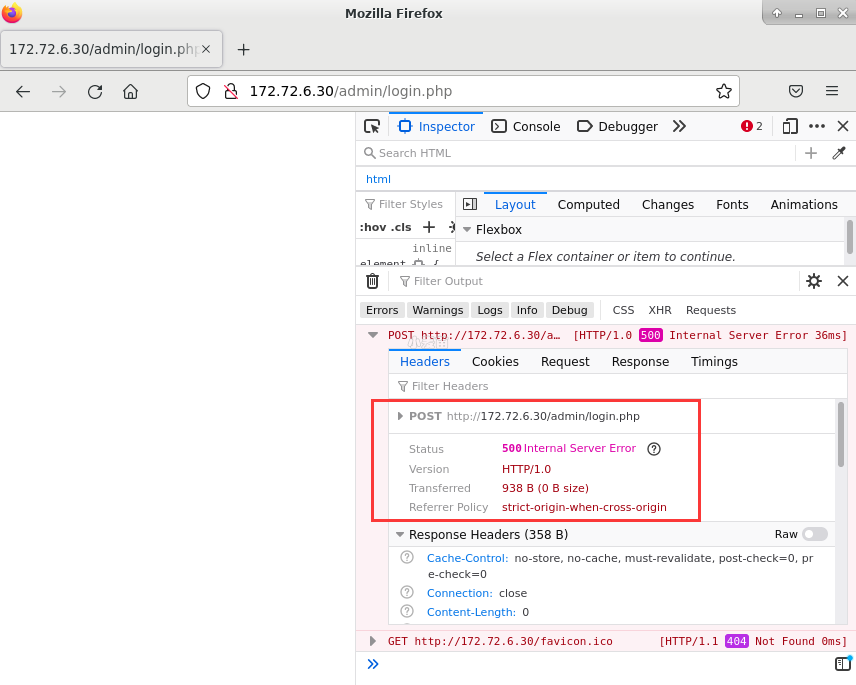
解决:php版本太低,最低需要PHP 5.6.0,请升级您的php版本。


新闻|Babelfish使PostgreSQL直接兼容SQL Server应用程序
中国PostgreSQL分会入选工信部重点领域人才能力评价机构

更多新闻资讯,行业动态,技术热点,请关注中国PostgreSQL分会官方网站
https://www.postgresqlchina.com
中国PostgreSQL分会生态产品
https://www.pgfans.cn
中国PostgreSQL分会资源下载站
https://www.postgreshub.cn

点击此处阅读原文
↓↓↓
