使用Python访问达梦数据库.md
Table of Contents
概要
本文主要介绍如何使用Python访问达梦数据库,达梦提供了dmPython的驱动使用户可以通过Python链接到达梦数据库。dmPython在达梦数据库安装目录${DM_HOME}/drivers/python/dmPython下。以下将以Windows环境为例,搭建Python链接达梦数据库的开发环境。
dmPython 简介
dmPython是DM提供的依据Python DB API version 2.0中API使用规定而开发的数据库访问接口。dmPython实现这些API,使Python应用程序能够对DM数据库进行访问。
编译
环境准备
dmPython要求DM Server版本大于7.0.0.9;Python版本大于2.6
Python环境搭建
为例方便,建议大家安装anaconda或miniconda,当然也可以只安装Python,我这里由于是为了搭建开发环境,又不想占用太多硬盘空间所以选择miniconda。
miniconda下载地址:https://repo.anaconda.com/miniconda/Miniconda3-latest-Windows-x86_64.exe
安装miniconda过程:略
环境变量设置
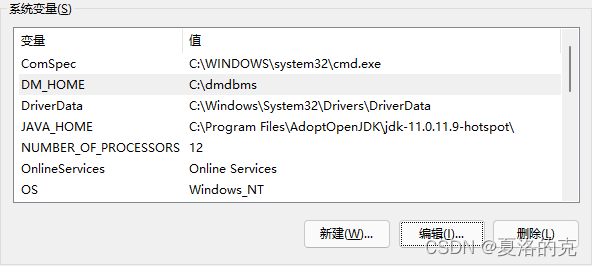
- 如果安装达梦数据库,环境变量中会有DM_HOME这个变量,这个是必须的,编译dmPython是会检测达梦数据库是否安装;

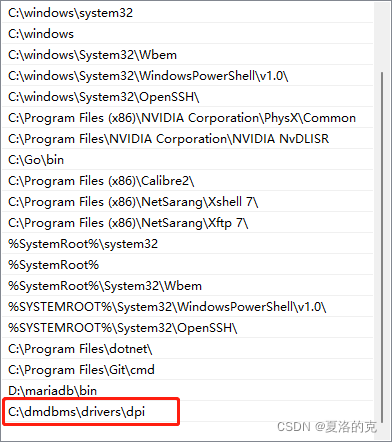
- 设置dpi目录到PATH中,这个步骤也很重要,否则在import dmPython的时候会报*找不到动态库*的错;

注意:dpi目录 ${DM_HOME}/drivers/dpi
编译源码
进入${DM_HOME}/drivers/python/dmPython目录,执行python setup.py install
(base) C:\dmdbms\drivers\python\dmPython>python setup.py install
running install
running bdist_egg
running egg_info
writing dmPython.egg-info\PKG-INFO
writing dependency_links to dmPython.egg-info\dependency_links.txt
writing top-level names to dmPython.egg-info\top_level.txt
reading manifest file 'dmPython.egg-info\SOURCES.txt'
writing manifest file 'dmPython.egg-info\SOURCES.txt'
installing library code to build\bdist.win-amd64\egg
running install_lib
running build_ext
creating build\bdist.win-amd64\egg
copying build\lib.win-amd64-3.9\dmPython.cp39-win_amd64.pyd -> build\bdist.win-amd64\egg
creating stub loader for dmPython.cp39-win_amd64.pyd
byte-compiling build\bdist.win-amd64\egg\dmPython.py to dmPython.cpython-39.pyc
creating build\bdist.win-amd64\egg\EGG-INFO
copying dmPython.egg-info\PKG-INFO -> build\bdist.win-amd64\egg\EGG-INFO
copying dmPython.egg-info\SOURCES.txt -> build\bdist.win-amd64\egg\EGG-INFO
copying dmPython.egg-info\dependency_links.txt -> build\bdist.win-amd64\egg\EGG-INFO
copying dmPython.egg-info\top_level.txt -> build\bdist.win-amd64\egg\EGG-INFO
writing build\bdist.win-amd64\egg\EGG-INFO\native_libs.txt
zip_safe flag not set; analyzing archive contents...
__pycache__.dmPython.cpython-39: module references __file__
creating 'dist\dmPython-2.3-py3.9-win-amd64.egg' and adding 'build\bdist.win-amd64\egg' to it
removing 'build\bdist.win-amd64\egg' (and everything under it)
Processing dmPython-2.3-py3.9-win-amd64.egg
removing 'c:\programdata\miniconda3\lib\site-packages\dmPython-2.3-py3.9-win-amd64.egg' (and everything under it)
creating c:\programdata\miniconda3\lib\site-packages\dmPython-2.3-py3.9-win-amd64.egg
Extracting dmPython-2.3-py3.9-win-amd64.egg to c:\programdata\miniconda3\lib\site-packages
dmPython 2.3 is already the active version in easy-install.pth

Installed c:\programdata\miniconda3\lib\site-packages\dmpython-2.3-py3.9-win-amd64.egg
Processing dependencies for dmPython==2.3
Finished processing dependencies for dmPython==2.3

(base) C:\dmdbms\drivers\python\dmPython>
验证
(base) C:\dmdbms\drivers\python\dmPython>python
Python 3.9.5 (default, May 18 2021, 14:42:02) [MSC v.1916 64 bit (AMD64)] :: Anaconda, Inc. on win32
Type "help", "copyright", "credits" or "license" for more information.
>>> import dmPython
>>> conn = dmPython.connect(user='SYSDBA', password='SYSDBA', server='localhost', port=5236, autoCommit=True)
>>> cursor = conn.cursor()
>>> cursor.execute("select * from person.person")
<builtins.DmdbCursor on <dmPython.Connection to SYSDBA@localhost:5236>>
>>> cursor.description
[('PERSONID', <class 'dmPython.NUMBER'>, 11, 10, 10, 0, 0), ('SEX', <class 'dmPython.FIXED_STRING'>, 1, 1, 1, 0, 0), ('NAME', <class 'dmPython.STRING'>, 50, 50, 50, 0, 0), ('EMAIL', <class 'dmPython.STRING'>, 50, 50, 50, 0, 1), ('PHONE', <class 'dmPython.STRING'>, 25, 25, 25, 0, 1)]
>>>
总结
操作过程中遇到了两个小问题,一是编译时目录没有权限,可以使用管理员方式打开或更换Python安装目录;二是import dmPython时找不到DLL,可以通过上文设置环境变量或者将dpi目录下的*.dll放到运行目录;生产上有可能需要在linux服务器上运行,后续会有对应的文章记录在linux上的环境搭建和使用,本文重点是在Windows上搭建开发环境;


