


本篇是接着我的上一篇文章《获取系统照片并解码渲染显示(附完整demo)》来写的。需要的可以先读读上一篇文件滴,本篇则是在上一篇代码基础上进一步修改而来。

说一下功能的升级(较上一版本):(ps:我也想搞分布式,可目前的现实不允许,还是等远程模拟器的多设备分布式联调能力开放吧)
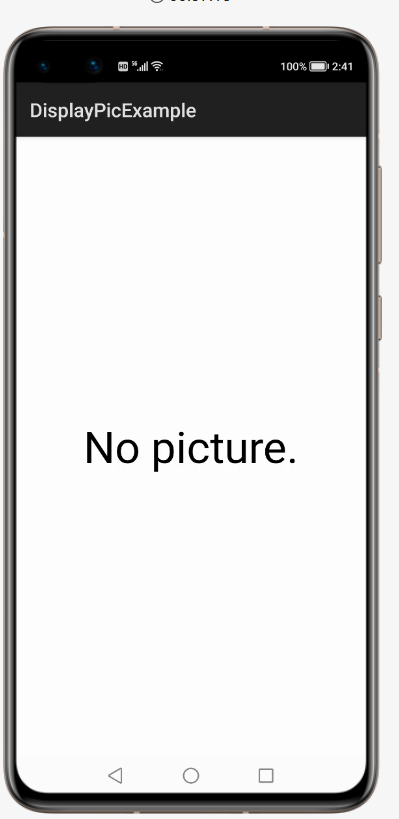
没有图片会出现提示
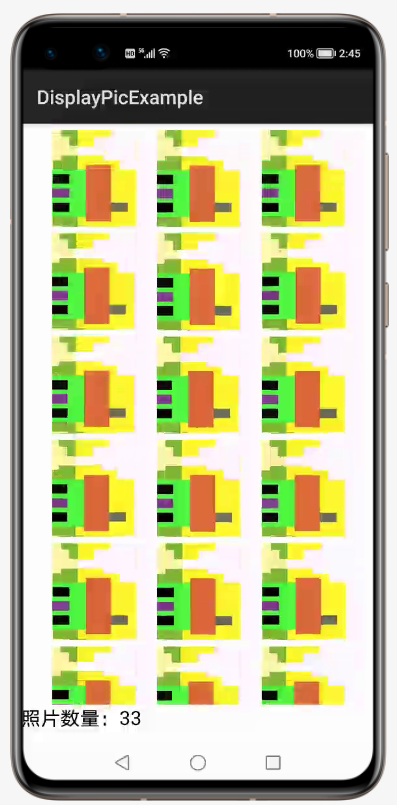
相册中的所有照片都可显示,并且显示计数
应用随打开随刷新
不多说,先上 demo 跑起来的效果,如下两张图:第一张图是在手机远程模拟器中一张图片都没有时候的显示界面,第二张是自己打开远程模拟器的照相功能一顿乱点,照了 N 张之后的显示界面。
老规矩先说升级的大概思路:
采用 TableLayout 布局实现了所有照片的显示。
添加两个 Text 用来显示无照片的提示信息和照片的计数信息。
在 onActive 生命周期函数中添加方法实现实时刷新。
①采用 TableLayout 布局实现了所有照片的显示
    <ScrollView ohos:width="match_parent"
                ohos:height="600vp"
                ohos:left_padding="25vp"
                >
    <TableLayout
        ohos:id="$+id:layout_id"
        ohos:height="match_content"
        ohos:width="match_parent"
        >
    </TableLayout>
    </ScrollView>
 TableLayout img_layout;
img_layout = (TableLayout)findComponentById(ResourceTable.Id_layout_id);
img_layout.setColumnCount(3);
Image img = new Image(MainAbilitySlice.this);
img.setId(mediaId);
img.setHeight(300);
img.setWidth(300);
img.setMarginTop(20);
img.setMarginLeft(20);
img.setPixelMap(pixelMap);
img.setScaleMode(Image.ScaleMode.ZOOM_CENTER);
img_layout.addComponent(img);
②添加两个 Text 用来显示无照片的提示信息和照片的计数信息
    <Text
        ohos:id="$+id:text_pre_id"
        ohos:width="match_parent"
        ohos:height="match_parent"
        ohos:text_alignment="center"
        ohos:text_size="45fp"
        ohos:text="Opening..."></Text>
    <Text
        ohos:id="$+id:text_id"
        ohos:width="match_content"
        ohos:height="match_content"
        ohos:text_alignment="center"
        ohos:text_size="20fp"></Text>
Text pre_text,text;
pre_text = (Text)findComponentById(ResourceTable.Id_text_pre_id);
text = (Text)findComponentById(ResourceTable.Id_text_id);
        if(img_ids.size() > 0){
            pre_text.setVisibility(Component.HIDE);
            text.setVisibility(Component.VISIBLE);
            text.setText("照片数量:"+img_ids.size());
        }else{
            pre_text.setVisibility(Component.VISIBLE);
            pre_text.setText("No picture.");
            text.setVisibility(Component.HIDE);
        }
③在 onActive 生命周期函数中添加方法实现实时刷新
onActive 生命周期函数介绍:Page 会在进入 INACTIVE 状态后来到前台,然后系统调用此回调。
Page 在此之后进入 ACTIVE 状态,该状态是应用与用户交互的状态。所以当你把应用放到后台,打开照相机照相的时候,然后在打开此应用的时候就会调用该生命周期函数。
    @Override
    public void onActive() {
        super.onActive();
        displayPic();
    }
public void displayPic(){
        img_layout.removeAllComponents();
        ArrayList<Integer> img_ids = new ArrayList<Integer>();
        DataAbilityHelper helper = DataAbilityHelper.creator(getContext());
        try {
            ResultSet result = helper.query(AVStorage.Images.Media.EXTERNAL_DATA_ABILITY_URI, null, null);
            if(result == null){
                pre_text.setVisibility(Component.VISIBLE);
            }else{
                pre_text.setVisibility(Component.HIDE);
            }
            while(result != null && result.goToNextRow()){
                int mediaId = result.getInt(result.getColumnIndexForName(AVStorage.Images.Media.ID));
                Uri uri = Uri.appendEncodedPathToUri(AVStorage.Images.Media.EXTERNAL_DATA_ABILITY_URI,""+mediaId);
                FileDescriptor filedesc = helper.openFile(uri,"r");
                ImageSource.DecodingOptions decodingOpts = new ImageSource.DecodingOptions();
                decodingOpts.desiredSize = new Size(300,300);
                ImageSource imageSource = ImageSource.create(filedesc,null);
                PixelMap pixelMap = imageSource.createThumbnailPixelmap(decodingOpts,true);
                Image img = new Image(MainAbilitySlice.this);
                img.setId(mediaId);
                img.setHeight(300);
                img.setWidth(300);
                img.setMarginTop(20);
                img.setMarginLeft(20);
                img.setPixelMap(pixelMap);
                img.setScaleMode(Image.ScaleMode.ZOOM_CENTER);
                img_layout.addComponent(img);
                System.out.println("xxx"+uri);
                img_ids.add(mediaId);
            }
        }catch (DataAbilityRemoteException | FileNotFoundException e){
            e.printStackTrace();
        }
        if(img_ids.size() > 0){
            pre_text.setVisibility(Component.HIDE);
            text.setVisibility(Component.VISIBLE);
            text.setText("照片数量:"+img_ids.size());
        }else{
            pre_text.setVisibility(Component.VISIBLE);
            pre_text.setText("No picture.");
            text.setVisibility(Component.HIDE);
        }
    }
这个 demo 目前来说,还算基本能看,有时间的我会继续尝试修改完善。有兴趣的朋友可以关注一下,完整 demo 的源码见阅读原文附件!

专注开源技术,共建鸿蒙生态

点“阅读原文”下载附件
文章转载自鸿蒙技术社区,如果涉嫌侵权,请发送邮件至:contact@modb.pro进行举报,并提供相关证据,一经查实,墨天轮将立刻删除相关内容。
