文章目录:
0x01 基础简介
0x02 安装实践
安装流程
配置示例
0x02 命令实践
命令参数
简单使用
0x01 基础简介
K9s - Kubernetes CLI To Manage Your Clusters In Style!描述: k9s 是用于管理 Kubernetes 集群的 CLI, K9s 提供了一个终端 UI 来与您的 Kubernetes 集群进行交互。通过封装 kubectl 功能 k9s 持续监视 Kubernetes 的变化并提供后续命令来与您观察到的资源进行交互,直白地说就是k9s可以让开发者快速查看并解决运行 Kubernetes 时的日常问题。
目前在 Github 上 该项目 star 将近 15k, 还是比较活跃的。
官网地址: https://k9scli.io/
功能特性:
跟踪在 Kubernetes 集群运行的资源的实时活动
处理 Kubernetes 标准资源和自定义资源
跟踪与资源相关联的实时指标,如 pods、容器和节点
支持定制外观
支持多资源视图
支持查看 RBAC 规则
支持遍历 Kubernetes 资源及其相关资源
参考来源:Github 项目地址: https://github.com/derailed/k9sGitee Mirrors 镜像地址: https://gitee.com/mirrors/K9s (国内推荐)
0x02 安装实践
K9s 在 Linux、macOS 和 Windows 平台上可用。
常用安装方式
# 编译后的二进制包https://github.com/derailed/k9s/releases# MacOS or LinuxBrew for Linuxbrew install k9s# On Arch Linuxpacman -S k9s# Via Webi for Linux and macOScurl -sS https://webinstall.dev/k9s | bash# Via Webi for Windowscurl.exe -A MS https://webinstall.dev/k9s | powershell# Running the official Docker imagedocker run --rm -it -v ~/.kube/config:/root/.kube/config quay.io/derailed/k9s
Tips: 当然您也可以参照官方文档进行从源码构建, K9s 目前使用的是 go v1.14 或更高版本。
安装流程
此外以安装二进制包为例进行实践。
# 1. 利用 wget 命令 -c 短点续传和 -b 后台下载wget -b -c https://github.com/derailed/k9s/releases/download/v0.25.18/k9s_Linux_x86_64.tar.gz# 2.解压并删除多余文件tar -zxf k9s_linux_x86_64.tar.gzrm k9s_linux_x86_64.tar.gz LICENSE README.md# 3.拷贝 kubernetes 控制配置文件到加目录中mkdir -p $HOME/.kubesudo cp -i etc/kubernetes/admin.conf $HOME/.kube/configsudo chown $(id -u):$(id -g) $HOME/.kube/configexport KUBECONFIG=/etc/kubernetes/admin.conf# 4.直接运行即可,如果你对vim操作比较熟悉,那么恭喜你了你很快能上手k9s./nfsdisk-31/newK8s-Backup/tools# ./k9s# 5.退出k9s指令:quit
配置示例
K9s 使用 256 色终端模式。在 `Nix 系统上,确保相应地设置了 TERM。
export TERM=xterm-256color
为了发出清单编辑命令,请确保您的 EDITOR 环境已设置。
# Kubectl edit command will use this env var.export EDITOR=my_fav_editor# Should your editor deals with streamed vs on disk files differently, also set...export K9S_EDITOR=my_fav_editor
K9s 更喜欢最近的 kubernetes 版本,即 1.16+。
K9s 将其配置保存在 k9s 目录中,位置取决于您的操作系统, 其利用 XDG 加载其各种配置文件。Unix :
~/.config/k9s
Mac :~/Library/Application Support/k9s
Windows :%LOCALAPPDATA%\k9s
# $XDG_CONFIG_HOME/k9s/config.yml k9s : # 代表 ui 轮询间隔。默认 2secs refreshRate : 2 # 与 api-server 的连接丢失后的重试次数。默认 15。 maxConnRetry : 5 # 启用鼠标支持。默认 false enableMouse : true # 设置为 true 以隐藏 K9s 标头。默认 false headless : false # 设置为 true 以隐藏 K9s crumbs。默认 false crumbsless : false # 指示是否禁用删除/杀死/编辑等修改命令。默认为 false readOnly : false # 切换图标显示,因为并非所有终端都支持这些字符。 noIcons : false # 日志配置 logger : # 定义要返回的行数。Default 100 tail : 200 # 定义视图中允许的日志行总数。Default 1000 buffer : 500 # 表示以秒为单位在日志时间线中返回多远。设置为 -1 将显示所有可用的日志。默认为 5 分钟。 sinceSeconds : 300 # 显示日志时全屏显示。默认 false fullScreenLogs : false # 切换日志换行。默认 false textWrap : false # 切换日志行时间戳信息。默认假 showTime : false # 表示当前的 kube 上下文。默认为当前上下文 currentContext : minikube # 表示当前的 kube 集群。默认为当前上下文集群 currentCluster : minikube # 保留每个集群首选项以获取最喜欢的命名空间和视图。 clusters: coolio: namespace: active: coolio favorites: - cassandra - default view: active: po featureGates: # 切换NodeShell支持 nodeShell : false # 启用功能门的 shell pod 自定义 shellPod : # 要使用的 shell pod 映像。 image : killerAdmin # 要启动到 shell pod 的命名空间。 namespace : fred # 在 shell pod 上设置的资源限制。 limits : cpu : 100m memory : 100Mi # 启动端口转发时使用的 IP 地址。 portForwardAddress : 1.2.3.4 kind : namespace : active : all favorites : - all - kube-system - default view : active : dp # 屏幕转储的路径。默认值:'%temp_dir%/k9s-screens-%username%'(k9s 信息) screenDumpDir :/tmp
Node Shell 配置,通过在给定集群上启用 nodeShell 功能门,K9s 允许您在集群节点中进行 shell。
# $XDG_CONFIG_HOME/k9s/config.ymlk9s: clusters: # Configures node shell on cluster blee blee: featureGates: # You must enable the nodeShell feature gate to enable shelling into nodes nodeShell: true # You can also further tune the shell pod specification shellPod: image: cool_kid_admin:42 namespace: blee limits: cpu: 100m memory: 100Mi
HotKey Support 设置: 允许用户定义自己的热键来激活他们最喜欢的资源视图。
# $XDG_CONFIG_HOME/k9s/hotkey.ymlcat <<'EOF' > ~/.config/k9s/hotkey.ymlhotKey: # Hitting Shift-0 navigates to your pod view shift-0: shortCut: Shift-0 description: Viewing pods command: pods # Hitting Shift-1 navigates to your deployments shift-1: shortCut: Shift-1 description: View deployments command: dpEOF
Command Aliases 设置: 命令别名设置。
# 使用此别名文件,您现在可以键入 pp/crb 以分别列出 pod 或 ClusterRoleBindings。# $XDG_CONFIG_HOME/k9s/alias.ymlcat <<'EOF' > ~/.config/k9s/alias.ymlalias: pp: v1/pods crb: rbac.authorization.k8s.io/v1/clusterrolebindingsEOF
FastForwards: 从 v0.25.0 开始,您可以利用 FastForwards 功能告诉 K9s 如何默认端口转发.
# 您现在可以使用以下注释来注释您的清单:k9scli.io/auto-portforwards -> 激活一个或多个端口转发,直接绕过端口转发对话框。k9scli.io/portforwards -> 在启动端口转发对话框时预先选择一个或多个端口转发。# 例如:# Pod fredapiVersion: v1kind: Podmetadata: name: fred annotations: k9scli.io/auto-portforwards: zorg::5556 # => 将默认为 zorg 容器端口5556和本地端口5566 # Or... k9scli.io/portforward: bozo::9090:p1 # => 启动“端口转发”对话框,选择为 bozo 容器中的p1(8081)映射到本地端口9090 ...spec: containers: - name: zorg ports: - name: p1 containerPort: 5556 ... - name: bozo ports: - name: p1 containerPort: 8081 - name: p2 containerPort: 5555 ...
Resource Custom Columns:自定义显示的资源列,您可以通过自定义视图更改为给定资源显示哪些列。
# $XDG_CONFIG_HOME/k9s/views.ymlcat <<'EOF' > ~/.config/k9s/views.ymlk9s: views: v1/pods: columns: - AGE - NAMESPACE - NAME - IP - NODE - STATUS - READY v1/services: columns: - AGE - NAMESPACE - NAME - TYPE - CLUSTER-IPEOF
plugin : K9s 允许您通过插件定义您自己的集群命令来扩展您的命令行和工具。
# k9s目前提供了额外的环境变量来自定义您的插件参数,可用的环境变量如下:$RESOURCE_GROUP-- 选定的资源组$RESOURCE_VERSION-- 选择的资源api版本$RESOURCE_NAME-- 选择的资源名称$NAMESPACE-- 选择的资源命名空间$NAME-- 选择的资源名称$CONTAINER-- 当前容器(如果适用)$FILTER-- 当前过滤器(如果有)$KUBECONFIG-- KubeConfig 位置。$CLUSTER -- 活动集群名称$CONTEXT -- 活动上下文名称$USER -- 活跃用户$GROUPS -- 活跃的群体$POD -- 在容器视图中$COL-<RESOURCE_COLUMN_NAME> -- 为查看的资源使用给定的列名。必须以 COL-!# 例如, 此处定义了一个插件实现 `ctrl-l` 快捷方式来在 pod 视图中跟踪日志。# $XDG_CONFIG_HOME/k9s/plugin.ymlcat <<'EOF' > ~/.config/k9s/plugin.ymlplugin: fred: shortCut: Ctrl-L confirm: false description: Pod logs scopes: - pods command: kubectl background: false args: - logs - -f - $NAME - -n - $NAMESPACE - --context - $CONTEXTEOF
11.Skins : 您可以根据自己的外观和风格来设计 K9s。
# $XDG_CONFIG_HOME/k9s/skin.ymlcat <<'EOF' > ~/.config/k9s/skin.yml# Skin InTheNavy...k9s: # General K9s styles body: fgColor: dodgerblue bgColor: '#ffffff' logoColor: '#0000ff' # ClusterInfoView styles. info: fgColor: lightskyblue sectionColor: steelblue # Help panel styles help: fgColor: white bgColor: black keyColor: cyan numKeyColor: blue sectionColor: gray frame: # Borders styles. border: fgColor: dodgerblue focusColor: aliceblue # MenuView attributes and styles. menu: fgColor: darkblue keyColor: cornflowerblue # Used for favorite namespaces numKeyColor: cadetblue # CrumbView attributes for history navigation. crumbs: fgColor: white bgColor: steelblue activeColor: skyblue # Resource status and update styles status: newColor: '#00ff00' modifyColor: powderblue addColor: lightskyblue errorColor: indianred highlightcolor: royalblue killColor: slategray completedColor: gray # Border title styles. title: fgColor: aqua bgColor: white highlightColor: skyblue counterColor: slateblue filterColor: slategray views: # TableView attributes. table: fgColor: blue bgColor: darkblue cursorColor: aqua # Header row styles. header: fgColor: white bgColor: darkblue sorterColor: orange # YAML info styles. yaml: keyColor: steelblue colonColor: blue valueColor: royalblue # Logs styles. logs: fgColor: white bgColor: blackEOF
0x02 命令实践
命令参数
# List all available CLI optionsk9s help# To get info about K9s runtime (logs, configs, etc..)k9s info # Configuration: root/.config/k9s/config.yml # Logs: tmp/k9s-root.log # Screen Dumps: tmp/k9s-screens-root# To run K9s in a given namespacek9s -n mycoolns# Start K9s in an existing KubeConfig contextk9s --context coolCtx# Start K9s in readonly mode - with all cluster modification commands disabledk9s --readonly
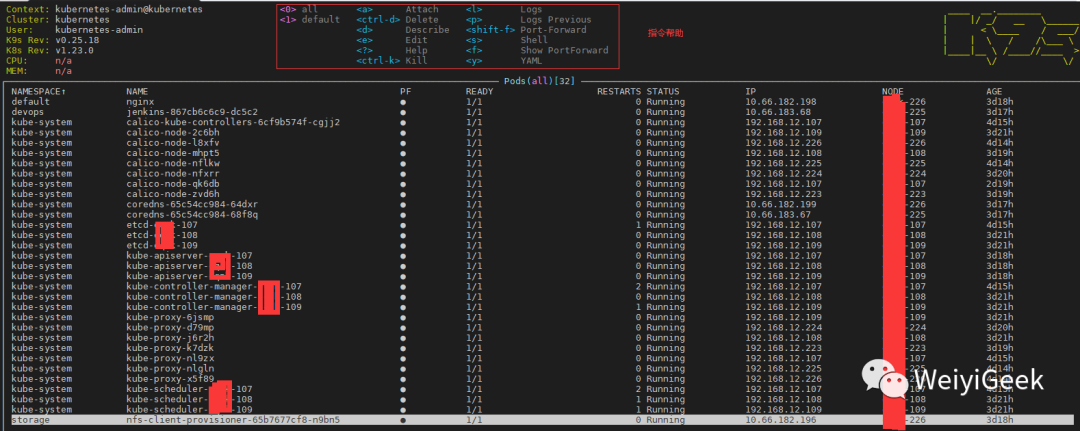
简单使用
使用截图
Pulses - A top level dashboard of the state of affairs of your cluster
XRay - Dig in your cluster resources and view their dependencies
Pods - List out your pods status and resource consumption
RBAC - View the who/what/how of authorizations on your cluster
实践使用
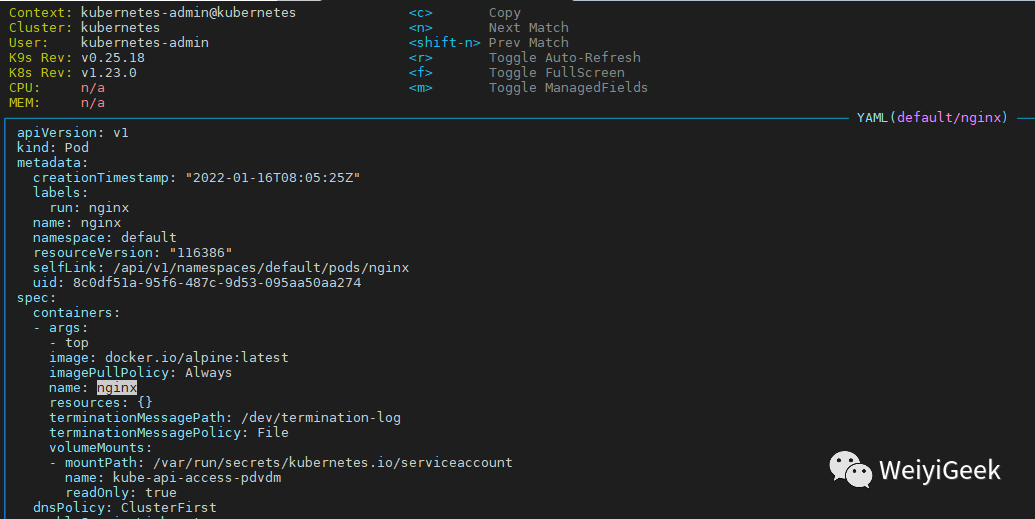
0.查看Pod资源配置清单,按键流程
:
->pods
->y
.(返回上一步是按ESC按键)
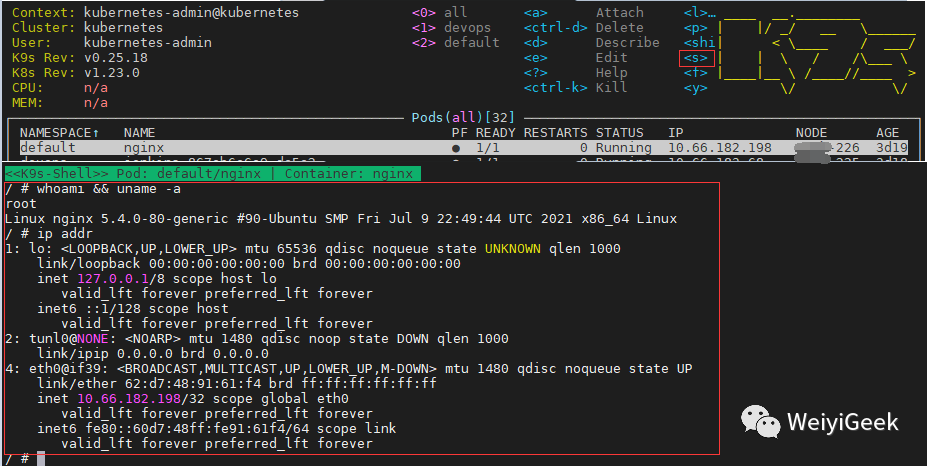
1.进入指定pod的shell终端中,按键流程
:
->pods
->s
.
2.指定pod进行容器内部端口转发,按键流程
:
->pods
-><shift-f>
, 输入容器内部名称::端口, 然后在输入映射到本地的端口,如果要查看端口转发配置,按键流程:
->pods
->f
即可查看。

3.pod 日志查看,按键流程
:
->pods
->l
。4.namespace 查看,按键流程
:
->ns
->l
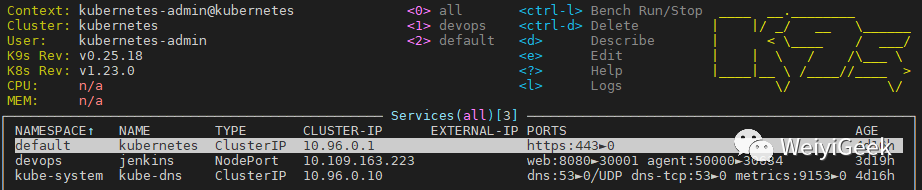
。5.svc 查看,按键流程
:
->svc
->l
。
6.我们创建一个新的pod并采用k9s进行管理编辑, 按键流程
:
->pods
->e
然后进行编辑该Pod资源清单,使用vim作为默认编辑器进行编辑,完成后输入:wq保存并退出。
~$ kubectl run myweb --image=nginx:latest --labels="app=web" --port=8080pod/myweb created~$ k9sspec: containers: - image: nginx:latest imagePullPolicy: Always name: myweb ports: - containerPort: 80 # 此处将 8080 端口改成 80 protocol: TCP resources: {}
7.deployments/statefulset/pod删除操作: ,按键流程
:
->pod|deploy|state
->ctrl+d
。8.查看集群中RBAC角色绑定信息,按键流程
:
->rbac
->e
编辑。

至此完毕!
更多精彩文章,请查看,我在B站学云原生之Docker镜像安全最佳实践(https://www.bilibili.com/read/cv15553799)
欢迎各位志同道合的朋友一起学习交流,如文章有误请在下方留下您宝贵的经验知识,个人邮箱地址【master#weiyigeek.top】或者 个人公众号【WeiyiGeek】联系我。
更多文章来源于【WeiyiGeek Blog - 为了能到远方,脚下的每一步都不能少】 个人博客【https://weiyigeek.top 】
专栏书写不易,如果您觉得这个专栏还不错的,请给这篇专栏【点个赞、投个币、收个藏、关个注,转个发】,这将对我的肯定,谢谢!。
echo "【点个赞】,动动你那粗壮的拇指或者芊芊玉手,亲!"
printf("%s", "【投个币】,万水千山总是情,投个硬币行不行,亲!")
fmt.Printf("【收个藏】,阅后即焚不吃灰,亲!")
System.out.println("【关个注】,后续浏览查看不迷路哟,亲!")
console.info("【转个发】,让更多的志同道合的朋友一起学习交流,亲!")