


大纲
一、Hello MyBatis
1、HelloMyBatis
1.1、导入依赖
<dependency>
  <groupId>org.mybatis</groupId>
  <artifactId>mybatis</artifactId>
  <version>x.x.x</version>
</dependency>
1.2、从 XML 中构建 SqlSessionFactory 与 从SqlSessionFactory中获取 SqlSession
SqlSessionFactoryBuilder 可以从 XML 配置文件或一个预先配置的 Configuration 实例来构建出 SqlSessionFactory 实例
- 编写xml(配置实例)
<?xml version="1.0" encoding="UTF-8" ?>
<!DOCTYPE configuration
  PUBLIC "-//mybatis.org//DTD Config 3.0//EN"
  "http://mybatis.org/dtd/mybatis-3-config.dtd">

<!-- 核心配置文件-->
<configuration>
  <!--开发环境test/dev/prod 可配置多套环境 default代表选择的环境-->
  <environments default="development">
    <environment id="development">
      <!--MyBatis事务管理有两种:JDBC/MANAGED,默认的事务管理,是使用的JDBC的事务管理,可以直接使用JDBC的提交和回滚设置-->
      <transactionManager type="JDBC"/>
      <!--MyBatis默认的连接池是POOLED-->
      <dataSource type="POOLED">
        <!--驱动、url、username、password-->
        <property name="driver" value=""/>
        <property name="url" value=""/>
        <property name="username" value=""/>
        <property name="password" value=""/>
      </dataSource>
    </environment>
  </environments>

  <!--每一个xml文件都需要在mybatis核心配置文件中注册-->
  <mappers>
    <mapper resource="org/mybatis/example/BlogMapper.xml"/>
  </mappers>
</configuration>
- 编写工具类(构建实例)
public class MyBatisUtils {
    private static SqlSessionFactory sqlSessionFactory;

    static{
        try {
            // SqlSessionFactoryBuilder根据mybatis-config.xml文件创建sqlSessionFactory对象
            String resource = "org/mybatis/example/mybatis-config.xml";
            InputStream inputStream = Resources.getResourceAsStream(resource);
            SqlSessionFactory sqlSessionFactory = new SqlSessionFactoryBuilder().build(inputStream);
        } catch (IOException e) {
            e.printStackTrace();
        }
    }

    // sqlSessionFactory对象调用openSession()方法创建sqlSession
    public static SqlSession getSqlSession(){
        // 也可以调用有参的openSession(true),代表自动提交事务,如下无参的需要手动提交事务
        SqlSession sqlSession = sqlSessionFactory.openSession();
        // SqlSession 包含了执行sql所需的所有方法
        return sqlSession;
    }
}
1.3、SqlSession执行sql
-
实体类(略)
-
Dao接口(略)
-
xml配置文件(类似于接口实现类)
<?xml version="1.0" encoding="UTF-8" ?> <!DOCTYPE mapper PUBLIC "-//mybatis.org//DTD Mapper 3.0//EN" "http://mybatis.org/dtd/mybatis-3-mapper.dtd" > <!--namespac命名空间,指定了DAO接口,将xml配置文件与DAO绑定起来了,相当于实现了这个接口--> <mapper namespace="com.enmo.nimbus.base.dao.BaseDAO" > <!--id对应方法名, 相当于重写该方法--> <select id="selectByParam" resultType="com.yang.test.User"> select count(*) from cs_user </select> </mapper> -
使用
private MyBatisUtils myBatisUtils;

// 获取SqlSession
SqlSession sqlSession = myBatisUtils.getSqlSession();

// 执行sql
UserDao userDao = sqlSession.getMapper(UserDao.calss);
List<User> userList = userDao.selectByParam();

// 关闭SqlSession
sqlSession.close();
2、MyBatis配置文件详解
【功能】
- 配置多个环境「environments」
- 数据库配置引用外部配置文件「properties」
- 设置缓存、驼峰名、日志具体实现「settings」
- 实体类起别名「typeAliases」
- 注册Mapper文件「mappers」
2.1、环境配置(environments)
-
environments
可以配置多个环境,并指定所需环境
-
transactionManager
MyBatis事务管理有两种:JDBC/MANAGED,默认的事务管理,是使用的JDBC的事务管理,可以直接使用JDBC的提交和回滚设置
-
dataSource
有三种数据源:UNPOOLED(没有连接池)、POOLED(有连接池)、JNDI。MyBatis默认使用POOLED
【连接池的作用】避免了创建新的连接实例时所必需的初始化和认证时间。
2.2、属性(properties)
引入外部配置文件
-
编写配置文件
driver=com.msql.jdbc.Driver url= username= password= -
在核心配置文件中引入
<!--放在第1位--> <properties resource="db.properties"/> <configuration> <environments default="development"> <environment id="development"> <transactionManager type="JDBC"/> <dataSource type="POOLED"> <!--可以直接饮用文件中变量:驱动、url、username、password--> <property name="driver" value="${driver}"/> <property name="url" value="${url}"/> <property name="username" value="${username}"/> <property name="password" value="${password}"/> </dataSource> </environment> </environments> -
补充:也可以配置文件和properties标签都写配置
<!--如果配置文件中也有password等属性,则会优先引用配置文件中的,这里写的无效-->
<properties resource="db.properties">
	<property name="username" value="yang"/>
  <property name="password" value="123456"/>
</properties>
2.3、设置(settings)
<settings>
  <!--功能一:二级缓存,开启全局缓存(全局缓存默认是开启的,也可以在这写上)-->
	<setting name="cacheEabled" value="true"/>

  <!--开启自动驼峰命名-->
  <serting name="mapUnderscoreToCamelCase" value=true/>

  <!--指定日志具体实现-->
  <serting name="logImpl" value="LOG4J"/>
</settings>
2.4、别名(typeAliases)
用于减少mapper中实体类名完全限定的冗余
<!--放在第3位-->
<typeAliases>
  <!--方式一:直接指定别名-->
	<typeAlias alias="User" type="com.yang.project.user.model.User"/>
  <!--方式二:直接指定一个包,这个包下的别名默认为首字母小写的类名(user)-->
  <package name="com.yang.project.user.model"/>
</typeAliases>
// 方式二限定后可以使用注解自定义指定别名
@Alias("User")
public class User{}
第一种可以自定义指定别名,第二种自动使用默认,如果要自定义需要使用注解在类上指定
2.5、映射器(mappers)
注册绑定Mapper文件(不绑定会报错:not know to the MapperRegisry)
-
四种方式(用第一种就行了)
<mappers>
  <!-- 使用相对于类路径的资源引用 【推荐】-->
  <mapper resource="org/mybatis/builder/AuthorMapper.xml"/>

  <!-- 使用映射器接口实现类的完全限定类名 【DAO接口和Mapper.xml文件必须在同一包下】-->
  <mapper class="org.mybatis.builder.AuthorMapper"/>

  <!-- 将包内的映射器接口实现全部注册为映射器 【DAO接口和Mapper.xml文件必须在同一包下】-->
  <package name="org.mybatis.builder"/>

  <!-- 使用完全限定资源定位符(URL) 【这种不用】-->
  <mapper url="file:///var/mappers/AuthorMapper.xml"/>

</mappers>
二、SpringBoot整合MyBatis
1、依赖配置
1.1、导入依赖
-
posthresql驱动依赖
<dependency> <groupId>org.postgresql</groupId> <artifactId>postgresql</artifactId> <version>42.2.5</version> <scope>runtime</scope> </dependency> -
连接池依赖
<dependency> <groupId>com.alibaba</groupId> <artifactId>druid-spring-boot-starter</artifactId> <version>1.1.10</version> </dependency> -
mybatis依赖
<dependency>
    <groupId>org.mybatis.spring.boot</groupId>
    <artifactId>mybatis-spring-boot-starter</artifactId>
    <version>1.3.2</version>
</dependency>
1.2、配置文件
注意:一定不要忘了在type-aliases-package:配置所有实例类所在目录
mybatis:
  mapper-locations: classpath*:mybatis/*.xml   # 配置映射文件位置(映射器)
  executor-type: simple
  config-location: classpath:mybatis-config.xml
  type-aliases-package: com.example.firstspringboot.mybatistest.model  # 配置实体类位置
  configuration:
    map-underscore-to-camel-case: true # 配置驼峰

# 指定连接数据库的信息
spring:
  datasource:
    url: jdbc:postgresql://192.168.X.XXX:5432/emcs
    # 指定驱动
    driver-class-name: org.postgresql.Driver
    username:
    password:
    type: com.alibaba.druid.pool.DruidDataSource
    hikari:
      login-timeout: 30
      connection-timeout: 10000
      idle-timeout: 600000
      max-lifetime: 1800000
      connection-test-query: select 1
2、项目使用流程
2.1、准备实体类(model)
@Data
public class ATest {
    private String t;
    private String u;
    private String v;
}
2.2、创建接口并配置扫描(dao)
public interface TestDao {
    ATest queryUByT(@Param("t") String t);
}
2.3、配置映射文件
<?xml version="1.0" encoding="UTF-8"?>
<!DOCTYPE mapper PUBLIC "-//mybatis.org//DTD Mapper 3.0//EN" "http://mybatis.org/dtd/mybatis-3-mapper.dtd">

<mapper namespace="com.example.firstspringboot.dao.TestDao">
    <select id="queryUByT" resultType="com.example.firstspringboot.mybatistest.ATest">
        select t, u, v
        from a_test
        where t = #{t}
    </select>
</mapper>
2.4、扫描映射文件
@MapperScan(basePackages = "com.example.firstspringboot.dao")
public class FirstSpringbootApplication {
    public static void main(String[] args) {
        SpringApplication.run(FirstSpringbootApplication.class, args);
    }
}
2.5、使用
-
原生mybatis使用
SqlSession sqlSession = MybatisUtils.getSqlSession(); TestDao testDao = sqlSession.getMapper(TestDao.class); ATest aTest = testDao.queryUByT(t); // 增删改需要提交事务 // sqlSession.commit(); sqlSession.close(); -
springboot中的使用
private TestDao testDao;
ATest aTest = testDao.queryUByT(t)
3、注解方式整合Mybatis
3.1、原理
底层使用反射:通过实体类反射解析出方法及方法上注解的value。
本质:反射机制
底层:动态代理
3.2、方法
@Insert("")
@Delete("")
@Update("")
@Select("")

@InsertProvider("")
@DeleteProvider("")
@UpdateProvider("")
@SelectProvider("")
3.3、使用场景
两个方法可以同时存在,复杂的sql用xml,简单的sql用注解
三、MyBatis原理
1、生命周期和作用域
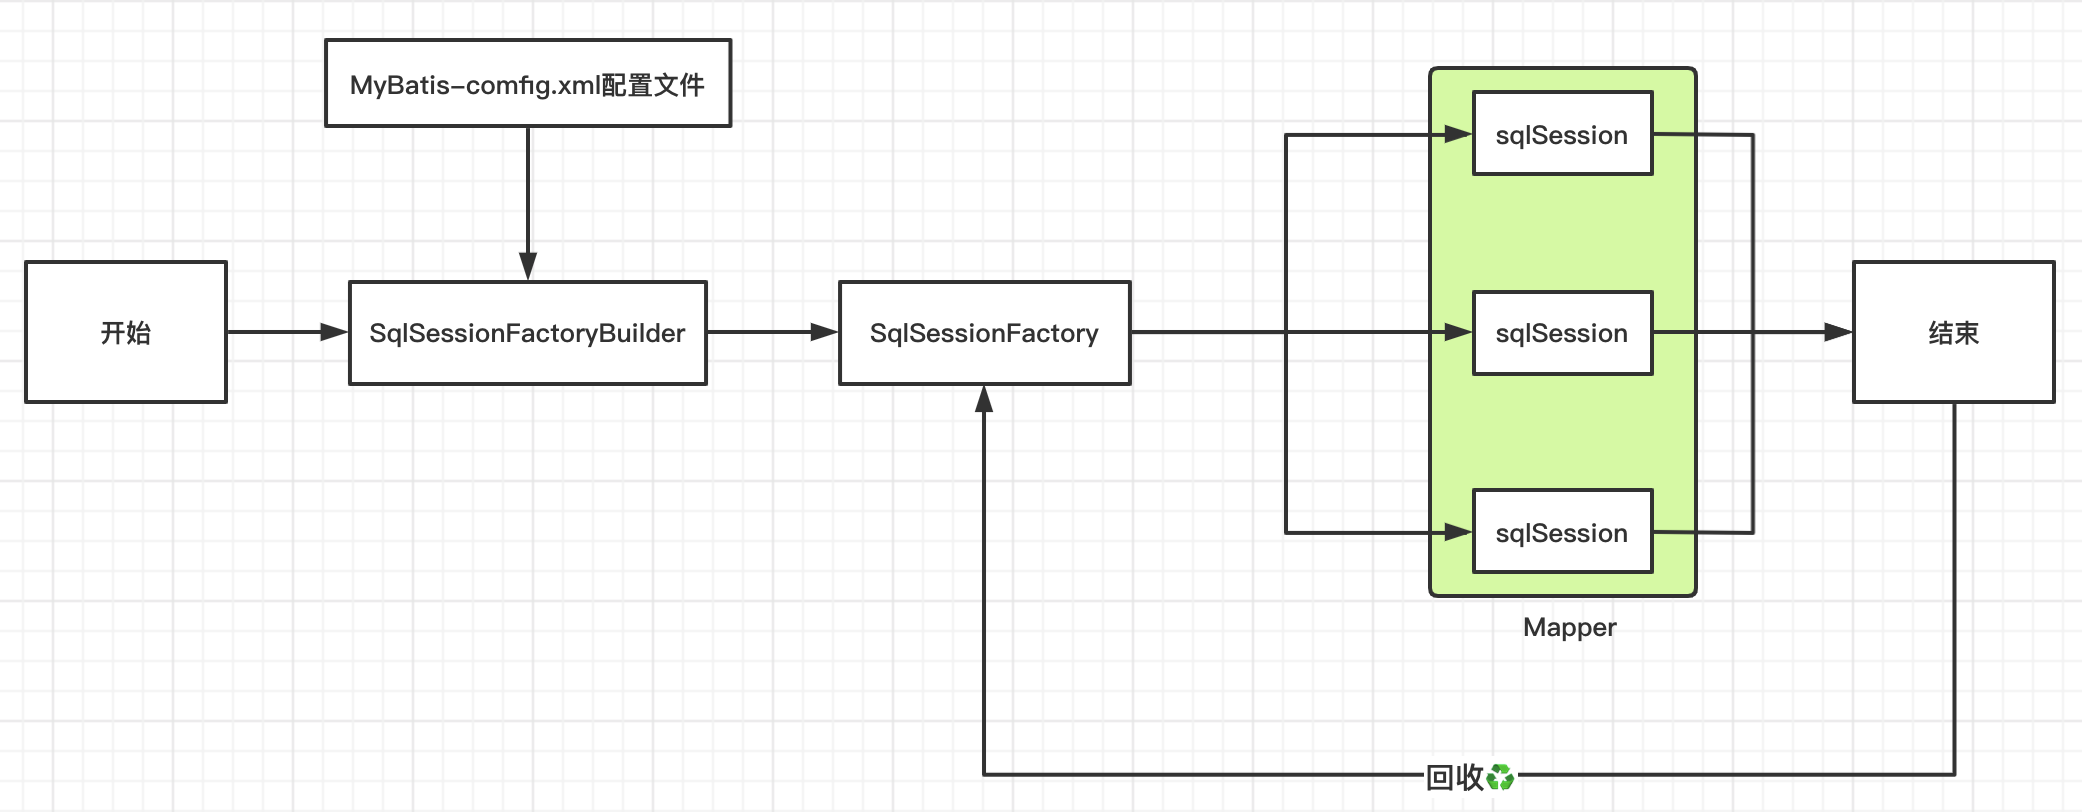
生命周期和作用域是至关重要的,因为错误的使用会导致并发问题
-
SqlSessionFactotyBuilder
- 【特点】:一旦创建了SqlSessionFactory,就不再需要
- 【作用域】:局部方法变量
-
SqlSessionFactory
- 可以想象为数据库连接池(创建、回收再利用Sqlsession)
- 【特点】:一旦被创建运行期间一直存在,没有任何理由丢弃它或创建另一个实例(相当于就有一个连接池,多个的话浪费资源)
- 【作用域】:全局变量(最简单的是使用单例模式或者静态单例模式,保证全局只有一个SqlSessionFactory)
-
SqlSession
- 相当于连接到连接池的一个请求
- 【特点】:创建使用后需要关闭,否则占用资源
- 【作用域】:局部方法变量(实例线程是不安全的,所以是不能被共享的)
四、MyBatis标签
1、CURD
1.1、Select
<select id="dao层的方法名" resultType="sql语句返回值类型" parameterType="参数类型,区别重载">
</select>
-
模糊查询
select ... from table where name like concat('%', #{search}, '%')
1.2、Insert
<insert id="dao层的方法名" parameterType="参数类型,区别重载"></insert>
1.3、Update
<update id="dao层的方法名" parameterType="参数类型,区别重载"></update>
1.4、Delete
<delete id="dao层的方法名" parameterType="参数类型,区别重载"></delete>
补充、万能Map
-
dao
User findByParam(Map<String, Object> map) -
xml
<select id="findByParam" parameterType="map"> select ... from table where id = #{a} and name = #{b} </select> -
service
private TestDao testDao;
Map<String, Object> map = new HashMap<String, Object>()
map.put("id", 1);
map.put("name", "yang")
ATest aTest = testDao.findByParam(map)
2、ResultMap结果集映射
2.1、起别名
MyBatis会根据数据库字段在幕后创建一个ResultMap,
实体类的属性名映射到JavaBean的属性上,
两者进行相互匹配,如果字段名与属性名不能精确匹配,
那么有两种方式解决:
-
1、sql起别名,这样别名将作为字段名,自动创建为ResultMap
<select id="getUserById" resultType="User"> select id, name, pwd password from cs_user </select> -
2、自定义ResultMap
<resultMap id="UserMap" resultType="User">
  <!-- column:数据库字段,property:model中字段 -->
  <result column="pwd" property="password"/>
</resultMap>


<select id="getUserById" resultMap="UserMap">
	select id, name, pwd from cs_user
</select>
2.2、实现多对一
association:关联(多对一)
-
实体类
多个学生对应一个教师
-
student
@Data @AllArgsConstructor @NoArgsConstructorpublic class Student { private int id; private String name; private Teacher teacher; } -
teacher
@Data
@AllArgsConstructor
@NoArgsConstructor
public class Teacher {
    private int id;
    private String name;
}
-
-
xml
-
方式一:按查询嵌套处理
<mapper namespace="com.msdn.dao.StudentMapper"> <select id="getStudent" resultMap="studentTeacher"> select * from student </select> <select id="getTeacher" resultType="teacher"> select * from teacher where id = #{tid} </select> <resultMap id="studentTeacher" type="student"> <id property="id" column="id" /> <result property="name" column="name" /> <association property="teacher" javaType="Teacher" column="tid" select="getTeacher" /> </resultMap> </mapper> -
方式二:按结果嵌套处理
<mapper namespace="com.msdn.dao.StudentMapper">
  <select id="getStudent2" resultMap="studentMap">
    select s.id sid,s.name sname,t.id ttid,t.name tname
    from student s,teacher t
    where s.tid=t.id;
  </select>

  <resultMap id="studentMap" type="student">
    <id property="id" column="sid" />
    <result property="name" column="sname" />
    <association property="teacher" javaType="Teacher" >
      <id property="id" column="ttid" />
      <result property="name" column="tname" />
    </association>
  </resultMap>

</mapper>
-
-
执行结果
Student(id=1, name=张三, teacher=Teacher(id=1, name=hresh))
Student(id=2, name=李四, teacher=Teacher(id=1, name=hresh))
Student(id=3, name=王武, teacher=Teacher(id=1, name=hresh))
Student(id=4, name=张散散, teacher=Teacher(id=1, name=hresh))
2.3、实现一对多
collection:包含(一对多)
-
实体类
一个教师对应多个学生
-
student
@Data @AllArgsConstructor @NoArgsConstructorpublic class Student { private int id; private String name; private int tid; } -
teacher
@Data
@AllArgsConstructor
@NoArgsConstructorpublic
class Teacher {
  private int id;
  private String name;
  private List<Student> students;
}
-
-
xml
-
方式一:按照嵌套处理
<mapper namespace="com.msdn.dao.TeacherMapper"> <select id="getTeacherById2" resultMap="TeacherStudent2"> select * from mybatis.teacher where id = #{id} </select> <select id="getStudents" resultType="Student"> select * from mybatis.student where tid = #{tid} </select> <resultMap id="TeacherStudent2" type="Teacher"> <id property="id" column="id" /> <result property="name" column="name" /> <collection property="students" column="id" javaType="ArrayList" ofType="Student" select="getStudents" /> </resultMap> </mapper> -
方式二:按照结果嵌套处理
<mapper namespace="com.msdn.dao.TeacherMapper">
  <select id="getTeacherById" resultMap="TeacherStudent">
    select s.id sid,s.name sname,t.id tid,t.name tname
    from mybatis.student s,mybatis.teacher t
    where s.tid = t.id and t.id =#{id}
  </select>

  <resultMap id="TeacherStudent" type="Teacher">
    <id property="id" column="tid" />
    <result property="name" column="tname" />
    <!--注意List<Student>,用ofType="Student"-->
    <collection property="students" ofType="Student" >
      <result property="id" column="sid" />
      <result property="name" column="sname" />
      <result property="tid" column="tid" />
    </collection>
  </resultMap>

</mapper>
-
-
执行结果
Teacher(id=1,
        name=hresh,
        students=[Student(id=1, name=张三, tid=1),
                  Student(id=2, name=李四, tid=1),
                  Student(id=3, name=王武, tid=1),
                  Student(id=4, name=张散散, tid=1)]
       )
3、动态SQL
根据不同条件生成不同的SQL
3.1、if
功能:条件判断(可多条件成立)
where state = 'pass'
<if test="search != null">
	and title = #{search}
</if>
3.2、trim(where|set)
-
where
功能:去掉开头的and/or
<where> <if test="state != null"> and state = 'pass' </if> <if test="search != null"> and title = #{search} </if> </where> -
set
功能:去掉无用逗号
<set> <if test="name != null"> name = #{name} </if> <if test="age != null"> age = #{age} </if> </set> -
trim
功能:定制where和set
<trim prefix="WHERE" prefixOverrides="AND | OR"> ... </trim><trim prefix="SET" suffixOverrides=","> ... </trim>
3.3、choose|when|otherwise
功能:条件选择(只能单条件成立)
<where>
  <choose>
  	<when test="type == 'create'">result = #{title}</when>
    <when test="name != null">and result = #{name}</when>
    <otherwise>and result = #{views}</otherwise>
  </choose>
</where>
3.4、sql片段
功能:提取sql片段方便复用
-
提取片段
<sql id="if-name-age"> <if test="name != null"> name = #{name} </if> <if test="age != null"> age = #{age} </if> </sql> -
使用
<set> <include refid="if-name-age"></include> </set> -
注意:不要包含
标签
3.5、foreach
功能:对集合遍历循环
<select id="selectUser" resultType="com.yang.User">
	select name, age
  from cs_user
  where id in
  <foreach item="item" index="index" collection="list" open="(" separator="," close=")">
  	#{item}
  </foreach>
</select>
-
实例
-
批量插入
<!--将List<Malog>批量插入数据库-->

<insert id="insert" parameterType="MaLog">
    insert into ma_log(finger_print,
                       ip,
                       country)
    values
      <foreach collection="list" item="malog" separator=",">
            (#{malog.fingerPrint},
            #{malog.ip},
            #{malog.country})
      </foreach>
</insert>
-
3.6、script
功能:注解中使用动态sql
@Update("<script>
  	update knowledge_group set sort=sort-1
  	<where>
      <if groupId != null>group_id=#{groupId}</if>
      and sort > #{newSort}
  	</where>
	</script>")
int updateBaseGroupSortMinum(Group group);
五、MyBatis缓存
1、概述
MyBatis中默认定义了两级缓存,默认只开启一级缓存,二级缓存需要手动开启,为了提高扩展性,MyBatis定义了缓存接口Cache, 我们可以通过实现Cache接口来自定义二级缓存。
2、一级缓存
- 概述
SqlSession级别的缓存,也称本地缓存
- 开启
默认开启,无需操作,也无法关闭
- 缓存作用域
SqlSession sqlSession = MybatisUtils.getSqlSession();
//...在sqlSession开启到关闭之间的查询会被缓存
sqlSession.close();
全过程:创建连接池,创建连接,进行sql操作(缓存作用域),关闭连接,将连接放回连接池。
-
缓存失效因素
-
select不同数据
-
insert、update、delete会刷新缓存
-
查询不同的mapper
-
手动清除缓存
sqlSession.claerCache(); // 手动清理缓存
-
3、二级缓存
- 概述
基于namespace级别的缓存
-
开启
<!--全局缓存默认是开启的,也可以在mybatis配置xml中写上-->
<settings>
	<setting name="cacheEabled" value="true"/>
</settings>

<!--只需要在Mapper.xml文件中加入标签即可-->
<cache/>
<!--可以自定义功能:先进先出,60秒自动刷新一次,最多存512个对象/列表的引用,只读--> <cache eviction="FIFO" flushInterval="60000" size="512" readOnly="true"/> <!--select可以单独控制要不要开启缓存--> <select id="" resultType="" useCache="false"></select> <!--update,delete,insert只能定义刷新缓存--> <update id="" parameterType="" falshCache="false"></update>- 清除策略
- LRU—最近最少使用:移除最长时间不被使用的对象
- FIFO—先进先出:按对象进入缓存的顺序来移除
- SOFT—软引用:基于垃圾回收器状态和软引用规则移除对象
- WEAK—弱引用:更积极的基于垃圾回收器状态和弱引用规则移除对象
- 清除策略
-
缓存作用域
是基于命名空间namespace的,会在整个Mapper.xml中生效(一般一个
会写在一个Mapper.xml中) 全过程:所有缓存会缓存到一级缓存,当一级缓存结束(sqlSession关闭),会将缓存放入二级缓存,当开启一个新的sqlSession会走二级缓存。
-
注意:需要将实体类序列化,否则会报错
Causer by:java.io.NotSerializbleException:com.yang.pojo.User
4、MyBatis缓存原理

5、MyBatis缓存与redis缓存
在spring整合mybatis之后,会自动管理sqlsession, 也就是说sql执行完后会自动关闭sqlsession,这样一来,一级缓存实际上是没用的,所以需要开启二级缓存,而MyBatis的二级缓存是缓存在服务器上的,占用服务器资源,并且不能做分布式的缓存(只存在当前服务器),所以使用redis代替mybatis的二级缓存,减少服务器资源占用,并能实现分布式缓存。
