通过本文,可实现CentOS下shadowsock服务端及客户端的搭建,并把代理的socket5转为http、https。可实现linux主机的全局代理
1. 服务端:
1.1 下载shadowsock一键脚本并赋予执行权限
[root@nginx-m ~]# wget --no-check-certificate -O shadowsocks-all.sh https://raw.githubusercontent.com/teddysun/shadowsocks_install/master/shadowsocks-all.sh
--2018-10-23 14:02:16-- https://raw.githubusercontent.com/teddysun/shadowsocks_install/master/shadowsocks-all.sh
Resolving raw.githubusercontent.com (raw.githubusercontent.com)... 151.101.76.133
Connecting to raw.githubusercontent.com (raw.githubusercontent.com)|151.101.76.133|:443... connected.
HTTP request sent, awaiting response... 200 OK
Length: 46141 (45K) [text/plain]
Saving to: ‘shadowsocks-all.sh’
100%[=====================================================================>] 46,141 --.-K/s in 0.004s
2018-10-23 14:02:16 (11.8 MB/s) - ‘shadowsocks-all.sh’ saved [46141/46141]
[root@nginx-m ~]# chmod +x shadowsocks-all.sh
1.2. 执行安装
[root@nginx-m ~]# ./shadowsocks-all.sh 2>&1 | tee shadowsocks-all.log
Which Shadowsocks server you'd select: #选择安装的版本
1) Shadowsocks-Python
2) ShadowsocksR
3) Shadowsocks-Go
4) Shadowsocks-libev
Please enter a number (Default Shadowsocks-Python):1 #默认1) Shadowsocks-Python
You choose = Shadowsocks-Python
Please enter password for Shadowsocks-Python #shadowsock客户端使用的密码
(Default password: teddysun.com):centos
password = centos
Please enter a port for Shadowsocks-Python [1-65535] #服务端监听的端口
(Default port: 17392):10086
port = 10086
Please select stream cipher for Shadowsocks-Python: #选择加密算法
1) aes-256-gcm
2) aes-192-gcm
3) aes-128-gcm
4) aes-256-ctr
5) aes-192-ctr
6) aes-128-ctr
7) aes-256-cfb
8) aes-192-cfb
9) aes-128-cfb
10) camellia-128-cfb
11) camellia-192-cfb
12) camellia-256-cfb
13) xchacha20-ietf-poly1305
14) chacha20-ietf-poly1305
15) chacha20-ietf
16) chacha20
17) salsa20
18) rc4-md5
Which cipher you'd select(Default: aes-256-gcm):12
cipher = aes-256-cfb
Press any key to start...or Press Ctrl+C to cancel #按任意键继续,Ctrl+C取消
1.3. 安装完成
INFO: loading config from /etc/shadowsocks-python/config.json
2018-10-23 14:05:43 INFO loading libcrypto from libcrypto.so.10
2018-10-23 14:05:43 INFO loading libsodium from libsodium.so.23
Starting Shadowsocks success
Congratulations, Shadowsocks-Python server install completed!
Your Server IP : XX.XX.XXX.XX #服务端地址
Your Server Port : 10086 #服务端监听端口
Your Password : centos #客户端访问该服务时使用的密码
Your Encryption Method: aes-256-cfb #加密算法
Your QR Code: (For Shadowsocks Windows, OSX, Android and iOS clients)
ss://YWVzLTI1Ni1nY206Y2VudG9zQDQ3Ljc1LjEyOS43OToxMDA4Ng==
Your QR Code has been saved as a PNG file path:
/root/shadowsocks_python_qr.png
Welcome to visit: https://teddysun.com/486.html
Enjoy it!
1.4. 启动:
启动脚本可用命令:
/etc/init.d/shadowsocks-python start | stop | restart | status
默认启动脚本读取/etc/shadowsocks-python/config.json
[root@nginx-m ~]# /etc/init.d/shadowsocks-python start
INFO: loading config from /etc/shadowsocks-python/config.json
2018-10-23 14:34:09 INFO loading libcrypto from libcrypto.so.10
2018-10-23 14:34:09 INFO loading libsodium from libsodium.so.23
started
Starting Shadowsocks success
手动指定配置文件():
[root@nginx-m ~]# /bin/python /usr/bin/ssserver -c /etc/shadowsocks.json -d start
INFO: loading config from /etc/shadowsocks.json
2018-10-23 14:43:06 INFO loading libcrypto from libcrypto.so.10
2018-10-23 14:43:06 INFO loading libsodium from libsodium.so.23
started
[root@nginx-m ~]# ss -tnl
State Recv-Q Send-Q Local Address:Port Peer Address:Port
LISTEN 0 128 *:9001 *:*
LISTEN 0 128 *:9002 *:*
LISTEN 0 128 *:9003 *:*
LISTEN 0 128 *:9004 *:*
LISTEN 0 128 *:22 *:*
LISTEN 0 128 *:8989 *:*
LISTEN 0 1 127.0.0.1:32000 *:*
1.5. 配置文件:
/etc/init.d/shadowsocks-python启动时默认读取/etc/shadowsocks-python/config.json,该文件不存在时,会读取/etc/shadowsocks.json
单用户配置文件:
{
"server":"0.0.0.0", #监听地址
"server_port":10086, #对外服务的端口
"local_address":"127.0.0.1",
"local_port":1080, #本地端口
"password":"centos", #对外服务密码
"timeout":300,
"method":"aes-256-cfb", #加密算法
"fast_open":true
}
多用户配置文件:
{
"server":"0.0.0.0",
"local_address":"127.0.0.1",
"local_port":1080,
"port_password":{
"8989":"centos",
"9001":"centos",
"9002":"centos",
"9003":"centos",
"9004":"centos"
},
"timeout":300,
"method":"aes-256-cfb",
"fast_open": false
}
2. 客户端:
2.1. 安装shadowsock客户端
[root@testweb ~]# pip install --upgrade pip #升级pip包管理器
Collecting pip
Downloading http://mirrors.aliyun.com/pypi/packages/c2/d7/90f34cb0d83a6c5631cf71dfe64cc1054598c843a92b400e55675cc2ac37/pip-18.1-py2.py3-none-any.whl (1.3MB)
100% |████████████████████████████████| 1.3MB 88.6MB/s
Installing collected packages: pip
Found existing installation: pip 8.1.2
Uninstalling pip-8.1.2:
Successfully uninstalled pip-8.1.2
Successfully installed pip-18.1 #成功升级pip
[root@testweb ~]# pip install shadowsocks
Looking in indexes: http://mirrors.aliyun.com/pypi/simple/
Collecting shadowsocks
Downloading http://mirrors.aliyun.com/pypi/packages/02/1e/e3a5135255d06813aca6631da31768d44f63692480af3a1621818008eb4a/shadowsocks-2.8.2.tar.gz
Installing collected packages: shadowsocks
Running setup.py install for shadowsocks ... done
Successfully installed shadowsocks-2.8.2
2.2. 为shadowsock增加配置文件
vim /etc/shadowsocks.json 增加以下内容:
{
"server":"XX.XX.XX.XX",
"server_port":10086,
"local_port":1080,
"password":"centos",
"timeout":600,
"method":"aes-256-cfb"
}
2.3. 启动shadowsock客户端:
[root@testweb ~]# nohup sslocal -c /etc/shadowsocks.json /dev/null 2>&1 &
[1] 22692
[root@testweb ~]# nohup: ignoring input and appending output to ‘nohup.out’ #程序启动时的输出重定向至nohup.out文件
echo " nohup sslocal -c /etc/shadowsocks.json /dev/null 2>&1 &" /etc/rc.local #设置开机自启动
2.4. 测试shadowsock服务是否正常连接
[root@testweb ~]# curl --socks5 127.0.0.1:1080 http://httpbin.org/ip
{
"origin": "X.X.X.X" #此处显示shadowsock服务器外网地址即为正常
}
2.5. 安装Privoxy
Shadowsocks 是一个 socket5 服务,我们需要使用 Privoxy 把流量转到 http/https 上。
[root@testweb ~]# yum -y install privoxy
Loaded plugins: fastestmirror
Loading mirror speeds from cached hostfile
Resolving Dependencies
--> Running transaction check
---> Package privoxy.x86_64 0:3.0.26-1.el7 will be installed
--> Finished Dependency Resolution
Dependencies Resolved
===============================================================================================================================================
Package Arch Version Repository Size
===============================================================================================================================================
Installing:
privoxy x86_64 3.0.26-1.el7 epel 936 k
Transaction Summary
===============================================================================================================================================
Install 1 Package
Total download size: 936 k
Installed size: 3.1 M
Downloading packages:
privoxy-3.0.26-1.el7.x86_64.rpm | 936 kB 00:00:00
Running transaction check
Running transaction test
Transaction test succeeded
Running transaction
Installing : privoxy-3.0.26-1.el7.x86_64 1/1
Verifying : privoxy-3.0.26-1.el7.x86_64 1/1
Installed:
privoxy.x86_64 0:3.0.26-1.el7
Complete!
2.6. 配置privoxy
配置文件路径:/etc/privoxy/config
确保以下两行未被注释,且forward-socks5t的端口号与shadowsock的local端口一致
listen-address 127.0.0.1:8118
forward-socks5t / 127.0.0.1:1080 .
2.7. 添加环境变量
新建/etc/profile.d/privoxy.sh,添加以下内容并加载
export http_proxy=http://127.0.0.1:8118
export https_proxy=http://127.0.0.1:8118
加载/etc/profile.d/privoxy.sh
source /etc/profile.d/privoxy.sh
2.8. 启动privoxy
[root@lxk ~]# systemctl start privoxy
2.9. 测试
curl命令测试:若返回一大堆HTML,则工作正常。
curl www.google.com.hk
也可用elinks测试,若正常,会显示谷歌文本格式界面
2.10. 注意:
若不需使用代理时,把/etc/profile.d/privoxy.sh的内容注释掉
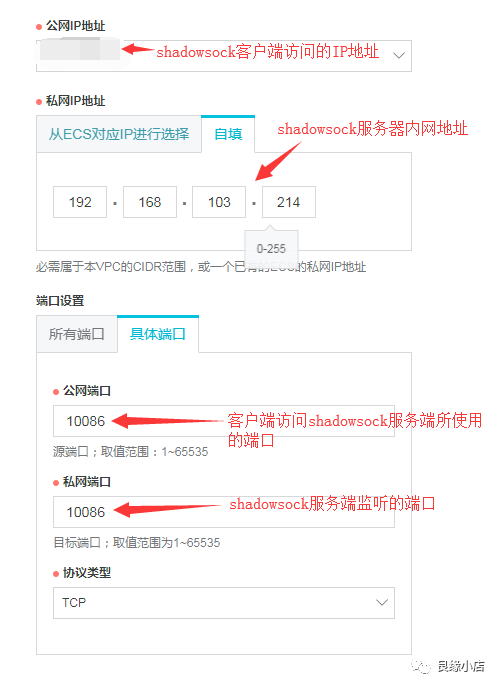
3. 阿里云服务器配置
若shadowsock服务器为阿里云服务器
有外网地址时:在安全组规则中开放10086端口
无外网地址时:需购买EIP,配置DNAT规则
通过本文,可实现CentOS下shadowsock服务端及客户端的搭建,并把代理的socket5转为http、https。可实现linux主机的全局代理
1. 服务端:
1.1 下载shadowsock一键脚本并赋予执行权限
[root@nginx-m ~]# wget --no-check-certificate -O shadowsocks-all.sh https://raw.githubusercontent.com/teddysun/shadowsocks_install/master/shadowsocks-all.sh
--2018-10-23 14:02:16-- https://raw.githubusercontent.com/teddysun/shadowsocks_install/master/shadowsocks-all.sh
Resolving raw.githubusercontent.com (raw.githubusercontent.com)... 151.101.76.133
Connecting to raw.githubusercontent.com (raw.githubusercontent.com)|151.101.76.133|:443... connected.
HTTP request sent, awaiting response... 200 OK
Length: 46141 (45K) [text/plain]
Saving to: ‘shadowsocks-all.sh’
100%[=====================================================================>] 46,141 --.-K/s in 0.004s
2018-10-23 14:02:16 (11.8 MB/s) - ‘shadowsocks-all.sh’ saved [46141/46141]
[root@nginx-m ~]# chmod +x shadowsocks-all.sh
1.2. 执行安装
[root@nginx-m ~]# ./shadowsocks-all.sh 2>&1 | tee shadowsocks-all.log
Which Shadowsocks server you'd select: #选择安装的版本
1) Shadowsocks-Python
2) ShadowsocksR
3) Shadowsocks-Go
4) Shadowsocks-libev
Please enter a number (Default Shadowsocks-Python):1 #默认1) Shadowsocks-Python
You choose = Shadowsocks-Python
Please enter password for Shadowsocks-Python #shadowsock客户端使用的密码
(Default password: teddysun.com):centos
password = centos
Please enter a port for Shadowsocks-Python [1-65535] #服务端监听的端口
(Default port: 17392):10086
port = 10086
Please select stream cipher for Shadowsocks-Python: #选择加密算法
1) aes-256-gcm
2) aes-192-gcm
3) aes-128-gcm
4) aes-256-ctr
5) aes-192-ctr
6) aes-128-ctr
7) aes-256-cfb
8) aes-192-cfb
9) aes-128-cfb
10) camellia-128-cfb
11) camellia-192-cfb
12) camellia-256-cfb
13) xchacha20-ietf-poly1305
14) chacha20-ietf-poly1305
15) chacha20-ietf
16) chacha20
17) salsa20
18) rc4-md5
Which cipher you'd select(Default: aes-256-gcm):12
cipher = aes-256-cfb
Press any key to start...or Press Ctrl+C to cancel #按任意键继续,Ctrl+C取消
1.3. 安装完成
INFO: loading config from /etc/shadowsocks-python/config.json
2018-10-23 14:05:43 INFO loading libcrypto from libcrypto.so.10
2018-10-23 14:05:43 INFO loading libsodium from libsodium.so.23
Starting Shadowsocks success
Congratulations, Shadowsocks-Python server install completed!
Your Server IP : XX.XX.XXX.XX #服务端地址
Your Server Port : 10086 #服务端监听端口
Your Password : centos #客户端访问该服务时使用的密码
Your Encryption Method: aes-256-cfb #加密算法
Your QR Code: (For Shadowsocks Windows, OSX, Android and iOS clients)
ss://YWVzLTI1Ni1nY206Y2VudG9zQDQ3Ljc1LjEyOS43OToxMDA4Ng==
Your QR Code has been saved as a PNG file path:
/root/shadowsocks_python_qr.png
Welcome to visit: https://teddysun.com/486.html
Enjoy it!
1.4. 启动:
启动脚本可用命令:
/etc/init.d/shadowsocks-python start | stop | restart | status
默认启动脚本读取/etc/shadowsocks-python/config.json
[root@nginx-m ~]# /etc/init.d/shadowsocks-python start
INFO: loading config from /etc/shadowsocks-python/config.json
2018-10-23 14:34:09 INFO loading libcrypto from libcrypto.so.10
2018-10-23 14:34:09 INFO loading libsodium from libsodium.so.23
started
Starting Shadowsocks success
手动指定配置文件():
[root@nginx-m ~]# /bin/python /usr/bin/ssserver -c /etc/shadowsocks.json -d start
INFO: loading config from /etc/shadowsocks.json
2018-10-23 14:43:06 INFO loading libcrypto from libcrypto.so.10
2018-10-23 14:43:06 INFO loading libsodium from libsodium.so.23
started
[root@nginx-m ~]# ss -tnl
State Recv-Q Send-Q Local Address:Port Peer Address:Port
LISTEN 0 128 *:9001 *:*
LISTEN 0 128 *:9002 *:*
LISTEN 0 128 *:9003 *:*
LISTEN 0 128 *:9004 *:*
LISTEN 0 128 *:22 *:*
LISTEN 0 128 *:8989 *:*
LISTEN 0 1 127.0.0.1:32000 *:*
1.5. 配置文件:
/etc/init.d/shadowsocks-python启动时默认读取/etc/shadowsocks-python/config.json,该文件不存在时,会读取/etc/shadowsocks.json
单用户配置文件:
{
"server":"0.0.0.0", #监听地址
"server_port":10086, #对外服务的端口
"local_address":"127.0.0.1",
"local_port":1080, #本地端口
"password":"centos", #对外服务密码
"timeout":300,
"method":"aes-256-cfb", #加密算法
"fast_open":true
}
多用户配置文件:
{
"server":"0.0.0.0",
"local_address":"127.0.0.1",
"local_port":1080,
"port_password":{
"8989":"centos",
"9001":"centos",
"9002":"centos",
"9003":"centos",
"9004":"centos"
},
"timeout":300,
"method":"aes-256-cfb",
"fast_open": false
}
2. 客户端:
2.1. 安装shadowsock客户端
[root@testweb ~]# pip install --upgrade pip #升级pip包管理器
Collecting pip
Downloading http://mirrors.aliyun.com/pypi/packages/c2/d7/90f34cb0d83a6c5631cf71dfe64cc1054598c843a92b400e55675cc2ac37/pip-18.1-py2.py3-none-any.whl (1.3MB)
100% |████████████████████████████████| 1.3MB 88.6MB/s
Installing collected packages: pip
Found existing installation: pip 8.1.2
Uninstalling pip-8.1.2:
Successfully uninstalled pip-8.1.2
Successfully installed pip-18.1 #成功升级pip
[root@testweb ~]# pip install shadowsocks
Looking in indexes: http://mirrors.aliyun.com/pypi/simple/
Collecting shadowsocks
Downloading http://mirrors.aliyun.com/pypi/packages/02/1e/e3a5135255d06813aca6631da31768d44f63692480af3a1621818008eb4a/shadowsocks-2.8.2.tar.gz
Installing collected packages: shadowsocks
Running setup.py install for shadowsocks ... done
Successfully installed shadowsocks-2.8.2
2.2. 为shadowsock增加配置文件
vim /etc/shadowsocks.json 增加以下内容:
{
"server":"XX.XX.XX.XX",
"server_port":10086,
"local_port":1080,
"password":"centos",
"timeout":600,
"method":"aes-256-cfb"
}
2.3. 启动shadowsock客户端:
[root@testweb ~]# nohup sslocal -c /etc/shadowsocks.json /dev/null 2>&1 &
[1] 22692
[root@testweb ~]# nohup: ignoring input and appending output to ‘nohup.out’ #程序启动时的输出重定向至nohup.out文件
echo " nohup sslocal -c /etc/shadowsocks.json /dev/null 2>&1 &" /etc/rc.local #设置开机自启动
2.4. 测试shadowsock服务是否正常连接
[root@testweb ~]# curl --socks5 127.0.0.1:1080 http://httpbin.org/ip
{
"origin": "X.X.X.X" #此处显示shadowsock服务器外网地址即为正常
}
2.5. 安装Privoxy
Shadowsocks 是一个 socket5 服务,我们需要使用 Privoxy 把流量转到 http/https 上。
[root@testweb ~]# yum -y install privoxy
Loaded plugins: fastestmirror
Loading mirror speeds from cached hostfile
Resolving Dependencies
--> Running transaction check
---> Package privoxy.x86_64 0:3.0.26-1.el7 will be installed
--> Finished Dependency Resolution
Dependencies Resolved
===============================================================================================================================================
Package Arch Version Repository Size
===============================================================================================================================================
Installing:
privoxy x86_64 3.0.26-1.el7 epel 936 k
Transaction Summary
===============================================================================================================================================
Install 1 Package
Total download size: 936 k
Installed size: 3.1 M
Downloading packages:
privoxy-3.0.26-1.el7.x86_64.rpm | 936 kB 00:00:00
Running transaction check
Running transaction test
Transaction test succeeded
Running transaction
Installing : privoxy-3.0.26-1.el7.x86_64 1/1
Verifying : privoxy-3.0.26-1.el7.x86_64 1/1
Installed:
privoxy.x86_64 0:3.0.26-1.el7
Complete!
2.6. 配置privoxy
配置文件路径:/etc/privoxy/config
确保以下两行未被注释,且forward-socks5t的端口号与shadowsock的local端口一致
listen-address 127.0.0.1:8118
forward-socks5t / 127.0.0.1:1080 .
2.7. 添加环境变量
新建/etc/profile.d/privoxy.sh,添加以下内容并加载
export http_proxy=http://127.0.0.1:8118
export https_proxy=http://127.0.0.1:8118
加载/etc/profile.d/privoxy.sh
source /etc/profile.d/privoxy.sh
2.8. 启动privoxy
[root@lxk ~]# systemctl start privoxy
2.9. 测试
curl命令测试:若返回一大堆HTML,则工作正常。
curl www.google.com.hk
也可用elinks测试,若正常,会显示谷歌文本格式界面
2.10. 注意:
若不需使用代理时,把/etc/profile.d/privoxy.sh的内容注释掉
3. 阿里云服务器配置
若shadowsock服务器为阿里云服务器
有外网地址时:在安全组规则中开放10086端口
无外网地址时:需购买EIP,配置DNAT规则