本来学习OpenCV的目的就是为了做人脸识别、车辆识别、人群计数等等,识别人脸首先要进行人脸检测,OpenCV中内置了Haar Cascade人脸分类器,其中包括haarcascade_frontalface_alt、haarcascade_frontalface_alt_tree、haarcascade_frontalface_alt2、haarcascade_frontalface_default这四种,本文不求甚解,只是从比对上判断一下这几种内置分类器的可用性。
比较的依据,一个是下载的ORL人脸数据库,40个人物*10张照片(92*112像素);另一个是从网络上下载的几张集体照。
ORL人脸数据库,每一个目录就是个人物,就是人物标签

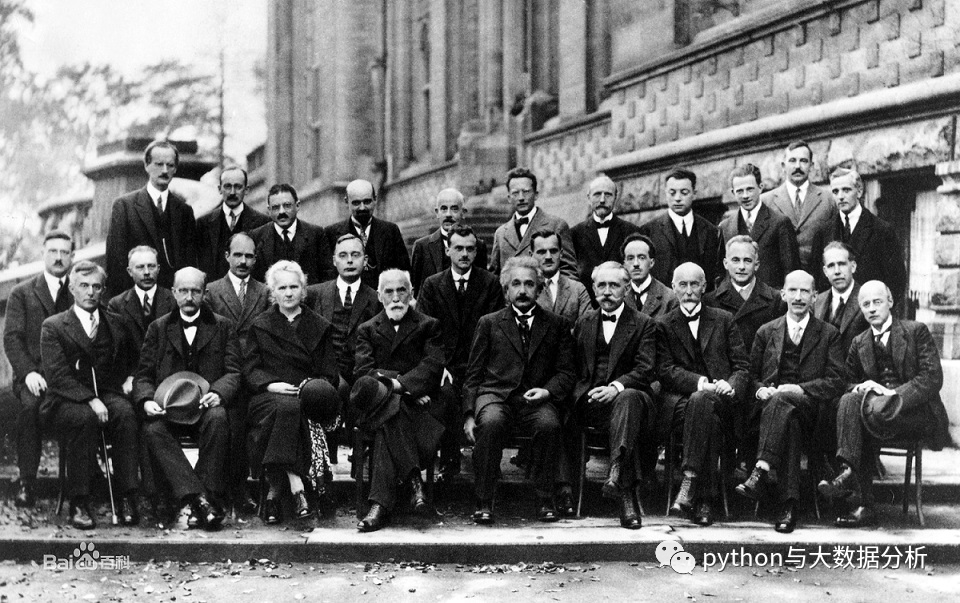
juhui1,1927年在比利时布鲁塞尔召开的第五次索尔维会议,共29个人,黑白照片
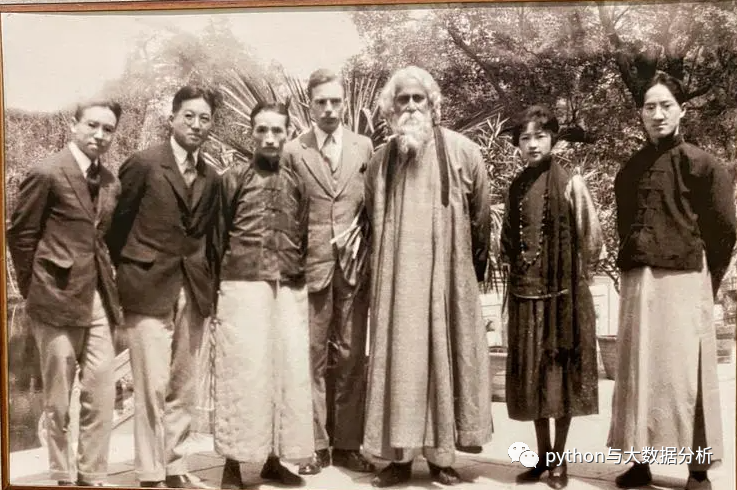
juhui2,1924年林徽因等与访问中国的泰戈尔合影,共7个人
juhui3,为某一届政协会议,主席台上有19个人

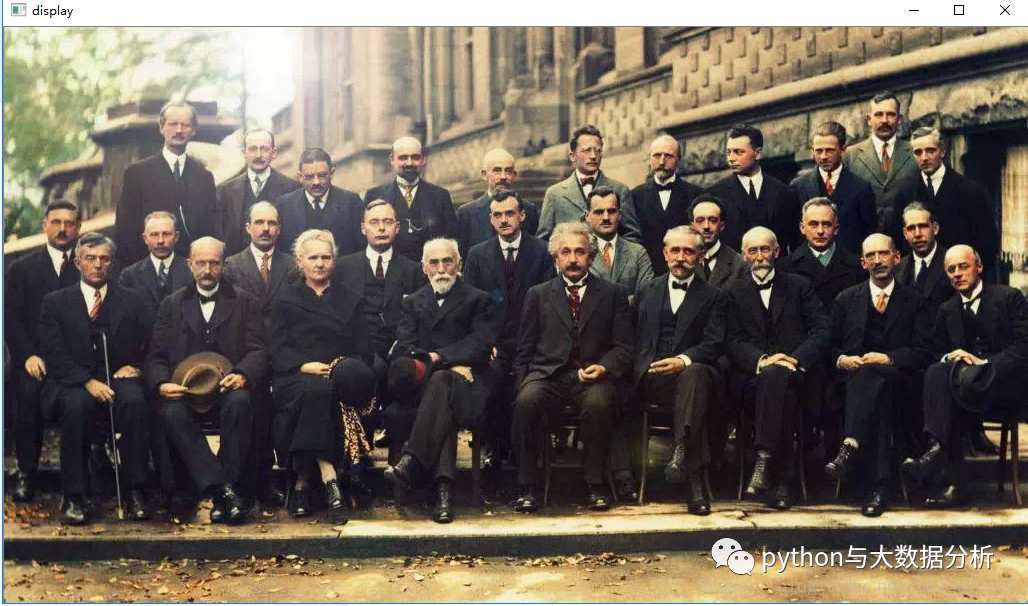
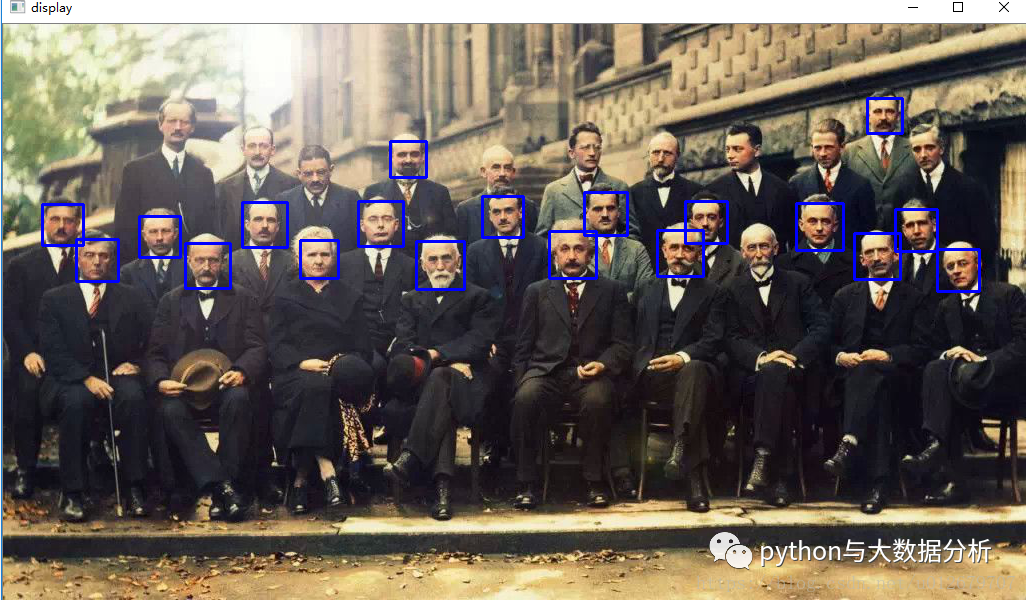
juhui4,仍然是1927年在比利时布鲁塞尔召开的第五次索尔维会议,共29个人,但是是彩色照片
下面的代码是读取摄像头,进行人脸检测
import numpy as npimport cv2import os# 定义绿色跟踪框color = (0, 255, 0)# 读取当前笔记本摄像头camera = cv2.VideoCapture(0)# 判断摄像头是否打开while camera.isOpened(): #cap.read()返回两个参数赋给两个值。 # 第一个参数ret的值为True或False,代表有没有读到图片。 # 第二个参数是frame,是当前截取一帧的图片 ret, frame = camera.read() if ret: # 获取当前帧 image = frame # 进行颜色灰度转换 gray = cv2.cvtColor(image, cv2.COLOR_BGR2GRAY) # 加载分类器,opencv自带的分类器,放在C:\Python\Python37\Lib\site-packages\cv2\data目录下,主要包括 # haarcascade_eye 睁开的眼睛的检测 # haarcascade_eye_tree_eyeglasses 戴眼镜时睁开的眼睛 # haarcascade_frontalcatface 正脸检测 # haarcascade_frontalcatface_extended 正脸检测 # haarcascade_frontalface_alt 正脸检测 # haarcascade_frontalface_alt_tree 正脸检测 # haarcascade_frontalface_alt2 正脸检测 # haarcascade_frontalface_default 正脸检测 # haarcascade_fullbody 全身检测 # haarcascade_lefteye_2splits 检测左眼开或闭合 # haarcascade_licence_plate_rus_16stages 俄罗斯车牌 # haarcascade_lowerbody 下肢检测 # haarcascade_profileface 人脸轮廓检测 # haarcascade_righteye_2splits 检测右眼开或闭合 # haarcascade_russian_plate_number 俄罗斯车牌号 # haarcascade_smile 微笑表情检测 # haarcascade_upperbody 上半身检测 classfier = cv2.CascadeClassifier("haarcascade_frontalface_alt2.xml") # detectMultiScale函数。可以检测出图片中所有的人脸,并将人脸用vector保存各个人脸的坐标、大小(用矩形表示),函数由分类器对象调用 # 参数1:image--待检测图片,一般为灰度图像加快检测速度; # 参数2:objects--被检测物体的矩形框向量组; # 参数3:scaleFactor--表示在前后两次相继的扫描中,搜索窗口的比例系数。默认为1.1即每次搜索窗口依次扩大10%; # 参数4:minNeighbors--表示构成检测目标的相邻矩形的最小个数(默认为3个)。 # 如果组成检测目标的小矩形的个数和小于 min_neighbors - 1 都会被排除。 # 如果min_neighbors 为 0, 则函数不做任何操作就返回所有的被检候选矩形框, # 这种设定值一般用在用户自定义对检测结果的组合程序上; # 参数5:flags--要么使用默认值,要么使用CV_HAAR_DO_CANNY_PRUNING,如果设置为 # CV_HAAR_DO_CANNY_PRUNING,那么函数将会使用Canny边缘检测来排除边缘过多或过少的区域, # 因此这些区域通常不会是人脸所在区域; # 参数6、7:minSize和maxSize用来限制得到的目标区域的范围。 faceRects = classfier.detectMultiScale(gray, scaleFactor=1.2, minNeighbors=3, minSize=(32, 32)) # 返回识别出来的脸部矩阵的位置数组 [[211 191 266 266] [211 191 266 266] [211 191 266 266]] # 如果已识别脸部对象 if len(faceRects) > 0: # 循环输出识别的数组 for faceRect in faceRects: # 获取矩阵的人脸的坐标、大小 x, y, w, h = faceRect # 通过rectangle()在图片上构建矩阵图 cv2.rectangle(image, (x - 10, y - 10), (x + w + 10, y + h + 10), color, 3) # 展示图片 cv2.imshow("My Capture", image) # 按q键退出 if cv2.waitKey(1) & 0xFF == ord('q'): break# 关闭摄像头camera.release()# 关闭窗口cv2.destroyAllWindows()
下面的代码是读取摄像头,进行人脸检测和眼睛检测
import numpy as npimport cv2import os# 定义绿色跟踪框color = (0, 255, 0)# 正脸检测分类器face_cascade = cv2.CascadeClassifier('C:\\Python\\Python37\\Lib\\site-packages\\cv2\\data\\haarcascade_frontalface_alt2.xml')# 睁开的眼睛的检测分类器,奇怪不加路径会报错eye_cascade = cv2.CascadeClassifier('C:\\Python\\Python37\\Lib\\site-packages\\cv2\\data\\haarcascade_eye.xml')# 读取当前笔记本摄像头camera = cv2.VideoCapture(0 ,cv2.CAP_DSHOW)# 判断摄像头是否打开while camera.isOpened(): ret, frame = camera.read() if ret: # 获取当前帧 image = frame # 灰度转换 gray = cv2.cvtColor(image, cv2.COLOR_BGR2GRAY) # 脸部检测 faces = face_cascade.detectMultiScale(gray, 1.3, 5) # 遍历脸部检测数组 for (x, y, w, h) in faces: # 输出脸部矩阵 cv2.rectangle(image, (x, y), (x + w, y + h), (255, 0, 0), 2) # 在脸部范围内搜索眼睛,一个灰度图(用来识别眼睛),一个颜色图(用来输出眼睛矩阵) roi_gray = gray[y:y + h, x:x + w] roi_color = image[y:y + h, x:x + w] # 进行眼睛检测 eyes = eye_cascade.detectMultiScale(roi_gray) # 在脸部区画眼睛矩阵 for (ex, ey, ew, eh) in eyes: cv2.rectangle(roi_color, (ex, ey), (ex + ew, ey + eh), (0, 255, 0), 2) cv2.imshow('img', image) # 按q键退出 if cv2.waitKey(1) & 0xFF == ord('q'): break # 关闭摄像头camera.release()# 关闭窗口cv2.destroyAllWindows()
用opencv内置分类器对几张聚会照片进行人脸检测。
import numpy as npimport cv2imgname = 'C:\\Python\\Pycharm\\docxprocess\\picture\\predict\\juhui4.png'face_cascade = cv2.CascadeClassifier( 'C:\\Python\\Python37\\Lib\\site-packages\\cv2\\data\\haarcascade_frontalface_alt.xml')# face_cascade = cv2.CascadeClassifier('C:\\Python\\Python37\\Lib\\site-packages\\cv2\\data\\haarcascade_frontalface_alt2.xml')# face_cascade = cv2.CascadeClassifier('C:\\Python\\Python37\\Lib\\site-packages\\cv2\\data\\haarcascade_frontalface_alt_tree.xml')# face_cascade = cv2.CascadeClassifier('C:\\Python\\Python37\\Lib\\site-packages\\cv2\\data\\haarcascade_frontalface_default.xml')img = cv2.imread(imgname)# img = cv2.imread('wukelan.jpeg')gray = cv2.cvtColor(img, cv2.COLOR_BGR2GRAY)faces = face_cascade.detectMultiScale(gray, 1.3, 5)for (x, y, w, h) in faces: cv2.rectangle(img, (x, y), (x + w, y + h), (255, 0, 0), 2)cv2.imshow('img', img)cv2.waitKey(0)cv2.destroyAllWindows()
比较检测出来的人脸,可以看出haarcascade_frontalface_alt_tree>haarcascade_frontalface_alt>haarcascade_frontalface_default>haarcascade_frontalface_alt2

下面是对ORL人脸数据库进行人脸检测。
import cv2import numpy as npimport osimport shutil# 载入图像,读取ORL人脸数据库,准备训练数据def loadimageface(data): # 加载图片数据用于训练 # params:data:训练数据所在的目录,要求图片尺寸一样 #ret: # images:[m,height,width] m为样本数,height为高,width为宽 # names:名字的集合 # labels:标签 images = [] names = [] labels = [] face_casecade = cv2.CascadeClassifier('C:\\Python\\Python37\\Lib\\site-packages\\cv2\\data\\haarcascade_frontalface_default.xml') # haarcascade_frontalface_alt_tree 21 # [ 3 9 13 13 13 13 15 17 24 31 33 34 34 34 35 35 36 37 37 37 37] # haarcascade_frontalface_alt 222 # [ 0 0 1 1 1 1 1 1 1 1 1 2 2 2 2 2 2 2 2 3 3 3 3 3 # 3 3 3 3 3 4 4 4 4 4 5 5 5 5 5 6 6 6 6 6 7 7 7 7 # 8 8 9 9 9 9 9 9 9 9 9 9 10 10 10 12 12 12 12 12 12 12 12 12 # 13 13 13 13 13 13 13 13 13 13 14 15 15 15 15 15 15 16 16 16 16 16 17 17 # 17 17 18 18 18 18 18 18 19 20 20 21 21 21 21 21 21 21 21 22 22 22 22 22 # 22 23 23 23 23 23 23 23 23 24 24 24 24 24 25 25 26 26 26 26 26 26 26 26 # 29 29 29 29 29 30 30 30 30 30 31 31 31 31 31 31 31 31 31 31 32 32 32 33 # 33 33 33 33 34 34 34 34 34 34 34 35 35 35 35 35 36 36 36 36 36 36 36 36 # 36 37 37 37 37 37 37 37 37 37 37 38 38 38 38 38 38 38 38 38 39 39 39 39 # 39 39 39 39 39] # haarcascade_frontalface_alt2 231 # [ 0 0 0 1 1 1 1 1 1 1 1 1 2 2 2 2 2 2 2 3 3 3 3 3 # 3 3 3 3 3 4 4 4 4 5 5 5 5 6 6 6 6 6 6 7 7 7 7 7 # 7 8 8 9 9 9 9 9 9 9 9 9 9 10 10 10 12 12 12 12 12 12 12 12 # 12 13 13 13 13 13 13 13 13 13 13 15 15 15 15 15 15 15 15 15 16 16 16 16 # 16 16 16 16 17 17 17 17 17 18 18 18 18 18 19 19 19 20 20 21 21 21 21 21 # 21 21 21 22 22 22 22 22 22 22 23 23 23 23 23 23 23 23 23 24 24 24 24 24 # 25 25 26 26 26 26 26 28 29 29 29 29 29 30 30 30 30 31 31 31 31 31 31 31 # 31 31 31 32 32 32 32 32 32 33 33 33 33 33 34 34 34 34 34 34 34 35 35 35 # 35 35 36 36 36 36 36 36 36 36 36 37 37 37 37 37 37 37 37 37 37 38 38 38 # 38 38 38 38 38 39 39 39 39 39 39 39 39 39] # haarcascade_frontalface_default 264 # [ 0 0 0 0 0 1 1 1 1 1 1 1 1 2 2 2 2 2 2 2 2 2 2 3 # 3 3 3 3 3 3 4 4 4 4 4 4 5 5 5 5 5 5 5 5 5 5 6 6 # 6 6 6 6 6 7 7 7 7 7 7 7 8 8 9 9 9 9 9 9 9 9 9 9 # 10 10 10 10 10 12 12 12 12 12 12 12 12 12 12 13 13 13 13 13 13 13 13 13 # 13 14 14 14 14 14 14 14 15 15 15 15 15 15 16 16 16 16 16 16 16 16 16 17 # 17 17 17 17 18 18 18 18 18 19 19 19 19 19 19 19 19 19 19 20 20 20 20 20 # 20 21 21 21 21 21 21 22 22 22 22 23 23 23 23 23 23 23 24 24 24 24 24 25 # 25 25 25 26 26 26 26 26 26 26 26 26 29 29 29 29 29 29 29 30 30 30 30 30 # 30 30 31 31 31 31 31 31 31 31 31 32 32 32 32 33 33 33 33 33 33 33 33 34 # 34 34 34 34 34 34 35 35 35 35 35 36 36 36 36 36 36 36 36 36 37 37 37 37 # 37 37 37 37 37 37 38 38 38 38 38 38 38 38 38 39 39 39 39 39 39 39 39] label = 0 # 遍历当前文件夹 for subdir in os.listdir(data): print('processing ',subdir) # 构造路径全链路 subpath = os.path.join(data, subdir) # 如果是否文件夹 if os.path.isdir(subpath): # 每个文件夹代表一个人,也就是构造人的姓名 names.append(subdir) # 遍历文件夹中的图片文件 for filename in os.listdir(subpath): imgpath = os.path.join(subpath, filename) print('processing ', filename) # 读取图片,并转换为灰度图片 # 灰度图片用于进行训练 # 构造图片和标签关系 img = cv2.imread(imgpath, cv2.IMREAD_COLOR) gray_img = cv2.cvtColor(img, cv2.COLOR_BGR2GRAY) faces = face_casecade.detectMultiScale(gray_img, 1.3, 5) print('faces=',faces,'face num=',str(len(faces))) for (x, y, w, h) in faces: cv2.rectangle(img, (x, y), (x + w, y + h), (255, 0, 0), 2) if (len(faces) > 0): (x, y, w, h) = faces[0] # 只返回图像的正面部分 images.append(gray_img[y:y + w, x:x + h]) labels.append(label) cv2.imshow('img', img) label += 1 # 将图片转换为易于操作的ndarray形式 images = np.asarray(images) # 将标签转为numpy格式 labels = np.asarray(labels) return images, labels, namesif __name__ == '__main__': trainimage = 'C:\\Python\\Pycharm\\docxprocess\\picture\\ORL\\' X, y, names = loadimageface(trainimage)
从效果上cade_frontalface_default>haarcashaarcascade_frontalface_alt2>haarcascade_frontalface_alt>haarcascade_frontalface_alt_tree
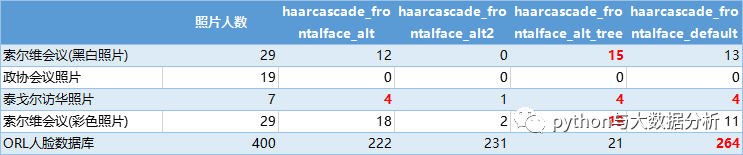
这就比较尴尬了。。。到底选谁好呢?
说到底,Haar Cascade人脸分类器是入门级的人脸检测工具,只能用于好玩的测试,看样子只能用更加高级的工具了。
最后,谢谢关注,谢谢支持!