



SpringBoot实现RabbitMQ的几种常用模式
昨天我们已经简单讲解了RabbitMQ的信息接收,今天主要介绍RabbitMQ的几种常用模式:
1.direct模式:RabbitMQ的默认模式,是RabbitMQ中最简单的模式,在创建MQ的时候,指定RoutingKey,当Producter发送消息的啥时候,指定对于Key,当Key和队列的RoutingKey相同时,就将消息发送的对于队列 2.tpoic模式:依靠通配符进行消息发送,队列和交换机的绑定以及通配符+字符串的模式,当发送消息的时候,指定的Key和通配符匹配,才可以发送到对于队列 #:匹配一个或多个关键字 *:匹配一个关键字 3.fanout(发布/订阅)模式:将消息发给绑定在这个路由上的所有队列,即使设置Key,也会被忽略 4.headers模式:根据发送消息内容中的Headers属性进行匹配,不依赖路由键的匹配原则进行匹配
以上就是RabbitMQ常用的几种模式,我们现在就介绍如何使用这几种模式,在这之前我们介绍一下,消息队列的大概的使用过程:
客户端链接到消息队列 客户端声明一个Exchange和设置其属性 客户端声明一个Queue和设置其属性 客户端使用routingkey,建立exchange和queue之间的绑定关系 客户端投递消息到exchang
消息队列的模式介绍
在以下的几种模式中,我们构建了两个项目一个是使用ShpringBoot整合RabbitMQ创建的Producter项目(以接口形式测试),用于消息的发送,另一个是Consumer项目,用于接收信息.
Producter项目的目录如下
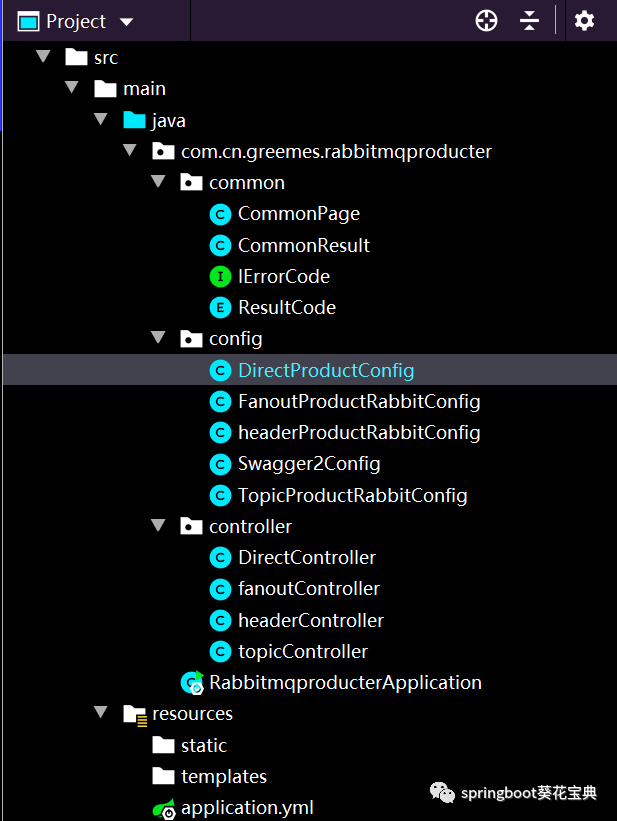
Producter项目的application.yml配置
server:
  port: 9999
spring:
  rabbitmq:
    addresses: 192.168.154.125
    username: guest
    password: guest
    # 端口是5672,不是15672,15672是管理端接口
    port: 5672
    virtual-host: /
Producter项目的Swagger配置
import org.springframework.context.annotation.Bean;
import org.springframework.context.annotation.Configuration;
import springfox.documentation.builders.ApiInfoBuilder;
import springfox.documentation.builders.PathSelectors;
import springfox.documentation.builders.RequestHandlerSelectors;
import springfox.documentation.service.ApiInfo;
import springfox.documentation.spi.DocumentationType;
import springfox.documentation.spring.web.plugins.Docket;
import springfox.documentation.swagger2.annotations.EnableSwagger2;
/**
 * Swagger2API文档的配置
 */
@Configuration
@EnableSwagger2
public class Swagger2Config {
    @Bean
    public Docket createRestApi(){
        return new Docket(DocumentationType.SWAGGER_2)
                .apiInfo(apiInfo())
                .select()
                //为当前包下controller生成API文档
                .apis(RequestHandlerSelectors.basePackage("com.cn.greemes.rabbitmqproducter.controller"))
                //为有@Api注解的Controller生成API文档
//                .apis(RequestHandlerSelectors.withClassAnnotation(Api.class))
                //为有@ApiOperation注解的方法生成API文档
//                .apis(RequestHandlerSelectors.withMethodAnnotation(ApiOperation.class))
                .paths(PathSelectors.any())
                .build();
    }

    private ApiInfo apiInfo() {
        return new ApiInfoBuilder()
                .title("rabbitmq演示")
                .description("rabbitmq")
                .contact("rabbitmq")
                .version("1.0")
                .build();
    }
}
Consumer项目的目录如下
Consumer项目的application.yml配置
server:
  port: 9998
spring:
  rabbitmq:
    addresses: 192.168.154.125
    username: guest
    password: guest
    # 端口是5672,不是15672,15672是管理端接口
    port: 5672
    virtual-host: /
Producter和Consumer项目的依赖
 <properties>
        <java.version>1.8</java.version>
        <swagger2.version>2.9.2</swagger2.version>
        <swagger-models.version>1.6.0</swagger-models.version>
        <swagger-annotations.version>1.6.0</swagger-annotations.version>
        <mysql-connector.version>5.0.15</mysql-connector.version>

        <mybatis-plus.version>3.3.2</mybatis-plus.version>
        <velocity.version>2.2</velocity.version>
    </properties>
    <dependencies>
        <dependency>
            <groupId>org.springframework.boot</groupId>
            <artifactId>spring-boot-starter-amqp</artifactId>
        </dependency>
        <dependency>
            <groupId>org.springframework.boot</groupId>
            <artifactId>spring-boot-starter-thymeleaf</artifactId>
        </dependency>
        <dependency>
            <groupId>org.springframework.boot</groupId>
            <artifactId>spring-boot-starter-web</artifactId>
        </dependency>

        <dependency>
            <groupId>org.projectlombok</groupId>
            <artifactId>lombok</artifactId>
            <optional>true</optional>
        </dependency>
        <dependency>
            <groupId>org.springframework.boot</groupId>
            <artifactId>spring-boot-starter-test</artifactId>
            <scope>test</scope>
        </dependency>
        <dependency>
            <groupId>org.springframework.amqp</groupId>
            <artifactId>spring-rabbit-test</artifactId>
            <scope>test</scope>
        </dependency>
        <!--Swagger-UI API文档生产工具-->
        <dependency>
            <groupId>io.springfox</groupId>
            <artifactId>springfox-swagger2</artifactId>
            <version>${swagger2.version}</version>
            <exclusions>
                <exclusion>
                    <artifactId>swagger-models</artifactId>
                    <groupId>io.swagger</groupId>
                </exclusion>
                <exclusion>
                    <artifactId>swagger-annotations</artifactId>
                    <groupId>io.swagger</groupId>
                </exclusion>
            </exclusions>
        </dependency>
        <dependency>
            <groupId>io.springfox</groupId>
            <artifactId>springfox-swagger-ui</artifactId>
            <version>${swagger2.version}</version>
        </dependency>
        <!--解决Swagger 2.9.2版本NumberFormatException-->
        <dependency>
            <groupId>io.swagger</groupId>
            <artifactId>swagger-models</artifactId>
            <version>${swagger-models.version}</version>
        </dependency>
        <dependency>
            <groupId>io.swagger</groupId>
            <artifactId>swagger-annotations</artifactId>
            <version>${swagger-annotations.version}</version>
        </dependency>
        <dependency>
            <groupId>jakarta.validation</groupId>
            <artifactId>jakarta.validation-api</artifactId>
            <version>2.0.2</version>
        </dependency>
    </dependencies>
RabbitMQ的Direct模式
direct模式是RabbitMQ的默认模式也是RabbitMQ中最简单的模式
1.在Producter项目中创建DirectProductConfig配置
package com.cn.greemes.rabbitmqproducter.config;
import org.springframework.amqp.core.*;
import org.springframework.context.annotation.Bean;
import org.springframework.context.annotation.Configuration;

@Configuration
public class DirectProductConfig {
    /**
     * 队列
     * @return
     */
    @Bean
    public Queue directQueue() {
        return new Queue("directQueue");
    }

    /**
     * Direct模式交换机
     * @return
     */
    @Bean
    public DirectExchange directExchange(){

        return  new DirectExchange("helloWorldExchange");
    }
    /**
     *  directExchange交换机和 directQueue队列绑定
     * @return
     */
    @Bean
    public Binding helloWorldBinging(){
        return BindingBuilder
                .bind(directQueue())
                .to(directExchange())
                .with("directKey");
    }
}
2.在Producter项目中创建DirectController
@Api(tags = "DirectController", description = " Direct模式")
@Controller
@RequestMapping("/direct")
public class DirectController {

    private static final Logger LOGGER = LoggerFactory.getLogger(DirectController.class);

    @Autowired
    private RabbitTemplate rabbitTemplate;

    @ApiOperation("Direct模式发送信息")
    @RequestMapping(value = "/send/{msg}", method = RequestMethod.GET)
    @ResponseBody
    public CommonResult sendMsg(@PathVariable String msg) {
        rabbitTemplate.convertAndSend("directExchange","directKey",msg);
        return CommonResult.success(ResultCode.SUCCESS);
    }
}
3.在 Consumer项目中添加DirectRabbitListener组件
@Component
public class DirectRabbitListener {

    /**
     * 监听directQueue队列
     * @param msg
     */
    @RabbitListener(queues = "directQueue")
    public void directListener(String msg){
        System.out.println(msg);
    }
}
RabbitMQ的fanout(发布/订阅模式)模式
1.在Producter项目中创建FanoutProductRabbitConfig配置
@Configuration
public class FanoutProductRabbitConfig {
    //发布/订阅模式

    @Bean
    public Queue fanoutQueueMessageA(){
        return  new Queue("fanoutQueueA");
    }
    @Bean
    public Queue fanoutQueueMessageB(){
        return  new Queue("fanoutQueueB");
    }
    @Bean
    public Queue fanoutQueueMessageC(){
        return  new Queue("fanoutQueueC");
    }

    @Bean
    FanoutExchange fanoutExchange(){
        return  new FanoutExchange("fanoutExchange");
    }

    @Bean
    Binding bindingFanoutExchangeA() {
        return BindingBuilder.bind(fanoutQueueMessageA()).to(fanoutExchange());
    }

    @Bean
    Binding bindingFanoutExchangeB() {
        return BindingBuilder.bind(fanoutQueueMessageB()).to(fanoutExchange());
    }


    @Bean
    Binding bindingFanoutExchangeC() {
        return BindingBuilder.bind(fanoutQueueMessageC()).to(fanoutExchange());
    }

}
2.在Producter项目中创建fanoutController
@Api(tags = "fanoutController", description = " fanout模式")
@Controller
@RequestMapping("/fanout")
public class fanoutController {

    private static final Logger LOGGER = LoggerFactory.getLogger(fanoutController.class);

    @Autowired
    private RabbitTemplate rabbitTemplate;

    @ApiOperation("fanout模式发送信息")
    @RequestMapping(value = "/send/{msg}", method = RequestMethod.GET)
    @ResponseBody
    public void fanoutsend(String msg) {
        String context = "fanout: "+msg ;
        System.out.println("Sender : " + context);
        this.rabbitTemplate.convertAndSend("fanoutExchange","", context);
    }
}
3.在 Consumer项目中添加FanoutRabbitListenerA、B、C组件
@Component
public class FanoutRabbitListenerA {
    @RabbitListener(queues = "fanoutQueueA")
    public void process(String message) {
        System.out.println("FanoutRabbitListenerA  : " + message);
    }
}
@Component
@RabbitListener(queues = "fanoutQueueB")
public class FanoutRabbitListenerB {
    @RabbitHandler
    public void process(String message) {
        System.out.println("FanoutRabbitListenerB  : " + message);
    }
}
@Component
@RabbitListener(queues = "fanoutQueueC")
public class FanoutRabbitListenerC {
    @RabbitHandler
    public void process(String message) {
        System.out.println("FanoutRabbitListenerC  : " + message);
    }
}
RabbitMQ的topic主题模式
1.在Producter项目中创建FanoutProductRabbitConfig配置
@Configuration
public class TopicProductRabbitConfig {


    @Bean(name="topicmessage")
    public Queue topicQueueMessage(){
       return new Queue("topic.message");
    }


    @Bean(name="topicmessages")
    public Queue topicQueueMessages(){
        return new Queue("topic.messages");
    }


    /**
     * 交换机,指定消息按照规则,路由到指定队列
     * @return
     */
    @Bean
    public TopicExchange  topicExchange(){
        return  new TopicExchange("topicExchange");
    }
    @Bean
    public Binding exchangeBingingMessage(){
        return BindingBuilder
                .bind(topicQueueMessage())
                .to(topicExchange())
                .with("topic.message");
    }
    @Bean
    public Binding exchangeBingingMessages(){
        return BindingBuilder
                .bind(topicQueueMessages())
                .to(topicExchange())
                .with("topic.#");
    }
}
2.在Producter项目中创建topicController
@Api(tags = "topicController", description = " Topic模式")
@Controller
@RequestMapping("/topic")
public class topicController {

    private static final Logger LOGGER = LoggerFactory.getLogger(topicController.class);

    @Autowired
    private RabbitTemplate rabbitTemplate;


    @ApiOperation("topic模式发送信息")
    @RequestMapping(value = "/send/{msg}", method = RequestMethod.GET)
    @ResponseBody
    public void send(String msg) {
        String context = "hi, i am message all  "+msg;
        System.out.println("Sender : " + context);
        this.rabbitTemplate.convertAndSend("topicExchange", "topic.1", context);
    }
    @ApiOperation("topic模式发送信息1")
    @RequestMapping(value = "/send1/{msg}", method = RequestMethod.GET)
    @ResponseBody
    public void send1(String msg) {
        String context = "hi, i am message 1  " +msg;
        System.out.println("Sender : " + context);
        this.rabbitTemplate.convertAndSend("topicExchange", "topic.message", context);
    }
    @ApiOperation("topic模式发送信息2")
    @RequestMapping(value = "/send2/{msg}", method = RequestMethod.GET)
    @ResponseBody
    public void send2(String msg) {
        String context = "hi, i am messages 2  "+msg;
        System.out.println("Sender : " + context);
        this.rabbitTemplate.convertAndSend("topicExchange", "topic.messages", context);
    }
}
3.在 Consumer项目中添加topicListener1、2组件
@Component
public class topicListener {

    /**
     *
     * @param msg
     */
    @RabbitListener(queues = "topic.message")
    public void helloWorldListener(String msg){
        System.out.println("Topic Receiver1  : " + msg);
    }

}
@Component
public class topicListener2 {
    @RabbitListener(queues = "topic.messages")
    public void helloWorldListener(String msg){
        System.out.println("Topic Receiver2  : " + msg);
    }
}
RabbitMQ的headers模式
1.在Producter项目中创建headerProductRabbitConfig配置
@Configuration
public class headerProductRabbitConfig {
    /**
     * 创建一个队列
     * @return
     */
    @Bean
    public Queue headerQueueMessageA(){
        return  new Queue("headerQueueMessageA");
    }

    /**
     * 创建一个Header模式交换机
     * @return
     */
    @Bean
    HeadersExchange headersExchange(){
        return  new HeadersExchange("headerExchange");
    }

    @Bean
    Binding bindingHeaderExchange(){
        Map<String, Object> stringObjectHashMap = new HashMap<String, Object>();
        stringObjectHashMap.put("headerKey","head1");
        return BindingBuilder.bind(headerQueueMessageA()).to(headersExchange()).whereAny(stringObjectHashMap).match();


    }
}
2.在Producter项目中创建headerController
@Api(tags = "headerController", description = " header模式")
@Controller
@RequestMapping("/header")
public class headerController {
    private static final Logger LOGGER = LoggerFactory.getLogger(headerController.class);


    @Autowired
    private RabbitTemplate rabbitTemplate;


    @ApiOperation("header模式发送信息")
    @RequestMapping(value = "/send/{msg}", method = RequestMethod.GET)
    @ResponseBody
    public void send(String msg) {

        CorrelationData correlationData = new CorrelationData("Header信息");
        MessageProperties properties = new MessageProperties();
        properties.setHeader("headerKey","head1");

        Message message = new Message(msg.getBytes(), properties);

        this.rabbitTemplate.convertAndSend("headerExchange", "", message,correlationData);
    }
}
3.在 Consumer项目中添加tHeaderRabbitListenerA组件
@Component
public class HeaderRabbitListenerA {

    @RabbitListener(queues = "headerQueueMessageA")
    public void headerQueueA(byte[] str){
        System.out.println("Header:"+new String(str));
    }
}
总结:
今天接着简单介绍了SpringBoot实现RabbitMQ几种常用的模式,如fanout、headers、direct、topic模式,以及其在SpringBoot中代码实现和配置。喜欢我的可以进行关注,谢谢

github地址:https://github.com/bangbangzhou/greemes/tree/master
公众号

文章转载自springboot葵花宝典,如果涉嫌侵权,请发送邮件至:contact@modb.pro进行举报,并提供相关证据,一经查实,墨天轮将立刻删除相关内容。
