


作者:杨涛涛
资深数据库专家,专研 MySQL 十余年。擅长 MySQL、PostgreSQL、MongoDB 等开源数据库相关的备份恢复、SQL 调优、监控运维、高可用架构设计等。目前任职于爱可生,为各大运营商及银行金融企业提供 MySQL 相关技术支持、MySQL 相关课程培训等工作。
本文来源:原创投稿
* 爱可生开源社区出品,原创内容未经授权不得随意使用,转载请联系小编并注明来源。
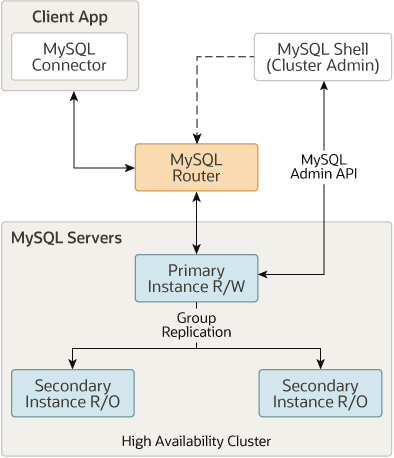
MySQL Shell 用来进行 MGR 的日常运维,MySQL Router 对上层应用提供一个简单的读写分离入口,MySQL MGR 则是用来存放真实数据的多个 MySQL 实例。对应的架构如下:
那如果想针对 MIC 做一个容灾功能,该怎么做?如果你一直使用 MySQL 8.0 ,并且保持 MySQL 版本一直为最新,那答案是肯定的(最新的 MySQL 8.0 小版本为 8.0.28 ),新名字为 MySQL InnoDB Cluster Set(MICS)。
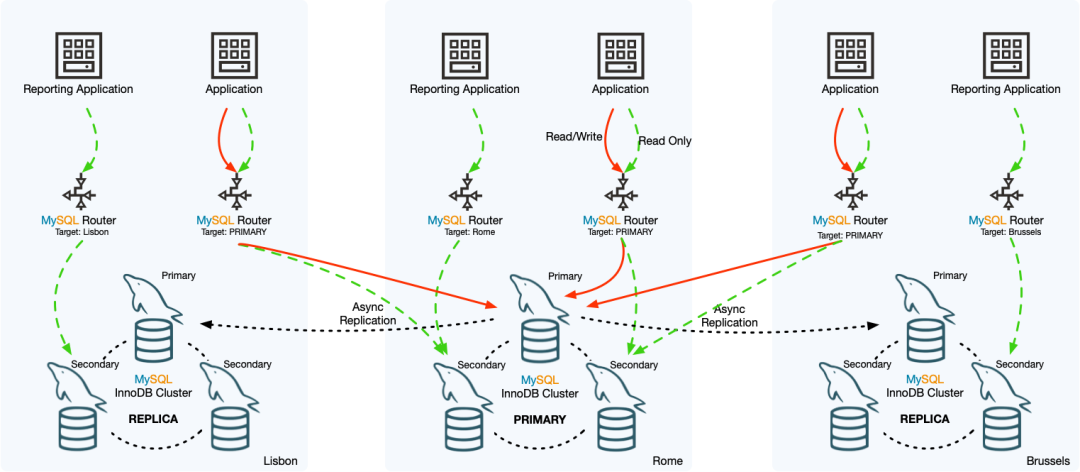
这个新特性其实就是基于纯粹的 MIC 做容灾。比如北京上地一套 MIC 对外提供服务,东直门另外一套 MIC 用来做灾备,两套 MIC 通过专用复制通道 clusterset_replication 来同步数据。截取官网的架构如下:
MICS 虽然看起来挺好,但是限制很多,几个主要限制如下:
MICS 的最大特性是高可用,而不是一致性。由于数据传输依赖传统的 MySQL 异步复制(不能使用半同步),无法避免异步复制的缺陷:数据延迟、数据一致性、需要手动故障转移等等。
从库不能是已有的 MIC ,必须新建。所以在搭建 MICS 前,得想办法解决已有数据的保存问题。
MICS 内部 MIC 限制为单主模式,不能多主。
MICS 内部只有一套 MIC 对外提供服务,其他只能作为备库。
只支持 MySQL 8.0 。
我来简单演示下搭建过程:(为了简单起见,没有包含 MySQL ROUTER 组件)
准备至少6台 MySQL 实例。(端口分别为3381、3382、3383、3384、3385、3386)
MySQL Py > for i in range(3381,3387): -> dba.deploy_sandbox_instance(i,{"password":"root"}) -> A new MySQL sandbox instance will be created on this host in root/mysql-sandboxes/3381 ...
端口3381、3382、3383 搭建一套 MGR ,名字为 ytt-rc1 。
MySQL Py > \c root:root@localhost:3381 Creating a session to 'root@localhost:3381' ... Server version: 8.0.28 MySQL Community Server - GPL ... MySQL localhost:3381 ssl Py > rc1 = dba.create_cluster('ytt-rc1'); A new InnoDB cluster will be created on instance 'localhost:3381'. ... MySQL localhost:3381 ssl Py > rc1.add_instance("root:root@localhost:3382",{"recoveryMethod":"clone"}) ... MySQL localhost:3381 ssl Py > rc1.add_instance("root:root@localhost:3383",{"recoveryMethod":"clone"}) ...
创建一套 MICS ,命名为:ytt-rc-set ,主库为 ytt-rc1 。
MySQL localhost:3381 ssl Py > rc1_set = rc1.create_cluster_set('ytt-rc-set') A new ClusterSet will be created based on the Cluster 'ytt-rc1'. * Validating Cluster 'ytt-rc1' for ClusterSet compliance. * Creating InnoDB ClusterSet 'ytt-rc-set' on 'ytt-rc1'... * Updating metadata... ClusterSet successfully created. Use ClusterSet.create_replica_cluster() to add Replica Clusters to it.
查看 MICS 状态:名字为 ytt-rc-set 、集群角色为 primary 、对应主实例为127.0.0.1:3381、状态为 healthy 。
MySQL localhost:3381 ssl Py > rc1_set.status() { "clusters": { "ytt-rc1": { "clusterRole": "PRIMARY", "globalStatus": "OK", "primary": "127.0.0.1:3381" } }, "domainName": "ytt-rc-set", "globalPrimaryInstance": "127.0.0.1:3381", "primaryCluster": "ytt-rc1", "status": "HEALTHY", "statusText": "All Clusters available."
接下来为 ytt-rc-set 添加从库,从库必须不属于任何 MIC 。
MySQL localhost:3381 ssl Py > dba.configure_instance("root:root@localhost:3384",{"clusterAdmin":"ics_admin","clusterAdminPassword":"root"}) Configuring local MySQL instance listening at port 3384 for use in an InnoDB cluster... ... Cluster admin user 'ics_admin'@'%' created. The instance '127.0.0.1:3384' is already ready to be used in an InnoDB cluster. Successfully enabled parallel appliers.
添加从库:从库 MIC 的名为为 ytt-rc2 。
MySQL localhost:3381 ssl Py > rc2=rc1_set.create_replica_cluster("root:root@localhost:3384","ytt-rc2",{"recoveryMethod":"clone","recoveryProgress":2}) Setting up replica 'ytt-rc2' of cluster 'ytt-rc1' at instance '127.0.0.1:3384'. ... Replica Cluster 'ytt-rc2' successfully created on ClusterSet 'ytt-rc-set'.
给 ytt-rc2 添加其他实例:
MySQL localhost:3381 ssl Py > rc2.add_instance("root:root@localhost:3385",{"recoveryMethod":"clone"}) MySQL localhost:3381 ssl Py > rc2.add_instance("root:root@localhost:3386",{"recoveryMethod":"clone"})
看下 ytt-rc-set 的最新状态:ytt-rc1 为主,ytt-rc2 为备。
MySQL localhost:3381 ssl Py > rc1_set.describe() { "clusters": { "ytt-rc1": { "clusterRole": "PRIMARY", "topology": [ { "address": "127.0.0.1:3381", "label": "127.0.0.1:3381" }, { "address": "127.0.0.1:3382", "label": "127.0.0.1:3382" }, { "address": "127.0.0.1:3383", "label": "127.0.0.1:3383" } ] }, "ytt-rc2": { "clusterRole": "REPLICA", "topology": [ { "address": "127.0.0.1:3384", "label": "127.0.0.1:3384" }, { "address": "127.0.0.1:3385", "label": "127.0.0.1:3385" }, { "address": "127.0.0.1:3386", "label": "127.0.0.1:3386" } ] } }, "domainName": "ytt-rc-set", "primaryCluster": "ytt-rc1" }
写条数据简单测试下数据同步:主库表 t1 插一条记录。
MySQL localhost:3381 ssl SQL > \sql MySQL localhost:3381 ssl SQL > create database ytt; Query OK, 1 row affected (0.0167 sec) MySQL localhost:3381 ssl SQL > use ytt; Default schema set to `ytt`. Fetching table and column names from `ytt` for auto-completion... Press ^C to stop. MySQL localhost:3381 ssl ytt SQL > create table t1(id int primary key,r1 int); Query OK, 0 rows affected (0.1561 sec) MySQL localhost:3381 ssl ytt SQL > insert t1 values (1,100); Query OK, 1 row affected (0.0185 sec) MySQL localhost:3381 ssl ytt SQL > table t1; +----+-----+ | id | r1 | +----+-----+ | 1 | 100 | +----+-----+ 1 row in set (0.0004 sec)
切换到从库,看下效果:表 t1 数据已经正常同步,并且只读。
MySQL localhost:3381 ssl ytt SQL > \c root@localhost:3384 Creating a session to 'root@localhost:3384' ... MySQL localhost:3384 ssl SQL > use ytt ... MySQL localhost:3384 ssl ytt SQL > table t1; +----+-----+ | id | r1 | +----+-----+ | 1 | 100 | +----+-----+ 1 row in set (0.0006 sec) MySQL localhost:3384 ssl ytt SQL > create table t2 like t1; ERROR: 1290 (HY000): The MySQL server is running with the --super-read-only option so it cannot execute this statement
手动进行主备切换:ytt-rc2 已经被提升了新的主。
MySQL localhost:3384 ssl ytt Py > rc1_set.set_primary_cluster('ytt-rc2') Switching the primary cluster of the clusterset to 'ytt-rc2' ... Cluster 'ytt-rc2' was promoted to PRIMARY of the clusterset. The PRIMARY instance is '127.0.0.1:3384'
看下 ytt-rc-set 最新状态:ytt-rc1 变为备,新主为 ytt-rc2 。
MySQL localhost:3384 ssl ytt Py > rc1_set.status() { "clusters": { "ytt-rc1": { "clusterRole": "REPLICA", "clusterSetReplicationStatus": "OK", "globalStatus": "OK" }, "ytt-rc2": { "clusterRole": "PRIMARY", "globalStatus": "OK", "primary": "127.0.0.1:3384" } }, "domainName": "ytt-rc-set", "globalPrimaryInstance": "127.0.0.1:3384", "primaryCluster": "ytt-rc2", "status": "HEALTHY", "statusText": "All Clusters available."
总结:
MySQL InnoDB Cluster Set 由于数据传输通道为异步复制,所以要谨慎使用!
本文关键字:#MySQL InnoDB Cluster Set# #MySQL InnoDB Cluster#


文章转载自爱可生开源社区,如果涉嫌侵权,请发送邮件至:contact@modb.pro进行举报,并提供相关证据,一经查实,墨天轮将立刻删除相关内容。
