


ora2pg 是怎么处理 Oracle 到 PostgreSQL 的数据类型转换
参考文章:https://ora2pg.darold.net/documentation.html#Column-type-control
数值类型
- PG_NUMERIC_TYPE
如果设置为 1,则将可变长度的数字类型替换为 PostgreSQL 内部类型。 Oracle 数据类型 NUMBER(p,s) 近似转换为 PostgreSQL的 real 和 float 数据类型。 如果有货币字段或不希望小数部分的截断问题,您应该在 PostgreSQL 中保留相同的 numeric(p,s) 数据类型,仅当您需要精确性时才这样做,因为使用 numeric(p,s) 比使用 real 或 double 慢。
test_dml=# create table tt_number (id int primary key, col1 real, col2 double precision, col3 float, col4 numeric(25,23));
test_dml=# \d tt_number
                  Table "public.tt_number"
 Column |       Type       | Collation | Nullable | Default
--------+------------------+-----------+----------+---------
 id     | integer          |           | not null |
 col1   | real             |           |          |
 col2   | double precision |           |          |
 col3   | double precision |           |          |
 col4   | numeric(25,23)   |           |          |
Indexes:
    "tt_number_pkey" PRIMARY KEY, btree (id)

-- float 会转成 double,这俩是一个类型
test_dml=# insert into tt_number values (1, 3.1415, 3.1415, 3.1415, 3.1415);
test_dml=# insert into tt_number values (2, 3.141592657777777, 3.141592657777777, 3.141592657777777, 3.141592657777777);
test_dml=# insert into tt_number values (3, 3.1415926577777777777777777777777777, 3.1415926577777777777777777777777777, 3.1415926577777777777777777777777777, 3.1415926577777777777777777777777777);
test_dml=# select * from tt_number;
 id |   col1    |        col2        |        col3        |           col4
----+-----------+--------------------+--------------------+---------------------------
  1 |    3.1415 |             3.1415 |             3.1415 | 3.14150000000000000000000
  2 | 3.1415927 |  3.141592657777777 |  3.141592657777777 | 3.14159265777777700000000
  3 | 3.1415927 | 3.1415926577777777 | 3.1415926577777777 | 3.14159265777777777777778
(3 rows)

-- real 类型截断保留小数后7位
-- double 类型截断保留小数后16位
-- numeric(p,s) 可以设置精度,对超出精度的部分进行四舍五入
- PG_INTEGER_TYPE
如果设置为 1,则将可变长度的数字类型替换为 PostgreSQL 内部类型。 Oracle 数据类型 NUMBER(p) 或 NUMBER 在精度值之后转换为 PostgreSQL的 smallint、integer 或 bigint 数据类型,如果没有精度的 NUMBER 替换为 DEFAULT_NUMERIC。 - DEFAULT_NUMERIC
仅当 PG_INTEGER_TYPE 为 true 时,默认情况下不带精度的 NUMBER 才会转换为 bigint,您可以将此值覆盖为任何 PG 类型,例如 integer 或 float。
test_dml=# create table tt_number (id int primary key, col1 smallint, col2 integer, col3 bigint, col4 float, col5 numeric);
test_dml=# \d tt_number
                  Table "public.tt_number"
 Column |       Type       | Collation | Nullable | Default
--------+------------------+-----------+----------+---------
 id     | integer          |           | not null |
 col1   | smallint         |           |          |
 col2   | integer          |           |          |
 col3   | bigint           |           |          |
 col4   | double precision |           |          |
 col5   | numeric          |           |          |
Indexes:
    "tt_number_pkey" PRIMARY KEY, btree (id)

test_dml=# insert into tt_number values (1, 32768, 2147483648, 2147483648, 2147483648, 2147483648);
ERROR:  smallint out of range
test_dml=# insert into tt_number values (1, 32767, 2147483648, 2147483648, 2147483648, 2147483648);
ERROR:  integer out of range
test_dml=# insert into tt_number values (1, 32767, 2147483647, 2147483648, 2147483648, 2147483648);
INSERT 0 1
test_dml=# select * from tt_number;
 id | col1  |    col2    |    col3    |    col4    |    col5
----+-------+------------+------------+------------+------------
  1 | 32767 | 2147483647 | 2147483648 | 2147483648 | 2147483648
(1 row)

-- smallint、integer、bigint 都是整型,smallint 的范围是(2的15次方) -32768 ~ -32767,integer 的范围是(2的31次方) -2147483648 ~ -2147483647,bigint 的范围(2的63次方) 。
| 数据类型 | ora2pg转换参数 | 转换后的类型 |
|---|---|---|
| NUMBER(p,s) | PG_NUMERIC_TYPE=1 | real、float、double |
| - | PG_NUMERIC_TYPE=0 | numeric(p,s) |
| NUMBER(p) | PG_INTEGER_TYPE=1 | smallint、integer、bigint |
| - | PG_INTEGER_TYPE=0 | numeric(p) |
| NUMBER | PG_INTEGER_TYPE=1 | bigint(integer、float) |
| - | PG_INTEGER_TYPE=0 | numeric |
| FLOAT | - | double precision |
| DOUBLE PRECISION | - | double precision |
| INT | - | integer |
| INTEGER | - | integer |
| REAL | - | real |
| SMALLINT | - | smallint |
| BINARY_FLOAT | - | double precision |
| BINARY_DOUBLE | - | double precision |
| BINARY_INTEGER | - | integer |
| PLS_INTEGER | - | integer |
字符类型
| 数据类型 | 转换后的类型 |
|---|---|
| CHAR | char |
| NCHAR | char |
| VARCHAR2 | varchar |
| NVARCHAR2 | varchar |
时间类型
| 数据类型 | 转换后的类型 |
|---|---|
| DATE | timestamp |
| TIMESTAMP | timestamp |
| TIMESTAMP WITH TIME ZONE | timestamp with time zone |
| TIMESTAMP WITH LOCAL TIME ZONE | timestamp with time zone |
其他类型
| 数据类型 | 转换后的类型 |
|---|---|
| LONG | text |
| LONG RAW | bytea |
| CLOB | text |
| NCLOB | text |
| BLOB | bytea |
| BFILE | bytea |
| RAW | bytea |
| RAW(16) | uuid |
| RAW(32) | uuid |
| UROWID | oid |
| ROWID | oid |
| DEC | decimal |
| DECIMAL | decimal |
| XMLTYPE | xml |
恩墨的 MTK 是怎么处理 Oracle 到 PostgreSQL 的数据类型转换
- 在官方文档中只找到一个 Oracle 到 openGauss/MogDB 的数据类型的转换对应表,但是和 PostgreSQL 差距应该不会很大
| Oracle | openGauss |
|---|---|
| SMALLINT | numeric |
| INTEGER | numeric |
| DECIMAL(8,5) | numeric(8,5) |
| NUMERIC(8,5) | numeric(8,5) |
| REAL | numeric |
| FLOAT(20) | numeric |
| NUMBER(8,5) | numeric(8,5) |
| BINARY_FLOAT | numeric |
| BINARY_DOUBLE | numeric |
| CHAR(8) | character(8) |
| NCHAR(8) | character(8) |
| VARCHAR(8) | character varying(8) |
| VARCHAR2(8) | character varying(8) |
| NVARCHAR2(8) | character varying(8) |
| DATE | timestamp without time zone |
| TIMESTAMP | timestamp without time zone |
| INTERVAL YEAR TO MONTH | interval |
| IDTS INTERVAL DAY TO SECOND | interval |
| LONG | text |
| RAW(111) | bytea |
| LONG RAW | bytea |
| CLOB | text/CLOB |
| BLOB | bytea/BLOB |
| NCLOB | text/NCLOB |
| BFILE | Not Support |
| User-Defined Types | Not Support |
| Any Types | Not Support |
| URI Data Types | Not Support |
| URIFactory Package | Not Support |
| SDO_GEOMETRY | Partially Supported |
| SDO_TOPO_GEOMETRY | Not Support |
| SDO_GEORASTER | Not Support |
Debezium 对常用数据类型的同步测试
CHAR and NCHAR and VARCHAR2 and NVARCHAR2
- PostgreSQL 数据库中的字符类型
https://www.postgresql.org/docs/14/datatype-character.html
| Name | Description | 备注 |
|---|---|---|
| character varying(n), varchar(n) | variable-length with limit | n 是字符长度,不是字节长度 |
| character(n), char(n) | fixed-length, blank padded | n 是字符长度,不是字节长度 |
| text | variable unlimited length |
CHAR and NCHAR
- 根据上文两个迁移工具对 Oracle CHAR and NCHAR 类型的转换形式,这里选择 PostgreSQL 的 character 反向同步到 Oracle 的 CHAR and NCHAR 中。
--源端 PostgreSQL
test_dml=# create schema test;
drop table IF EXISTS test.to_char1;
create table test.to_char1 (id int primary key, col1 character(10), col2 character(10));
insert into test.to_char1 values (1, 'aaaaaaa', 'aaaaaaa');
insert into test.to_char1 values (2, '数据驱动,成就未来', '数据驱动,成就未来');
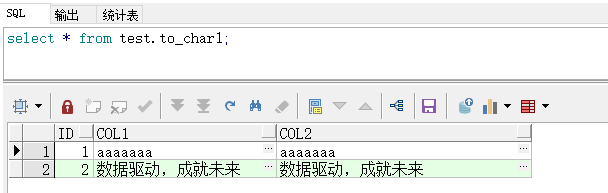
test_dml=# select * from test.to_char1;
id | col1 | col2
----+---------------------+---------------------
1 | aaaaaaa | aaaaaaa
2 | 数据驱动,成就未来 | 数据驱动,成就未来
(2 rows)
-- 目标端 Oracle 19C PDB
create table test.to_char1 (id int primary key, col1 char(10), col2 nchar(10));
-- 启动同步预期的报出以下错误,字符长度不够。
-- 所以同样是长度 10,PostgreSQL 是字符的长度,而 Oracle 是字节的长度。
-- 在 ZHS16GBK 字符集的数据库里每个中文是2个字节,"数据驱动,成就未来",加上中文的逗号和一个空格一共是19个字节,CHAR 类型会同步空格。
ORA-12899: value too large for column "TEST"."TO_CHAR1"."COL1" (actual: 19, maximum: 10)
-- 目标端增加长度
drop table test.to_char1 purge;
create table test.to_char1 (id int primary key, col1 char(20), col2 nchar(20));
- 同步到目标端的数据
VARCHAR2 and NVARCHAR2
- 根据上文两个迁移工具对 Oracle VARCHAR2 and NVARCHAR2 类型的转换形式,这里选择 PostgreSQL 的 character varying 和 text 反向同步到 Oracle 的 VARCHAR2 and NVARCHAR2 中。
--源端 PostgreSQL
drop table IF EXISTS test.to_varchar2;
create table test.to_varchar2 (id int primary key, col1 character varying(10), col2 text, col3 character varying(10), col4 text);
insert into test.to_varchar2 values (1, 'aaaaaaa', 'aaaaaaa', 'aaaaaaa', 'aaaaaaa');
insert into test.to_varchar2 values (2, '数据驱动,成就未来', '数据驱动,成就未来', '数据驱动,成就未来', '数据驱动,成就未来');
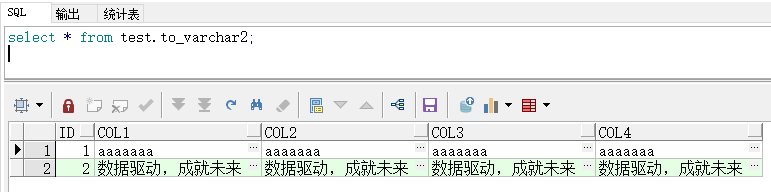
test_dml=# select * from test.to_varchar2;
id | col1 | col2 | col3 | col4
----+--------------------+--------------------+--------------------+--------------------
1 | aaaaaaa | aaaaaaa | aaaaaaa | aaaaaaa
2 | 数据驱动,成就未来 | 数据驱动,成就未来 | 数据驱动,成就未来 | 数据驱动,成就未来
(2 rows)
-- 目标端 Oracle 19C PDB
create table test.to_varchar2 (id int primary key, col1 varchar2(10), col2 varchar2(10), col3 nvarchar2(10), col4 nvarchar2(10));
-- 启动同步预期的报出以下错误,字符长度不够。
-- 所以同样是长度 10,PostgreSQL 是字符的长度,而 Oracle 是字节的长度。
-- 在 ZHS16GBK 字符集的数据库里每个中文是2个字节,"数据驱动,成就未来",加上中文的逗号一共是18个字节。
ORA-12899: value too large for column "TEST"."TO_VARCHAR2"."COL1" (actual: 18, maximum: 10)
-- 目标端增加长度
drop table test.to_varchar2 purge;
create table test.to_varchar2 (id int primary key, col1 varchar2(20), col2 varchar2(20), col3 nvarchar2(20), col4 nvarchar2(20));
- 同步到目标端的数据
NUMBER and NUMBER(p)and NUMBER(p,s)
- PostgreSQL 数据库中的数值类型
https://www.postgresql.org/docs/14/datatype-numeric.html
| Name | Storage Size | Description | Range |
|---|---|---|---|
| smallint | 2 bytes | small-range integer | -32768 to +32767 |
| integer | 4 bytes | typical choice for integer | 2147483648 to +2147483647 |
| bigint | 8 bytes | large-range integer | -9223372036854775808 to +9223372036854775807 |
| decimal | variable | user-specified precision, exact | up to 131072 digits before the decimal point; up to 16383 digits after the decimal point |
| numeric | variable | user-specified precision, exact | up to 131072 digits before the decimal point; up to 16383 digits after the decimal point |
| real | 4 bytes | variable-precision, inexact | 6 decimal digits precision |
| double precision | 8 bytes | variable-precision, inexact | 15 decimal digits precision |
| smallserial | 2 bytes | small autoincrementing integer | 1 to 32767 |
| serial | 4 bytes | autoincrementing integer | 1 to 2147483647 |
| bigserial | 8 bytes | large autoincrementing integer | 1 to 9223372036854775807 |
- smallint、integer 和 bigint 是整数类型,不存储小数部分。
- integer 是最常用的类型,因为它在数值范围、存储大小和性能之间提供了最佳平衡。
- numeric 推荐用于存储货币数值和其他需要精确性的数值,但是 numeric 的计算性能非常慢。
- real 和 double precision 是不精确的浮点类型。
NUMBER
- 根据上文两个迁移工具对 Oracle NUMBER 类型的转换形式,这里选择 PostgreSQL 的 bigint、integer、float 和 numeric 反向同步到 Oracle 的 NUMBER 中。
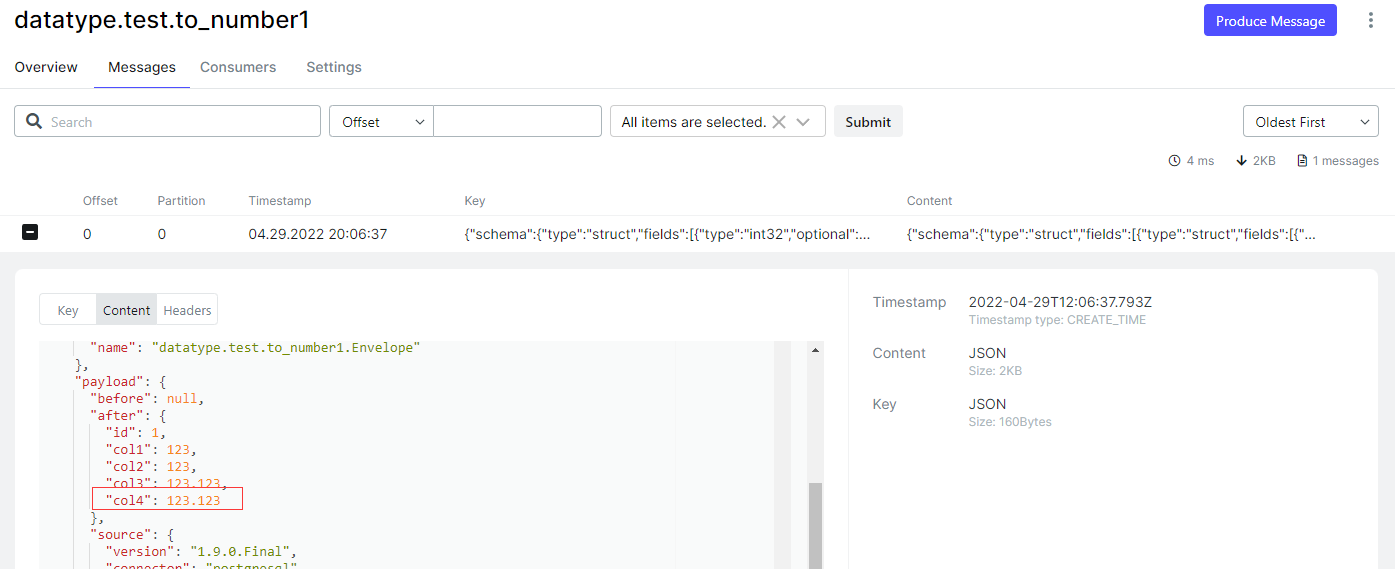
drop table IF EXISTS test.to_number1;
create table test.to_number1 (id int primary key, col1 integer, col2 bigint, col3 float, col4 numeric);
insert into test.to_number1 values (1, 123, 123, 123.123, 123.123);
select * from test.to_number1;

 id | col1 | col2 |  col3   |  col4
----+------+------+---------+---------
  1 |  123 |  123 | 123.123 | 123.123
(1 row)

create table test.to_number1 (id int primary key, col1 number, col2 number, col3 number, col4 number);
- 问题: Numeric 类型的数据不能从 Kafka 同步到目标端 Oracle。
tutorial-connect-1 | org.apache.kafka.connect.errors.ConnectException: Unsupported source data type: STRUCT

- 源端连接器配置 “decimal.handling.mode”: “double”,重新同步数据
- 同步到目标端的数据
SQL> select * from test.to_number1;

        ID       COL1       COL2       COL3       COL4
---------- ---------- ---------- ---------- ----------
         1        123        123    123.123    123.123
NUMBER(p)
- 根据上文两个迁移工具对 Oracle NUMBER(p) 类型的转换形式,这里选择 PostgreSQL 的 smallint、integer、bigint 和 numeric(p) 反向同步到 Oracle 的 NUMBER(p) 中。
drop table IF EXISTS test.to_number2;
create table test.to_number2 (id int primary key, col1 smallint, col2 integer, col3 bigint, col4 numeric(10));
insert into test.to_number2 values (1, 1234, 12345, 123456, 1234567);
select * from test.to_number2;

 id | col1 | col2  |  col3  |  col4
----+------+-------+--------+---------
  1 | 1234 | 12345 | 123456 | 1234567
(1 row)


create table test.to_number2 (id int primary key, col1 number(4), col2 number(8), col3 number(10), col4 number(10));
- 同步到目标端的数据
SQL> select * from test.to_number2;

        ID       COL1       COL2       COL3       COL4
---------- ---------- ---------- ---------- ----------
         1       1234      12345     123456    1234567
NUMBER(p,s)
- 根据上文两个迁移工具对 Oracle NUMBER(p,s) 类型的转换形式,这里选择 PostgreSQL 的 real、double precision 和 numeric(p,s) 反向同步到 Oracle 的 NUMBER(p,s) 中。
drop table IF EXISTS test.to_number3;
create table test.to_number3 (id int primary key, col1 real, col2 double precision, col3 numeric(10,5));
insert into test.to_number3 values (1, 12.34, 12.345, 12.3456);
select * from test.to_number3;

 id | col1  |  col2  |   col3
----+-------+--------+----------
  1 | 12.34 | 12.345 | 12.34560
(1 row)


create table test.to_number3 (id int primary key, col1 number(10,5), col2 number(10,5), col3 number(10,5));
- 同步到目标端的数据
SQL> select * from test.to_number3;

        ID       COL1       COL2       COL3
---------- ---------- ---------- ----------
         1      12.34     12.345    12.3456
DATE and TIMESTAMP and TIMESTAMP(6)
https://www.postgresql.org/docs/14/datatype-datetime.html
| Name | Storage Size | Description | Low Value | High Value | Resolution |
|---|---|---|---|---|---|
| timestamp [(p)] [ without time zone ] | 8 bytes | both date and time (no time zone) | 4713 BC | 294276 AD | 1 microsecond |
| timestamp [(p)] with time zone | 8 bytes | both date and time, with time zone | 4713 BC | 294276 AD | 1 microsecond |
| date | 4 bytes | date (no time of day) | 4713 BC | 5874897 AD | 1 day |
| time [(p)] [ without time zone ] | 8 bytes | time of day (no date) | 00:00:00 | 24:00:00 | 1 microsecond |
| time [(p)] with time zone | 12 bytes | time of day (no date), with time zone | 00:00:00+1559 | 24:00:00-1559 | 1 microsecond |
| interval [ fields ] [(p)] | 16 bytes | time interval | -178000000 years | 178000000 years | 1 microsecond |
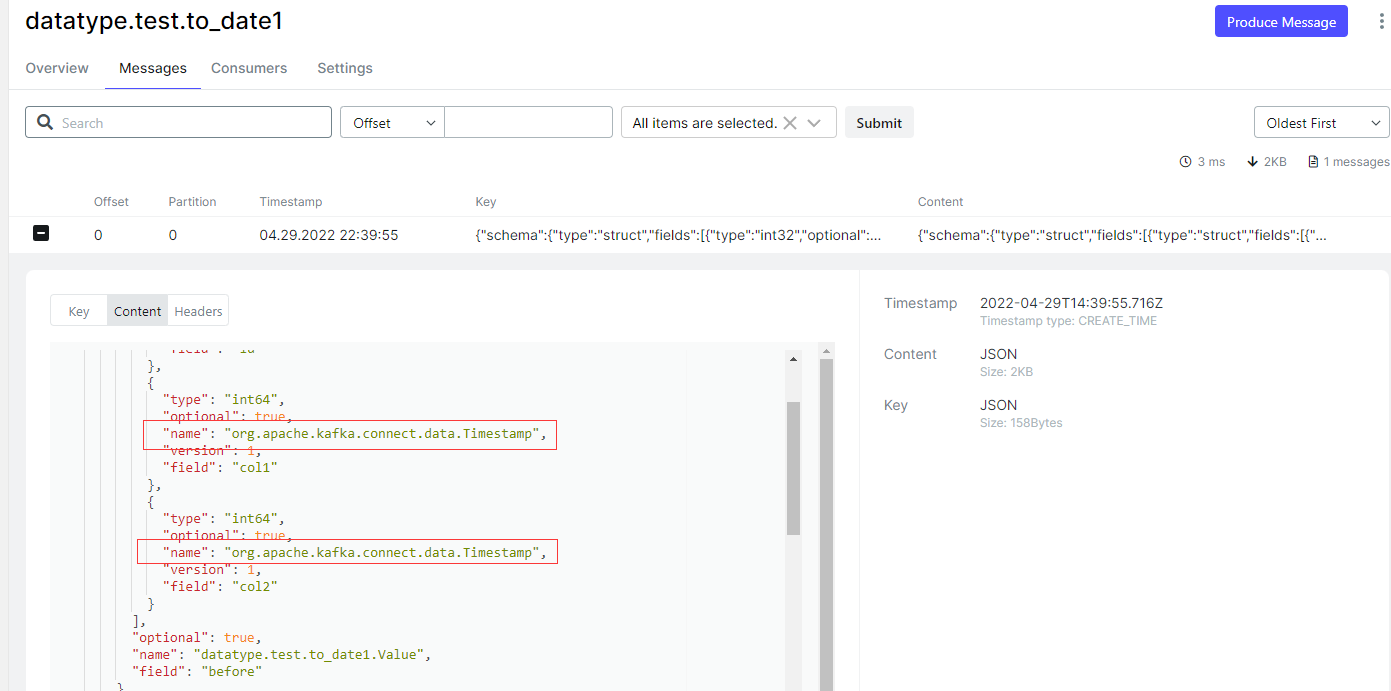
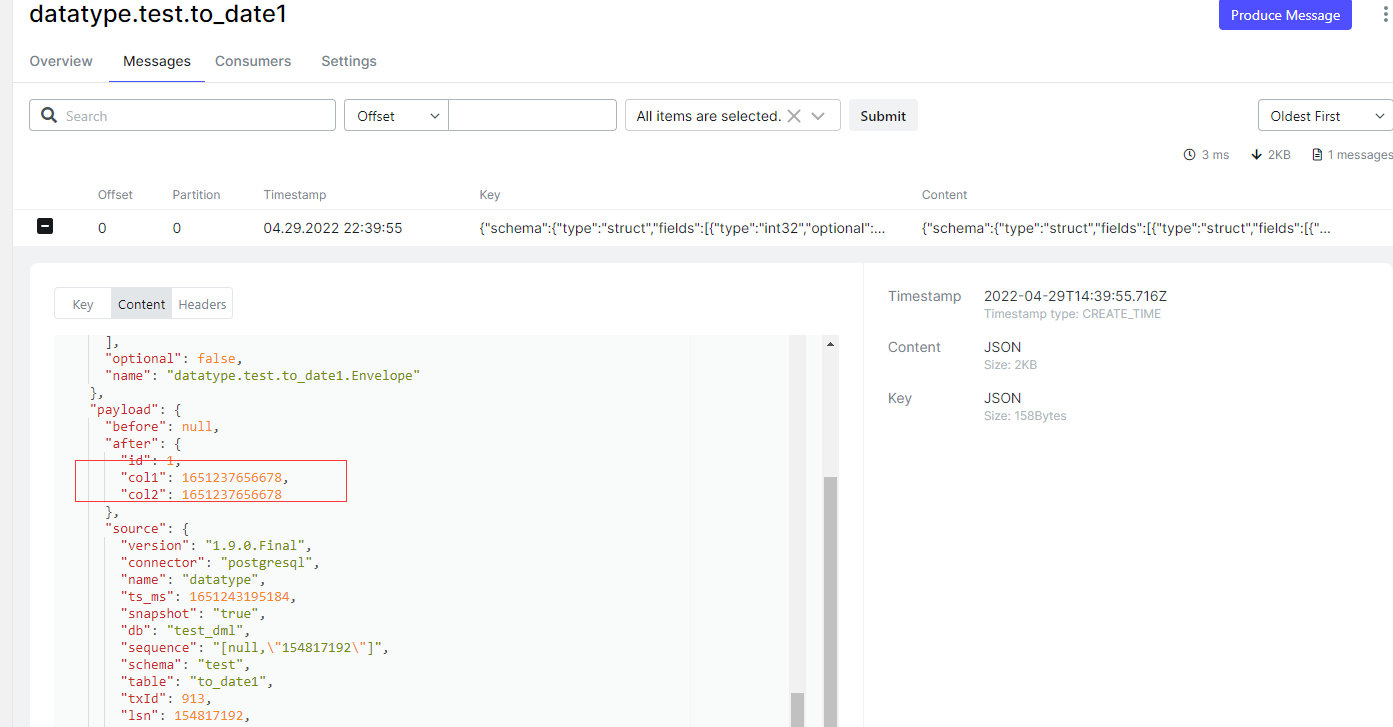
- 根据上文两个迁移工具对 Oracle DATE and TIMESTAMP 类型的转换形式,这里选择 PostgreSQL 的 timestamp without time zone 反向同步到 Oracle 的 DATE and TIMESTAMP 中。
drop table IF EXISTS test.to_date1;
create table test.to_date1 (id int primary key, col1 timestamp without time zone, col2 timestamp without time zone, col3 timestamp without time zone);
insert into test.to_date1 values (1, now(), now(), now());
select * from test.to_date1;

 id |            col1            |            col2            |            col3
----+----------------------------+----------------------------+----------------------------
  1 | 2022-04-29 13:07:36.678886 | 2022-04-29 13:07:36.678886 | 2022-04-29 13:07:36.678886
(1 row)


create table test.to_date1 (id int primary key, col1 date, col2 timestamp, col3 timestamp(6));
- 问题:timestamp without time zone 类型同步到 Kafka 变成了数值,不能写入到目标端 Oracle 数据库里
tutorial-connect-1 | java.sql.BatchUpdateException: ORA-00932: inconsistent datatypes: expected DATE got NUMBER
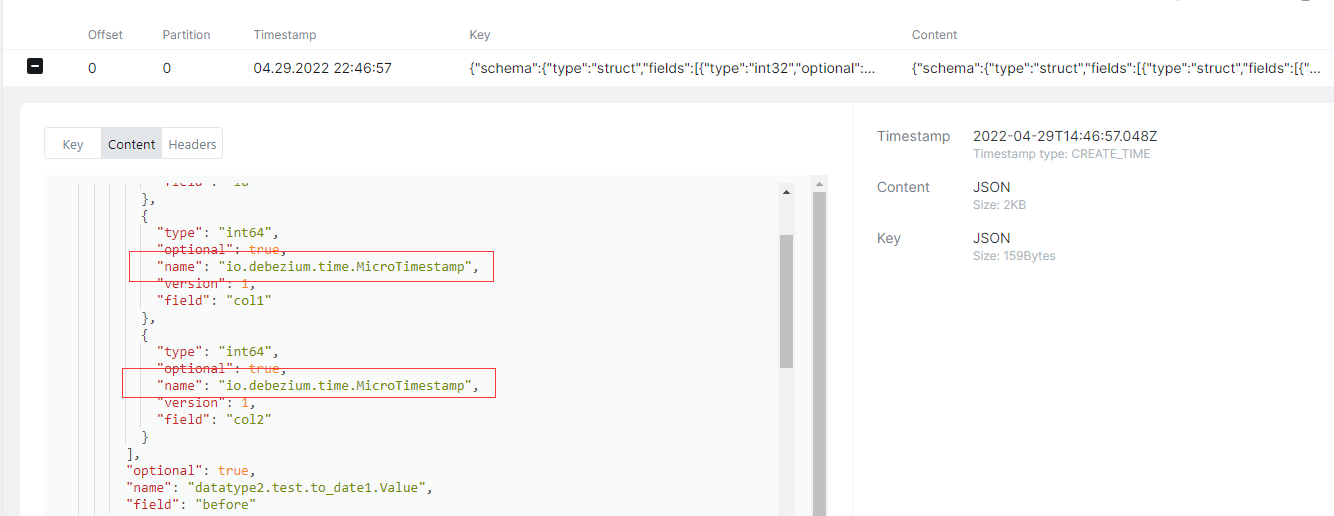

- 源端连接器添加 “time.precision.mode”: “connect”
- 同步到目标端的数据
SQL> alter session set NLS_DATE_FORMAT='YYYY-MM-DD HH24:MI:SS';
SQL> select * from test.to_date1;

        ID COL1                COL2                           COL3
---------- ------------------- ------------------------------ ------------------------------
         1 2022-04-29 13:07:36 29-APR-22 01.07.36.678000 PM   29-APR-22 01.07.36.678000 PM
- 问题:当前 docker 容器的时区不是东八区,修改一下
# 修改 docker 容器的时区
[root@docker tutorial]# docker exec -it tutorial-postgres-1 bash
root@79ba8e3c5a7e:/# date -R
Fri, 29 Apr 2022 14:56:25 +0000
root@79ba8e3c5a7e:/# cd /etc/
root@79ba8e3c5a7e:/etc# mv localtime localtime.bak
root@79ba8e3c5a7e:/etc# ln -s /usr/share/zoneinfo/Asia/Shanghai /etc/localtime
root@79ba8e3c5a7e:/etc# exit
[root@docker tutorial]# docker restart tutorial-postgres-1
tutorial-postgres-1
[root@docker tutorial]# docker exec -it tutorial-postgres-1 bash
root@79ba8e3c5a7e:/# date
Fri 29 Apr 2022 10:58:55 PM CST
root@79ba8e3c5a7e:/# date -R
Fri, 29 Apr 2022 22:59:14 +0800

# 重启 postgres 容器后,源端连接器任务会停止运行,重新启动源端连接器任务
[root@docker tutorial]# curl -s -X GET localhost:8083/connectors/inventory-connector-datatype/status | jq
{
  "name": "inventory-connector-datatype",
  "connector": {
    "state": "RUNNING",
    "worker_id": "192.168.48.2:8083"
  },
  "tasks": [
    {
      "id": 0,
      "state": "FAILED",
      "worker_id": "192.168.48.2:8083",
      "trace": "org.apache.kafka.connect.errors.ConnectException: An exception occurred in the change event producer. ... ...
    }
  ],
  "type": "source"
}

[root@docker tutorial]# curl -s -X POST localhost:8083/connectors/inventory-connector-datatype/tasks/0/restart
[root@docker tutorial]# curl -s -X GET localhost:8083/connectors/inventory-connector-datatype/status | jq
{
  "name": "inventory-connector-datatype",
  "connector": {
    "state": "RUNNING",
    "worker_id": "192.168.48.2:8083"
  },
  "tasks": [
    {
      "id": 0,
      "state": "RUNNING",
      "worker_id": "192.168.48.2:8083"
    }
  ],
  "type": "source"
}
- 时区正确后,同步一下数据看看
-- 源端插入数据,时间正确
test_dml=# insert into test.to_date1 values (5, now(), now());
test_dml=# select * from test.to_date1;
 id |            col1            |            col2            |            col3
----+----------------------------+----------------------------+----------------------------
  1 | 2022-04-29 13:07:36.678886 | 2022-04-29 13:07:36.678886 | 2022-04-29 13:07:36.678886
  2 | 2022-04-29 14:52:55.596212 | 2022-04-29 14:52:55.596212 | 2022-04-29 14:52:55.596212
  3 | 2022-04-29 14:59:57.756303 | 2022-04-29 14:59:57.756303 | 2022-04-29 14:59:57.756303
  4 | 2022-04-29 23:00:36.561669 | 2022-04-29 23:00:36.561669 | 2022-04-29 23:00:36.561669
  5 | 2022-04-29 23:06:25.568611 | 2022-04-29 23:06:25.568611 | 2022-04-29 23:06:25.568611
(5 rows)

-- 目标端同步的数据,时间正确
SQL> select * from test.to_date1;

        ID COL1                COL2                           COL3
---------- ------------------- ------------------------------ ------------------------------
         1 2022-04-29 13:07:36 29-APR-22 01.07.36.678000 PM   29-APR-22 01.07.36.678000 PM
         2 2022-04-29 14:52:55 29-APR-22 02.52.55.596000 PM   29-APR-22 02.52.55.596000 PM
         3 2022-04-29 14:59:57 29-APR-22 02.59.57.756000 PM   29-APR-22 02.59.57.756000 PM
         4 2022-04-29 23:00:36 29-APR-22 11.00.36.561000 PM   29-APR-22 11.00.36.561000 PM
         5 2022-04-29 23:06:25 29-APR-22 11.06.25.568000 PM   29-APR-22 11.06.25.568000 PM
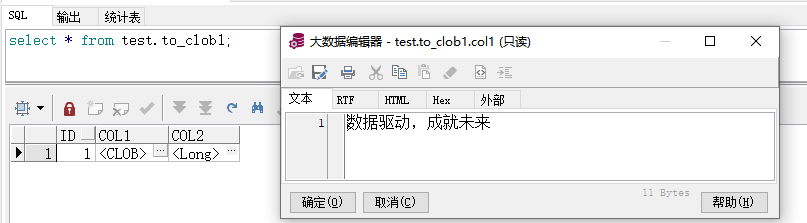
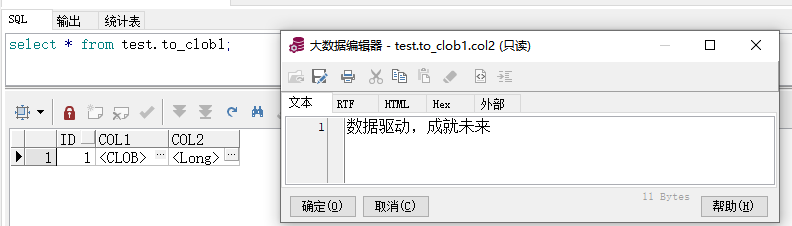
CLOB and LONG
- 根据上文两个迁移工具对 Oracle CLOB and LONG 类型的转换形式,这里选择 PostgreSQL 的 text 反向同步到 Oracle 的 CLOB and LONG 中。
drop table IF EXISTS test.to_clob1;
create table test.to_clob1 (id int primary key, col1 text, col2 text);
insert into test.to_clob1 values (1, '数据驱动,成就未来', '数据驱动,成就未来');
select * from test.to_clob1;

 id |        col1        |        col2
----+--------------------+--------------------
  1 | 数据驱动,成就未来 | 数据驱动,成就未来
(1 row)


create table test.to_clob1 (id int primary key, col1 CLOB, col2 LONG);
- 同步到目标端的数据
BLOB
https://www.postgresql.org/docs/14/datatype-binary.html
| Name | Storage Size | Description |
|---|---|---|
| bytea | 1 or 4 bytes plus the actual binary string | variable-length binary string |
- 根据上文两个迁移工具对 Oracle BLOB 类型的转换形式,这里选择 PostgreSQL 的 bytea 反向同步到 Oracle 的 BLOB 中。
drop table IF EXISTS test.to_blob1;
create table test.to_blob1 (id int primary key, col1 bytea);
insert into test.to_blob1 values (1, '数据驱动,成就未来');
select * from test.to_blob1;
 id |                           col1
----+----------------------------------------------------------
  1 | \xe695b0e68daee9a9b1e58aa8efbc8ce68890e5b0b1e69caae69da5
(1 row)


create table test.to_blob1 (id int primary key, col1 BLOB);
- 同步到目标端的数据
SQL> select * from test.to_blob1;

        ID COL1
---------- -------------------------------------------------------
         1 E695B0E68DAEE9A9B1E58AA8EFBC8CE68890E5B0B1E69CAAE69DA5
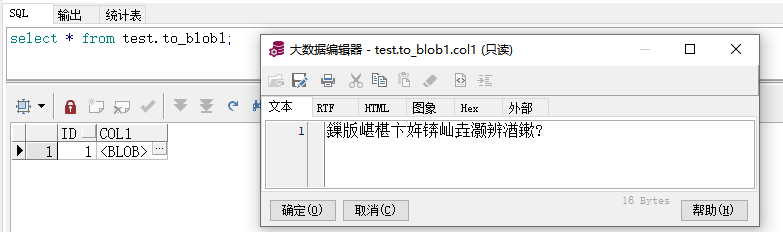
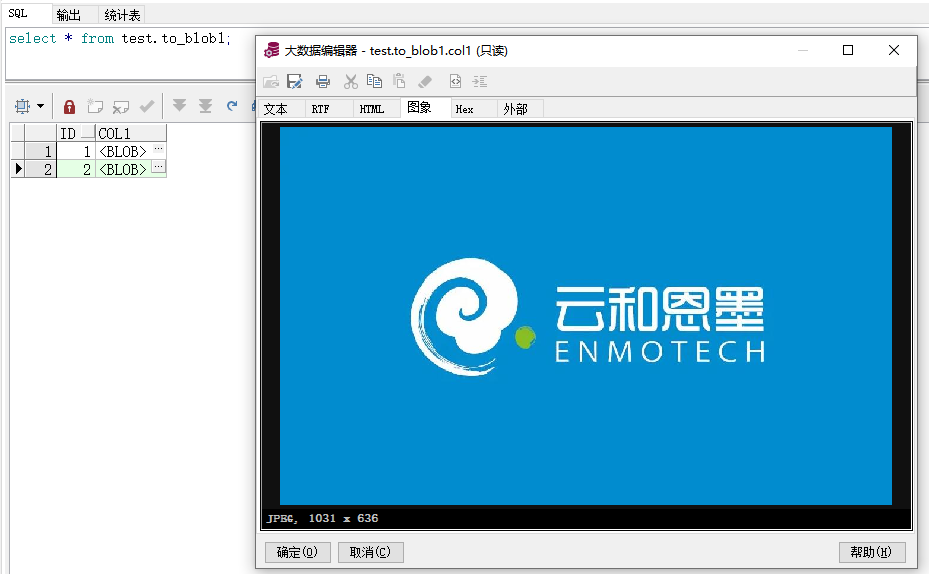
- BLOB 把中文转成乱码了,同步一张图片看看效果
- 目标端Oracle 成功打开图片
自动创建表的数据类型
- 如果同步的记录到目标端,发现目标端没有表或字段,当配置了 auto.create 和 auto.evolve 会自动在目标端创建表或者列,此时列的字段类型就会由连接器来指定。

最后修改时间:2022-05-03 08:34:05
「喜欢这篇文章,您的关注和赞赏是给作者最好的鼓励」
关注作者
【版权声明】本文为墨天轮用户原创内容,转载时必须标注文章的来源(墨天轮),文章链接,文章作者等基本信息,否则作者和墨天轮有权追究责任。如果您发现墨天轮中有涉嫌抄袭或者侵权的内容,欢迎发送邮件至:contact@modb.pro进行举报,并提供相关证据,一经查实,墨天轮将立刻删除相关内容。
