


一、测试环境情况
操作系统:Red Hat Enterprise Linux 7.8
IP:192.168.198.133
目录:/u01/tidb
#注:这个目录一看就是oracle的目录,因测试机器上没有多余的目录,因此公用该目录,剩余空间应不少于10G
#ip均为用户pc测试机ip。
二、配置/etc/hosts环境变量
在线部署,个人虚拟机需要联网,一般个人测试虚拟机没有dns,无法直接识别域名,因此手工配置一下/etc/hosts:
先ping一下tiup-mirrors.pingcap.com,找到其地址,然后在/etc/hosts下配置:
36.156.36.41    tiup-mirrors.pingcap.com
这样,就可以用域名访问了。
三、安装TiUP
在线安装命令如下:
curl --proto '=https' --tlsv1.2 -sSf https://tiup-mirrors.pingcap.com/install.sh | sh
测试环境,直接用root安装,详细输出如下:
[root@eomsdr ~]# curl --proto '=https' --tlsv1.2 -sSf https://tiup-mirrors.pingcap.com/install.sh | sh
  % Total    % Received % Xferd  Average Speed   Time    Time     Time  Current
                                 Dload  Upload   Total   Spent    Left  Speed
100 8606k  100 8606k    0     0   605k      0  0:00:14  0:00:14 --:--:--  647k
WARN: adding root certificate via internet: https://tiup-mirrors.pingcap.com/root.json
You can revoke this by remove /root/.tiup/bin/7b8e153f2e2d0928.root.json
Set mirror to https://tiup-mirrors.pingcap.com success
Detected shell: bash
Shell profile:  /root/.bash_profile
/root/.bash_profile has been modified to add tiup to PATH
open a new terminal or source /root/.bash_profile to use it
Installed path: /root/.tiup/bin/tiup
===============================================
Have a try:     tiup playground
===============================================
这样,tiup 就安装好了,tiup 这个工具很强大,安装利器。
四、安装数据库组件
使用tiup playground在线安装:tiup playground,如果组件已经安装,该命令可以启动组件,如果没有,会自动从互联网下载相关组件进行安装,非常好用。
[root@eomsdr ~]# tiup playground
The component `playground` is not installed; downloading from repository.
download https://tiup-mirrors.pingcap.com/playground-v1.2.4-linux-amd64.tar.gz 8.28 MiB / 8.28 MiB 100.00% 574.01 KiB p/s
Starting component `playground`: /root/.tiup/components/playground/v1.2.4/tiup-playground
Use the latest stable version: v4.0.8

    Specify version manually:   tiup playground <version>
    The stable version:         tiup playground v4.0.0
    The nightly version:        tiup playground nightly

Playground Bootstrapping...
The component `prometheus` is not installed; downloading from repository.
download https://tiup-mirrors.pingcap.com/prometheus-v4.0.8-linux-amd64.tar.gz 39.84 MiB / 39.84 MiB 100.00% 545.88 KiB p/s
download https://tiup-mirrors.pingcap.com/grafana-v4.0.8-linux-amd64.tar.gz 54.25 MiB / 54.25 MiB 100.00% 570.66 KiB p/s
Start pd instance
The component `pd` is not installed; downloading from repository.
download https://tiup-mirrors.pingcap.com/pd-v4.0.8-linux-amd64.tar.gz 38.85 MiB / 38.85 MiB 100.00% 570.94 KiB p/s
Start tikv instance
The component `tikv` is not installed; downloading from repository.
download https://tiup-mirrors.pingcap.com/tikv-v4.0.8-linux-amd64.tar.gz 135.46 MiB / 135.46 MiB 100.00% 574.33 KiB p/s
Start tidb instance
The component `tidb` is not installed; downloading from repository.
download https://tiup-mirrors.pingcap.com/tidb-v4.0.8-linux-amd64.tar.gz 39.16 MiB / 39.16 MiB 100.00% 530.98 KiB p/s
Waiting for tidb 127.0.0.1:4000 ready  ... 鉅[0m
Waiting for tidb 127.0.0.1:4000 ready  ... Done
Waiting for tikv 127.0.0.1:20160 ready  ... Done
Start tiflash instance
The component `tiflash` is not installed; downloading from repository.
download https://tiup-mirrors.pingcap.com/tiflash-v4.0.8-linux-amd64.tar.gz 360.61 MiB / 360.61 MiB 100.00% 598.77 KiB p/s
Waiting for tiflash 127.0.0.1:3930 ready  ... Done
CLUSTER START SUCCESSFULLY, Enjoy it ^-^
To connect TiDB: mysql --host 127.0.0.1 --port 4000 -u root
To view the dashboard: http://127.0.0.1:2379/dashboard
To view the Prometheus: http://127.0.0.1:9090
To view the Grafana: http://127.0.0.1:3000
文件默认安装在:
/root/.tiup/components/playground
这样,一个单机的测试环境就完成了。
五、目录结构
看一下目录结构:
[root@eomsdr components]# ls -lrt
total 0
drwxr-xr-x 3 root root 20 Nov 23 15:03 playground
drwxr-xr-x 3 root root 20 Nov 23 15:04 prometheus
drwxr-xr-x 3 root root 20 Nov 23 15:06 grafana
drwxr-xr-x 3 root root 20 Nov 23 15:07 pd
drwxr-xr-x 3 root root 20 Nov 23 15:11 tikv
drwxr-xr-x 3 root root 20 Nov 23 15:13 tidb
drwxr-xr-x 3 root root 20 Nov 23 15:23 tiflash
[root@eomsdr components]#
几个关键组件信息:
Pd:元数据及控制调度组件
Tikv:存储组件
Tidb:数据库实例组件
Tiflash:闪存组件
Tidb虽然和mysql类似,但是它厉害在分布式,如果要使用mysql,数据库变大后,要思考虑分库分表、使用mycat等数据路由工具,Tidb设计从底层一开始分布式,类似hdfs的存储架构,将分布式做成一种原生的架构。
六、查看组件日志
Ps进程,就可以看到组件的日志路径,对应查看即可,例如ps -ef|grep tidb,查看到tidb的进程对应的日志位置:
[root@eomsdr v4.0.8]# ps -ef|grep tidb
root      22590  22548  0 16:27 pts/2    00:00:02 /root/.tiup/components/tidb/v4.0.8/tidb-server -P 4000 --store=tikv --host=127.0.0.1 --status=10080 --path=127.0.0.1:2379 --log-file=/root/.tiup/data/SH9Q7P0/tidb-0/tidb.log
root      23061  23007  2 16:29 pts/1    00:00:27 /root/.tiup/components/tidb/v4.0.8/tidb-server -P 36829 --store=tikv --host=127.0.0.1 --status=32166 --path=127.0.0.1:33644 --log-file=/root/.tiup/data/SH9QQAS/tidb-0/tidb.log
root      23812  21745  0 16:32 pts/2    00:00:00 tail -f /root/.tiup/data/SH9QQAS/tidb-0/tidb.log

root@eomsdr v4.0.8]# ps -ef|grep tikv
root      22589  22548  0 16:27 pts/2    00:00:08 /root/.tiup/components/tikv/v4.0.8/tikv-server --addr=127.0.0.1:20160 --advertise-addr=127.0.0.1:20160 --status-addr=127.0.0.1:20180 --pd=http://127.0.0.1:2379 --config=/root/.tiup/data/SH9Q7P0/tikv-0/tikv.toml --data-dir=/root/.tiup/data/SH9Q7P0/tikv-0/data --log-file=/root/.tiup/data/SH9Q7P0/tikv-0/tikv.log
root      22590  22548  0 16:27 pts/2    00:00:02 /root/.tiup/components/tidb/v4.0.8/tidb-server -P 4000 --store=tikv --host=127.0.0.1 --status=10080 --path=127.0.0.1:2379 --log-file=/root/.tiup/data/SH9Q7P0/tidb-0/tidb.log
root      23055  23007  3 16:29 pts/1    00:00:36 /root/.tiup/components/tikv/v4.0.8/tikv-server --addr=127.0.0.1:12756 --advertise-addr=127.0.0.1:12756 --status-addr=127.0.0.1:28322 --pd=http://127.0.0.1:33644 --config=/root/.tiup/data/SH9QQAS/tikv-0/tikv.toml --data-dir=/root/.tiup/data/SH9QQAS/tikv-0/data --log-file=/root/.tiup/data/SH9QQAS/tikv-0/tikv.log
root      23061  23007  2 16:29 pts/1    00:00:28 /root/.tiup/components/tidb/v4.0.8/tidb-server -P 36829 --store=tikv --host=127.0.0.1 --status=32166 --path=127.0.0.1:33644 --log-file=/root/.tiup/data/SH9QQAS/tidb-0/tidb.log
 [root@eomsdr v4.0.8]#
七、访问Tidb数据库
访问Tidb数据库,需要mysql客户端,安装完成后,mysql客户端并没有被安装,需要自行下载。
Oracle官网下载mysql客户端:
https://downloads.mysql.com/archives/community/

当前下载的为:mysql-community-client-8.0.21-1.el7.x86_64.rpm
安装这个客户端,各种依赖包,建议用yum安装,或者,直接用redhat中的yum源安装一个maridb:yum install mysql,一本同源,实际安装的是maridb。
八、创建一个新数据库
连接到数据库上:
mysql --host 127.0.0.1 --port 4000 -u root
创建一个数据库:
MySQL [(none)]> create database yug_test;
查看创建的数据库:
MySQL [(none)]> show databases;
±-------------------+
| Database |
±-------------------+
| INFORMATION_SCHEMA |
| METRICS_SCHEMA |
| PERFORMANCE_SCHEMA |
| mysql |
| test |
| yug_test |
±-------------------+
6 rows in set (0.00 sec)
使用刚刚创建的数据库:
MySQL [(none)]> use yug_test;
Database changed
MySQL [yug_test]> create table abc(abc_test varchar(10));
Query OK, 0 rows affected (0.09 sec)
插入一条记录:
MySQL [yug_test]> insert into abc values(‘111111’);
Query OK, 1 row affected (0.02 sec)
查询:
MySQL [yug_test]> select * from abc;
±---------+
| abc_test |
±---------+
| 111111 |
±---------+
九、特别需要注意的问题
(1) 端口不一定4000,尤其是多次运行tiup playground,要看tiup playgound输出,有时候连接4000端口怎么都连接不上,注意观察tiup playgound输出欢迎信息:
CLUSTER START SUCCESSFULLY, Enjoy it ^-^
To connect TiDB: mysql --host 127.0.0.1 --port 9169 -u root
To view the dashboard: http://127.0.0.1:16787/dashboard
To view the Prometheus: http://127.0.0.1:11805
To view the Grafana: http://127.0.0.1:20040
(2)tiup playgound这个名字一看,就是一个测试环境,并且是个特殊的测试环境,如果你在这个特殊测试环境里创建了一个数据库,这个数据库会随着tidb进程重启消失,是的,会消失。例如,上面创建的yug_test数据库,重启进程后消失。笔者也是不解,找人问了才发现这个问题。
(3)在crt的cmd窗口运行tiup playground命令,如果Ctrl+C退出,数据库也就退出了,虽然启动到了测试环境,看到了欢迎信息,但是如果这时候Ctrl+C,以为数据库在后台运行,那就不对了,笔者刚开始测试的时候,不知道这个现象,看到欢迎信息,就直接Ctrl+C退出了,并且,退出后再进去,前面的测试数据库就没有了,应为有(2)这个注意点。
(4)Ctrl+C就是停止,是的,不行还可以kill,测试环境比较简单。
(5)localhost( 127.0.0.1)这个只能本机访问,如果要对外开放访问,启动命令修改:tiup playground --host 192.168.198.133后面的ip就是测试机器ip,这时候,访问就需要改成:mysql --host 192.168.198.133 --port 4000 -u root,这时候,也可以在外部访问这个tidb数据库了。
好了,基于这个环境,可以打开Tidb神奇的大门了,但是似乎不太好:
1、重启数据库就消失了;
2、稀里糊涂部署了,tiup这个工具太厉害,路径都是程序自动指定的,其实我们想自己指定部署路径及数据路径的;
3、那么多组件,其实我们想分布式部署的,部署到不同主机上的,这些主机往往在实践中还是需要跨机架、机柜的;
4、维护我们还系统用navicat等工具那,类似这个工具mysql工程师用习惯了;
......
用一台机器能模拟吗?当然可以,只是IP都是一个,重复指定IP,采用不通的端口即可。
先清理掉之前的安装:
[root@eomsdr ~]# tiup clean –all
然后正式开始:
用单机模拟集群方式安装
一、配置/etc/ssh/sshd_config文件
即将MaxSessions 30 最大session数量改大,例如本文改成30。改完重启service sshd restart,改这个参数是为了防止多进程scp文件时ssh登录数量超限制。
其它地方没必要改了,这个里面有安全基线,还有其它登录设置,如果改错了,sshd服务起不了,还要找主机管理员从concole进行处理。
二、编辑部署yarm文件
tidb部署是基于这个yarm文件来部署的,这个文件指定了各个组件的位置及端口,测试环境如下:
# # Global variables are applied to all deployments and used as the default value of
# # the deployments if a specific deployment value is missing.
global:
 user: "tidb"
 ssh_port: 22
 deploy_dir: "/u01/tidb/tidb-deploy"
 data_dir: "/u01/tidb/tidb-data"

# # Monitored variables are applied to all the machines.
monitored:
 node_exporter_port: 9100
 blackbox_exporter_port: 9115

server_configs:
 tidb:
   log.slow-threshold: 300
 tikv:
   readpool.storage.use-unified-pool: false
   readpool.coprocessor.use-unified-pool: true
 pd:
   replication.enable-placement-rules: true
   replication.location-labels: ["host"]
 tiflash:
   logger.level: "info"

pd_servers:
 - host: 192.168.198.133

tidb_servers:
 - host: 192.168.198.133

tikv_servers:
 - host: 192.168.198.133
   port: 20160
   status_port: 20180
   config:
     server.labels: { host: "logic-host-1" }

 - host: 192.168.198.133
   port: 20161
   status_port: 20181
   config:
     server.labels: { host: "logic-host-2" }

 - host: 192.168.198.133
   port: 20162
   status_port: 20182
   config:
     server.labels: { host: "logic-host-3" }

tiflash_servers:
 - host: 192.168.198.133

monitoring_servers:
 - host: 192.168.198.133

grafana_servers:
 - host: 192.168.198.133
可以看到配置文件中指定了各个组件的所在ip,同时注意,这个配置文件指定程序及数据路径:
deploy_dir: “/u01/tidb/tidb-deploy”
data_dir: “/u01/tidb/tidb-data”
这个两个路径,要提前建好,并且指定的用户tidb互通要配置好,需要scp互相拷贝文件。(单机模拟就省了)
三、使用tiup进行在线部署
命令如下:
(注意运行命令的位置:
[root@eomsdr tidb]# ls -lrt
total 16
-rw-r–r-- 1 root root 1233 Nov 24 11:58 topo.yaml
drwxr-xr-x 2 root root 4096 Nov 24 14:42 logs
drwxr-xr-x 11 root root 4096 Nov 24 15:14 tidb-deploy
drwxr-xr-x 9 root root 4096 Nov 24 15:14 tidb-data
[root@eomsdr tidb]# pwd
/u01/tidb
因为topo.yaml在这个路径下,如果用绝对路径,请忽略)
tiup cluster deploy myft_ticlu nightly ./topo.yaml --user root –p
myft_ticlu为自定义集群名,nightly为版本(最新版本),查看支持版本可用用:tiup list tidb。按照引导,输入”y”及 root 密码,来完成部署。正常输出如下:
[root@eomsdr tidb]# tiup cluster deploy myft_ticlu nightly ./topo.yaml --user root –p
Starting component `cluster`: /root/.tiup/components/cluster/v1.2.4/tiup-cluster deploy myft_ticlu nightly ./topo.yaml --user root –p
Please confirm your topology:
Cluster type:    tidb
Cluster name:    myft_ticlu
Cluster version: nightly
Type        Host             Ports                            OS/Arch       Directories
----        ----             -----                            -------       -----------
pd          192.168.198.133  2379/2380                        linux/x86_64  /u01/tidb/tidb-deploy/pd-2379,/u01/tidb/tidb-data/pd-2379
tikv        192.168.198.133  20160/20180                      linux/x86_64  /u01/tidb/tidb-deploy/tikv-20160,/u01/tidb/tidb-data/tikv-20160
tikv        192.168.198.133  20161/20181                      linux/x86_64  /u01/tidb/tidb-deploy/tikv-20161,/u01/tidb/tidb-data/tikv-20161
tikv        192.168.198.133  20162/20182                      linux/x86_64  /u01/tidb/tidb-deploy/tikv-20162,/u01/tidb/tidb-data/tikv-20162
tidb        192.168.198.133  4000/10080                       linux/x86_64  /u01/tidb/tidb-deploy/tidb-4000
tiflash     192.168.198.133  9000/8123/3930/20170/20292/8234  linux/x86_64  /u01/tidb/tidb-deploy/tiflash-9000,/u01/tidb/tidb-data/tiflash-9000
prometheus  192.168.198.133  9090                             linux/x86_64  /u01/tidb/tidb-deploy/prometheus-9090,/u01/tidb/tidb-data/prometheus-9090
grafana     192.168.198.133  3000                             linux/x86_64  /u01/tidb/tidb-deploy/grafana-3000
Attention:
    1. If the topology is not what you expected, check your yaml file.
    2. Please confirm there is no port/directory conflicts in same host.
Do you want to continue? [y/N]:  y
+ Generate SSH keys ... Done
+ Download TiDB components
  - Download pd:nightly (linux/amd64) ... Done
  - Download tikv:nightly (linux/amd64) ... Done
  - Download tidb:nightly (linux/amd64) ... Done
  - Download tiflash:nightly (linux/amd64) ... Done
  - Download prometheus:nightly (linux/amd64) ... Done
  - Download grafana:nightly (linux/amd64) ... Done
  - Download node_exporter:v0.17.0 (linux/amd64) ... Done
  - Download blackbox_exporter:v0.12.0 (linux/amd64) ... Done
+ Initialize target host environments
  - Prepare 192.168.198.133:22 ... Done
+ Copy files
  - Copy pd -> 192.168.198.133 ... Done
  - Copy tikv -> 192.168.198.133 ... Done
  - Copy tikv -> 192.168.198.133 ... Done
  - Copy tikv -> 192.168.198.133 ... Done
  - Copy tidb -> 192.168.198.133 ... Done
  - Copy tiflash -> 192.168.198.133 ... Done
  - Copy prometheus -> 192.168.198.133 ... Done
  - Copy grafana -> 192.168.198.133 ... Done
  - Copy node_exporter -> 192.168.198.133 ... Done
  - Copy blackbox_exporter -> 192.168.198.133 ... Done
+ Check status

Enabling component pd
+ Enable cluster
        Enable pd 192.168.198.133:2379 success
+ Enable cluster
+ Enable cluster
Enabling component tikv
        Enabling instance tikv 192.168.198.133:20162
        Enabling instance tikv 192.168.198.133:20160
+ Enable cluster
+ Enable cluster
+ Enable cluster
        Enable tikv 192.168.198.133:20162 success
Enabling component tidb
+ Enable cluster
        Enable tidb 192.168.198.133:4000 success
Enabling component tiflash
+ Enable cluster
        Enable tiflash 192.168.198.133:9000 success
Enabling component prometheus
+ Enable cluster
        Enable prometheus 192.168.198.133:9090 success
Enabling component grafana
+ Enable cluster
+ Enable cluster
Deployed cluster `myft_ticlu` successfully, you can start the cluster via `tiup cluster start myft_ticlu`
[root@eomsdr tidb]#
启动集群下,命令如下:
[root@eomsdr tidb]# tiup cluster start myft_ticlu
详细输出如下:
[root@eomsdr tidb]# tiup cluster start myft_ticlu
Starting component `cluster`: /root/.tiup/components/cluster/v1.2.4/tiup-cluster start myft_ticlu
Starting cluster myft_ticlu...
+ [ Serial ] - SSHKeySet: privateKey=/root/.tiup/storage/cluster/clusters/myft_ticlu/ssh/id_rsa, publicKey=/root/.tiup/storage/cluster/clusters/myft_ticlu/ssh/id_rsa.pub
+ [Parallel] - UserSSH: user=tidb, host=192.168.198.133
+ [Parallel] - UserSSH: user=tidb, host=192.168.198.133
+ [Parallel] - UserSSH: user=tidb, host=192.168.198.133
+ [Parallel] - UserSSH: user=tidb, host=192.168.198.133
+ [Parallel] - UserSSH: user=tidb, host=192.168.198.133
+ [Parallel] - UserSSH: user=tidb, host=192.168.198.133
+ [Parallel] - UserSSH: user=tidb, host=192.168.198.133
+ [Parallel] - UserSSH: user=tidb, host=192.168.198.133
+ [ Serial ] - StartCluster
Starting component pd
        Starting instance pd 192.168.198.133:2379
        Start pd 192.168.198.133:2379 success
Starting component node_exporter
        Starting instance 192.168.198.133
        Start 192.168.198.133 success
Starting component blackbox_exporter
        Starting instance 192.168.198.133
        Start 192.168.198.133 success
Starting component tikv
        Starting instance tikv 192.168.198.133:20162
        Starting instance tikv 192.168.198.133:20160
        Starting instance tikv 192.168.198.133:20161
        Start tikv 192.168.198.133:20161 success
        Start tikv 192.168.198.133:20160 success
        Start tikv 192.168.198.133:20162 success
Starting component tidb
        Starting instance tidb 192.168.198.133:4000
        Start tidb 192.168.198.133:4000 success
Starting component tiflash
        Starting instance tiflash 192.168.198.133:9000
        Start tiflash 192.168.198.133:9000 success
Starting component prometheus
        Starting instance prometheus 192.168.198.133:9090
        Start prometheus 192.168.198.133:9090 success
Starting component grafana
        Starting instance grafana 192.168.198.133:3000

        Start grafana 192.168.198.133:3000 success
+ [ Serial ] - UpdateTopology: cluster=myft_ticlu
Started cluster `myft_ticlu` successfully
[root@eomsdr tidb]#
四、创建创建一个数据库
[root@eomsdr ~]# mysql --port 4000 -u root
ERROR 2002 (HY000): Can’t connect to local MySQL server through socket ‘/var/lib/mysql/mysql.sock’ (2)
[root@eomsdr ~]# mysql --host 192.168.198.133 --port 4000 -u root
Welcome to the MariaDB monitor. Commands end with ; or \g.
Your MySQL connection id is 7
Server version: 5.7.25-TiDB-v4.0.0-beta.2-1617-g95adbe1a7-dirty TiDB Server (Apache License 2.0) Community Edition, MySQL 5.7 compatible
Copyright © 2000, 2018, Oracle, MariaDB Corporation Ab and others.
Type ‘help;’ or ‘\h’ for help. Type ‘\c’ to clear the current input statement.
MySQL [(none)]>
MySQL [(none)]>
MySQL [(none)]> show databases;
±-------------------+
| Database |
±-------------------+
| INFORMATION_SCHEMA |
| METRICS_SCHEMA |
| PERFORMANCE_SCHEMA |
| mysql |
| test |
±-------------------+
5 rows in set (0.00 sec)
MySQL [(none)]> create database yugtest;
Query OK, 0 rows affected (0.23 sec)
MySQL [(none)]>
MySQL [(none)]>
MySQL [(none)]> show database
-> ;
ERROR 1064 (42000): You have an error in your SQL syntax; check the manual that corresponds to your TiDB version for the right syntax to use line 1 column 13 near “database”
MySQL [(none)]> show databases;
±-------------------+
| Database |
±-------------------+
| INFORMATION_SCHEMA |
| METRICS_SCHEMA |
| PERFORMANCE_SCHEMA |
| mysql |
| test |
| yugtest |
±-------------------+
6 rows in set (0.00 sec)
MySQL [(none)]> use yugtest;
Database changed
MySQL [yugtest]> create table ft_table(test varchar(10));
Query OK, 0 rows affected (0.45 sec)
MySQL [yugtest]>
MySQL [yugtest]> insert into ft_table values(‘11111’);
Query OK, 1 row affected (0.15 sec)
MySQL [yugtest]> insert into ft_table values(‘11111’);
Query OK, 1 row affected (0.01 sec)
MySQL [yugtest]> insert into ft_table values(‘11111’);
Query OK, 1 row affected (0.02 sec)
MySQL [yugtest]> select test from ft_table;
±------+
| test |
±------+
| 11111 |
| 11111 |
| 11111 |
±------+
3 rows in set (0.02 sec)
通过navicat访问,新建连接:ip、端口、用户名(root)、密码为空,看看刚创建的表:
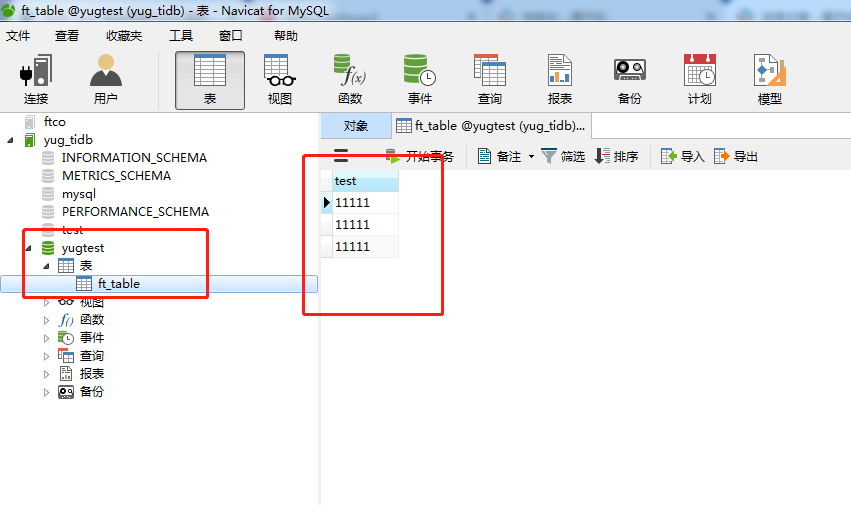
这个数据就是永久保留了,不是playgroud环境那么任性。
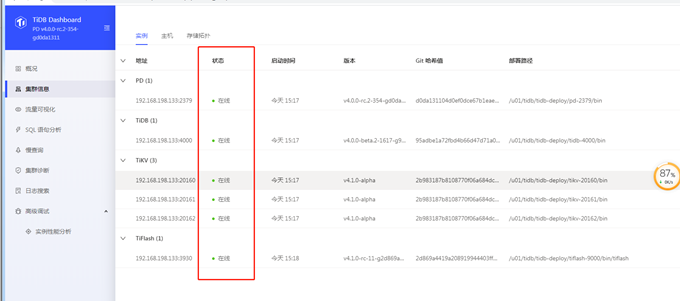
四、访问控制面板(控制面板这个工具还是挺好用的)
路径:http://192.168.198.133:2379/dashboard/#/signin
(ip自行修改即可)
主页:

(1) 看集群每个节点的状态
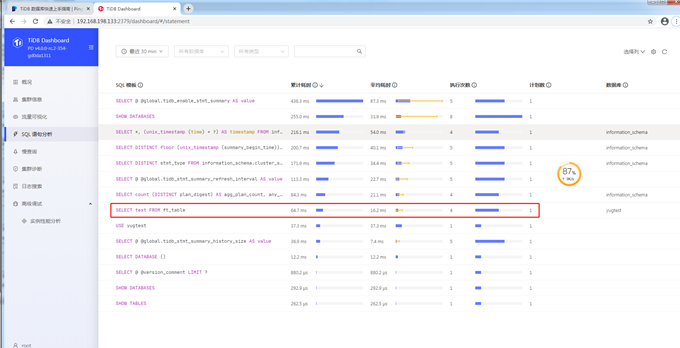
(2) 最近一段时间(指定)SQL情况分析
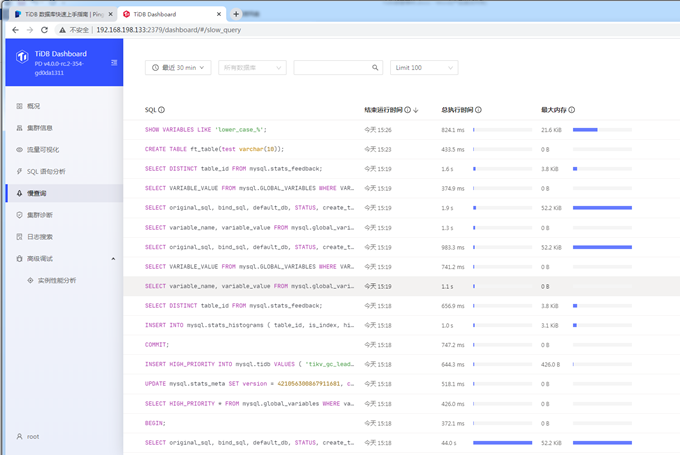
(3) 查看慢sql
(4) 集群诊断
开始诊断:
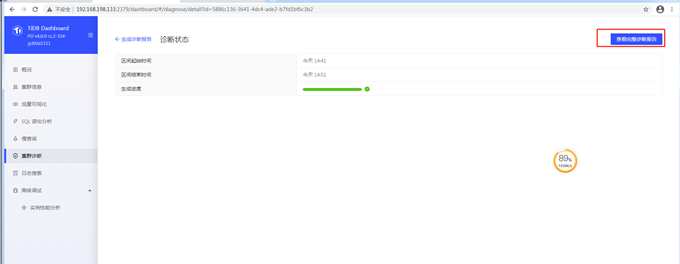
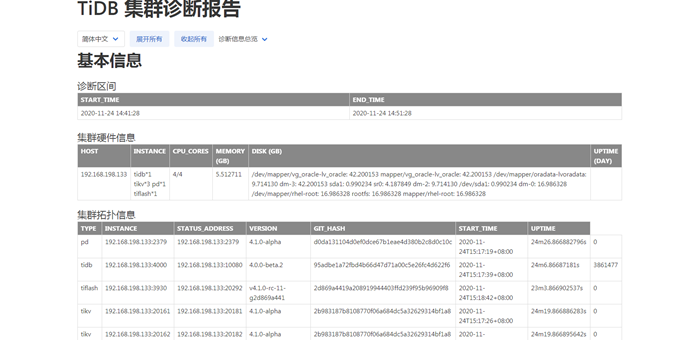
诊断报告,类似ORACLE的AWR(颜色搭配以灰色为主,看着不太舒服):
(4)高级调试:可以对每个组件进行性能分析
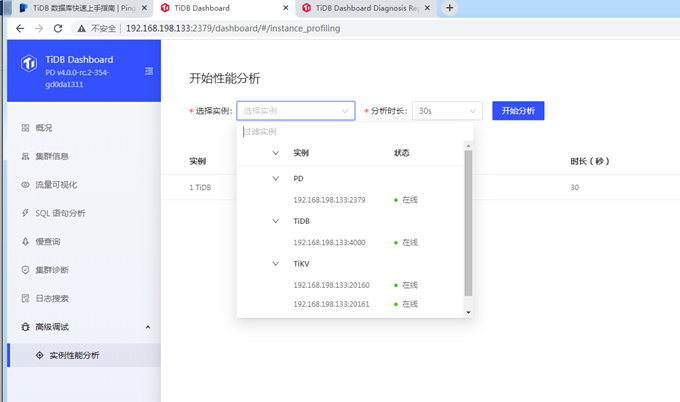
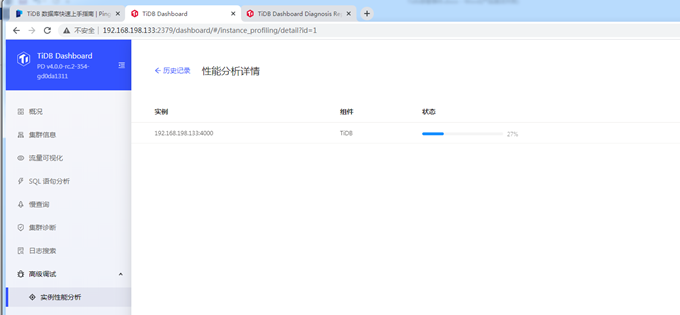
生成的格式是profiling_1_1_tidb_192_168_198_133_4000206051412.svg样式的,无法直接打开,应是需要工具分析或者遇到问题开support的时候需要
五、查看集群状态命令:tiup cluster display
[root@eomsdr tidb]# tiup cluster display myft_ticlu
Starting component `cluster`: /root/.tiup/components/cluster/v1.2.4/tiup-cluster display myft_ticlu
Cluster type:    tidb
Cluster name:    myft_ticlu
Cluster version: nightly
SSH type:        builtin
ID                     Role        Host             Ports                            OS/Arch       Status   Data Dir                             Deploy Dir
--                     ----        ----             -----                            -------       ------   --------                             ----------
192.168.198.133:3000   grafana     192.168.198.133  3000                             linux/x86_64  Up       -                                    /u01/tidb/tidb-deploy/grafana-3000
192.168.198.133:2379   pd          192.168.198.133  2379/2380                        linux/x86_64  Up|L|UI  /u01/tidb/tidb-data/pd-2379          /u01/tidb/tidb-deploy/pd-2379
192.168.198.133:9090   prometheus  192.168.198.133  9090                             linux/x86_64  Up       /u01/tidb/tidb-data/prometheus-9090  /u01/tidb/tidb-deploy/prometheus-9090
192.168.198.133:4000   tidb        192.168.198.133  4000/10080                       linux/x86_64  Up       -                                    /u01/tidb/tidb-deploy/tidb-4000
192.168.198.133:9000   tiflash     192.168.198.133  9000/8123/3930/20170/20292/8234  linux/x86_64  Up       /u01/tidb/tidb-data/tiflash-9000     /u01/tidb/tidb-deploy/tiflash-9000
192.168.198.133:20160  tikv        192.168.198.133  20160/20180                      linux/x86_64  Up       /u01/tidb/tidb-data/tikv-20160       /u01/tidb/tidb-deploy/tikv-20160
192.168.198.133:20161  tikv        192.168.198.133  20161/20181                      linux/x86_64  Up       /u01/tidb/tidb-data/tikv-20161       /u01/tidb/tidb-deploy/tikv-20161
192.168.198.133:20162  tikv        192.168.198.133  20162/20182                      linux/x86_64  Up       /u01/tidb/tidb-data/tikv-20162       /u01/tidb/tidb-deploy/tikv-20162
Total nodes: 8
[root@eomsdr tidb]#
tiup可以启动,也可以停止 tiup cluster stop myft_ticlu
这样,一个基本的,保持永久状态的tidb集群(单机模拟)就创建成功了。
六、遇到的问题
可能遇到的最大的问题,就是在部署节点文件拷贝超时:
[root@eomsdr tidb]# tiup cluster deploy myft_ticlu nightly ./topo.yaml --user root –p
Starting component `cluster`: /root/.tiup/components/cluster/v1.2.4/tiup-cluster deploy myft_ticlu nightly ./topo.yaml --user root –p
Please confirm your topology:
Cluster type:    tidb
Cluster name:    myft_ticlu
Cluster version: nightly
  - Copy tikv -> 192.168.198.133 ... Done
  - Copy tikv -> 192.168.198.133 ... Done
  - Copy tidb -> 192.168.198.133 ... Done
  - Copy tiflash -> 192.168.198.133 ... Error
  - Copy prometheus -> 192.168.198.133 ... Done
  - Copy grafana -> 192.168.198.133 ... Done
  - Copy node_exporter -> 192.168.198.133 ... Done
  - Copy blackbox_exporter -> 192.168.198.133 ... Done

Error: stderr: Run Command Timeout!
: executor.ssh.execute_timedout: Execute command over SSH timedout for 'tidb@192.168.198.133:22' {ssh_stderr: Run Command Timeout!
, ssh_stdout: , ssh_command: export LANG=C; PATH=$PATH:/usr/bin:/usr/sbin tar --no-same-owner -zxf /u01/tidb/tidb-deploy/tiflash-9000/bin/tiflash-nightly-linux-amd64.tar.gz -C /u01/tidb/tidb-deploy/tiflash-9000/bin && rm /u01/tidb/tidb-deploy/tiflash-9000/bin/tiflash-nightly-linux-amd64.tar.gz}

Verbose debug logs has been written to /u01/tidb/logs/tiup-cluster-debug-2020-11-24-12-46-57.log.
Error: run `/root/.tiup/components/cluster/v1.2.4/tiup-cluster` (wd:/root/.tiup/data/SHEMCpv) failed: exit status 1
Copy tiflash -> 192.168.198.133 … Error
executor.ssh.execute_timedout: Execute command over SSH timedout for ‘tidb@192.168.198.133:22’ {ssh_stderr: Run Command Timeout!
这些都是远程拷贝,实际上部署的时候,需要把tidb用户(这个用户是在yarm文件里指定的)的互信提前做好(这个oracle工程师可能有一百种方法,网上也有很多种),不再赘述。
另外,注意文件系统空间:解决这个问题,网上有export TMOUT=1000000及–ssh-timeout 1200方法
最神奇的的是一个:重启虚拟机解决了该问题,实际上ssh的默认超时时间都足够安装了,主要是空间的问题。
