


迟来的ambari文档。
环境安装好是这个样子的。。毕竟是测试环境,随便装装就好。要是正式环境就比较麻烦了,要从底层存储一步一步的配置,否则无法发挥出服务器的最大性能。
比如这个帖子我提到直接绑jbod和用Lvm的测试结果差很多。要配置正式环境的小伙伴可以去看一下。
https://www.modb.pro/db/41436
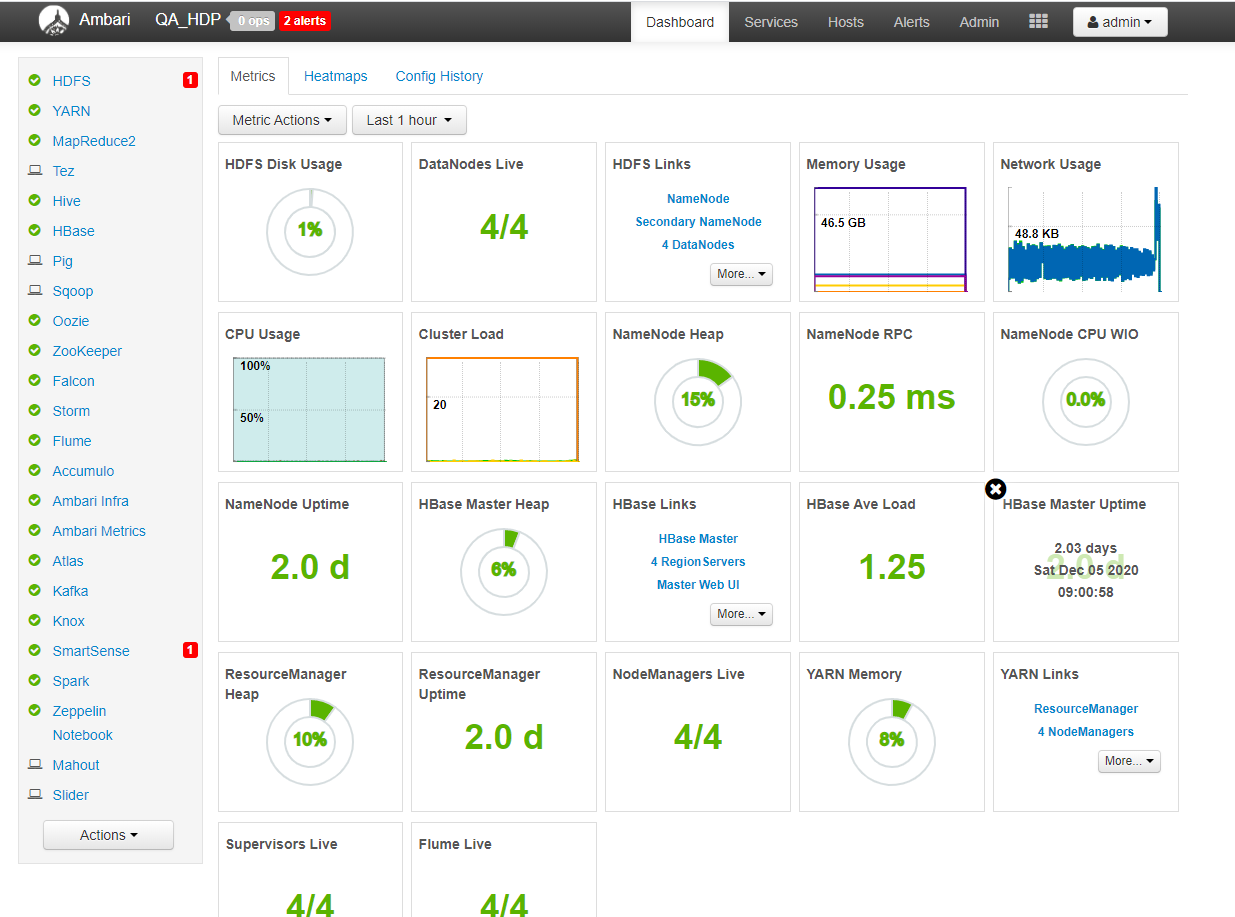
这是安装好的ambari测试环境。
不过,为了写这篇文档,我就重新搞一次环境吧。 官网的https://cwiki.apache.org/confluence/display/AMBARI/Installation+Guide+for+Ambari+2.7.5
搞了四个虚拟机。 32C-64G

修改Host
[root@bogon ~]# hostnamectl set-hostname bg1
[root@bogon ~]# bash
[root@bg1 ~]#
[root@bogon ~]# hostnamectl set-hostname bg2
[root@bogon ~]# bash
[root@bg2 ~]#
[root@bogon ~]# bash
[root@bg3 ~]#
[root@bogon ~]# bash
[root@bg4 ~]#
用的是阿里源。
wget -O /etc/yum.repos.d/CentOS-Base.repo http://mirrors.aliyun.com/repo/Centos-7.repo
配置/etc/hosts
10.90.9.180 bg1
10.90.9.179 bg2
10.90.9.193 bg3
10.90.9.188 bg4
配置ssh免密登陆
ssh-keygen -t rsa
ssh-copy-id -i ~/.ssh/id_rsa.pub root@bg1
ssh-copy-id -i ~/.ssh/id_rsa.pub root@bg2
ssh-copy-id -i ~/.ssh/id_rsa.pub root@bg3
ssh-copy-id -i ~/.ssh/id_rsa.pub root@bg4
配置关闭透明大页,然后配置开机启动脚本
[root@bg1 apache-ambari-2.7.5-src]# cat /etc/rc.local
#!/bin/bash
THIS FILE IS ADDED FOR COMPATIBILITY PURPOSES
It is highly advisable to create own systemd services or udev rules
to run scripts during boot instead of using this file.
In contrast to previous versions due to parallel execution during boot
this script will NOT be run after all other services.
Please note that you must run ‘chmod +x /etc/rc.d/rc.local’ to ensure
that this script will be executed during boot.
touch /var/lock/subsys/local
if test -f /sys/kernel/mm/transparent_hugepage/defrag; then
echo never > /sys/kernel/mm/transparent_hugepage/defrag
fi
if test -f /sys/kernel/mm/transparent_hugepage/enabled; then
echo never > /sys/kernel/mm/transparent_hugepage/enabled
fi
exit 0
[root@bg1 apache-ambari-2.7.5-src]#
检查透明大页
[root@bg1 apache-ambari-2.7.5-src]# cat /sys/kernel/mm/transparent_hugepage/enabled
always madvise [never]
[root@bg1 apache-ambari-2.7.5-src]#
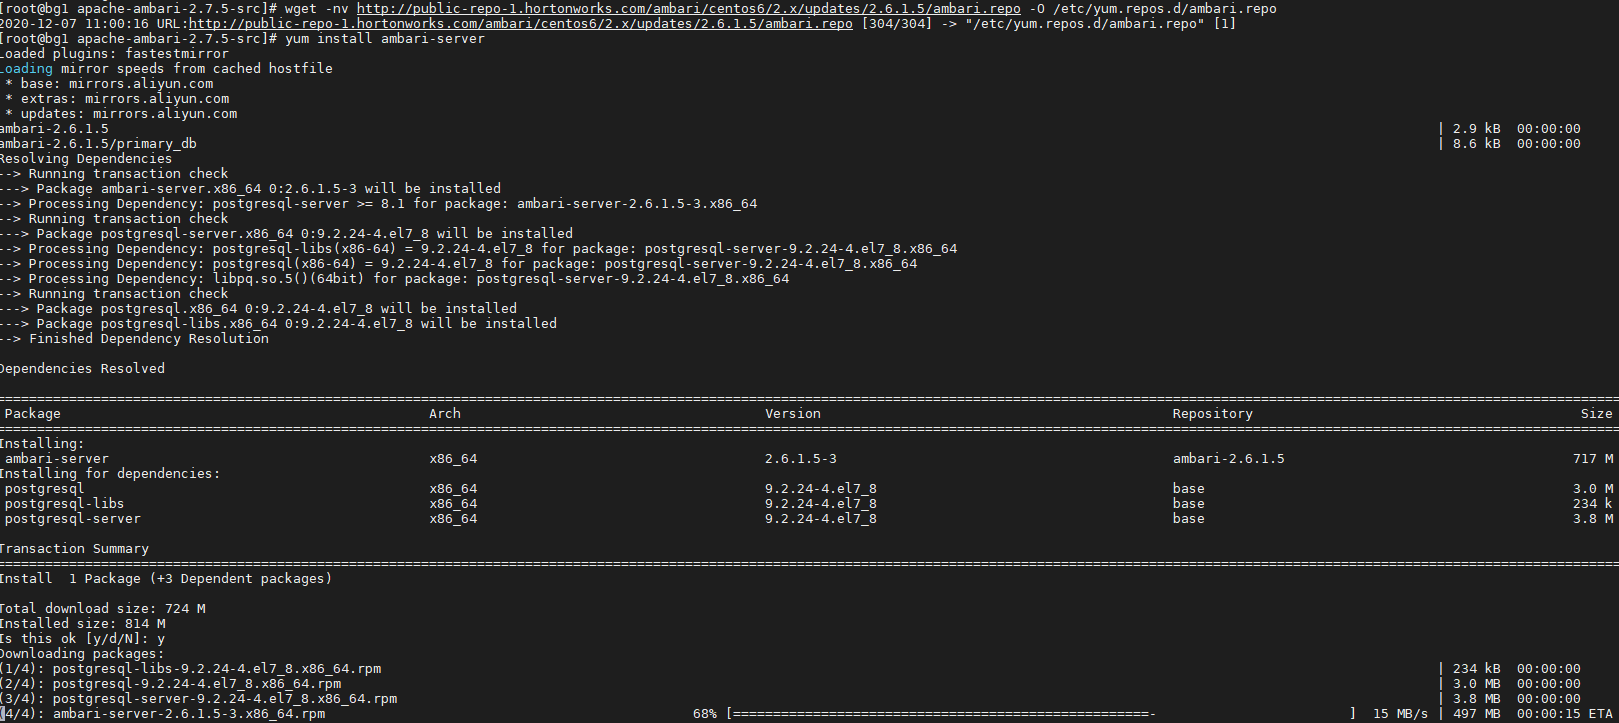
配置ambari.repo. 然后下载。
wget -nv http://public-repo-1.hortonworks.com/ambari/centos6/2.x/updates/2.6.1.5/ambari.repo -O /etc/yum.repos.d/ambari.repo
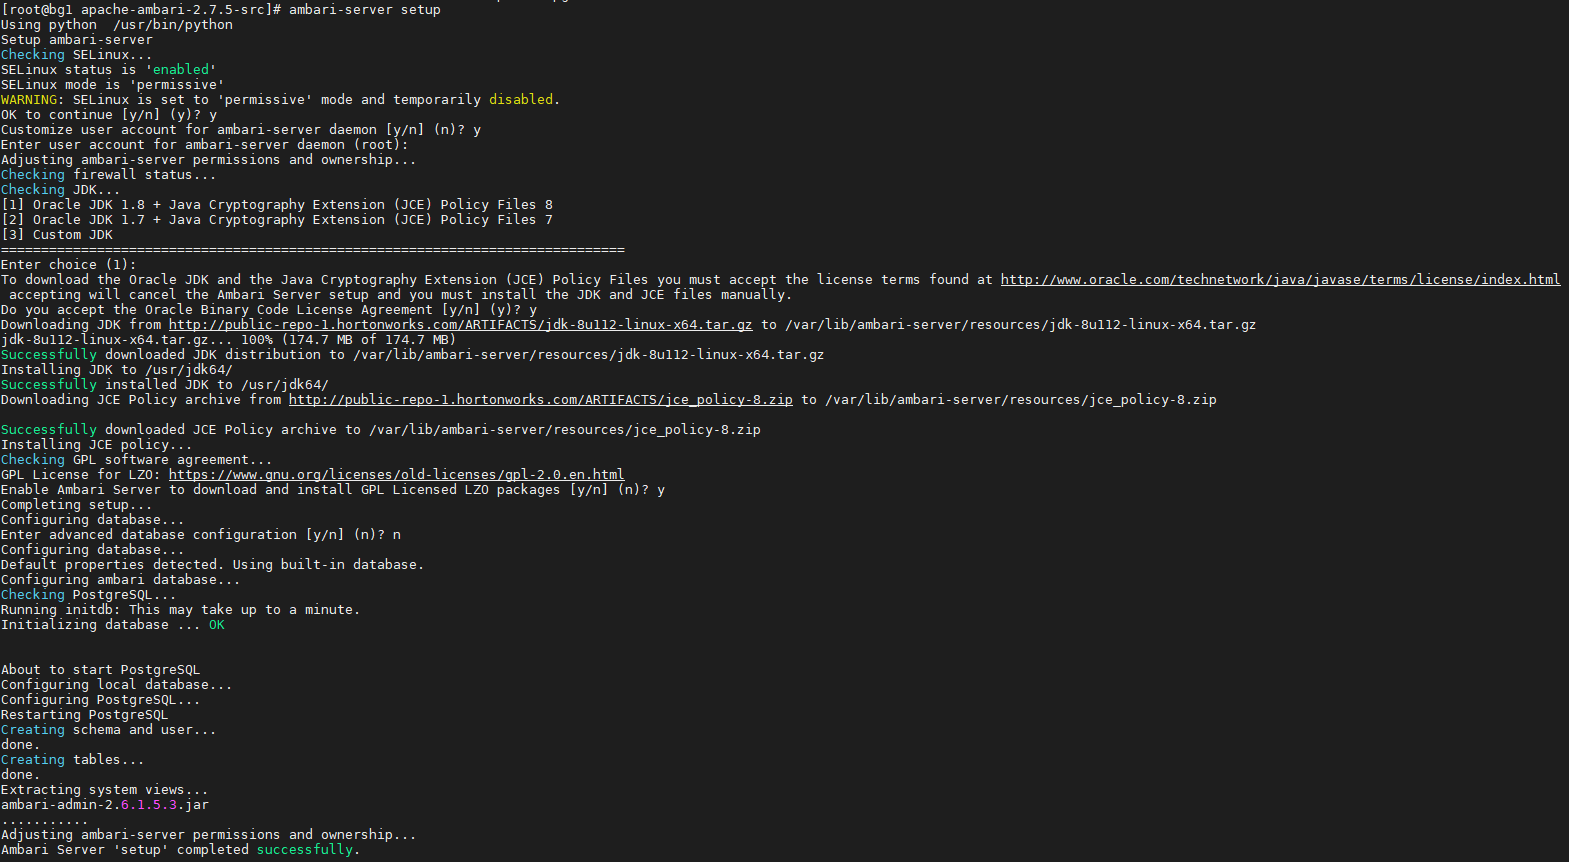
运行ambari-setup 命令来配置ambari初始化,包括用户,jdk,元数据库等等。这里你可以选择mysql, postgres, 甚至oracle。默认是Postgresql 。其它数据库要提前配置好。这里我用的是默认Postgresql。
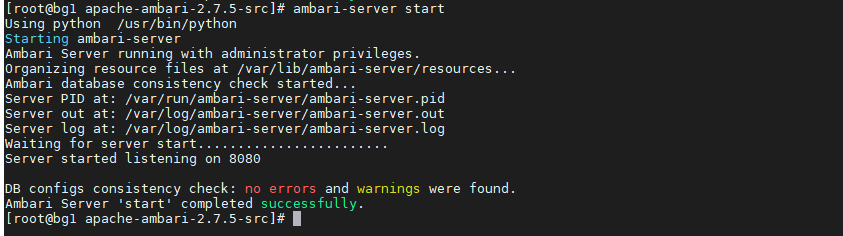
启动ambari-server
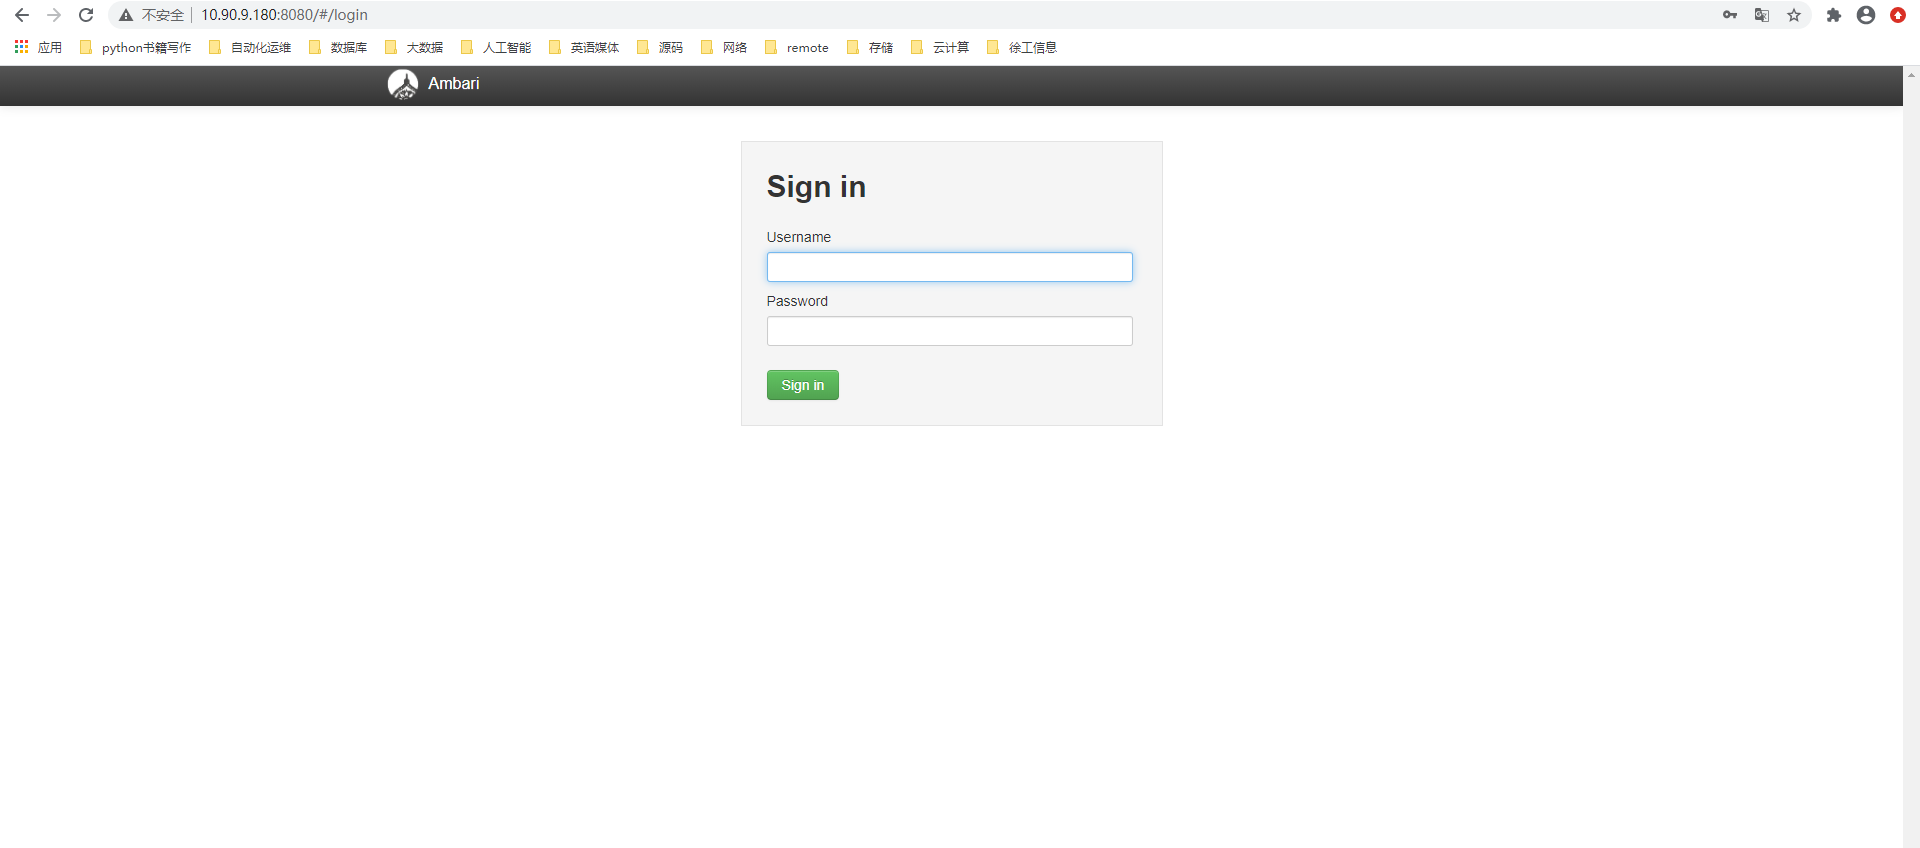
Ambari登录界面. http://10.90.9.180:8080/#/login
密码是admin/admin
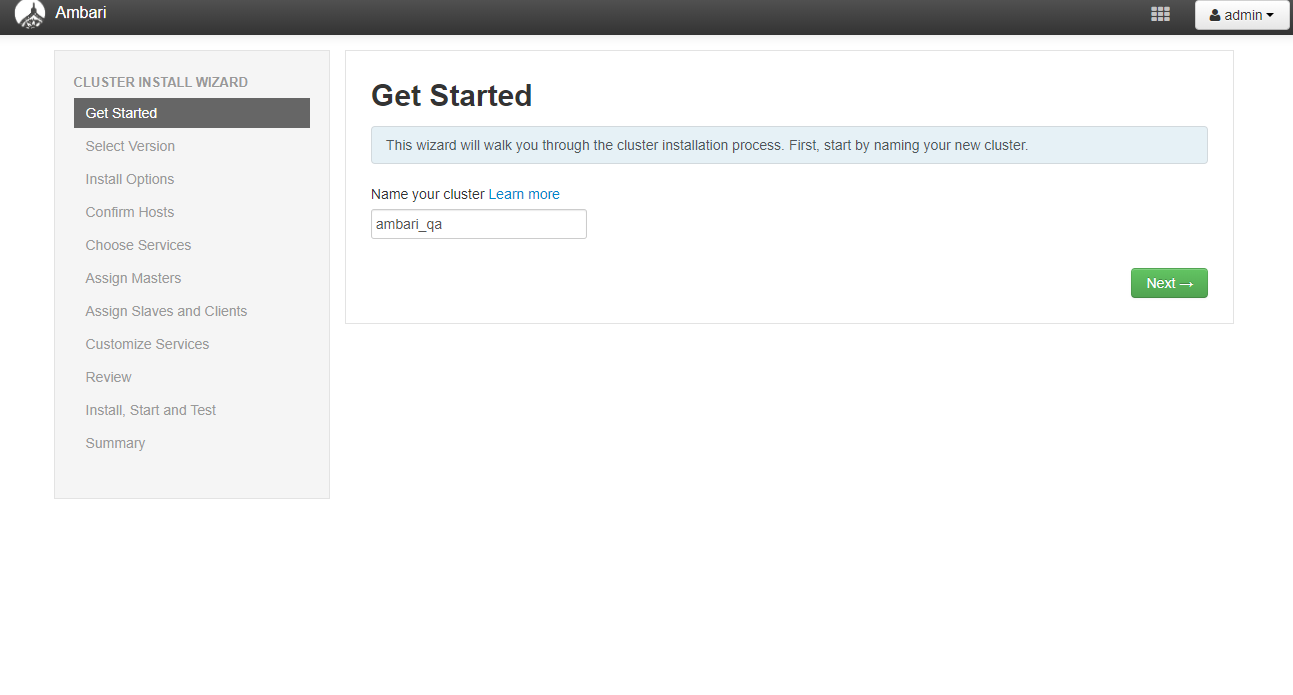
给大数据集群起个名字
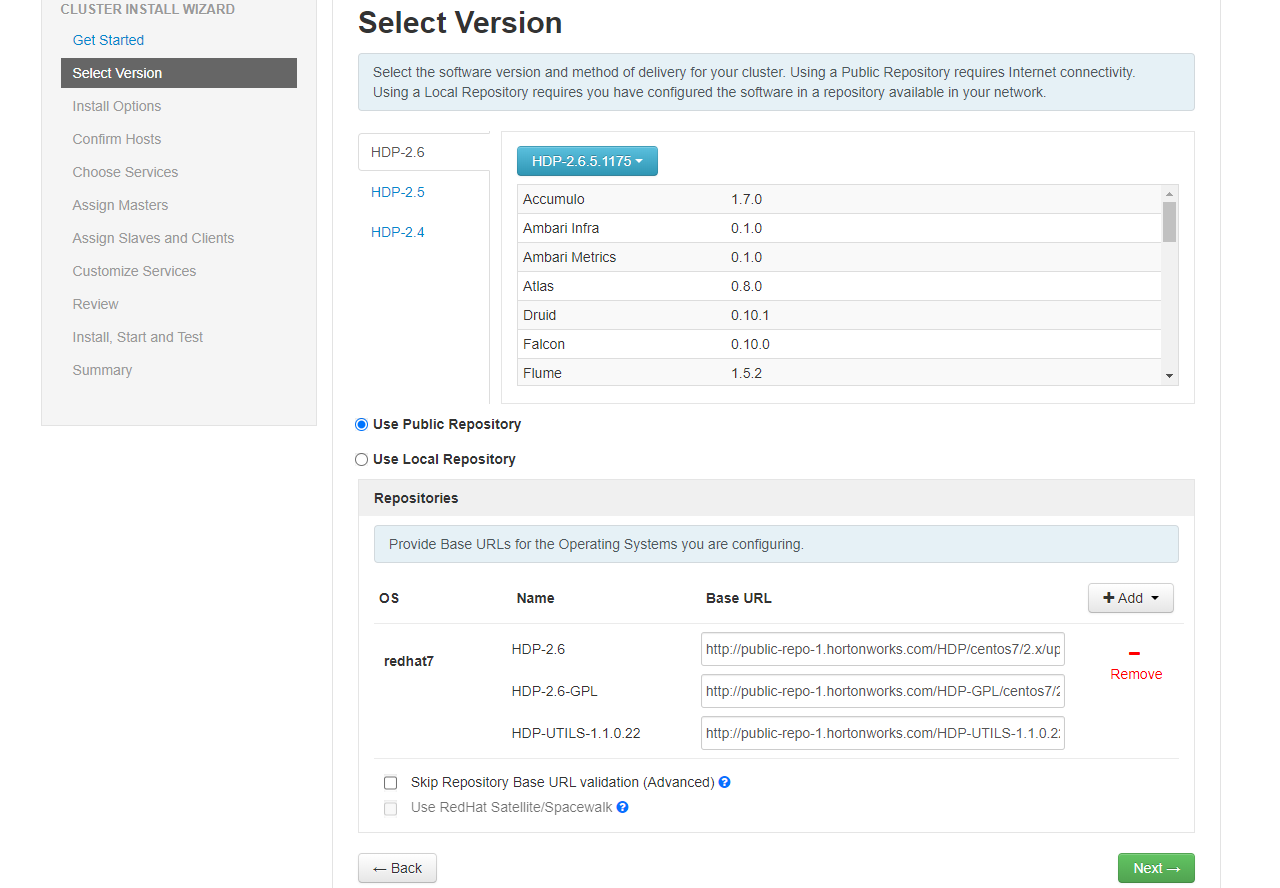
选择版本和源地址。就用默认的好了。。
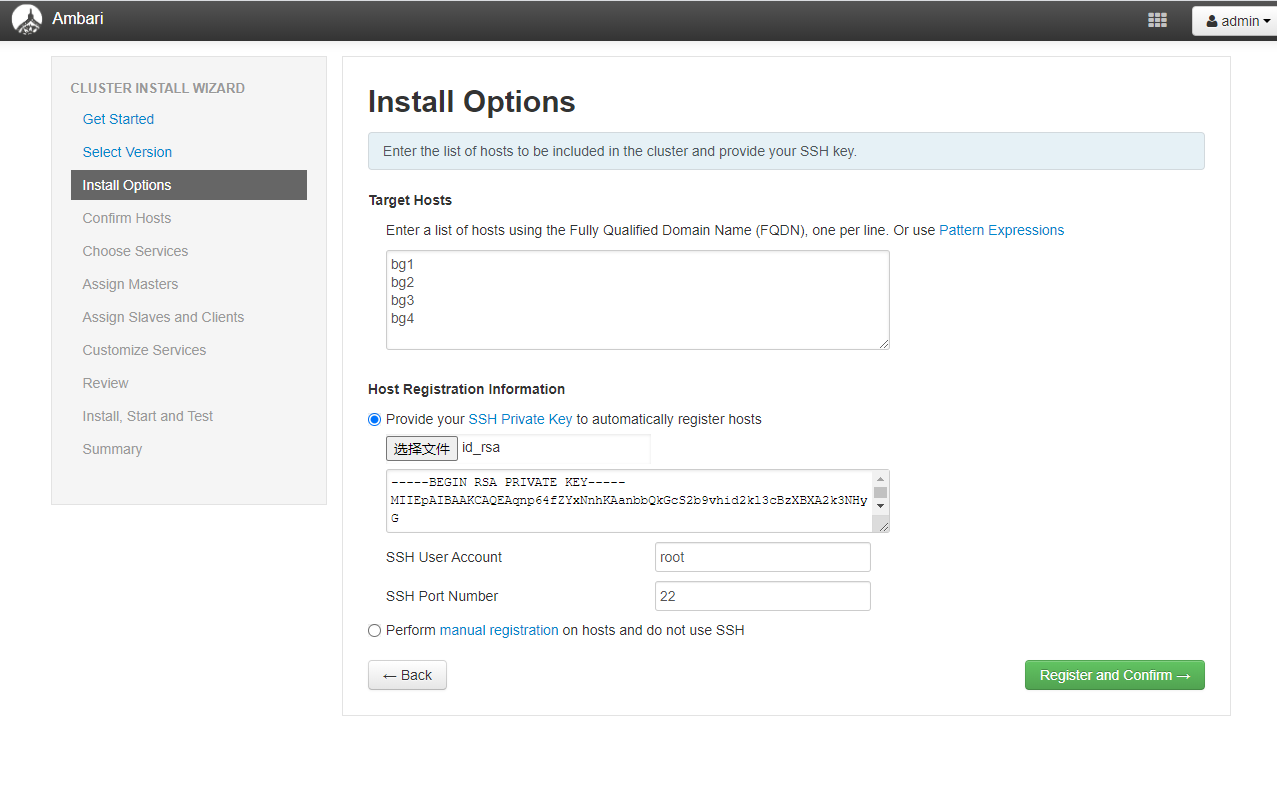
配置host 和免密,要把id_rsa从服务器下载下来,然后上传到这里。
在确实和注册host的时候,会报一个错误。

点击Failed url ,可以看python 日志。
Command start time 2020-12-07 11:20:54
("INFO 2020-12-07 11:21:01,143 HeartbeatHandlers.py:116 - Stop event received
INFO 2020-12-07 11:21:01,143 NetUtil.py:130 - Stop event received
INFO 2020-12-07 11:21:01,143 ExitHelper.py:56 - Performing cleanup before exiting…
INFO 2020-12-07 11:21:01,143 ExitHelper.py:70 - Cleanup finished, exiting with code:0
INFO 2020-12-07 11:21:02,994 main.py:283 - Agent died gracefully, exiting.
INFO 2020-12-07 11:21:02,996 ExitHelper.py:56 - Performing cleanup before exiting…
INFO 2020-12-07 11:21:03,635 main.py:145 - loglevel=logging.INFO
INFO 2020-12-07 11:21:03,635 main.py:145 - loglevel=logging.INFO
INFO 2020-12-07 11:21:03,635 main.py:145 - loglevel=logging.INFO
INFO 2020-12-07 11:21:03,636 DataCleaner.py:39 - Data cleanup thread started
INFO 2020-12-07 11:21:03,637 DataCleaner.py:120 - Data cleanup started
INFO 2020-12-07 11:21:03,637 hostname.py:67 - agent:hostname_script configuration not defined thus read hostname ‘bg1’ using socket.getfqdn().
INFO 2020-12-07 11:21:03,639 DataCleaner.py:122 - Data cleanup finished
INFO 2020-12-07 11:21:03,651 PingPortListener.py:50 - Ping port listener started on port: 8670
INFO 2020-12-07 11:21:03,655 main.py:437 - Connecting to Ambari server at https://bg1:8440 (10.90.9.180)
INFO 2020-12-07 11:21:03,656 NetUtil.py:70 - Connecting to https://bg1:8440/ca
ERROR 2020-12-07 11:21:03,662 NetUtil.py:96 - EOF occurred in violation of protocol (_ssl.c:618)
ERROR 2020-12-07 11:21:03,662 NetUtil.py:97 - SSLError: Failed to connect. Please check openssl library versions.
Refer to: https://bugzilla.redhat.com/show_bug.cgi?id=1022468 for more details.
WARNING 2020-12-07 11:21:03,662 NetUtil.py:124 - Server at https://bg1:8440 is not reachable, sleeping for 10 seconds…
", None)
("INFO 2020-12-07 11:21:01,143 HeartbeatHandlers.py:116 - Stop event received
INFO 2020-12-07 11:21:01,143 NetUtil.py:130 - Stop event received
INFO 2020-12-07 11:21:01,143 ExitHelper.py:56 - Performing cleanup before exiting…
INFO 2020-12-07 11:21:01,143 ExitHelper.py:70 - Cleanup finished, exiting with code:0
INFO 2020-12-07 11:21:02,994 main.py:283 - Agent died gracefully, exiting.
INFO 2020-12-07 11:21:02,996 ExitHelper.py:56 - Performing cleanup before exiting…
INFO 2020-12-07 11:21:03,635 main.py:145 - loglevel=logging.INFO
INFO 2020-12-07 11:21:03,635 main.py:145 - loglevel=logging.INFO
INFO 2020-12-07 11:21:03,635 main.py:145 - loglevel=logging.INFO
INFO 2020-12-07 11:21:03,636 DataCleaner.py:39 - Data cleanup thread started
INFO 2020-12-07 11:21:03,637 DataCleaner.py:120 - Data cleanup started
INFO 2020-12-07 11:21:03,637 hostname.py:67 - agent:hostname_script configuration not defined thus read hostname ‘bg1’ using socket.getfqdn().
INFO 2020-12-07 11:21:03,639 DataCleaner.py:122 - Data cleanup finished
INFO 2020-12-07 11:21:03,651 PingPortListener.py:50 - Ping port listener started on port: 8670
Solution
修改 /etc/ambari-agent/conf/ambari-agent.ini 文件,在 [security] 配置部分添加
[security]
…
force_https_protocol=PROTOCOL_TLSv1_2
用ambari-agent restart 重启ambari agent 服务。
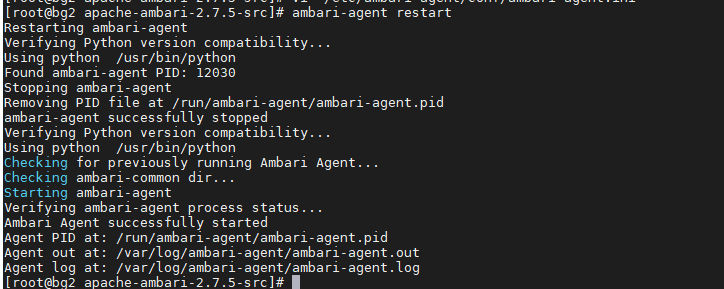
重跑注册流程。 : ) 成功。
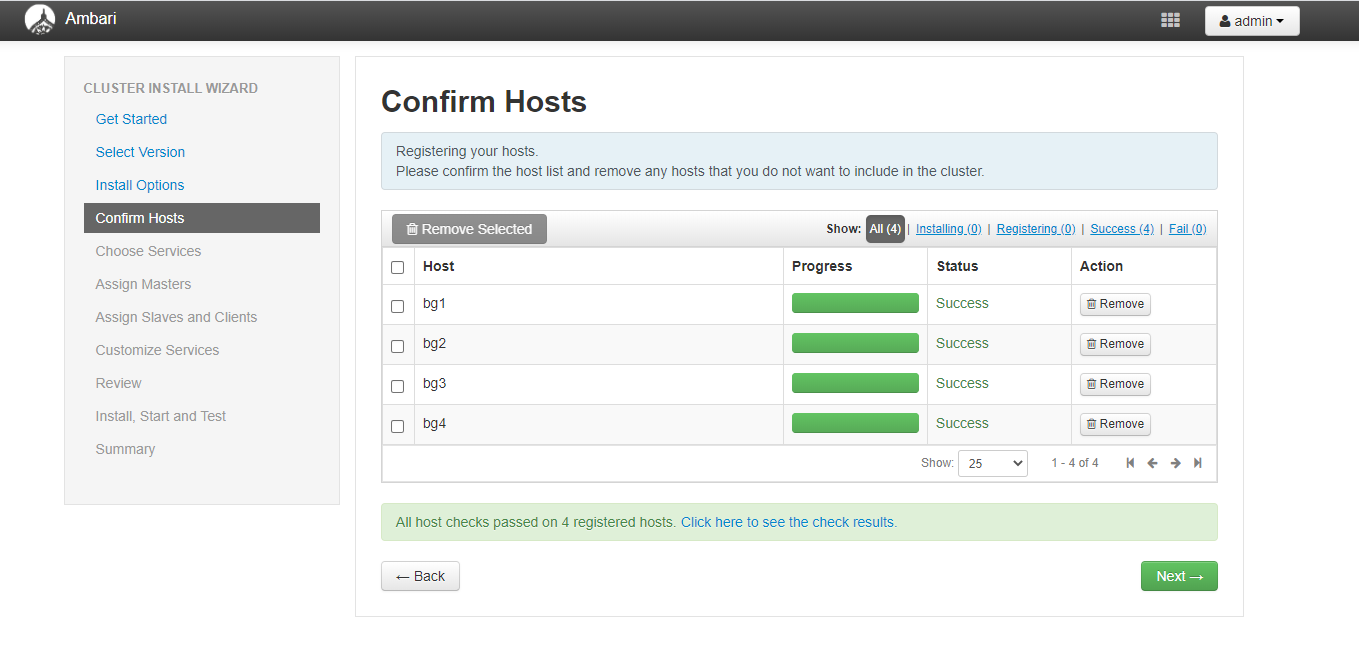
可以看到下面有个链接。。 可以看到预检任务是否成功/失败。
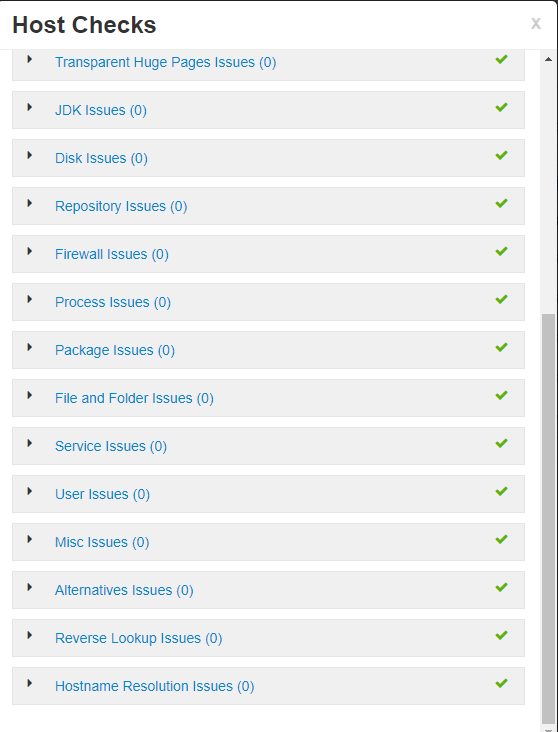
All host checks passed on 4 registered hosts. Click here to see the check results.
然后下一步就是配置各种服务组件
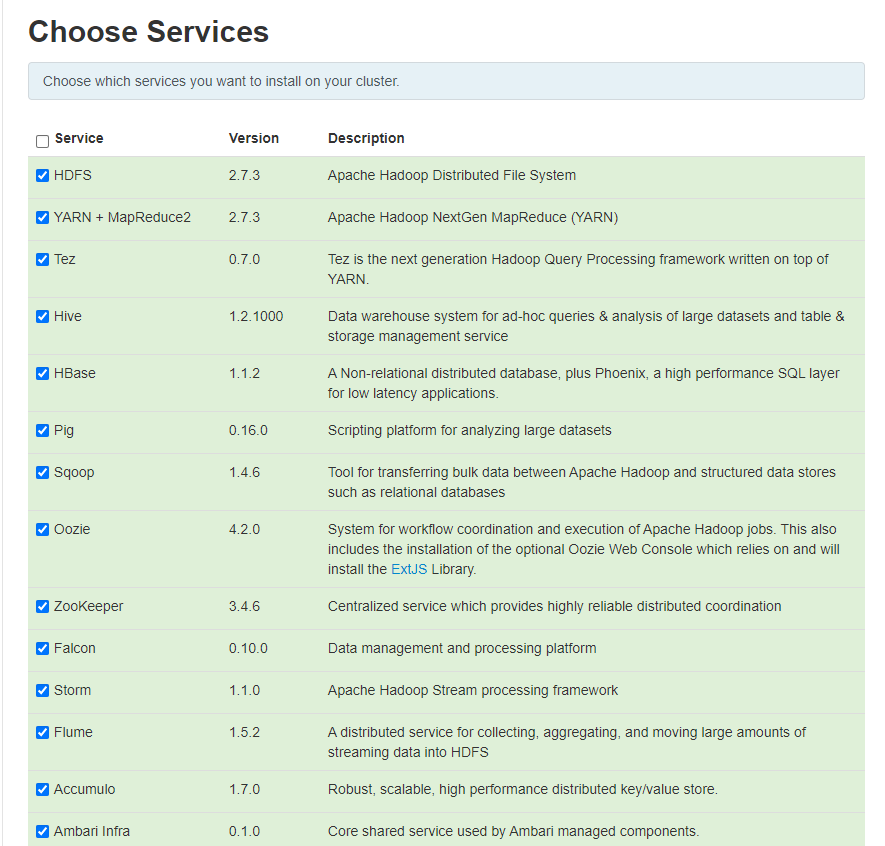
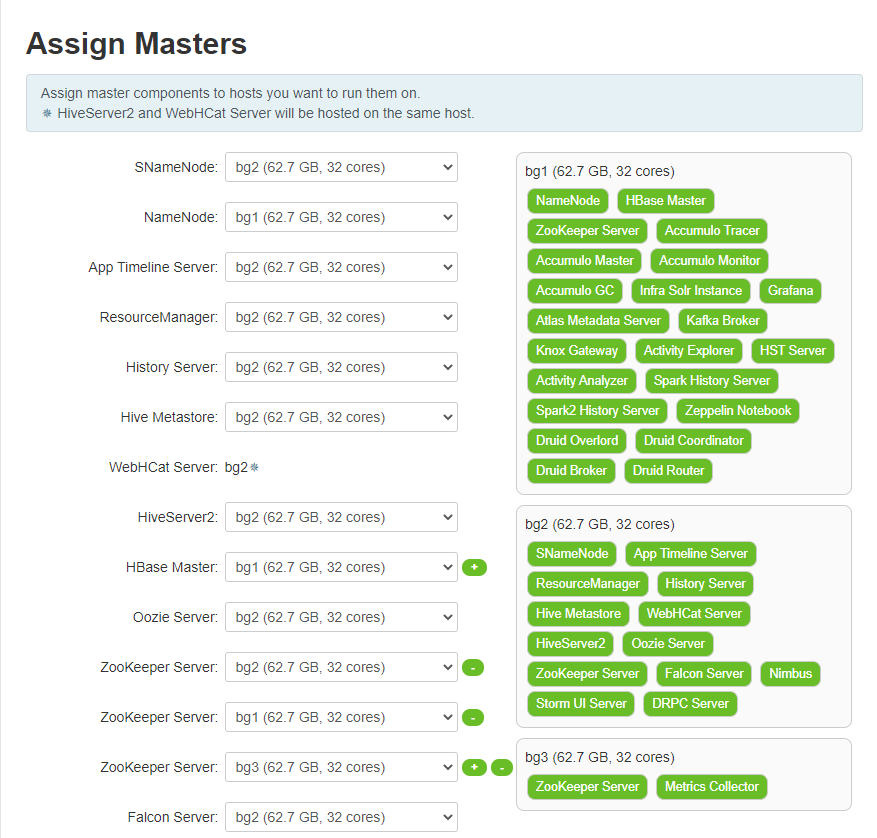
选好服务后就是指派各种服务到不同的服务器上。
然后就是配置各种slave 和clent.

点下一步即可。。自定义服务配置会有很多报警,这些都是根据你选择的组件来决定的。一般来说都是密码问题,jdbc连接问题。

配置jdbc.
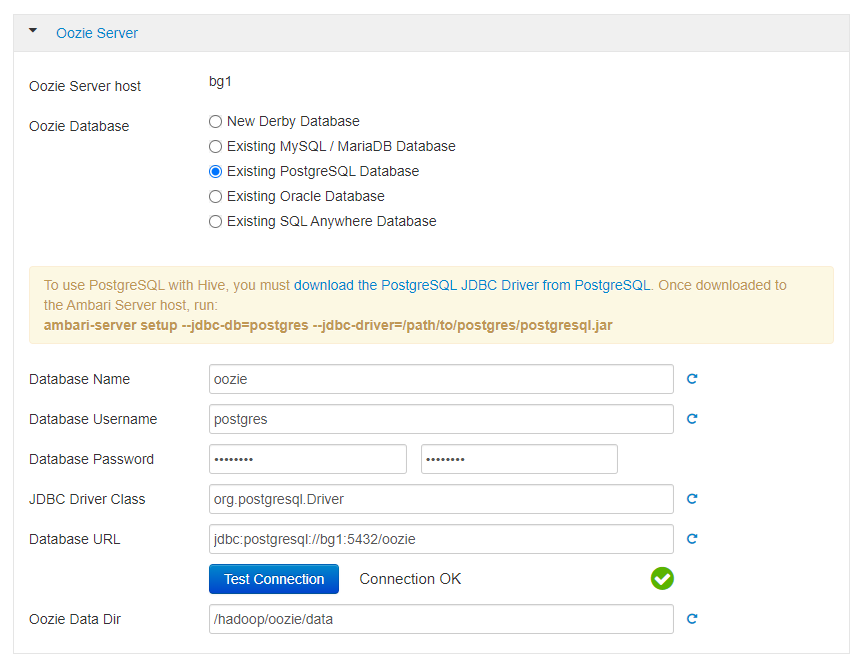
注意这一段提示。
To use PostgreSQL with Hive, you must download the PostgreSQL JDBC Driver from PostgreSQL. Once downloaded to the Ambari Server host, run:
ambari-server setup --jdbc-db=postgres --jdbc-driver=/path/to/postgres/postgresql.jar
你要从https://jdbc.postgresql.org/ 来下载postgresl jdbc的Jar包,并进行相关的配置。Mysql也是同理。
ambari-server setup --jdbc-db=postgres --jdbc-driver=/path/to/postgres/postgresql.jar
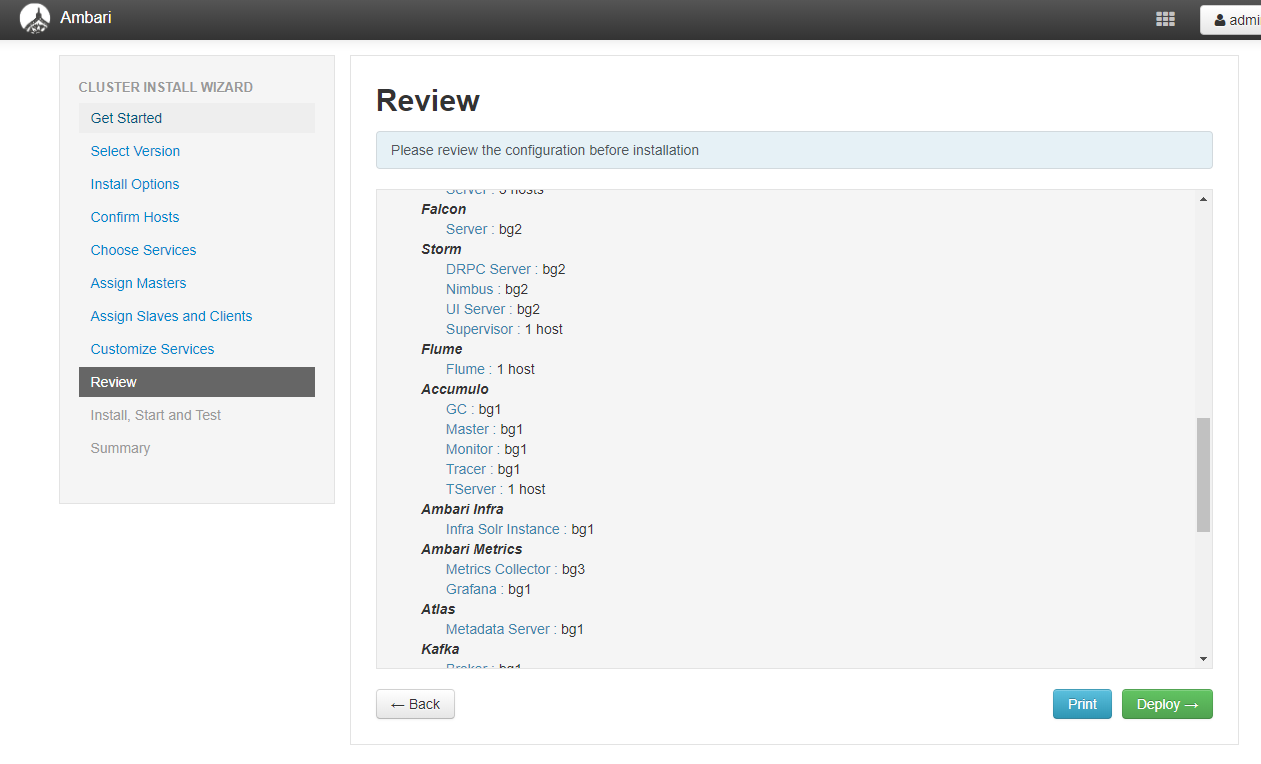
最后确定一下参数。
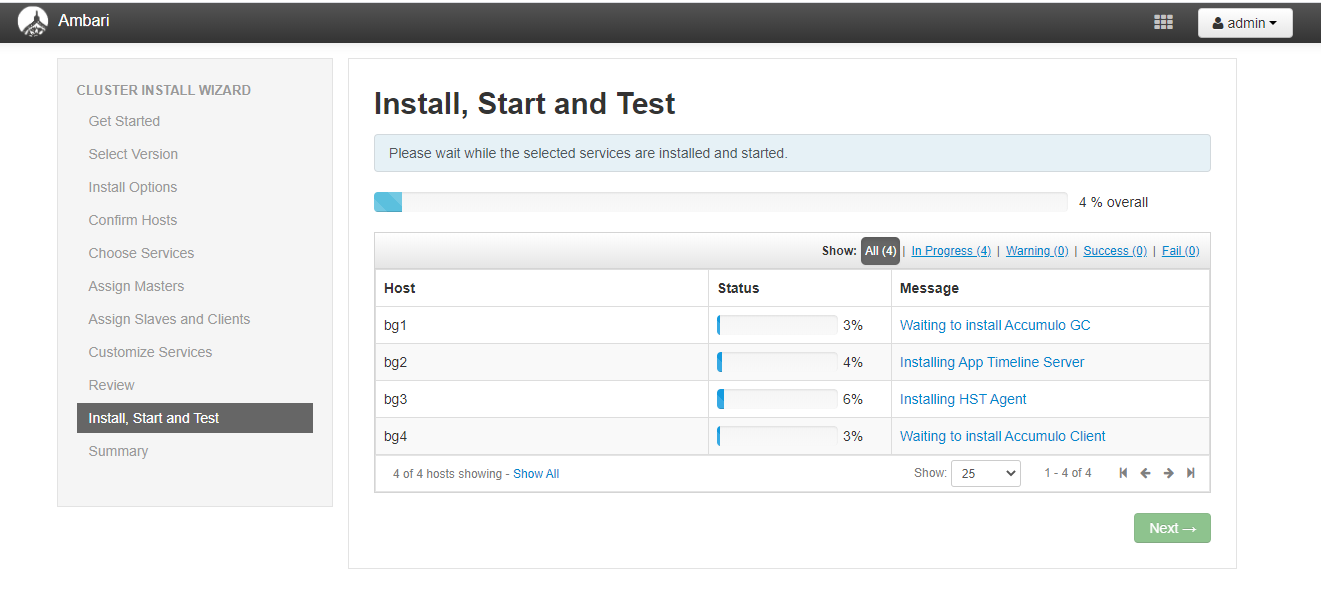
这就开始安装了。。。
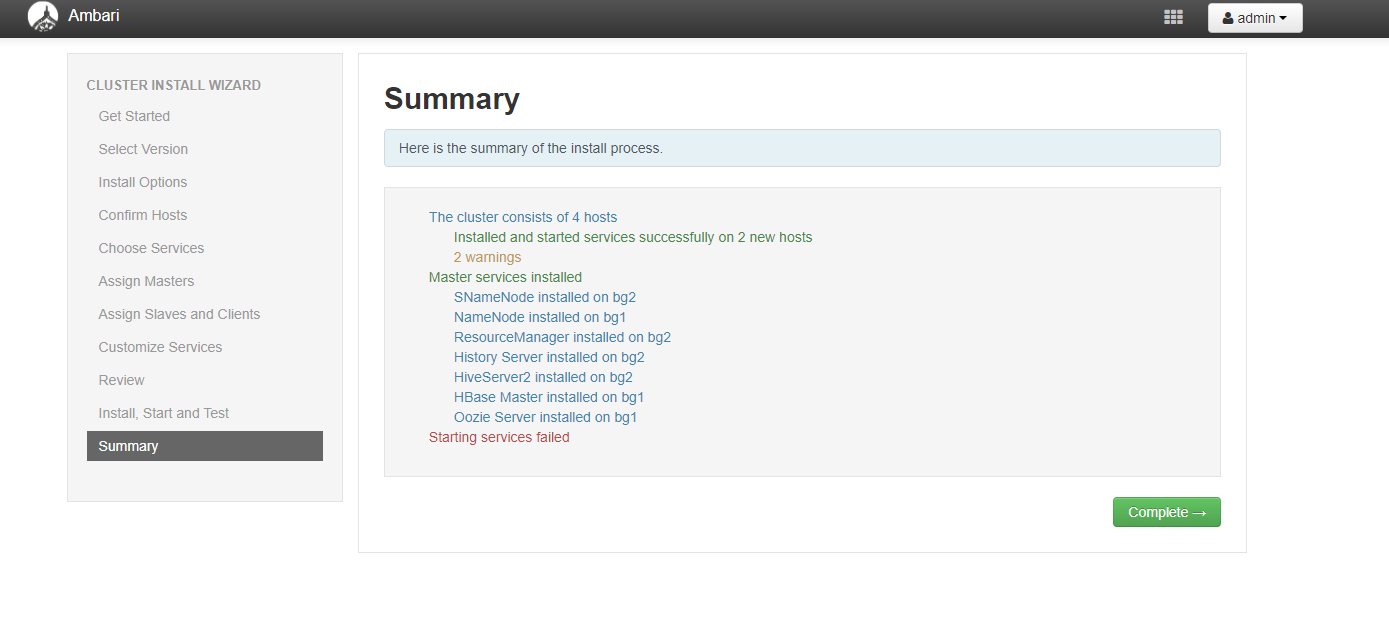
这基本就差不多。后面就是调试了。。。等有时间我在写个调参数的最佳实践。。。不过,最近家里事情多,未必会有时间。。。
