之前学习 TiDB 的时候都是用的单机架构的,一直想着要自己安装一套 TiDB 集群,近期由于新换了笔记本,配置还算凑合,便可以搭建一套 TiDB 集群了,本周一 (2022 年 6 月 13 日)TiDB 发布了 6.1.0 长周期版本,建议搭建直接使用 6.1.0 安装,我这里由于是五月初搭建的,6.1.0 正式版本还未发版,故这里使用的还是 V6.0.0 版本。
TiDB 体系架构这里不在说了,之前单机部署的时候已经提过了。
0、虚拟机设置说明
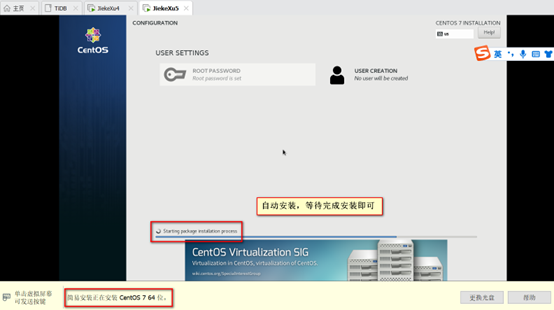
Win 10 环境使用VMWare 16 Contos7.6 安装虚拟机,配置 4c4g,50G 硬盘,网络使用 NAT 配置,默认分区。7 台虚拟机配置一模一样,IP 地址为192.168.75.11----75.17。

网卡配置如下
TYPE="Ethernet"
PROXY_METHOD="none"
BROWSER_ONLY="no"
BOOTPROTO="static"
DEFROUTE="yes"
IPV4_FAILURE_FATAL="no"
IPV6INIT="no"
NAME="ens33"
UUID="12550792-de37-403c-b072-7e9e81c7f97b"
DEVICE="ens33"
ONBOOT="yes"
IPADDR=192.168.75.11
GATEWAY=192.168.75.2
NETMASK=255.255.255.0
DNS1=114.114.114.114
DNS2=8.8.8.8
NM_CONTROLLED="no"
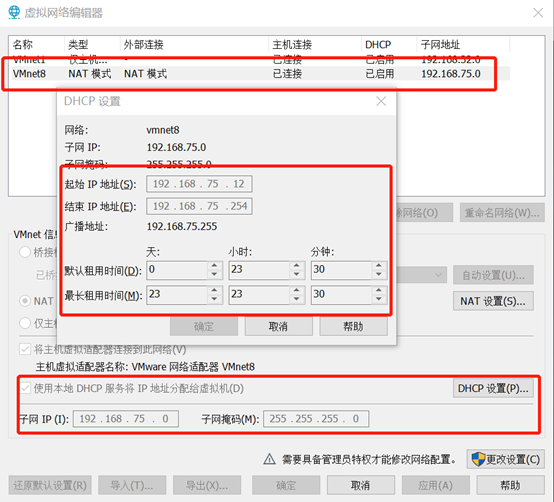
点击开启虚拟机,自动安装,不需手动设置,等待完成后设置 IP,使用 CRT 远程连接。
TiDB 拓扑结构表
| TiDB功能服务 | IP 地址 | 主机名 | CPU | 磁盘 |
|---|---|---|---|---|
| TiDB&TiUP中控机 | 192.168.75.11 | jiekexu1 | 4c4g | 50g(默认分区) |
| PD Server | 192.168.75.12 | Jiekexu2 | 4c4g | 50g(默认分区) |
| PD Server | 192.168.75.13 | Jiekexu3 | 4c4g | 50g(默认分区) |
| PD Server | 192.168.75.14 | Jiekexu4 | 4c4g | 50g(默认分区) |
| TiKV Server | 192.168.75.15 | Jiekexu5 | 4c4g | 50g(默认分区) |
| TiKV Server | 192.168.75.16 | Jiekexu6 | 4c4g | 50g(默认分区) |
| TiKV Server&监控相关 | 192.168.75.17 | Jiekexu7 | 4c4g | 50g(默认分区) |
1、CRT 链接配置
vim /etc/ssh/sshd_config
LoginGraceTime 0
PermitRootLogin yes
StrictModes yes
#MaxAuthTries 6
MaxSessions 50

UseDNS no

systemctl restart sshd.service
systemctl stop firewalld
systemctl status firewalld
2、时区、主机名设置
timedatectl set-timezone "Asia/Shanghai" && timedatectl status|grep Local

hostnamectl set-hostname jiekexu1
3、系统检查
[root@jiekexu1 ~]# dmidecode |grep Name
        Product Name: VMware Virtual Platform
        Product Name: 440BX Desktop Reference Platform
        Manufacturer Name: Intel
[root@jiekexu1 ~]# dmidecode|grep -A5 "Memory Device"|grep Size|grep -v No |grep -v Range
        Size: 4096 MB
[root@jiekexu1 ~]# grep SwapTotal /proc/meminfo | awk '{print $2}'
4064252
[root@jiekexu1 ~]# free -m
              total        used        free      shared  buff/cache   available
Mem:           3771         731        2263          36         775        2729
Swap:          3968           0        3968
[root@jiekexu1 ~]# df -Th
Filesystem     Type      Size  Used Avail Use% Mounted on
/dev/sda3      xfs        46G  4.0G   42G   9% /
devtmpfs       devtmpfs  1.9G     0  1.9G   0% /dev
tmpfs          tmpfs     1.9G     0  1.9G   0% /dev/shm
tmpfs          tmpfs     1.9G   13M  1.9G   1% /run
tmpfs          tmpfs     1.9G     0  1.9G   0% /sys/fs/cgroup
/dev/sda1      xfs       297M  157M  140M  53% /boot
tmpfs          tmpfs     378M  4.0K  378M   1% /run/user/42
tmpfs          tmpfs     378M   28K  378M   1% /run/user/0
4、禁用虚拟网卡、/etc/hosts 配置
systemctl stop libvirtd
systemctl disable libvirtd
-- Note:对于虚拟机可选,需要重启操作系统
vi /etc/hosts
192.168.75.11 jiekexu1
5、关闭防火墙和 SElinux
#关闭防火墙
systemctl stop firewalld
systemctl disable firewalld
systemctl status firewalld

cp /etc/selinux/config /etc/selinux/config_`date +"%Y%m%d_%H%M%S"`&& sed -i 's/SELINUX\=enforcing/SELINUX\=disabled/g' /etc/selinux/config
cat /etc/selinux/config
#不重启
setenforce 0
getenforce
sestatus
6、关闭其他服务
--禁用开机启动
systemctl disable accounts-daemon.service
systemctl disable atd.service
systemctl disable avahi-daemon.service
systemctl disable avahi-daemon.socket
systemctl disable bluetooth.service
systemctl disable brltty.service
##--systemctl disable chronyd.service
systemctl disable colord.service
systemctl disable cups.service
systemctl disable debug-shell.service
systemctl disable firewalld.service
systemctl disable gdm.service
systemctl disable ksmtuned.service
systemctl disable ktune.service
systemctl disable libstoragemgmt.service
systemctl disable mcelog.service
systemctl disable ModemManager.service
##--systemctl disable ntpd.service
systemctl disable postfix.service
systemctl disable postfix.service
systemctl disable rhsmcertd.service
systemctl disable rngd.service
systemctl disable rpcbind.service
systemctl disable rtkit-daemon.service
systemctl disable tuned.service
systemctl disable upower.service
systemctl disable wpa_supplicant.service
##--停止服务
systemctl stop accounts-daemon.service
systemctl stop atd.service
systemctl stop avahi-daemon.service
systemctl stop avahi-daemon.socket
systemctl stop bluetooth.service
systemctl stop brltty.service
##--systemctl stop chronyd.service
systemctl stop colord.service
systemctl stop cups.service
systemctl stop debug-shell.service
systemctl stop firewalld.service
systemctl stop gdm.service
systemctl stop ksmtuned.service
systemctl stop ktune.service
systemctl stop libstoragemgmt.service
systemctl stop mcelog.service
systemctl stop ModemManager.service
##--systemctl stop ntpd.service
systemctl stop postfix.service
systemctl stop postfix.service
systemctl stop rhsmcertd.service
systemctl stop rngd.service
systemctl stop rpcbind.service
systemctl stop rtkit-daemon.service
systemctl stop tuned.service
systemctl stop upower.service
systemctl stop wpa_supplicant.service
本小节关闭其他服务参考 Oracle 数据库安装手册。
7、关闭透明大页和 swap
关闭透明大页(即 Transparent Huge Pages,缩写为 THP)。数据库的内存访问模式往往是稀疏的而非连续的。当高阶内存碎片化比较严重时,分配 THP 页面会出现较高的延迟。
cat /sys/kernel/mm/transparent_hugepage/enabled
执行 grubby 命令查看默认内核版本。
# grubby --default-kernel
/boot/vmlinuz-3.10.0-957.el7.x86_64
执行 grubby --update-kernel 命令修改内核配置
grubby --args="transparent_hugepage=never" --update-kernel /boot/vmlinuz-3.10.0-957.el7.x86_64
执行 grubby --info 命令查看修改后的默认内核配置。--info 后需要使用实际的默认内核版本。
grubby --info /boot/vmlinuz-3.10.0-957.el7.x86_64
echo never > /sys/kernel/mm/transparent_hugepage/enabled
echo never > /sys/kernel/mm/transparent_hugepage/defrag
立即生效,无需重启主机
cat /sys/kernel/mm/transparent_hugepage/enabled

检查 cat /proc/cmdline
需重启生效的修改方法(numa 不需要关闭):
sed -i 's/quiet/quiet transparent_hugepage=never /' /etc/default/grub
grep quiet  /etc/default/grub
grub2-mkconfig -o /boot/grub2/grub.cfg
重启后检查是否生效:
cat /sys/kernel/mm/transparent_hugepage/enabled
cat /proc/cmdline
#不重启,临时生效
echo never > /sys/kernel/mm/transparent_hugepage/enabled
cat /sys/kernel/mm/transparent_hugepage/enabled
swap
TiDB 运行需要有足够的内存,如果内存不足,不建议使用 swap 作为内存不足的缓冲,因为这会降低性能,建议永久关闭系统 swap。
echo "vm.swappiness = 0">> /etc/sysctl.conf
swapoff -a && swapon -a
sysctl -p
vi /etc/fstab
# 注释加载swap分区的那行记录
#UUID=4f863b5f-20b3-4a99-a680-ddf84a3602a4 swap                    swap    defaults        0 0
8、时钟同步
TiDB 是一套分布式数据库系统,需要节点间保证时间的同步,从而确保 ACID 模型的事务线性一致性。目前解决授时的普遍方案是采用 NTP 服务,可以通过互联网中的 pool.ntp.org 授时服务来保证节点的时间同步,也可以使用离线环境自己搭建的 NTP 服务来解决授时。
systemctl status chronyd.service
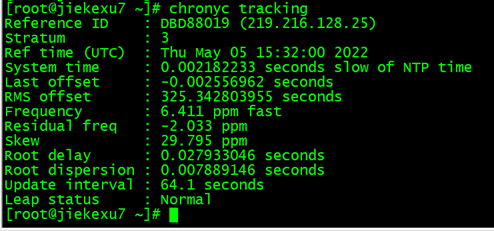
执行 chronyc tracking 命令查看 Chrony 服务是否与 NTP 服务器同步。
chronyc tracking
如果该命令返回结果为 Leap status : Normal,则代表同步过程正常。
9、磁盘 I/O 调度器设置
将存储介质的 I/O 调度器设置为 noop。对于高速 SSD 存储介质,内核的 I/O 调度操作会导致性能损失。将调度器设置为 noop 后,内核不做任何操作,直接将 I/O 请求下发给硬件,以获取更好的性能。同时,noop 调度器也有较好的普适性。
# cat /sys/block/sda/queue/scheduler
noop [deadline] cfq
查看虚拟机目前为 deadline,我这里由于是测试虚拟机,这里可以暂不设置。如下是设置方案:
CentOS 7.x默认支持的是deadline算法,CentOS 6.x下默认支持的cfq算法,而一般我们会在SSD固态盘硬盘环境中使用noop算法
1、查看CentOS6 CentOS7下IO支持的调度算法
CentOS 6.x
#dmesg | grep -i scheduler
io scheduler noop registered
io scheduler anticipatory registered
io scheduler deadline registered
io scheduler cfq registered (default)
CentOS 7.x
#dmesg | grep -i scheduler
[ 0.739263] io scheduler noop registered

[ 0.739267] io scheduler deadline registered (default)
[ 0.739315] io scheduler cfq registered
2、查看设备当前的 I/O 调度器
#cat /sys/block//queue/scheduler
假设磁盘名称是 /dev/sda
#cat /sys/block/sda/queue/scheduler
noop [deadline] cfq
3、临时生效的方法
#cat /sys/block/sda/queue/scheduler
noop [deadline] cfq
#echo cfq>/sys/block/sda/queue/scheduler
#cat /sys/block/sda/queue/scheduler
noop deadline [cfq]
4、永久生效的方法
CentOS 7.x
#grubby --update-kernel=ALL --args="elevator=deadline"
#reboot
#cat /sys/block/sda/queue/scheduler
noop [deadline] cfq
或者使用vi编辑器修改配置文件,添加elevator= cfq
#vi /etc/default/grub
GRUB_CMDLINE_LINUX="crashkernel=auto rhgb quiet elevator=noop numa=off"
然后保存文件,重新编译配置文件
BIOS-Based: grub2-mkconfig -o /boot/grub2/grub.cfg
UEFI-Based: grub2-mkconfig -o /boot/efi/EFI/centos/grub.cfg
10、CPU 频率模式设置
为调整 CPU 频率的 cpufreq 模块选用 performance 模式。将 CPU 频率固定在其支持的最高运行频率上,不进行动态调节,可获取最佳的性能。
执行以下命令查看 cpufreq 模块选用的节能策略。
cpupower frequency-info --policy
analyzing CPU 0:
  Unable to determine current policy
The governor “powersave” 表示 cpufreq 的节能策略使用 powersave,需要调整为 performance 策略。如果是虚拟机或者云主机,则不需要调整,命令输出通常为 Unable to determine current policy。
此为虚拟机不需修改,如物理机需按照官方文档进行修改。
https://docs.pingcap.com/zh/tidb/v6.0/check-before-deployment
11、系统参数修改
echo "fs.file-max = 1000000">> /etc/sysctl.conf
echo "net.core.somaxconn = 32768">> /etc/sysctl.conf
echo "net.ipv4.tcp_tw_recycle = 0">> /etc/sysctl.conf
echo "net.ipv4.tcp_syncookies = 0">> /etc/sysctl.conf
echo "vm.overcommit_memory = 1">> /etc/sysctl.conf

sysctl -p
配置用户的 limits.conf 文件
cat << EOF >>/etc/security/limits.conf
tidb           soft    nofile          1000000
tidb           hard    nofile          1000000
tidb           soft    stack           32768
tidb           hard    stack           32768
EOF
12、安装 numactl 工具
本节主要介绍如果安装 NUMA 工具,在生产环境中,因为硬件机器配置往往高于需求,为了更合理规划资源,会考虑单机多实例部署 TiDB 或者 TiKV。NUMA 绑核工具的使用,主要为了防止 CPU 资源的争抢,引发性能衰退。
• NUMA 绑核是用来隔离 CPU 资源的一种方法,适合高配置物理机环境部署多实例使用。
• 通过 tiup cluster deploy 完成部署操作,就可以通过 exec 命令来进行集群级别管理工作。
安装工具
yum -y install numactl
tiup cluster exec --help
tiup cluster exec JiekeXu_tidb --command "yum -y install numactl"
手动配置 SSH 互信及 sudo 免密码
对于有需求,通过手动配置中控机至目标节点互信的场景,可参考本段。通常推荐使用 TiUP 部署工具会自动配置 SSH 互信及免密登录,可忽略本段内容。
以 root 用户依次登录到部署目标机器创建 tidb 用户并设置登录密码。
useradd tidb && \
passwd tidb
• 执行以下命令,将 tidb ALL=(ALL) NOPASSWD: ALL 添加到文件末尾,即配置好 sudo 免密码。
vi sudo
tidb ALL=(ALL) NOPASSWD: ALL
• 以 tidb 用户登录到中控机,执行以下命令。将 192.168.75.11 替换成你的部署目标机器 IP,按提示输入部署目标机器 tidb 用户密码,执行成功后即创建好 SSH 互信,其他机器同理。新建的 tidb 用户下没有 .ssh 目录,需要执行生成 rsa 密钥的命令来生成 .ssh 目录。如果要在中控机上部署 TiDB 组件,需要为中控机和中控机自身配置互信。
ssh-keygen -t rsa
ssh-copy-id -i ~/.ssh/id_rsa.pub 192.168.75.11
• 以 tidb 用户登录中控机,通过 ssh 的方式登录目标机器 IP。如果不需要输入密码并登录成功,即表示 SSH 互信配置成功。
ssh 192.168.75.11
[tidb@192.168.75.11 ~]$
• 以 tidb 用户登录到部署目标机器后,执行以下命令,不需要输入密码并切换到 root 用户,表示 tidb 用户 sudo 免密码配置成功。
sudo -su root
[root@192.168.75.11 tidb]#
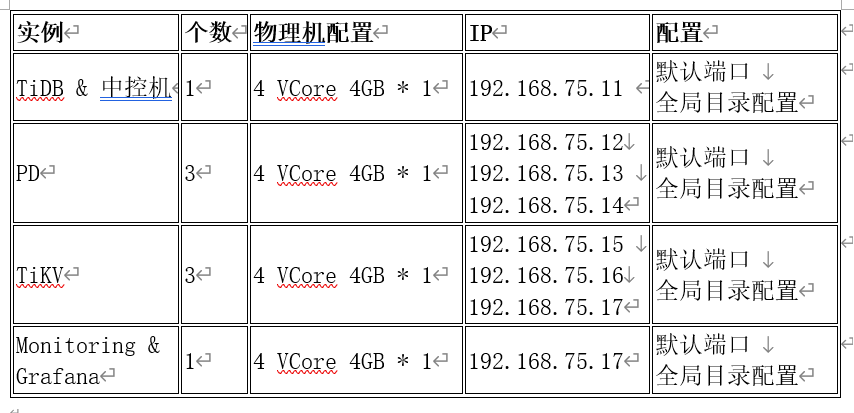
集群拓扑信息
以上 12 小节主机设置内容,均需要在七台主机上进行设置。
| 实例 | 个数 | 虚拟机配置 | IP | 配置 |
|---|---|---|---|---|
| TiDB&TiUP中控机 | 1 | 4 VCore 4GB * 1 | 192.168.75.11 | 默认端口 全局目录配置 |
| PD Server | 3 | 4 VCore 4GB * 1 | 192.168.75.12 | 默认端口 全局目录配置 |
| PD Server | 3 | 4 VCore 4GB * 1 | 192.168.75.13 | 默认端口 全局目录配置 |
| PD Server | 3 | 4 VCore 4GB * 1 | 192.168.75.14 | 默认端口 全局目录配置 |
| TiKV Server | 3 | 4 VCore 4GB * 1 | 192.168.75.15 | 默认端口 全局目录配置 |
| TiKV Server | 3 | 4 VCore 4GB * 1 | 192.168.75.16 | 默认端口 全局目录配置 |
| TiKV Server | 3 | 4 VCore 4GB * 1 | 192.168.75.17 | 默认端口 全局目录配置 |
| TiKV Server&监控相关 | 1 | 4 VCore 4GB * 1 | 192.168.75.17 | 默认端口 全局目录配置 |
使用 TiUP 部署 TiDB 集群
TiUP 是 TiDB 4.0 版本引入的集群运维工具,TiUP cluster 是 TiUP 提供的使用 Golang 编写的集群管理组件,通过 TiUP cluster 组件就可以进行日常的运维工作,包括部署、启动、关闭、销毁、弹性扩缩容、升级 TiDB 集群,以及管理 TiDB 集群参数。
目前 TiUP 可以支持部署 TiDB、TiFlash、TiDB Binlog、TiCDC 以及监控系统。
本文将介绍 TiDB 集群拓扑的具体部署步骤。
1、下载安装 TiUP 工具
说明:以下测试使用 TiDB Server主机(192.168.75.11) 作为中控机。
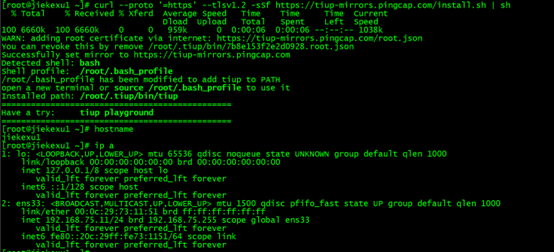
[root]# curl --proto '=https' --tlsv1.2 -sSf https://tiup-mirrors.pingcap.com/install.sh | sh
% Total    % Received % Xferd  Average Speed   Time    Time     Time  Current
                                 Dload  Upload   Total   Spent    Left  Speed
100 6660k  100 6660k    0     0   959k      0  0:00:06  0:00:06 --:--:-- 1038k
WARN: adding root certificate via internet: https://tiup-mirrors.pingcap.com/root.json
You can revoke this by remove /root/.tiup/bin/7b8e153f2e2d0928.root.json
Successfully set mirror to https://tiup-mirrors.pingcap.com
Detected shell: bash
Shell profile:  /root/.bash_profile
/root/.bash_profile has been modified to add tiup to PATH
open a new terminal or source /root/.bash_profile to use it
Installed path: /root/.tiup/bin/tiup
===============================================
Have a try:     tiup playground
===============================================
2、重新声明root环境变量
按照前面提示,生效环境变量.bash_profile
[root@jiekexu1 ~]# source /root/.bash_profile
[root@jiekexu1 ~]# which tiup
/root/.tiup/bin/tiup
3、安装 TiUP cluster 组件
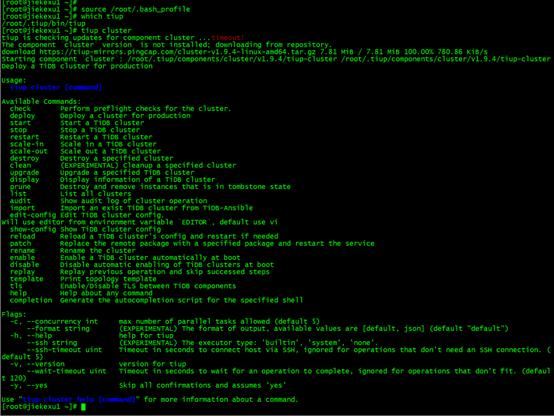
[root@jiekexu1 ~]# tiup cluster
tiup is checking updates for component cluster ...timeout! --- 不知会有这个 timeout提示,但不影响使用。
The component `cluster` version is not installed; downloading from repository.
download https://tiup-mirrors.pingcap.com/cluster-v1.9.4-linux-amd64.tar.gz 7.81 MiB / 7.81 MiB 100.00% 780.86 KiB/s
Starting component `cluster`: /root/.tiup/components/cluster/v1.9.4/tiup-cluster /root/.tiup/components/cluster/v1.9.4/tiup-cluster
Deploy a TiDB cluster for production
Usage:
tiup cluster [command]
Available Commands:
check Perform preflight checks for the cluster.
deploy Deploy a cluster for production
start Start a TiDB cluster
stop Stop a TiDB cluster
restart Restart a TiDB cluster
scale-in Scale in a TiDB cluster
scale-out Scale out a TiDB cluster
destroy Destroy a specified cluster
clean (EXPERIMENTAL) Cleanup a specified cluster
upgrade Upgrade a specified TiDB cluster
display Display information of a TiDB cluster
prune Destroy and remove instances that is in tombstone state
list List all clusters
audit Show audit log of cluster operation
import Import an exist TiDB cluster from TiDB-Ansible
edit-config Edit TiDB cluster config.
Will use editor from environment variable `EDITOR`, default use vi
show-config Show TiDB cluster config
reload Reload a TiDB cluster's config and restart if needed
patch Replace the remote package with a specified package and restart the service
rename Rename the cluster
enable Enable a TiDB cluster automatically at boot
disable Disable automatic enabling of TiDB clusters at boot
replay Replay previous operation and skip successed steps
template Print topology template
tls Enable/Disable TLS between TiDB components
help Help about any command
completion Generate the autocompletion script for the specified shell
Flags:
-c, --concurrency int max number of parallel tasks allowed (default 5)
--format string (EXPERIMENTAL) The format of output, available values are [default, json] (default "default")
-h, --help help for tiup
--ssh string (EXPERIMENTAL) The executor type: 'builtin', 'system', 'none'.
--ssh-timeout uint Timeout in seconds to connect host via SSH, ignored for operations that don't need an SSH connection. (default 5)
-v, --version version for tiup
--wait-timeout uint Timeout in seconds to wait for an operation to complete, ignored for operations that don't fit. (default 120)
-y, --yes Skip all confirmations and assumes 'yes'
Use "tiup cluster help [command]" for more information about a command.
4、更新 TiUP 和 TiUP cluster 组件至最新版本
[root@jiekexu1 ~]# tiup update --self && tiup update cluster
download https://tiup-mirrors.pingcap.com/tiup-v1.9.4-linux-amd64.tar.gz 6.50 MiB / 6.50 MiB 100.00% 618.64 KiB/s
Updated successfully!
component cluster version v1.9.4 is already installed
Updated successfully!
预期输出 “Update successfully!” 字样。

5、验证当前 TiUP cluster 版本信息
查看 TiUP cluster 组件版本:
[root@jiekexu1 ~]# tiup --binary cluster
/root/.tiup/components/cluster/v1.9.4/tiup-cluster
6、初始化集群拓扑
根据集群拓扑,编辑 TiUP 所需的集群初始化配置文件
• 生成集群初始化配置文件的模板:
[root@jiekexu1 ~]# tiup cluster template > topology.yaml
tiup is checking updates for component cluster ...
Starting component `cluster`: /root/.tiup/components/cluster/v1.9.4/tiup-cluster /root/.tiup/components/cluster/v1.9.4/tiup-cluster template
[root@jiekexu1 ~]# ll topology.yaml
-rw-r--r-- 1 root root 10671 May  6 23:26 topology.yaml

• topology.yaml 文件说明
文件中大概说明了部署相关的配置,使用 tidb 用户和 tidb 组,使用默认端口 22,软件安装目录默认为/tidb-deploy,数据目录默认为 /tidb-data,支持 amd64 架构,内存限制为 2G,CPU 为 200%。还有 PD server,tidb server,tikv server,tiflash server,Grafana 监控等节点配置信息,具体可查看此文件。
• 编辑 topology.yaml 文件,修改对应的IP地址:
[root@jiekexu1 ~]# vim topology.yaml
# # Global variables are applied to all deployments and used as the default value of
# # the deployments if a specific deployment value is missing.
global:
  # # The user who runs the tidb cluster.
  user: "tidb"
  # # group is used to specify the group name the user belong to if it's not the same as user.
  # group: "tidb"
  # # SSH port of servers in the managed cluster.
  ssh_port: 22
  # # Storage directory for cluster deployment files, startup scripts, and configuration files.
  deploy_dir: "/tidb-deploy"
  # # TiDB Cluster data storage directory
  data_dir: "/tidb-data"
  # # Supported values: "amd64", "arm64" (default: "amd64")
  arch: "amd64"
  # # Resource Control is used to limit the resource of an instance.
  # # See: https://www.freedesktop.org/software/systemd/man/systemd.resource-control.html
  # # Supports using instance-level `resource_control` to override global `resource_control`.
  # resource_control:
………………省略中间内容…………………………
# # Server configs are used to specify the configuration of Alertmanager Servers.
alertmanager_servers:
  # # The ip address of the Alertmanager Server.
  - host: 10.0.1.22
    # # SSH port of the server.
    # ssh_port: 22
    # # Alertmanager web service port.
    # web_port: 9093
    # # Alertmanager communication port.
    # cluster_port: 9094
    # # Alertmanager deployment file, startup script, configuration file storage directory.
    # deploy_dir: "/tidb-deploy/alertmanager-9093"
    # # Alertmanager data storage directory.
    # data_dir: "/tidb-data/alertmanager-9093"
    # # Alertmanager log file storage directory.
    # log_dir: "/tidb-deploy/alertmanager-9093/log"
配置文件修改内容如下
修改内容如下:
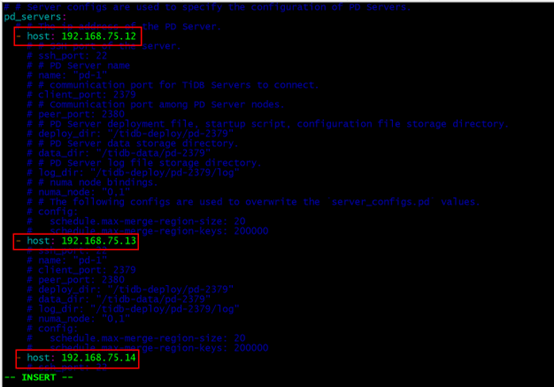
(1) 根据原先规划好的集群拓扑信息设置 PD 节点 IP 地址, 如下:
pd_servers:
# # The ip address of the PD Server.
- host: 192.168.75.12
…
- host: 192.168.75.13
…
- host: 192.168.75.14
(2) 根据原先规划好的集群拓扑信息设置 TiKV 节点 IP 地址, 如下:
tikv_servers:
# # The ip address of the TiKV Server.
- host: 192.168.75.15
…
- host: 192.168.75.16
…
- host: 192.168.75.17
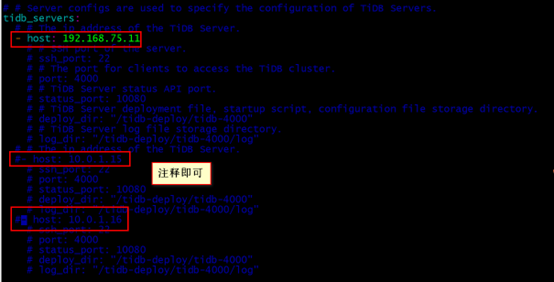
(3) 根据原先规划好的集群拓扑信息设置 TiDB 节点 IP 地址, 如下:
tidb_servers:
# # The ip address of the TiDB Server.
- host: 192.168.75.11
#- host: 10.0.1.15
#- host: 10.0.1.16
其余两个IP配置直接注释即可。
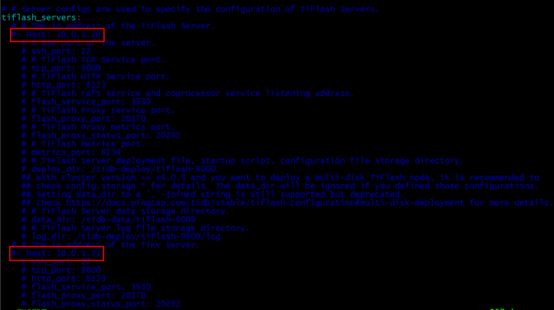
(4) 在此测试环境中关闭 TiFlash 节点,注释即可,如下:
tiflash_servers:
# # The ip address of the TiFlash Server.
# - host: 10.0.1.20
# - host: 10.0.1.21
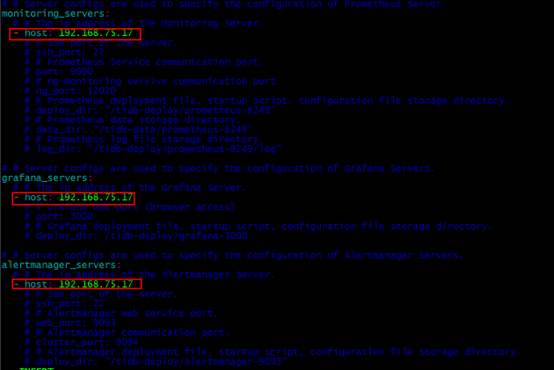
(5) 根据原先规划好的集群拓扑信息设置 monitoring 节点 IP 地址, 如下:
monitoring_servers:
# # The ip address of the Monitoring Server.
- host: 192.168.75.17
(5) 根据原先规划好的集群拓扑信息设置 Grafana 节点 IP 地址, 如下:
grafana_servers:
# # The ip address of the Grafana Server.
- host: 192.168.75.17
(5) 根据原先规划好的集群拓扑信息设置 alertmanager 节点 IP 地址, 如下:
# # Server configs are used to specify the configuration of Alertmanager Servers.
alertmanager_servers:
# # The ip address of the Alertmanager Server.
- host: 192.168.75.17
PD server节点 IP 修改如下
TiDB server 节点 IP 修改如下
host: 10.0.1.15 和 host: 10.0.1.16 注释掉即可,本测试环境仅使用一个 tidb server。
TiKV server 节点 IP 修改如下
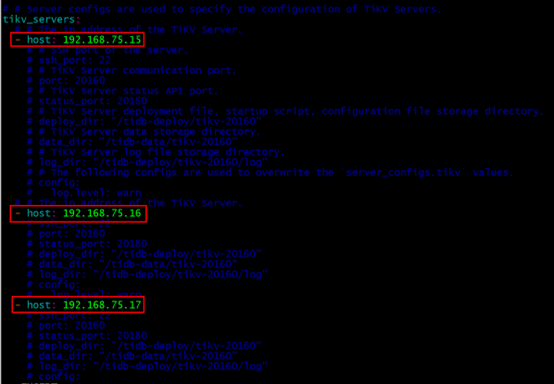
Tiflash servers 暂时注释掉 IP
Tiflash servers 本测试环境暂时不需要部署,故将其IP注释掉。
#- host: 10.0.1.20 和 #- host: 10.0.1.21
Grafana 监控相关节点IP 配置如下
7、检查和自动修复集群存在的潜在风险
[root@jiekexu1 ~]# tiup cluster check ./topology.yaml --user root -p -i /home/root/.ssh/gcp_rsa
主机之间没有配置互信,可以指定 -p 参数手动输入密码,–apply 参数会自动修复检查失败的项,再次执行检查,手动修复失败项。
echo never > /sys/kernel/mm/transparent_hugepage/enabled
echo never > /sys/kernel/mm/transparent_hugepage/defrag
tiup cluster check ./topology.yaml --apply --user root -p -i /home/root/.ssh/gcp_rsa
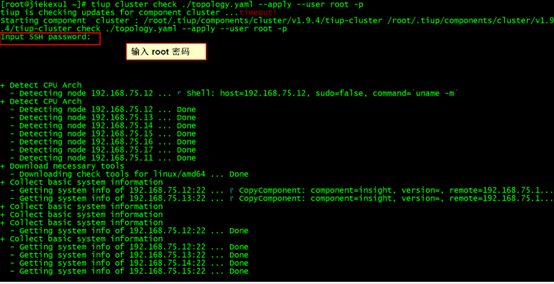
列出所有的检查项,有失败的需要手动修复。
Node           Check         Result  Message
----           -----         ------  -------
192.168.75.14  os-version    Pass    OS is CentOS Linux 7 (Core) 7.6.1810
192.168.75.14  cpu-cores     Pass    number of CPU cores / threads: 4
192.168.75.14  selinux       Pass    SELinux is disabled
192.168.75.14  disk          Warn    mount point / does not have 'noatime' option set, auto fixing not supported
192.168.75.14  thp           Fail    will try to disable THP, please check again after reboot
192.168.75.14  command       Fail    numactl not usable, bash: numactl: command not found, auto fixing not supported
192.168.75.14  cpu-governor  Warn    Unable to determine current CPU frequency governor policy, auto fixing not supported
192.168.75.14  swap          Fail    swap is enabled, please disable it for best performance, auto fixing not supported
192.168.75.14  memory        Pass    memory size is 4096MB
192.168.75.14  network       Pass    network speed of ens33 is 1000MB
192.168.75.15  memory        Pass    memory size is 4096MB
192.168.75.15  disk          Warn    mount point / does not have 'noatime' option set, auto fixing not supported
192.168.75.15  command       Fail    numactl not usable, bash: numactl: command not found, auto fixing not supported
192.168.75.15  network       Pass    network speed of ens33 is 1000MB
192.168.75.15  selinux       Pass    SELinux is disabled
192.168.75.15  thp           Fail    will try to disable THP, please check again after reboot
192.168.75.15  os-version    Pass    OS is CentOS Linux 7 (Core) 7.6.1810
192.168.75.15  cpu-cores     Pass    number of CPU cores / threads: 4
192.168.75.15  cpu-governor  Warn    Unable to determine current CPU frequency governor policy, auto fixing not supported
192.168.75.15  swap          Fail    swap is enabled, please disable it for best performance, auto fixing not supported
192.168.75.16  os-version    Pass    OS is CentOS Linux 7 (Core) 7.6.1810
192.168.75.16  cpu-governor  Warn    Unable to determine current CPU frequency governor policy, auto fixing not supported
192.168.75.16  swap          Fail    swap is enabled, please disable it for best performance, auto fixing not supported
192.168.75.16  disk          Warn    mount point / does not have 'noatime' option set, auto fixing not supported
192.168.75.16  selinux       Pass    SELinux is disabled
192.168.75.16  cpu-cores     Pass    number of CPU cores / threads: 4
192.168.75.16  memory        Pass    memory size is 4096MB
192.168.75.16  network       Pass    network speed of ens33 is 1000MB
192.168.75.16  thp           Pass    THP is disabled
192.168.75.16  command       Fail    numactl not usable, bash: numactl: command not found, auto fixing not supported
192.168.75.17  cpu-governor  Warn    Unable to determine current CPU frequency governor policy, auto fixing not supported
192.168.75.17  network       Pass    network speed of ens33 is 1000MB
192.168.75.17  thp           Fail    will try to disable THP, please check again after reboot
192.168.75.17  command       Fail    numactl not usable, bash: numactl: command not found, auto fixing not supported
192.168.75.17  selinux       Pass    SELinux is disabled
192.168.75.17  os-version    Pass    OS is CentOS Linux 7 (Core) 7.6.1810
192.168.75.17  cpu-cores     Pass    number of CPU cores / threads: 4
192.168.75.17  swap          Fail    swap is enabled, please disable it for best performance, auto fixing not supported
192.168.75.17  memory        Pass    memory size is 4096MB
192.168.75.17  disk          Warn    mount point / does not have 'noatime' option set, auto fixing not supported
192.168.75.11  thp           Fail    will try to disable THP, please check again after reboot
192.168.75.11  command       Fail    numactl not usable, bash: numactl: command not found, auto fixing not supported
192.168.75.11  os-version    Pass    OS is CentOS Linux 7 (Core) 7.6.1810
192.168.75.11  cpu-cores     Pass    number of CPU cores / threads: 4
192.168.75.11  swap          Fail    swap is enabled, please disable it for best performance, auto fixing not supported
192.168.75.11  memory        Pass    memory size is 4096MB
192.168.75.11  network       Pass    network speed of ens33 is 1000MB
192.168.75.11  cpu-governor  Warn    Unable to determine current CPU frequency governor policy, auto fixing not supported
192.168.75.11  sysctl        Fail    will try to set 'vm.swappiness = 0'
192.168.75.11  selinux       Pass    SELinux is disabled
192.168.75.12  os-version    Pass    OS is CentOS Linux 7 (Core) 7.6.1810
192.168.75.12  swap          Fail    swap is enabled, please disable it for best performance, auto fixing not supported
192.168.75.12  network       Pass    network speed of ens32 is 1000MB
192.168.75.12  selinux       Fail    will try to disable SELinux, reboot might be needed
192.168.75.12  command       Fail    numactl not usable, bash: numactl: command not found, auto fixing not supported
192.168.75.12  cpu-cores     Pass    number of CPU cores / threads: 4
192.168.75.12  cpu-governor  Warn    Unable to determine current CPU frequency governor policy, auto fixing not supported
192.168.75.12  memory        Pass    memory size is 4096MB
192.168.75.12  disk          Warn    mount point / does not have 'noatime' option set, auto fixing not supported
192.168.75.12  sysctl        Fail    will try to set 'vm.swappiness = 0'
192.168.75.12  thp           Fail    will try to disable THP, please check again after reboot
192.168.75.13  cpu-governor  Warn    Unable to determine current CPU frequency governor policy, auto fixing not supported
192.168.75.13  swap          Fail    swap is enabled, please disable it for best performance, auto fixing not supported
192.168.75.13  memory        Pass    memory size is 4096MB
192.168.75.13  network       Pass    network speed of ens33 is 1000MB
192.168.75.13  disk          Warn    mount point / does not have 'noatime' option set, auto fixing not supported
192.168.75.13  command       Fail    numactl not usable, bash: numactl: command not found, auto fixing not supported
192.168.75.13  os-version    Pass    OS is CentOS Linux 7 (Core) 7.6.1810
192.168.75.13  cpu-cores     Pass    number of CPU cores / threads: 4
192.168.75.13  selinux       Pass    SELinux is disabled
192.168.75.13  thp           Fail    will try to disable THP, please check again after reboot
以上检查大概需要关闭 swap,THP 透明大页,安装 numactl 等几项。手动修改后再次检查,检查时出现“无法确定当前CPU频率调控器策略,不支持自动修复”、“根挂载点没有’noatime’选项设置,不支持自动修复” ,由于是虚拟机这两项可忽略。
tiup cluster check ./topology.yaml --apply --user root -p
[root@jiekexu1 ~]# tiup cluster check ./topology.yaml --apply --user root -p
tiup is checking updates for component cluster ...timeout!
Starting component `cluster`: /root/.tiup/components/cluster/v1.9.4/tiup-cluster /root/.tiup/components/cluster/v1.9.4/tiup-cluster check ./topology.yaml --apply --user root -p
Input SSH password:


+ Detect CPU Arch
  - Detecting node 192.168.75.12 ... ⠋ Shell: host=192.168.75.12, sudo=false, command=`uname -m`
+ Detect CPU Arch
  - Detecting node 192.168.75.12 ... Done
  - Detecting node 192.168.75.13 ... Done
  - Detecting node 192.168.75.14 ... Done
  - Detecting node 192.168.75.15 ... Done
  - Detecting node 192.168.75.16 ... Done
  - Detecting node 192.168.75.17 ... Done
  - Detecting node 192.168.75.11 ... Done
+ Download necessary tools
  - Downloading check tools for linux/amd64 ... Done
+ Collect basic system information
+ Collect basic system information
  - Getting system info of 192.168.75.12:22 ... ⠋ Shell: host=192.168.75.12, sudo=false, command=`/tmp/tiup/bin/i...
+ Collect basic system information
+ Collect basic system information
+ Collect basic system information
+ Collect basic system information
+ Collect basic system information
  - Getting system info of 192.168.75.12:22 ... Done
  - Getting system info of 192.168.75.13:22 ... Done
  - Getting system info of 192.168.75.14:22 ... Done
  - Getting system info of 192.168.75.15:22 ... Done
  - Getting system info of 192.168.75.16:22 ... Done
  - Getting system info of 192.168.75.17:22 ... Done
  - Getting system info of 192.168.75.11:22 ... Done
+ Check system requirements
  - Checking node 192.168.75.12 ... ⠦ CheckSys: host=192.168.75.12 type=exist
+ Check system requirements
  - Checking node 192.168.75.12 ... ⠧ Shell: host=192.168.75.12, sudo=false, command=`cat /etc/security/limits.conf`
  - Checking node 192.168.75.13 ... ⠧ CheckSys: host=192.168.75.13 type=exist
+ Check system requirements
  - Checking node 192.168.75.12 ... ⠏ Shell: host=192.168.75.12, sudo=false, command=`cat /etc/security/limits.conf`
  - Checking node 192.168.75.13 ... ⠏ Shell: host=192.168.75.13, sudo=false, command=`cat /etc/security/limits.conf`
+ Check system requirements
  - Checking node 192.168.75.12 ... ⠋ Shell: host=192.168.75.12, sudo=true, command=`sysctl -a`
+ Check system requirements
+ Check system requirements
+ Check system requirements
  - Checking node 192.168.75.12 ... ⠙ Shell: host=192.168.75.12, sudo=false, command=`ss -lnt`
  - Checking node 192.168.75.13 ... ⠙ CheckSys: host=192.168.75.13 type=package
+ Check system requirements
+ Check system requirements
  - Checking node 192.168.75.12 ... Done
+ Check system requirements
+ Check system requirements
+ Check system requirements
+ Check system requirements
  - Checking node 192.168.75.12 ... Done
  - Checking node 192.168.75.13 ... Done
  - Checking node 192.168.75.14 ... Done
  - Checking node 192.168.75.15 ... Done
  - Checking node 192.168.75.16 ... Done
  - Checking node 192.168.75.17 ... Done
  - Checking node 192.168.75.11 ... Done
  - Checking node 192.168.75.17 ... Done
  - Checking node 192.168.75.17 ... Done
  - Checking node 192.168.75.17 ... Done
+ Cleanup check files
  - Cleanup check files on 192.168.75.12:22 ... Done
  - Cleanup check files on 192.168.75.13:22 ... Done
  - Cleanup check files on 192.168.75.14:22 ... Done
  - Cleanup check files on 192.168.75.15:22 ... Done
  - Cleanup check files on 192.168.75.16:22 ... Done
  - Cleanup check files on 192.168.75.17:22 ... Done
  - Cleanup check files on 192.168.75.11:22 ... Done
  - Cleanup check files on 192.168.75.17:22 ... Done
  - Cleanup check files on 192.168.75.17:22 ... Done
  - Cleanup check files on 192.168.75.17:22 ... Done
Node           Check         Result  Message
----           -----         ------  -------
192.168.75.13  cpu-governor  Warn    Unable to determine current CPU frequency governor policy, auto fixing not supported
192.168.75.13  network       Pass    network speed of ens33 is 1000MB
192.168.75.13  disk          Warn    mount point / does not have 'noatime' option set, auto fixing not supported
192.168.75.13  selinux       Pass    SELinux is disabled
192.168.75.13  thp           Pass    THP is disabled
192.168.75.13  command       Pass    numactl: policy: default
192.168.75.13  os-version    Pass    OS is CentOS Linux 7 (Core) 7.6.1810
192.168.75.13  memory        Pass    memory size is 4096MB
192.168.75.13  cpu-cores     Pass    number of CPU cores / threads: 4
192.168.75.14  disk          Warn    mount point / does not have 'noatime' option set, auto fixing not supported
192.168.75.14  selinux       Pass    SELinux is disabled
192.168.75.14  command       Pass    numactl: policy: default
192.168.75.14  os-version    Pass    OS is CentOS Linux 7 (Core) 7.6.1810
192.168.75.14  cpu-cores     Pass    number of CPU cores / threads: 4
192.168.75.14  cpu-governor  Warn    Unable to determine current CPU frequency governor policy, auto fixing not supported
192.168.75.14  memory        Pass    memory size is 4096MB
192.168.75.14  network       Pass    network speed of ens33 is 1000MB
192.168.75.14  thp           Pass    THP is disabled
192.168.75.15  network       Pass    network speed of ens33 is 1000MB
192.168.75.15  disk          Warn    mount point / does not have 'noatime' option set, auto fixing not supported
192.168.75.15  selinux       Pass    SELinux is disabled
192.168.75.15  thp           Pass    THP is disabled
192.168.75.15  command       Pass    numactl: policy: default
192.168.75.15  os-version    Pass    OS is CentOS Linux 7 (Core) 7.6.1810
192.168.75.15  cpu-cores     Pass    number of CPU cores / threads: 4
192.168.75.15  memory        Pass    memory size is 4096MB
192.168.75.15  cpu-governor  Warn    Unable to determine current CPU frequency governor policy, auto fixing not supported
192.168.75.16  disk          Warn    mount point / does not have 'noatime' option set, auto fixing not supported
192.168.75.16  selinux       Pass    SELinux is disabled
192.168.75.16  cpu-cores     Pass    number of CPU cores / threads: 4
192.168.75.16  network       Pass    network speed of ens33 is 1000MB
192.168.75.16  memory        Pass    memory size is 4096MB
192.168.75.16  thp           Pass    THP is disabled
192.168.75.16  command       Pass    numactl: policy: default
192.168.75.16  os-version    Pass    OS is CentOS Linux 7 (Core) 7.6.1810
192.168.75.16  cpu-governor  Warn    Unable to determine current CPU frequency governor policy, auto fixing not supported
192.168.75.17  memory        Pass    memory size is 4096MB
192.168.75.17  network       Pass    network speed of ens33 is 1000MB
192.168.75.17  thp           Pass    THP is disabled
192.168.75.17  os-version    Pass    OS is CentOS Linux 7 (Core) 7.6.1810
192.168.75.17  cpu-cores     Pass    number of CPU cores / threads: 4
192.168.75.17  cpu-governor  Warn    Unable to determine current CPU frequency governor policy, auto fixing not supported
192.168.75.17  disk          Warn    mount point / does not have 'noatime' option set, auto fixing not supported
192.168.75.17  selinux       Pass    SELinux is disabled
192.168.75.17  command       Pass    numactl: policy: default
192.168.75.11  thp           Pass    THP is disabled
192.168.75.11  command       Pass    numactl: policy: default
192.168.75.11  os-version    Pass    OS is CentOS Linux 7 (Core) 7.6.1810
192.168.75.11  cpu-cores     Pass    number of CPU cores / threads: 4
192.168.75.11  cpu-governor  Warn    Unable to determine current CPU frequency governor policy, auto fixing not supported
192.168.75.11  memory        Pass    memory size is 4096MB
192.168.75.11  network       Pass    network speed of ens33 is 1000MB
192.168.75.11  selinux       Pass    SELinux is disabled
192.168.75.12  cpu-cores     Pass    number of CPU cores / threads: 4
192.168.75.12  memory        Pass    memory size is 4096MB
192.168.75.12  selinux       Pass    SELinux is disabled
192.168.75.12  thp           Pass    THP is disabled
192.168.75.12  os-version    Pass    OS is CentOS Linux 7 (Core) 7.6.1810
192.168.75.12  cpu-governor  Warn    Unable to determine current CPU frequency governor policy, auto fixing not supported
192.168.75.12  network       Pass    network speed of ens32 is 1000MB
192.168.75.12  disk          Warn    mount point / does not have 'noatime' option set, auto fixing not supported
192.168.75.12  command       Pass    numactl: policy: default
+ Try to apply changes to fix failed checks
  - Applying changes on 192.168.75.15 ... Done
  - Applying changes on 192.168.75.16 ... Done
  - Applying changes on 192.168.75.17 ... Done
  - Applying changes on 192.168.75.11 ... Done
  - Applying changes on 192.168.75.12 ... Done
  - Applying changes on 192.168.75.13 ... Done
  - Applying changes on 192.168.75.14 ... Done
8、查看 TiDB 支持的最新版本
目前,截止2022年5月8日,最新版本为 6.1.0 版本,本次尝试部署 6.0 版本。
tiup list tidb
[root@jiekexu1 ~]# tiup list tidb
Available versions for tidb:
Version                                   Installed  Release                              Platforms
-------                                   ---------  -------                              ---------
nightly -> v6.1.0-alpha-nightly-20220508             2022-05-08T00:34:50+08:00            linux/amd64,linux/arm64,darwin/amd64,darwin/arm64
v3.0                                                 2020-04-16T16:58:06+08:00            linux/amd64,darwin/amd64
v3.0.0                                               2020-04-16T14:03:31+08:00            linux/amd64,darwin/amd64
v3.0.1                                               2020-04-27T19:38:36+08:00            linux/amd64,linux/arm64,darwin/amd64

v5.0.0-20210329                                      2021-03-29T19:48:21+08:00            linux/amd64,linux/arm64,darwin/amd64
v5.0.0-20210403                                      2021-04-03T09:16:32+08:00            linux/amd64,linux/arm64,darwin/amd64
v5.0.0-20210408                                      2021-04-08T17:05:21+08:00            linux/amd64,linux/arm64,darwin/amd64
v5.0.0-rc                                            2021-01-13T00:05:06+08:00            linux/amd64,linux/arm64,darwin/amd64
v5.0.0                                               2021-04-07T17:34:45+08:00            linux/amd64,linux/arm64,darwin/amd64
v5.0.1                                               2021-04-24T21:33:43+08:00            linux/amd64,linux/arm64,darwin/amd64
v5.0.2                                               2021-06-09T22:52:09+08:00            linux/amd64,linux/arm64,darwin/amd64
v5.0.3                                               2021-07-02T16:15:38+08:00            linux/amd64,linux/arm64,darwin/amd64
v5.0.4                                               2021-09-14T17:57:56+08:00            linux/amd64,linux/arm64,darwin/amd64
v5.0.5                                               2021-12-03T11:29:05+08:00            linux/amd64,linux/arm64,darwin/amd64
v5.0.6                                               2021-12-30T22:43:07+08:00            linux/amd64,linux/arm64,darwin/amd64
v5.1.0                                               2021-06-24T16:26:40+08:00            linux/amd64,linux/arm64,darwin/amd64
v5.1.1                                               2021-08-02T13:26:22+08:00            linux/amd64,linux/arm64,darwin/amd64,darwin/arm64
v5.1.2                                               2021-09-27T13:07:29+08:00            linux/amd64,linux/arm64,darwin/amd64,darwin/arm64
v5.1.3                                               2021-12-03T17:50:13+08:00            linux/amd64,linux/arm64,darwin/amd64,darwin/arm64
v5.1.4                                               2022-02-22T12:44:13+08:00            linux/amd64,linux/arm64,darwin/amd64,darwin/arm64
v5.2.0                                               2021-08-27T18:45:23+08:00            linux/amd64,linux/arm64,darwin/amd64,darwin/arm64
v5.2.1                                               2021-09-09T18:54:12+08:00            linux/amd64,linux/arm64,darwin/amd64,darwin/arm64
v5.2.2                                               2021-10-29T13:56:45+08:00            linux/amd64,linux/arm64,darwin/amd64,darwin/arm64
v5.2.3                                               2021-12-02T18:46:01+08:00            linux/amd64,linux/arm64,darwin/amd64,darwin/arm64
v5.2.4                                               2022-04-26T15:40:06+08:00            linux/amd64,linux/arm64,darwin/amd64,darwin/arm64
v5.3.0                                               2021-11-29T17:09:43+08:00            linux/amd64,linux/arm64,darwin/amd64,darwin/arm64
v5.3.1                                               2022-03-03T19:48:47+08:00            linux/amd64,linux/arm64,darwin/amd64,darwin/arm64
v5.4.0                                               2022-02-11T20:16:46+08:00            linux/amd64,linux/arm64,darwin/amd64,darwin/arm64
v6.0.0                                               2022-04-06T11:38:49+08:00            linux/amd64,linux/arm64,darwin/amd64,darwin/arm64
v6.1.0-alpha-nightly-20220508                        2022-05-08T00:34:50+08:00            linux/amd64,linux/arm64,darwin/amd64,darwin/arm64
9、部署 TiDB 集群
[root@jiekexu1 ~]# tiup cluster deploy jiekexu-tidb v6.1.0 ./topology.yaml --user root -p

因当时 8 日凌晨刚刚发布 6.1 版本还不能下载部署,故选择 6.0 版本。
[root@jiekexu1 ~]# tiup cluster deploy jiekexu-tidb v6.0.0 ./topology.yaml --user root -p
输入root密码,然后输入 y
Do you want to continue? [y/N]: (default=N) y
以上部署示例中:
• jiekexu-tidb 为部署的集群名称。
• v6.0.0 为部署的集群版本,可以通过执行 tiup list tidb 来查看 TiUP 支持的最新可用版本。
• 初始化配置文件为 topology.yaml。
• --user root 表示通过 root 用户登录到目标主机完成集群部署,该用户需要有 ssh 到目标机器的权限,并且在目标机器有 sudo 权限。也可以用其他有 ssh 和 sudo 权限的用户完成部署。
• [-i] 及 [-p] 为可选项,如果已经配置免密登录目标机,则不需填写。否则选择其一即可,[-i] 为可登录到目标机的 root 用户(或 --user 指定的其他用户)的私钥,也可使用 [-p] 交互式输入该用户的密码。
预期日志结尾输出 Cluster jiekexu-tidb deployed successfully 关键词,表示部署成功。
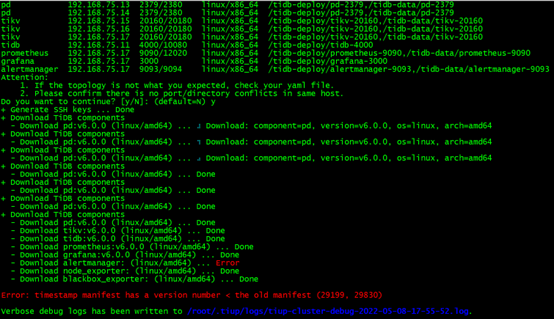
Error: timestamp manifest has a version number < the old manifest (29199, 29830) 中文意思为:错误:时间戳清单的版本号<旧的清单(29199,29830)
在 ASKTUG 社区搜索了下有大佬说反安装下 tiup 工具,即先卸载然后再安装一次。
tiup uninstall --self
curl --proto ‘=https’ --tlsv1.2 -sSf https://tiup-mirrors.pingcap.com/install.sh | sh
Error: unknown flag: --proto
居然报错,没办法,只能卸载重新安装 TiUP。
重新安装 TiUP
[root@jiekexu1 ~]# tiup uninstall --self
Remove directory '/root/.tiup/bin' successfully!
Remove directory '/root/.tiup/manifest' successfully!
Remove directory '/root/.tiup/manifests' successfully!
Remove directory '/root/.tiup/components' successfully!
Remove directory '/root/.tiup/storage/cluster/packages' successfully!
Uninstalled TiUP successfully! (User data reserved, you can delete '/root/.tiup' manually if you confirm userdata useless)
[root@jiekexu1 ~]# curl --proto '=https' --tlsv1.2 -sSf https://tiup-mirrors.pingcap.com/install.sh | sh


tiup cluster
tiup update --self && tiup update cluster
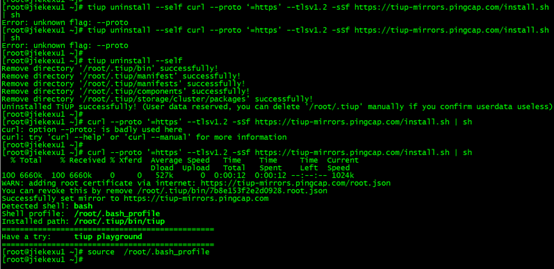
然后继续安装部署,下载时还会报同样的错,很苦恼!!!
后面想起来是不是和 DNS 配置有关,故将原先CRT 连接的 UseDNS no 再改回 yes,然后重启主机。
vim /etc/ssh/sshd_config
UseDNS yes
然后根据前面第七步check 结果手动删除各个节点/tidb-deploy 和 /tidb-data 目录,还有对应的服务,再重新检查,继续部署。
   rm -rf /etc/systemd/system/tikv-20160.service
   rm -rf /etc/systemd/system/grafana-3000.service
   rm -rf /etc/systemd/system/prometheus-9090.service
   rm -rf /etc/systemd/system/alertmanager-9093.service
部署 TiDB 集群
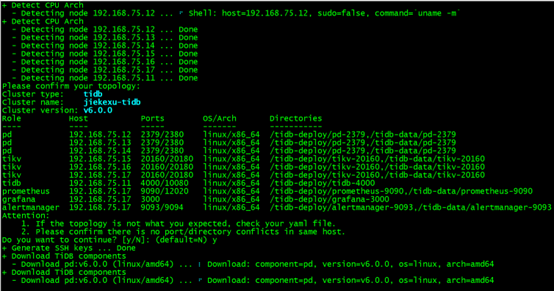
[root@jiekexu1 ~]# tiup cluster deploy jiekexu-tidb v6.0.0 ./topology.yaml --user root -p
tiup is checking updates for component cluster ...timeout!
Starting component `cluster`: /root/.tiup/components/cluster/v1.9.4/tiup-cluster /root/.tiup/components/cluster/v1.9.4/tiup-cluster deploy jiekexu-tidb v6.0.0 ./topology.yaml --user root -p
Input SSH password:


+ Detect CPU Arch
  - Detecting node 192.168.75.12 ... ⠋ Shell: host=192.168.75.12, sudo=false, command=`uname -m`
+ Detect CPU Arch
  - Detecting node 192.168.75.12 ... Done
  - Detecting node 192.168.75.13 ... Done
  - Detecting node 192.168.75.14 ... Done
  - Detecting node 192.168.75.15 ... Done
  - Detecting node 192.168.75.16 ... Done
  - Detecting node 192.168.75.17 ... Done
  - Detecting node 192.168.75.11 ... Done
Please confirm your topology:
Cluster type:    tidb
Cluster name:    jiekexu-tidb
Cluster version: v6.0.0
Role          Host           Ports        OS/Arch       Directories
----          ----           -----        -------       -----------
pd            192.168.75.12  2379/2380    linux/x86_64  /tidb-deploy/pd-2379,/tidb-data/pd-2379
pd            192.168.75.13  2379/2380    linux/x86_64  /tidb-deploy/pd-2379,/tidb-data/pd-2379
pd            192.168.75.14  2379/2380    linux/x86_64  /tidb-deploy/pd-2379,/tidb-data/pd-2379
tikv          192.168.75.15  20160/20180  linux/x86_64  /tidb-deploy/tikv-20160,/tidb-data/tikv-20160
tikv          192.168.75.16  20160/20180  linux/x86_64  /tidb-deploy/tikv-20160,/tidb-data/tikv-20160
tikv          192.168.75.17  20160/20180  linux/x86_64  /tidb-deploy/tikv-20160,/tidb-data/tikv-20160
tidb          192.168.75.11  4000/10080   linux/x86_64  /tidb-deploy/tidb-4000
prometheus    192.168.75.17  9090/12020   linux/x86_64  /tidb-deploy/prometheus-9090,/tidb-data/prometheus-9090
grafana       192.168.75.17  3000         linux/x86_64  /tidb-deploy/grafana-3000
alertmanager  192.168.75.17  9093/9094    linux/x86_64  /tidb-deploy/alertmanager-9093,/tidb-data/alertmanager-9093
Attention:
    1. If the topology is not what you expected, check your yaml file.
    2. Please confirm there is no port/directory conflicts in same host.
Do you want to continue? [y/N]: (default=N) y
+ Generate SSH keys ... Done
+ Download TiDB components
  - Download pd:v6.0.0 (linux/amd64) ... ⠇ Download: component=pd, version=v6.0.0, os=linux, arch=amd64
+ Download TiDB components
  - Download pd:v6.0.0 (linux/amd64) ... ⠋ Download: component=pd, version=v6.0.0, os=linux, arch=amd64
+ Download TiDB components
  - Download pd:v6.0.0 (linux/amd64) ... ⠹ Download: component=pd, version=v6.0.0, os=linux, arch=amd64
+ Download TiDB components
  - Download pd:v6.0.0 (linux/amd64) ... Done
+ Download TiDB components
  - Download pd:v6.0.0 (linux/amd64) ... Done
+ Download TiDB components
  - Download pd:v6.0.0 (linux/amd64) ... Done
  - Download tikv:v6.0.0 (linux/amd64) ... Done
  - Download tidb:v6.0.0 (linux/amd64) ... Done
  - Download prometheus:v6.0.0 (linux/amd64) ... Done
  - Download grafana:v6.0.0 (linux/amd64) ... Done
  - Download alertmanager: (linux/amd64) ... Done
  - Download node_exporter: (linux/amd64) ... Done
  - Download blackbox_exporter: (linux/amd64) ... Done
+ Initialize target host environments
  - Prepare 192.168.75.12:22 ... Done
  - Prepare 192.168.75.13:22 ... Done
  - Prepare 192.168.75.14:22 ... Done
  - Prepare 192.168.75.15:22 ... Done
  - Prepare 192.168.75.16:22 ... Done
  - Prepare 192.168.75.17:22 ... Done
  - Prepare 192.168.75.11:22 ... Done
+ Deploy TiDB instance
  - Copy pd -> 192.168.75.12 ... Done
  - Copy pd -> 192.168.75.13 ... Done
  - Copy pd -> 192.168.75.14 ... Done
  - Copy tikv -> 192.168.75.15 ... Done
  - Copy tikv -> 192.168.75.16 ... Done
  - Copy tikv -> 192.168.75.17 ... Done
  - Copy tidb -> 192.168.75.11 ... Done
  - Copy prometheus -> 192.168.75.17 ... Done
  - Copy grafana -> 192.168.75.17 ... Done
  - Copy alertmanager -> 192.168.75.17 ... Done
  - Deploy node_exporter -> 192.168.75.12 ... Done
  - Deploy node_exporter -> 192.168.75.13 ... Done
  - Deploy node_exporter -> 192.168.75.14 ... Done
  - Deploy node_exporter -> 192.168.75.15 ... Done
  - Deploy node_exporter -> 192.168.75.16 ... Done
  - Deploy node_exporter -> 192.168.75.17 ... Done
  - Deploy node_exporter -> 192.168.75.11 ... Done
  - Deploy blackbox_exporter -> 192.168.75.17 ... Done
  - Deploy blackbox_exporter -> 192.168.75.11 ... Done
  - Deploy blackbox_exporter -> 192.168.75.12 ... Done
  - Deploy blackbox_exporter -> 192.168.75.13 ... Done
  - Deploy blackbox_exporter -> 192.168.75.14 ... Done
  - Deploy blackbox_exporter -> 192.168.75.15 ... Done
  - Deploy blackbox_exporter -> 192.168.75.16 ... Done
+ Copy certificate to remote host
+ Init instance configs
  - Generate config pd -> 192.168.75.12:2379 ... Done
  - Generate config pd -> 192.168.75.13:2379 ... Done
  - Generate config pd -> 192.168.75.14:2379 ... Done
  - Generate config tikv -> 192.168.75.15:20160 ... Done
  - Generate config tikv -> 192.168.75.16:20160 ... Done
  - Generate config tikv -> 192.168.75.17:20160 ... Done
  - Generate config tidb -> 192.168.75.11:4000 ... Done
  - Generate config prometheus -> 192.168.75.17:9090 ... Done
  - Generate config grafana -> 192.168.75.17:3000 ... Done
  - Generate config alertmanager -> 192.168.75.17:9093 ... Done
+ Init monitor configs
  - Generate config node_exporter -> 192.168.75.15 ... Done
  - Generate config node_exporter -> 192.168.75.16 ... Done
  - Generate config node_exporter -> 192.168.75.17 ... Done
  - Generate config node_exporter -> 192.168.75.11 ... Done
  - Generate config node_exporter -> 192.168.75.12 ... Done
  - Generate config node_exporter -> 192.168.75.13 ... Done
  - Generate config node_exporter -> 192.168.75.14 ... Done
  - Generate config blackbox_exporter -> 192.168.75.15 ... Done
  - Generate config blackbox_exporter -> 192.168.75.16 ... Done
  - Generate config blackbox_exporter -> 192.168.75.17 ... Done
  - Generate config blackbox_exporter -> 192.168.75.11 ... Done
  - Generate config blackbox_exporter -> 192.168.75.12 ... Done
  - Generate config blackbox_exporter -> 192.168.75.13 ... Done
  - Generate config blackbox_exporter -> 192.168.75.14 ... Done
+ Check status
Enabling component pd
        Enabling instance 192.168.75.14:2379
        Enabling instance 192.168.75.13:2379
        Enabling instance 192.168.75.12:2379
        Enable instance 192.168.75.13:2379 success
        Enable instance 192.168.75.14:2379 success
        Enable instance 192.168.75.12:2379 success
Enabling component tikv
        Enabling instance 192.168.75.17:20160
        Enabling instance 192.168.75.15:20160
        Enabling instance 192.168.75.16:20160
        Enable instance 192.168.75.15:20160 success
        Enable instance 192.168.75.17:20160 success
        Enable instance 192.168.75.16:20160 success
Enabling component tidb
        Enabling instance 192.168.75.11:4000
        Enable instance 192.168.75.11:4000 success
Enabling component prometheus
        Enabling instance 192.168.75.17:9090
        Enable instance 192.168.75.17:9090 success
Enabling component grafana
        Enabling instance 192.168.75.17:3000
        Enable instance 192.168.75.17:3000 success
Enabling component alertmanager
        Enabling instance 192.168.75.17:9093
        Enable instance 192.168.75.17:9093 success
Enabling component node_exporter
        Enabling instance 192.168.75.15
        Enabling instance 192.168.75.11
        Enabling instance 192.168.75.16
        Enabling instance 192.168.75.12
        Enabling instance 192.168.75.13
        Enabling instance 192.168.75.17
        Enabling instance 192.168.75.14
        Enable 192.168.75.13 success
        Enable 192.168.75.14 success
        Enable 192.168.75.16 success
        Enable 192.168.75.15 success
        Enable 192.168.75.12 success
        Enable 192.168.75.17 success
        Enable 192.168.75.11 success
Enabling component blackbox_exporter
        Enabling instance 192.168.75.15
        Enabling instance 192.168.75.11
        Enabling instance 192.168.75.12
        Enabling instance 192.168.75.16
        Enabling instance 192.168.75.17
        Enabling instance 192.168.75.13
        Enabling instance 192.168.75.14
        Enable 192.168.75.15 success
        Enable 192.168.75.14 success
        Enable 192.168.75.13 success
        Enable 192.168.75.12 success
        Enable 192.168.75.17 success
        Enable 192.168.75.16 success
        Enable 192.168.75.11 success
Cluster `jiekexu-tidb` deployed successfully, you can start it with command: `tiup cluster start jiekexu-tidb --init`
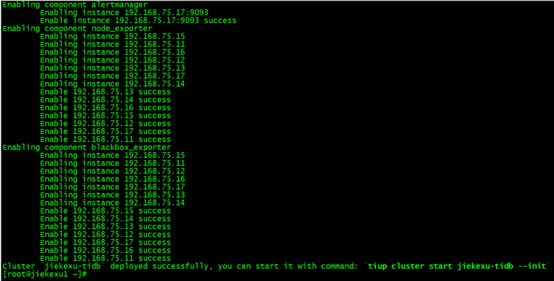
10、查看 TiUP 管理的集群情况
tiup cluster list
TiUP 支持管理多个 TiDB 集群,该命令会输出当前通过 TiUP cluster 管理的所有集群信息,包括集群名称、部署用户、版本、密钥信息等。
[root@jiekexu1 ~]# tiup cluster list
tiup is checking updates for component cluster ...timeout!
Starting component `cluster`: /root/.tiup/components/cluster/v1.9.4/tiup-cluster /root/.tiup/components/cluster/v1.9.4/tiup-cluster list
Name          User  Version  Path                                               PrivateKey
----          ----  -------  ----                                               ----------
jiekexu-tidb  tidb  v6.0.0   /root/.tiup/storage/cluster/clusters/jiekexu-tidb  /root/.tiup/storage/cluster/clusters/jiekexu-tidb/ssh/id_rsa

11、检查 jiekexu-tidb 集群情况
tiup cluster display jiekexu-tidb

12、使用 init 安全启动集群
tiup cluster start jiekexu-tidb –init
安全启动是 TiUP cluster 从 v1.9.0 起引入的一种新的启动方式,采用该方式启动数据库可以提高数据库安全性。安全启动后,TiUP 会自动生成 TiDB root 用户的密码,并在命令行界面返回密码。使用安全启动方式后,不能通过无密码的 root 用户登录数据库,需要记录命令行返回的密码进行后续操作。该自动生成的密码只会返回一次,如果没有记录或者忘记该密码,需参照忘记 root 密码的方法修改密码。当然也可以使用普通启动tiup cluster start jiekexu-tidb。这样是不需要 root 密码即可登录数据库的,推荐使用安全启动。
[root@jiekexu1 ~]# tiup cluster start jiekexu-tidb --init
tiup is checking updates for component cluster ...timeout!
Starting component `cluster`: /root/.tiup/components/cluster/v1.9.4/tiup-cluster /root/.tiup/components/cluster/v1.9.4/tiup-cluster start jiekexu-tidb --init
Starting cluster jiekexu-tidb...
+ [ Serial ] - SSHKeySet: privateKey=/root/.tiup/storage/cluster/clusters/jiekexu-tidb/ssh/id_rsa, publicKey=/root/.tiup/storage/cluster/clusters/jiekexu-tidb/ssh/id_rsa.pub
+ [Parallel] - UserSSH: user=tidb, host=192.168.75.16
+ [Parallel] - UserSSH: user=tidb, host=192.168.75.13
+ [Parallel] - UserSSH: user=tidb, host=192.168.75.15
+ [Parallel] - UserSSH: user=tidb, host=192.168.75.17
+ [Parallel] - UserSSH: user=tidb, host=192.168.75.17
+ [Parallel] - UserSSH: user=tidb, host=192.168.75.17
+ [Parallel] - UserSSH: user=tidb, host=192.168.75.17
+ [Parallel] - UserSSH: user=tidb, host=192.168.75.11
+ [Parallel] - UserSSH: user=tidb, host=192.168.75.14
+ [Parallel] - UserSSH: user=tidb, host=192.168.75.12
+ [ Serial ] - StartCluster
Starting component pd
        Starting instance 192.168.75.14:2379
        Starting instance 192.168.75.12:2379
        Starting instance 192.168.75.13:2379
        Start instance 192.168.75.14:2379 success
        Start instance 192.168.75.13:2379 success
        Start instance 192.168.75.12:2379 success
Starting component tikv
        Starting instance 192.168.75.17:20160
        Starting instance 192.168.75.15:20160
        Starting instance 192.168.75.16:20160
        Start instance 192.168.75.15:20160 success
        Start instance 192.168.75.17:20160 success
        Start instance 192.168.75.16:20160 success
Starting component tidb
        Starting instance 192.168.75.11:4000
        Start instance 192.168.75.11:4000 success
Starting component prometheus
        Starting instance 192.168.75.17:9090
        Start instance 192.168.75.17:9090 success
Starting component grafana
        Starting instance 192.168.75.17:3000
        Start instance 192.168.75.17:3000 success
Starting component alertmanager
        Starting instance 192.168.75.17:9093
        Start instance 192.168.75.17:9093 success
Starting component node_exporter
        Starting instance 192.168.75.13
        Starting instance 192.168.75.14
        Starting instance 192.168.75.17
        Starting instance 192.168.75.11
        Starting instance 192.168.75.12
        Starting instance 192.168.75.15
        Starting instance 192.168.75.16
        Start 192.168.75.14 success
        Start 192.168.75.11 success
        Start 192.168.75.13 success
        Start 192.168.75.12 success
        Start 192.168.75.17 success
        Start 192.168.75.15 success
        Start 192.168.75.16 success
Starting component blackbox_exporter
        Starting instance 192.168.75.13
        Starting instance 192.168.75.16
        Starting instance 192.168.75.14
        Starting instance 192.168.75.11
        Starting instance 192.168.75.17
        Starting instance 192.168.75.15
        Starting instance 192.168.75.12
        Start 192.168.75.11 success
        Start 192.168.75.16 success
        Start 192.168.75.12 success
        Start 192.168.75.14 success
        Start 192.168.75.13 success
        Start 192.168.75.17 success
        Start 192.168.75.15 success
+ [ Serial ] - UpdateTopology: cluster=jiekexu-tidb
Started cluster `jiekexu-tidb` successfully
The root password of TiDB database has been changed.
The new password is: '&$Y4Z#_8Mhv1SU97A0'.
Copy and record it to somewhere safe, it is only displayed once, and will not be stored.
The generated password can NOT be get and shown again.
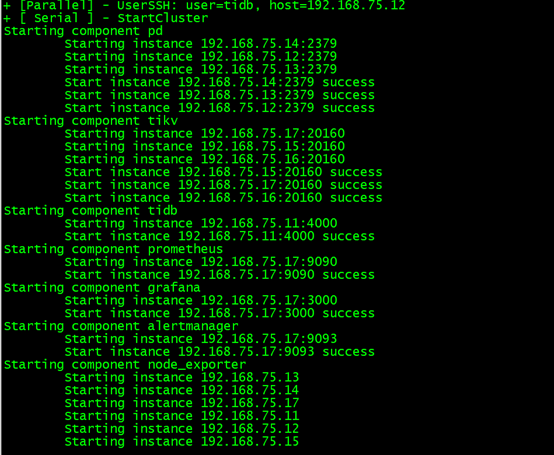
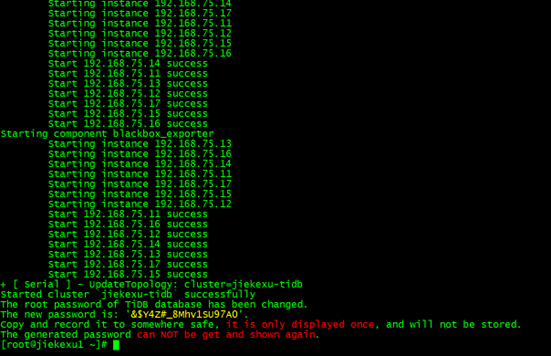
根据上图 PD、TiKV、TiDB、Prometheus、Grafana 等启动完成,集群启动完成,并初始化完成,’&$Y4Z#_8Mhv1SU97A0’ 显示出 root 用户的密码。
+ [ Serial ] - UpdateTopology: cluster=jiekexu-tidb
Started cluster `jiekexu-tidb` successfully
The root password of TiDB database has been changed.
The new password is: '&$Y4Z#_8Mhv1SU97A0'.
Copy and record it to somewhere safe, it is only displayed once, and will not be stored.
The generated password can NOT be get and shown again.
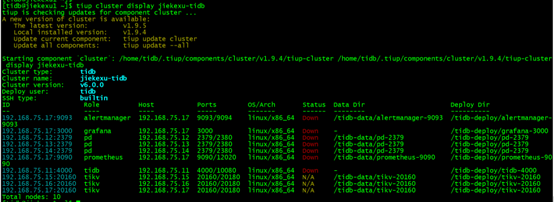
检查集群状态
tiup cluster display jiekexu-tidb

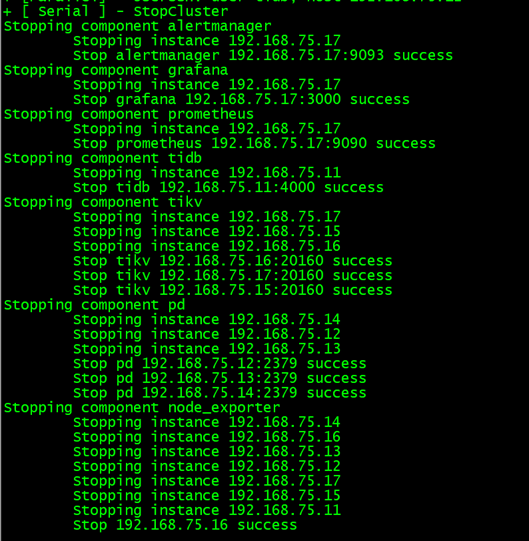
启动、关闭集群命令
tiup cluster start jiekexu-tidb
tiup cluster stop jiekexu-tidb
13、命令行连接到 TiDB 集群
TiDB 兼容 MySQL 协议,故需要 MySQL 客户端连接,则需安装MySQL 客户端。
Linux7 版本的系统默认自带安装了 MariaDB,需要先清理。
## 查询已安装的mariadb
rpm -qa |grep mariadb
或者
yum list installed | grep mariadb
## 卸载mariadb包,文件名为上述命令查询出来的文件
rpm -e --nodeps mariadb-libs-5.5.60-1.el7_5.x86_64
yum -y remove mariadb-libs.x86_64

安装mysql客户端
[root@jiekexu1 ~]# yum -y install http://dev.mysql.com/get/mysql57-community-release-el7-10.noarch.rpm
[root@jiekexu1 ~]# rpm --import https://repo.mysql.com/RPM-GPG-KEY-mysql-2022
[root@jiekexu1 ~]# yum -y install mysql
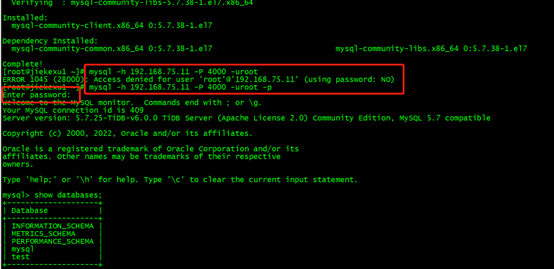
使用mysql客户端连接TiDB
连接 TiDB 数据库,密码为第十二步安全启动的字符串’&$Y4Z#_8Mhv1SU97A0’.
[root@jiekexu1 ~]# mysql -h 192.168.75.11 -P 4000 -uroot -p
[root@jiekexu1 ~]# rpm --import https://repo.mysql.com/RPM-GPG-KEY-mysql-2022
[root@jiekexu1 ~]# yum -y install mysql
Loaded plugins: fastestmirror, langpacks
Loading mirror speeds from cached hostfile
 * base: mirrors.cn99.com
 * extras: mirrors.ustc.edu.cn
 * updates: mirrors.ustc.edu.cn
mysql-connectors-community                                                                                            | 2.6 kB  00:00:00
mysql-tools-community                                                                                                 | 2.6 kB  00:00:00
mysql57-community                                                                                                     | 2.6 kB  00:00:00
(1/3): mysql-tools-community/x86_64/primary_db                                                                        |  86 kB  00:00:00
(2/3): mysql-connectors-community/x86_64/primary_db                                                                   |  87 kB  00:00:00
(3/3): mysql57-community/x86_64/primary_db                                                                            | 306 kB  00:00:00
Resolving Dependencies
--> Running transaction check
---> Package mysql-community-client.x86_64 0:5.7.38-1.el7 will be installed
--> Processing Dependency: mysql-community-libs(x86-64) >= 5.7.9 for package: mysql-community-client-5.7.38-1.el7.x86_64
--> Running transaction check
---> Package mysql-community-libs.x86_64 0:5.7.38-1.el7 will be installed
--> Processing Dependency: mysql-community-common(x86-64) >= 5.7.9 for package: mysql-community-libs-5.7.38-1.el7.x86_64
--> Running transaction check
---> Package mysql-community-common.x86_64 0:5.7.38-1.el7 will be installed
--> Finished Dependency Resolution

Dependencies Resolved

=============================================================================================================================================
 Package                                  Arch                     Version                         Repository                           Size
=============================================================================================================================================
Installing:
 mysql-community-client                   x86_64                   5.7.38-1.el7                    mysql57-community                    28 M
Installing for dependencies:
 mysql-community-common                   x86_64                   5.7.38-1.el7                    mysql57-community                   311 k
 mysql-community-libs                     x86_64                   5.7.38-1.el7                    mysql57-community                   2.6 M

Transaction Summary
=============================================================================================================================================
Install  1 Package (+2 Dependent packages)

Total download size: 31 M
Installed size: 119 M
Downloading packages:
(1/3): mysql-community-common-5.7.38-1.el7.x86_64.rpm                                                                 | 311 kB  00:00:00
(2/3): mysql-community-libs-5.7.38-1.el7.x86_64.rpm                                                                   | 2.6 MB  00:00:05
(3/3): mysql-community-client-5.7.38-1.el7.x86_64.rpm                                                                 |  28 MB  00:00:24
---------------------------------------------------------------------------------------------------------------------------------------------
Total                                                                                                        1.3 MB/s |  31 MB  00:00:24
Running transaction check
Running transaction test
Transaction test succeeded
Running transaction
  Installing : mysql-community-common-5.7.38-1.el7.x86_64                                                                                1/3
  Installing : mysql-community-libs-5.7.38-1.el7.x86_64                                                                                  2/3
  Installing : mysql-community-client-5.7.38-1.el7.x86_64                                                                                3/3
  Verifying  : mysql-community-client-5.7.38-1.el7.x86_64                                                                                1/3
  Verifying  : mysql-community-common-5.7.38-1.el7.x86_64                                                                                2/3
  Verifying  : mysql-community-libs-5.7.38-1.el7.x86_64                                                                                  3/3

Installed:
  mysql-community-client.x86_64 0:5.7.38-1.el7

Dependency Installed:
  mysql-community-common.x86_64 0:5.7.38-1.el7                           mysql-community-libs.x86_64 0:5.7.38-1.el7

Complete!
[root@jiekexu1 ~]# mysql -h 192.168.75.11 -P 4000 -uroot
ERROR 1045 (28000): Access denied for user 'root'@'192.168.75.11' (using password: NO)
[root@jiekexu1 ~]# mysql -h 192.168.75.11 -P 4000 -uroot -p
Enter password:
Welcome to the MySQL monitor.  Commands end with ; or \g.
Your MySQL connection id is 409
Server version: 5.7.25-TiDB-v6.0.0 TiDB Server (Apache License 2.0) Community Edition, MySQL 5.7 compatible

Copyright (c) 2000, 2022, Oracle and/or its affiliates.

Oracle is a registered trademark of Oracle Corporation and/or its
affiliates. Other names may be trademarks of their respective
owners.

Type 'help;' or '\h' for help. Type '\c' to clear the current input statement.

mysql> show databases;
+--------------------+
| Database           |
+--------------------+
| INFORMATION_SCHEMA |
| METRICS_SCHEMA     |
| PERFORMANCE_SCHEMA |
| mysql              |
| test               |
+--------------------+
5 rows in set (0.00 sec)
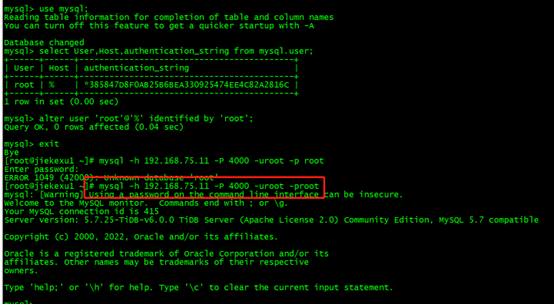
初始化时的 root 密码随机的,不利于记忆,这里是学习环境,将其修改“root”,如下所示:
mysql> use mysql;
Reading table information for completion of table and column names
You can turn off this feature to get a quicker startup with -A

Database changed
mysql> select User,Host,authentication_string from mysql.user;
+------+------+-------------------------------------------+
| User | Host | authentication_string                     |
+------+------+-------------------------------------------+
| root | %    | *385847D8F0AB25B6BEA330925474EE4C82A2816C |
+------+------+-------------------------------------------+
1 row in set (0.00 sec)

mysql> alter user 'root'@'%' identified by 'root';
Query OK, 0 rows affected (0.04 sec)
14、修改 tidb 用户环境变量
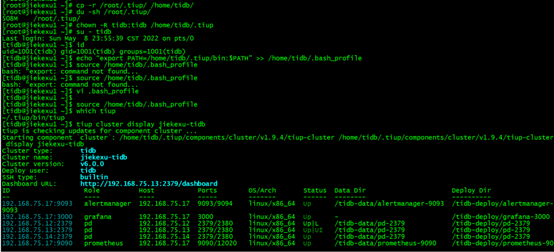
最后,由于 tidb 服务是 tidb 管理的,在部署时创建了 tidb 用户,启动了相关服务,但 TiUP工具是 root 用户管理的。所以,这里我打算将下载的 tiup 软件复制到 tidb 用户家目录下,并配置相应的环境变量,如下所示。
#cp -r /root/.tiup/ /home/tidb/
#chown -R tidb:tidb /home/tidb/.tiup
su – tidb
vim /home/tidb/.bash_profile
export PATH=/home/tidb/.tiup/bin:$PATH

source /home/tidb/.bash_profile
15、MySQL Workbench 8.0.29 下载安装
TiDB 兼容 MySQL 协议,故可使用兼容 MySQL 可视化工具进行连接管理,Navicat、 MySQL workbench、SQLyog、phpMyAdmin、DataGrip等都可以进行连接,这里使用 workbench,如下地址可下载 workbench,不过需要注册 Oracle 账号方可下载。
https://dev.mysql.com/downloads/workbench/
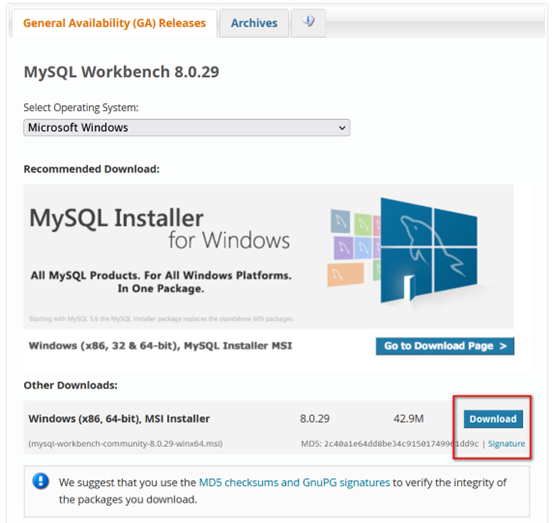
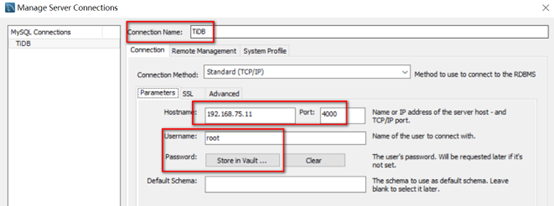
然后在 MySQL Connections 里新建连接,填写如下 IP 地址和端口号,用户名密码即可连接。
16、监控体系
通过 TiDB Dashboard 和 Grafana 检查集群状态
查看 TiDB Dashboard 检查 TiDB 集群状态
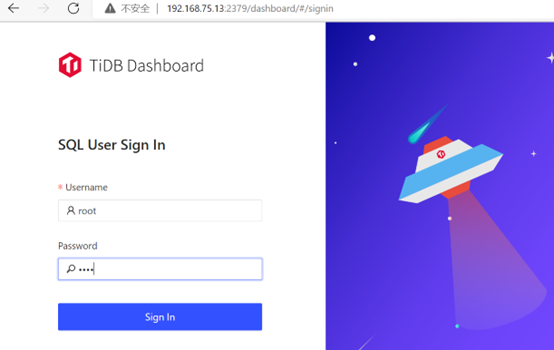
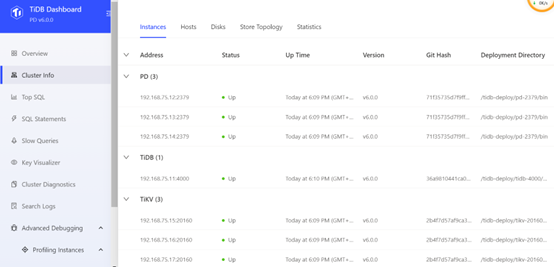
1.通过 {pd-ip}:{pd-port}/dashboard 登录 TiDB Dashboard,登录用户和口令为 TiDB 数据库 root 用户和口令。如果你修改过数据库的 root 密码,则以修改后的密码为准,默认密码为空。
http://192.168.75.12:2379/dashboard
查看 Grafana 监控 Overview 页面检查 TiDB 集群状态
• 通过 {Grafana-ip}:3000 登录 Grafana 监控,默认用户名及密码为 admin/admin。
http://192.168.75.17:3000/login

17、参考链接
https://asktug.com/t/topic/67868
https://www.modb.pro/db/330935
https://mp.weixin.qq.com/s/vf7mDDP8pD6pJK7RH14wCg
https://docs.pingcap.com/zh/tidb/v6.0/production-deployment-using-tiup
❤️ 欢迎关注我的公众号,一起学习新知识!
————————————————————————————
公众号:JiekeXu DBA之路
墨天轮:https://www.modb.pro/u/4347
CSDN :https://blog.csdn.net/JiekeXu
腾讯云:https://cloud.tencent.com/developer/user/5645107
————————————————————————————


