


一、啥是Oauth2
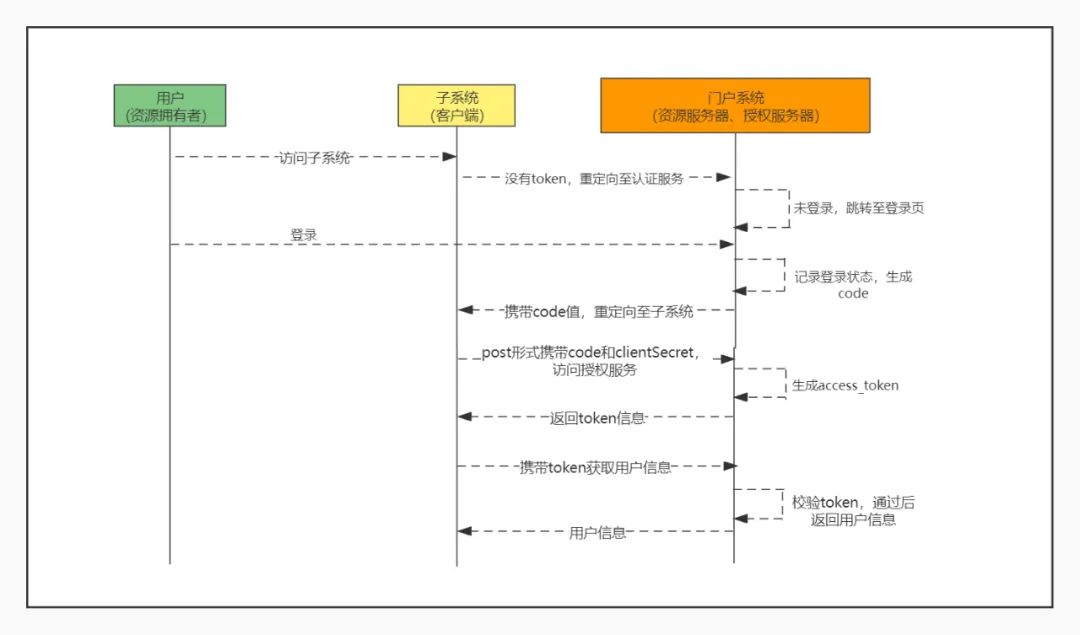
严格来说Oauth2不是一种技术,而是一种身份认证的协议和思想。其主要用途就是向第三方的客户端提供访问凭证,客户端可通过这个凭证去访问一些受限制的资源。Oauth定义了四种角色:Resource Owner(即用户)、ResourceServer(资源服务器,即用户最后需要访问的接口提供方)、AuthenticationServer(授权服务器,即提供授权服务的系统)、Client(客户端,即第三方系统)。Oauth2提供了四种授权模式,分别是密码模式、授权码模式、简化模式和客户端模式。其中最标准、安全的方式是授权码模式,一般在公网都采用这种方式。在下图,我们以接入统一门户的子系统实现单点登录为栗子,详细说明下授权码模式下的身份认证过程。
二、Spring Security Oauth2 实现单点登录
如第一节中所说Oauth2只是一种身份认证的协议,我们可以按照上一节中的流程自己去实现服务端和客户端需要做的操作。也可以直接使用Spring Security 已经封装好的实现,只需要配置一些必要参数就可快速实现身份认证和权限控制。这一节,我们就来看看怎么使用Spring Security Oauth2来实现客户端的单点登录,同时结合上一节的流程,扒一下Spring Security实现Oauth2的源码。首先是如何使用,我们来构建一个授权服务端、资源服务端和客户端(在实际环境中这授权服务和资源服务往往是在一起的):
1、服务端
第一步,导入依赖
<dependency><groupId>org.springframework.cloud</groupId><artifactId>spring-cloud-starter-oauth2</artifactId></dependency>
这里只说明与Oauth2相关的组件,其他的关于web项目的组件这里就不一一列出来了,下文也是。配置端口为8080
第二步,配置Token存储方式
@Configurationpublic class AccessTokenConfig {//token存储方式@BeanTokenStore tokenStore(){//默认采用的方式就是这个return new InMemoryTokenStore();}}
第三步,SpringSecurity相关配置
@Configurationpublic class MySecurityConfig extends WebSecurityConfigurerAdapter {//配置账户的认证方式,出于方便这里将账户存在内存数据库中@Overrideprotected void configure(AuthenticationManagerBuilder auth) throws Exception {auth.userDetailsService(userDetailsServiceBean()).passwordEncoder(passwordEncoder());}//密码加密器@BeanPasswordEncoder passwordEncoder(){return new BCryptPasswordEncoder();}@Overridepublic UserDetailsService userDetailsServiceBean() throws Exception {InMemoryUserDetailsManager mg = new InMemoryUserDetailsManager();mg.createUser(User.withUsername("user").password(passwordEncoder().encode("123456")).roles("USER").build());mg.createUser(User.withUsername("admin").password(passwordEncoder().encode("123456")).roles("USER","ADMIN").build());return mg;}//访问请求的过滤器@Overrideprotected void configure(HttpSecurity http) throws Exception {http.csrf().disable().formLogin();}}
第四步,授权服务配置
@Configuration@EnableAuthorizationServerpublic class AuthorizationServerConfig extends AuthorizationServerConfigurerAdapter {@Autowiredprivate TokenStore tokenStore;//前面配置过@Autowiredprivate ClientDetailsService clientDetailsService;@Autowiredprivate PasswordEncoder passwordEncoder;//前面配置过//打开验证Token的访问权限,并允许通过表单形式提交clientSecret@Overridepublic void configure(AuthorizationServerSecurityConfigurer security) throws Exception {security.checkTokenAccess("permitAll()")//后续客户端验证Token使用.allowFormAuthenticationForClients().passwordEncoder(passwordEncoder);}//配置客户端的详细信息,这里存在内存中的实际上一般是存数据库@Overridepublic void configure(ClientDetailsServiceConfigurer clients) throws Exception {//clientId,resourceIds,scopes,grantTypes,authoritiesclients.inMemory().withClient("client1")//配置clientId,唯一标识,表示客户端,即第三方应用.secret(new BCryptPasswordEncoder().encode("123456"))//客户端访问密码.autoApprove(true)// .resourceIds("res-1")//客户端所能访问的资源id集合//客户端支持的grant_type,可选值包括authorization_code,password,refresh_token,implicit,client_credentials, 若支持多个grant_type用逗号(,)分隔.authorizedGrantTypes("authorization_code","refresh_token")//客户端申请的权限范围,可选值包括read,write,trust;若有多个权限范围用逗号(,)分隔.scopes("all")//客户端的重定向URI.redirectUris("http://localhost:8082/login").and().withClient("resource1").secret(new BCryptPasswordEncoder().encode("123456"));}//配置令牌的访问端点和令牌服务@Overridepublic void configure(AuthorizationServerEndpointsConfigurer endpoints) throws Exception {endpoints.authorizationCodeServices(authorizationCodeServices()).tokenServices(tokenServices());}//配置授权码的存储,也可以选择用数据库存储@BeanAuthorizationCodeServices authorizationCodeServices(){return new InMemoryAuthorizationCodeServices();}//配置 Token 的一些基本信息@BeanAuthorizationServerTokenServices tokenServices(){DefaultTokenServices services = new DefaultTokenServices();services.setClientDetailsService(clientDetailsService);//配置客户端校验方式services.setReuseRefreshToken(true);//设置Token是否支持刷新services.setTokenStore(tokenStore);//设置Token的存储位置services.setAccessTokenValiditySeconds(60 * 60 * 2);//设置Token有效期services.setRefreshTokenValiditySeconds(60 * 60 * 24 * 7);//设置Token刷新有效期return services;}}
第五步,资源服务配置
@Configuration@EnableResourceServerpublic class ResourceServerConfig extends ResourceServerConfigurerAdapter {//因为资源服务器和授权服务器是分开的,所以需要配置一个验证Token的远程地址@BeanRemoteTokenServices tokenServices() {RemoteTokenServices services = new RemoteTokenServices();services.setCheckTokenEndpointUrl("http://localhost:8080/oauth/check_token");services.setClientId("resource1");services.setClientSecret("123456");return services;}}
@RestControllerpublic class UserController {@GetMapping("/user")public Principal getCurrentUser(Principal principal) {return principal;}}
2、客户端
第一步,导入依赖
<dependency><groupId>org.springframework.cloud</groupId><artifactId>spring-cloud-starter-oauth2</artifactId></dependency>
在你web项目的pom文件中引入上面的组件,这里之所以应用spring-cloud 的oauth2 组件而不是spring security 的组件,是因为spring cloud 在其中帮我们做了很多自动化配置的工作,使用起来更方便。
第二步,配置文件
#端口server.port=8082#配置客户端client-id,用于授权服务器端的验证security.oauth2.client.client-id=client1#配置客户端client-secret(由授权服务端生成)security.oauth2.client.client-secret=123456#授权服务器获取授权的地址,用于获取codesecurity.oauth2.client.user-authorization-uri=http://localhost:8080/oauth/authorize#获取tokensecurity.oauth2.client.access-token-uri=http://localhost:8080/oauth/token#通过资源服务器,获取用户信息security.oauth2.resource.user-info-uri=http://localhost:8080/userserver.servlet.session.cookie.name=client1
第三步,配置安全策略
@Configuration@EnableOAuth2Ssopublic class SecurityConfig extends WebSecurityConfigurerAdapter {@Overrideprotected void configure(HttpSecurity http) throws Exception {http .authorizeRequests().antMatchers("/", "/login**").permitAll().anyRequest().authenticated();}}
三、源码跟踪
public void doFilter(ServletRequest request, ServletResponse response) throws IOException, ServletException {if (this.currentPosition == this.size) {if (FilterChainProxy.logger.isDebugEnabled()) {FilterChainProxy.logger.debug(LogMessage.of(() -> {return "Secured " + FilterChainProxy.requestLine(this.firewalledRequest);}));}this.firewalledRequest.reset();this.originalChain.doFilter(request, response);} else {++this.currentPosition;Filter nextFilter = (Filter)this.additionalFilters.get(this.currentPosition - 1);if (FilterChainProxy.logger.isTraceEnabled()) {FilterChainProxy.logger.trace(LogMessage.format("Invoking %s (%d/%d)", nextFilter.getClass().getSimpleName(), this.currentPosition, this.size));}nextFilter.doFilter(request, response, this);}}
1、如何跳转到授权服务器登录页
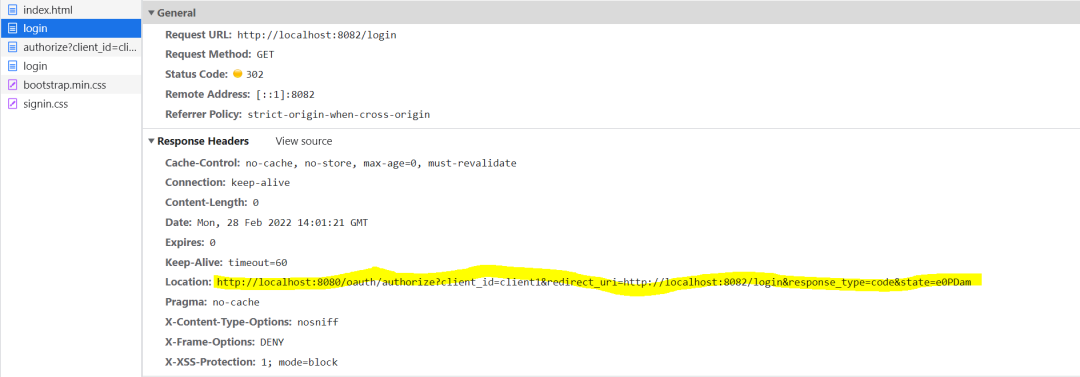
首先我们访问client端的一个地址:localhost:8082/index
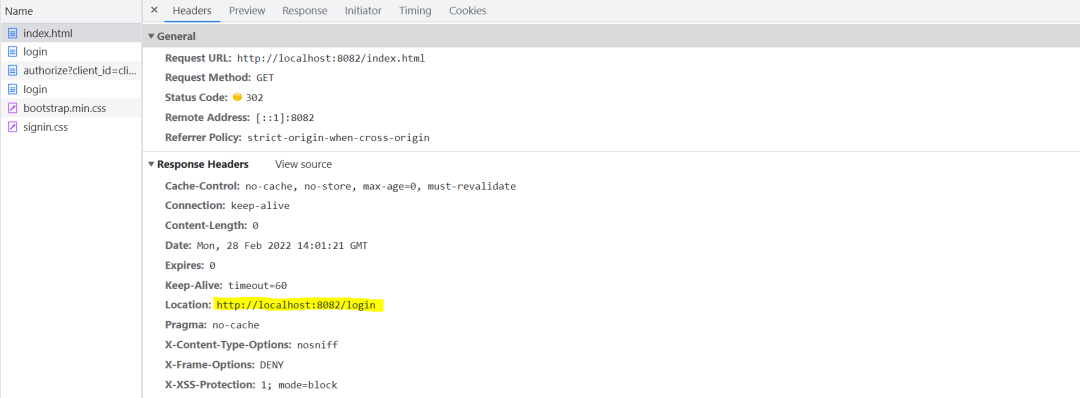
在浏览器的开发者模式中,我们可以看到在跳转至授权服务器登录页的过程中经历了两次重定向。
第一次,重定向到client端的login地址


第二次,重定向到授权服务器授权地址

第三次,跳转至授权服务器登录页
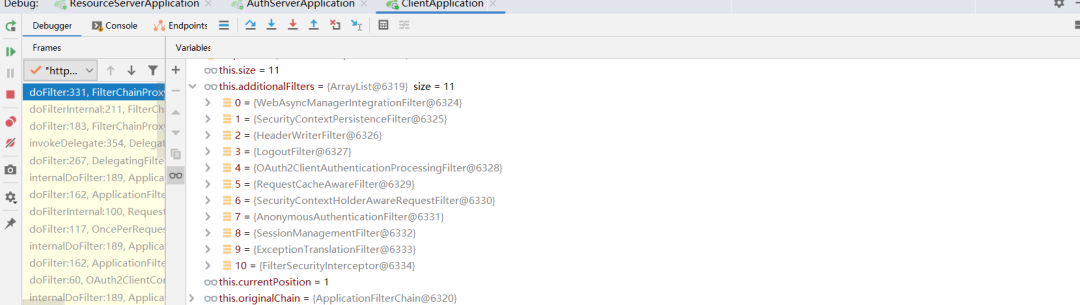
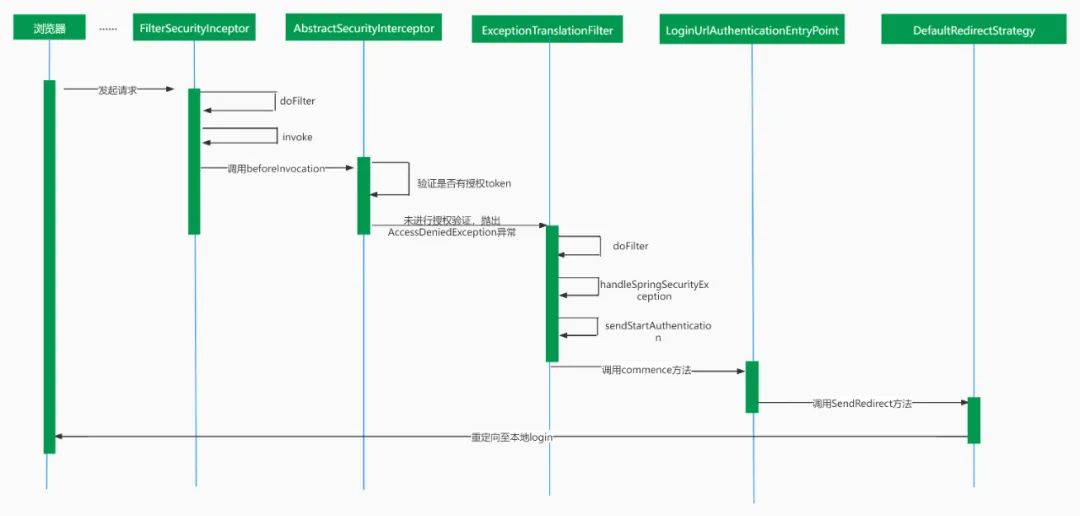
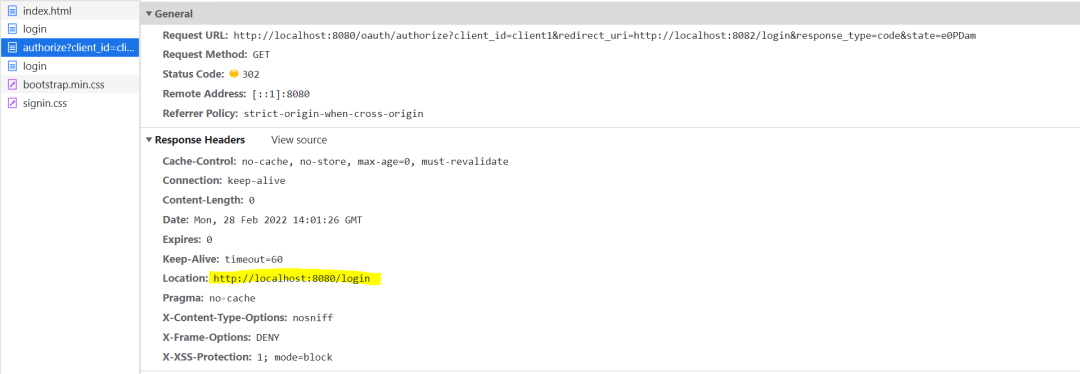 对授权地址的访问,在经过一系列过滤器后,最后会到达授权服务器端AuthorizationEndpoint的authorize方法中。因此时还没有登录授权,所以principal是null,所以会抛出InsufficientAuthenticationException。和client端一样,该异常最终也会被服务器端的异常处理过滤器拦截并重定向至登录地址。
//AuthorizationEndpoint.class@RequestMapping({"/oauth/authorize"})public ModelAndView authorize(Map<String, Object> model, @RequestParam Map<String, String> parameters, SessionStatus sessionStatus, Principal principal) {//省略try {if (principal instanceof Authentication && ((Authentication)principal).isAuthenticated()) {//授权不为空时,返回至client端login地址} else {throw new InsufficientAuthenticationException("User must be authenticated with Spring Security before authorization can be completed.");}} catch (RuntimeException var11) {sessionStatus.setComplete();throw var11;}//省略}
2、登录,返回code至client
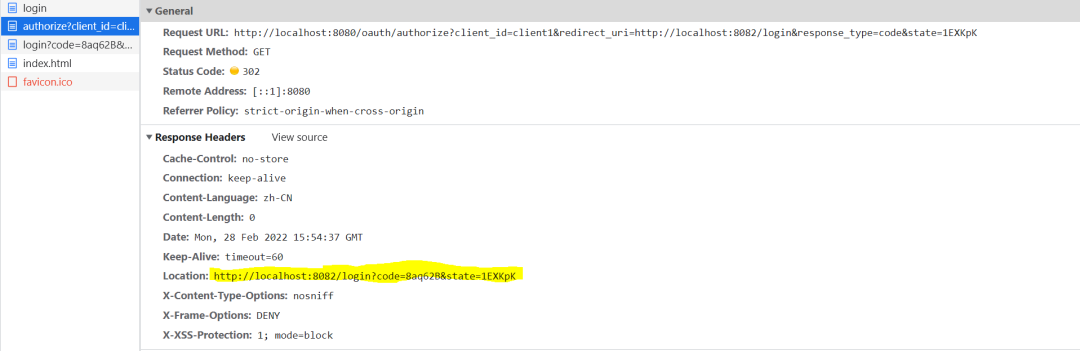
在授权服务端的登录页登录后,会以post方式将用户名和密码发送给授权服务器。授权服务器过滤器链中的UsernamePasswordAuthenticationFilter过滤器会去验证用户名和密码的正确性。在验证通过后,会重定向至之前的授权地址。
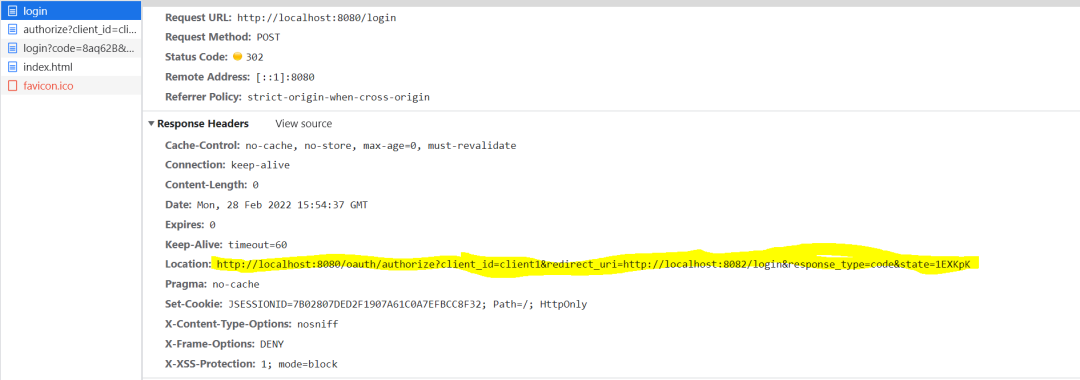
此时因为已经经过授权(principal不为空),会在authorize()方法中携带code参数重定向至client的登录地址。
3、获取Access_token和用户信息
获取access_token
//OAuth2AccessTokenSupport.classprotected OAuth2AccessToken retrieveToken(AccessTokenRequest request, OAuth2ProtectedResourceDetails resource,MultiValueMap<String, String> form, HttpHeaders headers) throws OAuth2AccessDeniedException {try {this.authenticationHandler.authenticateTokenRequest(resource, form, headers);this.tokenRequestEnhancer.enhance(request, resource, form, headers);final ResponseExtractor<OAuth2AccessToken> delegate = this.getResponseExtractor();ResponseExtractor<OAuth2AccessToken> extractor = new ResponseExtractor<OAuth2AccessToken>() {public OAuth2AccessToken extractData(ClientHttpResponse response) throws IOException {if (response.getHeaders().containsKey("Set-Cookie")) {request.setCookie(response.getHeaders().getFirst("Set-Cookie"));}//用来解析返回报文return (OAuth2AccessToken)delegate.extractData(response);}};return getRestTemplate().execute(getAccessTokenUri(resource, form), getHttpMethod(),getRequestCallback(resource, form, headers), extractor , form.toSingleValueMap());}// 省略}
在retrieveToken()方法中,又会通过getRestTemplate().execute()方法去授权服务器获取accessToken,这里会以post形式访问配置文件中security.oauth2.client.access-token-uri地址。
//RestTemplate.classprotected <T> T doExecute(URI url, @Nullable HttpMethod method, @Nullable RequestCallback requestCallback, @Nullable ResponseExtractor<T> responseExtractor) throws RestClientException { //省略Object var14;try {ClientHttpRequest request = this.createRequest(url, method);if (requestCallback != null) {requestCallback.doWithRequest(request);}//调用获取access_token的接口response = request.execute();this.handleResponse(url, method, response);var14 = responseExtractor != null ? responseExtractor.extractData(response) : null;} catch (IOException var12) {//省略} finally {//省略}return var14;}
在doExecute方法中,会通过responseExtractor.extractData()方法将返回报文转换成OAuth2AccessToken对象。OAuth2AccessToken源码如下:
@JsonSerialize(using = OAuth2AccessTokenJackson1Serializer.class)@JsonDeserialize(using = OAuth2AccessTokenJackson1Deserializer.class)@com.fasterxml.jackson.databind.annotation.JsonSerialize(using = OAuth2AccessTokenJackson2Serializer.class)@com.fasterxml.jackson.databind.annotation.JsonDeserialize(using = OAuth2AccessTokenJackson2Deserializer.class)public interface OAuth2AccessToken {String BEARER_TYPE = "Bearer";String OAUTH2_TYPE = "OAuth2";String ACCESS_TOKEN = "access_token";String TOKEN_TYPE = "token_type";String EXPIRES_IN = "expires_in";String REFRESH_TOKEN = "refresh_token";String SCOPE = "scope";Map<String, Object> getAdditionalInformation();Set<String> getScope();OAuth2RefreshToken getRefreshToken();//省略get方法}
在extractData方法中会遍历messageConverters, 如下图所示:
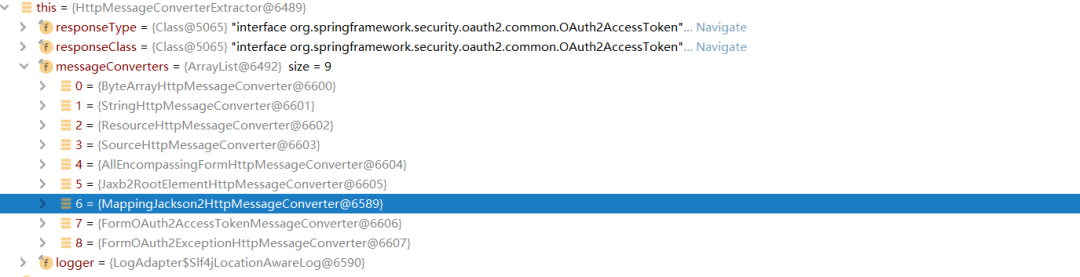
直到找到一个可以解析返回报文的converter,即MappingJackson2HttpMessageConverter,在该converter中会获取OAuth2AccessToken的jackson反序列化器完成解析。其反序列化器源码如下:
public final class OAuth2AccessTokenJackson2Deserializer extends StdDeserializer<OAuth2AccessToken> {省略public OAuth2AccessToken deserialize(JsonParser jp, DeserializationContext ctxt) throws IOException, JsonProcessingException {String tokenValue = null;String tokenType = null;String refreshToken = null;Long expiresIn = null;Set<String> scope = null;LinkedHashMap additionalInformation = new LinkedHashMap();while(jp.nextToken() != JsonToken.END_OBJECT) {String name = jp.getCurrentName();jp.nextToken();if ("access_token".equals(name)) {tokenValue = jp.getText();} else if ("token_type".equals(name)) {tokenType = jp.getText();} else if ("refresh_token".equals(name)) {refreshToken = jp.getText();} else if ("expires_in".equals(name)) {try {expiresIn = jp.getLongValue();} catch (JsonParseException var11) {expiresIn = Long.valueOf(jp.getText());}} else if ("scope".equals(name)) {scope = this.parseScope(jp);} else {additionalInformation.put(name, jp.readValueAs(Object.class));}}DefaultOAuth2AccessToken accessToken = new DefaultOAuth2AccessToken(tokenValue);accessToken.setTokenType(tokenType);if (expiresIn != null) {accessToken.setExpiration(new Date(System.currentTimeMillis() + expiresIn * 1000L));}if (refreshToken != null) {accessToken.setRefreshToken(new DefaultOAuth2RefreshToken(refreshToken));}accessToken.setScope(scope);accessToken.setAdditionalInformation(additionalInformation);return accessToken;}private Set<String> parseScope(JsonParser jp) throws JsonParseException, IOException {省略}}
获取用户信息
在成功获取到OAuth2AccessToken后,会携带token调用ResourceServerTokenServices的loadAuthentication方法去获取用户信息,这里最终是以get形式访问的是配置文件中的security.oauth2.resource.user-info-uri地址。
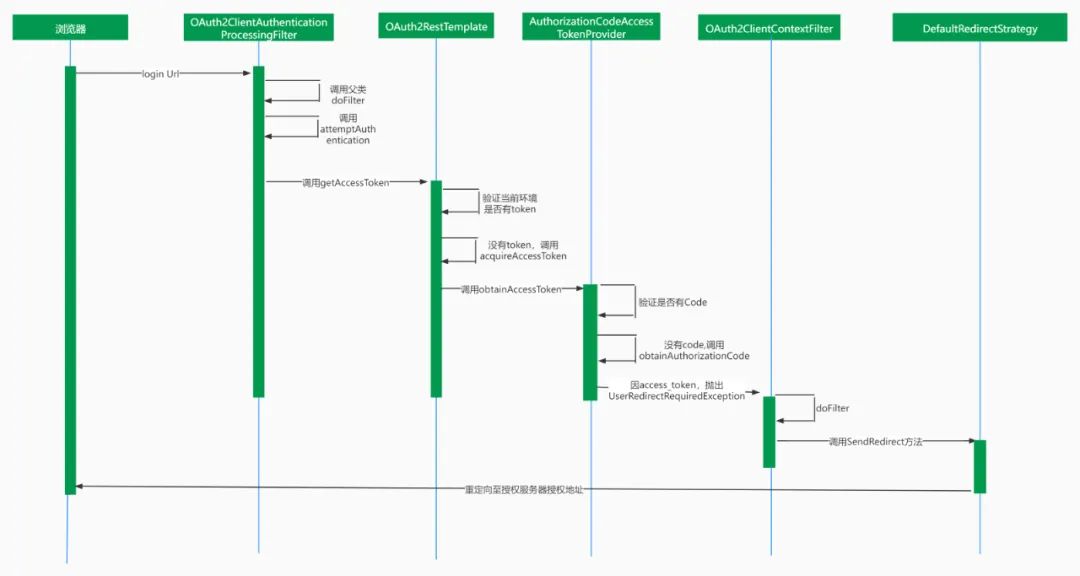
//OAuth2ClientAuthenticationProcessingFilter.classpublic Authentication attemptAuthentication(HttpServletRequest request, HttpServletResponse response) throws AuthenticationException, IOException, ServletException {OAuth2AccessToken accessToken;BadCredentialsException bad;try {//获取access_tokenaccessToken = this.restTemplate.getAccessToken();} catch (OAuth2Exception var7) {//省略}try {//加载用户信息OAuth2Authentication result = this.tokenServices.loadAuthentication(accessToken.getValue());//省略} catch (InvalidTokenException var6) {//省略}}
四、可能会遇到的适配问题
前面说到Oauth2只是一种身份认证的协议,因此除了Spring Security外,可能会有一些别的实现,在实际情况中很可能会出现,client端和授权服务端采用了不同的实现方式。下面就来说一下,在client端和授权服务端实现方式不同的情况下,可能涉及定制化改造的内容。
1、授权服务端授权接口返回报文的字段与client端接收字段定义不一致
在Spring Security的实现中返回的字段定义如下:
{"access_token": "1e93bc23-32c8-428f-a126-8206265e17b2","token_type": "bearer","refresh_token": "0f083e06-be1b-411f-98b0-72be8f1da8af","expires_in": 3599,"scope": "auth api"}
但在实际情况中,授权服务端不一定是按Spring Security的返回标准实现的,可能会以下面这种格式返回:
{"responseMsg":"success","responseCode:"0000000","data":{"access_token": "1e93bc23-32c8-428f-a126-8206265e17b2","token_type": "bearer","refresh_token": "0f083e06-be1b-411f-98b0-72be8f1da8af","expires_in": 3599,"scope": "auth api"}}
这种情况下,如果client端是用SpringSecurity Oauth2实现就会报错。授权服务端往往会给很多子系统提供授权服务,所以不可能要求授权服务端进行修改,所以只能在client端进行修改来进行适配。在上文获取access_token的源码分析这一节中,有说到client端在收到返回报文后,会通过MappingJackson2HttpMessageConverter获取反序列化器去解析,所以我们需要做的就是重写OAuth2AccessToken的反序列化器,是其能够正常的解析返回报文即可。
2、加载用户信息接口调用方式不一致
在上一节中说到,client端成功获取到access_token后会去加载用户信息,但在SpringSecurity中是以get的方式发送的请求,实际上授权服务端的用户信息服务可能只接收post形式的访问。当然这个冲突并不会影响使用,最多只是无法在session中获取到用户信息。解决方法可以是自己再写一个过滤器,在其中自己去调用获取用户信息的接口,然后将用户信息存入session。也可以重写loadAuthentication方法所在的UserInfoTokenService类,在其中将请求方式改为post。
3、SSL校验的问题
Security一般是开启SSL校验的,所以如果你配置在客户端里的那些地址是https,而服务端证书里没有你的Ip,就会通不过校验。可以选择在配置文件里用http进行访问。
4、页面中用ajax进行访问失败
Security默认是开启跨域校验的,使用ajax进行请求会被判定为跨域然后被禁止掉。可以在客户端的web安全配置中(即继承实现了WebSecurityConfigureAdapter的配置类)将跨域校验关闭,或者在请求时带上csrftoken参数。
5、内嵌的iframe打不开
同样在web安全配置中,配置允许iframe内嵌。
@Configuration@EnableOAuth2Ssopublic class SecurityConfig extends WebSecurityConfigurerAdapter {@Overrideprotected void configure(HttpSecurity http) throws Exception {//禁止CRRF跨域校验http.csrf().disable();//允许ifarme内嵌http.headers().frameOptions().disable();//这个方法里还可以对访问请求是否需要校验进行配置哦}}
五、一些参考资料
https://projects.spring.io/spring-security-oauth/docs/oauth2.html
https://time.geekbang.org/column/article/264179
https://www.cnblogs.com/wuzhiwei549/p/9113450.html
https://blog.csdn.net/u011317663/article/details/82355195
