


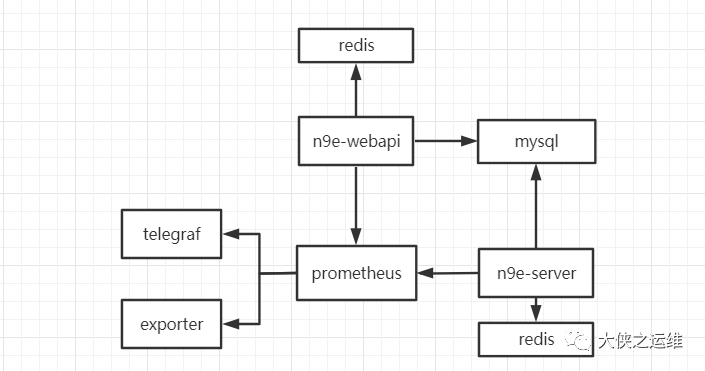
nginx 1.16.1 mysql 5.7.25 redis 5.0.14 prometheus 2.32.1 n9e 5.3.0 telegraf 1.21.2 软件安装目录 usr/local
yum install -y gcc
curl -OL https://download.redis.io/releases/redis-5.0.14.tar.gz
tar -xvf redis-5.0.14.tar.gz -C usr/local
#编译安装make PREFIX=/usr/local/redis/redis-single install#新建目录 在bin同级目录下cd /usr/local/redis/redis-singlemkdir run data log conf
#bind 127.0.0.1protected-mode yesport 6379tcp-backlog 511timeout 0tcp-keepalive 300daemonize nosupervised nopidfile var/run/redis_6379.pidloglevel noticelogfile ""databases 16always-show-logo yessave 900 1save 300 10save 60 10000stop-writes-on-bgsave-error yesrdbcompression yesrdbchecksum yesdbfilename dump.rdbdir ./replica-serve-stale-data yesreplica-read-only yesrepl-diskless-sync norepl-diskless-sync-delay 5repl-disable-tcp-nodelay noreplica-priority 100lazyfree-lazy-eviction nolazyfree-lazy-expire nolazyfree-lazy-server-del noreplica-lazy-flush noappendonly noappendfilename "appendonly.aof"appendfsync everysecno-appendfsync-on-rewrite noauto-aof-rewrite-percentage 100auto-aof-rewrite-min-size 64mbaof-load-truncated yesaof-use-rdb-preamble yeslua-time-limit 5000slowlog-log-slower-than 10000slowlog-max-len 128latency-monitor-threshold 0notify-keyspace-events ""hash-max-ziplist-entries 512hash-max-ziplist-value 64list-max-ziplist-size -2list-compress-depth 0set-max-intset-entries 512zset-max-ziplist-entries 128zset-max-ziplist-value 64hll-sparse-max-bytes 3000stream-node-max-bytes 4096stream-node-max-entries 100activerehashing yesclient-output-buffer-limit normal 0 0 0client-output-buffer-limit replica 256mb 64mb 60client-output-buffer-limit pubsub 32mb 8mb 60hz 10dynamic-hz yesaof-rewrite-incremental-fsync yesrdb-save-incremental-fsync yesdaemonize yesrequirepass password456
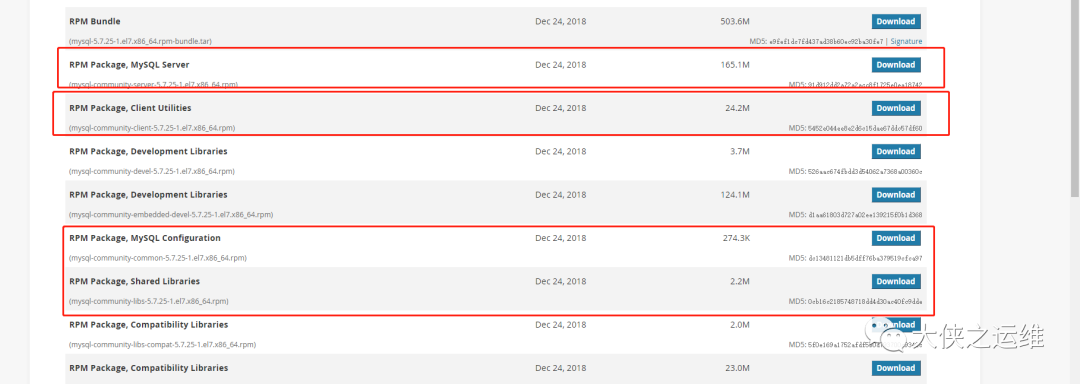
rpm -qa | grep mysqlyum remove mysql-libs
rpm -ivh mysql-community-common-5.7.25-1.el7.x86_64.rpmrpm -ivh mysql-community-libs-5.7.25-1.el7.x86_64.rpmrpm -ivh mysql-community-client-5.7.25-1.el7.x86_64.rpmrpm -ivh mysql-community-server-5.7.25-1.el7.x86_64.rpm
systemctl start mysqld.servicesystemctl enable mysqld.service
grep 'temporary password' var/log/mysqld.log
mysql> set global validate_password_policy=1;mysql> set password for root@localhost=password('password456');mysql> grant all privileges on *.* to root@'%' identified by 'password456';mysql> flush privileges;
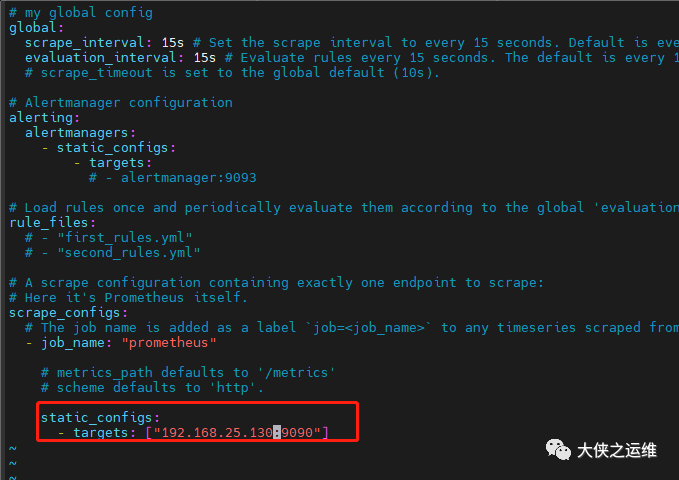
curl -OL https://github.com/prometheus/prometheus/releases/download/v2.32.1/prometheus-2.32.1.linux-amd64.tar.gztar -xvf prometheus-2.32.1.linux-amd64.tar.gz -C usr/local/mv prometheus-2.32.1.linux-amd64/ prometheus

curl -OL https://github.com/didi/nightingale/releases/download/v5.3.0/n9e-5.3.0.tar.gzmkdir /usr/local/n9etar -xvf n9e-5.3.0.tar.gz -C /usr/local/n9e
[Redis]# address, ip:portAddress = "192.168.25.129:6379"# requirepassPassword = "password456"[MySQL]# mysql address host:portAddress = "192.168.25.130:3306"# mysql usernameUser = "root"# mysql passwordPassword = "password456"[Reader]# prometheus base urlUrl = "http://192.168.25.130:9090"# Basic auth username[[Writers]]Url = "http://192.168.25.130:9090/api/v1/write"# Basic auth username
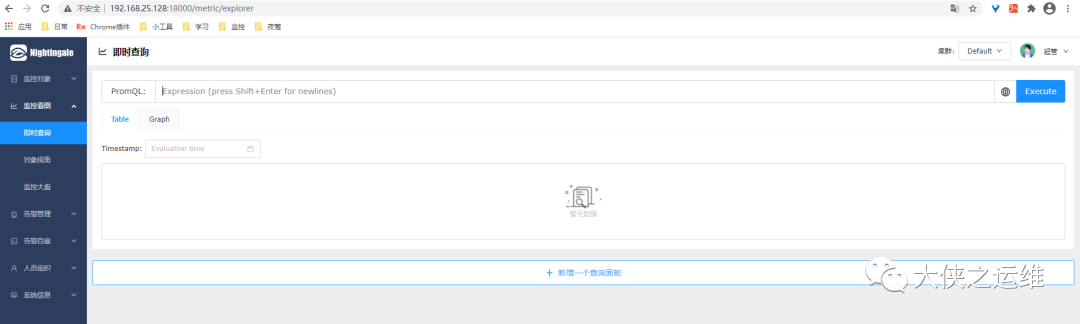
/usr/local/n9e/etc/webapi.confredis mysql[[Clusters]]# Prometheus cluster nameName = "Default"# Prometheus APIs base urlProm = "http://192.168.25.130:9090"
mysql -uroot -h192.168.25.130 -ppassword456 < a-n9e.sql
nohup ./n9e server &nohup ./n9e webapi &
后续更新实际使用情况
文章转载自大侠之运维,如果涉嫌侵权,请发送邮件至:contact@modb.pro进行举报,并提供相关证据,一经查实,墨天轮将立刻删除相关内容。
