



主要内容:1.前置环境准备2.k8s环境搭建3.mertics-server部署4.dashboard部署5.k8s命令补全
前言
2022年开始,每周一个关于kubernetes技术分享,也记录下关于k8s的一个学习或者实践历程。
2022年的第一周是进入新公司的第三周,在熟悉新环境的同时,利用一些空余时间,做一些简单的实践,本周的话,就从环境的安装开始吧。
其实现在安装一套k8s环境已经很简单了,没有之前几年开始兴起的时候,各种镜像源无法获取的问题,本文的话,是利用虚拟机环境,采用kubeadm方式安装的1.23.0版本。
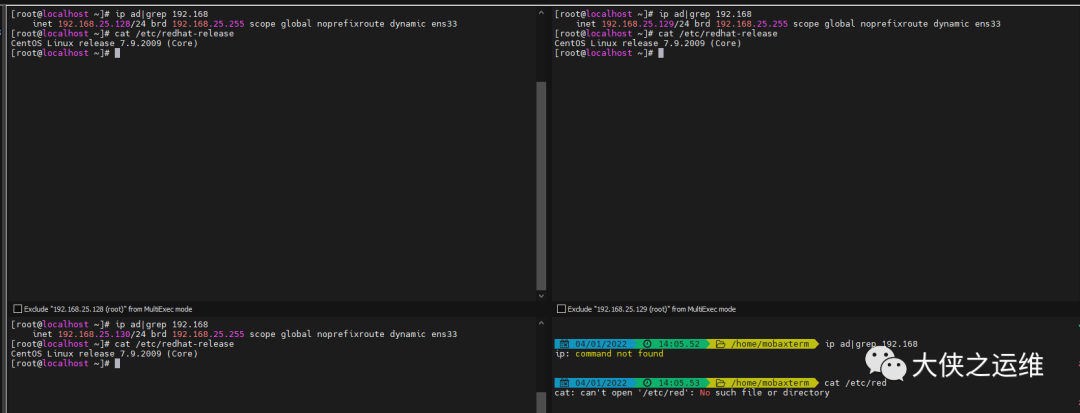
虚拟机环境是已经准备好的三台2c4G的centos7.9,有关虚拟机的问题,可以直接在后台问,看到会第一时间回复的。
安装环境
ip | 操作系统 | 配置 |
192.168.25.128 | centos7.9 | 2C4G |
192.168.25.129 | centos7.9 | 2C4G |
192.168.25.130 | centos7.9 | 2C4G |
安装版本
kubernetes版本 | 1.23.0 |
docker版本 | 20.10.12 |
前置工作
这部分主要涉及一些正式安装的之前的一些前置化操作,尤其是虚拟机环境,很多的基础命令没有,大致分为如下几步:
下面几步在三台主机上都要操作
systemctl stop firewalld && systemctl disable firewalldsetenforce 0 && sed -i "s/SELINUX=enforcing$/SELINUX=disabled/g" etc/selinux/configswapoff -a && sed -i "s/\/dev\/mapper\/centos-swap/\#\/dev\/mapper\/centos-swap/g" etc/fstab
yum 源替换 安装基础包
curl -o etc/yum.repos.d/CentOS-Base.repo http://mirrors.aliyun.com/repo/Centos-7.repoyum clean allyum makecacheyum install -y yum-utils device-mapper-persistent-data lvm2 vim chrony#同步各个节点时间systemctl start chronyd.service && systemctl enable chronyd.service
新增docker源,安装docker环境
yum-config-manager --add-repo https://mirrors.aliyun.com/docker-ce/linux/centos/docker-ce.repoyum install -y docker-cesystemctl start docker && systemctl enable docker#安装完docker后需要调整镜像源、修改cgroup驱动为systemdtee etc/docker/daemon.json <<-'EOF'{"registry-mirrors": ["https://pcy9sknd.mirror.aliyuncs.com"],"exec-opts": ["native.cgroupdriver=systemd"]}EOFsystemctl daemon-reload && systemctl restart docker
新增k8s安装包源,安装kube系列包
tee etc/yum.repos.d/kubernetes.repo <<-'EOF'[kubernetes]name=Kubernetesbaseurl=https://mirrors.aliyun.com/kubernetes/yum/repos/kubernetes-el7-x86_64/enabled=1gpgcheck=1repo_gpgcheck=1gpgkey=https://mirrors.aliyun.com/kubernetes/yum/doc/yum-key.gpghttps://mirrors.aliyun.com/kubernetes/yum/doc/rpm-package-key.gpgEOFyum install -y kubelet kubeadm kubectl --nogpgchecksystemctl start kubelet && systemctl enable kubelet
导入IPVS模块
cat > etc/sysconfig/modules/ipvs.modules <<EOFmodprobe -- ip_vsmodprobe -- ip_vs_rrmodprobe -- ip_vs_wrrmodprobe -- ip_vs_shmodprobe -- nf_conntrack_ipv4EOFchmod 755 etc/sysconfig/modules/ipvs.modules && bash
修改brige规则
cat > etc/sysctl.d/k8s.conf << EOFnet.bridge.bridge-nf-call-ip6tables = 1net.bridge.bridge-nf-call-iptables = 1vm.swappiness=0EOFsysctl --system
开启iptables的FORWARD转发链
iptables -P FORWARD ACCEPTsed -i '/ExecStart/a ExecStartPost=/sbin/iptables -P FORWARD ACCEPT' usr/lib/systemd/system/docker.service修改/etc/hosts文件tee etc/hosts <<-'EOF'127.0.0.1 localhost localhost.localdomain localhost4 localhost4.localdomain4::1 localhost localhost.localdomain localhost6 localhost6.localdomain6192.168.25.128 k8s-master192.168.25.129 k8s-node1192.168.25.130 k8s-node2EOF
#master节点添加解析,后面会用到18.199.108.133 raw.githubusercontent.com
搭建kubernetes集群
master初始化
cat > master-init.yaml << EOFapiVersion: kubeadm.k8s.io/v1beta2kind: InitConfigurationlocalAPIEndpoint:advertiseAddress: 192.168.25.128bindPort: 6443---apiVersion: kubeadm.k8s.io/v1beta2imageRepository: registry.cn-hangzhou.aliyuncs.com/google_containerskind: ClusterConfigurationkubernetesVersion: v1.23.0networking:dnsDomain: cluster.localpodSubnet: 10.244.0.0/16EOF
然后执行初始化命令
kubeadmin init --config==master-init.yaml
关于podSubnet这个配置采用不同的网络插件会有不同,flannel的话,默认采用10.244.0.0/16,采用calico的话默认192.168.0.0/16
查看输出结果如下,说明初始化成功
Your Kubernetes control-plane has initialized successfully!To start using your cluster, you need to run the following as a regular user:mkdir -p $HOME/.kubesudo cp -i etc/kubernetes/admin.conf $HOME/.kube/configsudo chown $(id -u):$(id -g) $HOME/.kube/configAlternatively, if you are the root user, you can run:export KUBECONFIG=/etc/kubernetes/admin.confYou should now deploy a pod network to the cluster.Run "kubectl apply -f [podnetwork].yaml" with one of the options listed at:https://kubernetes.io/docs/concepts/cluster-administration/addons/Then you can join any number of worker nodes by running the following on each as root:kubeadm join 192.168.25.128:6443 --token e6zejn.ofv83pndgkvq2xq9 \--discovery-token-ca-cert-hash sha256:e771115aab28654d85c2a73d08e6007587f05b7f945b27aa2aa6243984459f0d
然后根据提示进行操作
mkdir -p $HOME/.kubesudo cp -i etc/kubernetes/admin.conf $HOME/.kube/configsudo chown $(id -u):$(id -g) $HOME/.kube/config
这部分的的话是用来加入集群使用的
kubeadm join 192.168.25.128:6443 --token e6zejn.ofv83pndgkvq2xq9 \--discovery-token-ca-cert-hash sha256:e771115aab28654d85c2a73d08e6007587f05b7f945b27aa2aa6243984459f0d
网络插件初始化
搭建的集群是用的的flannel,用到的yaml文件如下
可以通过如下链接获取
https://raw.githubusercontent.com/coreos/flannel/master/Documentation/kube-flannel.yml
---apiVersion: policy/v1beta1kind: PodSecurityPolicymetadata:name: psp.flannel.unprivilegedannotations:seccomp.security.alpha.kubernetes.io/allowedProfileNames: docker/defaultseccomp.security.alpha.kubernetes.io/defaultProfileName: docker/defaultapparmor.security.beta.kubernetes.io/allowedProfileNames: runtime/defaultapparmor.security.beta.kubernetes.io/defaultProfileName: runtime/defaultspec:privileged: falsevolumes:- configMap- secret- emptyDir- hostPathallowedHostPaths:- pathPrefix: "/etc/cni/net.d"- pathPrefix: "/etc/kube-flannel"- pathPrefix: "/run/flannel"readOnlyRootFilesystem: false# Users and groupsrunAsUser:rule: RunAsAnysupplementalGroups:rule: RunAsAnyfsGroup:rule: RunAsAny# Privilege EscalationallowPrivilegeEscalation: falsedefaultAllowPrivilegeEscalation: false# CapabilitiesallowedCapabilities: ['NET_ADMIN', 'NET_RAW']defaultAddCapabilities: []requiredDropCapabilities: []# Host namespaceshostPID: falsehostIPC: falsehostNetwork: truehostPorts:- min: 0max: 65535# SELinuxseLinux:# SELinux is unused in CaaSPrule: 'RunAsAny'---kind: ClusterRoleapiVersion: rbac.authorization.k8s.io/v1metadata:name: flannelrules:- apiGroups: ['extensions']resources: ['podsecuritypolicies']verbs: ['use']resourceNames: ['psp.flannel.unprivileged']- apiGroups:- ""resources:- podsverbs:- get- apiGroups:- ""resources:- nodesverbs:- list- watch- apiGroups:- ""resources:- nodes/statusverbs:- patch---kind: ClusterRoleBindingapiVersion: rbac.authorization.k8s.io/v1metadata:name: flannelroleRef:apiGroup: rbac.authorization.k8s.iokind: ClusterRolename: flannelsubjects:- kind: ServiceAccountname: flannelnamespace: kube-system---apiVersion: v1kind: ServiceAccountmetadata:name: flannelnamespace: kube-system---kind: ConfigMapapiVersion: v1metadata:name: kube-flannel-cfgnamespace: kube-systemlabels:tier: nodeapp: flanneldata:cni-conf.json: |{"name": "cbr0","cniVersion": "0.3.1","plugins": [{"type": "flannel","delegate": {"hairpinMode": true,"isDefaultGateway": true}},{"type": "portmap","capabilities": {"portMappings": true}}]}net-conf.json: |{"Network": "10.244.0.0/16","Backend": {"Type": "vxlan"}}---apiVersion: apps/v1kind: DaemonSetmetadata:name: kube-flannel-dsnamespace: kube-systemlabels:tier: nodeapp: flannelspec:selector:matchLabels:app: flanneltemplate:metadata:labels:tier: nodeapp: flannelspec:affinity:nodeAffinity:requiredDuringSchedulingIgnoredDuringExecution:nodeSelectorTerms:- matchExpressions:- key: kubernetes.io/osoperator: Invalues:- linuxhostNetwork: truepriorityClassName: system-node-criticaltolerations:- operator: Existseffect: NoScheduleserviceAccountName: flannelinitContainers:- name: install-cni-pluginimage: rancher/mirrored-flannelcni-flannel-cni-plugin:v1.0.0command:- cpargs:- -f- flannel- opt/cni/bin/flannelvolumeMounts:- name: cni-pluginmountPath: opt/cni/bin- name: install-cniimage: quay.io/coreos/flannel:v0.15.1command:- cpargs:- -f- etc/kube-flannel/cni-conf.json- etc/cni/net.d/10-flannel.conflistvolumeMounts:- name: cnimountPath: etc/cni/net.d- name: flannel-cfgmountPath: etc/kube-flannel/containers:- name: kube-flannelimage: quay.io/coreos/flannel:v0.15.1command:- opt/bin/flanneldargs:- --ip-masq- --kube-subnet-mgrresources:requests:cpu: "100m"memory: "50Mi"limits:cpu: "100m"memory: "50Mi"securityContext:privileged: falsecapabilities:add: ["NET_ADMIN", "NET_RAW"]env:- name: POD_NAMEvalueFrom:fieldRef:fieldPath: metadata.name- name: POD_NAMESPACEvalueFrom:fieldRef:fieldPath: metadata.namespacevolumeMounts:- name: runmountPath: run/flannel- name: flannel-cfgmountPath: etc/kube-flannel/volumes:- name: runhostPath:path: run/flannel- name: cni-pluginhostPath:path: opt/cni/bin- name: cnihostPath:path: etc/cni/net.d- name: flannel-cfgconfigMap:name: kube-flannel-cfg
通过 kubectl apply -f kube-flannel.yaml 安装
安装完后pod及集群状态
kubectl get pods -n kube-systemNAME READY STATUS RESTARTS AGEcoredns-65c54cc984-rwzvn 1/1 Running 0 6m3scoredns-65c54cc984-shkx2 1/1 Running 0 6m3setcd-localhost.localdomain 1/1 Running 0 6m18skube-apiserver-localhost.localdomain 1/1 Running 0 6m18skube-controller-manager-localhost.localdomain 1/1 Running 0 6m17skube-flannel-ds-2br8l 1/1 Running 0 87skube-proxy-6c4w8 1/1 Running 0 6m3skube-scheduler-localhost.localdomain 1/1 Running 0 6m18skubectl get nodesNAME STATUS ROLES AGE VERSIONlocalhost.localdomain Ready control-plane,master 7m2s v1.23.1
node节点加入
根据master的提示进行node接入
kubeadm join 192.168.25.128:6443 --token e6zejn.ofv83pndgkvq2xq9 \--discovery-token-ca-cert-hash sha256:e771115aab28654d85c2a73d08e6007587f05b7f945b27aa2aa6243984459f0d
查看状态
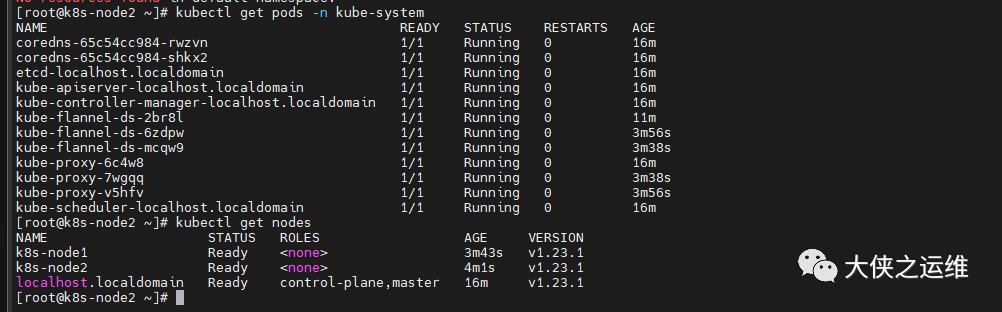
基础资源监控metrics-server
可以查看nodes、pod资源使用情况,后续的HPA的实现也依赖
mkdir metrics-servercd metrics-servercurl -OL https://github.com/kubernetes-sigs/metrics-server/releases/download/v0.3.6/components.yaml
修改部分配置
image: registry.cn-hangzhou.aliyuncs.com/google_containers/metrics-server-amd64:v0.3.6imagePullPolicy: IfNotPresentargs:- --cert-dir=/tmp- --secure-port=4443- --kubelet-insecure-tls- --kubelet-preferred-address-types=InternalIP
执行 kubectl apply -f coments.yaml
查看资源情况
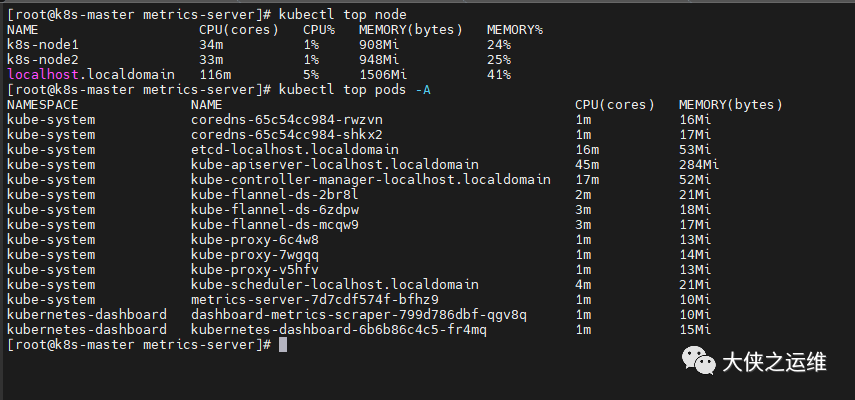
简单dashboard搭建配置
curl -OL https://raw.githubusercontent.com/kubernetes/dashboard/v2.4.0/aio/deploy/recommended.yaml
修改暴露服务方式为nodeport
kind: ServiceapiVersion: v1metadata:labels:k8s-app: kubernetes-dashboardname: kubernetes-dashboardnamespace: kubernetes-dashboardspec:type: NodePortports:- port: 443targetPort: 8443nodePort: 30001selector:k8s-app: kubernetes-dashboard下面为建立相关用户信息[root@k8s-master dashboard]# cat dashboard-adminuser.yamlapiVersion: v1kind: ServiceAccountmetadata:name: admin-usernamespace: kubernetes-dashboard[root@k8s-master dashboard]# cat dashboard-ClusterRoleBinding.yamlapiVersion: rbac.authorization.k8s.io/v1kind: ClusterRoleBindingmetadata:name: admin-userroleRef:apiGroup: rbac.authorization.k8s.iokind: ClusterRolename: cluster-adminsubjects:- kind: ServiceAccountname: admin-usernamespace: kubernetes-dashboard
分别创建,打开https://192.168.25.128:30001/ 页面如下
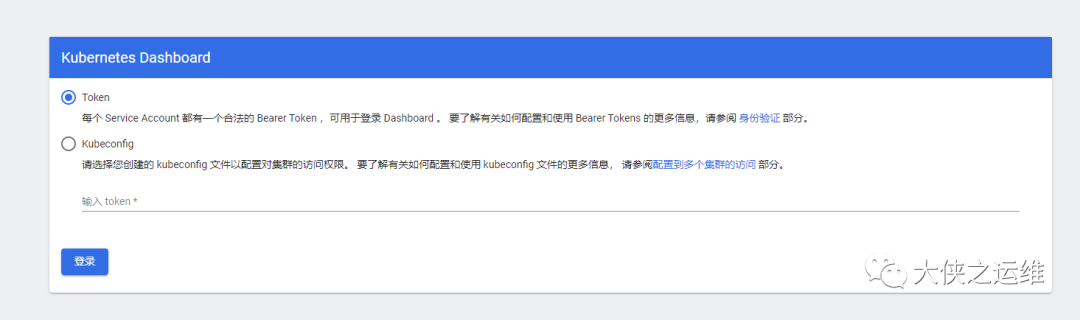
通过如下命令获取密钥
kubectl -n kubernetes-dashboard get secret $(kubectl -n kubernetes-dashboard get sa/admin-user -o jsonpath="{.secrets[0].name}") -o go-template="{{.data.token | base64decode}}"
K8S命令补全
yum -y install bash-completionsource /usr/share/bash-completion/bash_completionsource <(kubectl completion bash)echo “source <(kubectl completion bash)” >> ~/.bashrc
本文暂时到这里,更多关于k8s资料,可以直接在后台回复k8s获取
后面会讲关于Prometheus及alertmanager内容
