


关注「WeiyiGeek」公众号
设为「特别关注」每天带你玩转网络安全运维、应用开发、物联网IOT学习!

本章目录:
0x00 前言简述
0x01 安装部署
环境说明
libmaxminddb 下载
ngx_http_geoip2_module 下载
Geoip2 模块编译动态链接库
GeoLite2 数据库下载
GeoLite2 数据库自动更新
0x02 实践使用
1.使用GeoIP2模块请求客户端的IP地址国家省份经纬度展示
2.使用GeoIP2模块静止某一国家地区的IP地址访问网站
3.使用GeoIP2模块实现不同国家访问进入不同目录页面
0x0n 入坑出坑
问题1.非二进制方式安装Nginx GeoIP过程中可能会出现的错误问题如下,也帮大家列举出解决办法。
问题2: 如果在进行Nginx编译时出现
./configure: error: the GeoIP module requires the GeoIP library.You can either do not enable the module or install the library.
问题提示时解决方法。
原文地址: https://blog.weiyigeek.top
0x00 前言简述
描述: 为了实现根据访问者访问我们的网站时根据其IP显示其所属地,也为获取不同地区访问者的IP地址等相关信息为目的,所以在搜索引擎中查找解决方案,在网络上查询到如下几种方案Nginx+GeoIP2、使用收费 IP 识别接口、DNS 根据地域解析
,然后经过多方面考究,最终还是使用Nginx+GeoIP2解决方案。
三种解决方案优缺点
Nginx + GeoIP2
可以拿到请求 IP 的国家和城市信息然后进行各种个性化 Nginx 配置
可以将请求 IP 的地理位置通过 php-fpm 传递 php 程序
定时更新 MaxMind 免费数据库(GeoLite2-Country.mmdb + GeoLite2-City.mmdb
)完成完美闭环
maxmind 公司 2002 年成立至今,靠谱使用 IP 识别接口:稳定的需要收费(也不能保证 100% 高可用:限频、响应时间、接口异常等因素),免费的无法保证稳定性,接口远远没有将 GeoLite 数据放在本地稳定
DNS 根据地域解析:cloudflare 收费略贵,国内 cloudxns 已关闭免费服务(免费的东西说变就变,论 planB 的重要性)
所有在本章中,我将向您展示如何搭建与配置一个有效的 Nginx 和 Max Mind GeoIP2/GeoLite2 设置。从安装部署包的下载、编译安装步骤以及命令使用、包括安装过程中可能会遇到的坑,在最后博主也通过几个实践例子,展示如何使用 GeoIP2 按国家/地区限制对某些 URL 的访问。
TIPS: MaxMind GeoIP 已经被弃用了一段时间。对于您最新的地理定位需求,请改用 MaxMind GeoIP2(或免费版本的 GeoLite2)。
TIPS: 当前网上大部分Nginx + GeoIP 的教程都是 GeoIP 老版本的已经不适用了当前最新版本的Nginx二进制编译安装,你可参照本章更快的进行实践使用。
TIPS: GeoUP 依赖 MaxMind 的 IP 数据,需要频繁更新,所以我们在安装配置后也实现了使用crontab
服务,针对其国家城市数据库进行自动化脚本定时更新配置。
好了,不多说了,下面直接开始实践吧!
0x01 安装部署
环境说明
环境一览:
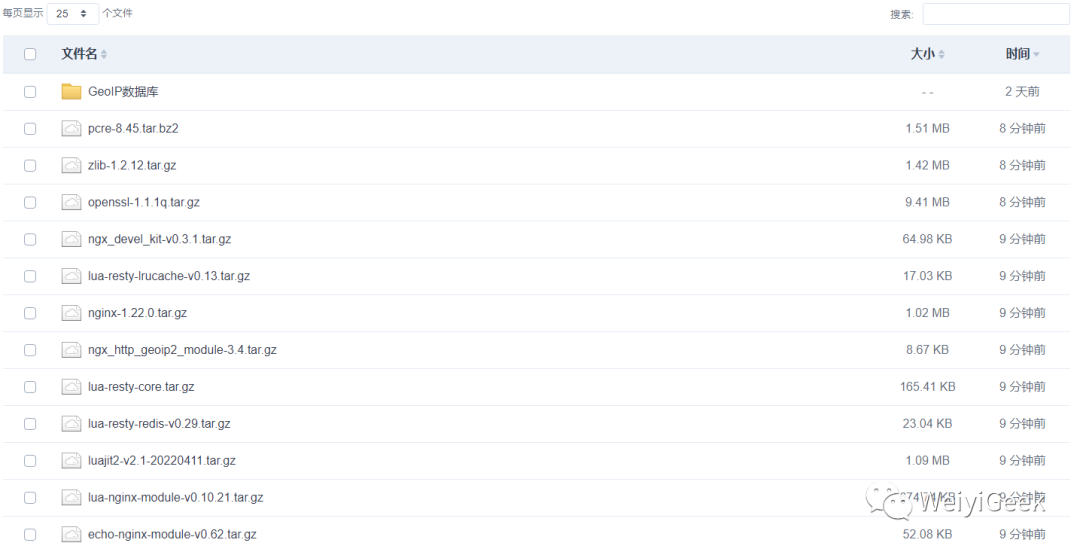
# 宿主机系统$ uname -a113-Ubuntu SMP Thu Feb 3 18:43:29 UTC 2022 x86_64 x86_64 x86_64 GNU/Linux$ cat etc/issue.netUbuntu 20.04.1 LTS# 应用软件nginx-1.22.0.tar.gzlibmaxminddb-1.6.0.tar.gzngx_http_geoip2_module-3.4.tar.gzGeoLite2-City_20220802.tar.gzGeoLite2-Country_20220802.tar.gz
温馨提示: 此处使用的是 Ubuntu 20.04 操作系统, 该系统已做安全加固和内核优化符合等保2.0要求【SecOpsDev/Ubuntu-InitializeSecurity.sh at master · WeiyiGeek/SecOpsDev 】, 如你的Linux未进行相应配置环境可能与读者有些许差异, 如需要进行(windows server、Ubuntu、CentOS)安全加固请参照如下加固脚本进行加固, 请大家疯狂的 star 。
加固脚本地址:【 https://github.com/WeiyiGeek/SecOpsDev/blob/master/OS-操作系统/Linux/Ubuntu/Ubuntu-InitializeSecurity.sh 】
为了节省大家的实践时间,我已经把需要用到的源码包上传到空间中,有需要的朋友可以看一下,下载地址: http://share.weiyigeek.top/d/36158960-50338508-7c5982?p=2088(访问密码:2088)
温馨提示: 如提示证书不对,请点击高级继续访问即可.
原文地址: https://blog.weiyigeek.top
libmaxminddb 下载
描述: 首先安装 libmaxminddb 库,其提供了一个用于读取MaxMind DB
文件的C库,包括来自MaxMind的GeoIP2数据库。这是一种自定义二进制格式,旨在促进 IP 地址的快速查找,同时允许在与地址关联的数据类型方面具有极大的灵活性。
项目地址: https://github.com/maxmind/libmaxminddb
下载构建:
wget -c https://github.com/maxmind/libmaxminddb/releases/download/1.6.0/libmaxminddb-1.6.0.tar.gztar -zxvf libmaxminddb-1.6.0.tar.gz && cd libmaxminddb-1.6.0./configuremake && make installtee -a etc/ld.so.conf.d/libc.conf <<'EOF'# libc default configuration/usr/local/libEOFsudo ldconfig
或使用apt命令进行安装:
$ sudo apt update
$ sudo apt install libmaxminddb0 libmaxminddb-dev mmdb-bin geoipupdate
上面安装的软件包是:
libmaxminddb0 libmaxminddb-dev – MaxMind 地理定位数据库
mmdb-bin – 二进制。从命令行调用的程序。使用此命令手动定位 IP。
geoipupdate – 帮助配置和更新 GeoIP2 GeoLite2 的软件包。
ngx_http_geoip2_module 下载
描述: 下载 ngx_http_geoip2_module 使用基于客户端 IP(默认)或特定变量(同时支持 IPv4 和 IPv6)的 maxmind geoip2
数据库中的值创建变量,该模块现在支持nginx流,并且可以以与http模块相同的方式使用。
项目地址: https://github.com/leev/ngx_http_geoip2_module/
下载构建:
wget -c https://github.com/leev/ngx_http_geoip2_module/archive/refs/tags/3.4.tar.gz -O usr/local/src/ngx_http_geoip2_module-3.4.tar.gztar -zxf ngx_http_geoip2_module-3.4.tar.gz && ls ngx_http_geoip2_module-3.4/# config LICENSE ngx_http_geoip2_module.c ngx_stream_geoip2_module.c README.md
Geoip2 模块语法
语法示例:
# HTTPhttp {...geoip2 etc/maxmind-country.mmdb {auto_reload 5m;$geoip2_data_country_code default=US source=$variable_with_ip country iso_code;}}# Streamstream {...geoip2 etc/maxmind-country.mmdb {auto_reload 5m;$geoip2_data_country_code default=US source=$remote_addr country iso_code;}...}
参数说明:
auto_reload <interval>
: 启用自动重新加载将使 nginx 以指定的时间间隔检查数据库的修改时间,如果发生更改则重新加载。$variable_name [default=<value] [source=$variable_with_ip] path ...
: 如果没有指定【default】参数,则如果未找到该变量将为空,如果没有指定【source】参数 $remote_addr 将用于执行查找。
从上面语法格式中您是否是一片茫然,不管你是不是反正我第一次看到就茫然了,那 country iso_code
关键字又是从何而来?
为了解决上面这个疑问,我们在来看看如下操作。
mmdblookup 命令
描述: 在前面编译安装libmaxminddb
库后,我们便可以使用 mmdblookup 工具,查找所需数据的路径(例如:国家/地区名称),以JSON格式返回的,其中continent(洲) 、country (国家) 、registered_country(已注册的国家)对象包含了code/geoname_id/names
键:
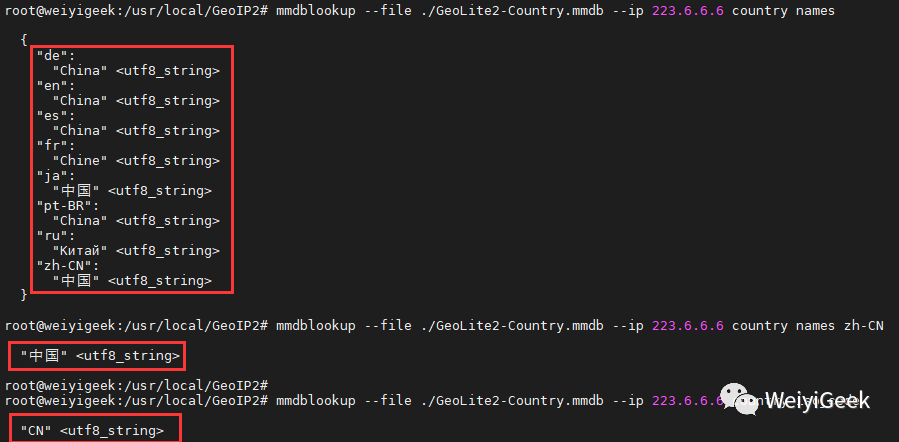
GeoLite2-Country.mmdb 库只带有 country 相关数据样本输出
$ mmdblookup --file ./GeoLite2-Country.mmdb --ip 223.6.6.6{"continent":{"code":"AS" <utf8_string>"geoname_id":6255147 <uint32>"names":{"de":"Asien" <utf8_string>"en":"Asia" <utf8_string>"es":"Asia" <utf8_string>"fr":"Asie" <utf8_string>"ja":"アジア" <utf8_string>"pt-BR":"Ásia" <utf8_string>"ru":"Азия" <utf8_string>"zh-CN":"亚洲" <utf8_string>}}"country":{"geoname_id":1814991 <uint32>"iso_code":"CN" <utf8_string>"names":{"de":"China" <utf8_string>"en":"China" <utf8_string>"es":"China" <utf8_string>"fr":"Chine" <utf8_string>"ja":"中国" <utf8_string>"pt-BR":"China" <utf8_string>"ru":"Китай" <utf8_string>"zh-CN":"中国" <utf8_string>}}"registered_country":{"geoname_id":1814991 <uint32>"iso_code":"CN" <utf8_string>"names":{"de":"China" <utf8_string>"en":"China" <utf8_string>"es":"China" <utf8_string>"fr":"Chine" <utf8_string>"ja":"中国" <utf8_string>"pt-BR":"China" <utf8_string>"ru":"Китай" <utf8_string>"zh-CN":"中国" <utf8_string>}}}
GeoLite2-City.mmdb 库带有 country City 相关数据样本输出 (一般推荐使用该库)
$ mmdblookup --file ./GeoLite2-City.mmdb --ip 223.6.6.6{"city":{"geoname_id":1808926 <uint32>"names":{"de":"Hangzhou" <utf8_string>"en":"Hangzhou" <utf8_string>"es":"Hangzhou" <utf8_string>"fr":"Hangzhou" <utf8_string>"ja":"杭州市" <utf8_string>"pt-BR":"Hangzhou" <utf8_string>"ru":"Ханчжоу" <utf8_string>"zh-CN":"杭州" <utf8_string>}}"continent":{"code":"AS" <utf8_string>"geoname_id":6255147 <uint32>"names":{"de":"Asien" <utf8_string>"en":"Asia" <utf8_string>"es":"Asia" <utf8_string>"fr":"Asie" <utf8_string>"ja":"アジア" <utf8_string>"pt-BR":"Ásia" <utf8_string>"ru":"Азия" <utf8_string>"zh-CN":"亚洲" <utf8_string>}}"country":{"geoname_id":1814991 <uint32>"iso_code":"CN" <utf8_string>"names":{"de":"China" <utf8_string>"en":"China" <utf8_string>"es":"China" <utf8_string>"fr":"Chine" <utf8_string>"ja":"中国" <utf8_string>"pt-BR":"China" <utf8_string>"ru":"Китай" <utf8_string>"zh-CN":"中国" <utf8_string>}}"location":{"accuracy_radius":1000 <uint16>"latitude":30.299400 <double>"longitude":120.161200 <double>"time_zone":"Asia/Shanghai" <utf8_string>}"registered_country":{"geoname_id":1814991 <uint32>"iso_code":"CN" <utf8_string>"names":{"de":"China" <utf8_string>"en":"China" <utf8_string>"es":"China" <utf8_string>"fr":"Chine" <utf8_string>"ja":"中国" <utf8_string>"pt-BR":"China" <utf8_string>"ru":"Китай" <utf8_string>"zh-CN":"中国" <utf8_string>}}"subdivisions":[{"geoname_id":1784764 <uint32>"iso_code":"ZJ" <utf8_string>"names":{"en":"Zhejiang" <utf8_string>"fr":"Province de Zhejiang" <utf8_string>"zh-CN":"浙江省" <utf8_string>}}]}
GeoLite2-Country.mmdb 与 GeoLite2-Country.mmdb 对比。
# - 国家 ./GeoLite2-Country.mmdb 库# 如果此时我只想获取 country 的名称可以这样。$ mmdblookup --file ./GeoLite2-Country.mmdb --ip 223.6.6.6 country names zh-CN"中国" <utf8_string># 当然如果你想获取国家的 iso_code 也是同样的。$ mmdblookup --file ./GeoLite2-Country.mmdb --ip 223.6.6.6 country iso_code"CN" <utf8_string># - 国家、城市库 ./GeoLite2-Country.mmdb 库$ mmdblookup --file ./GeoLite2-City.mmdb --ip 223.6.6.6 country names zh-CN"中国" <utf8_string>$ mmdblookup --file ./GeoLite2-City.mmdb --ip 223.6.6.6 country iso_code"CN" <utf8_string>$ mmdblookup --file ./GeoLite2-City.mmdb --ip 223.6.6.6 continent names zh-CN"亚洲" <utf8_string>$ mmdblookup --file ./GeoLite2-City.mmdb --ip 223.6.6.6 subdivisions 0 names zh-CN"浙江省" <utf8_string>$ mmdblookup --file ./GeoLite2-City.mmdb --ip 223.6.6.6 subdivisions 0 names iso_code"ZJ" <utf8_string>$ mmdblookup --file ./GeoLite2-City.mmdb --ip 223.6.6.6 city names zh-CN"杭州" <utf8_string>$ mmdblookup --file ./GeoLite2-City.mmdb --ip 223.6.6.6 location longitude # 经度120.161200 <double>$ mmdblookup --file ./GeoLite2-City.mmdb --ip 223.6.6.6 location latitude # 纬度30.299400 <double>$ mmdblookup --file ./GeoLite2-City.mmdb --ip 223.6.6.6 location time_zone # 时区"Asia/Shanghai" <utf8_string>
上述的两个示例我们可以将其转换为 geoip2 模块定义的nginx变量。
# 如只需要国家信息建议使用该库geoip2 usr/local/GeoIP2/GeoLite2-Country.mmdb {$geoip2_data_country "default=China" source=$remote_addr country names en}# 如需要获取国家以及省份信息建议使用该库,此处暂不演示使用,在后续实践中再进行介绍和使用。geoip2 usr/local/GeoIP2/GeoLite2-City.mmdb {$geoip2_data_country "default=中国" source=$remote_addr country names zh-CN; # 中国$geoip2_data_country_code country iso_code; # CN$geoip2_data_country_continent continent names zh-CN; # 亚洲$geoip2_data_country_continent_code continent code; # AS$geoip2_data_province_name subdivisions 0 names zh-CN; # 浙江省$geoip2_data_province_isocode subdivisions 0 names iso_code; # "ZJ"$geoip2_data_city city names zh-CN; # 杭州$geoip2_data_city_longitude location longitude; # 120.161200$geoip2_data_city_latitude location latitude; # 30.299400$geoip2_data_city_time_zone location time_zone; # "Asia/Shanghai"}
温馨提示: 当请求来自受信任的地址时,将使用“X-Forwarded-For”请求标头字段中的地址, 并且设置 geoip2_proxy_recursive < on | off >
指令。
如果递归搜索被禁用,那么将使用“X-Forwarded-For”中发送的最后一个地址,而不是与一个受信任地址匹配的原始客户端地址。
如果启用了递归搜索,那么将使用“X-Forwarded-For”中发送的最后一个非信任地址,而不是与可信地址之一匹配的原始客户端地址。
模块使用参考地址:https://github.com/leev/ngx_http_geoip2_module/#example-usage
Geoip2 模块编译动态链接库
描述: 有可能此时你通过源码编译方式安装 Nginx 了 ,那如何加入新的Nginx模块呢?
答: 那就是重新编译 Nginx 即可,我们不需要执行make install
重新安装 Nginx 具体操作如下所示。
温馨提示: 如果你没有Nginx二进制安装环境,可以访问【运维实践-最新Nginx二进制构建编译lua-nginx-module动态链接Lua脚本访问Redis数据库读取静态资源隐式展现】文章,并按照其流程进行二进制编译构建Nginx当前最新的稳定版本 1.22.0
Step 1.执行nginx -v
获取原编译构建的参数。
nginx version: nginx/1.22.0built by gcc 9.4.0 (Ubuntu 9.4.0-1ubuntu1~20.04.1)built with OpenSSL 1.1.1q 5 Jul 2022TLS SNI support enabledconfigure arguments: --prefix=/usr/local/nginx --with-pcre=../pcre-8.45 ...... --with-ld-opt=-Wl,--as-needed,-O1,--sort-common
Step 2.此处补充一点,你完全可按照自身需求使用--add-module
进行静态链接库安装,或者使用--add-dynamic-module
进行动态链接库安装。
# 动态链接库安装模块 (绝对或者相对路径)--add-dynamic-module=../ngx_http_geoip2_module-3.4--add-dynamic-module=/usr/local/src/ngx_http_geoip2_module-3.4# 静态链接库生成模块--add-module=../ngx_http_geoip2_module-3.4
Step 3.将步骤1获取的参数加入到./configure
, 并在末尾添加上--add-dynamic-module=/usr/local/src/ngx_http_geoip2_module-3.4
, 以重新构建支持 geoip2 模块的 nginx 二进制文件。
cd usr/local/src/nginx-1.22.0/# 预编译参数./configure --prefix=/usr/local/nginx --user=nginx --group=nginx --with-pcre=../pcre-8.45 --with-zlib=../zlib-1.2.12 --with-openssl=../openssl-1.1.1q --sbin-path=/usr/sbin/nginx --conf-path=/usr/local/nginx/nginx.conf --pid-path=/usr/local/nginx/nginx.pid --error-log-path=/var/log/nginx/error.log --http-log-path=/var/log/nginx/access.log --lock-path=/var/run/nginx.lock --modules-path=/usr/local/nginx/modules --http-client-body-temp-path=/var/cache/nginx/client_temp --http-proxy-temp-path=/var/cache/nginx/proxy_temp --http-fastcgi-temp-path=/var/cache/nginx/fastcgi_temp --http-uwsgi-temp-path=/var/cache/nginx/uwsgi_temp --http-scgi-temp-path=/var/cache/nginx/scgi_temp --with-threads --with-http_sub_module --with-http_v2_module --with-http_auth_request_module --with-http_realip_module --with-http_secure_link_module --with-http_gunzip_module --with-http_gzip_static_module --with-http_ssl_module --with-http_slice_module --with-http_stub_status_module --with-http_dav_module --with-http_flv_module --with-http_mp4_module --with-stream --with-stream_realip_module --with-stream_ssl_module --with-stream_ssl_preread_module --with-stream_geoip_module --with-mail --with-mail_ssl_module --with-http_addition_module --with-http_random_index_module --with-compat --with-file-aio --with-cc-opt='-Os -fomit-frame-pointer -g' --with-ld-opt=-Wl,-rpath,/usr/local/luajit/lib,--as-needed,-O1,--sort-common --add-module=/usr/local/src/ngx_devel_kit-0.3.1 --add-module=/usr/local/src/lua-nginx-module-0.10.21 --add-dynamic-module=/usr/local/src/echo-nginx-module-0.62 --add-dynamic-module=/usr/local/src/ngx_http_geoip2_module-3.4# 编译构建make# 编译后将会在objs目录生成动态链接库,我们需复制到 usr/local/nginx/modules$ ls objs/*.soobjs/ngx_http_geoip2_module.so objs/ngx_stream_geoip2_module.so$ cp -a objs/*.so usr/local/nginx/modules$ ls usr/local/nginx/modulesngx_http_echo_module.so ngx_http_geoip2_module.so ngx_stream_geoip2_module.so# 然后使用objs目录中生成的 nginx 二进制文件覆盖 usr/sbin/nginx$ cp -a objs/nginx usr/sbin/nginx$ make upgrade# 最后执行此命令验证安装是否成功nginx -V
GeoLite2 数据库下载
描述: Nginx 的 ngx_*_geoip2_module
模块依赖于 GeoLite2 数据库, 免费的 GeoLite2 数据库可从 Maxminds 网站获得(需要注册),GeoLite2 数据库基于 IP 地址的数据库和 Web 服务,提供有关地理位置、人口统计和用户以及匿名者的数据。
如果你想下载与更新 GeoLite2 数据库,您需要拥有 MaxMind 帐户 ID 和许可证密钥, 并且当我们在 nginx 中使用则该 GeoIP2 模块,在我们请求时Nginx时根据IP地址来识别来源国家城市,但是我们需要提前下载载该数据库.
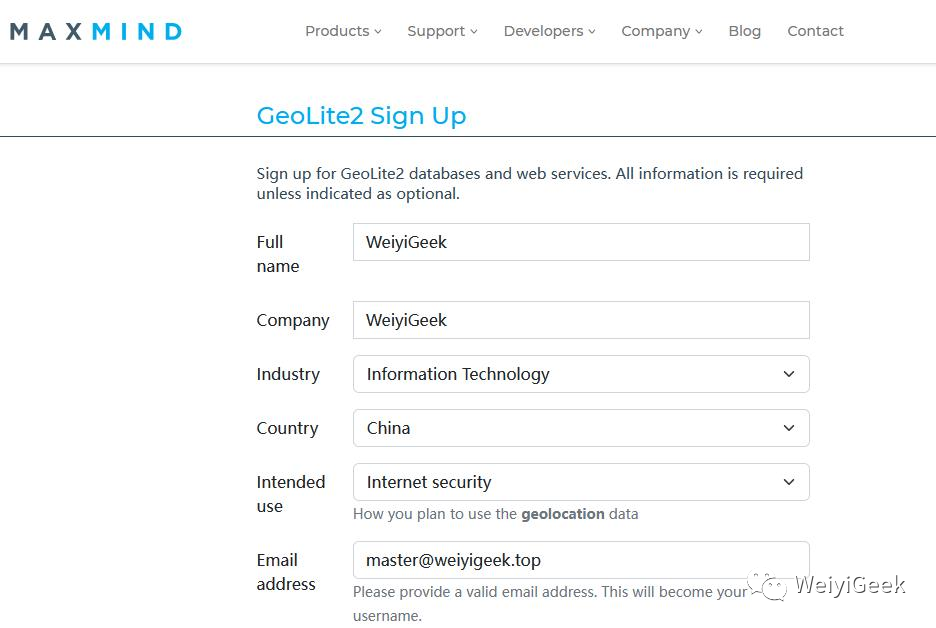
简单流程: 首先访问 Maxminds
官网,然后注册登陆到用户后台,创建并获取 License Key
, 最后下载 GeoLite2 数据库该压缩包,里面包含的是二进制mmdb格式的库文件。
Maxminds 官网地址: https://maxmind.com
GeoIP2 Web 服务演示(每天25次限额):https://www.maxmind.com/en/geoip2-precision-demo?ip_address=223.6.6.6
Locate My IP Address : https://www.maxmind.com/en/locate-my-ip-address
如果无法登录官网或者你不想注册登陆,也可以下载博主已经从官网下载好的 GeoIP2 数据库。
GeoLite2 数据库下载地址: http://share.weiyigeek.top/d/36158960-50280983-746907 (访问密码: 2088)
温馨提示: 如提示证书不对,请点击高级继续访问即可.
实践流程
Step 1.访问并登陆maxmind.com官网,此处我已经注册了账号,就不在演示如何注册了,如果没有注册的朋友可以安装如下提示进行注册(https://support.maxmind.com/hc/en-us/articles/4407099783707-Create-an-Account),相信大家都没问题。
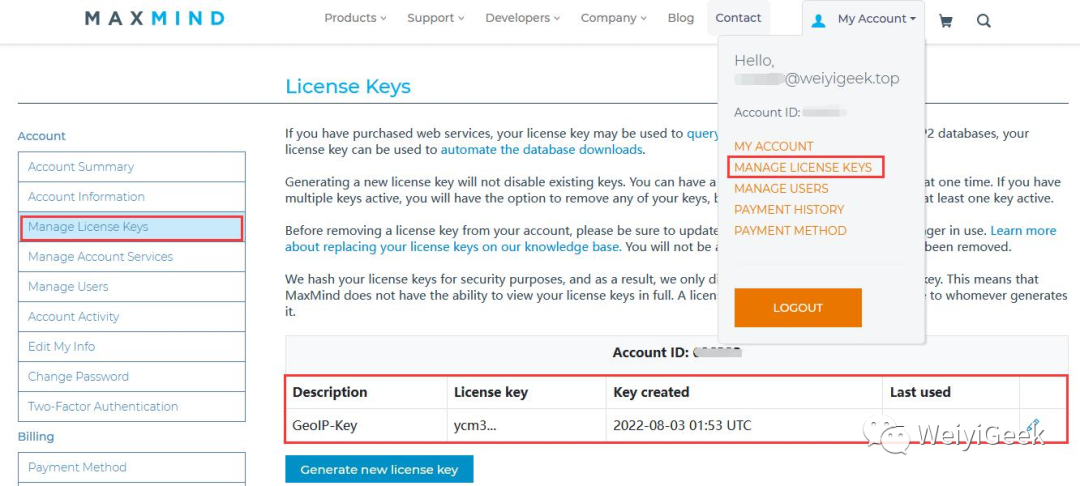
Step 2.登陆后点击 Account 用户-> Manage License Keys 管理许可 -> 生成许可,然后将会看见 New license key successfully created
提示,其中请记录号 Account/User ID 与 License key ,以备后续使用。
Step 3.随后点击右边的GeoIP2
选项卡中的 Download Files
, 你可安装需要下载 Country 国家
或者 City 城市
的数据,上述下载连接中我们已经下载了如图中的两个压缩包。
官方下载地址: https://www.maxmind.com/en/accounts/<your user account id>/geoip/downloads
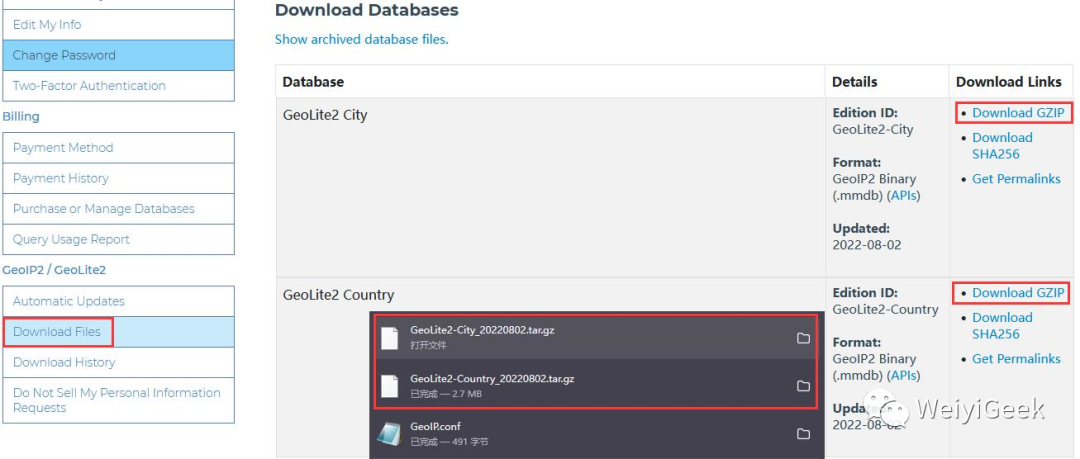
Step 4.下载后上传到Nginx服务器并解压到 /usr/local/GeoIP2
目录之中。
# 若不存在该目录请创建mkdir -vp usr/local/GeoIP2# 解压数据库ls ~GeoLite2-City_20220802.tar.gz GeoLite2-Country_20220802.tar.gztar -zxf GeoLite2-City_20220802.tar.gztar -zxf GeoLite2-Country_20220802.tar.gz# 将 mmdb 文件复制到 usr/local/GeoIP2 目录下mv GeoLite2-City_20220802/GeoLite2-City.mmdb usr/local/GeoIP2/mv GeoLite2-Country_20220802/GeoLite2-Country.mmdb usr/local/GeoIP2/rm -rf GeoLite2-City_20220802/ GeoLite2-Country_20220802/# 查看解压到 usr/local/GeoIP2/ 后的 GeoIP2 数据库$ tree usr/local/GeoIP2//usr/local/GeoIP2/├── GeoLite2-City.mmdb└── GeoLite2-Country.mmdb
Step 5.验证GeoIP模块部署环境,我们需要针对nginx相关配置文件进行如下配置:
# 1.在 nginx.conf 中进行如下几个关键部分配置。$ vim nginx.confworker_processes auto;# -- 关键点: 加载 geoip2 模块动态链接库load_module modules/ngx_http_geoip2_module.so;load_module modules/ngx_stream_geoip2_module.so;....http {...# -- 关键点: 日志格式log_format demo '$remote_addr - [ $geoip2_country_code $geoip2_data_city_name ] - $remote_user [$time_local] "$request" ''$status $body_bytes_sent "$http_referer" ''"$http_user_agent" "$http_x_forwarded_for" rt=$request_time urt=$upstream_response_time';# -- 关键点: geoip 模块变量绑定geoip2 usr/local/GeoIP2/GeoLite2-Country.mmdb {$geoip2_country_code country names en;}geoip2 usr/local/GeoIP2/GeoLite2-City.mmdb {$geoip2_data_country_name country names en;$geoip2_data_country_code default=China source=$remote_addr country iso_code;$geoip2_data_city_name city names en;$geoip2_data_province_name subdivisions 0 names en;$geoip2_data_province_isocode subdivisions 0 iso_code;$geoip2_continent_code continent code;}...}# 2.在 demo.conf 配置如下 location 以验证 GeoIP。server {....# -- 关键点: 访问日志设置access_log var/log/nginx/demo-${logdate}.log demo;...# -- 关键点: 该路径显示当前请求访问地址信息location = api/v1/info {default_type text/plain;return 200 "$remote_addr\n geoip2_country_code=$geoip2_country_code\n geoip2_data_country_name=$geoip2_data_country_name \n geoip2_data_country_code=$geoip2_data_country_code \n geoip2_data_city_name=$geoip2_data_city_name \n geoip2_continent_code=$geoip2_continent_code \n geoip2_data_province_name=$geoip2_data_province_name \n geoip2_data_province_isocode=$geoip2_data_province_isocode";}...}
Step 6.配置完成后检查nginx配置并重载nginx执行如下命令即可 nginx -t && nginx -s reload
, 然后使用浏览器进行访问 http://demo.weiyigeek.top/api/v1/info
验证,将会输入如下信息。
222.177.***.***geoip2_country_code=Chinageoip2_data_country_name=Chinageoip2_data_country_code=CNgeoip2_data_city_name=geoip2_continent_code=ASgeoip2_data_province_name=geoip2_data_province_isocode=
至此,GeoIP2 模块的所需环境的搭建就完毕了,更多模块示例请参考 ngx_http_geoip2_module
文档 , 下一章节将进行实战讲解该模块的使用。
GeoLite2 数据库自动更新
描述: 为了保证数据库中国家与城市的准确性,我们需要设置cron定时任务来更新MaxMind提供的GeoLite2-Country.mmdb
或者GeoLite2-City.mmdb
数据库库, 以保证其数据库保持最新。
操作流程
Step 1.使用apt命令帮助配置和更新 GeoIP2 GeoLite2 的软件包。
apt install -y geoipupdate
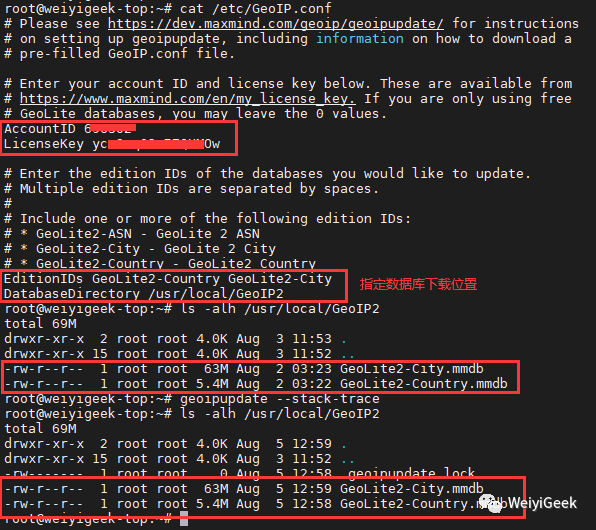
Step 2.使用文本编辑器打开并编辑位于 /etc/GeoIP.conf
的 MaxMind GeoIP conf
文件, 使用上述步骤获取的 AccountID 和 LicenseKey 字段信息填入其文件中, 之后便可执行进行地理位置数据库,操作后如下图所示
$ tee etc/GeoIP.conf <<'EOF'AccountID 696302LicenseKey ycm3xq02oE7QXMOwEditionIDs GeoLite2-Country GeoLite2-CityDatabaseDirectory /usr/local/GeoIP2EOFls -alh usr/local/GeoIP2 # 手动更新前geoipupdate --stack-tracels -alh usr/local/GeoIP2 # 手动更新后
Step 3.为了方便运维管理我们可以创建定时任务自动更新,提高工作效率。
# 查询执行文件绝对路径$ which geoipupdate/usr/bin/geoipupdate# 每周天的凌晨更新数据库$ crontab -e0 * * * 6 usr/local/bin/geoipupdate > var/log/geoipupdate.log 2>&1
官网更新参考地址: https://dev.maxmind.com/geoip/updating-databases?lang=en.
0x02 实践使用
1.使用GeoIP2模块请求客户端的IP地址国家省份经纬度展示
描述: 本次实践将根据请求者的国家显示中文或者英文的IP地址位置等相关信息在网页上,通过前面的学习,我们知道 geoip2 在检索有关 geoip 数据库的元数据时,其语法格式为 $variable_name metadata <field>
,
实践流程
Step 1.编辑Nginx.conf主配置文件在 http 片段中,自定义定义访问日志格式后加入如下两个 geoip2 指令片段。
http {.....geoip2 usr/local/GeoIP2/GeoLite2-Country.mmdb {# 启用自动重新加载将使 nginx 以指定的时间间隔检查数据库的修改时间,如果发生更改则重新加载。auto_reload 7d;$geoip2_country_code country names en;}geoip2 usr/local/GeoIP2/GeoLite2-City.mmdb {# 中国IP访问都显示中文$geoip2_data_country "default=中国" source=$remote_addr country names zh-CN; # 中国$geoip2_data_country_code country iso_code; # CN$geoip2_data_country_continent continent names zh-CN; # 亚洲$geoip2_data_country_continent_code continent code; # AS$geoip2_data_province_name subdivisions 0 names zh-CN; # 浙江省$geoip2_data_province_isocode subdivisions 0 names iso_code; # "ZJ"$geoip2_data_city city names zh-CN; # 杭州$geoip2_data_city_longitude location longitude; # 120.161200$geoip2_data_city_latitude location latitude; # 30.299400$geoip2_data_city_time_zone location time_zone; # "Asia/Shanghai"# 中国以外的访问都是显示英文$geoip2_data_country_en "default=United States" source=$remote_addr country names en; # United States$geoip2_data_country_code country iso_code; # US$geoip2_data_country_continent_en continent names en; # North America$geoip2_data_country_continent_code continent code; # NA$geoip2_data_province_name_en subdivisions 0 names en; # ""$geoip2_data_province_isocode subdivisions 0 names iso_code; # ""$geoip2_data_city city names en; # 杭州$geoip2_data_city_longitude location longitude; # 120.161200$geoip2_data_city_latitude location latitude; # 30.299400$geoip2_data_city_time_zone location time_zone; # "Asia/Shanghai"}....map $geoip2_data_country_code $CN {CN yes;TW yes;HK yes;MO yes;default no;}}
Step 2.同样编辑
conf.d/demo.conf
, 此处使用虚拟主机头(demo.weiyigeek.top)做演, 加入如下指令片段,其主要作用是根据区其地区,使用中英文显示请求者IP地理位置信息。
$ vim conf.d/demo.confserver {...# 精准匹配location = api/v1/ip {# 当访问者IP来自 `CN|TW|HK|MO` 时将会以json的形式进行返回中文的IP地址信息。if ( $geoip2_data_country_code ~* (CN|TW|HK|MO) ){rewrite (.*) api/v1/ip/cn last;}rewrite (.*) api/v1/ip/en last;}# 中文显示location api/v1/ip/cn {default_type application/json;return 200 '{"ip":"$remote_addr","country":{"name": "$geoip2_data_country", "iso_code": "$geoip2_data_country_code", "continent": "$geoip2_data_country_continent","continent_code": "$geoip2_data_country_continent_code"},"province":{"name":"$geoip2_data_province_name","iso_code":"$geoip2_data_province_isocode"},"city":{"name":"$geoip2_data_city","timezone":"$geoip2_data_city_time_zone"},"location":{"longitude":"$geoip2_data_city_longitude","latitude":"$geoip2_data_city_latitude"}}';}# 英文显示location api/v1/ip/en {default_type application/json;return 200 '{"ip":"$remote_addr","country":{"name": "$geoip2_data_country_en", "iso_code": "$geoip2_data_country_code", "continent": "$geoip2_data_country_continent_en","continent_code": "$geoip2_data_country_continent_code"},"province":{"name":"$geoip2_data_province_name_en","iso_code":"$geoip2_data_province_isocode"},"city":{"name":"$geoip2_data_city","timezone":"$geoip2_data_city_time_zone"},"location":{"longitude":"$geoip2_data_city_longitude","latitude":"$geoip2_data_city_latitude"}}';}....}
Step 3.配置 nginx 核验与重载 nginx 服务, 此处使用不同的网络使用浏览器进行访问
https://demo.weiyigeek.top/api/v1/ip
验证, 结果如下图所示:。
nginx -t && nginx -s reload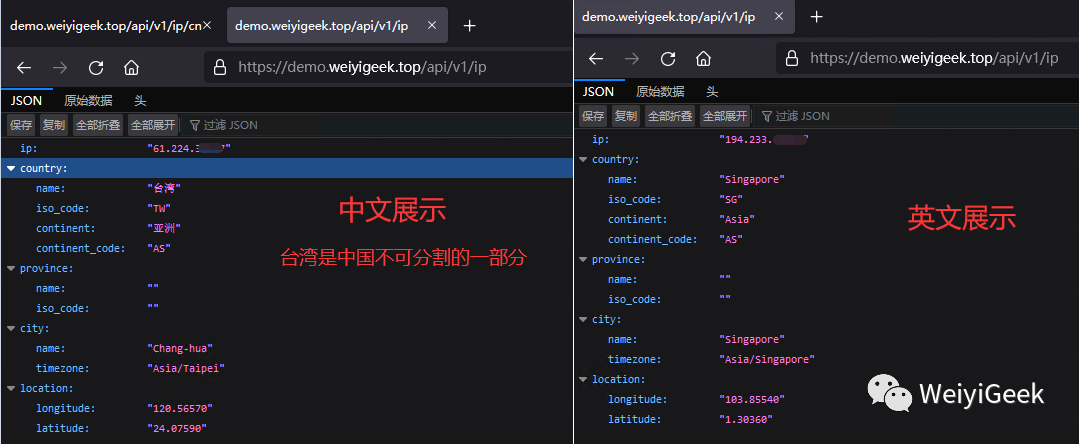
2.使用GeoIP2模块静止某一国家地区的IP地址访问网站
描述: 为了减少国外的攻击,我们可以将指定的地区IP访问进行放行,除此之外的全部拒绝。
实际流程:
Step 1.在 nginx.conf 中添加 map 指令并进行如下配置, 预定义了可以访问网站的地区。
http {
....
map $geoip2_data_country_code $allow_visit {
CN yes;
TW yes;
HK yes;
MO yes;
default no;}
....
}
温馨提示:
map 指令是由ngx_http_map_module模块提供的,默认情况下安装 nginx 都会安装该模块.
map 的主要作用是'创建自定义变量',通过使用 nginx 的'内置'变量,去'匹配'某些特定规则; 如果匹配成功则设置某个值给自定义变量,而这个'自定义变量'又可以'用作他用'。
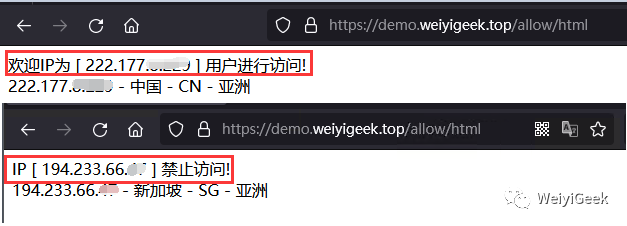
Step 2.在demo.conf配置文件中添加一个访问验证的示例。
# 访问该页面如果$allow_visit变量不为yes则返回403页面,否则返回访问者的IP地区信息。location /allow/html {default_type text/html;if ($allow_visit != yes ) {return 403 "IP [ $remote_addr ] 禁止访问! <br> $remote_addr - $geoip2_data_country - $geoip2_data_country_code - $geoip2_data_country_continent";}return 200 "欢迎IP为 [ $remote_addr ] 用户进行访问! <br> $remote_addr - $geoip2_data_country - $geoip2_data_country_code - $geoip2_data_country_continent";}
Step 3.同样修改完成后,我们需要针对nginx配置核验与重新加载配置
nginx -t && nginx -s reload
(PS: 后续将不再提示了,想必大家都聊熟于心了), ,之后分别使用工具进行访问验证,结果如下所示。
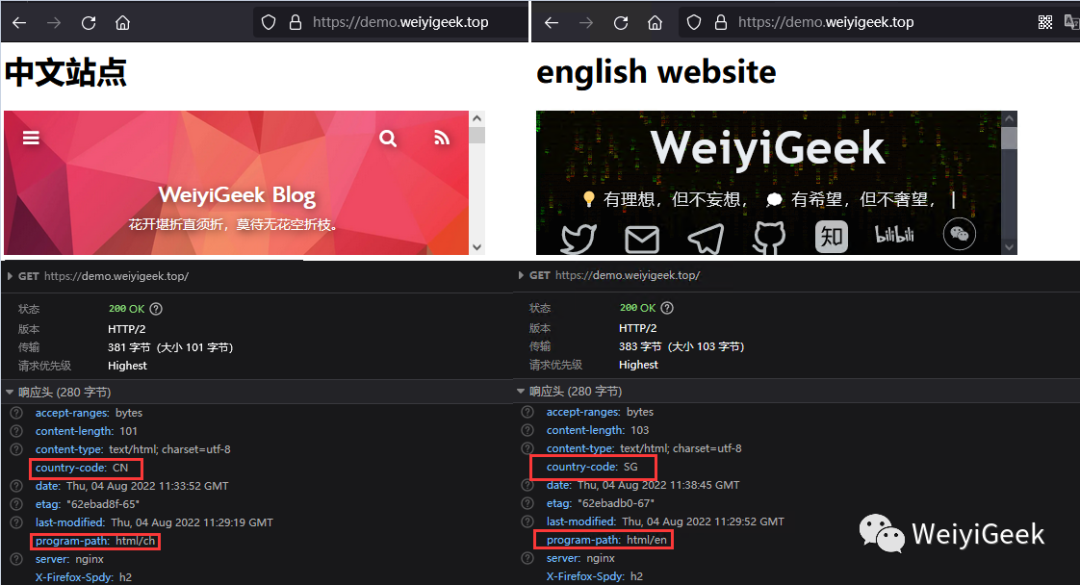
3.使用GeoIP2模块实现不同国家访问进入不同目录页面
描述: 在某些时刻我们可能会对不同地区来源访问的客户展示不同的页面,例如国内我就显示中文的页面,而新加坡我就显示英文的页面,这样一来就更加人性化一点。
示例演示
在/usr/local/nginx/html
目录中创建ch/en
子目录,同时准备两个不同地区访问的测试页面:
$ tree /usr/local/nginx/html
├── ch
│ └── index.html
├── en
│ └── index.html$ cat ch/index.html
<h1>中文站点</h1>
<iframe src="https://blog.weiyigeek.top" frameborder="0" width="500"></iframe>
Nginx 配置中使用GeoIP处理访问请求。
http {....map $geoip2_data_country_code $lang_ch {CN yes;TW yes;HK yes;MO yes;default no;}....server {listen 80;server_name demo.weiyigeek.top;location / {set $rootpath html/ch; # 关键点设置一个根目录变量。if ($lang_ch = no) {set $rootpath html/en;}add_header program-path $rootpath; # 关键点写入到响应头中。add_header country-code $geoip2_data_country_code;root $rootpath;index index.html index.htm;}}}
访问结果:
0x0n 入坑出坑
问题1.非二进制方式安装Nginx GeoIP过程中可能会出现的错误问题如下,也帮大家列举出解决办法。
错误信息:
错误1:./configure: error: C compiler cc is not found。
错误2:./configure: error: the HTTP rewrite module requires the PCRE library.
错误3:./configure: error: the HTTP gzip module requires the zlib library.
错误4:./configure: error: the HTTP XSLT module requires the libxml2/libxslt。
错误5:./configure: error: the HTTP image filter module requires the GD library.
错误6:./configure: error: SSL modules require the OpenSSL library.
解决办法:
sudo apt install gcc libpcre3 libpcre3-dev zlib1g-dev libxslt-dev libgd-dev libssl-dev
问题2: 如果在进行Nginx编译时出现 ./configure: error: the GeoIP module requires the GeoIP library.You can either do not enable the module or install the library.
问题提示时解决方法。
解决方式: 可以执行如下命令apt install -y libgeoip-dev
命令进行解决。
本文至此完毕,更多技术文章,尽情期待下一章节!
原文地址: https://blog.weiyigeek.top/2022/7-3-678.html
 往期相关文章
运维实践-最新Nginx二进制构建编译lua-nginx-module动态链接Lua脚本访问Redis数据库读取静态资源隐式展现
工作效率-十五分钟让你快速入门学习Markdown语法到精通排版实践(备忘录)
运维实践-使用WebP Server Go无缝转换图片为Google的webp格式让你网站访问加载速度飞起来
企业运维实践-如何在K8S集群环境Gitlab+Jenkins+Jmeter+Grafana技术中实现自动化分布压力测试数据展示
如何使用Grafana+Loki+Promtail日志聚合系统针对Kubernetes集群中Pods应用日志采集搜索展示
还不会部署高可用的kubernetes集群?企业DevOps实践之使用kubeadm方式安装高可用k8s集群v1.23.7
如何在Kubernetes集群中使用kubectl工具来进行管理多个外部K8S集群接入与资源操作?
实践使用Python编写对行程码图片内容批量识别的API接口

欢迎各位志同道合的朋友一起学习交流,如文章有误请在下方留下您宝贵的经验知识,个人邮箱地址【master#weiyigeek.top】
或者个人公众号【WeiyiGeek】
联系我。
更多文章来源于【WeiyiGeek Blog 个人博客 - 为了能到远方,脚下的每一步都不能少 】
个人主页: 【 https://weiyigeek.top】
博客地址: 【 https://blog.weiyigeek.top 】

专栏书写不易,如果您觉得这个专栏还不错的,请给这篇专栏 【点个赞、投个币、收个藏、关个注,转个发,留个言】(人间六大情),这将对我的肯定,谢谢!。
echo "【点个赞】,动动你那粗壮的拇指或者芊芊玉手,亲!"
printf("%s", "【投个币】,万水千山总是情,投个硬币行不行,亲!")
fmt.Printf("【收个藏】,阅后即焚不吃灰,亲!")
console.info("【转个发】,让更多的志同道合的朋友一起学习交流,亲!")
System.out.println("【关个注】,后续浏览查看不迷路哟,亲!")
cout << "【留个言】,文章写得好不好、有没有错误,一定要留言哟,亲! " << endl;

更多网络安全、系统运维、应用开发、物联网实战、全栈文章,尽在【个人博客 - https://blog.weiyigeek.top】站点,谢谢支持!
帅哥、美女、大佬们点个【赞+在看】吧! 👇
↓👇↓ 点击【"阅读原文"】,即可获取更多知识!
