[root@itlaoxin63 ~]# rm -Rf / #执行不成功的, rm: 在"/" 进行递归操作十分危险
rm: 使用 --no-preserve-root 选项跳过安全模式[root@itlaoxin63 ~]# rm -rf /* #这个可以执行成功。
ext4 文件系统上删除文件,可以恢复: extundelete ,ext3 恢复使用:ext3grep windows 恢复误删除的文件: final data v2.0 汉化版 和 easyrecovery
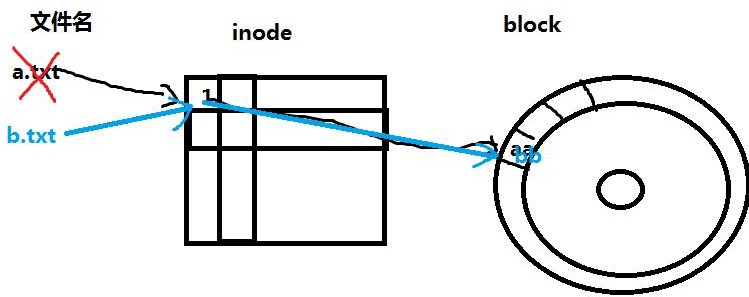
Linux 文件系统由三部分组成:文件名,inode,block windows 也由这三部分组成。
[root@itlaoxin63 ~]# cp /etc/passwd a.txt [root@itlaoxin63 ~]# ls a.txt
常识: 每个文件,有一个 inode 号。[root@itlaoxin63 ~]# ls -i a.txt 440266 a.txt
查看 inode 中的文件属性; 通过 stat 命令查看 inode 中包含的内容[root@itlaoxin63 ~]# stat a.txt # 查 看 inode 信 息 : [root@itlaoxin63 ~]# ls -l a.txt
-rw-r--r-- 1 root root 1720 Oct 25 10:21 a.txt
为什么删除比复制快?
误删除文件后,第一件事要做什么??? 你不心删除把存了几十年的大片删除了。避免误删除的文件内容被覆盖。 如何避免?
实战:在 ext4 文件系统上恢复被误删除的文件下载 extundelete
http://sourceforge.net/ 开源软件发布中心准备测试分区:
[root@itlaoxin63 /]# fdisk /dev/sdb #创建一个 sdb1 分区
WARNING: DOS-compatible mode is deprecated. It's strongly recommended to switch off the mode (command 'c') and change display units to sectors (command 'u').
Command (m for help): p #查看现有分区表
Disk /dev/sda: 21.5 GB, 21474836480 bytes
255 heads, 63 sectors/track, 2610 cylinders
Units = cylinders of 16065 * 512 = 8225280 bytes Sector size (logical/physical): 512 bytes / 512 bytes I/O size (minimum/optimal): 512 bytes / 512 bytes Disk identifier: 0x000b8b35
Device Boot Start End Blocks Id System
/dev/sda1 * 1 26 204800 83 Linux Partition 1 does not end on cylinder boundary.
26 | 1301 | 10240000 | 83 | Linux | |
1301 | 1428 | 1024000 | 82 | Linux swap / Solaris |
Command (m for help): n #创建一个新分区Command action
p primary partition (1-4) p #创建一个主分区
First cylinder (1428-2610, default 1428):
Last cylinder, +cylinders or +size{K,M,G} (1428-2610, default 2610): +1G #指定分区大小
Command (m for help): w # 保 存The partition table has been altered!
Calling ioctl() to re-read partition table.
WARNING: Re-reading the partition table failed with error 16: Device or resource busy.
The kernel still uses the old table. The new table will be used at the next reboot or after you run partprobe(8) or kpartx(8) Syncing disks.
[root@itlaoxin63 ~]# partx -a /dev/sdb #获得新分区表
[root@itlaoxin63 /]# mkdir /tmp/sdb1 #创建挂载点[root@itlaoxin63 ~]# mkfs.ext4 /dev/sdb1 #格式化[root@itlaoxin63 ~]# mount /dev/sdb1 /tmp/sdb1/ #挂载
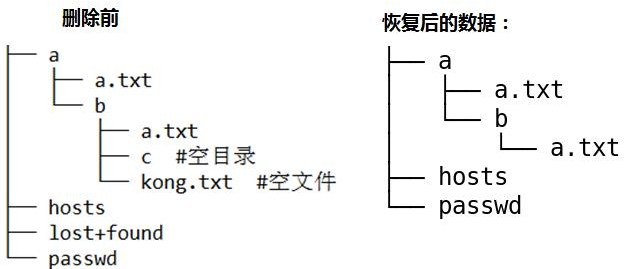
[root@itlaoxin63 ~]# mkdir -p /tmp/sdb1/a/b/c [root@itlaoxin63 ~]# cp a.txt /tmp/sdb1/a/ [root@itlaoxin63 ~]# cp a.txt /tmp/sdb1/a/b/ [root@itlaoxin63 ~]# touch /tmp/sdb1/a/b/kong.txt 安装 tree 命令:
[root@itlaoxin63 ~]# rpm -ivh /mnt/Packages/tree-1.5.3-2.el6.x86_64.rpm [root@itlaoxin63 ~]# tree /tmp/sdb1/
[root@itlaoxin63 ~]# cd /tmp/sdb1/ [root@itlaoxin63 sdb1]# ls
a hosts lost+found passwd [root@itlaoxin63 sdb1]# rm -rf a hosts passwd
误删除文件后,第一件事要做什么??? 如何避免误删除的文件内容被覆盖???
卸载需要恢复文件的分区:或以只读的方式挂载[root@localhost ~]#cd /root [root@localhost ~]# umount /tmp/sdb1
从 windows 上传 extundelete 文件到 linux,安装 xmanager v5 或者CRT
[root@itlaoxin63 ~]# rpm -ivh /mnt/Packages/lrzsz-0.12.20-27.1.el6.x86_64.rpm 安装后,就有了rz命令和sz命令 需要 xshell 连接上
rz : 上传 windows 中的文件到 linux sz :下载,将 linux 中的文件传到 windows
[root@itlaoxin63 extundelete-0.2.4]# tar jxvf extundelete-0.2.4.tar.bz2 [root@itlaoxin63 ~]# cd extundelete-0.2.4
[root@itlaoxin63]# yum install e2fsprogs-devel
[root@itlaoxin63 extundelete-0.2.4]# ./configure #检查系统安装环境Echo $?
[root@itlaoxin63 extundelete-0.2.4]# make -j 4 #编译,把源代码编译成可执行的二进制文件。
-j 4 使用 4 进程同时编译,提升编译速度 或 使用 4 核CPU 同时编译。[root@itlaoxin63 extundelete-0.2.4]# make install # 安 装
方法三:恢复某个目录,如目录 a 下的所有文件: 方法四:恢复所有的文件
[root@itlaoxin63 ~]# umount /tmp/sdb1/
[root@itlaoxin63 ~]# mkdir test #创建一个目录使用于存放恢复的数据[root@itlaoxin63 ~]# cd test/
[root@itlaoxin63 test]# extundelete /dev/sdb1 --inode 2
2 | ||
11 | ||
12 | Deleted | |
13 | Deleted | |
7313 | Deleted |
扩展:ext4 文件系统的分区根目录的 inode 值为 2,xfs 分区根目录的inode 值为 64
方法 1:通过 inode 结点恢复
[root@itlaoxin63 test]# extundelete /dev/sdb1 --restore-inode 12 NOTICE: Extended attributes are not restored.
Loading filesystem metadata ... 9 groups loaded. Loading journal descriptors ... 63 descriptors loaded. [root@itlaoxin63 test]# ls
RECOVERED_FILES
[root@itlaoxin63 test]# diff /etc/passwd RECOVERED_FILES/file.12 # 没有任何输出,说明一样
方法二,通过文件名恢复
[root@itlaoxin63 test]# extundelete /dev/sdb1 --restore-file passwd
[root@itlaoxin63 test]# diff /etc/passwd RECOVERED_FILES/passwd # 没有任何输出,说明一样
方法三:恢复某个目录,如目录 a 下的所有文件:
[root@itlaoxin63 test]# extundelete /dev/sdb1 --restore-directory a [root@localhost ~]# tree RECOVERED_FILES/
RECOVERED_FILES/
├── a
│ ├── a.txt
│ └── b
│ └── a.txt
├── file.12
└── hosts
下面是原来的目录结构:
[root@itlaoxin63 ~]# tree /root/sdb1-back/a/
/root/sdb1-back/a/
├── a.txt
└── b
├── a.txt
├── c
└── kong.txt
方法四:恢复所有的文件