



关注「WeiyiGeek」公众号
设为「特别关注」每天带你玩转网络安全运维、应用开发、物联网IOT学习!

本章目录:
0x00 Gitalk - 基于Github的评论系统
1.使用Gitalk进行Github的Oauth认证无法跨域获取Token问题解决办法
1.快速介绍
2.安装部署
3.使用实践
n.入坑出坑
原文地址: https://blog.weiyigeek.top/2022/8-17-682.html
0x00 Gitalk - 基于Github的评论系统
描述: 我想对于所有使用hexo、Hugo或者WordPress自建博客的博主来说GitTalk应该不陌生,GitTalk通过Github的OpenAPI以及issues功能实现社区评论确实还是很方便的,除开对国内访问速度较慢就没啥毛病,但是考虑到新手朋友此处还是简单介绍一下。
1.快速介绍
描述: Gitalk 是一个基于 Github Issue 和 Preact 的现代评论组件。
功能:
使用 github 帐号进行身份验证
无服务器,所有评论将存储为 github 问题
个人和组织的github项目都可以用来存储评论
本地化,支持多国语言 [en, zh-CN, zh-TW, es-ES, fr, ru, de, pl, ko, fa, ja]
类似 Facebook 的无干扰模式(可以通过 DistentionFreeMode 选项启用)
热键提交评论(cmd|ctrl + enter)
项目地址:https://github.com/gitalk/gitalk
帮助文档:https://github.com/gitalk/gitalk/blob/master/readme-cn.md
温馨提示: 当前 Gitalk 最新版本为 1.7.2 (Mar 3, 2021), 如后续随着时间推移,可能会有些许变化,建议参考官网(https://github.com/gitalk/gitalk/tags)
2.安装部署
描述:安装引用Gitalk评论系统的两种方式,
安装实践
方式1.在你的HTML页面中使用 link 与 script 标签引入。
<link rel="stylesheet" href="https://cdn.jsdelivr.net/npm/gitalk@1/dist/gitalk.css"><script src="https://oss-emcsprod-public.modb.pro/wechatSpider/modb_20220818_a31ae1be-1ea3-11ed-a966-38f9d3cd240d.png"></script><!-- or --><link rel="stylesheet" href="https://unpkg.com/gitalk/dist/gitalk.css"><script src="https://unpkg.com/gitalk/dist/gitalk.min.js"></script>
方式2.使用 npm 安装 gital 模块。
# 模块安装npm i --save gitalk# 项目导入import 'gitalk/dist/gitalk.css'import Gitalk from 'gitalk'
配置实践
首先,您需要为商店评论选择一个公共 github 存储库(已存在或创建一个新存储库),然后创建一个 GitHub 应用程序,如果你没有,点击这里 (https://github.com/settings/applications/new) 注册一个新的。
Application name : BlogTalk
Homepage URL : https://blog.weiyigeek.top
Application description : 欢迎访问 WeiyiGeek blog\'s [blog.weiyigeek.top] talk about , 欢迎留言骚扰哟,亲!Authorization callback URL : https://blog.weiyigeek.top
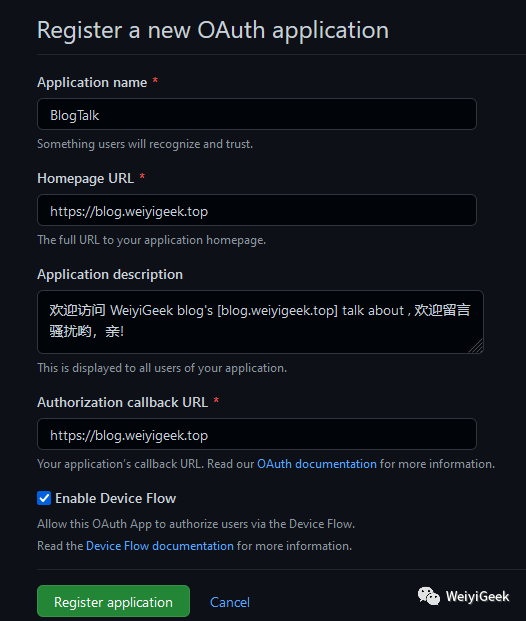
注意:您必须在授权回调 URL 字段中指定网站域 url。
然后,创建完成后你将获取Client ID 与 Client Secret,如下所示:
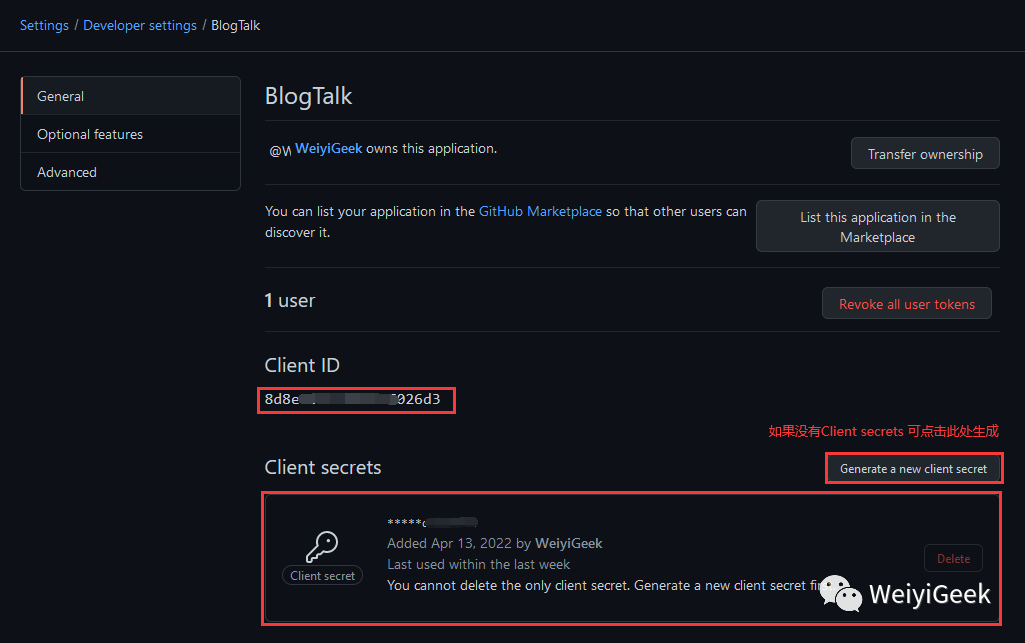
注意:后续更新修改可以进行访问 Settings/Developer settings
( https://github.com/settings/developers )
最后,创建一个公共仓库此处我创建的是blogtalk,创建完后在项目的(https://github.com/WeiyiGeek/blogtalk/settings)中启用 issue 即可
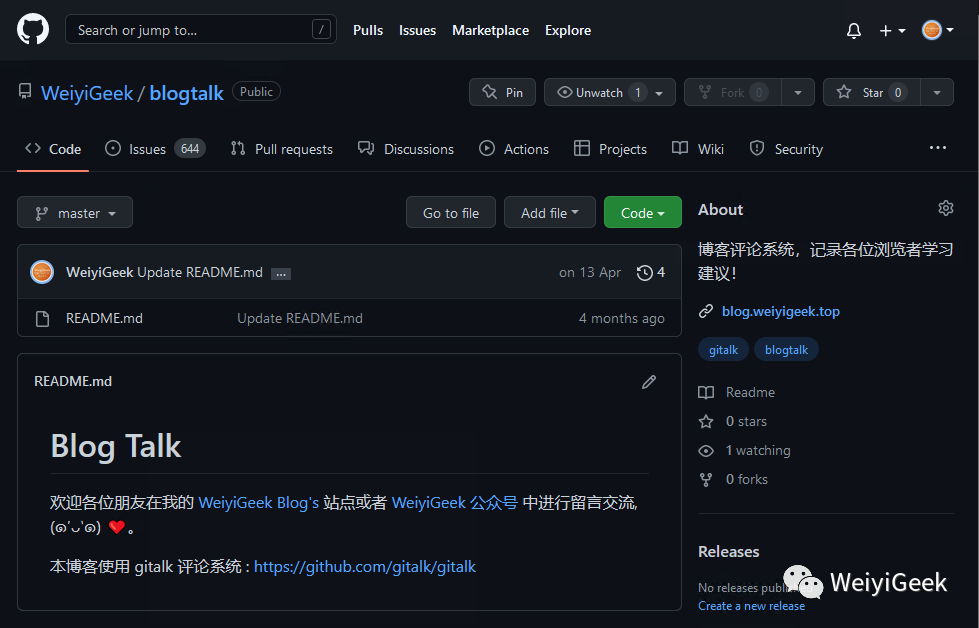
使用方式1.将如下代码添加到您的页面:
<head><link rel="stylesheet" href="https://cdn.jsdelivr.net/npm/gitalk@1/dist/gitalk.css"><script src="https://oss-emcsprod-public.modb.pro/wechatSpider/modb_20220818_a31ae1be-1ea3-11ed-a966-38f9d3cd240d.png"></script></head><body><div id="gitalk-container"></div><script>const gitalk = new Gitalk({clientID: 'GitHub Application Client ID', // 8d8e96********797026d3clientSecret: 'GitHub Application Client Secret', // secrets**********secretsrepo: 'GitHub repo', // blogtalkowner: 'GitHub repo owner', // WeiyiGeekadmin: ['GitHub repo owner and collaborators, only these guys can initialize github issues'], // ['WeiyiGeek']id: location.pathname, // Ensure uniqueness and length less than 50distractionFreeMode: false // Facebook-like distraction free mode})gitalk.render('gitalk-container')</script></body>
使用方式2.在React中使用
import GitalkComponent from "gitalk/dist/gitalk-component";// 并使用类似的组件<GitalkComponent options={{clientID: "...",// ...// options below}} >
温馨提示: Gitalk 对象实例化参数参考 (https://github.com/gitalk/gitalk#options)
3.使用实践
在 Hexo 中使用
描述: 此处以我的博客[https://blog.weiyigeek.top] 为例进行演示配置,此处笔者使用的是 hexo + mellow 主题 , 已经经过二次魔改(有需要该博客主题请在公众号回复【mellow博客主题】或者访问 https://weiyigeek.top/wechat.html?key=mellow博客主题 )。
Step 1.在 Hexo 主题中的 _config.yaml 配置加入如下配置片段。
# gittalk 评论系统gitalk:enable: trueowner: WeiyiGeek # github账号repo: blogtalk # 留言仓库proxy: /github/login/oauth/access_token # 反向代理解决跨域问题,后续将会主要讲解哦。oauth:client_id: 8d8e965c******97026d3 # Github App Auth IDclient_secret: e9c6141cb1f02f721********d01cb4d7a8f069 # Github App Auth secretperPage: 15
Step 2.在主题文档引擎中加入如下片段。
<div id="gitalk-container"></div><!-- 实际上是将 <script src="https://oss-emcsprod-public.modb.pro/wechatSpider/modb_20220818_a31ae1be-1ea3-11ed-a966-38f9d3cd240d.png"></script> js 下载到了本地 --><script type="text/javascript" src="<%- url_for(theme_js('/js/plugins/gitalk.min', cache)) %>"></script><script type="text/javascript" src="<%- url_for(theme_js('/js/custom/gitalk.init', cache)) %>"></script><!-- themes\mellow\source\js\custom\gitalk.init.js -->var gitalk = new Gitalk({clientID: '<%- theme.gitalk.oauth.client_id %>',clientSecret: '<%- theme.gitalk.oauth.client_secret %>',repo: '<%- theme.gitalk.repo %>',owner: '<%- theme.gitalk.owner %>',admin: ['<%- theme.gitalk.owner %>'],id: location.pathname,proxy: '<%- theme.gitalk.proxy %>',distractionFreeMode: true})# hexo g 生成静态文件后的样子# var gitalk = new Gitalk({# clientID: '8d8e965c******97026d3',# clientSecret: 'e9c6141cb1f02f721********d01cb4d7a8f069',# repo: 'blogtalk',# owner: 'WeiyiGeek',# admin: ['WeiyiGeek'],# id: location.pathname,# proxy: '/github/login/oauth/access_token',# distractionFreeMode: false# })# 创建 gitalk-containergitalk.render('gitalk-container')
温馨提示: 建议将distractionFreeMode
设置为false,因为True真心难看。
温馨提示: 为了 Github Apps ID 与 Secrets 的安全,我们需要针对上面 new Gitalk
实例化参数进行js加密混淆 (http://www.esjson.com/jsEncrypt.html)
n.入坑出坑
1.使用Gitalk进行Github的Oauth认证无法跨域获取Token问题解决办法
描述: 在最开始之初我们也是使用官方演示代码中,使用的第三方提供的CORS代理服务,他会默认放行所有CORS请求,但是随着而来的问题是登陆会出现网络错误 Error: Network Error 或者在使用时出现 Forbidden 错误 (https://github.com/gitalk/gitalk/issues/514) 。
目前由于该CORS代理服务遭到滥用,因此做了限制,导致GitTalk失效,在实践中发现如下CORS代理服务其要么有限制要么根本不能使用,所以实践的朋友们就不要像使用如下CORS代理服务:
# 限流https://cors-anywhere.herokuapp.com/https://github.com/login/oauth/access_token# 被墙https://cors-anywhere.azm.workers.dev/https://github.com/login/oauth/access_token
温馨提示: CORS Anywhere 是一个 NodeJS 代理,它将 CORS 标头添加到代理请求中。项目地址 (https://github.com/Rob--W/cors-anywhere)
在 百度 CSDN 中捡了一圈垃圾之后,还是没有最好的解决方案,然后通过某种方式Google了一下,找到两种替代的方式利用cloudflare worker (不幸得是默认的cf worker的域名workers.dev被墙了)或者 Vercel 搭建在线代理(无vps推荐使用Vercel)
或者 使用VPS中的nginx服务器来反代 https://github.com (比较推荐-当前博主正在使用)
。
方式1.没有VPS或者自己的服务器(想白嫖的)
描述: 在 cloudflare (https://dash.cloudflare.com/login/) 上创建一个免费的在线代理来解决gitalk授权登录跨域问题,利用CloudFlare Worker创建在线代理,不需要我们有服务器,也不需要搭建Node.js服务,只需要注册一个CloudFlare账号,创建一个Worker,部署一个JS脚本就可以了,简单方便,下面我们就来看看如何创建吧。
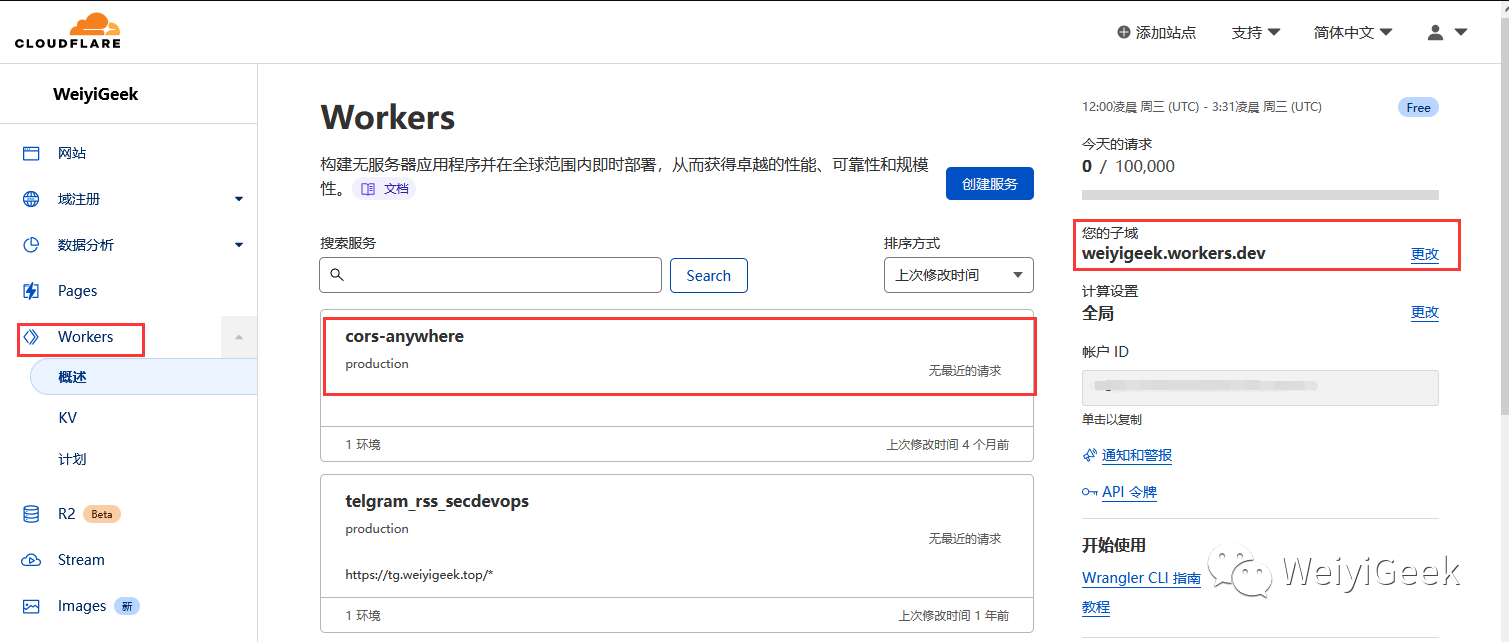
创建好之后我们便可编辑其 Worker 服务代码,如下代码也可通过 https://github.com/WeiyiGeek/SecOpsDev/tree/master/Application/Blog/Hexo/Gitalk 获得。
const exclude = []; // Regexp for blacklisted urlsconst include = [/^https?:\/\/.*weiyigeek\.top$/, ^https?:\/\/localhost/]; // Regexp for whitelisted origins e.g.const apiKeys = {EZWTLwVEqFnaycMzdhBz: {name: 'Test App',expired: false,expiresAt: new Date('2023-01-01'),exclude: [], // Regexp for blacklisted urlsinclude: ["^http.?://www.weiyigeek.top$", "weiyigeek.top$", "^https?://localhost/"], // Regexp for whitelisted origins},};// Config is all above this line.// It should not be necessary to change anything below.function verifyCredentials(request) {// Throws exception on verification failure.const requestApiKey = request.headers.get('x-cors-proxy-api-key');if (!Object.keys(apiKeys).includes(requestApiKey)) {throw new UnauthorizedException('Invalid authorization key.');}if (apiKeys[requestApiKey].expired) {throw new UnauthorizedException('Expired authorization key.');}if (apiKeys[requestApiKey].expiresAt && apiKeys[requestApiKey].expiresAt.getTime() < Date.now()) {throw new UnauthorizedException(`Expired authorization key.\nKey was valid until: ${apiKeys[requestApiKey].expiresAt}`);}return apiKeys[requestApiKey];}function checkRequiredHeadersPresent(request) {// Throws exception on verification failure.if (!request.headers.get('Origin') && !request.headers.get('x-requested-with')) {throw new BadRequestException('Missing required request header. Must specify one of: origin,x-requested-with');}}function UnauthorizedException(reason) {this.status = 401;this.statusText = 'Unauthorized';this.reason = reason;}function BadRequestException(reason) {this.status = 400;this.statusText = 'Bad Request';this.reason = reason;}function isListed(uri, listing) {let returnValue = false;console.log(uri);if (typeof uri === 'string') {for (const m of listing) {if (uri.match(m) !== null) {returnValue = true;}}} else { // Decide what to do when Origin is nullreturnValue = true; // True accepts null origins false rejects them.}return returnValue;}function fix(myHeaders, request, isOPTIONS) {myHeaders.set('Access-Control-Allow-Origin', request.headers.get('Origin'));if (isOPTIONS) {myHeaders.set('Access-Control-Allow-Methods', request.headers.get('access-control-request-method'));const acrh = request.headers.get('access-control-request-headers');if (acrh) {myHeaders.set('Access-Control-Allow-Headers', acrh);}myHeaders.delete('X-Content-Type-Options');}return myHeaders;}function parseURL(requestUrl) {const match = requestUrl.match(/^(?:(https?:)?\/\/)?(([^/?]+?)(?::(\d{0,5})(?=[/?]|$))?)([/?][\S\s]*|$)/i);// ^^^^^^^ ^^^^^^^^ ^^^^^^^ ^^^^^^^^^^^^// 1:protocol 3:hostname 4:port 5:path + query string// ^^^^^^^^^^^^^^^^^^^^^^^^^^^^^^^^^^^^// 2:hostif (!match) {console.log('no match');throw new BadRequestException('Invalid URL for proxy request.');}console.log('parseURL:match:', match);if (!match[1]) {console.log('nothing in match group 1');if (/^https?:/i.test(requestUrl)) {console.log('The pattern at top could mistakenly parse "http:///" as host="http:" and path=///.');throw new BadRequestException('Invalid URL for proxy request.');}// Scheme is omitted.if (requestUrl.lastIndexOf('//', 0) === -1) {console.log('"//" is omitted');requestUrl = '//' + requestUrl;}requestUrl = (match[4] === '443' ? 'https:' : 'http:') + requestUrl;}const parsed = new URL(requestUrl);if (!parsed.hostname) {console.log('"http://:1/" and "http:/notenoughslashes" could end up here.');throw new BadRequestException('Invalid URL for proxy request.');}return parsed;}async function proxyRequest(request, activeApiKey) {const isOPTIONS = (request.method === 'OPTIONS');const originUrl = new URL(request.url);const origin = request.headers.get('Origin');// ParseURL throws when the url is invalidconst fetchUrl = parseURL(request.url.replace(originUrl.origin, '').slice(1));// Throws if it fails the checkcheckRequiredHeadersPresent(request);// Excluding urls which are not allowed as destination urls// Exclude origins which are not int he included onesif (isListed(fetchUrl.toString(), [...exclude, ...(activeApiKey?.exclude || [])]) || !isListed(origin, [...include, ...(activeApiKey?.include || [])])) {throw new BadRequestException('Origin or Destination URL is not allowed.');}let corsHeaders = request.headers.get('x-cors-headers');if (corsHeaders !== null) {try {corsHeaders = JSON.parse(corsHeaders);} catch {}}if (!originUrl.pathname.startsWith('/')) {throw new BadRequestException('Pathname does not start with "/"');}const recvHpaireaders = {};for (const pair of request.headers.entries()) {if ((pair[0].match('^origin') === null)&& (pair[0].match('eferer') === null)&& (pair[0].match('^cf-') === null)&& (pair[0].match('^x-forw') === null)&& (pair[0].match('^x-cors-headers') === null)) {recvHpaireaders[pair[0]] = pair[1];}}if (corsHeaders !== null) {for (const c of Object.entries(corsHeaders)) {recvHpaireaders[c[0]] = c[1];}}const newRequest = new Request(request, {headers: recvHpaireaders,});const response = await fetch(fetchUrl, newRequest);let myHeaders = new Headers(response.headers);const newCorsHeaders = [];const allh = {};for (const pair of response.headers.entries()) {newCorsHeaders.push(pair[0]);allh[pair[0]] = pair[1];}newCorsHeaders.push('cors-received-headers');myHeaders = fix(myHeaders, request, isOPTIONS);myHeaders.set('Access-Control-Expose-Headers', newCorsHeaders.join(','));myHeaders.set('cors-received-headers', JSON.stringify(allh));const body = isOPTIONS ? null : await response.arrayBuffer();return new Response(body, {headers: myHeaders,status: (isOPTIONS ? 200 : response.status),statusText: (isOPTIONS ? 'OK' : response.statusText),});}function homeRequest(request) {const isOPTIONS = (request.method === 'OPTIONS');const originUrl = new URL(request.url);const origin = request.headers.get('Origin');const remIp = request.headers.get('CF-Connecting-IP');const corsHeaders = request.headers.get('x-cors-headers');let myHeaders = new Headers();myHeaders = fix(myHeaders, request, isOPTIONS);let country = false;let colo = false;if (typeof request.cf !== 'undefined') {country = typeof request.cf.country === 'undefined' ? false : request.cf.country;colo = typeof request.cf.colo === 'undefined' ? false : request.cf.colo;}return new Response('CLOUDFLARE-CORS-ANYWHERE\n\n'+ 'Source:\nhttps://github.com/chrisspiegl/cloudflare-cors-anywhere\n\n'+ 'Usage:\n'+ originUrl.origin + '/{uri}\n'+ 'Header x-cors-proxy-api-key must be set with valid api key\n'+ 'Header origin or x-requested-with must be set\n\n'// + 'Limits: 100,000 requests/day\n'// + ' 1,000 requests/10 minutes\n\n'+ (origin === null ? '' : 'Origin: ' + origin + '\n')+ 'Ip: ' + remIp + '\n'+ (country ? 'Country: ' + country + '\n' : '')+ (colo ? 'Datacenter: ' + colo + '\n' : '') + '\n'+ ((corsHeaders === null) ? '' : '\nx-cors-headers: ' + JSON.stringify(corsHeaders)),{status: 200, headers: myHeaders},);}async function handleRequest(request) {const {protocol, pathname} = new URL(request.url);// In the case of a "Basic" authentication, the exchange MUST happen over an HTTPS (TLS) connection to be secure.if (protocol !== 'https:' || request.headers.get('x-forwarded-proto') !== 'https') {throw new BadRequestException('Must use a HTTPS connection.');}switch (pathname) {case '/favicon.ico':case '/robots.txt':return new Response(null, {status: 204});case '/':return homeRequest(request);default: {// Not 100% sure if this is a good idea…// Right now all OPTIONS requests are just simply replied to because otherwise they fail.// This is necessary because apparently, OPTIONS requests do not carry the `x-cors-proxy-api-key` header so this can not be authorized.if (request.method === 'OPTIONS') {return new Response(null, {headers: fix(new Headers(), request, true),status: 200,statusText: 'OK',});}// The "x-cors-proxy-api-key" header is sent when authenticated.//if (request.headers.has('x-cors-proxy-api-key')) {// Throws exception when authorization fails.//const activeApiKey = verifyCredentials(request);// Only returns this response when no exception is thrown.return proxyRequest(request);//}// Not authenticated.//throw new UnauthorizedException('Valid x-cors-proxy-api-key header has to be provided.');}}}addEventListener('fetch', async event => {event.respondWith(handleRequest(event.request).catch(error => {const message = error.reason || error.stack || 'Unknown Error';return new Response(message, {status: error.status || 500,statusText: error.statusText || null,headers: {'Content-Type': 'text/plain;charset=UTF-8',// Disables caching by default.'Cache-Control': 'no-store',// Returns the "Content-Length" header for HTTP HEAD requests.'Content-Length': message.length,},});}),);});
部署结果: https://cors-anywhere.weiyigeek.workers.dev/ 可惜国内被墙。
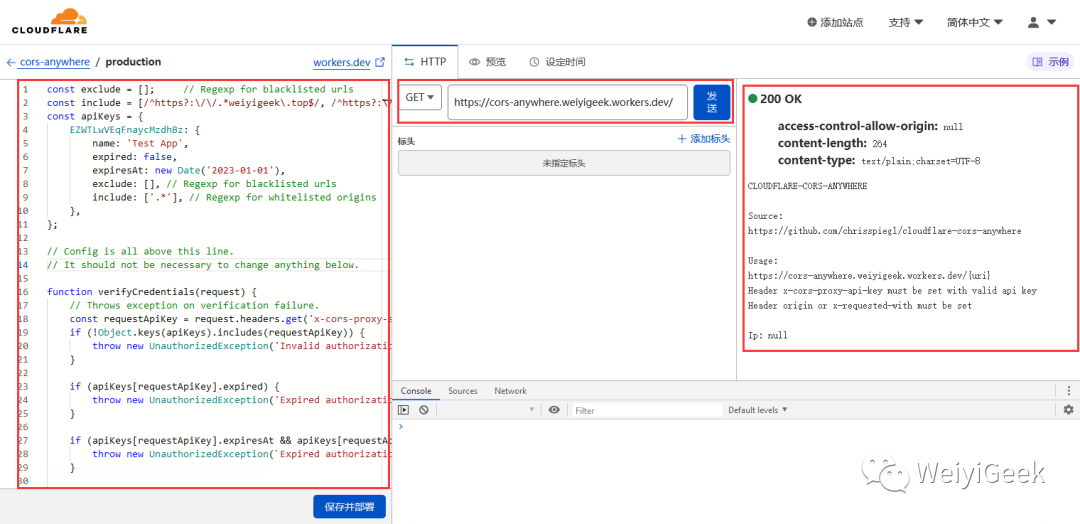
温馨提示: cloudflare 构建无服务器应用程序免费版本每天限额10万次请求,所有为了避免其它 people 恶意使用,请在使用时设置访问白名单, 上述源码来源于 (https://github.com/chrisspiegl/cloudflare-cors-anywhere)。
温馨提示: 除了使用 cloudflare 还可以使用 Vercel 免费部署node.js项目解决跨域问题,你可参考该项目 (https://github.com/Dedicatus546/cors-server) 最新推荐使用,此处就不在累述。
方式2.有公网VPS、服务器
描述: 由于我自己有VPS所以就不借用 cloudflare 与 Vercel,因为其国内网络原因,时而通畅时而有缓慢 , 此处我将使用Nginx服务在blog.conf配置Nginx文件中加入如下location指令片段
# https - www.weiyigeek.topserver {listen 80;listen 443 ssl http2;server_name blog.weiyigeek.top;# 插入 CORS 关键点add_header Access-Control-Allow-Origin '*.weiyigeek.top';add_header Access-Control-Allow-Methods 'GET,POST,OPTIONS';add_header Access-Control-Allow-Headers 'DNT,X-Mx-ReqToken,Keep-Alive,User-Agent,X-Requested-With,If-Modified-Since,Cache-Control,Content-Type,Authorization';...# 插入 Gitalk Auth Use 关键点location /github {if ($request_method = 'OPTIONS') {return 204;}proxy_pass https://github.com/; # 注意尾部斜杠不能少}...error_page 403 warn/403.html;error_page 404 warn/404.html;error_page 500 502 503 warn/500.html;error_page 504 warn/504.html;}
配置完成后检测blog.conf配置以及重载nginx服务 nginx -t && nginx -s reload
, 然后修改Hexo 主题中的 _config.yaml 将 Gitalk 的 proxy 配置为 proxy: github/login/oauth/access_token
即可。
# gittalk 评论系统gitalk:enable: trueowner: WeiyiGeek # github账号repo: blogtalk # 留言仓库proxy: /github/login/oauth/access_token # 关键点 (前台请求是https://blog.weiyigeek.top/github/login/oauth/access_token, 而实际请求是https://github.com/login/oauth/access_token,所以解决了跨域问题)oauth:client_id: 8d8e965c******97026d3 # Github App Auth IDclient_secret: e9c6141cb1f02f721********d01cb4d7a8f069 # Github App Auth secretperPage: 15
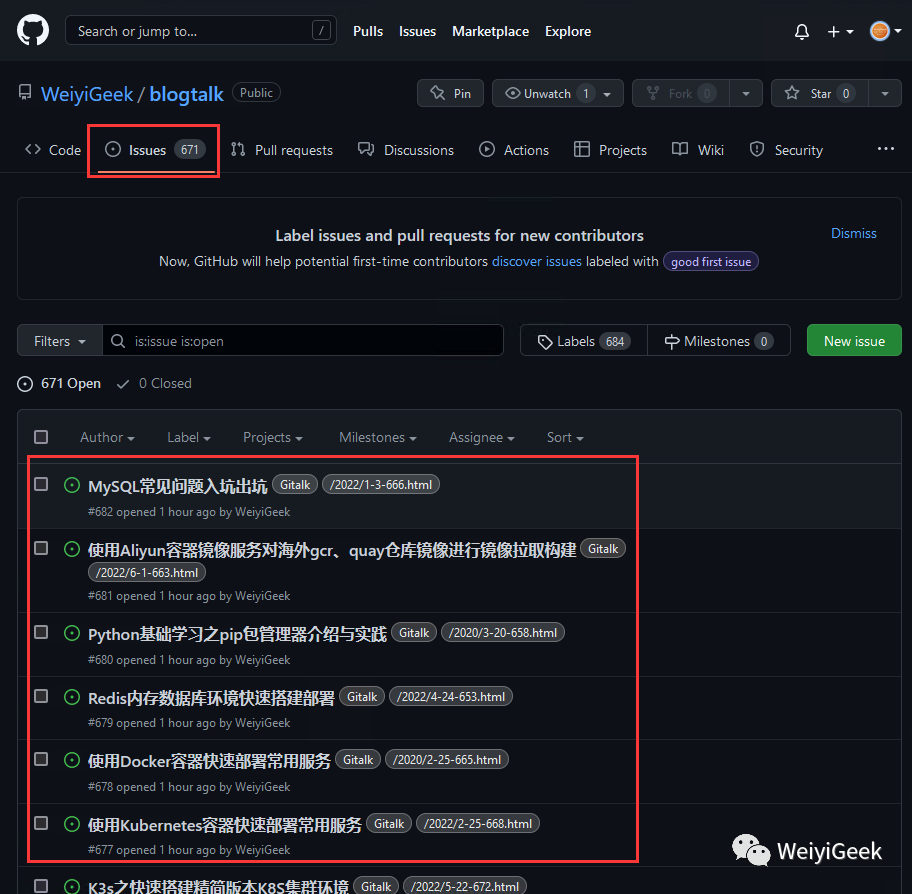
之后,我们需要批量初始每篇文章issue根据其路径/2020/3-20-658.html
,此处采用了gitalk-auto-init.js
脚本进行批量初始化文章issue。
温馨提示: 下述 gitalk-auto-init.js
脚本可以通过如下连接( https://github.com/WeiyiGeek/SecOpsDev/tree/master/Application/Blog/Hexo/Gitalk )进行获取
脚本依赖:
$ npm i -S hexo-generator-sitemap
$ npm i -D md5 moment request xml-parser
+ moment@2.29.2
+ request@2.88.2
+ md5@2.3.0
+ xml-parser@1.2.1
added 55 packages from 70 contributors in 8.467s
配置运行:
// gitalk-auto-init.js 脚本部分片段// 配置信息const config = {username: 'weiyigeek', // GitHub repository 所有者,可以是个人或者组织。对应Gitalk配置中的ownerrepo: "blogtalk", // 储存评论issue的github仓库名,仅需要仓库名字即可。对应 Gitalk配置中的repotoken: 'ghp_wnpWqL********6RIf0NR5iD', // 前面在Github中的 personal access tokensitemap: path.join(__dirname, './public/sitemap.xml'), // 自己站点的 sitemap 文件地址cache: true, // 是否启用缓存,启用缓存会将已经初始化的数据写入配置的 gitalkCacheFile 文件,下一次直接通过缓存文件判断gitalkCacheFile: path.join(__dirname, './gitalk-init-cache.json'), // 用于保存 gitalk 已经初始化的 id 列表gitalkErrorFile: path.join(__dirname, './gitalk-init-error.json'), // 用于保存 gitalk 初始化报错的数据};// sitemap.xml 示例<?xml version="1.0" encoding="UTF-8"?><urlset xmlns="http://www.sitemaps.org/schemas/sitemap/0.9"><url><loc>https://blog.weiyigeek.top/2020/5-28-588.html</loc><lastmod>2022-08-15T14:39:08.638Z</lastmod><title>Ingress-Nginx进阶学习实践扩充配置记录</title></url>....</urlset>
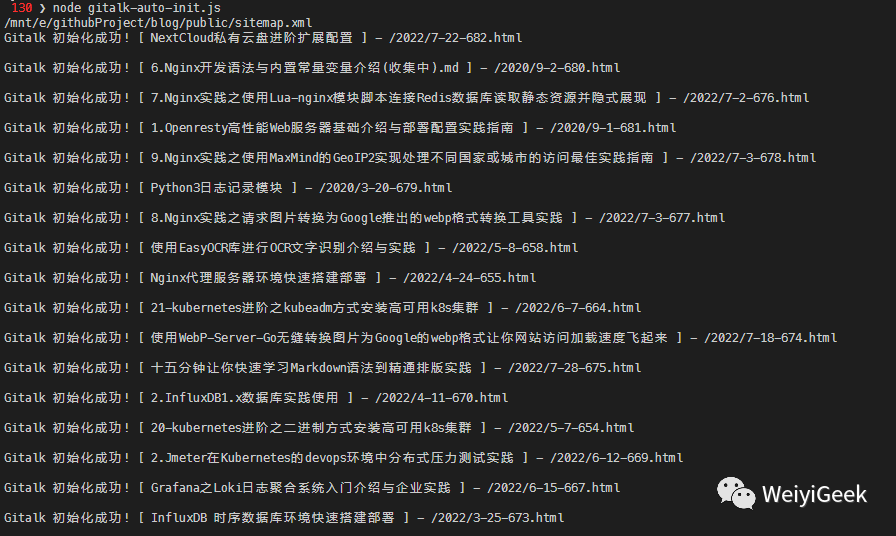
执行结果:
--------- 运行结果 ---------

报错数据:1 条。参考文件 mnt/e/githubProject/blog/gitalk-init-error.json。
本次成功:27 条。
写入缓存:90 条,已初始化 63 条,本次成功:27 条。参考文件 mnt/e/githubProject/blog/gitalk-init-cache.json。
我们也可以通过 blogtalk 项目中 issue (https://github.com/WeiyiGeek/blogtalk/issues) 查看初始化结果以及最新评论。
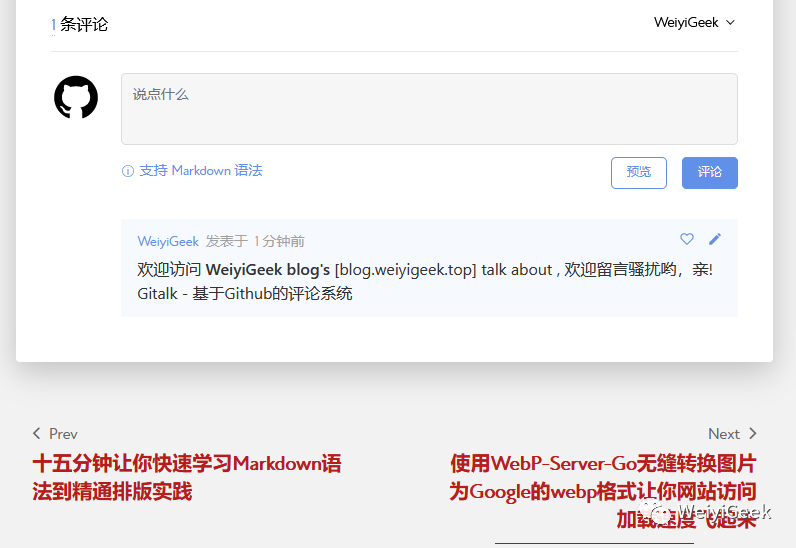
在初始化issue完成之后,我们可以找到一篇 https://blog.weiyigeek.top/about/ 文章进行留言验证。
本文至此完毕,更多技术文章,尽情期待下一章节!
原文地址: https://blog.weiyigeek.top/2022/8-17-682.html
 往期相关文章
安全运维-如何在Kubernetes中使用注释对ingress-nginx及后端应用进行安全加固配置实践
工具配置-如何在NextCloud私有云盘安装的olnyOffice插件中添加中文字体支持实践操作
企业运维实践-Nginx使用geoip2模块并利用MaxMind的GeoIP2数据库实现处理不同国家或城市的访问最佳实践指南
运维实践-最新Nginx二进制构建编译lua-nginx-module动态链接Lua脚本访问Redis数据库读取静态资源隐式展现
工作效率-十五分钟让你快速入门学习Markdown语法到精通排版实践(备忘录)
运维实践-使用WebP Server Go无缝转换图片为Google的webp格式让你网站访问加载速度飞起来
企业运维实践-如何在K8S集群环境Gitlab+Jenkins+Jmeter+Grafana技术中实现自动化分布压力测试数据展示
如何使用Grafana+Loki+Promtail日志聚合系统针对Kubernetes集群中Pods应用日志采集搜索展示
还不会部署高可用的kubernetes集群?企业DevOps实践之使用kubeadm方式安装高可用k8s集群v1.23.7

欢迎各位志同道合的朋友一起学习交流,如文章有误请在下方留下您宝贵的经验知识,个人邮箱地址【master#weiyigeek.top】
或者个人公众号【WeiyiGeek】
联系我。
更多文章来源于【WeiyiGeek Blog 个人博客 - 为了能到远方,脚下的每一步都不能少 】
个人主页: 【 https://weiyigeek.top】
博客地址: 【 https://blog.weiyigeek.top 】
学习交流群:【 https://weiyigeek.top/visit.html 】
专栏书写不易,如果您觉得这个专栏还不错的,请给这篇专栏 【点个赞、投个币、收个藏、关个注,转个发,留个言】(人间六大情),这将对我的肯定,谢谢!。
echo "【点个赞】,动动你那粗壮的拇指或者芊芊玉手,亲!"
printf("%s", "【投个币】,万水千山总是情,投个硬币行不行,亲!")
fmt.Printf("【收个藏】,阅后即焚不吃灰,亲!")
console.info("【转个发】,让更多的志同道合的朋友一起学习交流,亲!")
System.out.println("【关个注】,后续浏览查看不迷路哟,亲!")
cout << "【留个言】,文章写得好不好、有没有错误,一定要留言哟,亲! " << endl;

更多网络安全、系统运维、应用开发、物联网实战、全栈文章,尽在【个人博客 - https://blog.weiyigeek.top】站点,谢谢支持!
帅哥、美女、大佬们点个【赞+在看】吧! 👇
↓👇↓ 点击【"阅读原文"】,即可获取更多知识!
